1
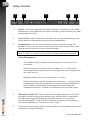
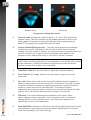
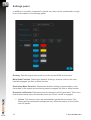
Operation Manual
Halo Upmix
User Manual
© 2015 NUGEN Audio
Contents
Page
Introduction
3
Interface
4
General Layout
4
Utility Controls
5
Upmix Control
6
Output Control & Monitoring
9
Center channel advanced control
11
I/O panel
14
Settings panel
16
DAW/NLE Specific Notes
17
General
17
Protools - Offline Upmixing using AudioSuite
17
Nuendo / Logic
18
Reporting a Problem
19
Version History
20
2
© 2015 NUGEN Audio
Introduction
NUGEN Audio Halo is a stereo to 5.1 / 7.1 upmix plug-in suitable for use in Film,
Television, Music and Game Audio production environments. The Halo upmix
process is designed to be highly downmix compatible, providing a natural extension
of the existing stereo panorama into a surround context, preserving the inherent
character of the original source whilst providing full control for all relative surround
balances for those applications that require a more immersive cinematic dynamic.
Centre channel extraction and control is provided for in a separate 'advanced' panel
for use when dealing with intricate mixes, where no access to the original stems is
available, offering unparalleled control - including neural network based dialog
extraction.
Other upmix formats are also provided, which continue to preserve downmix
compatibility, including LCR, 4.0, 4.1, 5.0, 6.0 and 6.1.
3
© 2015 NUGEN Audio
Interface – General Layout
1
2
3
4
1
Utility controls
2
Upmix control zone
3
Panel controls (Centre control panel, I/O panel and Settings panel)
4
Output control and monitoring
4
© 2015 NUGEN Audio
Utility Controls
1
2
3
4
5
1
Bypass. This button bypasses the effect 'in-place'. This allows for direct A|B
comparisons to be made with and without the effect, without altering any other
processing in the chain.
2
Undo | Redo. Unlimited session undo and redo commands allowing the user
to step back and forward through processing modifications.
3
Preset browser. Use the arrow buttons to step sequentially through the
presets or click the end control to open the preset menu to select from a list.
Double click the name to re-name session presets.
Note: 5.1 and 7.1 versions of Halo maintain independent preset systems.
Preset Management.
The 'Installed' folder contains the factory presets. These cannot be
overwritten.
User presets can be saved in the 'User folder'. An '*' symbol will be
shown against the preset name if the settings have been changed from
the saved version.
Additional folders can be created using the '+' button
Presets and folders can be organised by clicking the '…' symbol which
is highlighted when the mouse pointer is placed over the folder/preset
name. Folders can be deleted, renamed and browsed using the
standard OS interface. Presets can additional be moved and copied.
4
A|B and A to B (B to A). These controls switch data between the 'A' and 'B'
memories for direct comparisons between two different sets of parameters.
The A|B control toggles between the A and B memories (current active
memory highlighted). The A to B (B to A) button transfers current settings to
the memory indicated, ie. From A to B or vice versa.
5
? Opens the 'About' page, with access to credits, de-authorisation options and
the product manual (if installed).
5
© 2015 NUGEN Audio
Upmix Control
7
3
4
10
1
2
5
6
8
12
9
1
2
6
11
Mix type. Use this control to determine the over-all upmix algorithm target.
Choosing the correct setting will ensure downmix compatibility. Choose from:
5.1
Plug-in:
LCR, 3.1, 4.0, 4.1, 5.0, 5.1
7.1
Plug-in:
LCR, 3.1, 6.0, 6.1, 7.0, 7.1
Surround Scope. This dynamic real-time analysis view shows the energy
distribution of the audio output. Brighter sections indicate increased energy at
that position in the surround panorama. Colour can also be used to indicate
the speaker source of the audio in any position. This can be particularly useful
for balancing and examining the predominance of a hard vs phantom centre
during different sections of audio eg. when dialog is present.
© 2015 NUGEN Audio
Phantom Centre
Hard Centre
Using Color to indicate audio source
3
Channel node. Indicates an upmix channel. L, C, R etc. Click to Solo the
channel output. The Solo function can be globally switched to Mute in the
setting panel. Channels are paired left and right (where appropriate) by
default. This pairing can be adjusted in the I/O panel.
4
Centre Channel Divergence Arc. The Halo upmix process automatically
isolates mono audio (and dialog if this function is active) into the centre
channel. Use this control to 'diverge' the extracted centre information back into
the L/R channels, eg. To spill some of the isolated centre back into the
phantom centre. Setting all the way to L/R will turn off the C channel.
Tip: To create an upmix 'filling' the surrounds, try increasing the divergence
value. Stereo mixes typically have a lot of phantom centre (particularly modern
music production). Allowing this back into the phantom centre allows the
upmixer to return this energy to the soundfield.
5
Front/Rear Fade Arc. Use this slider to adjust the front/rear balance.
6
Rear Fade Arc (7.1 only). Use this control to push energy into the rear
surrounds.
7
Arc Link. When active, this control links all the distribution Arcs together to
allow for simple control over the overall 'size' of the upmix. This can be useful
for gentle or dramatic transitions, negating the need for multiple automation
tracks to control several arcs simultaneously. The linking is relative,
separations are preserved when a control is moved and returned to it's initial
position if the link function remains active throughout the process.
8
Diffusion. This control determines the definition of the upmix. More
diffuse settings create a 'smoother', less 'focussed' sound. Low diffusion
settings lead to a more 'detailed' upmix, with frequencies placed more
specifically in the surround panorama.
9
Rear Shelf filter. Activates a shelf filter to roll off the high frequencies from the
rear channels to give the psycho-acoustic effect of pushing the mix forward
while leaving energy in the rear channels.
7
© 2015 NUGEN Audio
10
LFE Channel. Because the LFE channel is not included in the downmix,
several modes of operation are available, depending upon the objective in
mind.
On. Toggles the LFE channel on
In 'normal' mode (split inactive) Halo takes low frequencies below the
frequency setting at the gain level specified and creates the LFE channel.
This mode adds additional energy into the mix, and so should be applied with
care, however it is fully down mix compatible with the original stereo source.
If Split is active, the frequency setting specifies the position of a frequency
crossover, below which low frequency information is passed to the LFE
channel. This method can be used to preserve the energy of the original mix,
however it is not fully downmix compatible with the original stereo potentially
producing an LF 'light' downmix.
Note: If the Exact downmix control is engaged (see below), the Split control
will not be available.
11
Parameter value display window. This window shows the value of any
parameters manually changed during operation. To check a parameter's value,
mouse over the control and the value will be shown in this window.
12
Panel controls. These buttons are used to switch between the different
available panels.
Center. Opens the advanced panel for center channel control (see below).
I/O. Opens the Input/Output panel (see below).
'Gear' Icon. This button opens the settings panel (see below).
8
© 2015 NUGEN Audio
Output control and Monitoring
3
1
1
2
Output Options.
Source. Switches the plug-in output to pass through the audio input,
without upmix processing, but with the channel configuration 'in place'
to enable simple A|B referencing of the input without needing to reconfigure channels from surround to stereo within the NLE/DAW.
Upmix. Switches the audio output to the full upmix, subject to any mute
or solo channel configurations currently enabled.
Downmix. Collapses the upmixed audio to stereo 'in place' using the
downmix coefficients specified in the settings panel.
Exact. This control disables upmix parameters that may prevent a
precise match of the downmix with the original source audio. This is
useful for situations where delivery documents require the downmix to
precisely match the original source audio.
2
Output metering. Shows individual channel output levels. Clicking the
channel label allows for individual channel Mute (M) and Solo (S) control
depending upon the configuration determined in the settings panel. Muted
channels will show 'greyed out' meters as the audio is no longer contributing to
the audio output.
Channel colours are indicated at the base of each meter to assist with channel
identification. These can be modified via the settings panel.
When the I/O panel is active, a surround view is substituted for the output level
meters, which are available in more detail in the main I/O panel.
9
© 2015 NUGEN Audio
3
10
NUGEN Audio logo. Clicking in this area opens up the licensing and credits
panel. This page includes:
•
Installed version number
•
Licensing details
•
Support panel access
•
Online check for updates
© 2015 NUGEN Audio
Center channel advanced control
In general, the upmix process will handle the centre channel automatically, however
in some situations, particularly when the entire surround mix relies on a single stereo
source and a hard Center is required (eg. archive restoration or TV upmix from
original stereo master), these controls provide additional versatility.
4
3
2
1
1
Center channel panel toggle. Toggles the panel on/off.
2
LCR output control. The level meters provide detailed output metering for the
LCR channels to facilitate fine balancing.
The arrow controls can be dragged vertically to give a gain offset, allowing for
fine balancing of the Center channel relative to Left and Right. Alternatively the
dB offset can be entered directly into the box below (double click to type).
The link control can be used to link the Left and Right dB offsets together.
11
© 2015 NUGEN Audio
Note: If the Exact downmix control is engaged (see above), the channel output
controls are not available.
3
Dialog Isolation. Where strict dialog isolation is required as part of a delivery
specification and there is no access to the original stems, the Dialog Iso
control provides access to an additional algorithm designed specifically for
isolating dialog into the centre channel.
Even where a hard Center channel is required, it is common for the main
upmix algorithm to provide sufficient isolation, however if this is not the case,
then this control may be required.
The Dialog Iso button toggles the algorithm on/off.
The Aggression setting determines how powerful the effect is (0% no effect).
The algorithm has been designed to prioritise dialog isolation in order to meet
delivery specifications, so in order to avoid 'over isolation' is is recommended
that the minimum suitable aggression is used to achieve the isolation
necessary.
Note: This algorithm is designed for TV upmixing and restoration work in
particular and has been optimised for spoken word.
The controls may be used in a number of different ways.
a) If there is clear dialog separation in the original mix ie. the dialog is
consistent, has not been heavily treated with stereo effects, and the music &
FX are reasonably distinct (either largely stereo in nature, or spaced at
different times), simply engage the control and set the aggression % to the
minimum setting to achieve the desired isolation.
b) If the dialog is reasonably consistent, but there are sections where, due to
the aggression setting, there is an element of 'over isolation' into the centre
channel when dialog is not present, the Dialog Iso control can be automated
using an automation track so that the additional isolation is only present when
there is dialog in the stereo master.
c) If the dialog in the original mix has been treated with stereo effects, and/or
the music and FX are confused with the dialog, then a more involved process
may be required. In this situation, different levels of the aggression control
may well be more acceptable than others in different parts of the mix. The
aggression control can be automated to provide the minimum necessary,
whilst attaining the level of isolation required.
4
12
C LF Split (Centre Channel Low Frequency Split). This control allows for
psycho-acoustic distribution of the Center channel energy. If an original mix is
very narrow, or a very hard centred upmix is desired, it is possible that the
centre channel may overload. This can be amended by adjusting the overall
output levels, however if it is important to maintain a high degree of correlation
between the original mix and the downmmix, the C LF split control can be
used to move some of the low frequency energy into the Left and Right
© 2015 NUGEN Audio
channels, without adversely affecting the perceived Center channel isolation,
making use of the fact that directional information is harder to perceive in low
frequency content, and any shift will be masked by the residual Center
channel mid-high energy.
C LF Split. Toggles the control On/Off.
Frequency. Determines the crossover frequency of the effect.
Listen LF. This control effectively 'solo's the low frequency split, to facilitate
optimal setting of the crossover frequency. When active it is possible to
audition the Low Frequency energy after redistribution from the Centre
Channel.
Divergence %. Determines how much energy residual in the Center channel
(after the initial application of main Center channel divergence setting – see
above) is spread into the Left and Right channels. This control is also
represented as an additional control arc on the main interface when C LF Split
is active.
Hard Centre
Hard Centre – LF Diverged
Using C LF divergence maintaining perceived Hard Centre
13
© 2015 NUGEN Audio
I/O panel
The I/O (Input/Output) panel provides trim and monitoring controls for all of the input
and upmix channels. The Downmix channel has no trim controls as this is a 'virtual'
audio output, derived from the downmix parameters determined in the settings panel.
2
3
4
5
1
6
7
8
1
I/O. Toggles the I/O panel view On/Off.
2
Mute. Channel mute control (subject to Link 'pairing' below)
3
Solo. Channel solo control (subject to Link 'pairing' below). Source and
Downmix 'Solo in place' is achieved using the Source and Downmix buttons in
the Output and Monitoring section (see above).
14
© 2015 NUGEN Audio
4
Margin. Shows remaining channel headroom. Click to reset.
5
Trim control arrows. These arrows can be dragged vertically to apply a dB
offset (gain or reduction) to the channels concerned. Again, these are subject
to the Link 'pairing' function below). This control is not available when the
Exact downmix function is engaged.
6
dB offset. The offset applied using the trim controls is shown here. Double
click to enter a numerical value directly. This control is not available when the
Exact downmix function is engaged.
7
Link. Pairs related Left and Right channels, mirroring changes to one side on
the other.
8
Surround scope. Surround energy distribution thumbnail view.
15
© 2015 NUGEN Audio
Settings panel
In addition to a number of presets for typical use, Halo can be customised in a high
level via the options in the settings panel.
Routing. Sets the output track order to suit the current DAW environment.
Main Node Function. Determines whether clicking a channel node on the main
interface engages the Solo or Mute function.
Secondary Meter Function. Determines whether clicking a channel label on the
meter bars in the output and monitoring section engages the Solo or Mute function.
Downmix coefficients. Determines how the downmix will be generated. This in turn
determines internal upmix functionality when the 'Exact' control is engaged.
1. Colors. The channel colors are automatically saved with the preset. The
Meter splits are persistent settings and only affect the meters on the Center
and I/O panels.
16
© 2015 NUGEN Audio
General
Channel Routing. Depending upon the DAW/NLE and/or project requirements,
different surround channel routings may be required. By default, Halo upmix will
generally choose the appropriate output for the DAW/NLE in question, however, if the
output channels are not as expected/desired, these can be changed using the
'Routing' option in the settings panel, which allows for a number of different standard
configurations.
Protools - Offline Upmixing using AudioSuite
Currently, the Protools does not automatically promote a channel from stereo to
surround when a plug-in with a higher track count in processed, however it is still
possible to automate the upmix process using the AudioSuite system using the
following methodology.
1.
Configure the AudioSuite settings enabling options as follows
a) “playlist”
b) “USE IN PLAYLIST”
c) “create continuous file”
d) “entire selection”
e) “multi-input mode”
2.
For convenience, enable “Commands Keyboard Focus” (the “az” button)
3.
Insert the stereo clip you wish to upmix onto a stereo track
4.
Create an empty 5.1 or 7.1 audio track immediately below
5.
Select the stereo clip and open the Halo AudioSuite plug-in
6.
Click Analyse
7.
Once analysis is complete press the ';' key to move to the blank track
8.
Click render
17
© 2015 NUGEN Audio
Nuendo
To upmix from stereo to surround
1.
Create a surround 5.1 (or 7.1) audio track
2.
Insert the stereo audio to be upmixed on the surround track
3.
Insert the Halo Upmix VST3 plugin
Logic
To upmix from stereo to surround
1.
Create a track with stereo in, 5.1 (or 7.1 out)
2.
Insert Halo as a 2.0 to 5.1 (or 7.1) Audio Unit
18
© 2015 NUGEN Audio
Reporting a problem.
If you encounter a problem with any of NUGEN Audio's products, please let us know,
to help us improve them.
Please email NUGEN Audio at [email protected] giving a clear
explanation of the problem. Please state how frequently you've experienced the
problem. If there are any particular steps you need to go through to see the problem,
please detail these.
Please also state your operating system, and the rough specs for your machine
(e.g.- CPU speed, RAM) - in Windows XP you can get this information by rightclicking "My Computer" and selecting properties.
Please be patient with any problems you may experience, particularly with products
at a beta stage of release. At NUGEN Audio we take problems with our software
seriously, and will endeavour to correct them as quickly as possible.
19
© 2015 NUGEN Audio
Version History
1.0
20
Initial release
© 2015 NUGEN Audio