1
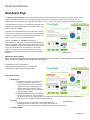
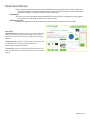
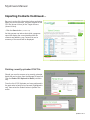
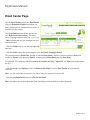
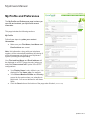
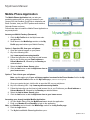
MyUnivera Manual User Manual - Version 3.25 Updated 2.15.13 MyUnivera Manual Contents Dashboard Page................................................................................................................................................ 3 Home Page ....................................................................................................................................................... 5 Manage Contacts Page ..................................................................................................................................... 7 Contact List: Adding Contacts............................................................................................................................ 8 Contact List: Importing Contacts ........................................................................................................................ 8 Importing Contacts Continued.... ....................................................................................................................... 9 Deleting recently uploaded CSV File ......................................................................................................... 9 Save Outlook Contacts as CSV File ........................................................................................................ 10 Contact List: Exporting Contacts...................................................................................................................... 11 Contact List: View/Edit Contact Details ............................................................................................................ 11 Contact Types ......................................................................................................................................... 12 Contact Groups ....................................................................................................................................... 12 My Calendar Page ........................................................................................................................................... 13 My Calendar Page (sync) ........................................................................................................................ 14 Outlook XP/2003 Users Only .................................................................................................................. 14 Marketing Tools Page ...................................................................................................................................... 15 Configure SPOTs* Page .................................................................................................................................. 16 Configure a New SPOT* ......................................................................................................................... 17 Video Manager* Page ..................................................................................................................................... 18 Marketing Agent Page ..................................................................................................................................... 19 My eSignature* ................................................................................................................................................ 20 Create Email.................................................................................................................................................... 21 Standard Emails ............................................................................................................... 22 Drip Emails ....................................................................................................................... 22 Custom Drip Emails .......................................................................................................... 22 Confirm Email Message Page ................................................................................................................. 24 Email Center Page .......................................................................................................................................... 25 Email Center Page (scheduled emails) ................................................................................................... 26 Review Drip Emails ......................................................................................................................................... 26 Newsletters...................................................................................................................................................... 27 My Profile and Preferences ............................................................................................................................. 28 My Profile and Preferences (instant contact) ........................................................................................... 29 Mobile Phone Application ................................................................................................................................ 30 Support Center Page ....................................................................................................................................... 31 Updated 2.15.13 MyUnivera Manual Dashboard Page The Home Page Dashboard is the landing page for MyUnivera. It is informative, yet simple to use and gives the user up to date information about their account and marketing performance. Each of the headings (Fig. 2 circled in red) are hyperlinks to the associated content with the "Notifications" section as the focal point for suggested marketing activities. The notifications you see on your homepage dashboard are intelligent recommendations based on contact activity, your actions, and other insights. Following the recommendations on the notification center is the best way to grow your contact list, maintain your existing contacts, and achieve success when using MyUnivera. We hope you enjoy your new recommendations. Should I "Continue" or "Dismiss" notifications? Most notifications will direct you to email certain contacts or navigate to certain page of the system to perform an activity. Clicking Continue will mark the notification as read, remove it from your notification list, and forward you to another location to complete the recommended activity. Clicking Dismiss will mark the notification dismissed and load the next one. Dashboard Fig. 1 What is the "Next" button? Some notifications are helpful tips or general notifications which do not need actions. These notifications will have a Next button to mark the message as read and load the next message. What happened to my notifications? Notifications whether dismissed or completed will automatically re-appear when important again. Dashboard includes: Notifications: o The notifications section (Fig. 2 boxed in yellow) is a dynamic, intuitive and educational section that will constantly suggest next best activities based on proven performance metrics. These notices will change over time and will be different between users. o Clicking Continue will mark the notification as read, remove it from your notification list, and forward you to another location to complete the recommended activity. Clicking Dismiss will mark the notification dismissed and load the next one. Contacts: Dashboard Fig. 2 o This graph gives you a view of the contacts highlighting the percentage with the most activity. View Agent and View All are quick links to the Hot Contact follow-up guide and to the full list of contacts. Top Video SPOTs Updated 2.15.13 MyUnivera Manual o These images are quick links to view and share SPOTs with new prospects and for driving traffic to the Associate's website. The SPOTs displayed are the users most effective based on views and captures and will be frequently encouraged to share through notifications. My Website: o This is the link to the Associate's replicated website (URL boxed in blue) for sharing with new prospects for recruitment into the business and for new customer sales. Marketing Results: o Displays in a graphical line chart, the Associate's traffic results for the previous three months. Need Help? • Need Help Items, (boxed in red) Access to the online User Manual or access to individual help topics is a click away. Simply select the topic and click it to display the descriptive help text. • Support Center, (boxed in red) Provides resources on the use of MyUnivera, and for tips and techniques for prospecting and business building. • Contact Us, (boxed in red) provides a method where any kind of feedback may be delivered for attention by corporate support. Updated 2.15.13 MyUnivera Manual Home Page The Home page includes these sections: The Home page is being replaced by the introduction of an intelligent Dashboard. As you access your account you will be offered the opportunity of seeing and using the Dashboard, simply click on the button (boxed in red) to switch to the new Dashboard. (Note, You can always return to this page if you wish too). For those that remain with the Home page the instructions are as follows: MyUnivera Announcements * Check this area often for important information about your marketing efforts with MyUnivera. Getting Started * If you are new to MyUnivera, click on getting started to go step by step in learning the basics for getting the most from your marketing system. My New Contacts * View all new contacts captured from your marketing efforts. Drill in to each Contact to make sure you have communicated to them via email or auto-responder message. • Use the Go to Manage Contacts link to view and manage all of your contacts. Hot Contacts * View a snapshot of contacts with unread notifications indicating recent activity by contacts listed as Prospects in your Contact List • Use the Go to My Agent link to see all contacts with unread notifications. My Marketing Summary • Catch a glimpse of how your Marketing Pages and most effective SPOTs* are performing My Upcoming Appointments • Shows a 2-week snapshot of your MyUnivera Calendar, with link to view your full calendar. Need Help? • Support Center Provides resources on the use of MyUnivera, and for tips and techniques for prospecting and business building. Updated 2.15.13 MyUnivera Manual • Contact Us ***Note: Firefox is the preferred browser for MyUnivera. However, if you are encountering issues with the MyUnivera interface, please use the Contact Us button (circled in red) to let us know, and we will respond as soon as possible. Updated 2.15.13 MyUnivera Manual Manage Contacts Page Use the Manage Contacts page to view and edit all of your contacts. You can add your own contacts manually or import or export your contacts using a comma delimited (.CSV) file. Contact List • Displays all of your contacts. • Click the column title to sort by that field. • Click the View/Edit icon (yellow pencil) in the Options column to update information for a contact. • Click the Email icon to create and send a customized message for a specific contact. • Click the Calendar icon to set up an appointment for a specific contact. • Create Groups to organize your contacts. • At the bottom of the list, you will find Search and Refresh icons to help you when working your contacts. • Use the arrow icons at the bottom of the list to navigate to another page of contacts. Upcoming Appointments • Gives you a 2-week snapshot of your calendar, with links to add notes or appointments. Contact Count • Shows you a graphical representation of the number of contacts you have, broken down by the month they were added. Updated 2.15.13 MyUnivera Manual Contact List: Adding Contacts Follow these steps to manually enter a contact: • Click the Add Manually button. (circled in red) • Enter the contact’s First Name, Last Name, Email and Telephone number. (outlined in red) Note: you will be add more information for this contact later using the View/Edit icon in the Options column. • Click the Add Contact button. The contact will be added to your Contact List. Contact List: Importing Contacts Follow these steps to import a list of contacts: • Click the Import Contacts button. (circled in red) • Click the Browse button to select a CSV file (outlined in red) Note: CSV stands for Comma-Separated Values. Export your database to as CSV file using a program like Excel, for example. • Click the Import File button. The Uploaded Contacts page opens. (shown on next page) Updated 2.15.13 MyUnivera Manual Importing Contacts Continued.... Be sure to review this information before continuing. Match the source columns, columns supplied in the CSV file (shown in blue) to the Target columns (shown in blue). • Click the Save button. (circled in red) As this process can take a short while a progress report will display the current details while the contacts are added to your Contact List and a summary of the results will be displayed. Deleting recently uploaded CSV File Should you need to reverse out a recently uploaded batch this can be done from the Manage Groups link. Click the Delete CSV Uploads in Batch (circled in red). From the list of CSV Uploads you have performed in the past select a batch to be removed (highlighted in red), then select the Submit button to perform the action. Updated 2.15.13 MyUnivera Manual Save Outlook Contacts as CSV File Follow these steps to save a Microsoft Outlook contact list as a CSV file: • Open Outlook, go to the File menu and select Import and Export... The Import and Export Wizard window opens (not shown). • Under Choose an action to perform, select Export to a file. • Click the Next button. • Under Create a File of Type, select Comma Separated Values. • Click the Next button. • Under Select folder to export from, select Contacts (under Mailbox). • Click the Next button. • Enter a name for the CSV file under Save exported file as. • Click the Next button. • Select Export “Contacts” from folder: Contacts. • Click the Finish button. Updated 2.15.13 MyUnivera Manual Contact List: Exporting Contacts Follow these steps to export your contact list: • Click the Export Contact button. (circled in red) A pop-up window opens. (outlined in red) • Select an option for your exported CSV file: Either Open with or Save File. Contact List: View/Edit Contact Details Follow these steps to view/edit your contact details. • Click the View/Edit Details icon (yellow pencil) in the Options column (outlined in red) for the contact you would like to view/edit. The View/Edit Details window opens. • Edit the Contact Information, if necessary. • Click the Add Detail button (circled in red) to see additional fields, such as, Best Time to Call and Time Zone. • Enter as much information as you have in the fields provided. • Click the Save Contact Info button when finished. Updated 2.15.13 MyUnivera Manual Contact Types Contact Type allows you to categorize your contacts based on types used by your company. Use the drop-down list to select a Contact Type for this contact. (outlined in red) There are four pre-set Types: 1. Customer 2. Lead 3. Member 4. Prospect Note: All of your contacts will fall in to one of these Types. • Click the Save Contact Info button when finished. (circled in red) Contact Groups You may also create custom Groups to better suit your needs and organize your contacts even further for grouping them in email. Follow these steps to create a new group: • Click the Manage Groups button. (circled in red) • Enter a Name for your new group. (outlined in red) • Click the Add button (outlined in red). Follow these steps to assign a contact to a Group: • Click the View/Edit Details icon in the Options column for the contact you would like to assign to a Group. The View/Edit Details window opens. • Use the drop-down list to select the Contact Group. (outlined in red) • Click the Save Contact Info button when finished. Updated 2.15.13 MyUnivera Manual My Calendar Page Use the My Calendar page to manage your appointments and follow-up calls. There are 4 types of events on your calendar: 1. Corporate Events 2. Regional Events 3. Univera Office Events 4. Personal Events such as appointments Note: the current date is highlighted green. Click on any existing event to view more details. Follow these steps to add an event: • Locate the date for your event on the calendar. Tip: use the green arrow navigation buttons at the top to go to the next month, if necessary. • Click on the event date to select it. • Enter the event details in the pop-up window. • Click the Create Event button. (circled in red) Follow these steps to remove or edit an event: • Click on the event. • Select either Remove Event , Edit Event or Duplicate Event in the pop-up window. (outlined in red) If you selected Edit Event or Duplicate Event, the Event Details pop-up window opens. (not shown) • Enter the updated information in the fields provided. • Click the Update Event button when finished. Updated 2.15.13 MyUnivera Manual My Calendar Page (sync) Easily synchronize your MyUnivera calendar to many common software packages or devices. Note: This is a one-way sync. Follow these steps to sync your calendar: • Click the Calendar Sync button at the top of the My Calendar page. (circled in red) The Calendar Sync pop-up window appears, displaying links to the available options. (outlined in red) • Select the desired software application or device. • Follow the on-screen instructions. Note: Setup will vary depending on the option selected. Outlook XP/2003 Users Only The Outlook XP/2003 option does not sync automatically with MyUnivera. Follow these steps to sync your calendar with Outlook XP/2003: • Select the Outlook XP/2003 option from the list. • Select Save File in the pop-up window. • Click the OK button. • Open Outlook XP/2003 and import the mycalendar_ics.ics file into your calendar. Note: Outlook XP/2003 only allows you to view the events in the file by importing them into your calendar. There is no synchronization after the file is imported, it must be re-imported to get updated information. Updated 2.15.13 MyUnivera Manual Marketing Tools Page The marketing tools provided on this page are all about attracting quality prospects to your Univera business by giving you the capability to share compelling video and Web site content. Use the Web sites provided or, if you have access to the SPOT Marketing*, create and place SPOTs wherever you want - social network sites, on personal Web sites, or even send in Emails. These are powerful tools for “attraction” marketing! A SPOT Video is a lead capture form widget designed to attract qualified leads and capture their contact information. With MyUnivera, you can create and embed SPOTs on any Web site, blog or social network site (like Facebook, Myspace, etc) or in an Email. The Marketing Tools page includes these sections: My Web Sites ● My Replicated Site ● My Lead Capture Sites Most Effective SPOTs ● This area displays your 3 top performing SPOTs in terms of view and contacts captured along with a button to quickly Share each SPOT. View Page Views Monthly ● This chart shows you how your marketing pages (replicated Web sites) are performing. It is important to compare your web pages to determine what is and what isn’t working for you. ● Click the Page View Daily link to monitor your marketing efforts more closely. Immediate impact is normally seen shortly after launching a marketing campaign. SPOT Views Monthly ● This chart shows you how your SPOTs are performing. ● Click the SPOT Views Daily link to monitor your marketing efforts more closely. Immediate impact is normally seen shortly after launching a marketing campaign. *The The SMA Lite subscription may not include access to all of the Lead Capture Pages. Upgrade your subscription to take advantage of this powerful tool! Updated 2.15.13 MyUnivera Manual Configure SPOTs* Page Create and reuse SPOTs all over the Internet! Your marketing success depends on being seen, and your SPOTs are terrific tools for helping you capture new prospects. The My Configured SPOTs section displays the configuration settings for each SPOT in your account: ● ● ● ● ● ● ● ● ● Created: date the SPOT was configured SPOT Name: named according to intended use Type: size and type of SPOT Autoresponder: If enabled, the system will automatically send a simple Thank You email (without links) when a lead is captured through the SPOT. IC** (Instant Contact): feature is enabled if box is checked Views: number of times SPOT has been viewed Contacts: number of contacts captured Share: click to share SPOT (see below) Options: View SPOT Statistics, Preview, Edit or Delete SPOT Follow these steps to Share a SPOT: ● Click the Share icon. (circled in red above) The Share your SPOT window opens. The following options are available: ● ● ● ● ● Share: Quick links to share SPOTs on popular platforms. Bookmark: Quick links to bookmark your SPOT on popular social bookmarking sites. Link: Share the link provided (Click in box and Copy, CRTL-C) then place (Paste) your SPOT link to any web page or Email. Embed: Select a social network or copy the text provided to embed your SPOT on any web page. Preview: Click the link to preview your SPOT. (not shown) * Creating SPOTs may be limited by subscription level ** Instant Contact (IC) minutes are only available on certain subscriptions and use of IC requires available call minutes on your account. Upgrade your subscription to take advantage of these powerful tools! Updated 2.15.13 MyUnivera Manual Configure a New SPOT* To create a new SPOT, just click on the Configure New SPOT button. A window will open on this page where you can create a SPOT. Follow these steps to Configure a New SPOT: ● Click the Configure a New SPOT button (circled in red) Note: your SPOT preview (outlined in red) will load automatically as you make your selections. ● ● Select a Type: Video, Prospect or Call Select a Size: Medium, Large, Small (if applicable) ● ● ● ● ● ● Select a Theme: Tip: choose a color scheme that will compliment the site where you plan to share your SPOT. If configuring a Video SPOT, select a Video. Note: Video features will only appear on Video type SPOTs. Enable Auto-Play? Select yes or no. Add A Message. Note: 70 characters max. Edit button text. Note: 30 characters max. Enable Autoresponder? If enabled, the system will automatically send a simple Thank You email (without links) when a lead is captured through the SPOT. ● ● ● ● Show Contact Info? Note: this option is only available on Large-size SPOTs. Send Contact to: Enter the URL where you would like to send your contact after they have entered their contact information. Give your SPOT a name. Tip: name each SPOT according to its use. Click the Save SPOT button (circled in red) to save. After you configure a SPOT it will appear in your My Configured SPOTs list on the Configure SPOTs page. * Creating SPOTs may be limited by subscription level Updated 2.15.13 MyUnivera Manual Video Manager* Page Create and upload your own videos to further customize and personalize your SPOTs. Note: All uploaded videos will be reviewed for appropriateness by the Univera Compliance Department, usually within 48 hours. (Check the Status in the Videos Available section at the bottom of the page for current availability). Important things to keep in mind: You must have approval from copyright owners to use copyrighted materials in your videos (i.e. music, voices, non-Univera owned items, etc.) All videos that contain misrepresentations of Univera’s products or compensation plans will not be approved for use. Our goal is to support all files that are commonly uploaded by users. The suggested file size is 50mb or less. Supported formats include: asf, 3gp, mov, flv, f4v, wmv, avi, raw, dat, divx, xvid, m1v, m21, m2v, m4e, m4v, mjp, mkv, movie, mp4, mpg, mpeg, ogm, qt, rm, vob, wm, wmv, yuv. If you experience difficulty uploading your video, please contact Customer Support. * This feature available on the SMA Pro level subscriptions. Updated 2.15.13 MyUnivera Manual Marketing Agent Page Use the Marketing Agent page to view your prospects with the highest chance of being converted based on their recent activity. Click the Email me My Marketing Agent button to send this report to your email address listed under the My Profile tab. You can also set up your Marketing Agent to be automatically emailed to you for your convenience. Follow these steps to change your Marketing Agent settings: 1. Click the My Profile tab in the main navigation bar. 2. Scroll down to the My Marketing Agent section. 3. Select the option that best fits your needs: ● Reminder Mode: Only send my Marketing Agent when I have not logged in for at least 20 days before the 15th of the month. ● Every Month: Send me my Marketing Agent email on the 15th of every month. ● Disabled: My Marketing Agent email will only be sent by my request on the Marketing Agent page. Updated 2.15.13 MyUnivera Manual My eSignature* Customize your graphical eSignature and use it as your digital business card in online mail services like Gmail, mail programs like Outlook, internet forums, and websites! Take advantage of its ability to drive further traffic to your marketing tools by the use of its many Buttons and Links. Use the eSignature Report (boxed in green) to keep track of views and clicks. If the recipient is entered in your Contact List, you can view their eSignature activity in the Contact Details. Note: Go to the My Profile page to set your eSignature as the closing to all emails sent through your account. Or you may copy your eSignature (boxed in red) to then paste it into your internet email system. * My eSignature may only be available at top levels of service. Go to Support Center to review service level features. To Modify your eSignature click the Modify My eSignature (boxed in blue) – On this you can choose different images, text styles, button messages and url links. Updated 2.15.13 MyUnivera Manual Create Email The create email page has been created so that you can perform all your emails needs from the one page. Simple and intuitive to use, this page includes: Getting Started:: o From the ‘To’ field start by typing in the name, email address or telephone number for whom you want to be receiving the email. You can enter multiple contact information as recipients to the email. String together multiple addresses with commas. e.g. "John Doe" <[email protected]>, Jane Doe <[email protected]>, [email protected], James <[email protected]> o ‘TO’ button - You can use the To: field just like in Outlook, Gmail, or any other email client. We even support copying from other email clients and automatic contact creation for email addresses you don't already Dashboard Fig. 1 have. o ‘TO’ button filters – Narrow down your email audience using the ‘TO’ button as described above. o Select the type (boxed in yellow above) of email you will be sending. Each type selected will have further options to select from (see next image). Inserting New contacts into your Contacts List: Create contacts from any emails list (Yahoo, Gmail, etc) into your Contacts List by CTRL+click each contact from any email and then CTRL+C to copy them all for pasting into the new email send page. New contacts will be added to your contacts list. o You can further streamline your selection by deleting individuals from the email address list by clicking the x (circled in red) on the email box. Updated 2.15.13 MyUnivera Manual Standard Emails o Standard emails allows you to build your own email or select from pre-formatted email templates including text content. Use the following buttons to complete the email (boxed in red): o Template (boxed in red) – Select from the drop down any one of the template emails. o Next button (boxed in red) – Use this button once you have completed your email content and ready to preview and send. o Change Content (boxed in red) – Allows you to return to the Getting started point without having to submit or send this email. o Use the edit features (boxed in yellow) to create your email, these include all standard email tools, Bold, Italics, Underline, Attachments, etc. Drip Emails o The Drip email option will allow you to select a series from the dropdown menu (boxed in red). The content of the individual emails can be seen by clicking the Preview button (circled in yellow). o The bookmark (boxed in red) dropdown option allows you to select the starting point when send the campaign. o Setup Events (boxed in red) - allows you to include event activity reminders into your calendar. o Next button (boxed in red) – Use this button once you have completed your email content and ready to preview and send. Change Content (boxed in red) – Allows you to return to the Getting started point without having to submit or send this email. o Change Content (boxed in red) – Allows you to return to the Getting started point without having to submit or send this email. Custom Drip Emails For users that have the feature included in their service level, you can create and maintain Custom Drip Emails from the Drip Campaign Series. Here you will see the Create Custom Series (boxed in red), Click this link to initiate the build process. Updated 2.15.13 MyUnivera Manual 1. Fill in the space to give the series a name and click Create Series (image 2, highlighted in red). 2. For each email you will have in the series, you can now Add New Emails (circled in red), adding the content. As you add content remember to use the pseudo {prospect_first_name} {signature} which are automatically substituted with the relevant data. 3. After Saving the email you get the opportunity to set the Delay (boxed in red), that is the delay in days before sending out this email in the series, 0 (zero) representing immediate, while a number represents the days delay from when the first email gets sent. 4. If you wish the series to include calendar reminders these can be added by clicking the Add New Follow-up Reminder (circled above in red). 5. You can remove (delete) a existing series by clicking the Delete “Sereis Name' button when previewing the campaign details. 6. Preview Email allows you to view the content and delay for each email. After selecting the Preview button, from the previous image, the pod will display the list of participating emails. Click the view content option (boxedin red) to see the actual email. The delay column indicates the delay in days when that specific email will be sent from (or since) the first email in the series goes out. Updated 2.15.13 MyUnivera Manual Confirm Email Message Page The Confirm Message page includes: Contacts Section • Displays a list of all the contacts who will be Emailed. Please briefly review the list and revise your selection criteria on the previous page if necessary. Timing Section • Shows the date that the message is scheduled to be sent. Please confirm the date and total number of contacts are correct. Message Preview Section • Please check message preview (outlined in red) for errors. Tips: 1. Do not leave the words “test” or “example” in your subject line. 2. Make sure you have not included an individual person’s name instead of the substitution variable, {prospect_first_ name} 3. Look for any visual problems with the Email. Most Email clients will see exactly what you see on this page. 4. Substitution variables, such as {prospect_first_name}, should not be visible in this preview subject or body. They have been substituted with example data (John, for example). If any of the above information is not correct, click the Change Settings button to return to the Create Email page, or click the Confirm and Send button if you are ready to send this message. (circled in red) Updated 2.15.13 MyUnivera Manual Email Center Page Use the Email Center to see your Sent Emails and your Scheduled Emails (messages you have created that are scheduled to be sent 1 or more days in the future). The Sent Emails section allows you to track your MyUnivera Email activity. The most recent message appears at the top. (outlined in red) • Date indicates the day the message was sent from MyUnivera. • Click the Subject link to see the message that was sent. • Click the Read column link (percentage) to view the Email Campaign Report. This report shows the Send Date, number of intended Recipients, number of actual recipients (Sent) and number of Opens. It will also give Details, including the Contact Name and the Date Read. For example, if the message had been sent to 4 contacts and only 1 opened it, the Open percentage would be 25%. • Click the red X in the Options column to Remove this Email from your Sent Emails list (not from the recipient). Note: you will not be able to reuse it in the future once you remove it from your list. • Click the envelope/red arrow icon to Reuse the Email. Note: this allows you to send the exact Email (including content and links) to other recipients. Updated 2.15.13 MyUnivera Manual Email Center Page (scheduled emails) The Scheduled Emails section displays all of the custom Emails you have created that are scheduled to be sent 1 or more days in the future. (outlined in red) Note: once the scheduled Email is sent, it will automatically move to the Sent Emails section. ● ● Click the envelope/red arrow icon in the Options column to Reuse the Scheduled Email and send to other recipients. Click the red X to Cancel the Scheduled Email. Note: the message will be permanently deleted and not sent to the recipient(s). Review Drip Emails Click the Review Drip Emails button (circled in red above) to see the history of all your Drip Email Campaigns. Use this list to keep track of who you sent campaigns to, and the date sent, as well as Recent Activity associated with each campaign. Updated 2.15.13 MyUnivera Manual Newsletters Corporate Newsletters will be submitted on a regular Monthly basis. Deliver the latest news and increase traffic to your replicated website by inviting your contacts to receive the monthly newsletter. All your contacts that have opted-in to receive the your Corporate Newsletters will be sent one each month automatically. It is your responsibility to keep your contacts aware that they can opt-in to receive this service by sending them newsletter invitations. Inviting Contacts to Opt-in to Newsletters Send your contacts Opt-in invitations to the regular Newsletter by clicking the Send Invitation to Newsletter (circled in blue, below) . This will take you to the email center. Here, like any normal email select the contacts you wish to receive the email, then complete the process by sending the emails. Notes: Contacts that have previously been sent invitations, will be excluded from the list so that they do not constantly receive this invitation mail. Recipients to the newsletter invitation email will need to click the Opt-in Button in the email to be set to receive future newsletters. Opt-in a Contact. Frequently you will meet people why verbally wish to opt-in to receive the newsletter, this can be done by selecting their name from the drop down list (in red square) and press the Opt-in Button (circled in red), these contacts will be sent a copy of the most recent newsletter and will be eligible to receive future newsletters. Updated 2.15.13 MyUnivera Manual My Profile and Preferences The My Profile and Preferences page is where you can view and maintain your MyUnivera account information. This page includes the following sections: My Profile Follow these steps to update your contact information: ● Make sure your First Name, Last Name and Email address are correct. Note: this information, along with your telephone number, will be automatically added as the closing of all Email messages sent through your MyUnivera system (including Autoresponders). Your First and Last Name and Email address will be displayed on a SPOT (large size only) when you select the Show contact info? option in the SPOT configurations. ● ● ● Your Display Name is only visible to you. It is displayed on the Home page, for example. Your Univera Member Number and Country are set by the system when you subscribe to MyUnivera. You are not allowed to edit these fields. Click the Save button at the bottom of the page when finished. (circled in red) Updated 2.15.13 MyUnivera Manual My Profile and Preferences (instant contact) My Instant Contact Details The Instant Contact* settings determine how the system will perform when a contact fills out the lead capture form on one of your SPOTs.** You can set it to call you only during those hours you are available, as well as send you an Email. Remember to update your Instant Contact settings or it will not function properly. Follow these steps to set up your Instant Contact Details: ● Enter the telephone number you would like the system to use. Note: use the following format: Country Code - (Area Code) - Telephone Number. Example: +1-(786)-111-2222 ● ● Select the Call Me Between time frame that works with your schedule. Use the drop-down list to select your GMT (Greenwich Mean Time) Offset. Examples: New York offset is -05:00 United States (ET), California offset is -08:00 United States (PT) ● The Also Send box allows you to turn off/on Email notification. Note: this box is enabled as default, which means you will receive a call and an Email. ● The Disable Calls box allows you to turn off all Instant Contact telephony features, but keep all of your IC settings. Check this box if your are going on vacation, for example. ● Click the Save button at the bottom of the page when finished. Follow these steps to set up a SPOT with Instant Contact option: ● Go to the Marketing tab, select Configure SPOTs. ● Check the IC box next to each SPOT to add the Instant Contact option. (outlined in red) * Instant Contact (IC) minutes are only available on certain subscription levels. Use of IC requires available call minutes on your account. Updated 2.15.13 MyUnivera Manual Mobile Phone Application The Mobile Phone Application lets you take your marketing system with you, giving you access to your Contact List, Add Contacts, quick links to telephone and Email Contacts, view your SPOT performance statistics, Calendar Events and more. Follow these steps to install the Mobile Phone Application on any smart-phone: Access your Mobile Passkey (Password) 1. Click the My Profile tab in the MyUnivera main navigation bar. 2. Scroll down to the Mobile App section on the My Profile page and retrieve your Mobile Passkey. Option 1: Open the URL from your cell phone. 1. Open the Internet browser on your phone. 2. Key in the following URL http://www.myunivera.com/my/mobile 3. Follow the instructions on the How to Install screen. Key in you ID either as your Email address or Univera Member ID, followed by the Passkey as retrieved above. 4. Select the Add to Home Screen option. 5. Click the Add button to add the MyUnivera icon to your home screen. Option 2: Text a link to your cell phone: Note: use this option only if your cell phone number is entered in the Phone Number field in the My Instant Contact Details section on the My Profile page. (outlined in red on Figure 2) 1. Once you receive the text, click the link to open the URL on your cell phone. 2. Key in the following URL - http://www.myunivera.com/my/mobile 3. Follow the instructions on the How to Install screen. Key in you ID either as your Email address or Univera Member ID, followed by the Passkey as retrieved above. 4. Select the Add to Home Screen option. 5. Click the Add button to add the MyUnivera icon to your home screen. Accessing your already installed Mobile Application 1. On your Mobile Phone Click the MyUnivera icon to launch the application. 2. Enter your Member ID and PassKey to login to the application. Note: your PassKey can be found in the Mobile App section on the My Profile page. 3. Click the Login button. 4. The MyUnivera Mobile Phone Application opens. Updated 2.15.13 MyUnivera Manual Support Center Page The Support Center is where you can find valuable information and on-line tutorials to get started using MyUnivera, along with sales coaching, resources, and answers to Frequently Asked Questions (FAQs). Use the tabs to browse by category, or enter a keyword in the Quick Search area to quickly locate information on a particular subject. Do you have questions about MyUnivera? Is there an enhancement you would like to see added? Please, contact us. Your feedback is important! Follow these steps to submit feedback about MyUnivera: • Click the Contact Us button, on the right side of any page. (circled in red above) • Select a topic from the drop-down list. • Enter a rating (if applicable) • Type your questions/comments in the space provided. • Click the Send Feedback button. Univera Customer Service is also available to answer any questions you may have. Updated 2.15.13