1
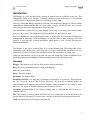
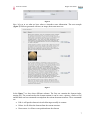
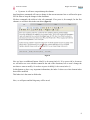
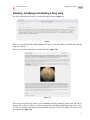
Blogger
User manual
Miguel González Losa
([email protected])
Adrian Fish
([email protected])
Centre for e-Science. University of Lancaster
Centre for e-Science
Blogger. User manual.
Table of contents
Introduction...................................................................................................................................3
Glossary ..................................................................................................................................... 3
Writing a blog entry .....................................................................................................................4
Reading, modifying and deleting a blog entry ...........................................................................9
Adding comments to a blog entry..............................................................................................10
Managing entries.........................................................................................................................12
2
Centre for e-Science
Blogger. User manual.
Introduction
The Blogger is a tool that allows the creation of journals that are available on the web. The
information written in the Blogger is instantly published in the Web site, so it is available
virtually wherever the potential readers are and whenever they want.
The way of using the Blogger depends of each user, but normally the Blogger is used to contain
updated daily information that the user wants either to make available to other users in their
work group or make accessible anywhere and at any time.
The information’s natures can vary tremendously, from a log of your daily job to general ideas
that you want to share. This information will be published in a chronological order.
However, the Blogger is not a chronological order of information. It is a tool that facilitates the
management of knowledge. With the Blogger you can store links to other web pages, files and
pictures; it also provides a search mechanism which makes it easy to track and find any
published information.
The Blogger is not just a personal blog. It is a team-oriented blog. That means that all the
information you publish to the team blog can be revised, modified and appended to by any
member of your team. All your team members can also add comments to any blog entry.
From now and onward, you and your team can enjoy the advantages of this collaborative tool,
publishing, sharing and managing all the knowledge generated in your daily activity.
Glossary
Blogger: This application. It can also be the person who creates entries.
Blog: The unit of information that is written in the Blogger.
Post: The same as Blog
Entry: The same as Blog
Document: The same as Blog
Document structure: Any blog has a fix number of elements in a fix position. These elements
are Title, Keywords, Abstract and Visibility. Moreover, any blog has an arbitrary number of
other elements in an arbitrary position between them. These elements are Text, Images, Links
and Files. The layout of all these elements is the document structure
Comment: information that is not, strictly speaking, part of a blog but has been written as a
complement to it.
Site: This concept is closely related with Sakai Site. It is a particular set of related Sakai tools
that are shown as web pages. To access a site a user has to provide a username and a password.
Team: Group of people who belong to the same site.
3
Centre for e-Science
Blogger. User manual.
Writing a blog entry
The best way to learn how to use the Blogger is by using it. So, let’s go to create our first blog.
In the figure 1 we have the main page of the Blogger, here we can see the 20 last entries
produced by us and other users. We can also see a simple menu with three options: Home, New,
Show all.
Home will take us to this same page. New will take us to the editor page; this is the page where
we can write blogs or posts. Finally, Show all will take us to a page where we can find all the
blogs and where we can do searches.
Figure 1
Now, we are going to click on New. The result will be this page:
Figure 2
The figure 2 is the Post Editor page, and it is the place from where we will create and modify
any blog entry.
4
Centre for e-Science
Blogger. User manual.
Each Post (this is the name given for a blog entry) has these pieces of information:
•
Title: it is the title of the post and it will be the main reference for any blog entry. It is
mandatory and we have to specify it before writing anything else.
•
Access: We have two options: PRIVATE and SITE. If the blog entry is PRIVATE, the
person who is written the post will be the only person who will see the entry. If it is
SITE, all members can read and modify the entry.
•
Keywords: this is information that could be useful when we make any search. We can
write as many keywords as we want. Each keyword has to be separated by a comma. We
can write complex keywords. So, as example, we can write something like this:
pollution, global warming, CO2
•
Abstract: A short text with information about the post subject. The title and the abstract
is the information that will be shown in the main page.
•
Tabs with Text, Images, Links, Files. Using these tabs we can choose what we want to
add to the post. The combination of elements of these types will produce the Post
Structure. So we could mix Text, Images, Links and Files in any order.
•
Preview, Save and Cancel: with these buttons we can do those operations, and
remember, you have to save the post because the Blogger does not do that in an
automatic way.
•
Current structure: it will show the post’s current structure. If the post is empty, we
won’t see anything here.
Looking in a higher detail the tab elements we have
•
Text
This is an editor which behavior is similar to any text editor. We can select different
kinds of fonts, sizes, colors, insert tables, etc.
I you are a user with basic skills in HTML, you can use this editor as an HTML editor in
order to do more advanced layouts. You can make links, complex tables, etc. You just
need to press on the button marked ‘<>’ and start to write HTML. But if you do not have
any idea of HTML, don’t worry, you only need to write and use it as any other text
editor.
Figure 3
5
Centre for e-Science
Blogger. User manual.
To write a text, just type, and after that press Add to document. This operation will add
this text to the current structure but it will not save the document, so you will need to
press Save when you have finished.
The Reset editor is necessary when the editor has “hanged”. This is due to a problem in
the editor that has not been solved.
•
Images
From here you can add image to your blog entry. The images will be stored in the
database compressed in the correct size, so you don’t need to be concerned about this
kind of stuff. The Blogger will do the whole resizing job for you. It is advisable to avoid
using images below 300x200 pixels. If you want to store a really big image, it will take
more uploading time, but that will happen just once. After that, when you will access to
the entry, the Blogger will use an adapted picture in order to improve the speed. We will
see more about pictures later on.
Figure 4
To add an image, press Browse…, select a picture from your computer (a JPG picture)
and finally, press Add to document. This operation will add this picture to the current
structure but it will not save the document, so you will again need to press Save when
you have finished.
•
Links
The Blogger has two ways to add links. You can write a link using the text editor, and
you can use the following method:
In Description type the string that users will see as a link. In URL type the location of the
page, for example http://www.mipage.com. Remember, you have to put http://
Figure 5
Once you have written the description and the URL, press Add to document. This
operation will add this link to the current structure but it will not save the document, so
you will need to press Save when you have finished.
•
Files
Adding a file to your blog entry is very easy. You just need to select the file and press
Add to document. This operation will add this file to the current structure but it will not
save the document, so you will need to press Save when you have finished.
6
Centre for e-Science
Blogger. User manual.
Figure 6
Now, let’s go to see what we have when we introduce some information. The next example
(figure 7) has been generated with text, an image, then some more text.
Figure 7
In the figure 7 we have three different columns. The first one contains the element index,
starting in 0. The second one has the element content (it can be a text, a picture, a link or a file)
and the third one has commands to manipulate the current document structure. These commands
are:
•
Edit: it will put the element in its tab allowing us modify its content.
•
Delete: it will delete the element from the current structure.
•
Down arrow: it will move one position down the element.
7
Centre for e-Science
•
Blogger. User manual.
Up arrow: it will move on position up the element.
Applying these commands will cause a change in the current structure but we still need to press
Save in order to keep the changes in the document.
Of these commands, the trickiest is the edit command. If we press it, for example, for the first
element, we will have this in the text editor (figure 8):
Figure 8
Now we have an additional button: Modify in document(index:0). If we press Add to document
we will add a new text with this content at the end of the document, but we won’t change the
text that we want to modify. So we have to press in Modify in document(index:0).
In this button we have very important information, the index. It shows us what element index
that will be modified.
This behavior is the same in all the tabs.
Now, we will press and the blog entry will be saved.
8
Centre for e-Science
Blogger. User manual.
Reading, modifying and deleting a blog entry
We have written our first entry, so in the main page we have (figure 9):
Figure 9
Here, we can read the title and the abstract. We can see who the author is and the date that the
blog was created.
Now, we can click on the title to read the full entry (figure 10).
Figure 10
Here we have the full entry, and we can, in addition to merely reading it, click in any link, file or
picture. If we click in a link, we will have another browser showing the linked page. If we click
in a file we will have the chance of downloading it and if we click in an image, we will see it in
its original size (figure 11).
9
Centre for e-Science
Blogger. User manual.
Figure 11
In the bottom of this page, we have three buttons: Edit, Delete and Add Comment
If we click on Edit we will put this entry in the editor, and we can modify it.
If we click on Delete will see a confirmation page asking us if we really want to delete it.
Add Comment allows anybody to add any comment to this entry. Let’s go to see how.
Adding comments to a blog entry
We are reading the full entry and we want to add a comment. So we have to click Add Comment:
(figure 12):
Figure 12
10
Centre for e-Science
Blogger. User manual.
Clicking Add Comment we will access to a similar page, one like this (figure 13):
Figure 13
Here we have a text editor where can write whatever. Once written we have to press save.
This comment will be added to the entry, allowing any user read these comments when they
access the content. The information will be displayed in this way (figure 14):
Figure 14
We can see the comment’s author and when the comment was written.
11
Centre for e-Science
Blogger. User manual.
Managing entries
We saw that we have a menu in the upper part of the Blogger (figure 15)
Figure 15
If we click on Show all we will access to a page where we can see all the entries (our SITE and
PRIVATE entries and the others’ SITE entries).
Figure 16
Here we have a chronological list of the entries, with the Date, creator and type of access, but,
the most useful thing here is the search.
The searcher works like Google. You only have to specify what words have to have the entries
that will mach with the search condition. Also, we can limit the scope of the search, looking in
all entries or just in the SITE or PRIVATE scope.
12