1
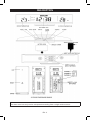
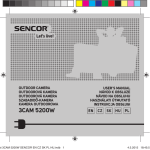
SWS 211 USER'S MANUAL UŽIVATELSKÁ PŘÍRUČKA NÁVOD NA OBSLUHU FELHASZNÁLÓI KÉZIKÖNYV INSTRUKCJA OBSŁUGI RADIO CONTROLLED LED CLOCK WITH WIRELESS INDOOR AND OUTDOOR TEMPERATURE RÁDIEM ŘÍZENÝ BUDÍK S LED DISPLEJEM A BEZDRÁTOVÝM MĚŘENÍM VNITŘNÍ/VENKOVNÍ TEPLOTY RÁDIOM RIADENÝ BUDÍK S LED DISPLEJOM A BEZDRÔTOVÝM MERANÍM VNÚTORNEJ/VONKAJŠEJ TEPLOTY LED KIJELZŐS RÁDIÓS ÉBRESZTŐÓRA VEZETÉK NÉLKÜLI BELSŐ/KÜLSŐ HŐMÉRSÉKLET MÉRÉSSEL BUDZIK STEROWANY RADIOWO Z WYŚWIETLACZEM LED I ZDALNYM POMIAREM TEMPERATURY WEWNĘTRZNEJ I ZEWNĘTRZNEJ CONTENTS DESCRIPTION ........................................................................................................................................2 ENVIRONMENTAL RECEPTION EFFECTS...........................................................................................3 QUICK SETUP .......................................................................................................................................3 TROUBLE SHOOTING ..........................................................................................................................6 SPECIFICATIONS ..................................................................................................................................7 INSTRUCTIONS AND INFORMATION REGARDING THE DISPOSAL OF USED PACKAGING MATERIALS ..........................................................................8 DISPOSAL OF USED ELECTRICAL AND ELECTRONIC APPLIANCES...............................................8 WARRANTY CONDITIONS.....................................................................................................................9 EN - 1 DESCRIPTION Note: The alarm clock can only receive a temperature reading from a single outdoor sensor. EN - 2 ENVIRONMENTAL RECEPTION EFFECTS Your radio controlled clock obtains the accurate time with wireless technology. Same as all wireless devices, the receiving ability maybe affected by, but not limited to, the following circumstances: ● ● ● ● ● ● ● ● ● ● ● Long transmitting distance Nearby mountains and valleys Among tall buildings Near railway, high voltage cable etc. Near freeway, airport, etc Near construction site Inside concrete buildings Near electrical appliances Near computers and TV’s Inside moving vehicles Near metallic structures Place your clock at a location with optimal signal, i.e. close to a window and away from metal surfaces or electrical appliances. QUICK SETUP For best reception of radio controlled signal, keep your clock at least 3 feet away from the AC outlet or AC/DC adaptor. Step 1 Plug in the AC/DC adaptor to any AC household outlet. Then plug in the power jack to the back of your unit. Step 2 Slide open the battery cover at the back of your thermometer, then insert 3 x AAA batteries (not included) into the battery compartment to the back of your thermometer by observation the correct +/- polarity sign inside the battery compartment. Replace the battery cover. Step 3 Keep your thermometer and wireless sensor next to each other. Slide open the battery cover at the back of your wireless outdoor sensor. Make sure the channel selector is set at position 1 (top position), then insert 2 x AAA batteries (not included) to the back of it. Replace the battery cover. Your thermometer will receive data signal from the outdoor sensor in few seconds. Then place your outdoor sensor in a dry and shaded area outdoor. Step 4 Peel off the protective label on the front. Your thermometer is ready to work for you. Step 5 After your thermometer receives the outdoor temperature, it will start to search for the DCF signal. This may take overnight. In case your thermometer does not catch the DCF signal during the day, set the clock manually. Remarks: Keep in mind that your outdoor sensor has a 50 meters open-air transmission with no obstructions. Actual transmission range will vary depending on what is in the path of the signal. Each obstruction (roof, walls, floors, ceilings, thick trees, etc.) will effectively cut signal range in half. EN - 3 Insert the holder to the bottom of the outdoor transmitter for desktop or insert it to the back of the transmitter for wall mount purpose. Remarks: During reception of the DCF time signal, your thermometer does not take temperature measurement. It will change to low brightness and will resume to high brightness after auto reception. After first time installation, the temperature readings will get stable and become more accurate in around 30 minutes. Battery Back Up When AC power is off, the batteries will power the clock to keep track of the time and alarm time. When only the back-up batteries are used, the LED panel is off. Power Up Reception and Signal Strength Display 1. After your thermometer receives the outdoor temperature, it will starts to receive DCF signal. icon blinks. Display shows . 2. When strong DCF signal is detected, display shows with 3 bars . When weak or no DCF or . You will need to replace the signal is detected, display shows with 1 bar clock to another area for better reception, or unplug the power jack to start over reception again. During reception, the signal strength may move from 1 bar to 2 bars to 3 bars. This is normal since the clock is detecting DCF signal and other signals in the air at the same time. 3. If the clock does not catch DCF time signal for 21 minutes. It will stop to search for the DCF signal. 4. During reception, press TIME button once will go to normal time display. Press WAVE/HR again will return to reception mode and signal strength indication. Successful Reception or failed reception icon becomes static (stop blinking) when reception is successful. icon disappears when reception is failed. EN - 4 Automatic Reception and Manual Reception The station starts automatic reception everyday at 1:00, 2:00, and 3:00. If it fails to receive the DCF signal at 3:00, it will start reception at 4:00. If it fails again, it will start reception at 5:00. If it fails again, it will start automatic reception at 1:00 again in the next day. Manual reception: press WAVE/HR button once anytime to start manual reception of DCF time signal. The LED time display will go to radio reception mode . To Set Time Press and hold TIME button and at the same time press WAVE/HR button to set hour. Press and hold TIME button and at the same time press MIN button to set minute. To Set Alarm 1 Time Press and hold ALM 1 button and at the same time press WAVE/HR button to set hour. Press and hold ALM 1 button and at the same time press MIN button to set minute. To Set Alarm 2 Time Press and hold ALM 2 button and at the same time press WAVE/HR button to set hour. Press and hold ALM 2 button and at the same time press MIN button to set minute. To Turn ON/OFF Alarm 1 or/and Alarm 2 To turn on Alarm 1 only, press ALM button, ALM 1 LED lights up on upper left of the hour digits. To turn on Alarm 2 only, press ALM button again, ALM 2 LED lights up on lower left of the hour digits. To turn on both Alarm 1 and 2, press ALM button again, ALM 1 and ALM 2 LED light up. To in-activate both Alarm 1 and 2 permanently, press ALM button again, both ALM 1 and ALM 2 LED turn off. To Use The Snooze Alarm When time reaches the set Alarm 1 or Alarm 2 time, the clock will beep with the ALM 1 or ALM 2 LED blinking. Press the SNOOZE button once, the alarm sound will stop and ALM 1 or ALM 2 LED keeps blinking. Alarm will sound again in time set for snooze duration. To Stop The Alarm When time reaches the set Alarm 1 or Alarm 2 time, the clock will beep with the ALM 1 or ALM 2 LED blinking. Press ALM 1 or ALM 2 button, the alarm sound will stop and ALM 1 or ALM 2 LED becomes static. Alarm 1 and/or Alarm 2 will sound again same time next day. To Set Snooze Duration (from 5 to 60 minutes) Press and hold SNOOZE and time display will show “05” (default snooze duration) and then press MINUTE button to set your desired snooze duration. EN - 5 To Select Time Zone Press TIME and SNOOZE button together, time display changes to “01”, release SNOOZE button and keep pressing TIME button, then press MIN button to set time zone: “00” = GMT + 0 hour (e.g. UK) “01” = GMT + 1 hour (Central European time e.g. Germany) “02” = GMT + 2 hours (Eastern European time e.g. Finland) To Use The Hi-Lo Dimmer Press SNOOZE button to adjust the LED brightness to a comfortable level to you in the dark. If You Lose The Outdoor Temperature When the outdoor temperature digits show “—“, the wireless transmission is either interrupted or lost. Press the RESET button of the outdoor transmitter. If you continue to lose the outdoor temperature display, try placing the transmitter in a different location until you have smooth transmission of temperature data. TROUBLE SHOOTING Press the RESET button of the thermometer and then press RESET button of the outdoor transmitter. Once you do this, your clock will be reset to default setting and needs to be up-dated by DCF time signal again. Care Of Your Clock 1. 2. 3. 4. 5. Do not expose your clock to extreme temperatures, water or direct sunlight. Avoid contact with any corrosive materials. Do not subject the clock to excessive force, dust or humidity. Do not open the inner back case or tamper with any components of this clock. Do not plug in any other AC/AC or AC/DC adaptor with incorrect specifications or voltage. EN - 6 SPECIFICATIONS DCF Radio Controlled Clock Alarm duration: Snooze duration: Operation temperature: Temperature measuring range: Indoor: 5 minutes 5 to 60 minutes 0°C to + 45°C Measurement accuracy: Temperature resolution: Transmission frequency: Transmission range: °C to +45°C (display shows HH.H / LL.L if out of this range) -40°C to +70°C (display shows HH.H / LL.L if out of this range) +/- 1°C 1°C 433 MHz up to 50 m in open space Power supply Main unit: Backup power supply: Outdoor sensor: Dimensions and weight of the main unit: Dimensions and weight of the outdoor sensor: 4.5V, 200mA adapter 3 x 1.5V type AAA batteries 2 x 1.5V type AAA batteries 285 x 75 x 55 mm/ 250 g without batteries 50 x 115 x 35mm/45 g without batteries Outdoor: Fast ČR a.s. declares that the SWS 211 conforms to the basic requirements and other relevant provisions of the directive 1999/5/ES. The device can be operated in the EU without restriction. The declaration of conformity is a part of the user‘s manual or can be found at the website www.sencor.eu EN - 7 INSTRUCTIONS AND INFORMATION REGARDING THE DISPOSAL OF USED PACKAGING MATERIALS Dispose of packaging material at a public waste disposal site. DISPOSAL OF USED ELECTRICAL AND ELECTRONIC APPLIANCES The meaning of the symbol on the product, its accessory or packaging indicates that this product shall not be treated as household waste. Please, dispose of this product at your applicable collection point for the recycling of electrical & electronic equipment waste. Alternatively in some states of the European Union or other European states you may return your products to your local retailer when buying an equivalent new product. The correct disposal of this product will help save valuable natural resources and help in preventing the potential negative impact on the environment and human health, which could be caused as a result of improper liquidation of waste. Please ask your local authorities or the nearest waste collection centre for further details. The improper disposal of this type of waste may fall subject to national regulations for fines. For business entities in the European Union If you wish to dispose of an electrical or electronic device, request the necessary information from your seller or supplier. Disposal in other countries outside the European Union If you wish to dispose of this product, request the necessary information about the correct disposal method from local government departments or from your seller. Changes to the text, design and technical specifications may occur without prior notice and we reserve the right to make these changes. Copyright © 2013, Fast ČR, a.s. Revision 09/2013 EN - 8 EN Warranty conditions Warranty card is not a part of the device packaging. This product is warranted for the period of 24 months from the date of purchase to the end-user. Warranty is limited to the following conditions. Warranty is referred only to the customer goods using for common domestic use. The claim for service can be applied either at dealer’s shop where the product was bought, or at below mentioned authorized service shops. The end-user is obligated to set up a claim immediately when the defects appeared but only till the end of warranty period. The end user is obligated to cooperate to certify the claiming defects. Only completed and clean (according to hygienic standards) product will be accepted. In case of eligible warranty claim the warranty period will be prolonged by the period from the date of claim application till the date of taking over the product by end-user, or the date the end-user is obligated to take it over. To obtain the service under this warranty, end-user is obligated to certify his claim with duly completed following documents: receipt, certificate of warranty, certificate of installation. This warranty is void especially if apply as follows: Defects which were put on sale. Wear-out or damage caused by common use. The product was damaged by unprofessional or wrong installation, used in contrary to the applicable instruction manual, used in contrary to legal enactment and common process of use or used for another purpose which has been designed for. The product was damaged by uncared-for or insufficient maintenance. The product was damaged by dirt, accident of force majeure (natural disaster, fire, and flood). Defects on functionality caused by low duality of signal, electromagnetic field interference etc. The product was mechanically damaged (e.g. broken button, fall). Damage caused by use of unsuitable media, fillings, expendable supplies (batteries) or by unsuitable working conditions (e.g. high temperatures, high humidity, quakes). Repair, modification or other failure action to the product by unauthorized person. End-user did not prove enough his right to claim (time and place of purchase). Data on presented documents differs from data on products. Cases when the claiming product cannot be indentified according to the presented documents (e.g. the serial number or the warranty seal has been damaged). Authorized service centers Visit www.sencor.eu for detailed information about authorized service centers. EN - 9 EN - 10