1
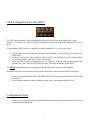
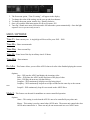
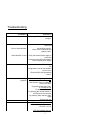
USER MANUAL
Model – ADVS-2
INTERNATIONAL SOUND CORPORATION
7130 Milford Industrial Rd.
Pikesville, Maryland 21208
Phone - 410-484-2244
Fax - 410-484-2499
www.isctv.com
Revised 4/9/2007
Front View
Back View
Features:
Record and Play simultaneously –
The ADVS will record incoming video and play another race/clip at the same time. You will not see
what is being recorded on the output monitor but it will be recording. You can use all the playback features
like slow motion at this time as well.
You can also begin viewing the race/clip that is currently being recorded by just playing the
race/clip. It will allow you to use all playback features. If you do fast forward, the ADVS will stop once it
gets to the point of the live race/clip.
Stack and Synchronize multiple units –
You can stack multiple ADVS units together and control all of them from one single ADVS unit or from an
optional ADVS Touch Screen Remote (TSRM-1). Each unit will be controlled and synchronized from the
one master control unit. Each unit will do as the others do giving you different angles of the race/clip at the
exact same location instantaneously.
Recalling Races/Clips –
The ADVS has ability to recall any race/clip immediately.
ADVS Touch Screen Remote (TSRM-1) –
(Optional)
With the TSRM-1 you get some additional features
2
1. Ability to store up to 4 cue points in the race/clip to give you instant access to specific points or
incidents on the track. Cues can be stored in record or playback.
2. A preset button that will jump back X number of seconds from the end of the race/clip. Perfect
for Stretch run instant replays.
3. An instant replay feature that will jump you back X number of seconds from your current
playback position.
4. Direct playback speed controls. This will give you buttons to jump to different playback speeds
like Pause, ¼ speed forward etc…
5. One Remote Control to operate multiple ADVS units either independently or as a group.
6. The ability to erase previously stored cues and replace them with new cues. This feature is only
available during playback.
Installation
1. Plug in the power plug but do not turn on the ADVS.
2. Plug in all video and audio connections. Make sure to have an NTSC signal in the video input.
(Any source with sync)
3. If you are not looping the input, you MUST terminate the loop.
4. There are 2 video outputs on the ADVS-2. You do not have to terminate output #2 if you are not
using it.
5. Once all the connections are made, you can now turn on the unit.
Upon initial power on, the unit will produce a light sequence during the boot process. This is normal. Once
the light sequence is completed the unit is ready for use. The boot process takes approximately 10 seconds.
CAUTION!
If you do not have an NTSC source connected to the ADVS when it is first powered on it will not recognize
the video source properly. You must turn the power off and correct the video source and then turn it back
on.
3
Cable Configuration to Link ADVS
The ADVS has the ability to link with other ADVS units so that you can control them from a single
controller. To do this you will utilize the RJ45 connections on the back of the ADVS shown in the picture
above.
To link multiple ADVS units to a controller you utilize standard Cat 5 or Cat 6 patch cords.
1. Plug the cable from the Touch Screen Remote Control (TSRM-1) into the Slave In jack on the back
of the ADVS.
2. Connect a cable from the Slave Out Jack of the first ADVS into the Slave In jack of the next ADVS.
3. Follow this procedure until the last ADVS is hooked up.
4. On the last ADVS you must terminate the Slave wiring loop. To do so, connect another Patch Cord
from the Slave Out of the last ADVS into the Slave Term Jack on the back of the ADVS.
You MUST terminate the slave wiring in the last unit in order for the system to work properly!
The Master Out jack is to be used to link and control ADVS units from one Master ADVS front panel.
1. Hook a Cable from the Master Out of the ADVS that will be the controller port to the Slave In of the
next ADVS.
2. You must then change the Mode # setting to Master in the corresponding Master ADVS.
Configuration Setup
1. To access the configuration menu, hold down the stop button in the record section and push the race
down button and release both.
4
2.
3.
4.
5.
6.
The first menu option, “Time Yr setting”, will appear in the display.
To change the value of the setting, use the race up and down buttons.
To change the menu option, turn the Jog / Shuttle clockwise.
Once you reach the final menu option it will say Firmware X.X
Turn Jog / Shuttle once more clockwise and it will reboot the system automatically. Once the light
sequence is over you are ready to use it.
MENU OPTIONS:
Time Yr –Enter current year.
A single digit will be used for years 2003 – 2009.
Time Mo – Enter current month.
Time Day – Enter current Day.
Time Hr – Enter hour of the day in military time 0-24 hours.
Time Min – Enter minutes.
Do After – This feature allows you to tell the ADVS what to do after it has finished playing the current
race/clip.
Options:
Stop – Will stop the ADVS and display the incoming video..
Pause – Will pause the ADVS on the last frame of the played video.
Next – Will play the next race/clip that follows.
LoopOne – Will continuously loop the race/clip being played.
LoopDay – Will continuously loop all races/clips recorded on the same day as the current
race.
LoopAll – Will continuously loop all races stored on the ADVS Drive.
Mode/# – This feature sets the unit for standalone or remote controlled operation.
Options:
Alone – This setting is used when the ADVS is not to be controlled by any other unit.
Master – This setting is used to control other ADVS units. The master unit controls the slave
ADVS units connected to it. There can only be one master unit in a set of ADVS units.
5
1 to 14 – This will set the address of each unit in a grouping. Each ADVS must have a
unique address.
Bit Rate - This is one of the most important settings in this configuration.
This determines the quality of
video that is recorded.
You can choose a bit rate between 1 and 12. The recommended bit rates and the corresponding
storage capabilities assuming a 80GB hard drive are in the chart below. The hard drive size is subject to
change.
Recording Bit
Rate
4
5
6
7
8
9
10
11
Storage Hours
43
34
28
24
20
18
16
14
Video Quality
VHS
SVHS
Beta
PVR delay – This setting should always be set at 25 and should not be changed before talking to our
technicians. This setting is used to correct for delays in synchronization when using the ADVS with
multiple units.
Max Rec – Maximum Record setting (Minutes). This setting is used to set the amount of time, in
minutes you can record for one race/clip. This setting avoids recording too long and accidentally filling up
the drive. This will automatically stop after the determined time has expired.
Options:
Disable – There will be no maximum record time.
1 – 30 – Maximum record time in minutes. Select any amount of time from one minute to 30
minutes.
IMPORTANT!!! This setting begins its timer as soon as you push record and does not stop timing
when you are in pause. If you press pause after you start recording and allow it to pause for a length of time
greater than your Max Record time the unit will stop recording.
6
Search – The search setting is used to set the default speed of the search button.
When you push the
search button in playback mode, the playback will jump to that speed.
There are 5 options for the Search speed.
Pause, ¼, ½, ¾, and normal speed.
Video – This setting is used to change video sources between NTSC, Pal, Secam and Auto mode.
The
Auto mode will detect the video source. The optimal setting would be the video standard you are using, not
Auto
EE – This is used to determine the status of the ADVS when it is in the stop position.
Options:
On – When in stop the ADVS will show the live video input.
Off – There are 2 possibilities for this option.
1. If the “Do After” setting is set to Stop, delayed live video will be seen when the
unit is in stop.
2. If the “Do After” setting is set to Pause, the last frame of the last race/clip will be
seen.
Name Dly – Name Delay setting is used to deal with races/clips run shortly after midnight.
When a
race/clip is recorded the ADVS assigns a time and date stamp to that race/clip and uses that for the name.
This will delay the date change X amount of hours for a race/clip recorded after midnight.
Options – You can choose between 0 and 6 hours
Example... If you record a race/clip on Jan. 15th at 11:55pm, that race/clip will be dated Jan. 15th. If
you then record the next race/clip that runs and it happens to run at 12:05am on Jan. 16th than the race/clip
will be dated Jan. 16th. Race 1. Although it was actually on the Jan. 15th race card.
To avoid this problem we put the name delay setting in so that any race/clip recorded will not take
the date until X amount of hours past Midnight.
Max Fwd – Maximum Forward speed setting.
This allows you to change the maximum fast forward
speed on the jog / shuttle control.
Options:
>2X, >4X, or >8X.
Max Rev – Maximum Reverse speed setting. This allows you to change the maximum reverse speed on
the jog / shuttle control.
Options:
7
<Normal, <2X, or <4X.
Firmware – This is the current firmware revision for the ADVS hardware.
This cannot be changed from
the front panel.
OPERATION:
The operation of the ADVS is very simple. There are 2 main sections on the ADVS, The record section and
the playback section.
To Record – Simply press the record button in the record section.
To pause recording, press pause.
The ADVS will remain in pause as long as you want it to or until the maximum record time
has expired.
To stop recording, press stop.
To Play – Simply press the play button in the play section to start playback.
To stop playback, press stop.
Search - To change the playback speed, press the search button.
Once pressed, the jog shuttle control
becomes active. Use the jog shuttle control to advance to different speeds. Turning the Jog / Shuttle
clockwise will increase playback speed, turning the Jog / Shuttle counterclockwise will decrease the
playback speed and switch to reverse speed as well.
Recalling Races/Clips – When the ADVS has completed the boot process, the most recent race/clip
will be displayed. Use the Race Up and Race Down buttons to select the race/clip you would like to play.
If you hold in the button it will advance through races/clips faster.
Delete – The delete features are limited.
You can only delete the last race/clip recorded on the system.
Once you record another race/clip you cannot go back and delete an earlier race/clip. You would have to
either leave it on the system or delete any races/clips that were recorded after that one as well.
To delete the last race/clip:
Hold the Stop button in the record section down and press the record button once. Pushing
the record button again will continue to delete races/clips. This will delete the last race/clip recorded on the
system and display the newest race/clip.
8
Troubleshooting
Problem
Solution
Unit will not record -Try turning ADVS off and then back
on again.
Unit will not power up -Check and make sure that power is
connected
Prior to Serial #015041
and working properly.
-Check fuse in rear panel and
replace if open.
Serial #015041 or later
-Verify the external power supply is
connected
-Verify the green LED is illuminated
on the external power supply
Video is flashing
-Make sure that the Video setting in
the
configuration is set for the satndard
you are using
-Re-boot ADVS with appropriate
source.
Video ouput freezes during
playback
If frozen on the beginning or end of
clip:
-Use search to move to a different
point in the video.
-Try pressing 'Stop' then 'Play'.
If in middle of clip:
-Try pressing 'play' again
-Try pressing the 'Normal' button on
the Remote touch controller
-Try pressing 'Stop' and then 'Play'
again
-Re-boot the unit.
Video looks hot
If EE is hot and playback is OK:
-Verify the video level feeding the
ADVS is 1.0v p-p.
If EE and playback are Hot:
9
-Terminate output of ADVS with 75
ohms.
"No Races" appears in display
If new ADVS or hard drive:
-Record something, this will be the
first clip.
If at least 1 clip has been recorded:
-Rebuild library.
Video has digital artifacts
-Increase the "Bit Rate" in the
configuration.
New clip names have the
incorrect date
-Set the clock in the configuration.
Error Codes
(Rev. 4.4 or later)
1, 2
Internal Time out. If the ADVS
does not seem to be working
properly, re-boot the ADVS
4
Exceeded the maximum of 250
races in one day. Additional
races will overwrite race # 250
5, 6, 7
Communication error between
ADVS and Touch Controller.
Check Cables, connectors, and
electrical noise sources.
9
Library test failed. Rebuild library
before recording any new races.
10
51 (On Playback)
51 (On Record)
The slave has been asked to play
a file not in it's library. Analyze
why the file is missing
Rebuild the library
If notified by International Sound Corporation to do any of the following please see the instructions below:
Rebuild Library –
If the Library file becomes corrupt in any way the ADVS will not function. To rebuild:
1. Turn the ADVS off and then on again.
2. Before the light sequence ends, press and hold both the race up and race down buttons.
3. “Ini Lib” will appear and a number counting sequence will begin on the display. This may take
several minutes.
4. When it has completed the rebuild the ADVS will automatically return to normal operation and
is ready for use.
Disk Setup –
CAUTION!!! This Will Destroy All Data On The Disk!
Used for New Hard Drives
1. Turn the ADVS on.
2. Before the light sequence finishes, Hold down the Record, pause and stop buttons in the Record
section as well as the Race up and Race Down buttons.
3. Hold the buttons down until you see “Re-boot w/ power” appears in the display
4. Turn the power off on the ADVS and then Back On again
5. After the light sequence, verify that “Ini Lib” appears in the display
6. After counting down the ADVS should re-boot and be ready.
11
Specifications
General:
Power Supply: 120 V AC, 50Hz-60Hz
Power Consumption: 30W
Ambient Operating Temperature: 40°F to 100°F
Dimensions: 19”W x 8”D x 1.75”H
Weight: 8lbs.
Encoding Format: MPEG-2
Video Standards: 525/60 (NTSC), 625/50 (PAL)
Video:
Input Connectors:
Line Input/Loop Out: BNC x 2 (Composite); 1.0 Vp-p,
(≈100kΩ @ < 10pF)
Output Connectors:
Line Output: BNC x 2 (Composite); 1.0 Vp-p, (75Ω)
Audio:
Input Connectors:
Line Input (Left/Right): RCA x 2; Line Level,
Single ended, High Impedance.
Output Connectors:
Line Output (Left/Right): RCA x 2; Line Level,
Single ended, High Impedance.
Other Input/Output Connectors:
Modular RJ45: Remote Control
Four Modular RJ45 Female, ISC Remote Control Interface.
12
INTERNATIONAL SOUND CORPORATION
7130 Milford Industrial Rd.
Pikesville, Maryland 21208
Phone - 410-484-2244
Fax - 410-484-2499
www.isctv.com
Copyright. 2006
13