1
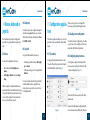
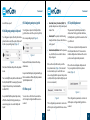
User manual
User manual
User manual
00 Index
01 Introduction
01 Introduction.....................................3 05 Configuration application....7
05.1 The window..............................7
02 First steps.......................................4
05.2 Reading current configu02.1 Minimum requirements.......4
ration........................................7
02.2 What’s included.......................4
05.3 Configuring an input as
02.3 Connecting enCore................4
mouse.........................................7
05.4 Configuring an input as
03 Installing the application......5
keyboard.....................................8
05.5 Configuring an input as
04 Mouse, keyboard or joystick...6
joystick.....................................8
04.1 Mouse..........................................6
0.5.6 Mouse speed........................9
04.2 Keyboard....................................6
0.5.7 Joystick displacement.........9
04.3 Joystick.......................................6
0.5.8 Keyboard distribution.....10
0.5.9 Saving the configuration.10
enCore is a USB interface for eight standard switches. This
user manual will help you get the most out of your enCore,
adapting it to your needs and the way you work.
All the information contained herein is subject to change
without notice, and does not represent a commitment by
Eneso Tecnología de Adaptación S.L. Eneso is the trade
name of Eneso Tecnología de Adaptación S.L
Eneso Tecnología de Adaptación S.L. shall not be held liable for any errors that appear in this manual or for damage
of any sort incurred as the result of the provision or use of
this manual.
2
3
User manual
02 First steps
02.1 Minimum requirements
The minimum requirements for an adequate use of enCore are:
• 50MB of free disk space..
• Windows XP or higher or GNU/Linux
with Gtk+ version 2.16 or higher.
• Conventional monitor.
• Conventional mouse and keyboard,
which chan be replace by enCore after it
has been installed.
• USB port.
02.2 What’s included
Please make sure all these items are included in the enCore package:
• enCore unit
• USB mini-AB cable
• Installation CD
User manual
03 Installing the application
02.3 Connecting enCore
1. Connect enCore to a free USB port of
your computer.
2. Connect as many switches as you want
(1 to 8) to any of the inputs of enCore. By
default, enCore is configured with these
actions:
Left click
Double click
Drag and drop
Move the pointer up
Move the pointer down
Move the pointer right
Move the pointer left
The installer is included in the CD. Please
make sure you install the software corresponding to your operating system
For Linux users:
1. Open the CD/DVD reader folder.
2. Open the CD/DVD reader folder.
3. Execute the file encore_X.Y.Z.deb with
root privileges (X.Y.Z indicates the application version).
4. Follow the on-screen instructions.
For Windows users:
1. Insert the application disc in the CD /
DVD reader. The program will start automatically.
2. Follow the on-screen instructions.
Right click
If the installation program does not start
automatically.
1. In Mi computer, select explore CD/DVD.
2. Open the folder Win32/.
3. Execute the file encore-X.Y.Z-setup.exe
(X.Y.Z indicates the application version).
4. Follow the on-screen instructions.
4
5
User manual
04 Mouse, keyboard or
joystick
Each enCore input can be configured to
perform a mouse, keyboard or joystick action.
04.1 Mouse
As mouse, the available actions are:
• Move the pointer left, right, up or
down.
• Left, right or double click, and drag/
drop.
When an input is configured with mouse
movement, the pointer will keep moving as
long as the switch is pressed down. You can
choose from a number of movement modes, see section ‘Mouse speed’.
User manual
05 Configuration application
04.2 Keyboard
As keyboard, you can configure an input to
simulate a key press. Besides, you can modify that key with any combination of Control, Shift and Alt.
The enCore application allows you to configure the actions associated to each switch
input.
04.1 Joystick
05.1 The window
As joystick, the available actions are:
In the application windows there is a box
for each of the enCore inputs. Each input is
identified with its symbol (Figure 1).
• Simulate joystick movement left, right,
up or down.
• Simulate pressing one of its eight virtual
buttons.
You can configure how far the joystick will
virtually displace when a joystick movement action is executed. See section ‘Joystick displacement’.
There is also a section to configure the
mouse speed and joystick displacement.
05.2 Reading current configuration
To read the current configuration of a enCore, just connect it to a USB port of the computer and click ‘Read configuration’.
05.3 Configuring an input as mouse
To configure an input so that it performs
mouse actions select option ‘Mouse’ in the
corresponding input (Figure 2).
Figure 2
Next, select the desires action in the dropdown menu.
Figure 1
6
Keep in mind that inputs configured with
mouse movement are affected by the para7
User manual
meter ‘Mouse speed’.
05.5 Configuring an input as joystick
05.4 Configuring an input as keyboard
To configure an input so that it performs
joystick action select the option ‘Joystick’ in
User manual
• Constant (slow) y Constant (fast): The
05.7 Joystick displacement
pointer always moves at the same speed,
The parameter ‘Joystick displacement’ inslow or fast.
dicates how far the joystick bar will move
• Accelerate: The pointer starts moving
(virtually) when a joystick movement action
slowly, and after a few seconds it increa- is performed.
ses its speed.
100% means complete bar displacement in
• Accelerate and brake: Like the previous the indicated direction. 50% means interone, but after a few seconds it reduces
mediate displacement between the center
its speed again.
position and complete displacement.
To configure an input so that it performs ke- the corresponding input (Figure 4).
yboard actions select the option ‘Keyboard’
in the corresponding input (Figure 3).
Figure 4
Figure 3
Next, select the desired key in the drop-down
menu.
Next, select the desired action in the dropdown menu.
Choose the model that suits you in the
Choose the most adequate displacement
drop-down menu (Figure 5). Accelerated
for your application in the drop-down
modes make it easy to reach both near
menu (Figure 6).
screen objects (which requieres fine pointer
control) and far objects (when higher speed
is more convenient).
Keep in mind that inputs configured with joystick movement are affected by the parameter
You can modifiy the key with a combination of
‘Joystick displacement’.
Control, Alt and Shift. For example, if you want
to type ‘A’ choose the key ‘a’ and activate the
05.6 Mouse speed
modifier Shift.
Keep in mind that the keyboard layout may
affect the character that is typed when you
execute a key press. See section ‘Keyboard
layout’.
Figure 6
You can choose from four movement modes for inputs configured with mouse movement:
Figure 5
This configuration parameter is common to
This configuration parameter is common to all the inputs configured with joystick moall the inputs configured with mouse move- vement.
ment.
8
9
User manual
05.8 Keyboard layout
You need not configure enCore every time
you connect it to the computer. Do it only
Some keys produce different characters
when you want to change the action assodepending on the keyboard layout. For
ciated to an input, mouse speed or joystcik
example, key ‘ñ’ in a Spanish keyboard is ‘;’ in displacement.
a USA keyboard. If you use a keyboard with
a different layout to what is configure in the
operating system, some keys will not produce the expected result.
enCore is not different. In most cases the
configuration application will automatically
detect the keyboard layout your operating
system is using and will configure enCore
correctly, but keep in mind that if you configure enCore in a computer and use it in
another one with a different keyboard layout, some inputs might generate different
characters.
05.9 Saving the configuration
Eneso Tecnología de Adaptación, S.L.
www.eneso.es
Tel.: + 34 902 005 561
When you are done choosing the desired
actions for each input, click ‘Send configuration’.
10


![Subject: [MB] 1987 W126 intermittent climate control](http://vs1.manualzilla.com/store/data/006030956_1-f014f75cb14526db0f9eb72ec9889b7e-150x150.png)