1
Freescale Semiconductor
Application Note
AN2578
Rev. 2, 12/2004
Creating a Linux ‘Out of the Box’ Experience
on a Sandpoint Platform
by
Maurie Ommerman
CPD Applications
Freescale Semiconductor, Inc.
Austin, TX
This application note describes the process of creating a Linux 'out
of the box' experience on a Sandpoint platform. The steps in this
process involve building a Linux file system on a hard drive,
obtaining and building a Linux kernel, flashing it to memory, and
starting Linux. When the process is completed and the hard drive
is installed, the system can be shipped to a recipient who can open
the box, connect the Sandpoint to a terminal emulator, turn it on,
and start Linux with one command to DINK32 or automatically
with no input to DINK32. The Sandpoint platform supports the
MPC824X, MPC74XX, and MPC75X PowerPC™
microprocessors.
© Freescale Semiconductor, Inc., 2004. All rights reserved.
Contents
1. Introduction . . . . . . . . . . . . . . . . . . . . . . . . . . . . . . . . . 2
2. Terminology. . . . . . . . . . . . . . . . . . . . . . . . . . . . . . . . . 2
3. Quick Start for a Pre-Configured Linux System on
Sandpoint . . . . . . . . . . . . . . . . . . . . . . . . . . . . . . . . . . . 3
4. What is DINK32? . . . . . . . . . . . . . . . . . . . . . . . . . . . . 4
5. Building a Linux File System on the Hard Drive . . . . 5
6. Obtaining a Linux Kernel Source . . . . . . . . . . . . . . . . 9
7. Building the Kernel . . . . . . . . . . . . . . . . . . . . . . . . . . 10
8. Flashing the Kernel to Flash Memory . . . . . . . . . . . . 13
9. Turning on Linux . . . . . . . . . . . . . . . . . . . . . . . . . . . . 15
10. Developing Linux on Sandpoint . . . . . . . . . . . . . . . . 22
11. Special Considerations for PowerPC Microprocessors
Supported on Sandpoint. . . . . . . . . . . . . . . . . . . . . . . 22
12. Network Controls for Linux . . . . . . . . . . . . . . . . . . . 23
13. Purchasing the Complete Linux System on
Sandpoint . . . . . . . . . . . . . . . . . . . . . . . . . . . . . . . . . . 27
14. Conclusion . . . . . . . . . . . . . . . . . . . . . . . . . . . . . . . . . 28
15. References . . . . . . . . . . . . . . . . . . . . . . . . . . . . . . . . . 28
16. Document Revision History. . . . . . . . . . . . . . . . . . . . 29
Introduction
1
Introduction
This application note describes the steps for obtaining, building, downloading, and starting Linux on a Sandpoint
platform. This section provides an overview of the various sections of this application note.
•
•
•
•
•
•
•
•
•
•
•
•
•
•
•
2
Section 2, “Terminology,” defines the terminology used in this application note.
Section 3, “Quick Start for a Pre-Configured Linux System on Sandpoint,” includes all the information
needed to start up and run Linux on the pre-configured Linux 'out of the box' system in fewer than 700
words.
Section 4, “What is DINK32?,” defines the DINK32 debugger.
Section 5, “Building a Linux File System on the Hard Drive,” describes how to build a Linux file system
suitable for booting a Linux kernel on a hard drive.
Section 6, “Obtaining a Linux Kernel Source,” describes the method for obtaining Linux kernel source code
specifically for the PowerPC.
Section 7, “Building the Kernel,” discusses the steps to build a working kernel for the Sandpoint from a
Linux source tree.
Section 8, “Flashing the Kernel to Flash Memory,” describes how to copy the kernel object from the host
system to the Sandpoint.
Section 9, “Turning on Linux,” describes the process of starting a Linux kernel on Sandpoint.
Section 10, “Developing Linux on Sandpoint,” describes the method of developing new kernels and other
Linux software on Sandpoint.
Section 11, “Special Considerations for PowerPC Microprocessors Supported on Sandpoint,” describes
considerations to be addressed when running a Linux kernel on the Sandpoint.
Section 12, “Network Controls for Linux,” describes how to assign a hard IP address, show a telnet session
from the Sandpoint, and perform a proper shutdown.
Section 13, “Purchasing the Complete Linux System on a Sandpoint,” describes the ordering procedure for
obtaining a Sandpoint pre-configured with the Linux 'out of the box' experience.
Section 14, “Conclusion,” describes where to get assistance and answers.
Section 15, “References,” lists the reference material used in preparing this document.
Section 16, “Document Revision History,” describes the history of this document.
Terminology
The following terms are used in this document.
Bash shell
bitkeeper
Boot
Boot address
Compiler
CPU
CVS
Extension to the Bourne shell, which is popular on Linux systems and is sometimes called
GNU Born Again Bourne Shell. This shell is the default for most Linux systems because
Linux uses GNU tools exclusively and is the best shell for running the ISS.
A web site with executables to obtain the latest PowerPC Linux kernel source code
Program that begins at hardware reset, which prepares the hardware for loading an
operating system
Address from which the board attempts to boot after reset
A software program that converts a high-level source code into machine specific binary
Central processor unit, that is, a PowerPC processor
Source control system
Creating a Linux ‘Out of the Box’ Experience on a Sandpoint Platform, Rev. 2
2
Freescale Semiconductor
Quick Start for a Pre-Configured Linux System on Sandpoint
SCCS
DINK32
Host
Source control system used by bitkeeper
Small operating system debugger for the Sandpoint evaluation board
A machine where kernels are built. The host may or may not be the same architecture. For
example, Freescale builds kernels on G4 machines, UNIX machines, and Intel machines.
Instruction set simulator
Operating system
Peripheral component interface
Random access memory
Read-only memory / persistent memory
A machine that holds and transfers objects, such as kernel objects. Can also be used as a
host.
ISS
OS
PCI
RAM
ROM/Flash
Server
3
Quick Start for a Pre-Configured Linux System on
Sandpoint
The pre-configured Linux Sandpoint system is shipped in a box with a null modem serial cable, an installed IDE
hard drive, an installed Ethernet card (Realtek 8139), a paper copy of this application note, the boxed version of
Yellow Dog Linux, and a CD. The CD includes the Linux kernel, a tarball of the kernel source, this application note
in PDF format, and a tarball of the root file system as installed on the hard drive.
Remove the Sandpoint system from its box and perform the following steps:
1. Connect the Sandpoint to a 120-VAC source using the supplied AC power cord. For international operation
at 240 VAC, replace the connector with an appropriately-keyed power cable.
2. Connect the Sandpoint machine to the local network with an Ethernet cable.
3. Connect the null modem serial cable between the COM1 port (topmost port on the Sandpoint) and the PC
(or workstation) serial port (usually COM1).
4. Start up a terminal emulator program, such as 'Hyperterminal,' available for free with most Windows PCs.
Set up the PC terminal program to use the following settings:
— 9600 baud
— 8 bits
— No parity
— 1 stop bit
— No handshaking
— Terminal emulation: vt100/vt102
5. Turn on the Sandpoint by pushing the power switch on the front of the chassis. DINK32 starts up and
automatically starts the Linux kernel (currently 2.4.21-rc1) from flash.
NOTE
To stop this automatic action, hold the backspace key down during boot. Sandpoint
boots into DINK32, and Linux can be started with the DINK32 command, go
FF010000.
Creating a Linux ‘Out of the Box’ Experience on a Sandpoint Platform, Rev. 2
Freescale Semiconductor
3
What is DINK32?
If DINK32 does not start automatically, type go FF010000 at the DINK32 prompt. Linux starts and prints
messages on the serial display as it accesses the hardware and software on Sandpoint.
The Linux kernel provided is configured to read the root file system from the hard drive at /dev/hda3. This
setting can be changed when the Linux kernel displays the following prompt:
Linux/PPC load: root=/dev/hda3
6. The supplied and installed hard drive has four partitions:
— /dev/hda1 contains an elf kernel file.
— /dev/hda2 contains a swap partition
— /dev/hda3 contains a full ext2 root file system
— /dev/hda4 contains the tarball of the Linux file system (that is, a tar of /dev/hdb3), the kernel source, and
the kernel executable on an ext2 file system.
7. The Linux kernel provided is configured to obtain an IP address from some DHCP server automatically,
although it may not succeed. If an IP is not obtained automatically, a manual IP for this network may be set
up as follows:
a) Find an available IP for the network by pinging for an available IP on some other working system,
Linux, Windows, Mac, Unix, or another system.
b) Assign this available IP to the Sandpoint Linux system using the commands below. It is necessary to
be root to issue them. On this Linux system, the root password is “freescale”; however, if you received
a system from us before September 2004, the older password was “Freescale.” Because several active
users are on this system, log in as a regular user using the user name ‘guest’ with the password ‘guest’.
Then change to root with the su - command.
– ifconfig eth0 xxx.xxx.xxx.xxx netmask xxx.xxx.xxx.xxx
for example, ifconfig eth0 10.82.117.201 netmask 255.255.252.0 (Replace this
example with the correct IP ascertained above.)
– route add -net 0.0.0/0 gw xxx.xxx.xxx.xxx
for example, route add -net 0.0.0.0/0 gw 10.82.119.254 (Replace this example
with the correct gateway IP.)
An example of this situation is shown in Section 12, “Network Controls for Linux.”
The system is now active. Create new users with the useradd command. A full native tool set is available and
ready on this file system. It is possible to obtain and develop new kernels and test them on this Sandpoint kernel.
See Section 7, “Building the Kernel.”
NOTE
Do not power off the Sandpoint while Linux is running. Always do a graceful
shutdown of Linux before shutting off power or resetting. Use the shutdown -h
now command. (See Section 12, “Network Controls for Linux.”)
4
What is DINK32?
Dynamic Interactive Nano Kernel (DINK32) is a small operating system debugger for the Sandpoint evaluation
board. DINK32 starts automatically when power is applied to the Sandpoint system. The Linux kernel elf file is
stored on a flash memory device on the MPMC daughter card at address FF000000. The DINK32 command, go
FF010000, starts execution at the first instruction of the kernel since an elf file has a 10000-byte header.
DINK32 has many useful commands for debugging and looking at Sandpoint facilities. Refer to the DINK32 user’s
manual, listed in Section 15, “References,” for a list of all the commands.
Creating a Linux ‘Out of the Box’ Experience on a Sandpoint Platform, Rev. 2
4
Freescale Semiconductor
Building a Linux File System on the Hard Drive
DINK32 has the capability of downloading data from a file on another machine, either with a serial port, which is
not discussed here, or with an Ethernet port, which is discussed later.
5
Building a Linux File System on the Hard Drive
A running Linux system consists of the following:
1. The Linux kernel, which is stored in memory on the Sandpoint and executes, decompressing itself and
copying itself to low memory, and continues the boot process until Linux runs.
2. The root file system, a series of directories and files on an available device. The three device types
available are: hard drive, NFS (network file system), or RAM disk (memory file system). This section
describes how to build a root file system on an IDE hard drive.
The following steps explain how to build a Linux file system on a hard drive. Only the root user has permission to
perform steps 3–14.
1. Install a new hard drive into a PowerPC system running Linux, such as Yellow Dog, which runs on a MAC
G4, Sandpoint, or an MAI platform. A pre-configured system can be purchased from Freescale. See Section
Section 13, “Purchasing the Complete Linux System on a Sandpoint,” for more information. This
application note uses the master drive on IDE0, hda. The purpose of the remaining steps is to clone an exact
copy of hda onto hdb.
Shut down the running system to connect the hard drive. Be sure to use the shutdown -h now command.
After the new hard drive is connected, boot the running system.
2. Install the hard drive as a slave device on the same IDE channel as the boot hard drive, or as a master or
slave on the other IDE channel. The hard drive is mounted as a slave on IDE0 and is therefore designated
as /dev/hdb. Change the hard drive to a slave; all drives are different, but usually a jumper on the drive can
swap it between master and slave.
3. Partition the hard drive /dev/hdb using the Linux command fdisk /dev/hdb into the following
partitions:
— /dev/hdb1, a Linux partition of type 83, approximately one third of the available disk space
— /dev/hdb2, a Linux swap partition of type 82, approximately 500 Mbytes
— /dev/hdb3, a Linux partition of type 83, approximately one third of the available disk space
— /dev/hdb4 a Linux partition of type 83, the rest of the available space. When booted, the root user can
mount this partition as a working partition.
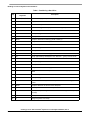
Table 1 shows the steps to partitioning a hard drive. The cylinder sizes are based on a 40-Gbyte hard drive.
Adjust these values accordingly for larger or smaller hard drives.
NOTE
Ensure that the disk that is about to be partitioned is not the boot disk or any disk
other than the one meant to be partitioned. It is possible to accidentally fdisk the
current file system or some other important disk, which could render the host Linux
system unusable. Notice that the fdisk command takes a device designator,
which is /dev/hdb in this case, assuming an IDE0 slave disk.
Creating a Linux ‘Out of the Box’ Experience on a Sandpoint Platform, Rev. 2
Freescale Semiconductor
5
Building a Linux File System on the Hard Drive
Table 1. Partitioning a Hard Drive
Command/
Keystroke
Step
Description
1
fdisk /dev/hdb
Open the fdisk program to partition disks.
2
m
Display the menu.
3
p
View the current partitions.
4
d <partition number>
Delete all existing partitions in preparation for creating four partitions next.
5
n
Create a new partition.
6
p
Select primary type.
7
1
Select partition 1.
8
<Enter>
Accept the default for the starting cylinder number (1).
9
25840
Specify about one third of the space on the disk.
10
n
Create a new partition.
11
p
Select primary type.
12
2
Select partition 2.
13
<Enter>
Accept the default for the starting cylinder number.
14
+24
Specify approximately 120 Mbytes in size. Note the ‘+’ (plus) in front of the 24.
15
n
Create a new partition.
16
p
Select primary type.
17
3
Select partition 3.
18
<Enter>
Accept the default for the starting cylinder number.
19
+25840
Specify about one third of the space on the disk. Note the ‘+’ (plus) in front of the
25840.
20
n
Create a new partition.
21
p
Select primary type.
22
<Enter>
Partition 4 is automatically selected. Accept the default for the starting cylinder
number.
23
<Enter>
Accept the default to use the rest of the disk space.
24
p
Print the partition information and verify that it is correct.
25
t
List the possible partition types. Partition 2 needs to be changed from 83 (Linux) to
82 (swap).
26
2
Select partition 2.
27
82
Change to type 82, Linux swap.
Creating a Linux ‘Out of the Box’ Experience on a Sandpoint Platform, Rev. 2
6
Freescale Semiconductor
Building a Linux File System on the Hard Drive
Table 1. Partitioning a Hard Drive (continued)
Command/
Keystroke
Step
Description
28
p
Print the partition information again and ensure that it is correct.
29
w
Write the partition information. Once the partition information has been written, it is
impossible to retrieve the original data on this disk.
4. Now that the hard drive /dev/hdb has been partitioned, create a swap file system on /dev/hdb2 with the
mkswap /dev/hdb2 command and create an ext2 file system on the rest of the partitions with the
following commands:
mke2fs /dev/hdb1
mke2fs /dev/hdb3
mke2fs /dev/hdb4
5. Create a temporary directory in the / root directory with ‘cd /’ and ‘mkdir /edisk’. If /edisk
already exists on hda, ensure that it is empty and not used for any other purpose before using it for the
following steps. If it is already in use, create the directory with a different name, and substitute that name
for /edisk in the instructions that follow.
6. Mount the ext2 partition hdb3 with mount /dev/hdb3 /edisk.
NOTE
Use the df -k command to see how much space is available on each partition
once it is mounted.
7. Create a root file system on /dev/hdb3 using the commands below. Use the -a parameter to preserve all the
symbolic links. Eleven directories are copied from the root partition, hda3, of the running system, and three
directories are created.
NOTE
Use a PowerPC running system for these steps. Create these directories and
populate them with PowerPC binaries.
cp -a
cp -a
cp -a
cp -a
cp -a
cp -a
cp -a
cp -a
cp -a
cp -a
cp -a
mkdir
mkdir
mkdir
/bin /edisk/bin
/dev /edisk/dev
/etc /edisk/etc
/home /edisk/home
/mnt /edisk/mnt
/root /edisk/root
/sbin /edisk/sbin
/usr /edisk/usr
/var /edisk/var
/lib /edisk/lib
/boot /edisk/boot
/edisk/tmp
/edisk/misc
/edisk/proc
Creating a Linux ‘Out of the Box’ Experience on a Sandpoint Platform, Rev. 2
Freescale Semiconductor
7
Building a Linux File System on the Hard Drive
8. Since only the serial terminal tty S0 is available, the other terminals must be disabled as outlined below.
(Be very careful with this step. Ensure that the working file is /edisk/etc/inittab, not the running system’s
/etc/inittab/, because working from it can cause the running system to stop working.) The /edisk/etc/inittab
file tells the Linux boot up system which terminals to start up.
a) vi /edisk/etc/inittab
b) Comment out all the respawn lines. When complete, the six lines should look like this:
#1:2345:respawn:/sbin/mingetty
#2:2345:respawn:/sbin/mingetty
#3:2345:respawn:/sbin/mingetty
#4:2345:respawn:/sbin/mingetty
#5:2345:respawn:/sbin/mingetty
#6:2345:respawn:/sbin/mingetty
tty1
tty2
tty3
tty4
tty5
tty6
c) Down arrow to the last commented line above. Type o to insert a new line and type
‘co:2345:respawn:/sbin/agetty ttyS0 9600 vt100’.
Type :wq to write and quit the file.
d) Issue the cat /edisk/etc/inittab command to verify the changes. The changed lines should
look like this:
#1:2345:respawn:/sbin/mingetty tty1
#2:2345:respawn:/sbin/mingetty tty2
#3:2345:respawn:/sbin/mingetty tty3
#4:2345:respawn:/sbin/mingetty tty4
#5:2345:respawn:/sbin/mingetty tty5
#6:2345:respawn:/sbin/mingetty tty6
co:2345:respawn:/sbin/agetty ttyS0 9600 vt100
9. Clean up the /edisk/home directory. (Be very careful with this step. Verify that the running system’s /home
is not being changed.) All users that exist on the host system should have home directories here, unless
they have been specified to be placed somewhere else. It is a good idea to remove all the files and
directories except the top-level home directories for all of these users. The following commands will take
care of this:
cd /edisk
ls /edisk/home > tmphome
cd /edisk/home
rm -rf *
cat ../tmphome | xargs mkdir
cd ..
rm -rf tmphome
10. Modify the /edisk/etc/fstab file, which tells the Linux boot up system which partitions to mount, to mount
three partitions: /dev/hdb2, /dev/hdb3, and /dev/hdb4. Remove all references to any hard disk other than
/dev/hda2, /dev/hda3, and /dev/hda4. (Be very careful with this step. Make sure that the running system’s
/etc/fstab file does not get modified because changing it can cause the running system to stop working.)
The file below is an example fstab file. It is used here as an example to show how to modify an fstab file.
[root@ydlG4 root]# cat /etc/fstab
/dev/hda3
/
ext2
defaults
1
/dev/hda6
/bigdisk
ext2
defaults
1
none
/dev/pts
devpts gid=5,mode=620 0
none
/proc
proc
defaults
0
none
/dev/shm
tmpfs
defaults
0
/dev/hda4
swap
swap
defaults
0
/dev/cdrom
/mnt/cdrom udf,iso9660 noauto,owner,kudzu,ro 0 0
/dev/sda4
/mnt/zip
auto
noauto,owner,kudzu 0 0
1
1
0
0
0
0
Creating a Linux ‘Out of the Box’ Experience on a Sandpoint Platform, Rev. 2
8
Freescale Semiconductor
Obtaining a Linux Kernel Source
[root@ydlG4 root]#
To tell the Linux boot up system to mount partitions /dev/hdb2, /dev/hdb3, and /dev/hdb4, the example file
above would be changed to look like the one below. The line with the hdb6 reference is deleted, and the
hda4, or swap, reference is changed to hda2. The ‘/’ directory reference in the example file is /dev/hda3, but
if it is not /dev/hda3 in the actual fstab file, it needs to be changed to /dev/hda3. All references to other
/dev/hda, /dev/hdb, /dev/hdbc, and /dev/hdbd lines are removed.
[root@ydlG4 root]# cat /etc/fstab
/dev/hda3
/
ext2
defaults
1
/dev/hda4
/mnt/temp
ext2
defaults
none
/dev/pts
devpts gid=5,mode=620 0
none
/proc
proc
defaults
0
none
/dev/shm
tmpfs
defaults
0
/dev/hda2 swap
swap
defaults
/dev/cdrom
/mnt/cdrom udf,iso9660 noauto,owner,kudzu,ro 0 0
[root@ydlG4 root]#
1
1 1
0
0
0
0 0
Note that /dev/hda2, /dev/hda3, and /dev/hda4 are being mounted even though /dev/hdb2, /dev/hdb3, and
/dev/hdb4 are being created. On the host system these partitions have been mounted as the /dev/hdb drive
because the /dev/hdb drive is physically attached as the IDE0 slave. On the Sandpoint system, it is
physically attached to the IDE0 master; thus this drive is /dev/hda on the Sandpoint system.
11. Tar this Linux file system to be placed on /hdb4 for backup so that the root file system hdb3 can be
recovered if it were to somehow be destroyed. This step takes several minutes.
cd
tar czvf motoLinuxFS.tar /edisk
12. Dismount (umount) the /edisk directory with umount /edisk.
13. Mount ext2 partition hdb4 with mount /dev/hdb4 /edisk. Place the tar on hdb4. Other files, such
as the source tar of the kernel, Mlinux.tgz, may also be copied here.
cd
cp motoLinuxFS.tar /edisk
14. Dismount (umount) hdb4 with umount /edisk.
At this point the hard drive has one root file system on it (/dev/hdb3), a partition with a tar of the file system and
possibly other files (/dev/hdb4), and a swap partition (/dev/hdb2). Shut down the running system with shutdown
-h now and remove the hard drive.
Change the hard drive to a master. Connect the hard drive to the Sandpoint on the IDE0 channel.
The root password will be the same as it was on the running Linux system that was used to create this hard drive.
All the other active users from the running Linux system are on this hard drive also.
6
Obtaining a Linux Kernel Source
Public sources of Linux are available on the following web sites:
1. http://www.kernel.org
This site is x86 centric. With the release of Linux kernel 2.6, this site is up to date with PowerPC code and
includes the Sandpoint platform. It is considerably easier to download the kernel source from this site than
from bitkeeper, which is described below in number 3. However, for Linux kernel 2.4, the PowerPC
specification code on bitkeeper was far more up-to-date than on this site; this site may eventually fall behind
bitkeeper again for Linux kernel 2.6. Therefore, it is useful to be familiar with both sites.
Creating a Linux ‘Out of the Box’ Experience on a Sandpoint Platform, Rev. 2
Freescale Semiconductor
9
Building the Kernel
To download the full tar source of the latest b2zip file, locate the most current Linux kernel 2.6 and click on
the ‘F’ link. An example from the site is: ‘The latest stable version of the Linux kernel is: 2.6.3 2004-02-18
04:36 UTC F V VI C Changelog’. Unzip the source with bunzip2 and untar it.
2. http://penguinppc.org
This site supplies information for Debian support and refers other sites for sources.
3. http://www.bitkeeper.com
This is the official site for obtaining the latest PowerPC Linux kernel sources. The sources cannot be
downloaded with a simple download from the web. It is necessary to register with bitkeeper and then
install the bitkeeper executables on the appropriate machine, as well as deal with any proxy servers. This
site has instructions and an example of how to download the latest SCCS directories. As root user, change
/tmp permissions to 777 to install the bitkeeper executables.
For this application note, the bk-3.0.4-powerpc-glibc21-linux.bin file was downloaded from bitkeeper. This
bitkeeper executable can be used only on PowerPC architectures and is being used on a Sandpoint. However, other
executables can be obtained for other architectures. Once bitkeeper is installed, the current PowerPC Linux kernel
directory tree may be cloned (downloaded) using bk clone, which takes the location and the directory name of
the tree as its parameters. An example using the directory name devclone_2_4 and location
http://ppc.bkbits.net/linuxppc_2_4_devel is:
bk clone http://ppc.bkbits.net/linuxppc_2_4_devel devclone_2_4.
This tree is under the source control SCCS. It is not a populated tree because it is stored in SCCS format. It is
necessary to populate this tree, and there are two methods to do this:
1. Check out the tree using the bk -r co <tree name> command. This method is not recommended
because it destroys the SCCS control of the tree. Should the tree be corrupted during development, it would
be impossible to revert to a pristine tree, and the tree would have to be recloned from bitkeeper. An example
of this command using the directory name of devclone_2_4 is bk -r co devclone_2_4.
2. A better method is to export this tree to a new directory, thus preserving the original SCCS tree. The
command is bk export -vw <SCCS tree> <new tree>. This creates a new populated tree at the
new tree location. An example of this command is bk export -vw devclone_2_4 devppc.
Now, development can proceed on this tree, devppc. If it becomes too corrupted and/or polluted it is
possible to revert back to the original SCCS tree and create a new pristine populated tree.
7
Building the Kernel
If a user has been created on Sandpoint, development on the kernel on the Sandpoint can be done following these
steps:
1. Copy the kernel tarball to the home directory with cp /mnt/temp/Mlinux.tgz Mlinux.tgz.
2. Untar the tarball with tar zvxf Mlinux.tgz.
3. Move into the top level of the directory Mlinuxppc_2_4_devel with cd Mlinuxppc_2_4_devel. This is
the Linux 2.4.21-rc1 kernel source.
4. Configuration:
a) Using the supplied 2.4.21-rc1 kernel on the sandpoint hard-drive:
The .config file already exists, so it is okay to ignore this step. However, to change any of the build
parameters or just look at what is configured, type make menuconfig.
Creating a Linux ‘Out of the Box’ Experience on a Sandpoint Platform, Rev. 2
10
Freescale Semiconductor
Building the Kernel
b) Using a 2.6 kernel downloaded from www.kernel.org:
There are special configuration files in ./arch/ppc/configs. The first pass at making a kernel should be
to set up the generic configuration. This is a list of the generic configurations available:
maurie@debian:~/linux-2.6.9.ADS$ cd arch/ppc/configs
maurie@debian:~/linux-2.6.9.ADS/arch/ppc/configs$ ls
FADS_defconfig
bseip_defconfig
lopec_defconfig
rainier_defconfig
IVMS8_defconfig
bubinga_defconfig
mbx_defconfig
redwood5_defconfig
SM850_defconfig
cedar_defconfig
mcpn765_defconfig redwood6_defconfig
SPD823TS_defconfig common_defconfig
menf1_defconfig
redwood_defconfig
TQM823L_defconfig cpci405_defconfig
mvme5100_defconfig rpx8260_defconfig
TQM8260_defconfig ebony_defconfig
oak_defconfig
rpxcllf_defconfig
TQM850L_defconfig ep405_defconfig
ocotea_defconfig rpxlite_defconfig
TQM860L_defconfig est8260_defconfig
pcore_defconfig
sandpoint_defconfig
adir_defconfig
ev64260_defconfig
pmac_defconfig
spruce_defconfig
ads8272_defconfig gemini_defconfig
power3_defconfig sycamore_defconfig
apus_defconfig
ibmchrp_defconfig
pplus_defconfig
walnut_defconfig
ash_defconfig
k2_defconfig
prpmc750_defconfig
beech_defconfig
lite5200_defconfig prpmc800_defconfig
maurie@debian:~/linux-2.6.9.ADS/arch/ppc/configs$
For example, to build a generic sandpoint configuration:
make sandpoint_defconfig
make zImage
Then to choose specific configuration options:
make menuconfig
make zImage
For example, to build a generic ads8272 configuration:
make ads8272_defconfig
make zImage
5. Ensure that the following options are chosen:
Platform support: Motorola Sandpoint
General setup: Initial Kernel Command String: 'root=/dev/hda3'
Network device support: Ethernet (10 or 100Mbit) ---> :RealTek RTL-8139 PCI Fast
Ethernet Adapter support
Character devices: /dev/nvram support TURNED OFF
6. Build the dependency list, and create the .depend file with make dep. This step is not necessary for the
Linux kernel 2.6.
7. Modify the memory size. The Linux kernel as released specifies that 64 Mbytes is the maximum memory
size. Sandpoint, however, has 128 Mbytes, and the kernel will not work correctly unless it specifies all 128
Mbytes.
– For the 2.4 kernel, modify arch/ppc/platforms/sandpoint_setup.c near line 430.
– For the 2.6 kernel, modify arch/ppc/platforms/sandpoint.c near line 486.
In both cases, in the function ‘sandpoint_find_end_of_memory,’ change the line
‘return 64*1024*1024;’ to ‘return 128*1024*1024;’.
8. Build the kernel with make zImage.
Creating a Linux ‘Out of the Box’ Experience on a Sandpoint Platform, Rev. 2
Freescale Semiconductor
11
Building the Kernel
9. As root, copy the kernel elf file to the hda1 partition of the hard drive using the Linux dd command. It is
assumed that the current directory is in the top level of the Linux source tree. This will change the
/dev/hda1 partition from an ext2 partition to a binary partition. Linux will no longer be able to read or write
to this partition except with the dd command. This does not cause a problem with running Linux since the
Sandpoint Linux is configured using /dev/hda3 as the root file system.
a) Type dd if=./arch/ppc/boot/images/zImage.sandpoint of=/dev/hda1.
NOTE
Be sure to verify that the location used is ‘of=/dev/hda1’. If the location is mistyped
as ‘of=/dev/hda,’ all the partitions on the drive are destroyed, and that location is
no longer usable as a root partition. The drive would need to be recreated by
untarring the root file system created in Section 5 or the three tar files supplied on
the CD (see Section 13.2, “Ordering the Data CD Only”).
To copy the kernel elf file to the hda1 partition before building a kernel, use the kernel elf file on
/dev/hda4 as shown in the following example. Log in as root.
cd /
mkdir /edisk
mount /dev/hda4 /edisk
dd if=/edisk/zImage.sandpoint of=/dev/hda1
If two hard drives reside on the machine, the image can be copied to either of the hard drives. However,
Linux will not be able to use a partition that is written to a binary partition. To copy the Linux kernel elf
file to partition 1 on the second hard drive, use the following Linux command, being careful not to
mistype ‘/dev/hdb’ in place of ‘/dev/hdb1’:
dd if=/arch/ppc/boot/images/zImage.sandpoint of=/dev/hdb1
b) Shut down the system with the shutdown -h now command.
c) Boot into DINK32.
d) Before copying the zImage.sandpoint elf file from the hda1 partition of the hard drive to Sandpoint
memory at address 0x800000, read the following hardware considerations for DINK32 carefully:
1. One hard drive (master on end of IDE cable)
a) Jumper the root file system hard drive as master.
b) Connect the master to the far position on the IDE cable, that is, the end of the cable.
2. Two hard drives (master on middle of IDE cable)
a) Jumper the root file system hard drive as master.
b) Connect it to the middle position on the IDE cable.
c) Jumper the second hard drive as slave.
d) Connect the slave to the far position on the IDE cable.
The position of the hard drive on the IDE cable is different for one drive versus two for DINK32. This
is only important for DINK32, as Linux does not care how the drives are configured on the IDE cable.
The following DINK32 commands copy elf file to the Sandpoint memory at address 0x800000:
di -i
di -d 0 (numeric zero)
di -r 3f -a 800000 -l 1700000
di -i initializes the DINK32 hard drive tables. This does not change anything on the hard drives. It
may be necessary to do this two or three times for DINK32 to recognize the drives. di -d 0 (numeric
zero) selects the master IDE0 drive. To select the slave, use di -d 1. In di -r 3f -a 800000
-l 1700000, 3f is the hex address of the logical block address (LBA) of the hard drive, 800000 has
Creating a Linux ‘Out of the Box’ Experience on a Sandpoint Platform, Rev. 2
12
Freescale Semiconductor
Flashing the Kernel to Flash Memory
five zeros and is a hex number indicating the hex address in memory, and 1700000 has five zeros and
is a decimal number indicating the length of the file.
NOTE
The di -r read command reads the hard drive in blocks of 512 (0x200) bytes.
/dev/hda1 begins at byte address 0x7E00, so 0x7E00/0x200 is block 0x3F.
However this is true only under the assumption that the hard drive being used was
supplied with the Linux pre-configured system, ordered from Freescale, or built
using this application note. These addresses may differ on a hard drive with a
different arrangement of partitions on the hard drive.
The Linux kernel elf file is now located at address 0x800000. It has a header 10000 bytes long. Linux
can be started by jumping to address 0x810000, the first executable instruction following the header,
with the command, go 810000. Linux will boot from the root file system on /dev/hda3. The following
is an example:
DINK32[MPC7457] {1} >>di -i
Disk scan...
A: 3967 MB, ST310210A
B: no drive detected.
C: no drive detected.
D: no drive detected.
DINK32[MPC7457] {2} >>di -d 0
DINK32[MPC7457] {3} >>di -r 3f -a 800000 -l 1400000
DINK32[MPC7457] {4} >>go 810000
Loaded at: 00810000 009221D8
Relocated to: 00800000 009121D8
zimage at: 00805907 0090E874
Available RAM: 00400000 00800000
Linux/PPC load: root=/dev/hda3
Uncompressing Linux...done.
Now booting the kernel
Memory BAT mapping: BAT2=128Mb, BAT3=0Mb, residual: 0Mb
10. This step is an alternative to step 9. The kernel should be in the ./arch/ppc/boot/images directory. Copy it to
another machine to be copied to RAM on reboot of the Sandpoint. See Section 8, “Flashing the Kernel to
Flash Memory”. Another option is to turn on the mtd flash devices, copy the kernel to the flash device on
the Sandpoint, and reboot from flash. (This is a risky operation because the working kernel may be
destroyed. All is not lost however because the working kernel can always be recopied to flash from
DINK32.)
8
Flashing the Kernel to Flash Memory
The kernel can be found at ./arch/ppc/boot/images after it is built. The elf file is named zImage.sandpoint. It is
necessary to download this image into the Sandpoint at RAM address 0x800000. To create an 'out of the box'
experience on Sandpoint, copy the kernel to flash.
Creating a Linux ‘Out of the Box’ Experience on a Sandpoint Platform, Rev. 2
Freescale Semiconductor
13
Flashing the Kernel to Flash Memory
NOTE
Usually the kernel is only copied to flash when few changes are expected in the
near future. Do not copy this kernel to flash during development. Keep a working
kernel in flash so that Linux can be rebooted. Thus, during development follow
only the directions for copying the kernel to RAM and booting Linux.
Copying the kernel to RAM, copying it to flash, and then booting Linux are three separate activities, as described
below:
1. Copy the kernel image to RAM. Sandpoint running DINK32 offers the following three methods for
downloading files to RAM:
a) Serial download of srecord files. The dl -k command can download files from the serial port. Use
the terminal emulator to send the file in plain ASCII.
b) Serial download of binary files using dl -b -o <load address>. Use the terminal emulator to
send the file in binary.
c) Ethernet download of the elf binary file using dl -nw -b -o <load address>
-f<filename>. However, before running this command, set up the DINK32 Ethernet definitions
using the following procedure:
1) Initialize the Ethernet definitions by using the ni -i command. Choose 1 for device number.
Choose n for Enable DHCP. Fill in the appropriate IP addresses for the network. The server is the
machine that is holding the zImage.sandpoint elf file. The gateway is the network gateway. The
netmask is the appropriate gateway mask, the DHCP server is all zeros, and the client is the IP address
assigned to this Sandpoint. See Section 3, “Quick Start for a Pre-Configured Linux System on
Sandpoint”. An example is shown below. Start DINK32 in Sandpoint.
DINK32[MPC8245] {2} >>ni -i
NUMBER
SLOT
MFG
DEV
NAME
1
15
10EC 8139
Realtek 81x9 Ethernet Card
Use device #1
Enable DHCP [y/N] ? n
SERVER(TFTP) : [10. 82.116.129] :
GATEWAY
: [10. 82.119.254] :
NETMASK
: [255.255.252. 0] :
DHCP SERVER : [0. 0. 0. 0] :
CLIENT(DINK) : [10. 82.117.201] :
DINK32[MPC8245] {3} >>
Creating a Linux ‘Out of the Box’ Experience on a Sandpoint Platform, Rev. 2
14
Freescale Semiconductor
Turning on Linux
2) Prepare the server. Copy zImage.sandpoint to the /tftpboot directory on the server. Create the
directory if it does not already exist and copy the kernel boot file on the server.
cd /
mkdir tftpboot
cd tftpboot
cp /home/<your home directory/<top level linux>/
arch/ppc/boot/images/zImage.sandpoint zImage.sandpoint
3) Using DINK32, tftp the boot file to the Sandpoint using the DINK32 download command in step 2
below.
2. Copy the kernel elf file to RAM with the download command for Ethernet download, dl -nw. An
example is shown below:
DINK32[MPC8245] {2} >>dl -nw -b -o800000 -fzImage.sandpoint
Filename = zImage.sandpoint
File format = Plain binary
Offset = 0x00800000
Received 1763 TFTP data blocks.
Successfully read 902601 bytes via TFTP at 1272470 bytes/sec
3. Start the Linux kernel. See Section 9, “Turning on Linux,” or copy the image to flash using the DINK32
command, fu -l <RAM address> <flash address> size. However, before doing this,
ensure the PMPC switches are set correctly. Refer to Section 15, “References,” number 2 or 3 depending
on the processor installed in the Sandpoint. Set the following switches:
ROMLOC = Boot from Sandpoint PCI flash
MAPSEL = Map B
PMCTYPE = VITA
Agent = Host
PROGMODE = Swap local flash to program
ROMSEL = Standard flash
M66N = 33 MHz PCI only
SYSRST = COP reset entire system
Copy zImage.sandpoint from RAM address 800000 to flash address FF000000. Copy zImage.sandpoint
from 800000 to flash at FF00000 for 2 Mbytes. As long as the Linux image is less than 2 Mbytes, copy
2 Mbytes, that is, 0x200000. Do not use the -o parameter. The absence of -o forces a flash erase before the
copy, which is exactly what is needed.
An example is shown below:
DINK32[MPC8245] {4} >>fu -l 800000 FF000000 200000
PPMC Local Flash Programmer
Are you sure? y
Check flash type: AMD Am29DL323CB
Overwrite flash : OK.
Program flash
: OK.
Verifying flash : OK.
DINK32[MPC8245] {5} >>
9
Turning on Linux
Finally, it is time to start Linux. At this point, DINK32 is still running on Sandpoint, regardless of whether the kernel
has just been flashed to flash memory or Sandpoint was just powered up.
1. If zImage.sandpoint was copied to flash, the command to start Linux is go FF010000. If
zImage.sandpoint was not copied to flash but was copied to RAM, type go 810000.
Creating a Linux ‘Out of the Box’ Experience on a Sandpoint Platform, Rev. 2
Freescale Semiconductor
15
Turning on Linux
2. It is possible to ignore step 1 completely by making DINK32 automatically start Linux. While this method
is superior to the step 1 for those who wish to ignore DINK32, it makes it a little more difficult to test out
new Linux kernels. Since there is no LILO, it is necessary to use DINK32 to boot a new kernel. However,
this method works for those who desire a true 'out of the box' Linux with no visual support from DINK32.
At the DINK32 prompt, perform the env BOOT=0xFF010000 command. Once this command is set in
DINK32, future boots will boot into Linux automatically, and step 1 will not be needed. To boot into
DINK32 instead of Linux, hold down the backspace key during boot. This is similar to forcing a PC to
boot only into the firmware.
3. If the kernel is on the hard drive, use the technique described in step 8, part d, of Section 7.
Upon examination, zImage.sandpoint is a boot loader wrapper around the Linux kernel, zmlinux. It is an elf file that
was downloaded to RAM at address 800000, or to flash at FF000000. As mentioned earlier, elf files have a
10000-byte header. The first executable instruction follows the header. Thus, execution should begin at either
810000 for RAM, or FF010000 for flash.
Once the boot loader at this start address begins, it queries the user to change any boot parameters, decompress the
kernel, and jump to the kernel. The kernel initializes all the board facilities, looks for the root file system specified
on the boot parameter, and finally, on successful completion, starts a login shell.
An example of this boot loader startup sequence is shown below:
DINK32[MPC8245] {1} >>go FF010000
loaded at:
FF010000 FF1221D8
relocated to:
00800000 009121D8
zimage at:
00805907 0090E874
avail RAM:
00400000 00800000
Linux/PPC load: root=/dev/hda3
Uncompressing Linux...done.
Now booting the kernel
When the boot loader displays the line ‘Linux/PPC load: root=/dev/hda3,’ press any key within five seconds to stop
the autoboot sequence. At this point, add more parameters or backspace over the parameter shown and change it. In
the case of this kernel and this configuration, the root file system is found on /dev/hda3.
A Linux example startup is shown below. This typical splash screen that DINK32 displays is followed by the
kernel’s display on the serial terminal.
I/O system initialized...
Memory Enabled: [ 128MB at CL=3 ]
Caches Enabled: [ L1I(16K), L1D(16K) ]
Register Inits: [ 32 GPRs, 32 FPRs, 222 SPRs ]
Creating a Linux ‘Out of the Box’ Experience on a Sandpoint Platform, Rev. 2
16
Freescale Semiconductor
Turning on Linux
##
##
##
##
##
##
##
#######
##
##
#######
##
##
##
##
##
##
##
##
##
##
##
##
##
######
##
##
##
##
##
##
##
##
##
##
######
##
##
##
Version : 13.1.1, Metaware Build
Released : May 13, 2003 Built on May 13 2003 13:09:37
Written by : Freescale's RISC Applications Group, Austin, TX
System : Sandpoint X3 with Unity (MPMC8245)
Processor : MPC8245 V1.1 @ 400 MHz, 133 MHz memory
Memory : Map B (CHRP) 128MB at CL=3
Copyright Freescale Inc. 1993-2003
Refer to `history.c' for release info, changes, errata and fixes.
DINK32[MPC8245] {1} >>go FF010000
loaded at:
FF010000 FF1221D8
relocated to:
00800000 009121D8
zimage at:
00805907 0090E874
avail RAM:
00400000 00800000
Linux/PPC load: root=/dev/hda3
Uncompressing Linux...done.
Now booting the kernel
Memory BAT mapping: BAT2=128Mb, BAT3=0Mb, residual: 0Mb
Linux version 2.4.21-rc1 ([email protected]) (gcc version 3.3) #97 Mo
n Jul 14 09:29:31 EDT 2003
Freescale SPS Sandpoint Test Platform
Port by MontaVista Software, Inc. ([email protected])
On node 0 totalpages: 32768
Creating a Linux ‘Out of the Box’ Experience on a Sandpoint Platform, Rev. 2
Freescale Semiconductor
17
Turning on Linux
zone(0): 32768 pages.
zone(1): 0 pages.
zone(2): 0 pages.
Kernel command line: root=/dev/hda3
OpenPIC Version 1.2 (1 CPUs and 11 IRQ sources) at fdfd0000
OpenPIC timer frequency is 133.000000 MHz
time_init: decrementer frequency = 33.002376 MHz
Calibrating delay loop... 263.78 BogoMIPS
Memory: 127064k available (1676k kernel code, 700k data, 80k init, 0k highmem)
Dentry cache hash table entries: 16384 (order: 5, 131072 bytes)
Inode cache hash table entries: 8192 (order: 4, 65536 bytes)
Mount cache hash table entries: 512 (order: 0, 4096 bytes)
Buffer-cache hash table entries: 8192 (order: 3, 32768 bytes)
Page-cache hash table entries: 32768 (order: 5, 131072 bytes)
POSIX conformance testing by UNIFIX
PCI: Probing PCI hardware
Linux NET4.0 for Linux 2.4
Based upon Swansea University Computer Society NET3.039
Initializing RT netlink socket
Starting kswapd
devfs: v1.12c (20020818) Richard Gooch ([email protected])
devfs: boot_options: 0x0
Installing knfsd (copyright (C) 1996 [email protected]).
initialize_kbd: Keyboard reset failed, no ACK
Detected PS/2 Mouse Port.
pty: 256 Unix98 ptys configured
keyboard: Timeout - AT keyboard not present?(ed)
keyboard: Timeout - AT keyboard not present?(f4)
Serial driver version 5.05c (2001-07-08) with MANY_PORTS SHARE_IRQ SERIAL_PCI enabled
ttyS00 at 0xfe0003f8 (irq = 4) is a 16550A
RAMDISK driver initialized: 16 RAM disks of 4096K size 1024 blocksize
loop: loaded (max 8 devices)
pcnet32.c:v1.27a 10.02.2002 [email protected]
PPP generic driver version 2.4.2
PPP Deflate Compression module registered
Creating a Linux ‘Out of the Box’ Experience on a Sandpoint Platform, Rev. 2
18
Freescale Semiconductor
Turning on Linux
8139too Fast Ethernet driver 0.9.26
eth0: RealTek RTL8139 Fast Ethernet at 0xc9000f00, 00:40:f4:79:72:73, IRQ 19
Uniform Multi-Platform E-IDE driver Revision: 7.00beta-2.4
ide: Assuming 33MHz system bus speed for PIO modes; override with idebus=xx
W82C105: IDE controller at PCI slot 00:0b.1
W82C105: chipset revision 5
W82C105: 100% native mode on irq 16
ide0: BM-DMA at 0xBFFFD0-0xBFFFD7, BIOS settings: hda:DMA, hdb:DMA
ide1: BM-DMA at 0xBFFFD8-0xBFFFDF, BIOS settings: hdc:DMA, hdd:DMA
Probing IDE interface ide0...
hda: WDC WD400BB-00CAA1, ATA DISK drive
hda: selected PIO 4 (120ns) (0240)
Probing IDE interface ide1...
ide1: Wait for ready failed before probe !
ide0 at 0xBFFFF8-0xBFFFFF,0xBFFFF6 on irq 14
hda: attached ide-disk driver.
hda: host protected area => 1
hda: 78165360 sectors (40021 MB) w/2048KiB Cache, CHS=77545/16/63
ide-floppy driver 0.99.newide
Partition check:
/dev/ide/host0/bus0/target0/lun0: p1 p2 p3 p4
ide-floppy driver 0.99.newide
SCSI subsystem driver Revision: 1.00
scsi0 : SCSI host adapter emulation for IDE ATAPI devices
usb.c: registered new driver usbdevfs
usb.c: registered new driver hub
usb.c: registered new driver hid
hid-core.c: v1.8.1 Andreas Gal, Vojtech Pavlik <[email protected]>
hid-core.c: USB HID support drivers
mice: PS/2 mouse device common for all mice
NET4: Linux TCP/IP 1.0 for NET4.0
IP Protocols: ICMP, UDP, TCP, IGMP
IP: routing cache hash table of 1024 buckets, 8Kbytes
TCP: Hash tables configured (established 8192 bind 16384)
NET4: Unix domain sockets 1.0/SMP for Linux NET4.0.
Creating a Linux ‘Out of the Box’ Experience on a Sandpoint Platform, Rev. 2
Freescale Semiconductor
19
Turning on Linux
VFS: Mounted root (ext2 filesystem) readonly.
Freeing unused kernel memory: 80k init
INIT: version 2.84 booting
Welcome to Yellow Dog Linux
Press 'I' to enter interactive startup.
Mounting proc filesystem:
[
OK
Configuring kernel parameters:
]
Setting clock
[
OK
]
(localtime): Sun Jul 13 10:49:36 EDT 2003 [
Setting hostname localhost.localdomain:
Mounting USB filesystem:
[
OK
[
OK
OK
]
]
]
Checking root filesystem
/dev/hda3: clean, 131027/1261568 files, 698483/2520756 blocks
[/sbin/fsck.ext2 (1) -- /] fsck.ext2 -a /dev/hda3
[
OK
]
Remounting root filesystem in read-write mode:
Activating swap partitions:
[
OK
]
swapon: /dev/hda4: Invalid argument
[FAILED]
Finding module dependencies:
depmod: Can't open /lib/modules/2.4.21-rc1/modules
.dep for writing
[FAILED]
Checking filesystems
Checking all file systems.
[
OK
]
Mounting local filesystems:
[
OK
Enabling local filesystem quotas:
]
[
OK
]
swapon: /dev/hda4: Invalid argument
Enabling swap space:
[
OK
]
modprobe: Can't open dependencies file /lib/modules/2.4.21-rc1/modules.dep (No such file
or directory)
INIT: Entering runlevel: 3
Entering non-interactive startup
Setting network parameters:
[
Bringing up loopback interface:
OK
]
[
OK
]
Bringing up interface eth0:
Determining IP information for eth0... failed.
[FAILED]
Creating a Linux ‘Out of the Box’ Experience on a Sandpoint Platform, Rev. 2
20
Freescale Semiconductor
Turning on Linux
Starting system logger: [
OK
]
Starting kernel logger: [
OK
]
Starting portmapper: [
Starting NFS statd: [
Starting keytable:
OK
OK
]
]
Loading keymap: [FAILED]
Loading system font: /etc/rc3.d/S17keytable: line 33: /dev/tty0: No such device
Couldnt get a file descriptor referring to the console
[
OK
]
[FAILED]
Mounting other filesystems:
[
OK
]
Starting automount: No Mountpoints Defined[
Starting sshd:
[
OK
Starting xinetd: [
OK
OK
]
]
]
Starting vsftpd for vsftpd: [
Starting xfs: [
OK
OK
]
]
Yellow Dog Linux release 3.0 (Sirius)
Kernel 2.4.21-rc1 on an ppc
This root file system is built from an existing Yellow Dog Linux system. The full Yellow Dog boxed set of CDs is
included in the purchased Linux Sandpoint. See Section 13, “Purchasing the Complete Linux System on a
Sandpoint.” If this system was not purchased and built according to these instructions, purchase the Yellow Dog
boxed set if any features beyond what was installed on this system are needed. Usually nothing else is needed to
build and develop Linux kernels and application code. See Section 10, “Developing Linux on Sandpoint.”
The following is an example of logging in and performing some commands, in this case switching to the root user
and displaying the Ethernet information. Note that an IP address has not been assigned.
localhost.localdomain login: guest
Password:
Last login: Sun Jul 13 10:44:15 on ttyS0
[guest@localhost maurie]$ su Password:
[root@localhost root]# ifconfig
eth0
Link encap:Ethernet
HWaddr 00:40:F4:79:72:73
UP BROADCAST RUNNING MULTICAST
MTU:1500
Metric:1
RX packets:60 errors:0 dropped:0 overruns:0 frame:0
TX packets:0 errors:0 dropped:0 overruns:0 carrier:0
collisions:0 txqueuelen:100
Creating a Linux ‘Out of the Box’ Experience on a Sandpoint Platform, Rev. 2
Freescale Semiconductor
21
Developing Linux on Sandpoint
RX bytes:4518 (4.4 Kb)
TX bytes:0 (0.0 b)
Interrupt:19 Base address:0xf00
lo
Link encap:Local Loopback
inet addr:127.0.0.1
Mask:255.0.0.0
UP LOOPBACK RUNNING
MTU:16436
Metric:1
RX packets:8 errors:0 dropped:0 overruns:0 frame:0
TX packets:8 errors:0 dropped:0 overruns:0 carrier:0
collisions:0 txqueuelen:0
RX bytes:560 (560.0 b)
TX bytes:560 (560.0 b)
[root@localhost root]#
10 Developing Linux on Sandpoint
The Sandpoint system with Linux is a complete Linux system that includes the gcc compiler tools, libraries, and
standard set of bash shell and Linux commands. The supplied CD has a tarball of the Linux kernel. The tarball is
also on the hard drive in /dev/hdb4. It may be copied to the home directory, untarred, and rebuilt after changes have
been made.
For any other packages that are not already installed on this hard drive, connect a CDROM, insert the appropriate
Yellow Dog Linux CD from the boxed set, and use RPM to install the desired package to the Sandpoint Linux.
11 Special Considerations for PowerPC Microprocessors
Supported on Sandpoint
11.1 Required Settings for the MPC8245
On the MPC8245, Linux has been tested at 400 MHz, 133-MHz memory. The PMC switches must be set from
position 1 to position 8 with the following settings (0 = Switch is set to ON, 1 = Switch is set to OFF):
•
•
SW2 = 01111111
SW3 = 10011110
11.2 Required Settings for the MPC745x
On the MPC745x, Linux has been tested at 1000 MHz, 100-MHz memory. The PMC switches must be set from
position 1 to position 8 with the following settings (0 = Switch is set to ON, 1 = Switch is set to OFF):
•
•
•
SW1 = 01111110
SW2 = 10101000
SW3 = 10001001
Other combinations may not uncompress.
Creating a Linux ‘Out of the Box’ Experience on a Sandpoint Platform, Rev. 2
22
Freescale Semiconductor
Network Controls for Linux
It may be necessary to configure the I2C on the PMC for a single bank of 128-Mbyte memory. To do so, run the
following commands after booting DINK32 and before starting Linux:
DINK32[MPC7457] {3} >>mi -b -w128
wsize = 128, i2c_data[31] = 32
writing I2C@127
mi -b -w128
DINK32[MPC7457] {5} >>dm i2c -a 50 3
0x03 : 0x0c : ? d
0x04 : 0x09 : ? X
Set the DINK32 environment as follows:
DINK32[MPC7457] {3} >>env -c
DINK32[MPC7457] {4} >>env L2CACHE = 0
DINK32 [MPC7457] {5} >>env L3CACHE = 0
Reboot and start Linux.
11.3 Considerations for all PowerPC Microprocessors Supported
on Sandpoint
If Linux starts automatically, it can be stopped and booted into DINK32 by holding the backspace key down during
boot. If this fails, quickly typing random characters on the keyboard also works.
The network name is currently SPlinux. This name can be modified by changing the /etc/sysconfig/network file.
12 Network Controls for Linux
12.1 Examples of Network Actions and Shutdown
The version of Linux using this root file system on the hard drive should automatically get an IP address from a
DHCP server because the /etc/systemconfig/network-scripts/ifcfg-eth0 file requests a DHCP. (Refer to Section 12.3,
“DHCP Network Configuration.”) If it fails, a hard IP address and hard route can be assigned.
1. The following example shows the DHCP failing and the user assigning a hard IP address. Before using it,
ensure that the IP address to be used is not assigned by doing a ping of the address and verifying that it is
unassigned. This can be done on any running Windows, Unix, Linux, or Mac system. The example uses the
IP address, 10.82.124.201.
Determining IP information for eth0... failed.
[root@localhost network-scripts]# man ifup
[root@localhost network-scripts]# ifconfig eth0
eth0
Link encap:Ethernet
HWaddr 00:40:F4:79:72:73
UP BROADCAST RUNNING MULTICAST
MTU:1500
Metric:1
RX packets:4110 errors:0 dropped:0 overruns:0 frame:0
TX packets:19 errors:0 dropped:0 overruns:0 carrier:0
collisions:0 txqueuelen:100
Creating a Linux ‘Out of the Box’ Experience on a Sandpoint Platform, Rev. 2
Freescale Semiconductor
23
Network Controls for Linux
RX bytes:349635 (341.4 Kb)
TX bytes:1310 (1.2 Kb)
Interrupt:19 Base address:0xf00
[root@localhost
network-scripts]# ifconfig eth0 10.82.124.201 netmask 255.255.252.0
[root@localhost network-scripts]# ifconfig eth0
eth0
Link encap:Ethernet
HWaddr 00:40:F4:79:72:73
inet addr:10.82.124.201
Bcast:10.255.255.255 Mask:255.255.252.0
UP BROADCAST RUNNING MULTICAST
MTU:1500
Metric:1
RX packets:4219 errors:0 dropped:0 overruns:0 frame:0
TX packets:19 errors:0 dropped:0 overruns:0 carrier:0
collisions:0 txqueuelen:100
RX bytes:360757 (352.3 Kb)
TX bytes:1310 (1.2 Kb)
Interrupt:19 Base address:0xf00
The above command, ifconfig, only sets up an IP address, so pinging only works within this subnet.
[root@localhost network-scripts]# ping 10.82.124.155
PING 10.82.124.155 (10.82.124.155) from 10.82.124.201 : 56(84) bytes of data.
64 bytes from 10.82.124.155: icmp_seq=1 ttl=128 time=0.433 ms
64 bytes from 10.82.124.155: icmp_seq=2 ttl=128 time=0.265 ms
64 bytes from 10.82.124.155: icmp_seq=3 ttl=128 time=0.254 ms
--- 10.82.124.155 ping statistics --3 packets transmitted, 3 received, 0% loss, time 1998ms
rtt min/avg/max/mdev = 0.254/0.317/0.433/0.083 ms
[root@localhost network-scripts]# route add -net 0.0.0.0/0 gw 10.82.127.254
[root@localhost network-scripts]# ping 10.82.116.129
PING 10.82.116.129 (10.82.116.129) from 10.82.124.201 : 56(84) bytes of data.
64 bytes from 10.82.116.129: icmp_seq=2 ttl=63 time=0.210 ms
64 bytes from 10.82.116.129: icmp_seq=3 ttl=63 time=0.212 ms
64 bytes from 10.82.116.129: icmp_seq=4 ttl=63 time=0.204 ms
The command route allows the users to ping between subnets, and, as the next example shows, telnet
to another subnet.
--- 10.82.116.129 ping statistics --4 packets transmitted, 3 received, 25% loss, time 3013ms
rtt min/avg/max/mdev = 0.204/0.208/0.212/0.017 ms
Creating a Linux ‘Out of the Box’ Experience on a Sandpoint Platform, Rev. 2
24
Freescale Semiconductor
Network Controls for Linux
2. This is an example of a telnet session from the Sandpoint.
[root@localhost network-scripts]# telnet 10.82.116.129
Trying 10.82.116.129...
Connected to 10.82.116.129.
Escape character is '^]'.
Yellow Dog Linux release 3.0 (Sirius)
Kernel \r on an \m
login: maurie
Password:
Last login: Mon Jul 14 08:58:11 from 10.82.124.155
[maurie@localhost maurie]$ ls
ifconfig.man
MakeHardDriveFS
olddisk1
zImage.sandpoint_15
linuxwork
my.inittab
olddisk2
zImage.sandpoint_8245_16
[maurie@localhost maurie]$ exit
logout
Connection closed by foreign host.
[root@localhost network-scripts]# exit
logout
3. This is an example of ftping a zImage.sandpoint elf file.
[maurie@localhost maurie]$ ftp 10.82.116.129
Connected to 10.82.116.129 (10.82.116.129).
220 (vsFTPd 1.1.3)
Name (10.82.116.129:maurie):
331 Please specify the password.
Password:
230 Login successful. Have fun.
Remote system type is UNIX.
Using binary mode to transfer files.
ftp> get zImage.sandpoint_8245_16
local: zImage.sandpoint_8245_16 remote: zImage.sandpoint_8245_16
227 Entering Passive Mode (10,82,116,129,106,223)
150 Opening BINARY mode data connection for zImage.sandpoint_8245_16 (1181380 bytes).
226 File send OK.
1181380 bytes received in 0.1 secs (1.1e+04 Kbytes/sec)
ftp> quit
221 Goodbye.
[maurie@localhost maurie]$ ls
Creating a Linux ‘Out of the Box’ Experience on a Sandpoint Platform, Rev. 2
Freescale Semiconductor
25
Network Controls for Linux
buildRootFS
j
olddisk1
olddisk2
zImage.sandpoint_8245_16
4. This is an example of a proper shutdown sequence.
[maurie@localhost maurie]$ su Password:
[root@localhost root]# shutdown -h now
INIT: Shutting down xfs: [
Stopping sshd:[
OK
OK
]
]
Shutting down vsftpd: [
Stopping xinetd: [
OK
OK
Stopping NFS statd: [
]
]
OK
Stopping portmapper: [
]
OK
]
Shutting down kernel logger: [
OK
]
Shutting down system logger: [
OK
]
Shutting down interface eth0:
[
Shutting down loopback interface:
Starting killall:
[
OK
OK
]
[
OK
]
]
Sending all processes the TERM signal...
Sending all processes the KILL signal...
Syncing hardware clock to system time
Turning off quotas:
Halting system...
flushing ide devices: hda
Power down.
12.2 Static Network Configuration
The root user can also set up two working files in the system file system for automatic assignment of static networks.
The system as shipped is set for DHCP networks. (See Section 12.3, “DHCP Network Configuration.”) To change
to a static network, change the following two files. Note that all Ethernet addresses are given here just as an example;
choose the correct Ethernet addresses for the site.
file: /etc/sysconfig/network
NETWORKING=yes
HOSTNAME=SPlinux.sps.mot.com
GATEWAY=10.82.119.254
Creating a Linux ‘Out of the Box’ Experience on a Sandpoint Platform, Rev. 2
26
Freescale Semiconductor
Purchasing the Complete Linux System on a Sandpoint
file: /etc/sysconfig/network-scripts/ifcfg-eth0
DEVICE=eth0
BOOTPROTO=static
BROADCAST=10.82.119.255
IPADDR=10.82.117.240
NETMASK=255.255.252.0
NETWORK=10.82.116.0
ONBOOT=yes
Once these files are created, use the following macros to start the network.
ifdown eth0
ifup eth0
In the future, whenever Linux is booted, the network will come up with these static addresses.
12.3 DHCP Network Configuration
For a DHCP system, the two files in Section 12.2, “Static Network Configuration,” are changed as shown below.
Notice that the /etc/sysconfig/network-scripts/ifcfg-eth0 file requests a DHCP.
file: /etc/sysconfig/network
NETWORKING=yes
HOSTNAME=SPlinux.sps.mot.com
file: /etc/sysconfig/network-scripts/ifcfg-eth0
DEVICE=eth0
BOOTPROTO=dhcp
ONBOOT=yes
13 Purchasing the Complete Linux System on a Sandpoint
13.1 Ordering the Pre-Configured Linux Sandpoint
The pre-configured Linux Sandpoint includes Sandpoint, a processor, a hard drive, and a data CD that contains the
following items:
•
•
•
•
Three tar files of the Linux file system from the hard drive
Linux kernel 2.4.21-rc1 elf file
Linux kernel 2.4.21-rc1 tar of the source
This application note (PDF)
Creating a Linux ‘Out of the Box’ Experience on a Sandpoint Platform, Rev. 2
Freescale Semiconductor
27
Conclusion
The following packages can be ordered from the Freescale web:
•
•
MPC8245 system - PPC DEV-SP3-8245
MPC7457 system - PPC DEV-SP3-7457
13.2 Ordering the Data CD Only
Order the data CD from the DINK32 website.
14 Conclusion
This application note has presented all the information needed to collect and build a running Linux system on a
Sandpoint or purchase a complete Linux on a Sandpoint system.
Linux is a large and complex operating system consisting of over 4 million lines of code, 8000 C and assembly files,
and 530 subdirectories. This application note describes only the very basics to building a Linux system. Many books
(see Section 15, “References,” number 5) and how-to papers (on www.kernel.org and other internet sites) are
available.
•
•
For assistance or answers to any questions on the information that is presented in this document, send an
email to [email protected].
For more detailed questions about Linux, see the following two email lists that are not affiliated with
Freescale. They are informally maintained by Linux developers all over the world.
– [email protected]
– [email protected]
15 References
1.
2.
3.
4.
5.
6.
SPX3BUM/D Sandpoint Microprocessor Evaluation System User’s Manual
Unity X4 (MPMC8240/MPMC8245) Configuration Guide
Valis X3(MPMC745x) Configuration Guide
DINK32 User’s Manual
Samba in Linux on a Sandpoint (AN2646)
Understanding the Linux Kernel, Daniel P. Bovet and Marco Cesati, available from O’Reilly Publishing
The first five references are available on the Freescale web site: http://www.Freescale.com.
For more information contact [email protected].
Creating a Linux ‘Out of the Box’ Experience on a Sandpoint Platform, Rev. 2
28
Freescale Semiconductor
Document Revision History
16 Document Revision History
Table 2 provides a revision history for this application note.
Table 2. Document Revision History
Revision Number
Release Date
Change(s)
1.3
12/2004
In Section 7, “Building the Kernel,” modified Step 4 to include 2.6 kernel
configuration.
1.2
10/2004
Updated template and references to “Freescale.”
1.1
3/2004
Changed step 3 of Section 8 to copy 2 Mbytes instead of 1.5 Mbytes.
1
3/2004
Added info on bitkeeper download, corrected kernel directory tree path, added
Table 1 in Section 5, step 3, updated and reorganized Section 5, updated
Section 6 source 1, added Section 12.3, included kernel 2.6 info.
0.2
12/2003
Renamed Section 12, renumbered Section 12 to 12.1, added Section 12.2.
0.1
9/2003
Added step 9 in Section 7 and reference to step 9 in Section 9.
0
9/2003
Initial release.
Creating a Linux ‘Out of the Box’ Experience on a Sandpoint Platform, Rev. 2
Freescale Semiconductor
29
Document Revision History
THIS PAGE INTENTIONALLY LEFT BLANK
Creating a Linux ‘Out of the Box’ Experience on a Sandpoint Platform, Rev. 2
30
Freescale Semiconductor
Document Revision History
THIS PAGE INTENTIONALLY LEFT BLANK
Creating a Linux ‘Out of the Box’ Experience on a Sandpoint Platform, Rev. 2
Freescale Semiconductor
31
How to Reach Us:
Information in this document is provided solely to enable system and software implementers to
Home Page:
www.freescale.com
use Freescale Semiconductor products. There are no express or implied copyright licenses
USA/Europe or Locations Not Listed:
Freescale Semiconductor
Technical Information Center, CH370
1300 N. Alma School Road
Chandler, Arizona 85224
(800) 521-6274
480-768-2130
information in this document.
Europe, Middle East, and Africa:
+44 1296 380 456 (English)
+46 8 52200080 (English)
+49 89 92103 559 (German)
+33 1 69 35 48 48 (French)
incidental damages. “Typical” parameters which may be provided in Freescale Semiconductor
Japan:
Freescale Semiconductor Japan Ltd.
Technical Information Center
3-20-1, Minami-Azabu, Minato-ku
Tokyo 106-0047 Japan
0120-191014
+81-3-3440-3569
any license under its patent rights nor the rights of others. Freescale Semiconductor products are
Asia/Pacific:
Freescale Semiconductor Hong Kong Ltd.
Technical Information Center
2 Dai King Street
Tai Po Industrial Estate,
Tai Po, N.T., Hong Kong
852-26668334
indemnify and hold Freescale Semiconductor and its officers, employees, subsidiaries, affiliates,
For Literature Requests Only:
Freescale Semiconductor
Literature Distribution Center
P.O. Box 5405
Denver, Colorado 80217
(800) 441-2447
303-675-2140
Fax: 303-675-2150
www.freescale.com
AN2578
Rev. 2
12/2004
granted hereunder to design or fabricate any integrated circuits or integrated circuits based on the
Freescale Semiconductor reserves the right to make changes without further notice to any
products herein. Freescale Semiconductor makes no warranty, representation or guarantee
regarding the suitability of its products for any particular purpose, nor does Freescale
Semiconductor assume any liability arising out of the application or use of any product or circuit,
and specifically disclaims any and all liability, including without limitation consequential or
data sheets and/or specifications can and do vary in different applications and actual performance
may vary over time. All operating parameters, including “Typicals” must be validated for each
customer application by customer’s technical experts. Freescale Semiconductor does not convey
not designed, intended, or authorized for use as components in systems intended for surgical
implant into the body, or other applications intended to support or sustain life, or for any other
application in which the failure of the Freescale Semiconductor product could create a situation
where personal injury or death may occur. Should Buyer purchase or use Freescale
Semiconductor products for any such unintended or unauthorized application, Buyer shall
and distributors harmless against all claims, costs, damages, and expenses, and reasonable
attorney fees arising out of, directly or indirectly, any claim of personal injury or death associated
with such unintended or unauthorized use, even if such claim alleges that Freescale
Semiconductor was negligent regarding the design or manufacture of the part.
Learn More: For more information about Freescale Semiconductor products, please visit
Freescale™ and the Freescale logo are trademarks of Freescale Semiconductor, Inc. The
PowerPC name is a trademark of IBM Corp. and is used under license. All other product or service
names are the property of their respective owners.
© Freescale Semiconductor, Inc. 2004.