1
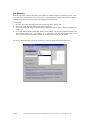
User Manual
Imagtst2
Image Test and Process 2.0 for ImagesControls 2.0
Version 2.0
December 4, 2000
Systems Corporation
Doc # hfw0007
Copyright 1998-2000 by hal Systems Corporation.
halFILE is a trademark of hal Systems Corporation.
All information contained or disclosed by this document is considered confidential and proprietary by hal
Systems Corporation, except for rights expressly granted by contract in writing to other parties concerning
the data or information disclosed herein. All design, manufacture, use, reproduction, and sales rights are
reserved by hal Systems Corporation. Under the copyright laws, neither the documentation nor the
software may be copied, photocopied, reproduced, translated, or reduced to any electronic medium or
machine readable format except in the manner described in the documentation. Copyright 1998-2000 by
hal Systems Corporation. All rights reserved.
Table of Contents
Overview..................................................................................................................................................... 3
Requirements .............................................................................................................................................. 3
Engine Selection ......................................................................................................................................... 3
File Selection .............................................................................................................................................. 4
Selecting Image Processing features........................................................................................................... 5
Processing ................................................................................................................................................... 7
How to ........................................................................................................................................................ 7
Test images on a CD that was just created.............................................................................................. 7
Remove the Black Border on a set of images ......................................................................................... 8
Deskew a set of images........................................................................................................................... 8
What to do if an Out of Memory occurs ................................................................................................. 8
Page 2
ImagTst2 and this documentation are copyrighted hal Systems Corporation, 1998. All rights reserved.
Overview
ImagTst2 is a program that provide a method to perform batch processing on a series of images. The
program can simply test the image as valid and viewable or it can load the image in to memory, perform
special functions on the image and then save the image back to disk.
Requirements
ImagTst2 requires the following:
!
!
Kofax ImageControls 2.0 software drivers.
If Image Processing is to be performed, an ImageControls 2.0 compatible engine. This can be Kofax
scanner interface card such as a KF-9210 or KF-7300 or the Kofax Adrenaline Image Processing
Software Drivers.
Engine Selection
When the program is started, you are first asked to select an engine. The engine can be the ImageControls
2.0 software engine that is not able to perform any Image Processing (as shown below). Or the engine can
be a Kofax scanner card or Adrenaline Image Processing software driver capable of Image Processing.
Engines are configured using the Kofax Source Manager found in the Windows Control Panel that was
installed when ImageControls 2.0 was installed.
Page 3
ImagTst2 and this documentation are copyrighted hal Systems Corporation, 1998. All rights reserved.
File Selection
Once the engine has been reset, the Image Test and Process program displays the following screen. There
are 3 tabs across the top that let you (1) select files, (2) Set up Image Processing features and (3) Execute
the Image Test and Process on the selected files using the features selected.
To select files:
1. Select the drive where the image files exist from the drop down ‘Drives’ box.
2. Specify the folder where the images exist in the ‘Folders’ list.
3. If you want to include images in folders that are beneath the selected folder, check the ‘Include Subfolders’ box.
4. If you only want to include certain files with the selected folder, you can enter a standard wilcard in the
‘File Selection Pattern’ box. For example, ‘0*.*’ would select only files starting with a zero. The
‘Files’ list shows the files that will be processed. It will not show the files in sub-folders.
The ‘Select and Reset Engine’ button can be used to re-select the Image Processing engine to use.
Page 4
ImagTst2 and this documentation are copyrighted hal Systems Corporation, 1998. All rights reserved.
Selecting Image Processing features
The Image Processing tab displays the processing features that are available if you have an Image
Processing engine available (either a Kofax Scan card or the Kofax Adrenaline Image Processing software
engine).
WARNING: Performing these Image Processing features permanently alters the
image. Therefore, you should make a back up of the images prior to processing.
Also, you should test the feature you want to use against some image samples.
To turn on an image processing feature, check the appropriate check box. Then click the related set up
button to define the parameters used for that feature. If permanent image rotation is desired (for instance, if
the images were scanned upside-down and you want to correct them), use the Rotation option.
The image processing features available are:
1.
2.
3.
4.
5.
Deskew. Often, the mechanical feeding action of scanners causes documents to get out of alignment
during the scan process. This produces images with varying amounts of misalignment, referred to as
skew. The Deskew feature can calculate and correct skew angles up to 12 degrees. Note: You can
also deskew during scanning when using a Kofax hardware card.
Despeckle. Speckles on an image are groups of black pixels surrounded by white pixels (or white
pixels surrounded by black pixels). You can remove unwanted speckles with this feature. Note that
by incorrectly setting your despeckle parameters you can essentially destroy your image!
Black Border Removal. Black Borders often appear on images as a result of capturing them on
scanners with black belts or drums. If black borders exist on your images, this feature will detect and
remove them.
Deshade. Shaded areas on an image are rectangular areas made up of a pattern of black speckles. The
deshade feature detects and removes this shading while preserving the text inside the shaded areas.
Note that by incorrectly setting your despeckle parameters you can essentially destroy your
image!
Streak removal. Sometimes streaks are included on an image during the scan process due to marks on
the original page, dust in the scanner assembly or a faulty scanner camera. These streaks can be
Page 5
ImagTst2 and this documentation are copyrighted hal Systems Corporation, 1998. All rights reserved.
6.
7.
removed with the streak removal feature. Note that by incorrectly setting your despeckle
parameters you can essentially destroy your image!
Line removal. If your images contain unwanted horizontal and/or vertical lines, you can remove them
with the line removal feature. You can optionally enable character reconstruction to repair text that
intersects the lines that are removed. This feature is most often used to remove the lines of a form in
order to reduce the image size and improve Optical Character Recognition. Note that by incorrectly
setting your despeckle parameters you can essentially destroy your image!
Image Filtering. Image filters can be used to enhance line edges, smooth characters, and remove
background noise on an image. Several different types of filters are available. Before using these filters
on production images you should experiment with them using sample images."
Once you set the options on any of the above Image Processing features, the options are written to
IMAGTST2.INI located in your Windows directory. The options then become the default settings from
session to session. Also stored in this INI file is the engine that was selected.
Page 6
ImagTst2 and this documentation are copyrighted hal Systems Corporation, 1998. All rights reserved.
Processing
The Execute tab is used to perform the specified Image Processing features on the selected images. The
‘Process Images’ button begins the process. The ‘Stop’ button can be used to abort the process. The
‘Close’ is used to close the Image Test and Process button.
The image being processed is displayed in the ‘Last Good Image’ box. The ‘Errors’ box lists any file that
can not be displayed (and therefore can not be processed. When the processing is complete, a message is
displayed showing the number of files processed and the number of errors encountered. Errors are
typically caused by trying to load a file that is not an image file. However, you should review the error list
for any valid image file names that could not be loaded. These are damaged or incomplete images that
must be re-scanned. Errors are also written to ERROR.LOG, located in the imagtst2 program directory.
How to
Test a set of images to be they can be viewed.
1. Select the folder where the images are located.
2. Turn OFF all image processing options.
3. Process the images.
Test images on a CD that was just created
1. Select the CD drive.
2. Select the Application folder on the CD (which matches the application id). You should see a list of
subfolders within the application folder.
3. Check the ‘Include Sub-folders’ box.
4. Turn off all image processing options.
5. Process the images.
Page 7
ImagTst2 and this documentation are copyrighted hal Systems Corporation, 1998. All rights reserved.
Remove the Black Border on a set of images
1. Select the folder where the images are located.
2. Turn on the Black Border check box behind the Image Processing tab. Click the Setup Black Border
button to view or change the settings for Black Border removal. The default setting should work best.
3. Process the images.
Deskew a set of images
1. Select the folder where the images are located.
2. Turn on the Deskew check box behind the Image Processing tab. Click the Setup Deskew button to
view or change the settings for Deskew. Set the minimum angle to 0 and the maximum to 12.
3. Process the images.
What to do if an Out of Memory occurs
Out of Memory errors occur when not enough memory is available to load the image into memory, perform
the Image Processing features selected to create a new copy of the image in memory, and save the new
image back to disk.
If you are using a Kofax hardware scan card, you can:
1. Select fewer Image Processing options. For instance, if you wanted to Deskew and remove the Black
Border and got an Out of Memory error, then try running Black Border removal first. Then run
Deskew.
2. Add memory to your scan card.
3. Scan at lower resolutions. Note that the resultion (DPI), the paper size and the amount of dots on the
image effect the memory required.
If you are using a Kofax Adrenaline Software Image Processing engine, you can:
1. Unload other programs that are running in Windows.
2. Select fewer Image Processing options. For instance, if you wanted to Deskew and remove the Black
Border and got an Out of Memory error, then try running Black Border removal first. Then run
Deskew.
3. Scan at lower resolutions. Note that the resultion (DPI), the paper size and the amount of dots on the
image effect the memory required.
Page 8
ImagTst2 and this documentation are copyrighted hal Systems Corporation, 1998. All rights reserved.