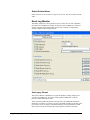
1
MonitorWareAgent 1.3
User Manual
By Adiscon
Contents
About MonitorWare Agent 1.3
2
Features...................................................................................................................................... 3
Complete Windows Event Monitoring........................................................................ 3
Active Network Probes................................................................................................ 3
Monitor Windows’ Services and Disk Space .............................................................. 3
External Events............................................................................................................ 3
Scalability.................................................................................................................... 3
Event Archiving .......................................................................................................... 3
Alerting........................................................................................................................ 4
Powerful Event Processing.......................................................................................... 4
Zero-Impact Monitoring.............................................................................................. 4
Robustness................................................................................................................... 4
Ease of Use.................................................................................................................. 4
Firewall Support .......................................................................................................... 4
Runs on large Variety of Windows Systems ............................................................... 4
Multi-Language Client ................................................................................................ 4
Components ............................................................................................................................... 5
MonitorWare Agent Configuration Client................................................................... 5
MonitorWare Agent Service........................................................................................ 5
Add-on Components.................................................................................................... 5
System Requirements ................................................................................................................ 6
Getting Started
8
Setup .......................................................................................................................................... 8
Creating an Initial Configuration ............................................................................................... 8
Installing Web Access ............................................................................................................... 9
Obtaining a Printable Manual .................................................................................................... 9
MonitorWare Agent Tutorial ................................................................................................... 10
Filter conditions......................................................................................................... 10
Ignoring Events ......................................................................................................... 10
Logging Events.......................................................................................................... 17
Time-Based Filters .................................................................................................... 19
Email Notifications.................................................................................................... 22
Alarming via Net Send .............................................................................................. 24
Starting Scripts and Applications in Response to an Event....................................... 25
Monitoring Hard Disk Space..................................................................................... 27
Monitoring external Devices via PING ..................................................................... 31
Monitoring External Devices via a PortProbe ........................................................... 33
Common Uses
36
Step-by-Step Guides
37
MonitorWareAgent 1.3 User Manual
Contents • iii
Using Interactive Syslog Server
38
Launching the Interactive Syslog Server ................................................................................. 38
The Interactive Logging........................................................................................................... 38
Start / Stop Logging Buttons ..................................................................................... 39
Write Logfile ............................................................................................................. 39
Resolve Host Names.................................................................................................. 39
Save All ..................................................................................................................... 39
Save Selection ........................................................................................................... 40
Clear All .................................................................................................................... 40
Interactive Syslog Server Options ........................................................................................... 40
Message Buffersize ................................................................................................... 40
Interactive Syslog Port .............................................................................................. 40
File Basename ........................................................................................................... 40
File Extension............................................................................................................ 41
Create unique filenames ............................................................................................ 41
Configuring MonitorWare Agent
42
License Options ....................................................................................................................... 44
Registration Name ..................................................................................................... 44
Registration Number ................................................................................................. 45
Debug Options ......................................................................................................................... 45
Enable Debug output into file.................................................................................... 45
File and path name .................................................................................................... 45
Debug Level .............................................................................................................. 46
Services.................................................................................................................................... 46
Syslog Server............................................................................................................. 46
SETP Server .............................................................................................................. 47
Event Log Monitor .................................................................................................... 48
File Monitor............................................................................................................... 51
Heartbeat ................................................................................................................... 53
Ping Probe ................................................................................................................. 55
Port Probe .................................................................................................................. 57
NT Services Monitor ................................................................................................. 59
Disk Space Monitor................................................................................................... 61
Filter Conditions ...................................................................................................................... 63
Global Conditions...................................................................................................... 65
Operations ................................................................................................................. 65
Filters......................................................................................................................... 66
General ...................................................................................................................... 66
Date/Time.................................................................................................................. 67
InformationUnit Type................................................................................................ 67
Syslog ........................................................................................................................ 67
Event Log Monitor .................................................................................................... 68
NT Service Monitor................................................................................................... 68
DiskSpace Monitor.................................................................................................... 69
Actions..................................................................................................................................... 69
File Options ............................................................................................................... 69
Database Options....................................................................................................... 73
Event Log Options..................................................................................................... 75
Mail Options.............................................................................................................. 76
Forward Syslog Options ............................................................................................ 79
Start Program............................................................................................................. 80
Net Send .................................................................................................................... 82
Forward SETP ........................................................................................................... 83
iv • Contents
MonitorWareAgent 1.3 User Manual
Set Property ............................................................................................................... 83
Getting Help
85
Frequently asked Questions ..................................................................................................... 85
I have an invalid source in my received syslog message - what to do? ..................... 85
How to install MonitorWare Agent in silent mode?.................................................. 86
MonitorWare Web Site............................................................................................................ 86
Support Forum ......................................................................................................................... 86
Email........................................................................................................................................ 86
Online Seminars....................................................................................................................... 86
Phone ....................................................................................................................................... 87
Fax ........................................................................................................................................... 87
Software Maintenance ............................................................................................................. 87
Non-Technical Questions ........................................................................................................ 87
Product Updates....................................................................................................................... 88
MonitorWare Concepts
89
Purchasing MonitorWare Agent
90
The License ............................................................................................................... 90
Pricing ....................................................................................................................... 90
How to order.............................................................................................................. 90
Order Form ................................................................................................................ 91
Reference
92
The MonitorWare Agent Service............................................................................................. 92
The Service Account ................................................................................................. 92
Command Line Switches........................................................................................... 92
Support for Mass Rollouts ....................................................................................................... 93
Formats .................................................................................................................................... 94
Database Format........................................................................................................ 94
XML Format.............................................................................................................. 95
Version History........................................................................................................................ 96
1.3.............................................................................................................................. 96
1.2 Service Pack 1 ..................................................................................................... 97
1.2.............................................................................................................................. 97
1.1.............................................................................................................................. 98
1.0 Final..................................................................................................................... 99
1.0 Beta 2................................................................................................................... 99
0.8 Preview................................................................................................................ 99
ICMP Codes ............................................................................................................................ 99
Copyrights ............................................................................................................................. 102
Glossary of Terms
103
Index
105
MonitorWareAgent 1.3 User Manual
Contents • v
MonitorWareAgent 1.3 User Manual
About MonitorWare Agent 1.3 • 1
About MonitorWare Agent 1.3
MonitorWare is an integrated, modular and distributed solution for system
management. Network administrators can continuously monitor their systems and
receive alarms as soon as important events occur.
MonitorWare is a distributed and extensible system. At its very base is the
MonitorWare Agent which includes all data gathering and real-time notification
functions. This manual concentrates on the MonitorWare Agent.
The agent is run on the systems to be monitored and provides the base functionality.
It can gather data from numerous sources, like the Windows Event Log, syslog
enabled devices (routers, firewalls ...) or text files to name a few. The MonitorWare
Agent supports very flexible and powerful local filtering and processing of these
events. Based on a powerful rule processor, events can be forwarded, acted on or
discarded - all at the discretion of the system administrator. Given this engine, even a
stand-alone MonitorWare agent performs useful work. For example, in a small
environment, it can generate alert emails at the occurrence of specific events.
Larger environments will consolidate all agent data in a central repository, for
example the MonitorWare event database or combined log files. The database is the
source of information for all reporting and analysis modules of the MonitorWare
system. By default, it can be created with Microsoft Access or SQL server (MSDE).
As standard SQL and ODBC are being used, it is easily adaptable to other database
systems.
A number of different modules work on this consolidated database or the log files to
achieve various activities. These modules include scheduled reporting facilities like
MoniLog reporting, a web interface or the upcoming MonitorWare Console.
Currently under development is an enterprise configuration manager, which
facilitates configuration of the MonitorWare system on enterprise scope. With the
MonitorWare Enterprise Manager, groups of configurations can be created (e.g. for
syslog servers, NT event log monitors, consolidation servers and the like). These
function-focused groups can then be automatically applied to machine groups. So a
whole MonitorWare system - no matter how large - can be administered from a
single MonitorWare Enterprise Manager.
MonitorWare does also integrate with other management related Adiscon products
like EventReporter and WinSyslog. In fact, it uses common terms and methods
wherever possible, so upgrading from these solutions to the full MonitorWare system
is easy.
2 • About MonitorWare Agent 1.3
MonitorWareAgent 1.3 User Manual
Features
Complete Windows Event Monitoring
Automatically monitor Windows Event Logs and application log files. All Event
Logs – including the Windows 2000 specific extensions – are fully processed.
Application log file monitoring provides support for virtually any application that
logs to a text file. Examples are Web server log files or Oracle error logs. Even
Windows itself stores some information not in the event log but application log files
(like the DHCP log files).
Active Network Probes
Ping and port probe services allow monitoring of both local and remote systems and
services. These services are not restricted to Windows machines – virtually any
existing service can be used with these probes. Good examples are LINUX based
web and mail servers or firewalls. But our probes don’t restrict you to an OS – even
if you have a SMTP server running on a mainframe, MonitorWare can check its
operational state.
Failing systems and services are detected and alert be generated.
Monitor Windows’ Services and Disk Space
The Windows service monitor and disk space monitor check the local machine.
Failing services and low disk space are quickly detected and can be used to trigger
notifications or even corrective actions before problems arise.
External Events
Events are accepted via a standard syslog server and hence all syslog-enabled
devices can be included in the MonitorWare system. This includes popular devices
like routers and switches as well as printers and a large number of UNIX/Linux
based systems and applications. Virtually all currently existing network devices
support syslog – so MonitorWare Agent can monitor all of them.
To reach an even broader device range, MonitorWare Agent not only supports
standards compatible syslog but also it supports popular extensions like syslog over
TCP.
Scalability
The MonitorWare system is modular and highly scalable. If a single server is to be
monitored, MonitorWare Agent can provide all monitoring and alerting needs.
However, multiple MonitorWare Agents in a complex, hierarchical network can talk
to each other and provide both local and central alerting and event archiving.
Event Archiving
All incoming events – no matter what source the came from – can be stored
persistently. Options include archiving in databases as well as log files.
MonitorWareAgent 1.3 User Manual
About MonitorWare Agent 1.3 • 3
Alerting
Alerts can be sent via email or syslog. As most pagers are accessible via email, this
interface can also be used to trigger pager notifications.
Powerful Event Processing
MonitorWare Agent’s powerful and flexible rule engine processes all events based
on a configured set of actions. An unlimited number of rules and actions allows
tailoring to the specific needs.
Zero-Impact Monitoring
MonitorWare Agent has no noticeable impact on system resources. It was
specifically written with minimal resource usage in mind. In typical scenarios, its
footprint is barely traceable. This ensures it can also be installed on heavily loaded
servers.
Robustness
MonitorWare Agent is written to perform robust even under unusual circumstances.
The reliability of the MonitorWare line of products is proven since 1996.
Ease of Use
MonitorWare Agent is easy to install and configure. Comprehensive step-by-step
guides and wizards help administrators with setting up even complex systems.
Firewall Support
Does your security policy enforce you to use non-standard ports? MonitorWare
Agent can be configured to listen on any TCP/IP port for syslog messages.
Runs on large Variety of Windows Systems
Windows 4.0, 2000, XP, .NET; Workstation or Server – MonitorWare Agent runs on
all of them. We also have Compaq (Digital) ALPHA processor versions on platforms
supporting this processor (service only, available on request).
Multi-Language Client
The MonitorWare Agent client comes with multiple languages ready to go. Out of
the box, English, French and German are supported. Other languages will be added
shortly. Languages can be switched instantly. Language settings are user-specific; so
multiple users on the same machine can use different languages.
4 • About MonitorWare Agent 1.3
MonitorWareAgent 1.3 User Manual
Components
MonitorWare Agent Configuration Client
The MonitorWare Agent Configuration Client – called “the client” - is used to
configure all components and features of the MonitorWare Agent. The client can
also be used to create a configuration profile on a base system. That profile can later
be distributed to a large number of target systems.
However, the client can only configure one machine at a time and has no notation of
machine or functional groups. For enterprise-wide administration, use the
MonitorWare Configuration Manager, available as a separate product.
MonitorWare Agent Service
The MonitorWare Agent Service – called “the service” - runs as a Windows service
and carries out the actual work.
The service is the only component that needs to be installed on a monitored system.
The MonitorWare Agent service is called the product "engine". As such, we call
systems with only the service installed "engine-only" installations.
The service runs in the background without any user intervention. It can be
controlled via the control panel "services" applet or the "Computer Management"
MMC under Windows 2000. The client can also be used to control service instances.
Add-on Components
There are a number of optional components available as free downloads.
All optional components work with the MonitorWare Common Database Format.
Interactive Syslog Server
The interactive syslog server is helpful for quick analysis and troubleshooting. It
displays incoming events in the interactive session.
Though it is not a core component, it is included in the MonitorWare Agent install
set.
MonitorWare Web Access
Web access is a convenient facility to access MonitorWare gathered events over the
web. All major browsers are supported. Web Access is fully integrated with
Microsoft’s IIS, so multiple security layers can be used.
MonitorWare Web Access is included in the MonitorWare Agent install set. It gets
installed automatically when IIS is present on the target machine. However, it is fully
optional and need not be installed.
MonitorWare Console
MonitorWare Console facilitates the Network Administrators to gather valuable
information about their networks and offers them strong analytical abilities with
which they can examine their network proficiently against countless problems
including security breaches. Using the Views and Reporting Modules of
MonitorWare Console, you can find the problematic areas in your network very
MonitorWareAgent 1.3 User Manual
About MonitorWare Agent 1.3 • 5
efficiently and promptly. As a network administrator, you would not only like to find
the problems but also their solutions. MonitorWare Console’s Knowledge Base
Module is exactly meant for this purpose. In short, MonitorWare Console is a very
powerful tool that will facilitate the Network Administrators to scrutinize their
networks from tip to toe and will give an in-depth perspective about what’s going on
in their system.
Windows Message Viewer
Within the MonitorWare line of products, there is a new Windows GUI based
message viewer coming up. It is available as a separate application that can installed
on the administrator workstations that are interested in reviewing the database
content.
The Windows message viewer is currently in beta and available on request. Please
see
http://www.monitorware.com/en/mwviewer/
for details on its availability. We will also post the final release there as soon as it is
available.
The Windows Message Viewer will shortly be a regular component to be used with
all MonitorWare line of products. The application is free.
Please note that the Windows Message Viewer works with the common
MonitorWare database format.
System Requirements
The MonitorWare Agent has minimal system requirements. The actual minimum
requirements depend on the type of installation. If the client is installed, they are
higher. The service has minimal requirements, enabling it to run on a large variety of
machines – even highly utilized ones.
The client can be installed on Windows NT 4.0 and above. This includes Windows
2000, Windows XP and the .NET servers. The operating system variant
(Workstation, Server …) is irrelevant. The client uses XML technology.
Unfortunately, operating system XML support is only available if at least Internet
Explorer 4.01 SP1 is installed. The client requires roughly 6 MB RAM in addition to
the operating system minimum requirements. It also needs around 10 MB of disk
space. The client is available for Intel based systems, only.
The service has fewer requirements. Most importantly, it does not need Internet
Explorer to be installed on the system. It works under the same operating system
versions. Additionally, it should perform well under NT 3.51, but as we have not yet
received any request for supporting this operating system version, no tests have been
conducted yet. This will be done upon request. The service also by design supports
the Compaq/Digital APHA processor, but again has not been ported yet due to
missing demand. If you are in need of such a version, please contact Adiscon at
[email protected].
At runtime, the base service requires 2 MB of main memory and less than 1 MB of
disk space. However, the actual resources used by the agent largely depend on the
services configured.
If the agent shall just monitor the local systems event log, impact on the monitored
system is barely noticeable, if at all visible. If the agent acts as a central syslog server
receiving hundreds of messages per second, it will need much more resources. Even
6 • About MonitorWare Agent 1.3
MonitorWareAgent 1.3 User Manual
then, the actual load is depending on the actions carried out. Storing the messages to
text files is much less performance intense than writing them to a database table –
especially if the database engine is located on the same machine. As such, there is no
single guideline for hardware sizing. It needs to be adapted to the expected workload.
Please note, however, that the service is specifically optimized to handle high
throughput including message bursts (for example received via syslog). If you expect
high volume burst and carry out time consuming actions (for example database
writes), we highly recommend adding additional memory to the machine1.
MonitorWare is capable of storing such bursts temporarily in memory even if the
machine would otherwise be too slow to process the messages.
MonitorWare Web Access requires Microsoft Internet Information Server (IIS)
version 3 or higher to be present on the machine where Web Access is to be
installed. Please note that Web Access can be installed on a machine different from
the service as long as that machine can access the MonitorWare database.
1
Even 64 MB additional memory will do nicely. A typical syslog message (including overhead) will take roughly 1.5
KB. With 64 MB, you can buffer up to 50,000 messages in 64 MB.
MonitorWareAgent 1.3 User Manual
About MonitorWare Agent 1.3 • 7
Getting Started
MonitorWare Agent can be used for simple as well as complex scenarios. This
chapter provides a quick overview of the agent and what can be done with it. Most
importantly, it contains a tutorial touching many of the basic tasks that can be done
with MonitorWare Agent as well as pointer on how to setup and configure.
Be sure to at least briefly read this section and then decide where to go from here - it
will definitely be a worth time spent.
Setup
Setup is quick and easy. The MonitorWare Agent uses a standard setup wizard.
Installing the MonitorWare Agent is simple and easy. A standard setup program
installs the application.
The install set (the ZIP file you downloaded) contains a standard setup program and
its necessary helper files. Please unzip the archive to any directory you like. This can
be a local drive, a removable one or a remote share on a file server. A Win32 Unzip
program can be found at http://www.winzip.com.
After unzipping, simply double-click "setup.exe" (this is the setup program) and
follow the onscreen instructions.
Please note that you might have downloaded the setup.exe file directly. This is
depending from where you download the install set. In this case simply run it to
setup the product.
Creating an Initial Configuration
MonitorWare Agent actually consists of five products in one. MonitorWare Agent
can work as
•
Data gatherer
Here, it gathers event data from important sources like Windows event
logs, text files, ping and port probes and the like.
•
Real Time Alerter
Alert conditions can be detected in real time and alerts be issued. Alerts
can be send by email and various other means. Alerts based on data
gathered by the data gatherers configured.
8 • Getting Started
MonitorWareAgent 1.3 User Manual
•
Automatic Admin Actions
Depending on certain events, administrative actions can be
automatically initiated, for example the deletion of temporary files in a
low-disk space condition.
•
Relay Server
MonitorWare Agent can be used to build, highly scalable, complex
systems with relay servers between locations or networks. As a relay
server, it will forward incoming events to another instance of
MonitorWare agent or a syslog daemon.
•
Event Repository
All gathered event data can be stored in a repository. The repository is
a database providing the base for all other MonitorWare products.
Events can also be stored in text files. With a specific configuration, a
secure log repository can be created for auditing purposes.
MonitorWare Agent can perform any mix of the five functions on a given machine.
There are no limits inside the product. Right after installation, however, it is not
configured for any of the above functions. So in order to have it do some useful
work, it needs to be configured.
In order to aid in this process, we have created a number of Step-By-Step guides as
well as scenarios. If you are not familiar with MonitorWare Agent, we highly
recommend to browse through “Common Uses” on page 36 as probably your
intended usage of MonitorWare Agent is already covered there.
Detailed configuration instructions for the different scenarios can be found in the
“Step-by-Step Guides” on page 37. These guides include detailed instructions
together with screen shots.
To unleash the full power of the MonitorWare Agent, be sure to read “MonitorWare
Concepts” on page 89.
Installing Web Access
MonitorWare Web Access is installed if Microsoft IIS is present on the target
machine. In that case, a web “WebAccess” is created.
After setup, Web Access is present, but needs to be configured. With this release,
configuration is done by editing the ConfigSettings.asp file inside the Web Access
directory. This can be done with any plain text editor like notepad (do not use Word
or any other text processor!). ConfigSettings.ASP contains comments on which
parameters can and need to be changed. Most notable, the database connection needs
to be updated.
In future releases, Web Access will be enhanced to support web based configuration.
Visit www.mwagent.com to learn if a new version is already available.
Obtaining a Printable Manual
A printable version of the manual can be obtained at
http://www.monitorware.com/en/Manual/
The manuals offered on this web-page are in PDF format for easy browsing and
printing. The version on the web might also include some new additions, as we post
MonitorWareAgent 1.3 User Manual
Getting Started • 9
manual changes – including new samples – frequently and as soon as they become
available.
MonitorWare Agent Tutorial
The goal of this tutorial is to provide a rough overview over the MonitorWare Agent
as well as some typical uses. It is in no way complete, but should help in
understanding MonitorWare Agent and how it can be configured to suit your needs.
For detailed instruction on the configuration of common scenarios, be sure to see
“Step-by-Step Guides” on page 37.
In the tutorial, we start by describing and focusing on the filter conditions, as these
are often needed to understand the usage scenarios that follow below.
MonitorWare Agent gathers network events – or “information units” as we call them
– with its services. Each of the events is then forwarded to a rule base, where the
event is serially checked against the different rule’s filter conditions. If such a
condition evaluates to true (“matches”), actions associated with this rule are carried
out (for example, storing the information unit to disk or emailing an administrative
alert.
Filter conditions
For every rule, filter conditions can be defined in order to guarantee that
corresponding actions are executed only at certain events.
These filter conditions are defined via logical operations. Boolean operators like
“AND” or “OR” can be used to create complex conditions.
If you are note so sure about the Boolean operations, you might find the following
brush-up helpful:
AND – All operands must be true for the result to be true. Example: AND(A, B):
Only if both A and B are true, the result of the AND operation is also true. In all
other cases, it is false.
OR – if at least one of the operands is true, the end result is also true. Example: OR
(A, B): The end result is only false if A and B are false. Otherwise, it is true.
NOT –negates a value. Example: NOT A: If A is true, the outcome is false and vice
versa. There can only be a single operand for a NOT operation.
Ignoring Events
In most cases, there are some events that we would like to ignore. Events we know to
occur often and we also know to be of no interest for what we try to accomplish.
Most often, there are events that we do not want to store in our log files and that
should also not cause any other action.
We handle these events on top of our rule set. This ensures that only minimal
processing time is needed and they are discarded as soon as possible.
In this tutorial, we define a filter that discards such events. In our example, we
assume that Events with the ID105, 108 and 118 are not required. Please note that for
simplicity reasons we only filter based on the event ID. In a production environment,
you might want to add additional properties to the filter set.
In this sample, no service or rule set is yet defined. It is just a “plain” system right
after install, as can be seen in the following screen shot:
10 • Getting Started
MonitorWareAgent 1.3 User Manual
We begin by defining a rule set. Right-click on “RuleSets” and choose “Add
RuleSet” from the context menu. Type in a name of your choice. In this tutorial, we
use the name "Defaults". Click on "Next". Leave all as is in the next dialog. Click
"Next", then "Finish". As can be seen in following screen shot, the rule set
"Defaults" has been created but is still empty..
Of course we can only use a rule if we configure a corresponding service. To do so,
right-click on "Running Services" and choose "Service" in the context menu. Then
select “Add Services" and "Event Log Monitor". Provide a name of your choice. In
our sample, we call the service "Event Log Monitor". Leave all defaults and click
“Next”, then “Finish”. Now click on "Event Log Monitor" under "Running
Services". You screen should look as follows:
MonitorWareAgent 1.3 User Manual
Getting Started • 11
Because there we created the “Defaults” rule set initially, it is shown as the rule set
to use for this service. For our purposes, that is correct. To learn more on the power
of rule set assignments, see other sections of this manual.
Now we will do something with the data that is generated by the event log monitor.
To do so, we must define rules inside the rule set.
In the tree view, right-click "Defaults" below “RuleSets”. Then, click "Add Rule".
Choose any name you like. In our example, we call this rule "Discard". Then, expand
the tree view until it looks like the following screen shot:
12 • Getting Started
MonitorWareAgent 1.3 User Manual
Click on “Filter Conditions” to see this dialog:
In that dialog, we will define our filter. Remember: we are about to filter those
events, that we are not interested in. As we would like to discard multiple events, we
need the Boolean “OR” operator in the top level node, not the default “AND”. Thus,
we need to change the Boolean operator.
There are different ways to do this. Either double-click the “AND” to cycle through
the supported operations. Or select it and click “Change Operator”. In any way, the
Boolean operation should be changed to “OR”.
We filter out “uninteresting” events via their event id. Again, there are different ways
to do this. In the sample, we do it via right-clicking the “OR” node and selecting
“AddFilter” from the pop up menu. This can be seen in the screen shot below:
MonitorWareAgent 1.3 User Manual
Getting Started • 13
I prefer to add all three event id property filters first and later on change the event id
to the actual value I am looking for. When you have added them, it should look as
follows:
In order to enter the actual values, select each of the three filter. A small dialog
opens at the bottom of the screen. There you enter the values you are interested in. In
our sample, these are IDs 105, 108 and 118. As we are only interested in exactly
these values, we do a comparison for equality, not one of the other supported
comparison modes.
When you have made the updates, you screen should look as follows:
14 • Getting Started
MonitorWareAgent 1.3 User Manual
Save the settings by clicking the (diskette-like) “Save” button. We have now selected
all events that we would like to be discarded. In reality, these are often far more or a
more complicated filter is needed. We have kept it simple so that the basic concept
is easy to understand – but it can be as complex as your needs are.
Now let us go ahead and actually discard these events. This is done via an action. To
do so, right-click on "Actions" and select "Discard."
MonitorWareAgent 1.3 User Manual
Getting Started • 15
Again, name the action as you like in the following dialog. We use “Discard” as this
is quite descriptive. Select “Next” and then “Finish” on the next page. Your screen
should like follows:
This concludes the definition of our first rule.
If we would start MonitorWare Agent service now, all events with IDs 105, 108 and
118 would be handled by this rule and thus be discarded. All other events will not
cause the filter condition to evaluate to true and thus those would be left untouched.
Consequently, only these other events will flow down to rules defined behind the
“Discard” rule. Obviously, our configuration effort is not yet completed. We just
16 • Getting Started
MonitorWareAgent 1.3 User Manual
finished a first step, excluding those events that we are not interested in. And of
course, in reality you need to decide which ones to discard in a real rule set.
Logging Events
Often, a broad range of events (or information units as we call them) need to be
stored persistently so that you can review and analyze them if there is need. As such,
we are in need of a rule that persists the events. In our sample, we choose to work
with a text log file (not a database, which we also could use). We will now create a
rule to store all those events not discarded by the previous rule.
To do so, right click the “Defaults” rule set as shown below. Then, select “Rule Sets”
and “Add Rule”:
Use a name of you choosing. In our sample, we call this rule "Write To file".
This rule should process all events that remained after the initial discard rule. As
such, we do not need to provide any filter condition (by default, the filter condition
matches always).
Since we want to store all still open Events with help of this rule, we don't require
any filter rules here. However, a corresponding action must be defined. So we just
need to define the action:
To do so, expand "Write To file" and right-click "Actions". Select “Add Action”,
then "Write To file" as can be seen below:
MonitorWareAgent 1.3 User Manual
Getting Started • 17
Again, choose a name. Do not modify the defaults. In our sample, we call this action
"Records". Click "Next", then "Finish."
Now the tree view contains a node “Records”, which we select:
18 • Getting Started
MonitorWareAgent 1.3 User Manual
Important: make sure that the folder specified exists! If it does not exist,
MonitorWare Agent will not write the log file. MonitorWare Agent will also not
create the folder by itself. So if the folder does not exist, be sure to either create it or
select a different (existing) one.
In our sample, we also change the file base name to “logdata”. This was just done
out of personal preference. There is no need to do so, but it may be convenient for a
number of reasons.
Summary
What did we do so far? All events from the Windows event log are passed through
our rule engine and rule filters. Certain events are discarded and the remaining
events are stored to a text file on the local disk (for later review or post-processing).
We can now do a quick test: Start MonitorWare Agent by hitting the start button
seen below:
The log file should be created in the path you have specified. Open it with notepad.
You should see many events originating from the event log. When you re-open the
log file, new events should appear (if there were any new events in the Windows
event log). The file is not easily readable. Most probably you have created it for
archiving purposes or to run some external scripts against it. For review, we
recommend using either the web interface or the upcoming MonitorWare Console
add-on.
Please note that the current date is appended to the log file. This facilitates file
management an archiving. The format is "logdata-YYYY-MM-DD.log".
You have now learned to define rules and actions. The following chapters thus will
not cover all details of this process. If in doubt, refer back to these chapters here.
Time-Based Filters
Time based filters are especially useful for notifications. For example, a user login is
typically a normal operation during daytime, but if there are no night shifts, it might
be worth generating an alert if a user logs in during night time. Another example
would be a backup run that routinely finishes during the night. If we see backup
events during the day, something might be wrong.
Similarly, there are a number of other good reasons why specific actions should only
be applied during specific time frames. Fortunately, MonitorWare Agent allows to
define complex time frames. In this tutorial, though, we focus on the simple ones.
Let us first define a sample time-based filter that applies a nightly time frame. In
fact, there are many ways to do this. We have used the method below, because it is
straightforward and requires the least configuration work.
To make matters easy, we use this filter condition just to write nightly event log data
to a different log file. In realty, time based filters are often combined with other
conditions to trigger time based alerts. But this would complicate things to much to
understand the basics.
MonitorWareAgent 1.3 User Manual
Getting Started • 19
In the sample below, an additional rule called “Timing Control” has been added. It
includes a time-based filter condition. Only if that condition evaluates to “true”, the
corresponding action is executed.
Please note: we use the 24 hour clock system below. As this manual is read by a
world-wide community, this provides easier understanding. Our apologies to those
using 12 hour clock systems (as a quick reminder, 1a is 01:00 while 1p is 13:00 – the
hours are just counted forward until 24:00 which is midnight).
All events generated by services binding to our rule set “Defaults” will now also be
passed along the “Timing Control” rule set. If these events come in nighttimes
between 19:00:01 (7p) and 5:59:50 (5:59a), the action “Write at Night” is executed.
Please note that the use of the “OR” operator is important because either one of the
time frames specified does apply. This is due to the midnight break.
If an event comes in at 8:00 in the morning, the action will not be called – it is
outside of the specified time frame:
08:00:00 > 19:00:00 = false
08:00:00 < 06:00:00 = false
If the very same event comes in at 8:00 in the evening (20:00 hours in the 24 hour
clock system), the filter condition evaluates to true and the action will be executed.
20:00:00 > 19:00:00 = true
20:00:00 < 06:00:00 = false
As stated earlier, time frames are most often used in combination with other filters.
Here is a more complete example:
20 • Getting Started
MonitorWareAgent 1.3 User Manual
In this example, we will call the configured actions if events with ID 592 occur
between 13:00:01 (1p) and 20:59:59 (roughly 9p). We will also execute the
configured actions if event ID 593 occurs. Please note that in the case of 593 events,
the time filter does not apply due to the used Booleam operations.
In this sample, you also notice that we use an “AND” condition to build the time
frame. The reason is that there is no implicit midnight boundary for our time frame
as was in the first sample. As such, we need to employ “AND” to make sure the
events are WITHIN the specified range.
Now let us look at some sample data:
We receive a 592 event at 7:00a sharp:
Event ID = 592
= true
07:00:00 > 13:00:00
= false
07:00:00 < 21:00:00
= false
“AND” Branch
= false
Event ID = 593
= false
In all, the filter condition is false.
Now, the same event comes in at 14:00 (2p):
Program start ID = 592
MonitorWareAgent 1.3 User Manual
= true
Event ID = 592
= true
14:00:00 > 13:00:00
= true
14:00:00 < 21:00:00
= true
“AND” Branch
= true
Event ID = 593
= false
Getting Started • 21
This time, the time frame is correct, yielding to an overall true condition from the
“AND” branch. That in turn yields to the filter condition as whole to evaluate to true.
In this example still is another Event ID. All events with her/it ID 593 is grasped.
This happens independently from the timing control when grasping the Events 592.
One last sample. At this time, event 593 comes in at 7:00 in the morning:
Program start ID = 592
= true
Event ID = 592
= false
07:00:00 > 13:00:00
= false
07:00:00 < 21:00:00
= false
“AND” Branch
= false
Event ID = 593
= true
This time the filter condition evaluates to true, too. The reason is that the (not
matched) time frame is irrelevant as the other condition of the top-level “OR” branch
evaluates to true (Event ID = 593).
Email Notifications
In this example, we would like to receive email notifications when certain events
happen.
So let us create an additional rule for that purpose: Right-click the “Defaults” rule set
and select “Rule Sets”, “Add Rule” from the pop up menu. Provide a name. We will
call it “mail reception” in this example. Then, add a “Forward via Email” action. In
the action details, be sure to configure at least the mail server, recipient and subject
properties. Please note that many mail servers also need a valid sender mail address
or otherwise will deny delivery of the message.
22 • Getting Started
MonitorWareAgent 1.3 User Manual
Then, select the filter conditions. Let us assume we are just interested in events of ID
600. Then the filter conditions should look as can be seen below:
When you have finished this steps, be sure to save the configuration and re-start the
MonitorWare Agent service. After the restart, the newly extended rule set will be
executed. In addition the rules defined so far, the new one will be carried out,
emailing all events with ID 600 to the specified recipient.
MonitorWareAgent 1.3 User Manual
Getting Started • 23
Alarming via Net Send
Again, we add another rule to our rule set. This time, we would like to receive
notification via the Windows messenger service (aka “net send”).
Please bear in mind that the Windows messenger service is not the instant messaging
service that many people nowadays associate with it. The messenger service is meant
for administrator notifications. If a windows workstation (or server) receives a
message via that service, a message box pops up on that workstation and the user
needs to press an “OK” button to continue. No interaction is possible.
We create a new rule in our rule set "Defaults". In this case, we assume that we will
receive messenger notifications for all events with event id 592. In a real use case,
you will make sure that this is a real important event, or chances are good you will
become overwhelmed with messaging windows. A better example could be a filter
that checks for a server running low on disk space (using the disk space monitor).
This time, we use the “Net Send” action as can be seen below. The target field holds
either the name or IP-Address of the workstation this message should be send to. The
message text itself goes into “Message to send”.
24 • Getting Started
MonitorWareAgent 1.3 User Manual
After saving the configuration and restarting the MonitorWare Agent, we will
receive notifications if the filter condition evaluates to true. A sample message might
look like this (slightly obscured in this sample):
Starting Scripts and Applications in Response to
an Event
We now want to start an application or a script when certain events occur. Typically,
this is done to start administrative scripts or corrective action. For example, if a disk
runs low on space, you could start a script that deletes temporary files, or if a service
fails, a script could restart it.
Or sample, on the other hand, is kept quite simple again. We just show how to
generically start an exe file. To do so, we define a new rule, name “Application
starts” below. Again, we use the imaginary event 592 as a filter condition. So the
application will start whenever event 592 comes in.
MonitorWareAgent 1.3 User Manual
Getting Started • 25
The start program action is just a “normal” action:
26 • Getting Started
MonitorWareAgent 1.3 User Manual
In the “Start Program” action’s parameters, select the file to run as well as all
parameters to be supplied to it (if any):
Once this configuration is done, the program will be executed as soon as an event
matching the filter condition comes in.
Monitoring Hard Disk Space
Monitoring hard disk space solves at least two purposes: it can be used to generate
alerts or trigger corrective actions if a system runs out of free space. It can also be
used as a statistical tool to monitor disk space utilization over time.
In our tutorial, we configure a simple disk space monitor and define a rule that stores
the results into a text file that can later be analysed. Of course, we could have added
trigger conditions for alerts and such. We have not done this, to keep things simple.
As always, we create the needed rule set first. In our sample, we call it “DiskSpace”.
Please note that this time we actually create a rule set, not just an additional rule in
the “Defaults” rule set. The reason is that for our purposes it is much easer to define
a specialised rule set and then bind this specialised rule set to the disk space monitor.
If we would use the generic “Defaults” rule set, we had to make sure that our filter
conditions would only match when an event of type disk space monitor would come
in. Also, it would require more processing time, as all rules and condition filters
would be processed – a process that is not needed as we deal with a specific case. As
such, it is more appropriate to define a specific rule set, which is then only used for
the disk space monitor. What is appropriate in your environment depends on your
needs. There is no general rule.
Inside the new rule, we create a filter condition that evaluates to true only if the
report has less than 20 gigabytes of free space. So we will log date only when we
potentially have constrained disk space. The filter looks as follows:
MonitorWareAgent 1.3 User Manual
Getting Started • 27
To create this filter, select “DiskSpace Monitor”, then “Disk Space Left” when
pressing the “Add Filter” button.
As I said initially, we use the “write to file” action in this sample. The action is
called “Write DiskSpace” as can be seen below. We could also have used other
actions, including emailing, to alert an administrator or start a script to delete
temporary files.
28 • Getting Started
MonitorWareAgent 1.3 User Manual
Please note: you should make sure that the base name is different from other “write
to file” actions. Otherwise data might get mixed up in the files.
Having created the new rule set, we now need to create the disk space monitor
service itself. It is the part of the software that actively goes out and monitors the
disk space. To create it, right-click “Running Services” and select “Add Service”,
then “DiskSpace Monitor” as seen below:
MonitorWareAgent 1.3 User Manual
Getting Started • 29
When the wizard starts, you need to name the new service. We use “DiskSpace
Monitor” in our sample. Leave the default settings and click “Next” and “Finish”.
When you select the new service, it is typically bound to the “Defaults” rule set (as
seen above). We need to change this, as we have created the specific “DiskSpace”
rule set. Change the “Rule Set to Use” to update it to the new binding.
Save the configuration and restart he service. After a few moment, the disk space log
file should fill up (if there is less than 20 GB of free space on the monitored
system). In notepad, it looks like follows:
30 • Getting Started
MonitorWareAgent 1.3 User Manual
Monitoring external Devices via PING
In this sample, we use the ping probe to monitor the availability of external devices.
The ping probe issues a standard IP “PING”. Each system that is “pinged” will
provide a reply to the system initiating the ping. When the reply comes back, the
initiator knows that the pinged system is up and running. Please note that this does
not imply that all services on that machine are running. To check this, a port probe
must be used. But at least the ping probe can detect failing systems. It can also used
in any case, whereas the port probe can only be used with TCP based services.
As first step, we create a new rule set. Please see the previous example for the
reasoning of doing so. We call the new rule set “Ping Probe”. We would like to
receive email notifications if the ping probe fails. So we add a “Send Email” action.
After doing so, the screen looks as follows:
We do not customize the send mail action properties in this sample. In your
environment, you need to use some meaningful settings.
Now that we have defined the rule set, we need to create the corresponding service.
To do so, right-click “Running Services” and follow the screen shot below:
MonitorWareAgent 1.3 User Manual
Getting Started • 31
Use a name of your choosing, leave the defaults as is and click “Next” and then
“finish”. We have used the name “Ping Probe” in our sample.
Click the newly created service. We need to uncheck the “Generate an event if
PingProbe was successful” check box. If it is checked, an event is generated every
time. If unchecked, it is generated only when the ping fails. As we are just interested
in failed systems, we uncheck it. So we do not need to apply any other filters. If you
forget to uncheck this option, you will receive multiple emails – one each time the
ping probe runs and probes the configured system.
You screen should now look as follows:
32 • Getting Started
MonitorWareAgent 1.3 User Manual
Now save the settings and restart the service.
Whenever the ping probe fails, you will receive mail. This mail looks as follows:
Event message:
Facility: 16
Priority: 6
Source: 192.168.1.1
Message:
PingProbe Status="error" remoteip="192.168.1.1" PingStatus="11003"
ErrorMessage="Destination Host Unreachable"
A ping probe service can monitor a single device in this version of MonitorWare
Agent. So if you would like to monitor multiple devices, you need to create multiple
ping probe services.
Monitoring External Devices via a PortProbe
This sample is very similar to the ping probe sample directly above. Thus we
describe it briefly, only.
The main difference between the ping probe and the port probe is that the port probe
tries to connect to a specific TCP port. As such, it can only be used with TCP based
services like mail server, web servers or ftp servers. For the very same reason, the
port probe does not only check the status of the machine it is connecting to but rather
if a specific service is available. Let us assume you are interested in monitoring a
mail server. If you do a ping probe, the mail server itself might have died while the
machine is still running. The ping probe can not detect this. The port probe, on the
other hand, directly connects to the mail server, e.g. on port 25 (the default smtp
port). If the mail server has died, it will probably not answer this connection request
and thus the port probe is able to detect the failing state of the service.
MonitorWareAgent 1.3 User Manual
Getting Started • 33
In our sample, we probe a web server, which typically listens to port 80 (the default
port for http). We will send an alert email if the port probe can not connect
successfully to the web server.
Because this sample is so close to the previous one, we do not create a new rule set
specifically for email alerting. It is already covered in the “PingProbe”. This is a
good sample of rule set reuse. It might be clever to rename the rule set in such a case.
For simplicity reasons, we have not done this here.
So we begin by creating the new service, done by right-clicking “Running Services”:
Use a name of your choosing, leave the defaults as is and click “Next” and then
“finish”. We have used the name “Port Probe” in our sample.
After doing so, select the newly created service in the tree view to look at its
properties. Be sure to bind it to the “Ping Probe” rule set as seen below:
34 • Getting Started
MonitorWareAgent 1.3 User Manual
Save the configuration and restart the service. From now on, the following mail alert
will be generated when the port can not be connected to:
Event message:
Facility: 16
Priority: 6
Source: 192.168.1.1
Message:
PortProbe status="fail" target="192.168.1.1" port="80" netstate="10065"
message="Couldn't connect to host"
MonitorWareAgent 1.3 User Manual
Getting Started • 35
Common Uses
MonitorWare Agent can be used in a multitude of ways to perform well in many
different environments serving many different needs. This chapter describes some
typical use cases. It includes pointers what to set up and also what can be achieved.
This chapter provides an overview of the scenario. Detailed setup and configuration
instructions can be found int the “Step-by-Step Guides” on page 37.
This chapter is organized among the four main use cases, which are
•
Analysis
•
Event Archival
•
Alerting
•
Solving Problems
Besides this main benefits, there are also some other scenarios, like relaying event
data. They are also described.
While reading through the scenarios, please keep in mind that MonitorWare Agent is
extremely flexible. A single instance on a single machine can be configured to
perform all actions and functions concurrently. They are grouped here for easier
lookup, but this in no way implies that the Agent can do only one thing or the other.
36 • Common Uses
MonitorWareAgent 1.3 User Manual
Step-by-Step Guides
The step-by-step guides are meant to get you started quickly. They provide
information on how to configure the product in common scenarios. Each section
includes the information necessary to complete a specific task.
The information is presented in an easy to follow “step by step” way (hence the
name). Each section begins with the intended result and then explains the steps to
achieve it in the correct order. They are documented together with hardcopies, so
they should be easy to follow. For best results, please be sure to follow the exact
order of the steps.
The step-by-step guides do not include all information that might be relevant to the
situation. For details on the configuration properties, please see “Configuring
MonitorWare Agent” on page 42.
In the step-by-step guides, we assume the product is already successfully installed
but no configuration has been done. If it is not installed, please do so first.
Information on installing can be found in “Setup” on page 8.
All step-by-step guides assume that the client is running. This is kind of a step 0 for
all the guides.
Creating a simple syslog server
Forwarding NT event logs to a syslog server
Forwarding NT event logs to an SETP server
Creating a rule set for database logging
Centralized event reports with Monilog
Intrusion detection via the Windows event log
Sample syslog device configurations
Firewall setup for MonitorWare Agent
Configuring Windows for the Event Log Monitor
Creating a hardened log host
MonitorWareAgent 1.3 User Manual
Step-by-Step Guides • 37
Using Interactive Syslog Server
With interactive Syslog Server it is easy to immediately display syslog messages.
Interactive syslog server is an add-on to the MonitorWare Agent. It is a syslog server
on its own and runs in the foreground. It is most helpful for troubleshooting
purposes. It is the same program that is included in the WinSyslog product.
In this chapter, you will learn how to work and configure the Interactive Syslog
Server.
Launching the Interactive Syslog Server
To run the Interactive Syslog Server, click the " Interactive Syslog Server" icon
present in the program folder located in the Start menu.
It can also be launched from the command prompt:
•
Open a Command Prompt window
•
Change to the drive and directory where the MonitorWare Agent is
installed.
•
Type " InteractiveSyslogServer.exe " and hit enter.
The Interactive Logging
Interactive Logging enables the client to log syslog messages itself. Therefore, it can
work without the service. However, by default the service is required to run and
needs to be configured to forward syslog messages to port 10514 via UDP. This is
done to prevent conflicts between the interactive server and the background service.
If you do not have a good reason to do so, we strongly recommend using this default
setup.
Interactive syslog is also supported under Windows 9x and Windows Me systems.
The service does not work on these platforms.
38 • Using Interactive Syslog Server
MonitorWareAgent 1.3 User Manual
Start / Stop Logging Buttons
These buttons start and stop Interactive logging. Once started, the client will log all
incoming messages until logging is stopped by the user. Messages are written to a
circular buffer. That means if the maximum buffer size is reached, new messages
will be stored, but older messages will be removed from the buffer. This allows the
client to run for extended periods of time without taking up to much system memory.
The buffer size is configurable. New messages are always displayed on top of the
list. Older ones are towards the bottom.
Write Logfile
If checked, all messages are written to a log file in addition to the interactive display.
Please note that this option influences the client only. If you would like to provide a
reliable long term log, we strongly suggest to use the service. It’s file logging
parameters are customized under the “file tab”.
Resolve Host Names
If checked, the sender is displayed as a host name instead of the IP address. This is
often useful to quickly see the system that sent the message. Please keep in mind,
though, that the host name resolution takes a little bit of time (especially if a host can
not be resolved) and as such should not be used on a loaded system.
Save All
Used to save the current buffer contents to a comma-delimited file (so called CSV
format). All entries displayed in the grid are written.
MonitorWareAgent 1.3 User Manual
Using Interactive Syslog Server • 39
Save Selection
Also saves a comma-delimited file. However, only messages selected (highlighted)
will be written to the file.
Clear All
Erases all messages from real-time display.
Interactive Syslog Server Options
This screenshot shows you the available options in the Interactive Server.
Message Buffersize
The message buffer size (in number of messages) to be used for real-time display.
This is the maximum number of messages to be stored in memory. If this number is
reached and a new message arrives, the oldest one is deleted from memory.
Interactive Syslog Port
The UDP port the real-time display listens to. 0 is default from system services
database. Most installations can leave it at 10514.
File Basename
The File Basename also includes the file path. An example could be
“C:\temp\MWAgent”.
40 • Using Interactive Syslog Server
MonitorWareAgent 1.3 User Manual
File Extension
The File Extension is “txt” by default. This will open the files automatically in the
default text viewer. .
Create unique filenames
If enabled, the Interactive Server will build a unique filename each day containing
the year, month and day. An example would be “Syslog-2002-01-01.txt”.1
Language
The Interactive Syslog Server is multilingual by design. Select the user interface
language here.
Languages are set on a per user basis. They can be switched instantly without the
need to restart.
Additional languages might be made available. Please check www.mwagent.com
from time to time. If you are interested in other languages and volunteer to provide
translation services, please email [email protected]. We will gladly help.
MonitorWareAgent 1.3 User Manual
Using Interactive Syslog Server • 41
Configuring MonitorWare Agent
MonitorWare Agent is easy to use and is powerful.
In this chapter, you will learn how to configure the MonitorWare Agent Service.
The MonitorWare Agent service runs in the background once it is configured. There
is no manual intervention needed to operate it. As such, this chapter focuses on the
MonitorWare Agent configuration client application. It is used to configure the
service settings.
To run the MonitorWare Agent Configuration client, simply click its icon present in
the MonitorWare Agent program folder located in the Start menu. Once started, a
Window similar to the following one appears:
MonitorWare Agent Configuration Client
The configuration client (“the client”) has two elements. On the left hand side is a
tree view that allows you to select the various elements of the MonitorWare Agent
system. On the right hand side are parameters specific to the element selected in the
tree view. In the sample above, the right hand side displays the specific parameters
for a rule action.
The tree view has three top-level elements: General, Running Services and Rules.
Under General, basic operational parameters as well as defaults for actions and
services are defined. The default themselves do not activate anything. However, the
parameters in here are used each time an actual service or action needs a
42 • Configuring MonitorWare Agent
MonitorWareAgent 1.3 User Manual
configuration parameter and none is defined in that specific instance. We highly
recommend putting the most common parameters into the defaults. That will reduce
the amount of data entry in the specific elements dramatically. Please note that each
default can be overwritten in a specific service or action.
The tree view’s Running Services area lists all configured services as well as their
parameters. There is exactly one service entry for each service created. Please note
that there can be as many instances of a specific service type as your application
requires. In the above example, there are two instances of the syslog server, each one
listening to a separate port. Theoretically, you can run a few hundred services in a
single service instance. However, both from a usage scenario point of view as well as
concerning operating system resources, we recommend limiting the services to a
maximum of 20 to 30. Of course, there are some applications where more than this
limit is useful. MonitorWare Agent does not restrict this number. If there is a need
for a large number of services and the hardware is capable of managing all these
tasks, there is nothing in the Agent that limits from doing so.
The service definition looks like this:
MonitorWare Agent Configuration Client - Service Definition View
The actual parameters depend on the service type. Common to all services is the
capability to enable or disable a service. A service is started only if it is enabled.
Otherwise, it will be not run, but the configuration data can still be present. That
way, it is easy to temporarily disable a service without deleting it.
Also common to all service types is the association to a rule set seen at the bottom of
the right hand configuration dialog. This specifies which of the rule sets will be
applied to information units generated by this service.
To create a new service, right click on “Running Services”. Then select “Add
Service” and the respective service type from the pop up menu. Then follow the
wizard. To delete an existing service, right click it and select “Delete Service”. This
will remove the service and its configuration irrecoverable. To temporarily “remove”
a service, simply disable it in the property sheet.
The tree view’s last main element is Rules. Here, all rule sets are configured.
Directly beneath “Rules” are the individual rule sets. Each set is completely
MonitorWareAgent 1.3 User Manual
Configuring MonitorWare Agent • 43
independent from each other. They are just centrally stored so they can be associated
with services (see above for an explanation).
Beneath each rule set are the individual rules. As described in “Fehler!
Verweisquelle konnte nicht gefunden werden.” on page Fehler! Textmarke nicht
definiert., a rule’s position in the list is vitally important. Rules at the top of the rule
set are executed before those further down. To move a rule up or down, simply right
click it and select “move up” or “move down” from the pop up menu.
In the tree view, filter conditions and actions are beneath the rule they are associated
with. Finally, beneath actions are all actions to carry out.
The following sections describe each element’s properties.
License Options
This tab can be used to enter the MonitorWare Agent license after purchase.
License Option Parameters
Registration Name
The registration name is chosen by the user. It should correspond to your
organization name, e.g. a company called "AA Carpenters, Inc." should not choose
"AA" as registration name. This can easily be mistaken and most probably will be
rejected by Adiscon for that reason. With the above scenario, we recommend using
the full company name "AA Carpenters, Inc.".
Please note: the registration name is case sensitive. It must be entered exactly as
given. Leading and trailing spaces are also part of the registration name, so be sure to
enter none.
44 • Configuring MonitorWare Agent
MonitorWareAgent 1.3 User Manual
Registration Number
Adiscon provides this number. It is valid for a specific registration name. Be sure to
enter the correct registration number. The client will detect invalid registration
numbers and report and corresponding error.
Debug Options
This tab can be used to debug rule bases. Especially with complex bases, it might be
necessary to learn what MonitorWare Agent is internally doing while it is processing
them. With the debug log, the service will tell you some of this internal workings.
Other than rule basis testing, the debug log is also helpful when contacting Adiscon
support. An Adiscon support engineer might ask you to set the debug log to a
specific level while doing troubleshooting.
Important: Debug logging requires considerable system resources. The higher the
log level, the more resources are needed. But even the lowest level considerable
slows down the service. As such, we highly recommend turning debug logging off
for normal operations.
Debug OptionsParameters
Enable Debug output into file
If checked, the debug log is enabled and written as the service operates. If
unchecked, no debug log is written.
For performance reasons, it is highly recommended that this box is unchecked during
normal operations.
File and path name
The full name of the log file to be written. Please be sure to specify a full path name
including the driver letter.
If just the file and/or path name is specified, that information is local to the service
default directory. As this depends on a number of parameters, it might be hard to find
the actual log file. So for consistency purposes, be sure the specify a fully qualified
file name including the drive
MonitorWareAgent 1.3 User Manual
Configuring MonitorWare Agent • 45
Debug Level
This controls the amount of debug information being written. We highly recommend
only selecting “Minimum Debugoutput” unless otherwise instructed by Adiscon
support.
Services
MonitorWare Agent services gather information from many sources – like syslogenabled devices, NT event logs, ping probes and many others.
Syslog Server
Configures a syslog server service.
Protocol Type
Syslog messages can be received via either UDP, TCP or RFC3195RAW. One
listener can only listen to one of the protocols. Typically, syslog messages are
received via UDP protocol, which is the default. MonitorWare Agent also can
receive syslog messages via TCP and reliable syslog messages via TCP using the
new RFC 3195 standard.
Listener Port
The port the syslog server listens on. The typical (standard) value is 514. This should
be changed only if there is a definite need for it. Such a need typically arises from
security concerns. If the port is changed, all reporting devices (routers, printers …)
must also be configured to use the non-standard port.
Use Original Message Timestamp
If this box is checked, the timestamp is retrieved from the syslog message itself
(according to RFC 3164). If left unchecked, the timestamp is generated based on the
local system time. The syslog message timestamp does not contain time zone
46 • Configuring MonitorWare Agent
MonitorWareAgent 1.3 User Manual
information. Thus, we strongly recommend unchecking this box if messages from
devices in multiple time zones are to be received.
Take source system from Syslog message
If this box is checked, the name or IP address of the source system is retrieved from
the syslog message itself (according to RFC 3164). If left unchecked, it is generated
based on the address the message was received from.
Please note that there are many devices, that do NOT generate RFC 3164
compliant messages. If you check this option here, you might see a very strange
value as the event source!
Resolve Hostnames
If this box is checked, the name of the source system is retrieved via DNS reverse
name resolution. If unchecked, the IP address itself is used as the name.
Please note that this setting does have no effect if the “Take source system from
Syslog message” setting is checked. In this case, the message is always taken from
the syslog message itself.
Default Rule set Name
Name of the rule set to be used for syslog server services. The rule set name must be
valid.
SETP Server
Configures a SETP server service. A SETP server is used inside the MonitorWare
line of products to reliable receive events from other systems. There are only few
configuration options, as SETP takes the original message from the sender and uses
the exact settings that the sender was configured for. No alteration occurs at the
SETP server side, as such no values need to be configured for the message format.
SETP Server Properties
Listener Port
The port the SETP server listens on. The default value is 5432. This should be
changed only if there is a definite need for it. Such a need typically arises from
security concerns. If the port is changed, all reporting agents must also be configured
to use the non-standard port.
SETP operates over TCP.
MonitorWareAgent 1.3 User Manual
Configuring MonitorWare Agent • 47
Default Ruleset Name
Name of the rule set to be used for syslog server services. The rule set name must be
valid.´
Event Log Monitor
This dialog configures event log monitor services. These services offer capabilities
like Adiscon’s EventReporter product. To allow previous EventReporter customers
seamless upgrades to the MonitorWare Agent, it has a number of compatibility
settings to support older message formats.
Use Legacy Format
This option enhances compatibility to scripts and products working with previous
versions of EventReporter. The legacy format contains all Windows event log
properties within the message itself.
The new format includes the plain text message only. The additional information
fields (like event ID or event source) are part of the XML formatted event data. If the
new format is used, we highly recommend sending or storing information in XML
format. This is an option in each of the action properties (of those actions that
48 • Configuring MonitorWare Agent
MonitorWareAgent 1.3 User Manual
support it – the write database option for example always stores the fields separated,
so there is no specific option to do so).
Add Facility String
If checked, facility identification is prepended to the message text generated. This
parameter enhances compatibility with existing syslog programs and greatly
facilitates parsing the generated entries on the syslog server. We strongly encourage
users to use this enhancement.
However, pre-version 3.2 EventReporter customers might want to turn it off to
preserve compatibility with their existing parsing scripts. These versions did not
support the "facility string.
This setting does only apply if the “Use Legacy Format” option is checked.
Otherwise, it does not have any meaning and consequently cannot be configured in
that case.
Syslog Message Numbers
If checked, a continuously advancing message number is prepended to the generated
message. This is useful for syslog delivery to make sure that all messages have been
received at the remote server.
This setting does only apply if the “Use Legacy Format” option is checked.
Otherwise, it does not have any meaning and consequently cannot be configured in
that case.
Add Username
If checked, the NT user that generated the event log entry is transmitted. If
unchecked, this information is not forwarded.
This is a configurable option for customers who have written scripts to parse
EventReporter output. This option must also be unchecked if MoniLog is being used.
This setting does only apply if the “Use Legacy Format” option is checked.
Otherwise, it does not have any meaning and consequently cannot be configured in
that case.
Default Ruleset Name
Name of the rule set to be used for syslog server services. The rule set name must be
valid.
Sleep Time
The event log monitor periodically checks for new event log entries. The “Sleep
Time” parameter specifies how often this happens. This value is in milliseconds.
We recommend a value of 60000 milliseconds for the “Sleep Time”. With that
setting, the event log monitor will check for new events every 60 seconds. Larger
periods can be specified for occasionally connected systems or if email delivery with
few emails per day is intended.
Very security-aware environments might use a shorter interval. The MonitorWare
Agent is specifically designed to limit the burden on the monitored system. As such,
resource usage is typically low, even with frequently run event log checks. However,
we recommend not running the event log monitor more often than once a second.
MonitorWareAgent 1.3 User Manual
Configuring MonitorWare Agent • 49
Overrun Prevention Delay
This property allows configuring a delay after generating an event. The time is the
delay in milliseconds.
If run at a value of zero, the MonitorWare Agent generates events as fast as the
machine permits. We have seen scenarios where routers and receivers are not able to
keep up with this rate, resulting in packet loss. In addition, the CPU of the reporting
machine is run at 100% - which is not a problem because MonitorWare Agent runs at
a low priority. However, with even a 1-millisecond delay, there is no noticeable CPU
activity even when large bursts of events are forwarded. At one millisecond,
MonitorWare Agent can still generate 1000 events per second.
The default setting is an overrun protection of five millisecond, which allows
roughly 200 events per second. This should be sufficient for even very busy servers.
Event Log Types
The “Event Log Types” configure per-event-log settings. The corresponding log
will only be processed if the respective “Enable” checkbox is checked. The
parameters are common to all logs and will be explained only once. Each dialog
looks similar:
Report Truncated Log
Windows NT event logs can be truncated programmatically or via the NT Event
Viewer program. When a log is truncated, all information is erased from it. Any
entries not already processed by the agent will be lost.
The agent detects event log truncation. If "Report Truncated Log" is checked, it will
generate a separate message stating the truncation. This option is most useful in
environments where truncation is not expected and as such might be an indication of
system compromise.
If you regularly truncate the NT event logs as part of your day-to-day operation, we
suggest you turn this option off. In this case, we also recommend using a short sleep
period (for example 10,000 which is 10 seconds) to avoid loosing log entries.
50 • Configuring MonitorWare Agent
MonitorWareAgent 1.3 User Manual
Syslog Facility
The syslog facility to map information units stemming from this log to. Most useful
if the message shall be forwarded to a syslog daemon.
Last Record
NT event log records are numbered serially, starting at one. The agent service
records the last record processed. This textbox allows you to override this value. Use
it with caution!
If you would like a complete dump of a specific NT event log, reset the "Last
Record" to zero. If you missed some events, simply reset it to some lower value than
currently set. It is possible to set "Last Record" to a higher value. This will suspend
event reporting until that record has been created. We strongly discourage to use this
feature unless definitely needed.
Event Types to Log
These checkboxes allow local filtering of the event log. Filtering is based on the NT
event type. There is a checkbox corresponding to each NT event type. Only checked
event types will be processed. Unchecked ones will be ignored.
Filtering out unnecessary log types at this level enhances system performance
because no information units will be generated and passed to the rule engine. Thus,
Adiscon strongly recommends dropping unnecessary log types.
Important notice to pre version 6 EventReporter Customers
EventReporter had advanced filtering options. These options could be used to filter
event log records based on their type, source and other settings. This functionality
has been superseded by the rule engine. Consequently, it is no longer available at the
event log monitor level.
File Monitor
The file monitor monitors the content of a text file just as the event monitor monitors
the NT event log. Its purpose is to gather vital information that is stored in system
text files. Many applications do not write events to the event log but to a text file.
This is also the case with many Microsoft applications (for example the WINS log).
The file monitor can also gather Internet Information Server (Windows’ web server)
log files. This is very useful for monitoring web activity and detecting attacks.
MonitorWareAgent 1.3 User Manual
Configuring MonitorWare Agent • 51
File and path name
Here, type the name of the file to be monitored. To select a file from a browser, press
the browse button. If a complete file name is specified, exactly that file is monitored.
The file name will never change automatically. However, many systems generate
changing log files. For example, Internet Information Server can be configured to
change the log file every day. Therefore, each day’s log file has a different name.
To support changing log file names, there are replacement characters available
within the file name. These are:
Character
Meaning
%y
Year with two digits (e.g. 2002 will become “02”)
%Y
Year with 4 digits
%m
Month with two digits (e.g. March will become “03”)
%M
Minute with two digits
%d
Day of month with two digits (e.g. March, 1st will
become “01”)
%h
Hour as two digits
%S
Seconds as two digits. It is hardly believed that this will
ever be used in reality.
%w
Weekday as one digit. 0 means Sunday, 1 Monday and so
on.
%W
Weekday as three-character string. Possible values are
“Sun”, “Mon”, “Tue”, “Wed”, “Thu”, “Fri”, “Sat”. This
replacement character is most useful for DHCP log files.
52 • Configuring MonitorWare Agent
MonitorWareAgent 1.3 User Manual
Please note: the replacement characters are case sensitive!
For example, daily Internet Information Server log files are named “exyymmdd.log”,
with yy being the 2 digit year, mm the month and dd the day of month. To generate
the same name with file monitor, use the following name “ex%y%m%d.log”.
Please note that there is no replacement character for the monthly week number (1st
week, 2nd week). As such, the weekly log file setting of IIS is not supported.
Check Interval
This is the interval, in milliseconds, that the file monitor checks the file for new
records.
We recommend a value of 60000 milliseconds for the “Check Interval”. With that
setting, the file monitor will check for new records every 60 seconds. Larger periods
can be specified for occasionally connected systems or if email delivery with few
emails per day is intended.
Very security-aware environments might use a shorter interval. The MonitorWare
Agent is specifically designed to limit the burden on the monitored system. As such,
resource usage is typically low, even with frequently run file monitor checks.
However, we recommend not running the file monitor more often than once a
second.
Syslog Facility
The syslog facility to be assigned to events created by the heartbeat service. Most
useful if the message shall be forwarded to a syslog daemon.
Syslog Priority
The syslog priority to be assigned to events created by the heartbeat process. Most
useful if the message shall be forwarded to a syslog daemon.
Syslog Tag Value
The syslog tag value to be assigned to events created by the heartbeat process. Most
useful if the message shall be forwarded to a syslog daemon.
Resource ID
The resource id to be assigned to events created by the heartbeat process. Most
useful if the message shall be forwarded to a syslog daemon.
Default Ruleset Name
Name of the rule set to be used for this service. The rule set name must be valid.
Heartbeat
The heartbeat process can be used to continuously check if the MonitorWare Agent
is running. It generates an information unit every specified time interval. That
information unit can be forward to a different system. If it does not receive additional
packets within the configured interval, it can doubt that the Agent is either in trouble
or already stopped running.
MonitorWareAgent 1.3 User Manual
Configuring MonitorWare Agent • 53
Message to Send
This is the message that is used as text inside the information unit. Use whatever
value is appropriate. There is no check inside MonitorWare for a specific value.
Sleep Time
This is the interval, in milliseconds, that the heartbeat service generates information
units in. Please note that the receiving site should be tolerant. The interval specified
here is the minimum time between packets. Under heavy load, the interval might be
slightly longer. It is good practice to allow twice this interval before the Agent is
considered suspect by the system monitoring the agent’s health.
Syslog Facility
The syslog facility to be assigned to events created by the heartbeat service. Most
useful if the message shall be forwarded to a syslog server.
Syslog Priority
The syslog priority to be assigned to events created by the heartbeat process. Most
useful if the message shall be forwarded to a syslog server.
Syslog Tag Value
The syslog tag value to be assigned to events created by the heartbeat process. Most
useful if the message shall be forwarded to a syslog server.
Resource ID
The resource id to be assigned to events created by the heartbeat process. Most
useful if the message shall be forwarded to a syslog daemon.
54 • Configuring MonitorWare Agent
MonitorWareAgent 1.3 User Manual
Default Ruleset Name
Name of the rule set to be used for this service. The rule set name must be valid.
Ping Probe
The ping probe can be used to check the health of a remote system. The ping probe
process sends ping messages2 to a configured system. If configured properly, the
remote system will send a response. If this response is received, the machine and its
IP stack are operating. This does not indicate, however, that all services on this
machine are alive.
If no response is received, the remote system or its IP stack is most probably not
operating properly. However, the ping message might have been lost in transit or the
round-trip time might have been too long so that a timeout occurred. Therefore, a
single failing ping makes a system suspect, but it alone cannot be used to confirm
problems at the remote system. If multiple successive pings fail, it is relatively safe
to assume that the remote system has failed
Please note that most firewall setups do not allow ping messages. As such, a system
behind a firewall typically cannot be pinged and the ping probe cannot be used in
this configuration. If in doubt, please check with your firewall administrator.
The ping probe is typically used to check the availability of a remote system. The
ping probe periodically sends the ping messages. As long as responses are received,
nothing happens. If no response is received, it generates an event and passes it to the
rule engine. As ping messages can get lost, the ping probe will retry failed probes
before it reports an error. Both the number of retries and the retry interval can be
specified.
2
more precisely: ICMP Echo Requests
MonitorWareAgent 1.3 User Manual
Configuring MonitorWare Agent • 55
Probe Interval
This is the interval of the ping probes. After each probe, the MonitorWare Agent
ping probe process goes “to sleep”. This period is specified in milliseconds.
Timeout Limit
The amount of time (in milliseconds) the remote system is expected to answer in. If
no response is received within this period, the ping fails and an event is generated.
The default value of 1000 milliseconds is a proper value for most well connected
networks. If the ping probe runs against a heavily loaded system and/or slow
network link, the amount must be adjusted accordingly.
IP Address / Hostname
Either the IP address or resolvable host name of the system the ping probe is to be
run against. This system has been called “remote host” in the description above.
Please note that specifying a host name can cause the ping probe to fail if DNS name
resolution fails (for example due to a failing DNS server). To avoid this, specify an
IP address.
Syslog Facility
The syslog facility to be assigned to events created by this service. Most useful if the
message shall be forwarded to a syslog server.
56 • Configuring MonitorWare Agent
MonitorWareAgent 1.3 User Manual
Number of Retries
If a ping fails, it is first retried to see if it is a persistent problem. The “Number of
Retries” controls how many retries will be made. If this is set to zero, no retries will
be made and a ping probe fail event is immediately generated.
For typical systems, we recommend a setting of three retries. This is also the default
value.
Retry Interval
If there is a temporary network issue like network congestion, it most probably takes
some seconds to resolve it. As such, an immediate retry might not be appropriate. To
delay it, configure a retry interval. This value is in milliseconds. If a ping fails, the
next retry will be after a pause specified in this property.
The default and recommended value is 5 seconds (5000 milliseconds).
Syslog Priority
The syslog priority to be assigned to events created by this service. Most useful if the
message shall be forwarded to a syslog server.
Syslog Tag Value
The syslog tag value to be assigned to events created by this service. Most useful if
the message shall be forwarded to a syslog server.
Resource ID
The resource id to be assigned to events created by this service. Most useful if the
message shall be forwarded to a syslog server.
Default Ruleset Name
Name of the rule set to be used for this service. The rule set name must be valid.
Port Probe
The port probe is very similar to the ping probe described above. The main
difference is that it does not check the IP stack availability but rather a specific TCP
port.
The difference here is that using this method a specific service on the remote
machine is monitored, for example a mail (SMTP) server. The port probe tries to
connect to the service port (25 in our example). If that fails, the service is definitely
not running. In this case, an event will be generated. A single event is a definite
indication of problems, as such there is no need for repetitive failures before
initiating action on this (although this can be configured in the rule engine).
Being able to connect to the remote machine and service TCP port most probably
means that the remote service is running. However, more certainty can be gained by
actually initiating some communication with the service. The exact application
protocol needs to be known to try this test. Thus, this step is optional. If turned on, a
single command can be send to the remote service and a single response will be
expected back and be compared to a pre-defined response. This does not take care of
all possible application protocols, but provides an additional layer of confidence for
important services like SMTP. It is up to the user to know the command sequences
that a given service will understand and reply with.
MonitorWareAgent 1.3 User Manual
Configuring MonitorWare Agent • 57
As a rule of thumb, the port probe provides superior protection against service failure
even without checking the message exchange. So if in doubt, use it without this
advanced feature.
Please note that the port probe can probe TCP based services only. Most application
services are TCP based, but there are some – mostly system – services out there, that
are not. One of the most notable exceptions is DNS, which is operated primarily over
UDP. In UDP, there is no notion of a session and as such, it is not possible to probe
the session setup, which essentially is what the port probe does. As such, a port
probe can unfortunately not be used to check the status of those services. However,
the majority of services like application server, databases, mail, web and a large
number of others can be used with the port probe.
Probe Interval
This is the interval of the port probes. After each probe, the MonitorWare Agent port
probe process goes “to sleep”. This period is specified in milliseconds.
Timeout Limit
The amount of time (in milliseconds) the remote system is expected to answer in. If
no response is received within this period, the ping fails and an event is generated.
The default value of 1000 milliseconds is a proper value for most well connected
networks. If the ping probe runs against a heavily loaded system and/or slow
network link, the amount must be adjusted accordingly.
58 • Configuring MonitorWare Agent
MonitorWareAgent 1.3 User Manual
IP Address / Hostname
Either the IP address or resolvable host name of the system the ping probe is to be
run against. This system has been called “remote host” in the description above.
Please note that specifying a host name can cause the ping probe to fail if DNS name
resolution fails (for example due to a failing DNS server). To avoid this, specify an
IP address. Please note that you typically can use 127.0.0.1 (the so-called loop back
address) to check a service that is running on a local machine. This ability might be
limited by service configuration, because the service must listen to that IP address).
Port
This port is to be probed. Please see your server’s reference for the actual value to
use. For example, mail servers typically listen to port 25 and web servers to 80.
Send Message and wait for expected Message
If left unchecked, the port probe checks the TCP session setup to the remote service
only. As stated above, a successfully completed session setup most probably means
the service is healthy. As an extra measure, some actual message exchange can be
enabled. This is done by checking this box.
Message to Send
This message text will be sent to the service after the TCP session has been
established.
Message Expected
This is the message expected to be received from the service. Reception starts after
sending the “Message to Send”. Please note that the “Message Expected” is
compared against the first message sent from the service on the TCP session. With
some protocols, this means the message compared will be an initial greeting message
and not a response to the “Message to Send”.
Default Ruleset Name
Name of the rule set to be used for this service. The rule set name must be valid.
NT Services Monitor
The NT Services Monitor is used to monitor if vital operating services are running.
The monitor continuously checks all services set to “automatic” startup. If such a
service does not run, an event is generated and passed to the rule engine.
MonitorWareAgent 1.3 User Manual
Configuring MonitorWare Agent • 59
Check Interval
This is the interval in which the service status is checked. This period is specified in
milliseconds. The default is 60,000 ms, which is one minute. We recommend to
lower this interval only if the server is performing very critical operations and
service stops need to be detected in close real-time.
For performance reasons, we do not recommend using an interval of less than 2000
ms.
Delay on Startup
During system boot, MonitorWare Agent most likely starts before all other services
have been started. As such, the service monitor will most probably find some
services not running – simply because they are to be started very soon. Nevertheless,
MonitorWare Agent will still generate a “service not running” event.
To avoid this situation, use the startup delay setting. It specifies an amount of time
(in milliseconds) that the service monitor will be hold right after startup. So during
system boot, the operating system has a chance to start all other services before the
service monitor comes into action.
The actual delay is very much depending on the number of services and hardware
sizing of a particular server. Typically, a value 60,000 (one minute) should be a good
bet. But a busy server with many services might require a much higher value.
Syslog Facility
The syslog facility to be assigned to events created by this service. Most useful if the
message shall be forwarded to a syslog server.
60 • Configuring MonitorWare Agent
MonitorWareAgent 1.3 User Manual
Syslog Priority
The syslog priority to be assigned to events created by this service. Most useful if the
message shall be forwarded to a syslog server.
Resource ID
The resource id to be assigned to events created by this service. Most useful if the
message shall be forwarded to a syslog server.
Syslog Tag Value
The syslog tag value to be assigned to events created by this service. Most useful if
the message shall be forwarded to a syslog server.
Rule Set to Use
Name of the rule set to be used for this service. The rule set name must be valid.
Disk Space Monitor
This monitor checks the available and used space on all hard disks in the system. All
hard disks present in the system are automatically checked. New disks are
automatically detected. One event specifying the maximum size and the used size is
generated per disk. The Disk Space Monitor runs continuously based on an interval
set in the configuration.
Check Interval
This is the interval in which the service status is checked. This period is specified in
milliseconds. The default is 60,000 ms, which is one minute. This should be
sufficient for a typical server. If you would like to have the disk space check run less
MonitorWareAgent 1.3 User Manual
Configuring MonitorWare Agent • 61
often, you might for example use the value of 3,600,000 for one hour (or a multiple
for multiple hours).
For performance reasons, we do not recommend using an interval of less than 30,000
ms.
Syslog Facility
The syslog facility to be assigned to events created by this service. Most useful if the
message shall be forwarded to a syslog server.
Syslog Priority
The syslog priority to be assigned to events created by this service. Most useful if the
message shall be forwarded to a syslog server.
Resource ID
The resource id to be assigned to events created by this service. Most useful if the
message shall be forwarded to a syslog server.
Syslog Tag Value
The syslog tag value to be assigned to events created by this service. Most useful if
the message shall be forwarded to a syslog server.
Rule Set to Use
Name of the rule set to be used for this service. The rule set name must be valid.
62 • Configuring MonitorWare Agent
MonitorWareAgent 1.3 User Manual
Filter Conditions
Filter conditions specify when to apply a rule. If the filter condition evaluates to true,
the rule containing those conditions is treated as matching and the actions specified
in that rule will be carried out.
Filter conditions can be as complex as needed. Full support for boolean operations
and nesting of conditions is supported.
By default, the filter condition is empty, respective contains only a single “AND” at
the top level. This is to facilitate adding filters (the top level-node is typically
“AND” and thus provided by default. A filter condition containing only the “AND”
always evaluates as true. A sample screenshot can be found below:
The default filter condition means that the actions associated with the rule are to be
carried out for every information unit received. It is often used for actions that should
be broadly taken, for example to write all incoming information units to a database
or text file.
MonitorWareAgent 1.3 User Manual
Configuring MonitorWare Agent • 63
On the other hand, there are actions that should only be executed under very special
conditions. They may even require a complex filter condition including multiple
levels of Boolean operations. Below is a sample of such a condition:
This filter condition is part of an intrusion detection rule set. Here Windows file
system auditing is used to detect a potentially successful intrusion via Internet
information server. This is done by enabling auditing on all executable files. Internet
Information Server will access them under the IUSR_<machinename> account,
which in our sample is “P15111116\IUSR_ROOTSERVER”. If that user runs any
unexpected executables, chances are good that someone was able to intrude the
machine via IIS. Please note that perl and PHP scripts need to run the perl and PHP
engine. This is reflected by specifically checking if perl.exe and php.exe is executed
– and if so, no alarm shall be triggered.
Here is how the above sample works: first of all, the message contents is checked if
it contains either the full path name to perl.exe or php.exe. This is done in the “OR”
branch at the bottom. We now need to keep in mind that when a filter condition
evaluates to “true”, the actions are executed.. In case of perl.exe and php.exe this is
just the opposite of what we want. We need it to be executed, when other files are
executed. Consequently, we negate (Boolean “NOT”) the result of the OR. The end
result of the “NOT” operation is then combined via a “AND” with some other
properties describing the event we need. First of all, we check if the specific event
really occurred. For this, we need to make sure we deal with an Event Log Monitor
infounit. Then, these infounits are identified by the event source as well as the event
id. We also check for the event user to identify only IIS generated requests. Lastly,
we check if the message contains the string “.exe”.
In order to avoid too frequent alerts, we also have specified a minimum wait time of
60 seconds. So the filter condition will evaluate as “true” at most every 60 seconds,
even if all other conditions are true.
64 • Configuring MonitorWare Agent
MonitorWareAgent 1.3 User Manual
Global Conditions
Global Conditions apply to the rule as whole. They are automatically combined with
a logical “AND” with the conditions in the filter tree.
Fire only if Event occurs
This is kind of the opposite of the “Minimum Wait Time”. Here, multiple events
must come in before a rule fires. Take another example. This time, we use a ping
probe. Ping is not a very reliable protocol, so a single ping might be lost. Thus, it
may not be the best idea to restart some processes just because a single ping failed. It
would be much better to wait for repetitive pings to fail before doing so.
Exactly this is why the “Fire only if Event Occurs” filter condition is made for. It
waits until a configured amount of the same events occurs within a period. Only if
the count is reached, the filter condition matches and the rule can fire.
If you used previous versions of the product, you might remember a filter called
“Occurrences”. This has just been renamed.
Minimum Wait Time
This filter condition can be used to prevent rules from firing to often. For example, a
rule might be created to check the status of a port probe event. The port probe probes
an SMTP server. If the event is fired and the rule detects it, it will spawn a process
that tries to restart the service. This process will take some time. Maybe the SMTP
gateway need some more time to fully start up so that the port probe might fail again
while the problem is already taken care of. The port probe as such will generate an
additional event. Setting a minimum wait time will prevent this second port probe
event to fire again if it is – let’s say – within 5 minutes from the original one. In this
case, the minimum wait time is not yet reached and as such, the rule will not match.
If, however, the same event is generated 5 hours later (with the mail gateway failing
again), the rule will once again fire and corrective action taken.
Operations
In general, Operations describes how Filter conditions are linked together. The
following Operations can be used.
AND
All filters below must be true. Only then AND will return true.
OR
Even if one filter below OR is true, OR will return true.
NOT
Only one Filter can below NOT operation, and if the filter evaluation is true, NOT
will return false.
XOR
Only one to two Filters are possible in the XOR Operation.
TRUE
Useful for debugging, will just return TRUE.
MonitorWareAgent 1.3 User Manual
Configuring MonitorWare Agent • 65
FALSE
Useful for debugging as well, will return FALSE.
Filters
Filters can be added under each Operation node. There are a few common filters
which can be used for all Services, and there are special filters which only apply if a
special kind of InfoUnit is evaluated. Note, if a filter is used that does not apply to
the evaluated InfoUnit, it will be just ignored. This gives you the possibility to build
one Filterset for several types of InfoUnits.
For details on how filter conditions are evaluated, please see “Fehler!
Verweisquelle konnte nicht gefunden werden.” on page Fehler! Textmarke nicht
definiert..
There are different types of Filter, and so there a different ways in which you can
compare them to a value. The following Types exist:
String
Can be compared to another String with “=”, “Not =” and “Range Match”.
Number
Can be compared with another number with “=”, “Not =”, “<” and “>”
Boolean
Can be compared to either TRUE or FALSE with “=” and “Not =”
Time
Can be compared with another time but only with “=”.
Below is a List of possible filters, which can be evaluated.
General
These are non-event log specific settings.
Source System
This filter condition checks the system that generated the information unit. For
example, in case of the syslog server, this is the syslog device sending a syslog
message.
This filter is of type sting and should contain the source system name or IP address.
Message Content
The message content filter condition is very powerful. It evaluates to true if the
specified content is found anywhere within the message. As there is implicit
wildcarding, there is no need for extra wildcards to be specified.
The content search can be limited to a region within the message. To do so, select a
starting and ending position within the string. This can be done via the start and end
list boxes. Please note that you can enter the character position you desire in these
fields. The default “Start” and “End” or only there as shortcuts. If you would like to
search for a string just between positions 10 and 50, specify these values as start and
end values, respectively.
66 • Configuring MonitorWare Agent
MonitorWareAgent 1.3 User Manual
This filter is of type string.
Status Name and Value (Type=String)
Date/Time
This filter condition is used to check the time frame (and/or day of week in which an
event occurred. For example, a syslog message from a Cisco router saying that it
dialed up is normal if it occurs during office hours. If it occurs at night, so, it is an
alerting signal and an administrator might receive notification of this event (while he
might otherwise decide to discard it). This can be done with the time setting.
The following filters are available in detail:
Start time (Type=Time)
End Time (Type=Time)
Run on Monday (Type=Boolean)
Run on Tuesday (Type=Boolean)
Run on Wednesday (Type=Boolean)
Run on Thursday (Type=Boolean)
Run on Friday (Type=Boolean)
Run on Saturday (Type=Boolean)
Run on Sunday (Type=Boolean)
InformationUnit Type
Select the specific information if a rule should just be processed for some
information unit types. This is especially useful if a specific type needs non-standard
processing. There is one pre-defined filter for each possible InformationUnitType
available (shown below).
Syslog (Type=Boolean)
Heartbeat (Type=Boolean)
Event Log Monitor (Type=Boolean)
File Monitor (Type=Boolean)
Ping Probe (Type=Boolean)
Port Probe (Type=Boolean)
NT Services Monitor (Type=Boolean)
Disk Space Monitor (Type=Boolean)
Syslog
Syslog related filters are grouped here. Please keep in mind that every
InformationUnit has assigned a syslog priority and facility and thus these filters can
be used with all InformationUnits.
MonitorWareAgent 1.3 User Manual
Configuring MonitorWare Agent • 67
Syslog Priority
The information unit must have the specified syslog priority value. For syslog type
information units, it is the actual syslog priority code, for all others it is a value
mapped on a best effort basis.
The first list box allows to set a matching mode. The operations “less than” (<),
“greater than” (>) and “equal” (=) can be selected. The match is made depending on
these operations, so a “less than” operation means that all priorities below the
specified priority math. Please note that the specified priority is not a match. If you
would like to include it, be sure to specify the next higher one.
Syslog Facility
The information unit must have the specified syslog facility value. For syslog type
information units, it is the actual syslog priority code, for all others it is a value
mapped on a best effort basis.
Event Log Monitor
Event log monitor specific filters are grouped here.
Event ID
This is the event log id as specified in the NT event log. If enabled, the event must
have the configured event id or the rule will not match. This is an integer value.
This filter condition should only be used with event log information units. If used
with others, a mapped value will be used which might not properly reflect the actual
value.
This filter is of type number.
Event Source
This is the event log source as specified in the NT event log. If enabled, the event
must have the configured event source or the rule will not match. This is a string
value. There must be an exact match. Please note that this value is case-sensitive.
This filter condition should only be used with event log information units. If used
with others, a mapped value will be used which might not properly reflect the actual
value.
This filter is of type string.
EventLog Severity
This is the event log severity as specified in the NT event log. If enabled, the event
must have the configured severity or the rule will not match. The supported values
can be selected from the list box.
This filter condition should only be used with event log information units. If used
with others, a mapped value will be used which might not properly reflect the actual
value.
This filter is of type number.
NT Service Monitor
NT Service Name (Type=String)
68 • Configuring MonitorWare Agent
MonitorWareAgent 1.3 User Manual
DiskSpace Monitor
This filter works with the disk space report, only. It can be used to trigger actions
when disk space is running low and / or becoming free again.
Disk Space left (MB) (Type=Number)
Disk Space left (GB) (Type=Number)
Disk Space left (%)(Type=Number)
Actions
Actions are carried out when the filter conditions of a given rule match.
File Options
This configuration dialog is available both in the defaults section as well as with file
logging actions.
File logging is used to write text files of received messages. One file per day is
written. New entries are appended to the end of the file.
File locks are released when currently no data is written. Therefore, other
applications can access the files while the service is running. However, please be
sure that the other applications do not place a file-lock onto it. Popular WordPad
does so. In this case, the service will not be able to log any further messages (an error
event is written to the NT event log in this case). We recommend copying the file
when accessing it at runtime - or use notepad.exe, which does not place file-locks on
the files it opens.
The filename is build as follows:
<FilePathName><FileBaseName>-year-month-day.<FileExtension>
with the parameters in brackets being configured via the dialog.
MonitorWareAgent 1.3 User Manual
Configuring MonitorWare Agent • 69
File Logging Options
Create unique Filenames
If checked, MonitorWare Agent will create a unique file name for each day. This is
done by adding the current date to the base name (as can be seen above).
If left unchecked, the date is not added and as such, there will be a single file,
consistent file name. This is used by some customers that have custom scripts to look
at the file name.
Click here for a sample screen-shot.
Use UTC in Filename
This works together with the “Create unique Filenames” setting. If unique names are
to be created, the “Use UTC in Filename” selects if the file name is generated based
on universal coordinated time (UTC) or on local time. UTC was formerly referred to
as “GMT” and is the basis of the time zone system. For example, New York, USA is
5 hours behind UTC. Therefore, if it is 12 noon in New York, the UTC time is 5pm.
When it comes to log file creation, it means that the date is computed on UTC.
Taking the same example, if the “Use UTC in Filename” is checked, the log file
name would roll over to the next date at 7pm New York time. If it were unchecked,
the rollover would occur exactly at midnight New York time (5am UTC).
70 • Configuring MonitorWare Agent
MonitorWareAgent 1.3 User Manual
Using UTC for file name creation can be helpful if log files are written among
different time zones and later consolidated. Using UTC ensures a consistent time
notation across all log files.
Please note that this setting does affect the file name creation only. The dates
recorded inside the file are controlled by a different setting.
Click here for a sample screen-shot.
File Path Name
The base path (directory) of the file. Please see above for exact placement. Default is
"c:\temp".
Click here for a sample screen-shot.
File Base Name
The base name of the file. This is the part before the date specific information. Please
see above for exact placement.
Click here for a sample screen-shot.
File Extension
The extension to be used when writing the file. Please see above for exact placement.
Default is ".log".
Click here for a sample screen-shot.
File Format
This controls the format that the log file is written in. The default is “Adiscon”,
which offers most options. Other formats are available to increase log file
compatibility to third party applications.
The “Raw syslog message” formats writes raw syslog format to the log file. That is,
each line contains the syslog message as of RFC3164. No specific field processing or
information adding is done. Some third party applications require that format.
The “WebTrends syslog compatible” mimics the format that WebTrends applications
expect. Please note that we only mimic the log file format. It is still the job of the
reporting device (most notable firewall) to generate the correct WebTrends WELF
format. The “WebTrends” format is supported because many customers would like
to use MonitorWare Agent enhanced features while still having the ability to work
with WebTrends.
Please note that any other format besides “Adiscon Default” is a fixed format. As
such, if it is selected, all other formatting options do not apply and consequently are
turned off.
Click here for a sample screen-shot.
Include Source in Filename
If checked, the file name generation explained above is modified. The source of the
syslog message will be automatically added to the file name.
This feature has been introduced because many customers would like to have
separate log files for each device. While this can be achieved with multiple rules, it is
much more straightforward with this single checkbox. If it is checked, the messages
MonitorWareAgent 1.3 User Manual
Configuring MonitorWare Agent • 71
are automatically written to separate files and the file name includes the originating
device information.
Click here for a sample screen-shot.
Use XML to Report
If checked, the message part includes a complete XML-formatted information
record. It includes additional information like timestamps, syslog facility and priority
and others in an easy to parse format. If XML output format is selected, you might
consider turning all other information fields off, as they are already included in the
XML stream. However, this is not a requirement.
Click here for a sample screen-shot.
Use UTC for Timestamps
Please see the definition of UTC above at “Use UTC in Filename”. This setting is
very similar. If checked, all time stamps will be written in UTC. If unchecked, local
time will be used instead. Again, UTC is useful if logs written in multiple time zones
are to be consolidated.
Click here for a sample screen-shot.
Include <Fieldname>
The various “include” settings control which fields are written to the log file. All
fields except the message part itself are optional. If a field is checked, it will be
written to the log file. If unchecked, it will not be written. All fields are commadelimited.
Please note the difference between the “Date and Time” and “Date and Time
reported by Device”. Both are timestamps. Either both are written in local time or
UTC based on the “Use UTC for Timestamps” check box. However, “Date and
Time” is the time the message was received by MonitorWare Agent. Therefore, it
always is a consistent value.
In contrast, the “Date and Time Reported by Device” is a timestamp taken from the
actual message. As such, it is dependent on the reporting device clock, which might
be off. In addition, in the case of syslog messages, there is no time zone information
within the device reported timestamp. As such, if devices from multiple time zones
are reporting, the timestamp information is not consistent. This is due to syslog
design as of RFC 3164. The syslog server can be configured to ignore the RFC in
this case and provide a consistent time stamp. However, from the view of the log file
writer, the “Date and Time Reported by Device” might not be as trustworthy as the
“Date and Time” field. Nevertheless, it might also be more useful than the former
one. This is the reason both timestamps are present and can individually be selected.
The “Include Message” and “Include RAW Message” fields allow to customize the
message part that is being written. The raw message is the message as it was
received by MonitorWare Agent – totally unmodified. This might be useful if a third
party application is expecting raw syslog entries. The message itself is just that part
of the syslog message that is being parsed as message, that is without e.g. host
information or a tag value. Please note that we recommend selecting only one of
these options, as otherwise two message fields will be written. Similarily, if non is
selected no message is written at all. Please note that we support these
configurations, too – there might be a legitimate need for them.
Click here for a sample screen-shot.
72 • Configuring MonitorWare Agent
MonitorWareAgent 1.3 User Manual
Database Options
Database logging allows persisting all incoming messages to a database. Once they
are stored inside the database, they can easily be browsed by different message
viewers as well as custom applications.
Database logging allows writing incoming events directly to any ODBC-compliant
database (virtually any database system currently available for the Windows
operating system supports ODBC). Adiscon directly supports Microsoft JET
databases (as used by Microsoft Access) and Microsoft SQL Server. We also know
of many customers who run it successfully with Oracle and Sybase as well as a
variety of other systems.
DSN
This is the name of the system data source (DSN - data source name) to be used
when connecting to the database. Create this in ODBC manager (can be found in
control panel under Windows NT). Press the “Data Sources (ODBC)” button to start
the operating system ODBC Administrator where data sources can be added, edited
and removed.
MonitorWareAgent 1.3 User Manual
Configuring MonitorWare Agent • 73
Important: The DSN must be a system DSN, not a user or file DSN. The DSN must
be configured to have the correct connection parameters (for example database type
and name, server name, authentication mode, etc.).
Click here for a sample screen-shot.
User-ID
The user id used to connect to the database. It is dependant on the database system
used if it must be specified (e.g. Microsoft Access does not need one, while
Microsoft SQL Server can force you to use one). If in doubt, please see your
database administrator.
Click here for a sample screen-shot.
Password
The password used to connect to the database. It must match the "User ID". Like the
user id, it is dependant on the database system if a password is needed. Passwords
can be stored either encrypted or unencrypted. We highly recommend storing them
encrypted.
Click here for a sample screen-shot.
Enable Encryption
Check to store the ODBC password encrypted. If left unchecked, the password is
stored unencrypted. We strongly recommend checking this box.
If you store the password unencrypted for some reason, please be aware of the
security implications. In this case, we recommend using an account with limited
access privileges, only. Even when stored encrypted, we recommend using limited
privileges accounts. We are not applying very strong cryptography here.
Click here for a sample screen-shot.
Table Name
The name of the table to log to. This name is used to create the SQL insert statement
and must match the database definition. Default is "SystemEvents".
Please note that the default table name must be used when other members of
the MonitorWare family (like the web interface or the MonitorWare Console)
should work with the database. This customization option is meant for those
customers that use third-party or custom software.
Click here for a sample screen-shot.
Table Field Names
These settings allow overriding the default field names to be used when storing data
into the system events table. The field names can be changed to any name as long as
that name is a valid database field (column) name. However, all fields need to be
present. Otherwise, the ODBC writer will fail.
Please note that the default field names must be used when other members of
the MonitorWare family (like the web interface or the MonitorWare Console)
should work with the database. This customization option is meant for those
customers that use third-party or custom software.
Click here for a sample screen-shot.
74 • Configuring MonitorWare Agent
MonitorWareAgent 1.3 User Manual
Important
The default name for the message field - "Message" is a reserved name on Sybase
database systems. If you would like to log to a Sybase database, you must change
that field name. Otherwise, you will receive an ODBC error (visible in NT Event
Viewer). We are unfortunately not able to change the default, as this would break
many existing logging environments that migrate from WinSyslog to MonitorWare
Agent.
The database conforms to the Common MonitorWare Database Format
For a specification of the database format and samples provided, please see
“Database Format” on page 94.
Event Log Options
This tab is used to configure the logging to the Windows NT / 2000 or XP event log.
It is primarily included for legacy purposes.
Replace Event Log Source
If checked, a special mapping mechanism is activated. In this mode, the Windows
event source is set to the IP address of the system sending the syslog message. In
addition, the ID is set to syslog facility. This mode helps to quickly gather
information about the system state in Windows event viewer.
However, this mode has its drawbacks. Effectively, we are writing invalid event
source information to the event log. This does not harm any application, but
Windows event viewer will try to locate the matching message libraries. Of course,
this is impossible. As such, event viewer will warn the user that the message library
could not be found. Nevertheless, it will display the complete logged message. This
happens only in detail view.
Users should fully understand the implications of this mapping mechanism for their
environment before turning this option on.
Click here for a sample screen-shot.
EventType
The type – or severity – this log entry is written with. Select from the available
Windows system values.
Click here for a sample screen-shot.
MonitorWareAgent 1.3 User Manual
Configuring MonitorWare Agent • 75
EventID
The ID to be used when writing to the event log. Different IDs can be used to
provide other processes with a consistent interface to specific messages. WinSyslog
does not restrict the IDs that can be used. However, if an ID is written that is not
registered with the operating system, Windows Event Viewer places an error
message pointing this out before the actual message text. To avoid this text, event
IDs 10,000 to 10,100 have been registered with the OS. We highly recommend that
these IDs be used for all custom messages. IDs below 10,000 should not be used as
they might potentially interfere with events generated by MonitorWare Agent itself.
Click here for a sample screen-shot.
Mail Options
This tab is used to configure mail (SMTP) parameters. These here are the basic
parameters for email forwarding. They need to be configured correctly if mail
message should be sent by the service
Mailserver
This is the Name or IP address of the mail server to be used for forwarding
messages. Please note that this server must be able to relay messages if the recipient
is not hosted at this server. Be sure to contact your mail server's administrator if in
doubt on this issue.
The service expects to talk to a standard SMTP mail server. Message relaying to the
final destination must be permitted.
Click here for a sample screen-shot.
76 • Configuring MonitorWare Agent
MonitorWareAgent 1.3 User Manual
Port
Port the mail server is to be contacted at. Usually, this is 25. It might, however, be
changed by in your system. Then, specify the port your mail server uses. If in doubt,
try the default of 25 - or contact your mail server administrator.
Click here for a sample screen-shot.
Sender
Email address used as the sender address for outgoing messages. In order for your
SMTP server to accept it, it probably must be a valid address.
Click here for a sample screen-shot.
Recipient
The recipient emails are addressed to. If multiple recipients are to receive an email
via a single “Send EMail" action, a server distribution list must be supported.
Alternatively, multiple “Send EMail" actions can be defined, each one with another
recipient.
Click here for a sample screen-shot.
Subject
Subject line to be used for outgoing emails. The subject line is used for each message
sent. It can contain replacement characters to customize it with event details. This is
especially useful when sending email to cellular phones or pagers, which often
display only the subject line and not the actual message body. The subject line – after
expansion of the replacement characters – can hold a maximum of 255 characters.
Characters beyond this will be truncated. Please note that some email systems do
impose a stricter limit and truncation as such might occur before the 255-character
limit.
The following replacement characters can be used inside the subject line:
%s
IP address or name (depending on the “resolve hostnames”
setting) of the source system that sent the message.
%f
numeric facility code of the received message
%p
numeric priority code of the received message
%m
the message itself. Please note: this is the complete message text
and can be rather lengthy. As such, it is most probably subject to
truncation. If that occurs, all other information after the %m
replacement character is also truncated. As such, we strongly
recommend using the %m replacement at the end of the subject
line only.
%%
represents a single % sign.
In the example above, replacement characters are being used. If a message “This is a
test” were received from “172.16.0.1”, the resulting email subject would read:
Event from 172.16.0.1: This is a test
The mail body will also include full event information, including the source system,
facility, priority and actual message text as well as any other information that came
MonitorWareAgent 1.3 User Manual
Configuring MonitorWare Agent • 77
with this event. As there is no size limitation for message bodies, the body always
contains the full message received (except otherwise configured – see below).
There will be one email for each received message. Email delivery is meant for
urgent notifications and actions (e. g. calling pagers and such). It is not meant to
provide an email report.
Click here for a sample screen-shot.
Session Timeout
This option controls if multiple rapidly incoming messages should be combined to a
single email message. The SMTP session with the server is held open for the
specified timeout period. Please note that the period is specified in milliseconds, not
seconds.
If a new event arrives within the specified timeout period, that event will be included
in the same email message as the previous one. Then, the timeout is re-started. As
such, any events coming in within successive timeout periods will be combined in a
single mail.
This is most appropriate when large burst of messages are expected and these should
be combined in few mail messages. Otherwise, multiple mail messages can easily
overflow the administrator’s mailbox.
The session timeout is user configurable between 0 and 4000 milliseconds. Larger
values are not supported as they probably affect the SMTP server performance and
can lead to unpredictable results.
The session timeout of zero milliseconds has a special meaning: if it is selected,
every event will be sent in a separate message, no matter how fast two messages
occur after each other.
Click here for a sample screen-shot.
Use SMTP Authentication
Check this box if your server requires SMTP authentication. To fight SPAM, more
and more server operators allow relaying only for authenticated users. It might even
happen that an existing account does no longer work because the server has been
reconfigured to disallow anonymous posting.
If your server requires (or supports) SMTP authentication, check this box and enter
your userid and password in the boxes below. The exact values will be provided by
your server operator – if in doubt, please ask the mail server support.
If the mail server does not support authentication, leave this box unchecked.
We recommend using authentication if it is available. Even when the current server
configuration allows unauthenticated relay, this potentially will change in the future
(as the SPAM problem grows). If you already use authentication, such a server
configuration change will not affect you. Otherwise, it will disrupt mail service.
Click here for a sample screen-shot.
Include message / event in email body
This checkbox controls whether the syslog message will be included in the message
body or not. If left unchecked, it will not be included in the body. If checked, it will
be sent.
This option is useful for pagers and mobile phones, especially those with WML
support. These devices are often capable of displaying only limited amounts of data.
78 • Configuring MonitorWare Agent
MonitorWareAgent 1.3 User Manual
Some do not display the message body at all. As such, it makes limited sense to send
a message body. As such, it can be turned off with this option. With these devices,
use a subject line with the proper replacement characters.
Even if your WML enabled phone supports receiving message bodies, it might be a
good idea to turn them off. WML and WAP are relatively expensive. Generated
messages can become lengthy (depending on the message source). As such, it might
be appropriate to disable the message body in such a scenario.
Click here for a sample screen-shot.
Use XML to Report
If checked, the received event will be included in XML format in the mail. If so, the
event will include all information, like the original timestamp, the facility, priority
etc. XML format is especially useful if the mail is sent to an automated system,
which will then parse the message.
If unchecked, just the plain text message will be included in the mail. This format is
more readable for a human reader.
Click here for a sample screen-shot.
Forward Syslog Options
This dialog controls syslog forwarding options.
Forward Syslog Properties
Syslog Server
This is the name or IP address of the systems syslog messages should be sent to.
Click here for a sample screen-shot.
Syslog Port
The remote port on the syslog server to report to. If in doubt, please leave it at the
default of 514, which is typically the syslog port. Different values are only required
for special setups, for example in security sensitive areas.
MonitorWareAgent 1.3 User Manual
Configuring MonitorWare Agent • 79
Click here for a sample screen-shot.
Protocol Type
The Agent can forward messages via either UDP, TCP or RFC3195RAW. The
syslog standard allows UDP delivery only. This is also the default. Change it to TCP
only if you have a very good reason to do so and you know the receiving server is
capable of accepting syslog over TCP.
RFC3195RAW is used for reliable syslog delivery via TCP. Also use only if sure
that the receiving server accepts messages with the RFC3195 standard.
Click here for a sample screen-shot.
Output Encoding
This setting is most important for Asian languages. A good rule is to leave it at
“System Default” unless you definitely know you need a separate encoding. “System
Default” works perfect in the far majority of cases, even on Asian (e.g. Japanese)
Windows versions.
Click here for a sample screen-shot.
Add Syslog Source
If this box is checked, information on the original originating system is prepended to
the actual message text. This allows the recipient to track where the message
originally came from.
Please note: This option is not compatible with RFC 3164. We recommend selecting
it primarily when message forwarding to a WinSyslog Interactive Server is intended.
Click here for a sample screen-shot.
Use XML to Report
If checked, the forwarded syslog message is a complete XML-formatted information
record. It includes additional information like timestamps or originating system in an
easy to parse format.
The XML formatted message is especially useful if the receiving system is capable
of parsing XML data. However, it might also be useful to a human reader as it
includes additional information that cannot be transferred otherwise.
Click here for a sample screen-shot.
Start Program
This dialog controls the start program options.
With the “Start Program” action, an external program can be run. Any valid
Windows executable can be run. This includes actual programs (EXE files) as well
as scripts like batch files (.BAT) or VB scripts (.vbs).
Start Program can, for example, be combined with the service monitor to restart
failed services. Another example application is a script that deletes temporary files if
the disk space monitor detects a low space condition.
80 • Configuring MonitorWare Agent
MonitorWareAgent 1.3 User Manual
Start Program Dialog
Program to execute
This is the actual program file to be executed. This can be any valid executable file.
A relative file name can be specified if it can be found via the operating system
default search path.
Click here for a sample screen-shot.
Parameters
These parameters are passed to the program executed. They are passed as command
line parameters. There is no specific format – it is up to the script to interpret them.
Parameters can contain replacement characters to customize it with event details.
This allows passing event data to the script. The following replacement characters
can be used:
%d
date and time in localtime
%s
IP address or name (depending on the “resolve hostnames”
setting) of the source system that sent the message.
%f
numeric facility code of the received message
%p
numeric priority code of the received message
%m
the message itself
%%
represents a single % sign.
In the example above, replacement characters are being used. If a message “This is a
test” were received from “172.16.0.1”, the script would be started with 3 parameters:
Parameter 1 would be the string “e1” – it is assumed that this has some meaning to
the script. Parameter 2 would be the IP address, 172.16.0.1. Parameter 3 would be
“This is a test”. Please note that due to the two quotes (“), the message is interpreted
as a single parameters. If they were missing, it would typically be split into several
ones, with parameter 3 being “This”, 4 being “is” and so on. So these quotes are very
important!
Click here for a sample screen-shot.
MonitorWareAgent 1.3 User Manual
Configuring MonitorWare Agent • 81
Time Out
When a program is executed, the service waits for it to finish before it carries on
further actions. This is needed in order to ensure that all actions are carried out in the
correct sequence.
The external program should only run for a limited amount of time. If it would block
for some reason, the agent would be prevented from carrying out any further
processing. As such, a timeout value must be specified. If the program still runs after
the configured timeout, the rule engine cancels it, flags the action as unsuccessful
and then carries on with processing.
Important: Even though the timeout value can be as high as 30 seconds, we strongly
recommend limiting the run time of external program to below 5 seconds. Otherwise,
they could affect the overall performance too much. If the average run time is 5
seconds, the default timeout of 10 seconds ensures that the program can finish even
when there is high system activity.
For performance reasons, we also strongly recommend to use the “Start Program”
action only for rules that apply relatively seldom.
Click here for a sample screen-shot.
Net Send
This dialog controls the net send options.
With the “Net Send” action, short alert messages can be sent via the Windows “net
send” facility. These messages are delivered on a best-effort basis. If the recipient
can be reached, they will pop up in a message box on the recipient’s machine. If the
recipient cannot be reached, they will simply be discarded. No buffering takes place.
Consequently, the rule engine does not check if the message can be delivered. It will
never flag an action to be in error due to a reported delivery problem with “net send”.
Net Send Dialog
Target
This is the Windows user name of the intended recipient, a NETBIOS machine name
or even an IP address (in the form of 10.1.1.1)
Click here for a sample screen-shot.
Message to Send
This is the message that is sent to the intended target.
82 • Configuring MonitorWare Agent
MonitorWareAgent 1.3 User Manual
Click here for a sample screen-shot.
Forward SETP
This dialog controls the forward setp options.
With the “Forward SETP” action, messages can be forwarded to a SETP server.
Forward SETP Dialog
Systemname
The agent identifies itself to the SETP server under this name. With the current
SETP 1.0 implementation, this is not a required parameter. Future versions might
require it.
Click here for a sample screen-shot.
Server SETP Port
The SETP server is expecting incoming requests on this port. The default value is
5432.
The SETP port configured here must match the port configured at the server. If they
do not match, a SETP session cannot be initiated. The rule engine will log this to the
NT Event Log.
Click here for a sample screen-shot.
Set Property
This dialog controls the set property options.
With the “Set Property” action, some properties of the incoming message can be
modified. This is especially useful if an administrator would like to e.g. rename two
equally named devices.
Please note: when you change a property, the value will be changed as soon as the
set property action is carried out. It will not change before that happens and the old
value is no longer available thereafter. That means all actions and filter conditions
will use the new value after it is set. So if you would like e.g. rename a system, make
sure the set property actions are at the top of the rule base!
MonitorWareAgent 1.3 User Manual
Configuring MonitorWare Agent • 83
Set Property Dialog
Select Property Type
Select the property type to be changed. The list box contains all properties that can
be changed.
Click here for a sample screen-shot.
Set Property Value
The new value to be assigned to the property. Any valid property value can be
entered.
In the example above, the SourceSystem is overridden with the value “newname”.
That name will from now on be used inside the rule base. More precisely, it will be
use in the filter conditions and actions.
Click here for a sample screen-shot.
84 • Configuring MonitorWare Agent
MonitorWareAgent 1.3 User Manual
Getting Help
TheMonitorWare Agent is very reliable. In the event you experience problems, find
here how to solve them.
Please note that all options (except priority support) are also open to evaluating
customers. So do not hesitate to try them. Help is available in English and German
language. Our local resellers may provide local language support. Please check with
them.
Frequently asked Questions
For a current list of Frequently Asked Questions (FAQ), please visit
http://www.winsyslog.com/en/FAQ/
The FAQ area is continuously being updated. Some of the most important FAQ
entries are also included in this manual. However, we recommend using the web site
as there might be updates even to the items included in this manual.
I have an invalid source in my received syslog
message - what to do?
If I look at the received syslog message source system, I see invalid names like
"su", "root" and the like. These correspond to some part of the syslog message. In
any case, it is not the real system name. What can I do to receive the correct name?
The problems stems from non syslog-RFC compliant systems. The syslog service
does RFC compliant message parsing. Unfortunately, many existing systems are not
compliant to the syslog RFC and format the message other then specified. As such,
the syslog service picks up an invalid source system - simply because invalid
information is where the source system should be.
Fortunately, the syslog server can be instructed to ignore the source system in
the syslog message. This is the default mode for all installations after 2002-03-20.
This is done with the "Take source system from syslog message". If that check box is
checked, the source is taken from the message as specified in the syslog RFC. If it is
unchecked, it is determined based on the sending system.
Adiscon's experience is that as of this writing only a limited number of systems
support RFC compliant message formatting, so we recommend to uncheck this
option.
MonitorWareAgent 1.3 User Manual
Getting Help • 85
For details on how to configure this, please see “Fehler! Verweisquelle konnte
nicht gefunden werden.” on page Fehler! Textmarke nicht definiert..
How to install MonitorWare Agent in silent mode?
MonitorWare Agent uses the Windows Installer Service. As such, it is easy to
start the Installation in silent mode.
There are two ways to do it.
1. Using the WinSyslog msi-file (Only possible if Windows Installer is installed on
the target machine)
The msi-file has to be started with the following command line options (Using a
sample File location):
msiexec /i C:\SetupFileName.msi /qn
2. Using the WinSyslog setup-file (Only necessary if Windows Installer 2.0 isn't
installed - a reboot might be required).
The setup-file has to be started with the following command line options (Using a
sample File location):
SetupFileName.exe /v"/qn" /s
For more informations about the Windows Installer command line options see:
http://msdn.microsoft.com/library/default.asp?url=/library/enus/msi/hh/msi/app_73eb.asp.
MonitorWare Web Site
Visit the support area at
www.mwagent.com/en/support/
for further information. If for any reason that URL will ever become invalid, please
visit www.adiscon.com for general information.
Support Forum
Share questions and answers with your peers! The forum is also monitored by
Adiscon support staff.
To access the forum, point your browser at
http://forum.adiscon.com/viewforum.php?f=1
Email
Please address all support requests to
[email protected]
An appropriate subject line is highly appreciated.
Online Seminars
Adiscon offers a selection of online seminars. This selection is continuously being
expanded. All available seminars can be found at:
86 • Getting Help
MonitorWareAgent 1.3 User Manual
http://www.adiscon.com/Common/SeminarsOnline/
Please note: Windows Media Player is required to view the seminars.
Phone
+49-2235-985004 (with "+" being the international dialing prefix, for example 011
in the US).
Toll free from the US: 1-888-318-3395
Phone technical support is limited to UpgradeInsurance customers.
Please note that we are in the Central European Time zone (CET). That is 1 hour east
of Greenwich Time. If it is 12pm in New York, it is 9pm at our office location. Our
office hours are from 9am to 5pm. Therefore, we generally advise US customers to
call in early mornings and Asian customers to call in late afternoon.
For best customer service, we highly recommend limiting phone calls to
emergencies. We are checking our other support options regularly. Email support is
available also during non-office hours, typically until 10pm CET.
Fax
Please direct your faxes to
+49-9349-928820
Toll free in the US: 1-888-900-3772
with "+" being the international dialing prefix, e.g. 011 in the US and 00 in most
other countries.
From the US, you can also send faxes to our toll free number 1-888-3183395.
Software Maintenance
Adiscon’s software maintenance plan is called UpgradeInsurance. It offers unlimited
free upgrades and priority support during its duration. It can be purchased for a
period between 1 and 5 years.
To learn more about UpgradeInsurance, please visit
http://www.adiscon.com/Common/en/products/upgrade-insurance-details.asp
Non-Technical Questions
Please address all non-technical questions to
[email protected]
This email alias will answer all non-technical questions like pricing, licensing or
volume orders.
MonitorWareAgent 1.3 User Manual
Getting Help • 87
Product Updates
The MonitorWare line of products is being developed since 1996. New versions and
enhancements will be made available continuously.
Please visit
www.mwagent.com
for information about new and updated products.
88 • Getting Help
MonitorWareAgent 1.3 User Manual
MonitorWare Concepts
Learn what MonitorWare is made for and made of.
The MonitorWare Agent offers advanced monitoring capabilities. It cannot only
monitor the system it is installed on; it can also include information received from
syslog-enabled devices. To fully unleash MonitorWare’s power, you need to learn a
bit about its concepts. This chapter here has full details.
MonitorWare operates on a set of elements. These are
•
Services
•
Information Units
•
Filter Conditions
•
Actions
•
Rules
•
The SETP Protocol
It is vital to understand each element and the way they interact. This chapter
describes each element in detail. The MonitorWare agent has multiple and very
powerful capabilities. This enables very quick configuration of highly efficient and
comprehensive systems. On the other hand, the concepts must be fully understood to
make such complex systems really work.
MonitorWareAgent 1.3 User Manual
MonitorWare Concepts • 89
Purchasing MonitorWare Agent
All MonitorWare Agent features can be used for 30 days after installation without a
license. However, after this period a valid license must be purchased. The process is
easy and straightforward.
The License
Please see license.txt for full license information. This file can be found in the ZIP
file and is displayed during installation.
Pricing
The license fee is US$ 129 per server and $59 per workstation. A workstation is a
system running Windows NT Workstation, Windows 2000 Professional or Windows
XP Professional or Home Edition.
For customers in the “Euro Zone” (European countries using the EURO as official
currency), the license fee is EURO 169 per server and EURO $79 per workstation.
These prices include 16% VAT, which can be waived if a proper VAT ID number is
specified (almost all corporations and organizations inside the EURO zone do have a
VAT ID. If in doubt, check with your financial department).
European Community residents with VAT identification number should state this
number in order to receive tax exemption. If not stated, full VAT will be charged.
All European Community orders will be processed in EURO. US$ payment is
available for international customers, only.
Please email Adiscon at [email protected] if you are interested in a volume order.
How to order
The most convenient way is via our online order processing system found at
https://secure.adiscon.com/MWAgent/en/
If you do not like to order online, registration is still as simple as 1-2-3:
90 • Purchasing MonitorWare Agent
1.
Print out the registration form on the order web site
2.
Please fill it in. Remember to include number of licenses requested and
payment information as well as your email id.
3.
Mail or fax the registration form to Adiscon.
MonitorWareAgent 1.3 User Manual
We accept all major credit cards. If you would like to place a purchase order, please
see
http://www.adiscon.com/Common/en/OrderByPO.asp
for details.
If you need any additional payment options, please contact us at [email protected]
or the below given addresses.
Direct your orders to:
Adiscon GmbH
Franz-Marc-Strasse 144
50374 Erftstadt
Germany
Fax: +49-9349-928820
Phone +49-2235-985004
email: [email protected]
All credit card orders need to be processed in Euro. US$ payments will be converted
to Euro according to current exchange rate. There might be a slight difference in the
converted value due to exchange rate differences.
Order Form
Your order can be placed using the following form. The most current online order
form is available at
https://secure.adiscon.com/MWAgent/en/
If you would like to order by mail or fax, please print out the order form and sign it.
MonitorWareAgent 1.3 User Manual
Purchasing MonitorWare Agent • 91
Reference
The MonitorWare Agent Service
The service operates in the background while your computer is running.
The MonitorWare Agent is installed as a system service during setup. It typically
runs on each machine being monitored. However, some machines can also be
dedicated to run it for housekeeping functions (for example log consolidation).
The MonitorWare Agent can be "engine only" installed. In this case, only the service
is installed onto a machine. It can be customized either by directly editing the
registry or by copying a registry snapshot from a machine with installed client.
Please note that "Engine Only" installs need a full MonitorWare Agent license.
The MonitorWare Agent service program is called "mwagent.exe". It is the sole
executable that needs to be distributed for mass rollouts.
The Service Account
NT Services must utilize an NT logon account in order to perform their intended
tasks. The MonitorWare Agent service is no different. The account initially used by
the service is "local system". We recommend retaining this setting.
If for any reason you would like to change the service account, you can do so via the
control panel "services" applet (or the "Computer Management" MMC under
Windows 2000). However, you need to make sure that the new account has sufficient
permissions.
Command Line Switches
The MonitorWare Agent supports a limited set of command line switches. These are
primarily used for unattended installations or "engine only" installs. These are:
92 • Reference
mwagent –h
Help, displays a short usage notice.
mwagent –I
Installs the service
mwagent –u
Removes (uninstalls) the service
mwagent –v
Displays version information as well as whether or not the
service is installed.
MonitorWareAgent 1.3 User Manual
Support for Mass Rollouts
A “mass rollout” in the scope of this chapter is any case where the product is rolled
out to more than 5 to 10 machines.
The common thing among such rollouts is that the effort required to set up the files
for unattended distribution of the configuration file and poduct executable is less
than doing the tasks manually. For less than 5 systems, it is often more economical to
repeat the configuration on each machine – but this depends on the number of rules
and their complexity.
Please note that an automatted configuration system is planned, which will enable
fully automatic distribution of configuration settings after the initial setup. Please
contact [email protected] if you are interested in this system. We let you know
when it is available.
Before considering a mass rollout, be sure to read “The MonitorWare Agent Service”
on page 92. This covers necessary background information.
The basic idea behind a mass rollout is to create the intended configuration on a
master (or baseline) system. This system holds the complete configuration that is
later to be applied to all other systems. Once that is system is fully configured, the
configuration will be transferred to all others.
The actual transfer is done with simple operating system tools. The complete
configuration is stored in the the registry. Thus, it can be exported to a file. This can
be done with the client. In the menu, select “Computer”, then select “Export Settings
to Registry File”. A new dialog comes up where the file name can be specified. Once
this is done, the specified file contains an exact snapshot of that machine’s
configuration.
This snapshot can then be copied to all other machines and put into their registries
with the help of regedit.exe.
An example batch file to install the product and configuration on the “other” servers
might be:
copy \\server\share\mwagent.exe c:\some-local-dir
cd \some-local-dir
mwagent –i
regedit \\server\share\configParms.reg
The file “configParams.reg” would be the registry file that had been exported with
the configuration client.
Of course, the batch file could also operate off a CD – a good example for DMZ
systems which might not have Windows networking connectivity to a home server.
Please note that the above batch file fully installs the product – there is no need to
run the setup program at all. All that is needed to distribute the service is the
mwagent.exe file, which is the core service. For a locked-down environment, this
also means there is no need to allow incoming connections over Windows RPC or
NETBIOS for an engine only install.
MonitorWareAgent 1.3 User Manual
Reference • 93
Formats
Database Format
MonitorWare Agent stores and expects data in the “MonitorWare Common Database
Format”. This format is understood by all members of the MonitorWare line of
products.
The database format is easy to implement and does not rely on database-specific
features. All event data is stored in a single table.
There are some large textual elements inside that table, namely the message part and
the Windows event log binary data part. These entities should be stored as a large
text element whenever the database system supports it. For example, under Microsoft
SQL Server this is the “text” data type.
Adiscon officially support Microsoft Jet and SQL Server databases. However, all
MonitorWare products work with a large variety of databases, including for example
Oracle or Sybase. As long as there is a standard ODBC driver available for a given
database, it should be usable with MonitorWare.
The default table name as well as all field (column) names can be overwritten with
the configuration client. This is most useful if the data is to be included into an
already existing database or to solve reserved-name conflicts with not directly
supported systems. For example, this needs to be done with Sybase as “message” is a
reserved word there. For ease of use, we recommend not to change any of the default
names if there is no definite need to do so.
There are samples available for Microsoft Jet (Access) and Microsoft SQL Server.
Database Samples
These sample here implement the MonitorWare Common Database Format in widely
used database systems.
Attention Sybase users: the “Message” name is reserved in your database system
and cannot be used as a field name. It needs to be changed, otherwise the table create
will fail. Be sure to also change it in to client database field name configuration.
JET (MS Access) Sample
A sample JET (Microsoft Access) database file is included in the MonitorWare
Agent install set. It conforms to the MonitorWare Common Database format.
It is in Microsoft Access 97 format to enhance compatibility. It can be converted to
any more current format without any problems. In fact, we recommend using the
most current format supported by your system because it offers the best performance.
To convert it, please use Microsoft Access.
Microsoft SQL Server Sample
If you would like to create the default database on Microsoft SQL server, please use
the following script:
CREATE TABLE.SystemEvents (
ID int IDENTITY (1, 1) NOT NULL,
ReceivedAt datetime NULL,
DeviceReportedTime datetime NULL,
94 • Reference
MonitorWareAgent 1.3 User Manual
Facility smallint NULL,
Priority smallint NULL,
FromHost nvarchar (60) NULL,
Message text,
NTSeverity int NULL,
Importance int NULL,
EventSource nvarchar (60),
EventUser nvarchar (60) NULL,
EventCategory int NULL,
EventID int NULL,
EventBinaryData text NULL,
MaxAvailable int NULL,
CurrUsage int NULL,
MinUsage int NULL,
MaxUsage int NULL,
InfoUnitID int NULL ,
SysLogTag varchar(60),
EventLogType varchar(60),
GenericFileName varchar(60)
)
This script should also be easily adaptable to other database systems like Oracle.
When porting the script to other database systems, please note that “nvarchar” is
essentially “varchar”. The difference is that data is stored in Unicode which allows
storage of non-ANSI characters. Typically, it can be replaced with “varchar” or an
equivalent data type without any problems.
XML Format
The following XML tags are used by MonitorWare:
Tag Name
Content Description
iut
This is the InfoUnitType. This uniquely identifies the
type of event. This is an integer value.
severity
The NT Event Log severity.
user
The user information that was logged with the event.
The constant "N\A" denotes that there has no user
information been logged with this record. This is most
important with Windows event log events.
source
The computer the event originates from. It can be either
an IP address or a computer name, depending on the
reporting service and its configuration. If it is a name, it
can similarly be either the name the system knows
itself of, a name taken from a configuration database
(like reverse DNS lookup) or an name overridden by an
rule.
sourceproc
For Windows event log entries, this is the event source
as reported in the event log.
id
The event ID as reported by the reporting service. For
example, it is the Windows event log ID for the event
log monitor.
msg
This is the message text that comes with the event. For
MonitorWareAgent 1.3 User Manual
Reference • 95
example, with Windows event log reports it is the
message logged in the event log while with syslog
messages it is the actual message text.
All events provide a “msg” part – but its format and
meaning is largely dependent on the reporting service.
We recommend not to parse the msg part, as this can
change. All well-known values are available via
separate XML tags.
category
A numerical category description. It is a sub-id for the
current event and depending on the event source.
Currently, it is most useful with Windows event log
entries where it represent the numerical category
description from the event log.
bdata
Used with few event sources. So far, only Windows
event logs generate this tag (if configured to do so).
The bdata tag includes large binary data that is
associated with the event. For Windows event logs, it is
the binary data from the log file. Other event source
might use it for similar purposes. It is more a dump-like
field and can become very large – so use it wisely.
Version History
Interested how the MonitorWare Agent evolved and which features are new to this
build? Read it here!
This short history provides some background information about the versions
available
This is user driven software.
Please provide us with your feedback. Many features have become reality with the
help of envisioning users!
1.3
Release Date: 2003-08-26
96 • Reference
•
RFC 3195 Support(Client) - MonitorWare Agent now supports
reliable syslog delivery via TCP when sending syslog messages. TCP
syslog is implemented based on the new RFC 3195 and thus is
standards-compliant.
•
RFC 3195 Support(Server) - The syslog listener service now also
supports TCP syslog messages based on RFC3195.
•
Service bugfix - When logging Event data into a file in legacy format,
the trailing “ got lost. This has been corrected now.
•
Minor Web access bugfix - there was a minor bug in the web access
component, which was fixed.
•
Usability issues fixed - Adding Services, Rulesets, Rules and Actions
is now also possible from one level lower than before.
•
New Manual - The new version of MonitorWare Agent comes with a
streamlined version of the manual that uses online resources.
MonitorWareAgent 1.3 User Manual
1.2 Service Pack 1
Release Date: 2003-07-29
•
Configuration Client enhancements - Added two new filters, Event
Category and Event Type. These two filters can be used for
EventMonitor filtering.
•
Configuration Client bugfix - If a RuleSet was deleted, all RuleSets
below the deleted one could lose their filter. This has been corrected
now.
•
Syslog Service - New setting Enable RFC 3164 Parsing added. If
this setting is disabled, MW Agent will not try to search for a
SyslogTag in Syslog messages.
1.2
Release Date: 2003-02-25
MonitorWareAgent 1.3 User Manual
•
New Scaleable Filterengine -The new filter engine as very powerful,
you can build complex filter conditions like known from Microsoft
Network Monitor. A note for existing MonitorWare Agent Users. After
update, you have to start the MWAgent Client first. This is
important, because it will automatically import your existing filters
into the new Filter system.
If you are new to this kind of filtering, I recommend that you read the
Filter Conditions part of the manual before you start to play with the
filters.
•
New Actions
Call RuleSet Action - this Action is used to call another RuleSet for
processing.
Set Status Action - Used to set an internal status variable. Can be used
together with the Status Filter. The manual will contain more
information about the Status Engine in future.
•
Add Comments - You can Add Comments under Services, RuleSets,
Rules and Actions now. This is useful if you want to write down some
notes.
•
New Import / Export functions - It is now possible to Import or
Export the registry settings by using a binary format.
•
Import / Export RuleSets - You can Import / Export complete
RuleSets into a XML Based format (Right click a RuleSet). This can be
very useful if you want to duplicate RuleSets for example. The Client
uses its own file extension here (.mwx = MontorWare XML) which is
also bound to the Client. That means double-clicking such a File will
automatically invoke the Client to import the RuleSet.
•
Syslog Service - Enhanced the message handling (RFC 3164) to also
accept not valid RFC Syslog tags.
•
Event Log Monitor - Added new option for the legacy format: Add
Logtype. Added a button to configure for Monilog as well.
•
File Logging Action enhanced - There is a new option "Use circular
logging" available. You can specify a number of logfiles and a
maximum file size for circular logging.
Reference • 97
•
Database Logging Action enhanced - You can now use the new
function "Create Database" to create a MonitorWare Agent valid
database.
•
MW Agent Client enhancements - All fields which specifies seconds
are replaced with a Combobox with predefined time values. It is also
possible to configure custom values.
•
Minor bugfixes in the MW Agent Client - Fixed minor problems in
the Filterimport function.
1.1
Release Date: 2002-09-20
This release includes numerous enhancements as well as stability updates. All users
are strongly advised to update to this version. Specifically, it includes the following
enhancements:
98 • Reference
•
New NT Service Monitor - Allows monitoring all local NT services.
Generates an event for each service which is not started but set to start
automatically.
•
New Disk Space Monitor - Monitors all local hard disk partitions. Can
be used for statistics or to alert if disk space is low.
•
German and French are now available consistently throughout the
product screens.
•
Much improved Japanese language support. The output encoding
(EUC, JIS, SJIS) can now be selected for email and syslog forward
actions.
•
Incoming message can now be filtered based on a lower, higher or
equal syslog priority. Previously, only an exact match was supported.
This greatly simplifies rule creation in common scenarios.
•
Replacement characters are now supported in the “Start Program”
action. This allows e.g. to pass the source system or message content to
an external program.
•
Improved syslog over TCP receiver – offers greater compatibility and
more options.
•
Support for debugging complex rule bases (log file can be written)
•
Interactive Syslog Server can now be instructed not to scroll incoming
messages as they arrive – often requested to save client machine
performance.
•
New exclude filters based on message content (all previous versions
supported include filters, only)
•
Support for SMTP authentication added
•
File logger does now allow concurrent reads and writes to the log file.
So it can be reviewed e.g. with notepad while it is constantly being
written.
•
Support for Windows XP visual styles added.
MonitorWareAgent 1.3 User Manual
•
Database schema change to capture new data and provide seamless
interaction with upcoming changes and new products like the new web
interface or the MonitorWare console.
•
Enhanced WinSyslog Web Access based on the former web interface
now part of the core product.
•
General stability updates
1.0 Final
Release Date: 2002-03-01
Final, officially supported release.
1.0 Beta 2
Release Date: 2001-11-30
Much enhanced release, now feature complete. The numerous changes will not be
listed separately as there are so many. The Beta 2 release is expected to be very close
to the final production code.
0.8 Preview
Release Date: 2001-09-28
This is the initial release for people to get a sneak preview. It is incomplete, but the
implemented features work reasonable stable. This release is not intended for
production use.
ICMP Codes
ICMP codes are often used when doing firewall and/or router diagnostics. For
convenience, find an excerpt from RFC1700 below. The full RFC can be obtained
from several places, for example at
http://www.ietf.org/rfc/rfc1700.txt
ICMP TYPE NUMBERS
The Internet Control Message Protocol (ICMP) has many messages that are
identified by a "type" field.
MonitorWareAgent 1.3 User Manual
Reference • 99
Man
y of
t
Thes
e
ICM
P
type
s
have
a
"cod
e"
field
.
Here
we
list
the
type
s
agai
n
with
their
assi
gned
code
field
s.
Type
---0
Type
0
1
2
3
4
5
6
7
8
9
10
11
12
13
14
15
16
17
18
19
20-29
30
31
32
33
34
35
36
37-255
Name
------------------------Echo Reply
Codes
0
Reference
[RFC792]
[JBP]
[JBP]
[RFC792]
[RFC792]
[RFC792]
[JBP]
[JBP]
[RFC792]
[RFC1256]
[RFC1256]
[RFC792]
[RFC792]
[RFC792]
[RFC792]
[RFC792]
[RFC792]
[RFC950]
[RFC950]
[Solo]
[ZSu]
[RFC1393]
[RFC1475]
[David Johnson]
[Bill Simpson]
[Bill Simpson]
[Bill Simpson]
[Bill Simpson]
[JBP]
Reference
--------[RFC792]
No Code
1
Unassigned
[JBP]
2
Unassigned
[JBP]
3
Destination Unreachable
Codes
0
1
2
3
4
5
6
7
8
9
10
100 • Reference
Name
Echo Reply
Unassigned
Unassigned
Destination Unreachable
Source Quench
Redirect
Alternate Host Address
Unassigned
Echo
Router Advertisement
Router Selection
Time Exceeded
Parameter Problem
Timestamp
Timestamp Reply
Information Request
Information Reply
Address Mask Request
Address Mask Reply
Reserved (for Security)
Reserved (for Robustness Experiment)
Traceroute
Datagram Conversion Error
Mobile Host Redirect
IPv6 Where-Are-You
IPv6 I-Am-Here
Mobile Registration Request
Mobile Registration Reply
Reserved
[RFC792]
Net Unreachable
Host Unreachable
Protocol Unreachable
Port Unreachable
Fragmentation Needed and Don't Fragment was Set
Source Route Failed
Destination Network Unknown
Destination Host Unknown
Source Host Isolated
Communication with Destination Network is
Administratively Prohibited
Communication with Destination Host is
Administratively Prohibited
MonitorWareAgent 1.3 User Manual
11
12
Destination Network Unreachable for Type of Service
Destination Host Unreachable for Type of Service
4
Source Quench
Codes
0 No Code
[RFC792]
5
Redirect
[RFC792]
Codes
0
1
2
3
6
Redirect
Redirect
Redirect
Redirect
for
for
for
for
the
the
the
the
Network (or subnet)
Host
Type of Service and Network
Type of Service and Host
Alternate Host Address
Codes
0
[JBP]
Alternate Address for Host
7
Unassigned
8
Echo
[JBP]
[RFC792]
Codes
0
9
Datagram
Datagram
Datagram
Datagram
No Code
Router Advertisement
[RFC1256]
Codes
0
10
Router Selection
Codes
0
11
13
14
16
MonitorWareAgent 1.3 User Manual
[RFC792]
[RFC792]
[RFC792]
No Code
Information Reply
Codes
0
[RFC1108]
No Code
Information Request
Codes
0
[RFC792]
No Code
Timestamp Reply
Codes
0
15
Pointer indicates the error
Missing a Required Option
Bad Length
Timestamp
Codes
0
[RFC792]
Time to Live exceeded in Transit
Fragment Reassembly Time Exceeded
Parameter Problem
Codes
0
1
2
[RFC1256]
No Code
Time Exceeded
Codes
0
1
12
No Code
[RFC792]
No Code
Reference • 101
17
Address Mask Request
Codes
0
18
[RFC950]
No Code
Address Mask Reply
Codes
0
[RFC950]
No Code
19
Reserved (for Security)
[Solo]
20-29
Reserved (for Robustness Experiment)
30
Traceroute
[RFC1393]
31
Datagram Conversion Error
[RFC1475]
32
Mobile Host Redirect
33
IPv6 Where-Are-You
[Bill Simpson]
34
IPv6 I-Am-Here
[Bill Simpson]
35
Mobile Registration Request
[Bill Simpson]
36
Mobile Registration Reply
[Bill Simpson]
[ZSu]
[David Johnson]
Copyrights
This documentation as well as the actual MonitorWare Agent product is copyrighted
by Adiscon GmbH, Germany. To learn more about other Adiscon products, please
visit www.adiscon.com/en/products/. To obtain information on the complete
MonitorWare line of products, please visit www.monitorware.com.
Please note that MonitorWare Agent is part of the MonitorWare line of products.
Please visit the MonitorWare site (www.monitorware.com) to receive updates and
information on all members of the family. The site also does have information on
combining the individual components to build a complex distributed configuration.
Microsoft, Windows, and the Windows logo are trademarks, or registered trademarks
of Microsoft Corporation in the United States and/or other countries.
Other mentioned trademarks are for reference only. They belong to their respective
owners.
102 • Reference
MonitorWareAgent 1.3 User Manual
Glossary of Terms
MonitorWareAgent 1.3 User Manual
Glossary of Terms • 103
Index
information unit type 67
message content 66
minimum wait time 65
occurences 65
source system 66
syslog facility 68
time 67
filter condition
syslog priority 68
filter condition diskspace 69
filter conditions 63
forward SETP action 83
forward syslog action 79
I
C
common monitorware database format 94
Common MonitorWare Database Format 75
conditions 63
configuration 42
forward setp action 83
forward syslog action 79
net send action 82
send email action 76
set propertyaction 83
start program action 80
write database action 73
write event log action 75
write file action 69
criteria 63
interactive syslog server 38
L
license 90
license options 44
M
maintenance 87
mass rollout 93
mobile phone 78
N
net send action 82
D
O
database
format 94
samples 94
debug level 46
debug log
location 45
debug options 45
online seminar 86
ordering MonitorWare Agent 90
P
pager 78
phone 78
purchase MonitorWare Agent 90
E
EMail
Subject Line
Replacement Characters 77
engine only install 93
R
F
S
Features 3
filter condition
event id 68
event log severity 68
event source 68
sample databases 94
seminar 86
send email action 76
set property action 83
MonitorWareAgent 1.3 User Manual
registration name 44
registration number 45
RFC 3164 80
Index • 105
setup 8
software maintenance 87
Start Program
Replacement Characters 81
start program action 80
step by step guides 37
support
newsgroups 86
online seminars 86
support options 85
T
tutorial 37
U
unattended installation 93
UpgradeInsurance 87
W
write database action 73
write event log action 75
write file action 69
106 • Index
MonitorWareAgent 1.3 User Manual