1
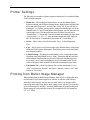
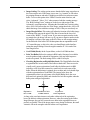
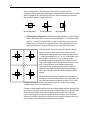
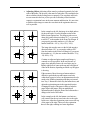
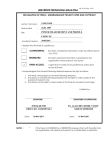
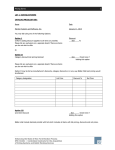
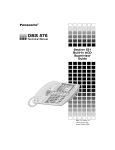
Better Elections Every Day
ES&S Ballot on Demand
Printing Procedures Manual
Election Systems and Software, Inc.
Corporate Headquarters
11208 John Galt Blvd.
Omaha, NE 68137, USA
Phone: (402) 593-0101
Toll Free Inside of U.S.: (800) 247-8683
Fax: (402) 593-8107
http://www.essvote.com
ES&S Ballot on Demand
Printing Procedures Manual
Version 1.0
July 31, 2003
Election Systems and Software, Inc.
Corporate Headquarters
11208 John Galt Blvd.
Omaha, NE 68137, USA
Phone: (402) 593-0101
Toll Free Inside U.S.: (800) 247-8683
Fax: (402) 593-8107
http://www.essvote.com
Copyright
2003 All Rights Reserved
Our Mission
Our Mission is to support democracy worldwide by providing proven,
accurate, and innovative election systems and services to voters and election
officials.
Our Vision
Our Vision is to continuously improve and grow our integrated total
election solutions that provide "Better Elections Every Day.” We will
accomplish this vision with an uncompromising commitment to customer
satisfaction and integrity within the election process.
Who We Are
ES&S is a company of dedicated people building integrated systems and
developing solutions for the election official’s total management needs:
•
Election and voter registration management software
•
•
Ballot counting and tabulation hardware
Election information management software
2003 by Election Systems & Software, 11208 John Galt Blvd., Omaha, NE 68137-2364.
All rights reserved. Printed in the USA.
All information contained in this manual is proprietary to Election Systems & Software. No part of this document
may be photocopied or reproduced in any manner without the prior consent of Election Systems & Software.
ES&S Precinct Ballot Counter and ES&S 650 Central Ballot Scanner are trademarks or service marks of Election
Systems & Software.
Disclaimer
Election Systems & Software does not extend any warranties by this document. All product information
and material disclosure contained in this document is furnished subject to the terms and conditions of a
purchase or lease agreement. The only warranties made by Election Systems & Software are contained
in such agreements. Users should ensure that the use of this equipment complies with all legal or other
obligations of their governmental jurisdictions.
FCC Compliance:
This device complies with Part 15 of the FCC Rules. Operation is subject to the following two conditions: (1) This
device may not cause harmful interference, and (2) this device must accept any interference received, including
interference that may cause undesired operation.
This equipment has been tested and found to comply with the limits for a Class B digital device,
pursuant to part 15 of the FCC rules. These limits are designed to provide reasonable protection against
harmful interference in a residential installation. This equipment generates, uses and can radiate radio
frequency energy and, if not installed and used in accordance with the instructions, may cause harmful
interference to radio communications. However, there is no guarantee that interference will not occur in
a particular installation. If this equipment does cause harmful interference to radio or television
reception, which can be determined by turning the equipment off and on, the user is encouraged to try
to correct the interference by one or more of the following measures:
•
•
•
•
Reorient or relocate the receiving antenna.
Increase the separation between the equipment and receiver.
Connect the equipment into an outlet on a circuit different from that to which the receiver
is connected.
Consult the dealer or an experienced radio/TV technician for help.
C:\Documents and Settings\clmiller\Desktop\bodprinter.doc
Table of Contents
Chapter 1: Introduction ............................................................................................................... 1
Contacting ES&S for Technical Support.................................................................................. 1
Paper Stock ............................................................................................................................... 3
Blank Paper Stock............................................................................................................... 3
Digital Ballot Stock............................................................................................................. 3
Printer Trays.............................................................................................................................. 3
Tray 1 .................................................................................................................................. 3
Multipurpose Tray .............................................................................................................. 3
Paper Insertion in Tray 1........................................................................................................... 4
Main Paper Guides.............................................................................................................. 4
Rear Paper Guides............................................................................................................... 5
Drawer Closing ................................................................................................................... 7
Paper Insertion in Multi-purpose Tray...................................................................................... 7
Printer Settings.......................................................................................................................... 8
Printing from BIM .................................................................................................................... 8
1
Chapter 1: Introduction
Election Systems and Software’s Ballot on Demand is a ballot publishing tool that
allows you to control the printing of the ballots you created using Image Manager.
Use Ballot on Demand to print all of your ballots or send your ballot formats to an
outside printing company and use Ballot on Demand to print additional ballots on
Election Day.
ES&S recommends using the Okidata 9300 printer in conjunction with Ballot on
Demand. No other printer is recommended for use with BOD at this time.
This manual is a guide for use of the Okidata 9300 printer and Ballot on Demand
for ES&S paper ballot tabulators. It includes a detailed set of procedures for the
printer and the Ballot Image Manager that must be followed to ensure high quality
BOD ballots. Following all of these procedures ensures your scanner can read
your BOD ballots accurately.
Contacting ES&S for Technical Support
This user’s manual should aid you in accomplishing most ballot printing tasks.
However, if you need additional assistance, or if you encounter a processing
problem or system error, ES&S’s technical support staff can provide advice and
help you resolve the situation.
When you contact ES&S for technical support, please be near your printer. In
addition, be prepared to provide the following information to the support
representative:
•
The model number of the product you are using.
•
The exact wording of any messages that appeared on your printer.
•
A description of what happened, what you were doing when the problem
occurred, and how you tried to solve the problem.
Support representatives are available between 8:00 a.m. and 5:00 p.m. Central
Standard Time, however, support hours are extended during election periods.
2
You can contact an ES&S support representative in several ways:
Telephone:
800-247-8683 (USA & Canada) or
402-593-0101 (International)
Fax:
402-593-8107
Mail:
Election Systems & Software
11208 John Galt Blvd.
Omaha, NE 68137 USA
E-Mail
[email protected]
3
Paper Stock
The paper stock itself plays a very important role in application of BOD.
B lank P aper Stoc k
The paper must be ES&S Opaque, and it must be trimmed to the proper width and
length specifications (8.50” x 14.00” +/- .020”). If the paper is narrow, it will
reduce the printing tolerances, which makes it more difficult to meet proper ballot
specifications. The narrow paper will also have more freedom of movement
through the printer, which can result in a skewed ballot image. In addition to the
increased possibility of a skewed ballot image, a narrow ballot will also increase
the possibility of a ballot skew within the scanner ballot transport that can lead to
feeding errors. A major disadvantage of using blank stock is that there is no visual
confirmation that a ballot has been printed within tolerances.
Di gital Ball ot S tock
ES&S has developed a Digital Ballot Stock (DBS) that enhances our ability to
produce quality ballots on xerographic printers. The DBS is produced with ES&S
Opaque paper. Since the stock is preprinted with trim and registration marks, the
width of the DBS is guaranteed to be within specification, and the registration
targets allow visual inspection of each finished ballot to insure that it was printed
within tolerances. ES&S highly recommends the use of DBS to insure high quality
ballots and a minimal scanner rejection rate.
Printer Trays
Two printer input paper trays can be used on the Okidata 9300.
Tray 1
Tray 1 is the paper drawer under the printer. This tray can be used to duplex 14
and 17-inch ballots. 19-inch ballots must be fed into the Multipurpose Tray.
Mul ti purpose Tray
The Multipurpose Tray extends from the right side of the printer. This tray can be
used for 14,17, and 19-inch ballots. The printer will duplex both the 14 and 17
inch ballots from this tray, but the 19 inch ballots must be fed through a second
time to print the backs.
4
Paper Insertion in Tray 1
It is important to insert the paper stock into the tray straight and consistently to
ensure consistent ballots. If the paper is placed in the tray at an angle, the ballot
images will be skewed. The printing drum in the printer is in a fixed location, so it
is important to place the paper in the tray consistently to minimize any image
adjustments that need to be made in the Ballot Image Manager when replacing
paper. Also, make sure to jog the stack of paper itself with even edges before
inserted it.
Mai n P aper Guides
The main paper guides should be set for 8.50” wide paper. When these guides lock
into position, the distance between the sides is 8.53” so they can accommodate
oversized paper. The excess space will allow paper movement of .030” side to
side. This will result in ballot images that vary .030” from stack to stack depending
on alignment of the edge of the side guides of the paper. Before inserting paper,
make sure to jog the stack with smooth edges. This will ensure consistency from
top to bottom of the stack. We also recommend centering the paper between the
two side guides. The easiest way to do this is to grab both sides of the guide and
press them against the edges of the paper as shown in the picture below on the left.
Press guides together to center stack.
Cut corner in upper left side of tray.
When you release the side guides, they will move back into the normal position,
and the paper will be centered between the guides. If printing two-sided ballots in
duplex mode, the cut corner of the ballot stock should be in the upper left-hand
corner as shown in the second picture. If you are printing single sided ballots with
duplexing disabled, the cut corner should be in the upper right-hand corner.
5
Rear P aper Guides
The Okidata printer comes with two rear paper guides for the 8.5 x 14-inch
documents in Tray 1. Snap them into place as shown in the picture to the right. If
you will be printing 17-inch ballots from Tray 1, these will have to be removed.
ES&S has developed an optional rear paper guide to help stabilize the far end of a
17-inch paper stack. These guides will also help prevent skewed ballot images by
ensuring that the paper is not angled in the paper tray. This guide is placed into
Tray 1 and can be adjusted for both 14 and 17-inch ballots. It can be adjusted for
the 14 and 17-inch ballots, and can be removed for printing on letter size paper. To
install, see the illustrations below.
There are two mounting pins on the paper guide. ………Align pins with the mounting holes.
6
Put the far pin in first, and slide it to the end. …. Insert closest pin in the proper hole.
Once installed, the registration posts adjust to fit comfortably against the paper
edges. To loosen the posts, turn counterclockwise. This will allow them to slide
within the slots to provide a firm registration edge for the ballots. This paper guide
can also be used for 14-inch ballots by moving the registration posts into the 14inch slots. The picture below has each of the slots labeled. To move the
registration posts from one slot to the other, loosen the post and slide all the way
out to the side to remove. Place the registration posts in the proper slots and slide
them against the ballot edge before tightening. These should be set so that the
paper centers between the main paper guides.
Slots for 14 and 17 inch ballots.
……….Turn counter-clockwise to loosen and adjust.
Tighten gently against ballot edges. ……………It should be centered between the guides.
7
Drawer Cl osi ng
In addition to loading paper into the tray consistently, it is also important to close
the tray consistently. After loading paper into Tray 1, close the tray until it latches.
On the Okidata, when the tray is pressed in and latched, it should return to the
same position each time. There may be slight variations in the final position of the
tray depending on how hard it is closed. If it does not spring back all the way and
align itself with the rest of the printer on it’s own, you should grab both sides of
the tray and pull it toward you until it is. The two pictures below illustrate this
situation from a side view. The first picture on the left shows a tray that was
pressed in but completely returned to the resting position. The next picture shows
the tray when it is pulled out flush with the front surface of the printer.
Paper Insertion in Multi-purpose Tray
This tray must be pulled out from the right side of the printer as shown below.
Before inserting paper, make sure to jog the stack with smooth edges. Place it in
the tray as shown below, and adjust the side guides against the sides of the paper.
It is a good idea to tap the guides against the edges a few times to align the paper
as straight as possible. When placing the ballot stock into the tray, the cut corner
should be on the right side of the leading edge as shown in the second picture
below.
8
Printer Settings
The following are a number of printer properties that need to be set on the Okidata
9300 for proper operation:
•
Media Size – After loading the printer drivers, access the Okidata Printer
Properties though your Windows Settings Menu. Right click the Okidata 9300
driver and select “Properties”, and select the “Setup” tab. If you will only be
printing 8.5” x 14 ballots, you just need to change the default paper size to the
standard legal. If 17 and 19-inch ballots will be printed, you can enter these as
custom paper sizes. Click the pull down menu for Media Size and select
“Custom Page 1”. Click on the Custom Size button and rename the paper from
“Custom Page 1” to “8.5 x 17”, enter the proper length and width, and press
OK. Do the same for 19-inch ballots if necessary on “Custom Page 2”.
•
Source – This is where you will select either Tray 1, or the Multipurpose
Tray.
•
Type – This is where you will set the paper type. Medium-Heavy is the proper
setting for ES&S Opaque ballot paper. If this setting is not correct, the printer
may not print properly.
•
2-Sided Printing – If printing two-sided ballots, select “Long-Edge binding.”
If printing single-sided ballots set it to “None.” Remember that this selection
will determine what direction you place the ballot stock into the paper trays.
See section 3 (tray 1) and 4 (multipurpose tray) to determine where the cut
corner of the paper stacks should be located when inserting the paper stack.
•
Job Options Tab -- On the Job Options Tab, confirm that Quality is set to
“Fine”, Orientation to “Portrait”, Job Type to “Normal”, Scale to “100”, and
Stacker to “face-down”.
Printing from Ballot Image Manager
When printing from the Ballot Image Manager, there are a few settings that need
to fine tuned for your printer output to be accurate. It will take a little effort to
make these initial settings, but once they are made, little or no changes will be
required in future ballot runs. Before these settings can be adjusted, you must first
open a ballot image file in BIM. Consult the BIM manual for proper loading and
layout settings for your particular election. The examples below will assume an
8.5” x 14” ballot:
9
•
Image Scaling--The scaling option ensures that the ballot image reproduces at
the correct aspect ratio. If the image is not a true 1 to 1 transfer, it will reduce
the printing tolerances and make it slightly more difficult to print an accurate
ballot. To access this option select “Ballot” from the main menu bar, and
select “Advanced.” Select “Yes” when presented with the warning message.
The “BOD Scaling Factor” settings are in the lower right section of the
Advanced Layout Options box. Adjusting the Horizontal and Vertical scaling
above 100% will increase the size of the image, setting them below 100% will
shrink the image. Start with these settings at 100% if they are not already set.
•
Image Margin/Offset--This setting will adjust the location of the ballot image
in relation to the paper in the printer. This item is located in the lower left
corner of the “Ballot”, “Layout” menu. If you enter a negative number in the
top margin box, the image will move up. If you enter a negative number in the
left margin, it will move the image to the left. There are also margin settings
for the backside of the ballot. The Okidata printer has an unprintable area of
.18” around the page, so this is the value you should begin with when finetuning the margin settings. Enter the negative number of -18 in each of the
four margin boxes.
•
Oval Width (Pixels)--In the Layout Menu, set the Oval Width to three.
•
Print Test Ballot--Before the settings in BIM can be fine-tuned, a test ballot
must be produced and evaluated for registration. Only one ballot sequence
needs to be printed. The final settings will be valid for all styles.
•
Checking Registration on Digital Ballot Stock--The Digital Ballot Stock has
a registration box in each corner of the ballot on both sides. These are used to
visually verify proper registration of each ballot. he ballot artwork in BIM
includes a set of cross hairs centered in a small circle in each corner of the
ballot. When the ballot image is printed, the cross hairs and circle should align
with the registration boxes on the DBS. The images below show the
registration box that is in each corner of the Digital Ballot Stock, the cross
hairs and circle printed by BOD, and what the two look like together when the
ballot prints with good registration.
Registration
Box on DBS
Cross-Hairs & Circ le
on Ballot Artwork
Together for
Good Registration
As long as the cross hairs intersect each other within each of the registration
boxes, the ballot is within registration. However, when first setting up the Ballot
Image Manager, the goal is to center the cross hairs in the registration boxes as
perfectly as possible. Then if the image starts to stray during a ballot run, the small
variances will not be enough to take the ballots out of registration.
10
In the examples below, the first image on the left is the goal for perfect
registration. The second image shows some misalignment, but since the cross hairs
intersect within the box, the ballot is still good. The last example is bad because
the cross hairs intersect outside of the box.
Perfec t Registration
•
Good Registration
Bad Registration
Adjusting the Scaling Factor--The first item that should be set is the Scaling
Factor. The distance between the cross hairs should be 7.5” from horizontally,
and 13.4” vertically. With the DBS, you don’t need a ruler; you just need to
compare the cross hairs to the registration boxes. The example below shows
four registration boxes to represent each corner on the front of the ballot.
With the top left cross hairs centered in the box, the top
right cross hair is a little left of center. In this case the
Horizontal Scaling should be increased. As a general rule,
½ of the registration box is .03” or .4% of the width. Since
this example is off about .015 or ¼ of the box, the
horizontal scaling factor should be set to about 100.20%.
Adjust this setting until the distance between the two cross
hairs is about the same as the distance between the
registration boxes. At this point they do not need to be
centered in the registraion boxes, just the same distance
apart. We will center them later with the Margins/Offset
setting.
Do the same for the Vertical Scaling. Since the length of
the ballot is nearly twice the width, to move the lower cross
hairs the same amount would only be about .10%. In this
example, the lower cross hairs stretch below the boxes, so the correct setting
would be about 99.90% to bring them up.
Continue to print samples and fine-tune the scaling settings until the spacing of the
cross hairs is very close to the spacing of the registration boxes. Just do this on the
front side of the ballots; there is not a separate setting for the back. Once the
correct scaling options are set, they should not have to change from election to
election. It would be a good idea to check it in case the printer changes over time.
It is now time to fine-tune the horizontal and vertical offsets.
11
•
Adjusting Offsets--Adjusting offsets must be performed separately for both
sides of the ballot. The process is the same for both sides. The example below
shows a ballot with the scaling factor set properly. The cross hairs and circle
are not centered in the box yet, but you can see that they offset from their
respective registration boxes in the same amount and direction. It is now time
to shift the entire image to center the cross hairs in the registration boxes as
well as possible.
In the example to the left, the image is too high and too
far the to the right. Go to the Margins section of the
Ballot Layout options box. The image needs to move
down (the positive direction) about .015”, so you need
to add .015” to the number in the Front Top Margin. If
you properly preset this number to (-18), the new
number should be -.165. ((-.18)+.015=(-.165)).
The image also needs to move to the left (the negative
direction) about .030”, so you need to subtract .030”
from the number in the Front Left Margin. If you preset
this number to (-.18), the new number should be -.21 ((.18)-.030=(-.21)).
Continue to adjust and print samples until image is
centered as well as possible. In the end, because of
paper skew and other factors, the cross hairs may be
slightly right/(left) of center at the top and left/(right) of
center at the bottom, depending on which way the paper
is skewing.
If the amount of skew from top to bottom makes it
difficult to get both the top and bottom cross hairs
within their respective boxes, an adjustment needs to be
made to the ES&S registration guide that was inserted
into Tray 1. Determine which way the ballot skews, and
adjust the registration posts in the opposite direction.
Changing the angle of the paper in the tray helps the
paper align in the printer. Keep in mind that an
adjustment made to help the front of the ballot makes a
change to the back of the ballot.
In the example to the left, the bottom cross hairs are
well centered, but the top cross hairs skew to the right.
In this case, adjust the registration posts to move the top
of the paper to the right. This moves the registration
boxes to the right, resulting in a better alignment.
12
Once all off these adjustments are made, little needs to be done to continue
printing ballots within registration if the paper is loaded in the tray consistently.
You can keep an eye on the registration as you produce ballots to determine if it
needs any adjustments.
•
Checking Registration on Blank Ballot Stock--Since blank ballot stock does
not have registration targets, it is much more difficult to determine if a ballot is
within registration. This is why ES&S recommends the use of the DBS.
Otherwise, a Ballot Overlay, ruler, or caliper would be required to validate
registration of each ballot.
To verify correct scaling, the distance between the cross hairs needs to be
measured. The distance should be 7.5” horizontally, and 13.4” vertically. Adjust
the scaling as described earlier and reprint samples until it is accurate.
To check the Margin settings, you need to measure from the center of each of the
cross hairs to its closest edges of the ballot. A perfectly registered ballot will have
the center of all the cross hairs .500” from the left and right edges of the paper, and
.300” from the top and bottom edge of the paper. The tolerances on these numbers
for an acceptable ballot are +/-.030”. Adjust the Margins as described earlier and
reprint samples until it is accurate.
The following products and services are
available from ES&S:
Unity Election System™
Election Data Manager
Ballot Image Manager
Ballot on Demand
iReport
Hardware Programming Manager
Data Acquisition Manager
Election Reporting Manager
Profile Voter Registration Systems™
PowerProfile™
StateProfile™
MegaProfile™
CandidateProfile™
Ballot Counting Systems
Systems for use at the Precinct or Polling Place – Electronic Ballot:
iVotronic® DRE Touch Screen Voting System
V-2000 Full Face DRE Touch Panel Voting System
Systems for use at the Precinct or Polling Place – Paper Ballot:
Model 100 OMR System
Model 2100 Punch Card System
Systems for use at Central or Regional Locations – Paper Ballot:
Model 150 OMR System
Model 550 OMR System
Model IV-C OMR System
Election Services and Support
On-site Training and Election Day Support
Election Programming Services
Comprehensive Training Programs and Tools
Maintenance Programs
Toll Free Phone and On-line Support
Ballot Printing Services
Systems and Procedures Documentation
Complete Inventory of Election Supplies
If you would like more information on any of our products or services please contact us:
Election Systems & Software, Inc.
11208 John Galt Blvd.
Omaha, NE 68137
Phone: 402-593-0101
Toll Free Inside the U.S.: 1-800-247-8683
Fax: 402-593-8107
Visit our website at www.essvote.com
Better Elections Every Day