1
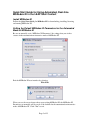
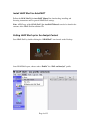
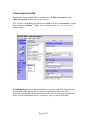
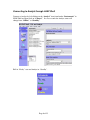
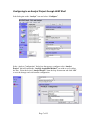
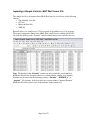
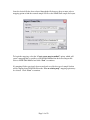
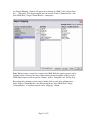
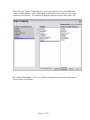
User Manual
Integration of LEAP Shell
DART Control and MSRedux-XI
in the Analyst Context
Version 1.0
IonSense, Inc.
January 2009
Table of Contents
Install MSRedux-XI.................................................................................................. 3
Install LEAP Shell for AutoDART ......................................................................... 4
Setting LEAP Shell up for the Analyst Context .................................................... 4
Connecting to the PAL ............................................................................................. 5
Connecting to Analyst through LEAP Shell .......................................................... 6
Configuring to an Analyst Project through LEAP Shell ...................................... 7
Creating a LEAP Shell Method to Include an Analyst Acquisition Method...... 8
Setting up the LEAP Shell Sample List to Acquire Analyst Data ....................... 9
Importing a Sample List into LEAP Shell from a File........................................ 10
The Chemical “Formula” Feature of MSRedux-XI............................................ 11
Steps to Importing a Sample List into LEAP Shell from a File ......................... 12
Getting Ready to Run............................................................................................. 19
Submit the Sample List to the LEAP Shell Queue and Run .............................. 21
DART Shutdown Feature ...................................................................................... 22
Additional Comments............................................................................................. 23
Page 2 of 23
Quick Start Guide for Using Automated, Real-time
MSRedux-XI in the LEAP Shell Context
Install MSRedux-XI
Follow the Quick Start Guide for MSRedux-XI for downloading, installing, licensing
and running MSRedux-XI.
Setting the Default MSRedux-XI Parameters for the Automated
Mode of MSRedux-XI
Be sure to manually set in “MSRedux-XI Parameters” the settings that you wish to
execute in the automation/non-interactive mode of MSRedux-XI.
Exit the MSRedux-XI user interface by selecting:
File->Exit
When you see the screen shown above upon exiting MSRedux-XI, the MSRedux-XI
Parameters set manually will be saved as the defaults for the automation/non-interactive
mode of MSRedux-XI. Click “Yes” to exit.
Page 3 of 23
Install LEAP Shell for AutoDART
Follow the LEAP Shell 3 for AutoDART Manual for downloading, installing and
licensing instructions and for general LEAP Shell settings.
Note: A PDF copy of the LEAP Shell 3 for AutoDART Manual can also be found in the
contents of the LEAP Shell installation CD.
Setting LEAP Shell up for the Analyst Context
Start LEAP Shell by double clicking the “LEAPShell” icon located on the Desktop.
Once LEAP Shell opens, choose under “Profile” the “PAL and Analyst” profile.
Page 4 of 23
Connecting to the PAL
In the header next to “LEAP Shell” it should now read “PAL and Analyst” for the
“PAL and Analyst” profile that was just selected.
Now connect to the PAL by left clicking on the PAL icon in the “Instruments” bar and
then clicking on “Connect”. Within a few seconds the word “Ready” in green text
should appear.
Troubleshooting: If you are having difficulties connecting to the PAL, first make sure
that the PAL power supply has been switched on and that the PAL serial cable is
connected to the PC that will be controlling the PAL. If you still cannot connect to the
PAL restart the LEAP Shell software and then try again to connect to the PAL.
Page 5 of 23
Connecting to Analyst through LEAP Shell
Connect to Analyst by left clicking on the “Analyst” icon found under “Instruments” in
LEAP Shell and then click on “Connect”. In a few seconds the Analyst status will
change from “Offline” to “Standby”.
PAL in “Ready” state and Analyst in “Standby”.
Page 6 of 23
Configuring to an Analyst Project through LEAP Shell
Left click again on the “Analyst” icon and select “Configure”.
In the “Analyst: Configuration” dialog box that appears, configure to the “Analyst
Project” that will contain the “Analyst Acquisition Method” you wish to use to collect
the data. Select the desired “Analyst Project” from the drop down menu and click “Ok”
to save the changes and exit from the configuration.
Page 7 of 23
Creating a LEAP Shell Method to Include an Analyst Acquisition
Method
For general questions about creating a Shell Method refer to the LEAP Shell 3 for
AutoDART Manual.
The Analyst specific sections in the LEAP Shell Method are the “Analyst: Data
acquisition” section and the “DART Warm-up Time (min)” that appear at the bottom
of the page.
In “Analyst: Data acquisition” section the “Instrument selection” will be “Analyst”
and the Analyst Acquisition Method will be chosen from the drop down box labeled
“DataAcq: Acquisition method”.
The “DART Warm-up Time (min)” feature allows the user to set a fixed time interval
for the DART to heat at the beginning of EVERY sample batch submitted to the LEAP
Shell Sample Queue. The default time is set to 0 minutes.
When a “DART Warm-up Time” is set the following will take place:
• DART Control will automatically be turned “ON” by LEAP Shell at the
beginning of EVERY sample batch in the LEAP Shell Queue and LEAP Shell
will wait for the set warm-up time.
• The DART status automatically changes to “RUN”.
• The DART heater is automatically turned “ON” and set to the “Run Time”
heater temperature set through the DART Method.
• The DART “Run Time” gas is automatically selected.
Note: These events also occur even if no DART Warm-up Time is set, e.g. set to 0 min.
Page 8 of 23
Setting up the LEAP Shell Sample List to Acquire Analyst Data
The user has two options to create a sample list to run in LEAP Shell:
1. Directly within LEAP Shell by filling in the required fields
2. By importing a file into LEAP Shell
This sample list set-up assumes 1 sample analysis
(1 data acquisition) per Analyst .wiff file.
Creating a Sample List Directly in LEAP Shell for Analyst Data
The first option is straight forward. Shown in the image below are the generic fields the
user will need to fill in when creating a sample list directly in LEAP Shell for Analyst
data acquisition.
•
•
•
The LEAP Shell “SampleID” will be the “Analyst Sample Name”
The “DataFileName” will become the Analyst .wiff file name
The “Mass_of_Interest” column is reported to MSRedux-XI for the data
processing. The mass of the analyte in Daltons (not the m/z value) should be
entered here.
o Note: A value of “-1” may also be entered in this “Mass_of_Interest”
field provided that a molecular formula for the analyte of interest is
contained within the sample information. The only way that the user may
create a custom column labeled “Formula” is to import a sample list into
LEAP Shell. This feature is explained in greater detail in the Importing a
Sample List into LEAP Shell from a File section of this manual.
Note: There is a limit of 80 characters total for the length of the “DataFileName”
entered in the LEAP Shell sample list plus the name of the Analyst Project that LEAP
Shell is configured to. If the combination of these two names exceeds 80 characters in
length the quality of the MSRedux-XI printout will be reduced.
Page 9 of 23
Importing a Sample List into LEAP Shell from a File
The sample list file to be imported into LEAP Shell may be saved in any of the following
formats:
• Tab delimited (text) file
• CSV file
• Microsoft Excel file
• XML file
Pictured below is an example of a CSV file opened in OpenOffice.org’s Calc program.
The general components found in the LEAP Shell sample list are contained in the CSV
file, with the addition of the “Formula” custom column that has been added by the user.
Note: The header for the “Formula” column can only contain the word formula as
MSRedux-XI will only recognize entries in a column labeled with the word formula.
Formula may be entered in the following formats: “Formula”, “FORMULA”, or
“formula”. For example, if the user labels the custom column “Chemical Formula”
MSRedux-XI will not process any of the formulas in that sample list.
Page 10 of 23
The Chemical “Formula” Feature of MSRedux-XI
In order for MSRedux-XI to process a chemical formula entered into the LEAP Shell
sample list, the value “-1” must be entered into the “Mass_of_Interest” column for the
each sample that contains chemical formula information. The “-1” tells MSRedux-XI to
look for a chemical formula and use it to calculate a mass.
In the case that both a chemical formula and a theoretical mass of interest are entered into
the LEAP Shell sample list, MSRedux-XI will use the mass of interest to determine the
presence of the analyte of interest and the chemical formula is extra information.
If you select “-1” for a mass of interest, MSRedux-XI will look for a chemical formula in
the wiff file and will calculate the mass of interest based on the formula. The formula
should be written in with element names starting with capital letters. Two-letter elements
should have lower case second letters. Number characters representing stoichiometry
should follow the element. Omit all non alpha-numeric characters, viz., omit spaces,
underscores, dashes, etc. Order of elements is not important. For instance, ethanol could
be represented as
C2H6O
or
CH3CH2OH
Sodium must be “Na” and never “NA”.
Page 11 of 23
Steps to Importing a Sample List into LEAP Shell from a File
From the “Samples” Sample List view in LEAP Shell, the “Import” feature is found
under “File -> Import” or can be accessed directly by hitting “F3” on the keyboard.
When the user engages the “Import” feature of LEAP Shell the “Import from file…”
dialog box will appear on screen.
Page 12 of 23
In this dialog box, the user can immediately select the “Browse” button leaving the
default setting for the file format as “Text file (smart guess delimitor)” and lookup the
desired file. The user may want to select the desired file’s format before browsing for the
file to narrow down the number of possible files to choose from.
The image below shows the case where the user has left the default setting for the file
format as “Text file (smart guess delimitor)” and began searching for the CSV file.
Page 13 of 23
Once the desired file has been selected through the file browser, the user must select a
mapping option to link the external sample list file to the LEAP Shell sample list layout.
To begin the mapping, select the “Create a new map to method” option, which will
create a mapping that is specific to a LEAP Shell Method for the desired import file.
Select a LEAP Shell Method and click “Next” to continue.
If a mapping file has previously been created and saved for the type of sample list that
will be imported into LEAP Shell then the “Use an existing map” mapping option may
be selected. Click “Next” to continue.
Page 14 of 23
An “Import Mapping” window will appear after clicking on “Next” in the “Import from
file…” dialog box. First begin mapping the non-custom “Source Column Headers” with
their LEAP Shell “Target Column Headers” counterparts.
Note: When creating a sample list to import into LEAP Shell the mapping process can be
simplified if the user keeps the same column naming in their document as there is in the
LEAP Shell sample list for the generic columns, such as “SampleID” and “Pal.Tip Tray”.
By keeping this continuity you can simply double click on each of the column names
under “Source Column Headers” that directly match one of the LEAP Shell “Target
Column Headers” to add them into the center “Mapping” column.
Page 15 of 23
To map a custom column into a LEAP Shell sample list map it to the “new” option in the
“Mapping” column. This will trigger the “Import column” dialog box to appear. The
name of the custom column will appear in the text field for “Column name” as it was
entered into the file that is being imported. For the column type select “string”.
For the “Reference” select “Analyst” from the drop down box. Click “Ok” to save the
changes and create the “Formula” column header in the LEAP Shell “Target Column
Headers”.
Page 16 of 23
When all of the “Source Column Headers” have been mapped to one of the LEAP Shell
“Target Column Headers” select “Save map” at the bottom of the window to save a copy
of the map for future use. To complete the mapping without saving the map, select “Ok”.
By selecting “Save map” a “Save As” window will appear where the map can be named
and saved to a safe location.
Page 17 of 23
After saving the mapping file or proceeding without saving the mapping file, the LEAP
Shell sample list view will appear as shown below. LEAP Shell will prompt the user to
name the sample list and save it under “Sample Lists” within LEAP Shell.
Page 18 of 23
Getting Ready to Run
To prepare to run make sure that the DART Control software has been opened and the
desired DART Method has been loaded.
Page 19 of 23
In LEAP Shell, check that all “Instruments” are in the “Ready” mode. When
connecting to Analyst through LEAP Shell the default Analyst mode will be “Standby”,
the user can “Ready” Analyst through the “Analyst: Status” window.
In the “Analyst: Status” window click on “Ready” to put Analyst in the “Ready” mode.
Page 20 of 23
Submit the Sample List to the LEAP Shell Queue and Run
View of the LEAP Shell Sample Queue.
At the bottom of the LEAP Shell window the “DART Warm-up Time” set through the
LEAP Shell Method will be displayed. The time posted in the message is the time that
the PAL will begin running the samples in the Queue. This example shows a 5 minute
“DART Warm-up Time”.
The status of the Analyst data acquisition can be checked through LEAP Shell by
accessing the “Analyst: Status” window. Left click on the “Analyst” icon under
“Instruments” and select “Status” to open the “Analyst: Status” window shown below.
Page 21 of 23
DART Shutdown Feature
At the end of any submitted batch in the LEAP Shell Sample Queue DART Control is
triggered by LEAP Shell to shutdown.
•
•
•
DART Control is placed into “Standby” mode with the heater “ON”.
The DART heater will be turned off in 3 minutes after being placed
in “Standby” by the DART Shutdown feature.
DART Control will be completely turned “OFF” in a total of 5
minutes.
In the event that:
• There are multiple sample batches in the queue, the DART will not be shut down
until the last sample batch submitted has finished running. Note: If a “DART
Warm-up Time” has been set in the LEAP Shell Method it will be executed at the
beginning of every sample batch.
o It is suggested that for multiple sample batch submissions to not include a
“DART Warm-up Time” in the LEAP Shell Method. For this case it is
advised to allow the DART to fully heat in “Standby” before starting the
run through LEAP Shell. LEAP Shell will automatically turn DART
Control into “Run” mode.
•
The user wishes to cancel the DART Shutdown at any time click the “Cancel”
button in the “DART Shutdown” window.
View of the DART Shutdown window at the end of a LEAP Shell run.
Page 22 of 23
Additional Comments
By design, many of the user configurable features in the automated version of the
MSRedux-XI software can only be set by the interactive (GUI) version and are
inaccessible from LEAP Shell.
Page 23 of 23