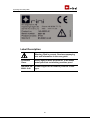
1
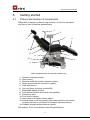
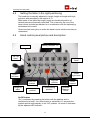
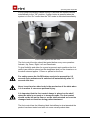
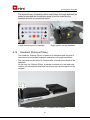
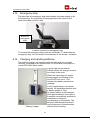
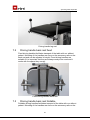
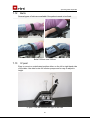
User manual Operationsbord RiEye Mk II 100-00101-0n Operating table RiEye Mk2 - Model R5 100-00105-00 - Model R6 100-00105-01 - Model R7 100-00105-02 2011-0068 v88-92 92 79 www.r ini.se Operating table RiEye Mk2 Table of content 1. Introduction - operating table RiEye Mk2 ....................................... 4 2. Registration ....................................................................................... 7 3. Unpacking .......................................................................................... 7 4. Important – Before use ..................................................................... 8 4.1 Mounting of backrest actuator ........................................................ 8 4.2 Mounting of cushions ..................................................................... 9 5. Product identification label ............................................................ 10 6. Getting started................................................................................. 11 6.1 Picture and location of components ............................................. 11 6.2 Areas of use ................................................................................. 12 6.3 Transport and parking of the table - wheels and brakes .............. 12 6.4 Setting the table in the right positioning ....................................... 14 6.5 Hand control panel picture and description .................................. 14 6.6 Programmable user setting (normal mode) .................................. 15 6.7 Programmable user setting (auto mode) ...................................... 16 6.8 Level 0 - Anaesthesia position ..................................................... 16 6.9 Trendelenburg position ................................................................ 17 6.10 Foot control (option) ..................................................................... 17 6.11 Headrest (lockable) ...................................................................... 21 6.12 Headrest (weightless) .................................................................. 22 6.13 Electrical adjustment (option for weightless headrest) ................. 24 6.14 Headrest (Rubens Pillow) ............................................................ 25 6.15 Emergency stop ........................................................................... 26 6.16 Charging and handling batteries .................................................. 26 7. Accessoaries to RiEye Mk2 ............................................................ 28 7.1 Driving handle leg rest (recumbent patient) ................................. 28 7.2 Driving handle back rest fixed ...................................................... 29 7.3 Driving handle back rest foldable ................................................. 29 7.4 Attachment rails on seat............................................................... 30 7.5 Collapsible side rails .................................................................... 31 7.6 Anaesthesia armrest .................................................................... 31 7.7 Backrest extension – width and length ......................................... 32 7.8 Holder for hand control................................................................. 32 2 Operating table RiEye Mk2 7.9 Wrist support ................................................................................ 33 7.10 Knee support................................................................................ 34 7.11 Special mattress for anesthesia ................................................... 34 7.12 Belts ............................................................................................. 35 7.13 IV pool .......................................................................................... 35 7.14 Drape support with and without air connection ............................ 36 7.15 Protective cover for leg cushion ................................................... 36 8. Cleaning and maintenance ............................................................. 37 8.1 Patient near surfaces ................................................................... 37 8.2 Periodic cleaning .......................................................................... 37 8.3 Disinfection .................................................................................. 37 8.4 Maintenance and service ............................................................. 38 9. Safety ............................................................................................... 39 9.1 Warning and other labels ............................................................. 39 9.2 CE Deklaration of conformance ................................................... 39 10. Technical data ................................................................................. 40 10.1 Specification................................................................................. 40 10.2 Transportation and storage conditions ......................................... 41 10.3 Electromagnetic emission and immunity. ..................................... 41 10.4 Disposal and recycling ................................................................. 44 11. Warranty .......................................................................................... 44 3 Operating table RiEye Mk2 1. Introduction - operating table RiEye Mk2 Thank you for choosing Rini’s operating table for microsurgery. RiEye Mk2 with modern attractive design is developed functionally and ergonomically in close collaboration with a number of leading Swedish and international clinics. The table has wide area of application in both stationary mode or in mobile "roll-in roll-out" procedures. Great care has been put in the design of the table and its accessories to improve the freedom of movement for the surgeon and assisting personnel in the vicinity of the patients head. The headrest is easy to adjust and has a unique ergonomic design that makes it comfortable for the patient and at the same time has high accessibility. Thanks to smooth surfaces and smart seams as well as cushion that are easy to remove, the table is easy to keep clean and hygienic. RiEye Mk2 is battery powered and the settings are variably adjusted from sitting to horizontal position with the hand or optional foot control. Customized positions can also easily be pre-programmed. The table is raised and lowered by two electrically driven telescopic columns. The table is also equipped with electrically Trendelenburg feature that is activated by a button on the hand control panel. The minimum height is below 500mm allowing for easy boarding and exit for the patient and the maximum height gives ensures good ergonomic working positions for the surgeon and assisting personnel. Accessory rails are fitted with on each side of the back cushion enabling mounting of various optional accessories from Rini or third party. The four large wheels with heavy duty ball bearings are all steerable for easy manoeuvring and the table can to reach the correct working position even when there is little space. The chassis is painted with durable powder coating and important parts are covered with protective caps which make the table easy to clean. The table has a new type of wheel suspension and stands steady even on uneven floors due to the unique adaptive chassis. 4 Operating table RiEye Mk2 An ergonomic placed central break locks all four wheels simultaneous in operating mode. If moved it can also move sideways thanks to wheels that easily rotate. The hand control has an intuitive layout with easy choices in function where back- leg- and seat cushion as well as height can be set individually. Special quick buttons are available for Trendelenburg and zero level positions as well as possibility to pre-program six user settings. RiEye Mk2 is based on a new base platform and is available in three models that can be equipped with most of the available accessories making it possible to customize the table for different mobile and stationary procedures. Model R5 (100-00105-00) Width 580mm and leg rest 400mm. Suitable when physical space in the clinic is limited or the requirement is that the table should be possible to fold the table completely as a chair. Model R5 with holder hand control and width extension Model R6 (100-00105-01) Width 580mm and leg rest 500mm. This model offers a good compromise between mobility and patient comfort. 5 Operating table RiEye Mk2 Model R6 with holder hand control, width extension, driving handles backrest and foot control Model R7 (100-00105-02) Width 580 or 700mm and Leg rest 680mm. For longer treatments and anesthesia surgery this model is best suited. Model R7 with electrical brake, holder hand control, width extension, driving handles backrest, foot control, IV pole, side rails and electrical headrest 6 Operating table RiEye Mk2 2. Registration We at Rini are constantly working to improve our current products and develop new ones. We always focus on the user and we appreciate hearing viewpoints and ideas that can move our products offerings forward. So please do not hesitate to let us know what you think about our products. Please register your Rini products to help us improve our service and support to you. In addition you will receive the latest news from us on upgrades and new ergonomic product and solutions for your specific area. 3. Unpacking To ensure patient safety and the life span of the product it is important to observe the following instructions before use. Please read this manual carefully and understand how to use the product before you start. Before you unpack the product check the packaging: Make sure that the packaging has not been damaged during transport. Report any damage immediately to the transport company and your local Rini representative Remove the packaging: Detach the top of the pallet and remove it Take out any non-installed accessories that are packed separately with the table Remove the side sections of the transport pallet Remove all the packing material such as plastic, tape etc. from the table Warning! Do not use sharp tools when removing the packaging material. This can cause damage. Make sure that the delivery includes all ordered parts. Contact your Rini sales representative if you find any discrepancies Lift the table carefully off the transport pallet and put it on the floor Warning! Be careful when lifting the table off the pallet. The table is heavy and may cause injury. Avoid bumping it as this can cause material damage. 7 Operating table RiEye Mk2 Before using the product, please check the following: The product has not been damaged in transport All cables are connected as described in this manual Please contact your local Rini sales representative if you have any concerns. 4. Important – Before use When you receive the table the base unit is normally already assembled and ready for use. To reduce packing size and cost of shipping the only part that may need to be configured is the back rest and mounting of cushions. If accessories are separately included in the package they must be assembled as described in this manual or as directed by Rini or your local Rini representative. All electrical connections are pre-wired and ready to use. Since the table is designed for battery power all you have to do is check that the battery is charged and properly connected. Also make sure that emergency stop is deactivated. 4.1 Mounting of backrest actuator If the actuator is disconnected in shipping then first fold the backrest in a position so that it is possible to mount the bolt with the included locking mechanism. Attach clip on the inside Install shaft from the outside The clip is locked with a ”click” Mounting of backrest actuator 8 Operating table RiEye Mk2 4.2 Mounting of cushions The cushions have a quick locking mechanism that allows easy mounting and removal. Make sure when mounting that the material between the cushions are place as shown in the pictures so it does not get stuck. Mounting of cushions Before use for maximum safety of persons and equipment: Read through this manual or make sure you have reveived the required training to handle this product. Understand were the emergency stop is located and how to use it. See chapter 6.12 in the manual Understand how Trendelenburg position is activated. See chapter 6.9 in the manual. 9 Operating table RiEye Mk2 5. Product identification label The label is placed at the bottom of the table and states to what standard the product has been tested and sets out some overall product data. Label Description Warning. Risk is present. Read accompanying text and information in the user guide. Type B equipment with ground for protection against electric shock. SWL Safe Work Load. The table must not be loaded with more than the specified weight. The value 3000N corresponds to 300 kg. Mode of operation Average ratio between operating time and rest time of the electrical lifting mechanism. Standard EN 60601-2-46 Product approval for medical products of this type. 10 Operating table RiEye Mk2 6. Getting started 6.1 Picture and location of components RiEye Mk2 is designd to allow for high mobility, comfort for the patient and easy of use for medical professionals. 4 2 5 1 3 6 6 13 3 7 9 10 8 10 8 10 11 8 12 8 8 Main components of RiEye Mk2 (Model R6) 1 2 3 4 5 6 7 8 9 10 11 12 Headrest (standard model) Hand control Backrest width and length extension (option) Drape support with air connection (option) Side rails (option) Leg rest (show in picture is model R6) Detachable battery module Front wheels left with directional lock capability Emergency stop Foot control (option) Hand control on flexible holder (option) Central break on all four wheels (down ward position) and control of directional lock on left wheel for transport (upward position) 13 Foldable driving handles backrest (option) See chapter 10 for more detailed technical specifications. 11 Operating table RiEye Mk2 6.2 Areas of use The RiEye Mk2 operating table is designed for microsurgery and can be used either as a stationary unit in the operating room or used as a mobile unit according to the "roll-in roll-out" method. The table gives high freedom of movement to surgeons and assistants around the patient's head and its intended areas of use include: Eye surgery Ear, nose and throat surgery Esthetic facial surgery Dental surgery If full anesthesia is used the table should be equipped with the optional extended leg rest and anesthesia armrest. The table is only intended for indoor use and transport of patients on normal floor conditions. The table may only be equipped with accessories and components that have been approved by Rini Ergoteknik AB. Repairs or any other technical modifications of the table may only be performed by authorized personnel from Rini Ergoteknik AB. The table should not be used by patients weighing more than 300kg. The wheels must be secure and locked with the central break during operation. 6.3 Transport and parking of the table - wheels and brakes The table has four large rotatable wheels where the left front wheel has a directional lock capability. When space is limited or fine positioning side-ways of the table needs to be done it is an advantage that all wheels can rotate. To facilitate transport over longer distances the directional lock is available on the left front wheel. This makes the table easy to steer straight for instants during transport in corridors. Direction lock will cause the table keeps a straight course and turn around the direction of the wheel locked. All wheels have brakes which are centrally controlled by the foot pedals. There are two identical ones on each side of the table that also control the directional lock. 12 Operating table RiEye Mk2 To break and lock the position of then table the foot pedal is pressed down. The brake is released by moving the pedal in the opposite direction until the neutral position has been reached. To set the directional lock, first align the front left wheel strait and then press the foot pedal upwards. To release the directional lock function move the pedal in the opposite direction one step down until the neutral position has been reached or two steps down to the brake mode. Warning! It is important that the wheels are kept locked during surgery. Improper use may cause personal injury. 13 Operating table RiEye Mk2 6.4 Setting the table in the right positioning The headrest is manually adjusted in length, height and angle with high precision and described in the section 6.11. Other parts of the table like height, angel and combined position of various parts are electrically controlled. This is done by the use of the hand control included as standard or in combination with the optional joy stick based foot control. Great care has been given to make the hand control intuitive and easy to understand. 6.5 Hand control panel picture and description Memory position 1-6 On/Off ”Up” left hand ”Up” right hand ”Down” ”Down” left hand right hand Leg rest position Back rest position Height of table Anaesthesia position Trendelenburg position Knee support Activate Memory Store On/Off button ”On” is activated by pressing the button with the padlock and is confirmed by a beep. If no other button is activated in 10 seconds the system returns automatically to the “Off” position. On mode is indicated by the adjacent LED indicator. 14 Operating table RiEye Mk2 ON mode is necessary to activate all other functions except for the Trendelenburg position which overrides the On/Off function. If the On/Off button is pressed when the system is in the On mode then the Off mode is activated immediately. When the system returns to the Off mode it will also reset the selected function key. Buttons for primary adjustment of the table These buttons control the operating table functions. Respective LED lights up when selected function is chosen. Only one function can be selected at a time. The function keys are used in conjunction with Up and Down buttons. They have identical function of the left and right side of the hand control panel to fit left handed and right handed persons. First select the desired function which is then guided Up or Down. Table height - Raise and lowers the complete table Back rest - Change the angle of the back cushion Leg rest - Change the angle of the leg rest Knee support - This function elevates or lowers knee support Up - Controls the upward direction after the selection function Down - Controls the downward direction after the selection function 6.6 Programmable user setting (normal mode) The buttons 1 – 6 handle pre-programmed memory settings of the table. Users can easily design up to six own chosen positions of the table for example “Preparation” “Transport” “Surgery” “Recovery” and store them. A stored position is retrieved by continuously pressing the button 1 - 6 until the stored position is reached. How to store a desired position First adjust the table to the desired position using the button for primary adjustment of the table. Then press the ”S” button that activates the storing capability. Within 2 seconds select one of the buttons 1 - 6 to store the desired position and a successful programming is confirmed by a “beep”. If the selected button 1 - 6 already had a pre-programmed position stored, this setting will be replaced by the new one. 15 Operating table RiEye Mk2 6.7 Programmable user setting (auto mode) The basic functions are the same as describe in the previous section. But instead of needing to press the selected stored position button continuously it is sufficient to keep it pressed for 1 second. The table will then go to the stored position automatically. If any button on the hand control or the foot control is activated during the automatic mode it will be stopped. The auto mode is an extra option that is supplied on the users own risk as the medical directive for safety reasons require the function described in section 6.6. How to store a desired position in auto mode First adjust the table to the desired position and then press the ”S” button for approx. 5 seconds that activates the storing capability confirmed by a “beep”. Within 2 seconds select one of the buttons 1 - 6 to store the desired position and a successful programming is confirmed by a “beep”. 6.8 Level 0 - Anaesthesia position Anaesthesia position is a pre-programmed function that puts the table in horizontal position. Table in pre-programmed “Level 0” position 16 Operating table RiEye Mk2 6.9 Trendelenburg position In an acute patient situation the table can be tilted in the Trendelenburg position so that the patients head is lower than the rest of the body. Table in pre-programmed Trendelenburg position To quickly activate this function there is a dedicated button “Trend” for this that also overrides the unlock function with On/Off button. If this button is pressed the whole table is made flat with an angle of minus 15 degrees with the head in the lowest position. The Trendelenburg button overrides the On/Off button. Be careful handling this function so it is not activated by mistake. It can cause personal injury. 6.10 Foot control (option) The foot control is a factory mounted optional accessory that normally needs to be ordered with the table or upgrades in the factory. The foot control gives additional control of some key adjustments normally to be used by the surgeon for fine tuning during operation. These adjustments include raising and lowering the table as well as changing the angle of the back support. Note that these are the same as available on the hand control. 17 Operating table RiEye Mk2 Joystick – for ”cradle” function and electrical headrest (option) Joystick – for up/down and backrest Activate/Deactivate Foot control placed on designated shelf To use the foot control, first push the green On/Off button to activate the function and for safety reasons the button needs to be pressed for at least 0,5 seconds. The active state is confirmed with a beep and the LEDs for the “Table height” and “Back rest” are lit on the hand control. Foot control placed on retracted shelf 18 Operating table RiEye Mk2 If no joy-stick movement is done during 10 seconds the system returns automatically to the “Off” position. If green button is pressed when the system is in the “On” mode then the “Off” mode is activated immediately. Foot control placed on the floor The foot control function should be tested before every new operation: Activate, Up, Down, Right, Left and Deactivate. To give flexibility and allow for a good ergonomic work positions the foot control can either be placed on the designated shelf on the chassis or on the shelf retraced approx. 130mm or placed on the floor. For safety reason the On/Off button needs to be pressed for 0,5 seconds to be activate and is switched off automatically after 10 seconds idle time. Never insert hand or other body in the mechanics of the table when it is in motion. It can cause personal injury. It is important that the foot control always is placed on the shelf when the table is not used or in transport mode. The foot control should not be left on the floor or on the shelf retracted as is can be damaged and not function during patient treatment. The foot control has the following label that defines to what standard the product has been tested and sets out some overall product data. 19 Operating table RiEye Mk2 Label Description Warning. Risk is present. Read accompanying text and information in the user guide. Protective Class Safety against water penetration. IPX6 means water proof but not washing machine proof. Standard EN 60601-2-46 Product approval for medical products of this type. 20 Operating table RiEye Mk2 6.11 Headrest (lockable) The headrest is retractable and can be adjusted in height and angle by loosen two different locking mechanisms. When these adjustments are made one hand must be placed under the headrest to support the patient's head. B. Angle and height adjustment A. Length adjustment Angle and length adjustment of headrest To adjust the headrest, first release the locking mechanism “A” to enable setting a suitable length of the headrest and then re-lock the mechanism. Secondly adjust the angle and height position “B” of the headrest so that the patient is comfortable and then re-lock the mechanism. When the table is used with a patient never loosen the headrest mechanism without supporting the patient's head with one hand under the headrest. For easy cleaning or if different types (normal or soft) are to be used there is a quick release function to detach the complete headrest mechanism. 21 Operating table RiEye Mk2 Pull out to release Release of complete headrest 6.12 Headrest (weightless) A patent pending design has been developed to minimize the number of manual adjustments needed for medical staff during an operation cycle. At the same time the patient will experience greater comfort compared to a conventional operating table. The headrest is adjustable in length, height and angle at the same time as the headrest is perceived as weightless. It automatically adapts to the operation table different angular settings while the patient's head remains firmly fixed. B. Angle and height adjustment A. Screw to lock length 22 Operating table RiEye Mk2 Angle and height adjustment and lock for length Before the patient sits on the operating table check that the headrest can move freely in the longitudinal direction and the screw "A" is un-locked. Normally, the screw "A" un-locked and locked only if there are special needs that the length is fixed. Next, adjust a base angle and height of the headrest bowl with the locking mechanism 'B'. The headrest should normally have a slightly raised angle for maximum patient comfort. Never loosen the headrest mechanism “B” without supporting the patient's head with one hand under the headrest. Lock "A" must be open when the backrest of the table is adjusted otherwise the patient may be harmed. Depending on the patient's height a base setting of the headrest is made while the patient is in a sitting position (backrest in upraise position) according to the pictures below. Patient heigth up to 180cm Patient heigth over 180cm This default setting covers over 90% of all patient cases. In cases where the patient has a special body constitution some additional adjustment may be necessary. It is also important that the headrest is extracted a minimum of 60mm in order to take up the movement that is generally associated with the table backrest adjustment. Minimum pull-out length is indicated by a mark on the headrest rails. For easy cleaning or if different types of headrests are used there is a quick release function to detach the complete headrest mechanism. Make in such case sure that the locking screw “A” is tightened. 23 Operating table RiEye Mk2 Pull out to release Release of complete headrest 6.13 Electrical adjustment (option for weightless headrest) As an option, fine adjustment of the angle of the weightless headrest can be made electrically by the hand control on the right joystick on the foot control – moving it up or down. To set the headrest in the middle position and get maximum adjustment range – press the button on the hand control and wait until the motor stops. Electrical angle adjustment of headrest 24 Operating table RiEye Mk2 The electrical way of adjusting can be useful when the angle between the patient's head and the microscope needs to be fine tuned and the headrest as such is covered and sterile. Hand control layout for headrest 6.14 Right joystick control headrest Headrest (Rubens Pillow) The headrest “Rubens Pillow” is based on a stainless steel tray that is mounted on the standard headrest mechanism for length extraction. The tray itself can be raised or lowered with a handle at the back of the headrest. On the tray the “Rubens Pillow” is placed consisting of a soft and wide cushion for the patients head that also serves as a wrist support for the surgeon. Headrest “Rubens Pillow” – complete with cushion 25 Operating table RiEye Mk2 6.15 Emergency stop The table has an emergency stop which breaks the power supply to all the electronics. If any position is being adjusted by the hand or foot control the table is put to a halt. Button for emergency stop Location of button for emergency stop To activate the emergency stop, push the red button. To deactivate the emergency stop, turn the button in the direction of the arrows - clockwise. 6.16 Charging and handling batteries The external charger unit delivered with the table shall be mounted vertically, according to the picture below, on a wall and connected to a normal 220-240V mains outlet. A green light on the module indicates when the charger is active and ready to be used. When the hand control is used a buzzer signal and blinking of the On/Off LED can occur. This indicates the battery needs to be recharge. A fully loaded battery can handle approx. 40 operations sessions with a patient weight of 75kg. An empty battery is fully charged after approximately 4 hours and is thereafter automatically switched to maintenance charge so overcharging is not possible. The battery is also designed so that it can be placed on a metal surface without short-circuiting Battery charger 26 Operating table RiEye Mk2 To charge the battery, remove it as shown above and put it into the external charger. A yellow light will indicate that the battery is being charged and is turned off when the battery is fully charged. Battery module Batteries older than 4 years should be replaced with new ones. New batteries must be ordered from Rini or by a Rini approved distributor. Make sure the new battery is fully charged before use. Tip: Take the habit of charging the battery at the end of the workday and order an extra battery that always is charged and stand-by. Battery dropped or subjected to hard impact must be checked. Old batteries are recycled as car batteries. If the battery is re-placed with a patient on the table, verify that the emergency stop is activated. 27 Operating table RiEye Mk2 7. Accessoaries to RiEye Mk2 Some of the accessories ordered will come pre-mounted on the table but can also be mounted afterwards. These include Driving handle leg rest, Attachment rails on the seat and Collapsible side rails. Normally these stay fixed on the table. Some additional accessories are available so the table can be tailored to fit the preference of the surgeon and assisting personnel as well as the constitution of the patient or particular treatment. These be attach either permanently or temporarily and include Anesthesia armrest, Backrest extensions, Wrist support, Holder for hand control, IV pool and Drape support with or without air. Backrest extension width Drape support with air Example of accessories 7.1 Driving handle leg rest (recumbent patient) In addition to the standard driving handles located at the backrest of the table there is an option to fit driving handles also near the leg rest. This is useful if the transport of the patient is done mostly recumbent. The driving handles are mounted with screws to the metal frame beneath the leg rest cushion. 28 Operating table RiEye Mk2 Driving handle leg rest 7.2 Driving handle back rest fixed Fixed driving handles facilitates transport of the table with our without patient. Mounting of the handles are done on the accessory rails on the back rest and can be adjusted in height. Fixed driving handles are suitable if it is important that they are always ready to be used and it works with the space they occupy. Fixed driving handles back rest 7.3 Driving handle back rest foldable Foldable driving handles facilitates transport of the table with our without patient. Mounting of the handles are done on the accessory rails on the 29 Operating table RiEye Mk2 back rest. Foldable driving handles are suitable if minimum space is desired. Fixed driving handles back rest 7.4 Attachment rails on seat In addition to the standard rails located at the backrest of the table there is an option to rails along the seat. This is useful to increase the flexibility where to mount other accessories. The rails are mounted with screws to the metal frame beneath the seat cushion. Attachment rail on seat – available on right and left side 30 Operating table RiEye Mk2 7.5 Collapsible side rails Collapsible side rails increase the safety of the patient and are practical for the patient to hold on to. These can be mounted on either left or right side of the table. Collapsible side rails – available on right and left side 7.6 Anaesthesia armrest The anaesthesia armrest is comfortable for the patient with its soft cushion for pressure relief and can easily be adjusted with a one hand grip. It can be mounted on the left or right side on the rails on the backrest. Anaesthesia armrest 31 Operating table RiEye Mk2 If backrest extensions are used, first remove this on the side where the anaesthesia armrest should be mounted and then lock the armrest with the clamp. 7.7 Backrest extension – width and length Used for pressure relief and comfort typically for large or tall patients. Backrest width extension The width extension is identical for left and right side and is attached to the rails on the backrest. The length extension can be used when the headrest is much extracted from the backrest and is mounted on top of the backrest to give comfort to shoulders. 7.8 Holder for hand control With the holder, that is equipped with a rotatable top, the hand control is always easy accessible for assisting personnel. It makes it efficient to adjust the operating table and reduces the risk of the hand control to be damaged or activated by mistake. The holder is formable for best ergonomics and is mounted on the chassis at optional location giving a fixed height of the hand control independent on the height of the table. 32 Operating table RiEye Mk2 Flexible attachment of holder for hand control 7.9 Wrist support The wrist support is an accessory that is used to give pressure relief for the surgeon during operation. It is built around a foldable bow that can be adjusted in height, depth and sideways. The wrist support is manufactured in stainless steel and is mounted on an adapter directly on the headrest mechanism that makes it easy to mount and remove when required. Wrist support 33 Operating table RiEye Mk2 7.10 Knee support Knee support comes in two versions that are practical to have available and provide more comfort for the patient. Knee support - round 150mm high and half round 200mm high 7.11 Special mattress for anesthesia Special mattresses with "slow recovery" materials can be placed on the operating table. These are available as a whole pad or divided into sections. These are useful during long operations and when the table in a horizontal or nearly horizontal position. Special mattress - 40mm whole pad 34 Operating table RiEye Mk2 7.12 Belts Several types of belts are available if the patient needs to be fixed. Belts 2100mm and 700mm 7.13 IV pool Easy to mount on a dedicated position either on the left or right hand side of the table. Has twin hooks for infusion pumps and is easy to adjust in height. IV pool – can be mounted on right or left side 35 Operating table RiEye Mk2 7.14 Drape support with and without air connection Both versions of the drape support are easy formable and keeps the drape over the patients head. Air connection Drape support (with air) mounted on rail They can be attached on the standards rails, either on the left or right side of the back rest. 7.15 Protective cover for leg cushion The leg cushion can be equipped with an optional protective cover to facilitate cleaning and extend the life span of the cushion. To mount the protective cover first detach the leg cushion and then pull over it over as shown in the picture below. Mounting of protective cover for leg cushion 36 Operating table RiEye Mk2 8. Cleaning and maintenance 8.1 Patient near surfaces Patient near surfaces need special attention regarding cleaning and maintenance and include; Cushions, Headrest, Armrests and accessories; Cover bow, Soft headrest, Anesthesia armrest, IV pole, foot rests and side rail. 8.2 Periodic cleaning General cleaning of the table should be made at least once a week and exposed parts should be cleaned after each patient use. Detergents Details Detergent Information Mild soap If stronger detergents are used, rinse afterwards with water to prevent drying and cracking Cushions Headrest Stand Wheel Frame Metal Plastic shell Painted surfaces Electronic parts such as hand/foot control, joystick, control box and battery Battery charger Use damp cloth Water Note! Do not flush with water under pressure Use damp cloth (if the charger is mounted vertically, wet brush can be used.) Water Note! Do not flush with water under pressure 8.3 Disinfection Clean the table with disinfectant or germicidal agents according to the manufacturer’s instructions and follow the hospital's or clinic's protocol for cleaning of body fluids off the table's surface. 37 Operating table RiEye Mk2 Recommended disinfection Detail Cushions and other parts of leatherette Hand control and other electronics Other parts 8.4 Disinfectants Virkon Information 1 % concentration (and most other disinfectants medium without alcohol) Follow manufacturer's instructions concerning the concentration Noedischer Dekonta 1-3 % concentration CCOTRADE RW 0,5 % concentration (and most other disinfectants) Follow manufacturer's instructions Same as above plus: M-alcohol, Periform or equivalent Follow the manufacturer's instruction Moderate alcohol appears to dry and crack the seat and back material and should not be used Use damp cloth Maintenance and service Service Annual service of the table is recommended to maintain optimum performance of operational and maximize personal security. Such services include: Safety check and replacement/adjustment of moving mechanical parts and accessories if required Check of cushions quality and damages to avoid bacteria traps Check of electrical equipment, batteries and battery charger Please contact your Rini distributor regarding service. 38 Operating table RiEye Mk2 Periodic maintenance Monthly Headrest Loosen the latch and lubricate the two joints with a drop of oil * Anaesthesia armrest ** Lubricate the joints with a drop of oil * Collapsible side rails** Lubricate the joints with a drop of oil * Battery Batteries should be recharged at least once a month for continued capacity * Most types of non-corrosive lubricating oils can be used ** Optional accessories Spare parts and repairs Please contact Rini or your local Rini distributor for information regarding spare parts for your product. The product should only be repaired by Rini or by Rini authorized service centre/engineer. Items under warranty must be sent to a by Rini authorized service centre. Warning! Unauthorized repairs and modifications may result in loss of function and void warranty. 9. Safety The operating table should only be used as it is intended to as described in this guide. Improper use and departure from the safety instructions can cause injury to personal or product. This guide should always be available in conjunction with the operating table. Necessary knowledge of the operating table is required before use. This guide has to be read before equipment is put into service. No other accessory than those mentioned in this guide may be used. Please note warning signs on the product. 9.1 Warning and other labels Warning signs are used when there is a risk for patients, staff or equipment. 9.2 CE Deklaration of conformance Operating table 100-00101-00/-01 follows MDD EU Directive 93/42 EEC for medical products. Tested according to standard EN 60601-2-46 and SS-EN 60601-1. 39 Operating table RiEye Mk2 10. Technical data 10.1 Specification Dimensions Back support Seat cushion Leg support Length x Width 500 x 580/700 mm 430 x 580/700 mm 400/500/700 x 580/700 mm see section 1 for different models R5, R6 and R7 Headrest 180 x 210 mm (integral mould) Maximum width 750 mm (foot-print of chassis) Maximum length 1900/2000/2200 mm (with patient in horizontal position with head in headrest) Height 495 - 895 mm Weight 95 kg (excluding accessories) Maximum static load 300 kg Safe working load 3000N/300 kg Headrest Angle Height Length o o -30 - 30 0 - 80 mm -100 - 350 mm (minus when placed on backrest) o o Back rest angle 80 vertical to -20 Leg rest angle -90 /-45 /-35 (model R5, R6, R7) Trendelenburg position -15 (relative horizontal position of head) o o o o Material Stand and frame Cushions Accessory rail Battery Powder coated metal Standard or seamless design in different colours Stainless steel Battery charger 24 V 10Ah Rechargeable lead acid charging time: 4 hours 100-240V 450 mA Charge voltage: 29,5V, max 19W IP 65 (vertically mounted) Protection class IP 54 Medical classification Class 1 Working conditions Temperature Relative humidity Atmospheric pressure o o +10 C to +40 C o 20 % to 90 % at 30 C 700 to 1060 hPa 40 Operating table RiEye Mk2 10.2 Transportation and storage conditions Transport condition Temperature Relative humidity Atmospheric pressure o o o o -10 C to +50 C o 20 % to 90 % at 30 C 700 to 1060 hPa Storage condition Temperature Relative humidity Atmospheric pressure 10.3 -10 C to +50 C o 20 % to 90 % at 30 C 700 to 1060 hPa Electromagnetic emission and immunity. Medical electrical equipment is subject to special safety precautions regarding EMC requirements and must be installed and put into service in accordance to the following EMC information. The aim is that the operating table not accidentally moves subjected to surrounding electromagnetic interference. Guidance and manufacturer’s declaration – electromagnetic emissions RiEye Mk2 is intended to be used in the electromagnetic environment specified below. The customer or the user must assure that it is used in such an environment. Emissions test Compliance Electromagnetic environment - guidance RF emissions CISPR 11 Group 1 RiEye Mk2 uses RF energy only for its internal function. Therefore, its RF emissions are very low and are not likely to cause any interference in nearby electronic equipment. RF emissions CISPR 11 Class B RiEye Mk2 is suitable for use in all establishments including domestic establishments and those directly connected to the public low-voltage power supply network that supplies buildings used for domestic purposes. Harmonic emissions IEC 61000-3-2 N/A Voltage fluctuations/flicker emissions IEC 61000-3-3 N/A 41 Operating table RiEye Mk2 Guidance and manufacturer’s declaration – electromagnetic immunity RiEye Mk2 is intended to be used in the electromagnetic environment specified below. The customer or the user must assure that it is used in such an environment. Immunity test IEC 60601 test level Compliance level Electromagnetic environment - guidance Electrostatic discharge (ESD) IEC 61000-4-2 +/- 6 kV contact +/- 8 kV air +/- 6 kV contact +/- 8 kV air Floors should be wood, concrete or ceramic tile. If floors are covered with synthetic material then RH should be > 30 %. Electrical fast transient/burst IEC 61000-4-4 +/- 2 kV for power supply lines +/- 2 kV for power supply lines Mains power quality should be that of a typical commercial or hospital environment. Surge IEC 61000-4-5 +/- 1 kV Line to Line +/- 1 kV Line to Line Mains power quality should be that of a typical commercial or hospital environment. Voltage dips, short interruptions and voltage variations on power supply input lines IEC 61000-4-11 <5 % UT (>95 % dip in UT) for 0,5 cycle <5 % UT (>95 % dip in UT) for 0,5 cycle 40 % UT (60 % dip in UT) for 5 cycles 40 % UT (60 % dip in UT) for 5 cycles 70 % UT (30 % dip in UT) for 25 cycles 70 % UT (30 % dip in UT) for 25 cycles <5 % UT (>95 % dip in UT)) for 5 sec <5 % UT (>95 % dip in UT)) for 5 sec Mains power quality should be that of a typical commercial or hospital environment. If the user of the [Equipment or System] requires continued operation during power mains interruptions, it is recommended that the [Equipment or System] be powered from an uninterruptible power supply or battery. 3 A/m 3 A/m Power frequency (50/60 Hz) magnetic field IEC 61000-4-8 Power frequency magnetic fields should be at levels characteristic of a typical location in a typical commercial or hospital environment Note: UT is the AC mains voltage prior to application of the test level 42 Operating table RiEye Mk2 Guidance and manufacturer’s declaration – electromagnetic immunity continuing… Immunity test IEC 60601 test level Compliance level Electromagnetic environment - guidance Portable and mobile RF communications equipment should be used no closer to any part including cables than the separation distance calculated from the equation applicable to the frequency of the transmitter. Separation distance Conducted RF 3 Vrms IEC 61000-4-6 150 kHz to 80 MHz Radiated RF 3 V/m IEC 61000-4-3 80MHz to 2,5GHz 3 Vrms d 1,2 P 3 V/m d 1,2 P 80 MHz to 800 MHz d 2,3 P 800 MHz to 2,5 GHz P is the maximum output power rating of the transmitter in watts (W) according to the transmitter manufacturer and d is the recommended separation distance in meters (m). Field strengths from fixed RF transmitters, as determined by an 1) electromagnetic site survey should be less than the compliance level in each frequency 2) range . Interference may occur in the vicinity of equipment marked with the following symbol. These guidelines may not apply in all situations as electromagnetic propagation is affected by absorption and reflected from structures objects and people. 1) Field strengths from fixed transmitters such as base stations for radio (cellular/cordless) telephones and land mobile radios, amateur radio, AM and FM radio broadcast and TV broadcast cannot be predicted theoretically with accuracy. To assess the electromagnetic environment due to fixed RF transmitters an electromagnetic site survey should be considered. If the measured field strength in the location used exceeds the applicable RF compliance level above the RiEye Mk2 should be observed to verify normal operation. If abnormal performance is observed additional measures may be necessary. 2) Over the frequency range 150 kHz to 80 MHz field strengths should be less than 10 V/m. 43 Operating table RiEye Mk2 Recommended separation distances between portable and mobile RF communications equipment and RiEye Mk2 RiEye Mk2 is intended for use in an electromagnetic environment in which radiated RF disturbances are controlled. The customer or the user of the RiEye Mk2 can help prevent electromagnetic interference by maintaining a minimum distance between portable and mobile RF communications equipment (transmitters) and the RiEye Mk2 as recommended below, according to the maximum output power of the communications equipment. Rated maximum output power of transmitter W Separation distance acc to frequency of transmitter (meters) 150 kHz to 80 MHz 80 MHz to 800 MHz 800 MHz to 2.5 GHz d 1,2 P d 1,2 P d 2,3 P 0.01 0.12 0.12 0.24 0.1 0.38 0.38 0.73 1 1.2 1.2 2.3 10 3.8 3.8 7.3 100 12 12 23 Transmitters rated at a maximum output power not listed above the recommended separation distance d in meters (m) can be estimated using the equation applicable to the frequency of the transmitter, where P is the maximum output power rating of the transmitter in watts (W) according to the transmitter manufacturer. Warning! Portable and mobile RF equipment can effect Medical electrical equipment. Warning! Only use original spare parts and approved accessories from Rini. 10.4 Disposal and recycling RiEye Mk2 is mainly made from environmentally recyclable material. The product consists of steel, stainless steel, aluminium, PVC and other plastics. Rini recommends that the material be sorted and recycled as much as possible in connection with the destruction of the product. Electronic parts and cables Electronic parts and cables shall be handled as electronic waste in accordance with local requirements. Battery The battery contains lead and must be discarded as car batteries according to current environmental legislation. 11. Warranty The warranty is one year from date of purchase. For further information please see Rini’s general condition of sale. 44 Rini Ergoteknik AB Fågelsångsvägen 3B SE-186 42 Vallentuna Sweden Phone +46 8 594 77170 Fax +46 8 929 279 Email [email protected] www.rini.se