1
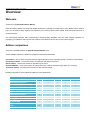
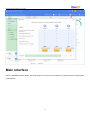
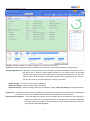
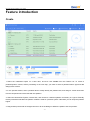
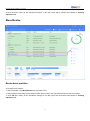
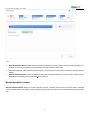
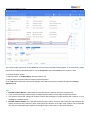
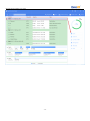
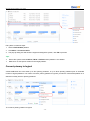
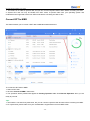
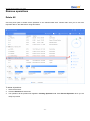
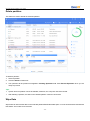
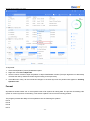
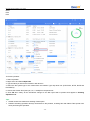
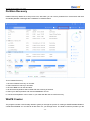
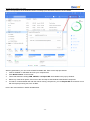
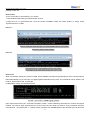
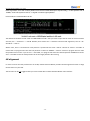
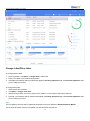
EaseUS Partition Master User Guide
EaseUS® Partition Master
User Guide
EaseUS Partition Master User Guide
Table of content
Table of content ................................................................................................................................................................. - 2 Overview ............................................................................................................................................................................ - 1 Welcome .................................................................................................................................................................... - 1 Edition comparison ................................................................................................................................................... - 1 Getting started ................................................................................................................................................................... - 2 Hardware requirements ........................................................................................................................................... - 2 Supported file systems............................................................................................................................................. - 2 Supported storage devices...................................................................................................................................... - 3 Install and uninstall ................................................................................................................................................... - 3 Activation.................................................................................................................................................................... - 3 Main interface .................................................................................................................................................................... - 4 Feature introduction ......................................................................................................................................................... - 6 Create ......................................................................................................................................................................... - 6 Move/Resize .............................................................................................................................................................. - 7 Resize basic partition ....................................................................................................................................... - 7 Resize dynamic volume ................................................................................................................................... - 8 Move partition or volume ............................................................................................................................... - 10 Merge........................................................................................................................................................................ - 10 Clone ........................................................................................................................................................................ - 11 Disk clone......................................................................................................................................................... - 11 Partition/volume clone .................................................................................................................................... - 13 Migrate OS ....................................................................................................................................................... - 14 Conversion operations ........................................................................................................................................... - 15 Convert to NTFS ............................................................................................................................................. - 15 Convert primary to logical .............................................................................................................................. - 16 Convert logical to primary .............................................................................................................................. - 17 Convert dynamic disk to basic ...................................................................................................................... - 17 Convert MBR to GPT ..................................................................................................................................... - 19 Convert GPT to MBR ..................................................................................................................................... - 20 Remove operations ................................................................................................................................................ - 21 Delete All .......................................................................................................................................................... - 21 Delete partition ................................................................................................................................................ - 22 Wipe Data ........................................................................................................................................................ - 22 Format .............................................................................................................................................................. - 23 System Optimize ..................................................................................................................................................... - 25 Junk File Cleanup ........................................................................................................................................... - 26 Large File Cleanup ......................................................................................................................................... - 26 Disk Optimization ............................................................................................................................................ - 27 Partition Recovery .................................................................................................................................................. - 28 WinPE Creator ........................................................................................................................................................ - 28 Other operations ..................................................................................................................................................... - 31 Repair RAID 5 dynamic volume ................................................................................................................... - 31 Rebuild MBR ................................................................................................................................................... - 31 -
EaseUS Partition Master User Guide
Set active ......................................................................................................................................................... - 32 Initialize to GPT disk ....................................................................................................................................... - 32 Command line ................................................................................................................................................. - 32 4K alignment .................................................................................................................................................... - 34 Change Label/Drive letter .............................................................................................................................. - 35 Check File System .......................................................................................................................................... - 36 Hide partition.................................................................................................................................................... - 36 Explore partition .............................................................................................................................................. - 36 Properties ......................................................................................................................................................... - 36 Surface test...................................................................................................................................................... - 37 Feedback and Technical support.................................................................................................................................. - 37 -
EaseUS Partition Master User Guide
Overview
Welcome
Thanks for using EaseUS Partition Master.
EaseUS Partition Master is a smart and reliable assistance to manage your hard drive in many different ways. With its
help, you are able to easily organize and optimize your hard drive with Create, Delete, Resize and other dozens of
powerful features.
The user-friendly interface with comprehensive wizards greatly simplifies even the most complex operation on
managing your partitions and ensures every feature in this product can be easy to found and navigate.
Edition comparison
There are 5 available editions of EaseUS Partition Master in all.
These available editions are different in features and license authorization.
Free edition - free for home users and doesn’t support Windows server operating system. Limited in some features.
Professional edition - commercial version for desktops and laptops end users.
Server edition - commercial version for Windows server users.
Unlimited Edition - commercial version for enterprise users. It allows unlimited usage within one company.
Technician edition - providing technical service with unlimited usage.
Detailed comparisons among different editions is in the table below.
EaseUS Partition Master
Free
Professional
Server
Unlimited
Technician
Resize/move partition
√
Resize/move dynamic volume
×
Merge partitions
Rebuild MBR
√
√
√
√
√
√
√
√
√
√
√
√
√
√
√
√
√
√
√
√
√
√
√
√
√
√
√
√
√
√
√
√
√
√
√
√
√
√
√
√
√
√
√
Convert dynamic disk to basic
disk
×
√
Repair RAID 5 dynamic volume
×
√
√
√
√
√
√
Wipe partition & disk
Wipe unallocated space
Hide/unhide partition
Set an active partition
Defrag disk
×
-1-
EaseUS Partition Master User Guide
Convert between primary and
logical partitions
√
√
√
√
√
Disk surface test
√
Command line
×
√
√
√
√
√
√
√
√
Delete, Create, Format, Recovery
EXT2/EXT3 partition
√
√
√
√
√
Initialize to GPT disk/MBR disk
√
Convert MBR system disk to GPT
×
Convert GPT system disk to MBR
×
WinPE bootable disk
×
4K alignment
MBR disk & partition copy
√
√
√
Copy dynamic volume
×
GPT disk & partition copy
×
Migrate OS
×
√
√
√
√
√
√
√
√
√
√
√
√
√
√
√
√
√
√
√
√
√
√
√
√
√
√
√
√
√
√
√
√
√
√
√
√
√
√
√
√
Partition Recovery
×
√
√
√
√
Windows XP, Vista, 7, 8/8.1, 10
√
√
√
√
√
Windows Server
×
×
√
√
√
Windows Home Server
×
×
√
√
√
Resize EFI partition
Getting started
Hardware requirements
EaseUS Partition Master requires the computer at least with X86 or compatible CPU with main frequency 500 MHz,
a standard PC system with mouse, keyboard and color monitor, and the capability of the RAM memory equal or larger
than 1.5GB.
Supported file systems
⚫
FAT12/FAT16/FA532
⚫
NTFS
⚫
ReFS
⚫
EXT2/EXT3
Important consideration: Limited features are supported with EXT2/EXT3 file systems, including Create, Delete, Copy
(in Sector Mode only), Format, and Partition Recovery.
-2-
EaseUS Partition Master User Guide
Supported storage devices
IDE, SATA, SCSI, USB removable hard disk, Firewire Hard disk, USB flash drive, memory card, etc. Supported
capability ranges from minimum 2 GB to maximum 16 TB.
Install and uninstall
To install EaseUS Partition Master:
1. Double Click EaseUS Partition Master setup file to initiate the installation. The Setup Wizard page will be launched.
Click Next to continue.
2. Please carefully read the License Agreement, if you accept the terms, select I accept the agreement, otherwise
you will not be able to proceed with the installation.
3. Choose a location to install the software, install it to the default folder by clicking NEXT, or click Browse to select a
specified location.
4. Set a location for the shortcut in Windows start menu.
5. Tick the corresponding option to create a shortcut on your desktop or Windows quick launch bar. Also, you can tick
them both.
6. Click Install to confirm your previous selection and start the installation. The final page reports the end of the setup
process. Click Finish to complete the wizard.
To Uninstall EaseUS Partition Master:
1. From the Windows Start menu, select Start > Settings > Control Panel (From the Windows Start menu, select
Start > Control Panel in Windows 7/Vista)
2. Double-click Add/Remove Programs, and select Change or Remove Programs (Double-click Programs and
Features in Windows 7/Vista).
3. Select EaseUS Partition Master, and click Remove to uninstall the related components (Select EaseUS Partition
Master from the list and click Uninstall in Windows 7/Vista).
4. Or select Start > All Programs > EaseUS Partition Master > Uninstall EaseUS Partition Master. Then, follow the
instructions of the uninstallation wizard.
Activation
1.
To activate Free or Trial edition, please click Activate button at the top-right corner.
2.
Copy and paste your license code to the box and then click the Activate.
-3-
EaseUS Partition Master User Guide
Main interface
After the installation please double click the program icon to launch. Once started you will get access to the program
main interface.
-4-
EaseUS Partition Master User Guide
Tool bar - This bar consists of 4 resident features on the left and several tools.
Feature list - All the operations that are available to proceed to the selected drive/partition are listed in here.
Pending Operation List - By default, the program does not accomplish operations immediately, but places them on
this special list. It helps to avoid possible mistake as you should confirm all provided
changes, and saves your time and effort when executing several operations as you don’t
need to wait for each operation to physically complete before proceeding to the next one.
You can click Undo to cancel the operation or Apply to proceed it.
Apply changes - execute all of the Pending operations
Undo last change - cancel the last change from the list.
Redo last change - relist the changes which are canceled by clicking "Undo last change" in Pending operation.
Partition list - This area lists all the disks and partitions recognized on this computer. By selecting each disk/partition
you are able to see all the available features that can be operated to this drive/partition.
Disk map and legend bar - This area displays the layout of all the storage devices recognized on this computer in
graphic map. Each device is represented with a rectangle bar that contains small-sized
bar, which represents partitions. Some operations can be directly made from here if you
right click the selected disk/partition.
-5-
EaseUS Partition Master User Guide
Feature introduction
Create
1. Select the unallocated space on a hard drive, and then click Create from the Feature List. To create a
partition/dynamic volume, before proceeding to the next step, you need to select a partition/volume type and add
disk(s) to this volume.
2. In the opened window, enter a partition label to easily identify the partition later, and assign a vacant drive letter
from the drop-down list to associate with this partition.
3. Select the desired File System, Cluster Size, and choose to create this partition as Primary or Logical. Generally
Primary should be selected if the partition created is used for operation system. Otherwise you can keep this partition
logical.
4. Drag-and-drop the border of the light blue bar or fill in the dialogs to define the partition size and position.
-6-
EaseUS Partition Master User Guide
5. Click OK when ready. All the introduced changes to the disk layout will be pended until applied in Pending
Operation List.
Move/Resize
Resize basic partition
To resize/move a partition:
1. Select a partition, click Move/Resize from the Feature List.
2. Drag-and-drop the borders from a partition (either from the left or the right side) to define its size and position.
3. Click OK when ready. All the introduced changes to the disk layout will be pended until applied in Pending
Operation List.
-7-
EaseUS Partition Master User Guide
Tips:
➢
EaseUS Partition Master automatically considers the limitations of file systems and parameters provided. For
example, it won't let you enlarge a FAT16 partition over the maximum 4GB value.
➢
After Moving/Resizing the partition with restore point, you may lose the restore point created by "System Restore"
before.
➢
EaseUS Partition Master is able to resize the BitLocker encrypted partition, only from the right border. You are
suggested to completely decrypt the disk before resizing it.
Resize dynamic volume
EaseUS Partition Master helps you resize a dynamic volume, including simple volume, mirrored volume, spanned
volume, striped volume and RAID 5 volume. Please note all the dynamic volumes can be resized from the right border
only.
-8-
EaseUS Partition Master User Guide
The volumes which have been set the Quota cannot be shrunk in EaseUS Partition Master. To remove Quote, please
right click the volume in Windows Explorer, choose Properties, and set the Quota for this volume in here.
To resize a dynamic volume:
1. Select a volume, click Move/Resize from the Feature List.
2. Drag-and-drop the right borders to define its size and position.
3. Click OK when ready. All the introduced changes to the disk layout will be pended until applied in Pending
Operation List.
Tips:
➢
EaseUS Partition Master is able resize the volume that was created on the same computer only.
➢
If you increase the simple volume space to multiple dynamic disks, it will change into spanned volume.
➢
The spanned volume will change into a simple volume after shrinking it to single dynamic disk. However, it is not
available for a striped volume.
➢
EaseUS Partition Master only supports resizing dynamic volume of NTFS, ReFS and FAT (FAT16/FAT32) file
system. Except for NTFS volumes, all the system dynamic volumes on the other 3 file systems can be extended
only with the unallocated space adjacent to the right border of the volume on the same hard disk.
-9-
EaseUS Partition Master User Guide
Move partition or volume
To move a partition or volume:
1. Select a partition/volume, click Move/Resize from the Feature List.
2. Drag-and-drop this partition/volume to define its new position.
3. Click OK when ready. All the introduced changes to the disk layout will be pended until applied in Pending
Operation List.
Merge
Merge feature enables to combines the disk space, which originally belongs to 2 adjacent partitions, into a single,
larger partition.
Please note that only NTFS, ReFS, FAT12. FAT16 and FAT32 partitions are supported. The order, in which 2 partitions
has been chosen is important. You are always suggested to merge the partition with less data to the other one to save
your time and effort.
To merge partitions:
- 10 -
EaseUS Partition Master User Guide
1. Select a partition and click Merge from the Feature List.
2. Select an adjacent partition to merge.
3. Select to merge the space to 1 of the 2 specified partition. All the contents on the other partition will be placed in a
folder on the resulted jointed partition.
4. Click OK when ready. All the introduced changes to the disk layout will be pended until applied in Pending
Operation List.
Tips:
➢
EaseUS Partition Master supports merging partitions on basic disk only. It cannot merge dynamic volumes.
➢
You can merge the NTFS partitions of different cluster size.
➢
The 2 partitions you select to merge must be adjacent. It means there should be no other partitions except for
unallocated space between these 2 partitions. If there are unallocated space, they will be also merged into the
resulted joint partition.
➢
Only the non-hidden partition can be merged.
➢
The boot partition, system partition as well as the partition where EaseUS Partition Master installed cannot be
merged into any other partitions.
➢
The unused space of the operating partitions should be more than 5% of the total partition space.
➢
After merging a FAT 16 partition and a FAT 32 partition or both of the partitions are FAT16 file system, the file
system of the resulted joint partition will be changed into FAT32 automatically.
➢
NTFS partition cannot be merged into FAT partition.
Clone
Disk clone
Disk clone transfers all data (include operating system and program) on the selected hard disk to another. To ensure a
successful and smooth clone, please confirm that the capacity of target disk is larger than the used space of source disk.
- 11 -
EaseUS Partition Master User Guide
- 12 -
EaseUS Partition Master User Guide
Here are the steps of disk clone:
1. Select a source disk.
2. Click the Clone.
3. Select a target disk.
4. Confirm to delete the partitions and data on the target disk.
5. Edit the partition size on the target disk and click the OK to initiate the clone.
Tips:
➢
In order to make the Windows Operating System bootable on target disk, make sure that:
1. Remove the source disk and shut down the computer after disk copy.
2. Connect the target disk to the socket of the source disk to boot from it.
➢
Please do not start the computer directly from the target disk once the disk copy is finished.
➢
All partitions and data on target disk will be overwritten.
Partition/volume clone
Cloning a single partition/volume to unallocated space is often used when copying a data partition/volume.
- 13 -
EaseUS Partition Master User Guide
To copy a partition:
1. Select a source partition/volume and click the Clone from the Feature List
2. Select unallocated space as target partition.
3. Edit the size of target partition and click OK to clone.
Tips:
➢
This feature is not available for the partition which contains Operation System on a GPT disk.
➢
Dynamic volume can only be copied to the unallocated space on basic disk.
Migrate OS
Migrate OS is an easy-to-navigate wizard to copy your OS to a new HDD or SSD. Boot and System partitions will be
automatically selected in this feature to ensure the target disk can be correctly booted after the work.
- 14 -
EaseUS Partition Master User Guide
To migrate OS:
1.
Click Migrate OS from the Tool bar.
2.
Select a target disk.
3.
Edit the partition size on the target disk.
4.
Click OK to initiate the clone.
Tips:
➢
This feature is not available in WinPE Emergency Disk.
➢
This option is available only if the system and boot partitions are on the same disk.
➢
All partitions on the target drive will be overwritten.
Conversion operations
Convert to NTFS
This feature gives you the option to convert a FAT partition to NTFS, which is nowadays the preferred file system for
Microsoft’s Windows Operation System, with a great improvement over FAT.
- 15 -
EaseUS Partition Master User Guide
File system conversion steps:
1. Select a FAT12/16/32 partition
2.
Click More > Convert to NTFS
3. The pop-up dialog box will show the original and target file system, click OK to proceed.
Tips:
➢
Source file system must be FAT12, FAT16 or FAT32 and the partition is non-hidden.
➢
Make sure 3% free space at least on the target partition.
Convert primary to logical
A basic MBR disk can have either up to four primary partitions, or up to three primary partitions plus an unlimited
number of logical partitions. You need to convert a primary partition to logical if you want to create a fifth partition on a
disk that currently has four primary partitions.
To convert a primary partition to logical:
- 16 -
EaseUS Partition Master User Guide
1.
Right-click the primary partition that you want to convert and then click Convert to logical.
2.
The operation will be pended until executed in Pending Operation List. Click Execute Operation when you are
ready to proceed.
Tips:
➢
Converting the boot partition or the system partition to logical partition is not available. Otherwise, the computer
may have a bootable issue.
➢ The size of the converted partition might be slightly different from that of the original primary partition, as some
space might be required to store supplementary information.
Convert logical to primary
To convert a logical partition to primary:
1. Right-click the logical partition that you want to convert to primary and then click Convert to primary.
2. The operation will be pended until applied in Pending Operation List. Click Execute Operation when you are
ready to proceed.
Tips:
➢
A basic MBR disk can only have up to four primary partitions, or up to three primary partitions plus successive
logical partitions.
➢ If the disk contains more than one logical partition, you can convert a logical partition to primary only when there
are two or less primary partitions on the disk.
Convert dynamic disk to basic
This feature allows you to convert a dynamic disk containing simple volumes or mirrored volumes into a basic one
while keeping its content intact.
- 17 -
EaseUS Partition Master User Guide
To convert a dynamic disk to basic disk:
1. Select the dynamic disk.
2. Click the Convert to basic in feature list.
3. The operation will be pended until applied in Pending Operation List. Click Execute Operation when you are
ready to proceed.
Generally, after converting the dynamic disk, all of the dynamic volumes will be converted to logic partitions except the
following situations:
1. If there is no enough space for exchanging temporary data on the volume (less than 5% unused space in the
volume and no adjacent unallocated space), this volume will be converted to primary partition. However, the MBR
basic disk has the limitation that there can be 4 primary partitions at most, if the number of the volumes on a disk
with less than 5% unused space and no adjacent unallocated space is over 4, the conversion operation cannot be
implemented.
2. If the file system of the volume is NOT FAT or NTFS, and there is no unallocated space next to the volume, it will
be converted to primary partition. If the volumes which fit this situation are more than 4, the dynamic disk cannot
be converted to basic disk.
Tips:
➢
This feature can only process dynamic disk with simple and mirrored volumes. The other types of dynamic disk
- 18 -
EaseUS Partition Master User Guide
like spanned volume, striped volume is not supported.
➢
To convert a dynamic disk containing mirrored volumes to a basic disk, please break the mirrored volumes before
converting.
➢
Converting dynamic disk to basic will not cause data loss, however, to avoid data loss caused by other uncertain
computer factors, we recommend you back up the disk before any operation!
Convert MBR to GPT
This feature allows you to convert an MBR disk to GPT disk without data loss. MBR can only use utmost 2TB space
on a hard disk. To convert an MBR drive to GPT can easily break this limitation.
To convert an MBR disk to GPT:
1. Select an MBR disk.
2. Click the Convert to GPT in feature list.
3. The operation will be pended until applied in Pending Operation List. Click Execute Operation when you are
ready to proceed.
Tips:
- 19 -
EaseUS Partition Master User Guide
1. The feature is not valid for dynamic disk, but you can convert a dynamic disk to basic before converting it to GPT.
2. System GPT disk can only be booted from UEFI mode, so please make sure your operating system and
motherboard are supported to boot from UEFI mode before converting the disk to GPT.
Convert GPT to MBR
This feature allows you to convert a GPT disk to MBR disk without data loss.
To convert the GPT disk to MBR:
1. Select a GPT disk.
2. Click the Convert to MBR in feature list.
3. The operation will be pended until applied in Pending Operation List. Click Execute Operation when you are
ready to proceed.
Tips:
1. The feature is not valid for dynamic disk, but you can convert a dynamic disk to basic before converting it to MBR.
2. For system disk, please make sure your motherboard is supported to boot from BIOS mode.
- 20 -
EaseUS Partition Master User Guide
Remove operations
Delete All
One easy-click option to delete all the partitions on the selected hard drive. Please make sure you do not have
important data on this disk before using this feature.
To delete all partitions:
1. Select a hard drive.
2. Click the Delete All in feature list.
3. The operation will be pended until applied in Pending Operation List. Click Execute Operation when you are
ready to proceed.
- 21 -
EaseUS Partition Master User Guide
Delete partition
This feature is used to delete the selected partition.
To delete a partition:
1. Select a partition.
2. Click the Delete in feature list.
3. The operation will be pended until applied in Pending Operation List. Click Execute Operation when you are
ready to proceed.
Tips:
➢
System and boot partition cannot be deleted, otherwise, the computer cannot be booted.
➢
After deleting a partition, the data on the deleted partition cannot be accessed!
Wipe Data
Wipe Data can erase all the data on the selected partition/disk/unallocated space. In most cases the data cleaned with
this feature are not able to be retrieved.
- 22 -
EaseUS Partition Master User Guide
To wipe data:
1. Select a disk/partition (volume)/unallocated space.
2. Right-click it and Select Wipe Data.
3. Set the number of times to wipe the partition in Wipe Disk/Partition window (The wipe algorithm is to alternately
overwrite the disk by 0x00 and random digit according to the wipe times)
4. Click OK when ready. All the introduced changes to the disk layout will be pended until applied in Pending
Operation List.
Format
All partitions should contain one or more specific kinds of file systems for storing data. The process of installing a file
system is commonly known as formatting. This section explains how to format an existing partition.
The program provides the ability to format partitions into the following file systems:
FAT12
FAT16
FAT32
NTFS
- 23 -
EaseUS Partition Master User Guide
ReFS
Ext2
Ext3
To format a partition:
1. Select a partition.
2. Right-click it and Select Wipe Data.
3. Type the label you want in the Partition Label text box.
4. Select the file system type to be created from the Partition Type drop-down list. (FAT/FAT32, NTFS, ReFS and
EXT2/EXT3)
5. Choose the Cluster Size (512 byte,1,2,4…64KB) from drop-down list.
6. Click OK when ready. All the introduced changes to the disk layout will be pended until applied in Pending
Operation List.
Tips:
➢
Smaller cluster size makes less wasting of disk space.
➢
Partition formatting operation destroys all the data on this partition, including files and folders! Take special care
when performing this operation.
- 24 -
EaseUS Partition Master User Guide
System Optimize
System Optimize includes Cleanup and Optimization functions, it is a tool to keep your system clean and fast. It helps
you remove unused files from your system and clean your internet history.
- 25 -
EaseUS Partition Master User Guide
Junk File Cleanup
Junk File Cleanup cleans junk files from System, Browser, Windows Built-in Applications and other Applications, it will
save disk space and improve your computer performance.
Large File Cleanup
If the capacity of your hard drive is running low, it is time to clean off some files. A good place to start is by locating the
largest files on your hard drive. Large File Cleanup can locate these files and easily remove them from your hard
drive.
- 26 -
EaseUS Partition Master User Guide
Disk Optimization
Disk optimization improves the performance of a storage device affected by fragmentation.
- 27 -
EaseUS Partition Master User Guide
Partition Recovery
Partition Recovery Wizard is an easy-to-use tool, with which you can recover partitions from a hard drive that were
accidentally deleted or damaged due a hardware or software failure.
To run Partition Recovery
1. Click the Partition Recovery on Tool Bar.
2. Select a disk from which you lost data.
3. Click the Scan to scan the hard drive.
4. All detected lost partitions will be listed after the scanning is finished.
5. Select your desired partition and click the Proceed to recover.
6. The Recovered partition can be seen on your hard disk after the successful recovery.
WinPE Creator
The program includes a user-friendly wizard to guide you through the process of creating a WinPE Bootable Media on
a USB drive/CD/DVD or in an ISO file to later burn it to your storage device. The build-in interface provides you the
- 28 -
EaseUS Partition Master User Guide
same user experience as in Windows version to manage your hard drive before an OS is installed.
With any paid edition, you can create a WinPE bootable disk. Here are the step procedures.
1.
Insert a CD/DVD or USB flash drive into your computer first.
2.
Click WinPE Creator on the tool bar.
3.
Three radio buttons including USB, CD/DVD, and Export ISO are available in the pop-up window.
4.
Select any of the three options, and move to the next step to download Microsoft WinPE component.
5.
If it fails to create bootable disk with the built-in burning components, you can Export ISO file and then burn it
with a third-party burning tool, such as Nero.
Here is the main interface in WinPE bootable disk.
- 29 -
EaseUS Partition Master User Guide
You are suggested to click the Add Driver to add proper hardware driver if your RAID drive or hard disk cannot be
recognized by WinPE bootable disk.
Feature comparison in different environment
The detailed comparison between WinPE bootable disk and Windows environment:
WinPE
Windows
bootable disk
environment
Resize/move partition
√
√
Resize dynamic volume
√
√
Create partition
√
√
Format partition
√
√
Delete partition
√
√
Merge partitions
√
√
Wipe
√
√
Format system partition
×
×
Resize/move system partition
√
√
- 30 -
EaseUS Partition Master User Guide
Clone partition
√
√
Clone disk
√
√
Migrate OS
×
√
Copy dynamic volume
√
√
Delete all partitions
√
√
Convert dynamic to basic
×
√
Defragment
×
√
Surface test
√
√
Partition recovery
√
√
Change drive letter
×
√
Convert logical to primary
√
√
Convert primary to logical
√
√
Convert FAT to NTFS
×
√
Command line
√
√
Repair Raid 5 dynamic volume
×
√
Convert MBR to GPT
√
√
Convert GPT to MBR
√
√
Resize EFI partition
√
√
4K alignment
√
√
Other operations
Repair RAID 5 dynamic volume
When the hard disk of RAID 5 dynamic volume goes wrong or if you want to replace the old hard disk with a larger one,
you need to repair the RAID 5 volume.
To repair RAID 5 dynamic volume:
1. Select a RAID 5 dynamic volume
2. Right-click the volume and Select Repair RAID-5 volume.
3. The operation will be pended until applied in Pending Operation List. Click Execute Operation when you are
ready to proceed.
Rebuild MBR
Once MBR (Master Boot Record) of disk is damaged, system cannot be booted. This feature will rewrite the Master
Boot Record of the selected disk without destroying the disk partition table.
To Rebuild MBR:
- 31 -
EaseUS Partition Master User Guide
1. Select an MBR disk to rebuild MBR
2. Right-click the disk and Select Rebuild MBR
3. Set up the type of MBR to rebuild in Rebuild MBR window.
4. Click OK. The operation will be pended until applied in Pending Operation List. Click Execute Operation when
you are ready to proceed.
Set active
If you have several primary partitions, you must specify one to be the boot partition. For this, one partition can be set
as active. As a rule, a disk can have only one active partition.
If there are several primary partitions on an MBR system disk, you must specify only one partition as active for system
boot, in most case, the partition should be system or boot partition.
To set an active partition:
1. Select a primary partition on MBR disk.
2. Right click the selected primary partition and click Set Active.
3. Click OK. The operation will be pended until applied in Pending Operation List. Click Execute Operation when
you are ready to proceed.
Tips:
➢
Before you make a partition active, you must make sure it is formatted and contains an operating system.
Otherwise your PC cannot boot from this partition!
➢ If you set a partition as active and there is another active partition on the disk, it will be unset automatically. This
might also prevent your PC from booting.
Initialize to GPT disk
This feature allows you to initialize a disk into GPT partition mode:
1. Select the unused/blank disk.
2. Right-click the disk and select "Initialize to GPT", or select "Disk > Initialize to GPT" in the main menu.
3. The operation will be pended until applied in Pending Operation List. Click Execute Operation when you are
ready to proceed.
Tips:
This feature can process disk without any partitions only. GPT partition mode can be applied to all 64-bit Windows OS.
The partition mode of GPT supports disks over 2TB.
Command line
EaseUS Partition Master works with Windows Command Line. Using the command line gives you the ability to
manage your hard drive without launching the program. Additionally, you can use it to add specific operations when
- 32 -
EaseUS Partition Master User Guide
creating a batch file.
How to start
To use our product in command line, you need to:
1. Run Windows CMD using your Administrator account.
2. Drag the icon of "epmConsole.exe" from the product installation folder into CMD window or simply locate
"epmConsole.exe" in CMD.
Method 1:
Method 2:
How to use
When successfully starting our product in CMD, all the available command and parameters for each command will be
listed automatically (or you can input -h to get this guide information at any time). The commands can be written in full
mode or abbreviation mode, for example.
In abbreviation mode, the command can be:
Input "epmconsole.exe list -d1" to list the information of Disk 1. And the following command is to create a new logical
partition. You need to input "epmconsole.exe" at the front every time when you want to do any operation using the
command line. "-d1"=select Disk 1, "-s4008"=create a partition from 4008MB space of the hard disk (you can also omit
- 33 -
EaseUS Partition Master User Guide
these arguments, and it will create a partition from the first unallocated space acquiescently), "-z100"=partition size is
100MB, "-fntfs"=file system is NTFS, "-t=logical"=create a logical partition.
In full mode, the command also can be:
The difference between the full mode and abbreviation mode is that you need to input the full name of each command.
And also, the "-" should be "--" instead. Besides, there need to be "=" between command and arguments, such as "-d1"
should be "—disk=1".
What's more, here is a command to resize partition: "epmconsole.exe resize --disk=0 --volume=0 --start=0 --size=200". It
means that our program will resize the first partition on Disk 0 to 200MB. "--start=0" means our program will not resize
the partition from its left. If you set it as "--start=100", our program will shrink the selected partition 100MB from its left.
And "--size=200" means the total partition size of the target partition after resizing.
4K alignment
In order to ensure the best performance of an SSD, EaseUS Partition Master provides the 4K alignment function to align
the 4K sectors on your SSD.
The function can be run triggered after you select a hard disk in EaseUS Partition Master main interface:
- 34 -
EaseUS Partition Master User Guide
Change Label/Drive letter
To change partition label:
1. Select a partition, Click More > Change label in feature list.
2. Enter a new label in the Partition label window.
3. Click OK. The operation will be pended until applied in Pending Operation List. Click Execute Operation when
you are ready to proceed.
To change drive letter:
1. Select a disk and a partition.
2. Click More > Change drive letter.
3. Specify the drive letter you want to assign to the partition, in the new drive letter-drop down list.
4. Click OK. The operation will be pended until applied in Pending Operation List. Click Execute Operation when
you are ready to proceed.
Tips:
The new partition structure will be graphically displayed in the main window of EaseUS Partition Master.
The Change drive letter function is available only with Windows environment.
- 35 -
EaseUS Partition Master User Guide
Check File System
EaseUS Partition Master enables you to check hard disk partitions for file system errors.
1. Select a partition.
2. Choose More > Check partition.
3. In the Check partition window, there is an option “Try to fix errors if found”, the found errors will be fixed if you tick
the option.
4. Click Start to check errors on your partition.
Hide partition
EaseUS Partition Master allows you to hide a partition. It can be useful for protecting important information from
unauthorized or casual access.
To hide a partition:
1. Select a partition.
2. Click More > Hide.
3. Click OK. The operation will be pended until applied in Pending Operation List. Click Execute Operation when
you are ready to proceed.
Tips:
To unhide a partition, repeat the steps above but click Unhide partition in step 2.
Explore partition
This feature is used to browse a partition of FAT/NTFS/ReFS/EXT2/EXT3 file system. With this feature, you can check
the following information:
➢
Total and free space of the entire partition.
➢
The File directory of all folders and files. There is Created/Modified/Accessed time information for each folder/file.
Besides, the size information of a specific file is also available with this feature.
Explore partition as following steps:
1. Choose a FAT/NTFS/EXT2/EXT3 partition.
2. Click More > Explore.
Properties
To view disk/partition property:
1. Select a disk/partition.
2. Click More > Properties in the feature list.
Choose a specific tab to view the information you seek for.
- 36 -
EaseUS Partition Master User Guide
Surface test
This function is used for checking bad sectors on one disk. EaseUS Partition Master will check each sector and
display when it finds a bad sector.
To run Surface Test:
1. Right-click the disk/partition that you want to check, and then click More > Surface test.
2. The operation will be immediately performed.
Feedback and Technical support
We invite your comments on how well EaseUS Partition Master performed, and we are also enthusiastic in
replying all your questions about using it. Please feel free to contact us at:
[email protected]
We also provide online chat service and the Live Chat option can be located on EaseUS official website
www.easeus.com.
To know more about this product, see Basic Technical FAQ For Using Partition Master.
- 37 -