1
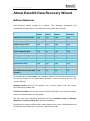
EaseUS Partition Master User guide Data Recovery Wizard® User guide -1- EaseUS Partition Master User guide Table of contents Introduction..................................................................................................................................- 3 Welcome ..............................................................................................................................- 3 How to use this manual .....................................................................................................- 3 About EaseUS Data Recovery Wizard ...................................................................................- 5 Edition Statement ...............................................................................................................- 5 New Features in Data Recovery Wizard 5.5.1 ...............................................................- 6 Restorable chance of the lost data ..................................................................................- 6 URGENT - Read this before using Data Recovery Wizard..........................................- 7 Getting Started............................................................................................................................- 8 Pre-Installation Checklist ...................................................................................................- 8 System Requirements .......................................................................................................- 8 Supported File Systems and Storage Media..................................................................- 8 Install/uninstall ....................................................................................................................- 9 Recovering lost data ............................................................................................................... - 11 Launching Data Recovery Wizard ................................................................................ - 11 Recovery mode................................................................................................................ - 11 Deleted File Recovery ............................................................................................ - 11 Complete Recovery................................................................................................. - 12 Partition Recovery ................................................................................................... - 13 RAW Recovery ........................................................................................................ - 14 Disk Image........................................................................................................................ - 15 Settings ............................................................................................................................. - 15 Settings in Data Recovery Wizard ........................................................................ - 15 Searching specified file type .................................................................................. - 15 Ignore bad sectors................................................................................................... - 16 Export/import to continue Previous Recovery ..................................................... - 16 Option ........................................................................................................................ - 16 Working with the Found Data ........................................................................................ - 18 Search required files ............................................................................................... - 18 Destination Selection .............................................................................................. - 20 Report........................................................................................................................ - 20 Recover data from system partition/disk ...................................................................... - 21 How to recover data from system partition/disk .................................................. - 21 WinPE Bootable Disk.............................................................................................................. - 21 About WinPE bootable disk ........................................................................................... - 21 Create WinPE bootable disk .......................................................................................... - 21 Add Device Driver ........................................................................................................... - 22 Support...................................................................................................................................... - 22 FAQ ................................................................................................................................... - 22 Troubleshooting ............................................................................................................... - 25 Need Further Assistance ................................................................................................ - 27 Upgrade Data Recovery Wizard ................................................................................... - 27 -2- EaseUS Partition Master User guide Glossary .................................................................................................................................... - 28 - Introduction Welcome Welcome to the user manual for Data Recovery Wizard, the most powerful and successful data recovery software. We offer you cost-effective software solutions of data recovery for almost any data loss covering servers, desktops or laptops for media, Windows Operating Systems and file types. Data Recovery Wizard is unmatched in its ability to recover the lost data caused by any factor. Data Recovery Wizard is complex data recovery software developed for non-destructive data recovery from Hard Disk drives and other storage devices. You may feel complicated at first glance, but after reading this manual and using Data Recovery Wizard, you'll find that it's still very easy to use, despite of the complexity of the software, since this manual has detailed instructions about each feature and all the options in our product. We sincerely hope that you will like it. Data Recovery Wizard is of Patent-Pending Technology, our Company reserves the International Rights. How to use this manual This manual is on the basis of a complete data recovery process. So we suggest you roughly read over this manual before you use Data Recovery Wizard, which may ensure you have got all the notes in a data recovery process and the desired data will be well protected(avoid further damage). Below are simple descriptions about each section in this manual, you may find the information you need in relevant section. Or press F1 to run this manual directly with related content displayed when you have question about a feature or an option. Introduction This section includes a brief description and the usage about this manual. About EaseUS Data Recovery Wizard -3- EaseUS Partition Master User guide Some detailed introduction of our product, it includes the edition comparison, new features in the latest version, retrievable chance of your lost data and the most important rule of data recovery. Getting Started Here we describe system requirements of our product, some notes before installation, and the file systems/storage media our product can support. In the end, we will tell you how to install and uninstall Data Recovery Wizard. If a previous version has been installed in your computer, you should unload it before you install a new version. Recovering Lost Data The core section of this manual, here we specify all recovery modes and each setting you may encounter in our product. Step-by-step introduction ensures that you can easily understand how our product works. And it will guide you go through the recovery session easily with its intelligent partition analysis and file search, you don't need complicated setting. Support If you've read over the section “Recovering lost data” and followed every instruction but you're still experiencing problems, or you encountered some unexpected troubles. Please just check out the “Support” section for some basic FAQ and Troubleshooting. If you still cannot find what you are looking for and need further assistance, we encourage you to contact EaseUS Technical Support by [email protected]. Glossary As you use Data Recovery Wizard and read this user manual, you will come across terms with which you may be not familiar with. So we've compiled a list of definitions to help you with the understanding. -4- EaseUS Partition Master User guide About EaseUS Data Recovery Wizard Edition Statement Data Recovery Wizard consists of 4 editions, Free, Standard, Professional and Professional Unlimited edition. The differences among them are as follows. Free edition Standard edition Professional edition Professional Unlimited Deleted file recovery mode YES YES YES YES Complete recovery mode YES YES YES YES Partition recovery mode YES YES YES YES RAW recovery mode YES YES YES YES Image bad device YES YES YES YES Support Windows Server YES YES YES YES Support dynamic disk YES NO YES YES Support EXT2/EXT3 YES NO YES YES Change search range YES YES YES YES Search files by type YES YES YES YES Search files by file header YES YES YES YES Export scan result YES YES YES YES Import scan result YES YES YES YES Ignore bad sector YES YES YES YES The amount of recovery data limitation 1GB NO NO NO As the table above, Free edition is an evaluation edition for the user who wants to know the recovery quality of our product before purchase. It has full features, but can only recover 1GB files. Standard edition also has full features, but it cannot support Linux file system EXT2/EXT3 and dynamic disk. Professional edition can not only recover data from EXT2/EXT3 and dynamic but also works more efficient when recovering data. The user who has Professional Unlimited will Enjoy Unlimited Usage on Multiple Machines and Preferential Service, also has full features. Except the four editions, we have other 2 demo editions for our users. Standard demo and Professional demo which can only recover 1 file less than 1MB. -5- EaseUS Partition Master User guide New Features in Data Recovery Wizard 5.5.1 Ignore bad sectors - Ignore all bad sectors existed on the selected device when search lost data, which will significantly accelerate the scan speed. Export/Import scan result - Help you manage the scan result to avoid unnecessary rescanning. It is especially useful when upgrade from trial to full. Select "Lost Files" types before the scan - Choose your desired file type(s) only before scan lost data, this may also speed up the scan process. Except above new added features, we have also fixed some compatible and quality problems in this version, includes: Support Windows 7 & Server 2008 R2 SP1. Correct the crash problem during "Building Directory" which caused by insufficient memory. Solve some incompatible problem with Windows API (mainly happened in Windows Vista SP2). Restorable chance of the lost data When intending to perform a recovery session with Data Recovery Wizard, you can evaluate what the software can do for you with the Demo/Free edition at first. The simple built-in recovery wizards make the software like an experienced data-recovery technician at your home or in your business! As long as the lost files are intact and haven't been overwritten, our product will have a high chance to recover them. Data Recovery Wizard can recover folders and files lost because of following causes: Intentional (trashed files) or unintentional deletion Viruses Formatting a disk FDISK or any other disk-partitioning tool All other non-physical data loss problems Data Recovery Wizard can recover files and folders from disks on which the following components have become corrupted (or even if they are completely missing): -6- Partition table (main or extended) Boot record (sometimes called "BIOS Parameter Block" or BPB) EaseUS Partition Master User guide File Allocation Table (both FAT1 and FAT2 on file systems that use FAT12, FAT16 and FAT32) Root folder Master File Table URGENT - Read this before using Data Recovery Wizard Before using Data Recovery Wizard to recover lost data, you must keep a very important rule in mind: DO NOT MAKE ANY CHANGES TO THE DISK ON WHICH THE LOST DATA IS LOCATED (the Bad Device). The success of your data recovery depends largely on your adherence to some crucial rules. When we say to make no changes to the damaged disk, we mean that you basically should leave the disk alone. These include as follows: Do not try to delete folders or files from the Bad Device, even if you are able to see them and think that they are not damaged. Do not try to save anything in the Bad Device. Do not attempt to format or re-partition the Bad Device, not even with a program like FDISK or format. If the support people for these or any other applications tell you it's OK to format or re-partition the Bad Device, do not copy. You will risk permanent data loss if you do not keep these warnings in your mind. If you have made one of these mistakes, don't worry. Just don't make any more changes to the Bad Device. You can use Data Recovery Wizard freely to see if your data is still recoverable. Even if Data Recovery Wizard can't detect your Bad Device, it doesn't mean the data is lost. If your Bad Device is HDD, it is not detectable by computer's BIOS. It's URGENT for you to turn off the power of the device immediately! You will not be able to recover the data in this device without any commercially available utilities, and you should ask for a professional data recovery service provider. -7- EaseUS Partition Master User guide Getting Started Pre-Installation Checklist Before you install Data Recovery Wizard on the Host Computer, it's very important for you to complete the following four steps on the following checklist: 1. DO NOT install Data Recovery Wizard and save the recovered Lost Data to the Bad Device. Remember the golden rule of data recovery: Never change anything on the Bad Device! 2. Make sure you have enough memory on the Host Computer for Data Recovery Wizard. The application requires at least 32MB free space for installation and 128 MB of free RAM for normal operation, but we recommend as much free RAM as better (depending on how much data and how large a drive is being recovered). 3. Make sure you have enough free space on your Good Device. You need more space than the size of your lost data. 4. Close all other applications to improve the performance during installation. Although not necessary, this is highly recommended. System Requirements Data Recovery Wizard supports Windows 2000 SP4, Windows XP, Windows Vista, Windows Server 2000/2003/2008 and Windows 7. Windows 7 & Server 2008 R2 SP1 are also supported. Supported File Systems and Storage Media Supported Storage Media Data Recovery Wizard can be used to recover data from the following types of devices: -8- IDE HDD USB HDD SCSI HDD SATA HDD Fire Wire HDD Floppy drive EaseUS Partition Master User guide Dynamic disk, there are five types of Dynamic volumes: Simple Volume, Striped Volume, Spanned Volume, Mirrored Volume, and RAID-5 Volume (Only supported by professional version). Compact Flash cards and other disk-like media that use a FAT/NTFS file system and EXT2/EXT3 file system to store files and folders. Supported File Systems Data Recovery Wizard supports the following file systems: FAT12 (used by DOS and Windows on floppy disks and some small-sized media like Compact Flash cards for digital cameras) FAT16 (used by DOS and Windows for partitions less than 2 gigabytes in size) FAT32 (used by Windows for bigger partitions) NTFS (used by Windows NT, Windows 2000, Windows XP, Windows Server 2003, Windows Vista, Windows 7, windows 2008) EXT2 (used by Linux/UNIX Operating System) EXT3 (used by Linux/UNIX Operating System) If you intend to recover data from EXT2/EXT3 file system, you should install our product in Windows at first, and then connect EXT2/EXT3 hard disk to Windows to perform the recovery process. Install/uninstall Install Follow these steps to install Data Recovery Wizard on the Host Computer: 1. Double click EaseUS Data Recovery Wizard setup file. The setup wizard will prompt and click Next to start installation. 2. Read License Agreement carefully. If you accept the terms, select I accept the agreement to continue. 3. Confirm the Information. After you read it, click Next to continue. 4. Choose a location where to install the software, install to the default folder by clicking NEXT, or click Browse to select a specified location. 5. Confirm Install Location. If you have confirmed it, select I have read the caution to continue. -9- EaseUS Partition Master User guide 6. Set a location where the shortcut saved in Windows start menu. 7. Tick the related option to have a shortcut on your desktop or Windows quick launch bar. Also you can tick them both. Then click Next. 8. Click Install to start the installation. Uninstall Here's how to do so: Make sure that Data Recovery Wizard is not running. On the Windows Start menu, go to Start > Programs > EaseUS Data Recovery Wizard > Uninstall Data Recovery Wizard Click "Yes" to confirm the Uninstall. Data Recovery Wizard will be completely removed from your computer automatically. If this item is not available, you can remove Data Recovery Wizard as follows: 1. Click "Control Panel", and then double-click the "Add or Remove Programs" icon. 2. Click Data Recovery Wizard, and then click "Remove". 3. Click "Yes" when the confirmation dialog box appears. 4. Follow the on-screen instructions. - 10 - EaseUS Partition Master User guide Recovering lost data Launching Data Recovery Wizard Double click the icon on desktop to start our product or launch the application by going to: Start > Programs > EaseUS Data Recovery Wizard > Data Recovery Wizard Here are three recovery modes: "Deleted File Recovery", "Complete Recovery" and "Partition Recovery" in the main interface of our product after it launches. Choose "Deleted File Recovery" if you want to recover files that were intentionally (or accidentally) deleted. Choose "Complete Recovery", if you've lost data after computer crash, virus activity or formatting Bad Drive. Choose "Partition Recovery", if you've not found the partition from which you want to recover data by "Deleted File Recovery" and "Complete Recovery". For some mini storage devices, such as SD card, thumb drive, sometimes you may fail to detect it with Complete Recovery; in this situation, please just try again with Partition Recovery. (You can go back to the main window at any time - just click "HOME" button.) Recovery mode Deleted File Recovery This mode works with deleted files or the files emptied from Recycle bin and allows you to "undelete" them (another popular term is "unerase"). Intact file system is important for this mode. Here are the steps for Deleted File Recovery. 1. Choose Deleted File Recovery, you will see the list of common file types. You can uncheck 'Search for all "Lost File" types' option, and choose desired file type(s) in the list. If you have bad sectors on the device, please tick 'Ignore bad sectors' and program will skip bad sectors to scan. - 11 - EaseUS Partition Master User guide 2. A list contains all partitions found on Host Computer will be displayed. Choose desired partition and press the "NEXT" button (double clicking on the partition or choosing "Recover" from the right-click menu which brings the same result). 3. Then you will see the "Building directory". Data Recovery Wizard will read file system information on selected partition. If you click the "Cancel" button, you will be prompted with this dialog: "Abort Building?" If your answer is "No", the recovery process will continue. If your answer is "Yes", then you will be transferred to the Partition List Page. In general, before giving you the final result, the program will prompt a tip "If the files are not found or corrupted in this mode, please go to 'Complete Recovery'!" Just click "OK" to accept it. If you want to ignore this message, please tick "Don't show this message again." Deleted File Recovery is just a quick solution for deleted files, but it will be inability in some special environment or due to Windows storage technology. In such situation, you may need to try with Complete Recovery for a further deep scan. Complete Recovery This mode is designed for data recovery from Hard Disk including formatted partition, crashed file system without drive letters. How to recover data by this mode: 1. Choose Complete Recovery, you can see the list of common file types. You can uncheck 'Search for all "Lost File" types' option, and choose desired file type(s) in the list. If you have bad sectors on the device, please tick 'Ignore bad sectors' and program will skip bad sectors to scan. 2. Then you will see a list of all the partitions arrayed by drive letters found from all Hard Disks. If the partitions did not have drive letters, they will be listed at the hindmost. And the drive letter will be displayed as "*". Select the partition from which you want to recover data and then press "NEXT" to start "Intelligent Searching". 3. After the searching, our product will show you a list of possible partitions. In general, you will see a green partition in the list, which means this partition is High suggested to recover data from. You may select it and press "Next" button to start "Building directory" procedure. 4. Our product will list all found files from the selected partition, if your desired files are not included, click BACK to return partition list and select other possible partition to have another try. Tips: Data Recovery Wizard allows you choosing 4 partitions at most at one time to recover the data. - 12 - EaseUS Partition Master User guide 5. About how to filter needed files in scan result, please refer to Working with the Found Data section. Select the files you want to recover and click NEXT to save them. Partition Recovery This mode is designed for recover data from Hard Disk including crashed file system, mistakenly deleted partitions, hidden partitions, drives with failed operating/file system, and drives suffered from virus. Generally speaking, if the partition you want to recover data from cannot be seen under Disk Management (right click "My Computer" and choose "Manage" -> "Storage" -> "Disk Management") anymore, choose this mode will detect partition at first, and then try to recover data from the found partition(s). 1. Choose Partition Recovery, you can see the list of common file types. You can uncheck 'Search for all "Lost File" types' option, and choose desired file type(s) in the list. If you have bad sectors on the device, please tick 'Ignore bad sectors' and program will skip bad sectors to scan. 2. Then you will see a list of physical devices that are connected to Host Computer. Select the device from which you want to recover data and then click "NEXT" to start searching partitions on it. Tips: If your device is not found on the list, please click "Refresh List" button to make the device seen in the list or verify whether the device is properly connected or there are any hardware problems with the device. 3. After the Quick Partition Searching process completes, Data Recovery Wizard workspace will display a Partition List Page. You can select proper partition and click "Next" to continue. 4. Then the number of the found objects will dynamically update with the searching process. Before giving you the final result, the program will prompt a message "If the files you need are not found, please select the "Full Scan"." Just click "OK". After that, the program will list all found files in the File List Page. 5. If the partition you need is not listed, tick the Full Scan (If the partition is not found, please check it and click NEXT) to "Intelligent Searching" for searching the device again. After the exhaustive scanning, every possibly existed partition will be detected and listed out. 6. One or more green partitions will be listed after the Intelligent Searching. They are the High suggested partitions which you can select to recover data from. You can also choose 4 proper partitions at most and press "NEXT" button to recover. - 13 - EaseUS Partition Master User guide 7. Our product will list all found files from the selected partition, if your desired files are not included, click BACK to return partition list and select other possible partition to have another try. 8. About how to filter needed files in scan result, please refer to Working with the Found Data section. Select the files you want to recover and click NEXT to save them. If the Quick Partition Searching cannot find any partitions or if you press "Cancel" in Quick Partition Searching, it will transfer to the Intelligent Searching to search partitions automatically. RAW Recovery If the file system has been badly damaged and searching from FAT (File Allocation Table) or MFT (Master File Table) is of no use for data recovery, RAW recovery mode will easily handle this situation. When using RAW recovery, files will be detected by their headers taken from sectors of the disk. In some cases, Raw Recovery is the only method to recover needed file(s). However, it cannot recover files in original names, but content of the file can be recovered up to 100%. After you select Complete Recovery or Partition Recovery mode and enter the device/partition list, you can choose "Option" -> "RAW" to set the RAW recovery. Recover RAW file: This option is selected by default, which means the recovery result will contain the files found by RAW recovery. Uncheck it will cancel the RAW recovery. Recover RAW files only: If you tick this option, program will only process a RAW recovery and the search result will also just contain RAW files. Maximal file size: The maximal size of single file allowed by RAW recovery. You can set the file size between 50000000 bytes (about 50MB) and 2147483647 bytes (about 2GB) in the blank. You can also select the desired file type(s) in the RAW file list. After you finish the setting in RAW option, please click "OK" to apply the change. If you want to turn back to original setting, please click "Default" to restore it. After that, please select the proper device/partition to begin the searching. Tips: If you use Partition Recovery to recover lost data, when you finish setting RAW option and begin the searching, please "Cancel" the Quick Partition Searching to transfer to the Intelligent Searching. Otherwise, the RAW recovery will not take effect. - 14 - EaseUS Partition Master User guide Disk Image Disk Image - A Disk Image is a sector-by-sector copy of the data on partition or device. You can create Disk Image after you choose a recovery mode (Deleted File Recovery mode does not support this function). During the process, the selected partition or hard disk will be truly imaged to *.edi, *.edf and *.edp files, and then you can save these files to the appointed directory. Advanced Wizard mode - This option allows you to create compacted Disk Image file in different compression levels and split the Disk Image file on slices. So you can separately store these slices in different partitions or other physical locations. We strongly advise you not to transfer anyone of these slices to other places for storage after you have created them; otherwise you cannot open the Disk Image normally. At this time, you will be prompted with a dialog box. You are able to check the state of each *.edf file and location from there. If the slice has been moved to other location, then you should update the location of it in the list. Open Disk Image - If you have ever made a Disk Image, then you can click this option to choose the *.edi file to open it. By this means, the device in Disk Image will be added to the list. Then you are able to perform the recovery operation on this Disk Image the same as disk device but without any risks. Delete Image - Choose the device in Disk Image and click this option to remove the device from the list. Settings Settings in Data Recovery Wizard This subject contains all the options you may encounter in recovery process, they are: select file type(s) to recover, ignore bad sectors, export/import scan result and option. We will make detailed instructions about them. Searching specified file type If you can remember the exact file type of your lost files, scan them only in the process may reduce the required searching time, and only the selected file types will be listed after scan. - 15 - EaseUS Partition Master User guide You may choose the file type(s) after selecting recovery mode in main interface. By default, the option Search all lost files automatically is ticked, which means our product will search all the lost files. If you want to search specified file type(s), please tick Select lost files by types below, and tick the file type(s) you desired. Tips: If you select the file types in this page, these selected file types will be checked in "Option" -> "RAW" page as well. Ignore bad sectors If there are some physical bad sectors on the storage device which you want to pull desired data out, the scan speed of recovery tools may be significantly reduced. In some worse situation, the tool may hung up when read from the bad sectors and the process will never finished. With this new feature, you can skip all bad sectors to make sure the process can be finished at least, since the lost files which are not located on the bad sectors may be still retrievable. Export/import to continue Previous Recovery Once you have performed a scan on the "Complete Recovery" or "Partition Recovery", then Data Recovery Wizard will automatically save the searching result, and later on, when you rerun the recovery mode, the "Previous Recovery" graphic option will appear in the list for you to choose to continue just from the location where it was stopped. You can also "Export" the searching result as an .rsf file to specified place, and "Import" this .rsf file when you restart the program and select the same recovery mode. It would be very useful when you install the full version but need the scan result of demo/free version. Option FAT12/16/32 If your device is in a FAT format, then changing the FAT options may yield better quality data than using the default settings. There are several FAT-specific options: 1: Check DATE/TIME field of file descriptors. - 16 - EaseUS Partition Master User guide Data Recovery Wizard checks if these fields contain valid values, and if values do not fit proper range, corresponding objects (files and folders) will be less included in the list of all found files and folders. 2: Use the first/second FAT copy. You may have to try to use the first FAT copy ("FAT1") or second FAT copy ("FAT2"), or maybe even no FAT to get the best quality of data (depending on the nature of the damage to the disk and fragmentation of the files prior to the loss). NTFS There are three options available for NTFS partition: 1: Use NTFS Files for volume size detection. 2: Use $MFT file. 3: Show files that belong to $MFT only. Change them only if you are not satisfied with results of default settings. Common The option in "Common" has the same function in improving the recovery result. RAW "RAW" option is used for "Raw Recovery", when files are detected by their headers taken from sectors of the disk. In some cases, Raw Recovery is the only method to recover needed file(s). Raw recovery cannot recover filenames, but content of the file can be recovered up to 100%. The main categories include Graphics, Documents, Archives, Multimedia, Email, Databases and Financials. To make an exact choice, click the "+" before each category to spread the main category tree and choose the listed type. You can always return to the default options by pressing "Default" button. - 17 - EaseUS Partition Master User guide Working with the Found Data Search required files Working with Data Recovery Wizard's file/folder tree is simple - you can walk thru the tree, check subfolders and preview contents of files. Main goal here is to select all files and folders you want to recover. You might see the files have two colors. About this situation, please read the FAQ. Maximize Data Recovery Wizard application window now; get more details on files and folders you are going to recover. There are 2 important folders in recovered virtual file system - "Lost files" and "Raw Files". Be sure to check both of them, sometimes, recovered files will be placed here. You can walk thru folder tree in the left pane, seeing subfolders and files in the right pane, with the name, size, files count, date and time. When you choose one file, you can right click the file. And then you will find an option Recovery. With this function, you will be allowed to directly save this file to the appointed directory. After scanning, the program will list all the files which were found in the right pane of the interface. To check the files clearly, you can press "File Type" to reorder the files by their extensions. Headers of columns are clickable; you can change sorting order for the list of files by clicking header of the column. You can search for files and find file by name with buttons on the upside of Data Recovery Wizard application window: Find file by name With thousands of files and directories to view, it may be difficult to find a particular file in a tree display. The Find File by Name option makes much easier for you to find the file you need. This option is modeled after some of the most popular Windows programs make it very easy to use by viewing in the directory tree display. If you are looking for files with a specific name, you can enter a character string, either with or without using Match Case or Whole Word. Data Recovery Wizard will guide you - 18 - EaseUS Partition Master User guide to visit each file which matches what you enter until you find what you want. And this function will not lose the file tree structure. Search Files The features of Search Files allow you to filter the files you are interested in and it will list in downpull menu. You can filter the files by the condition of file name, part of file name or file mask. Also, you can find files based on the characteristics, such as file type, date, file size in Kbytes and Other parameters. File Preview Do not miss File Preview button, it launches the File Viewer window (available if you've selected a file); The File Preview button will allow you to view the selected files in several formats. You may easily find this function from the tool bar on the top or the Right-Click Menu. To check the quality of the data in the container, highlight a text file (with an extension of .txt, .doc, .docx, .xls, .xlsx) or an image file (with an extension of .bmp, .jpg, .gif). The contents of the highlighted file will be displayed in the File Viewer. If you are able to view the contents of several texts or image files, then it's safe to say that the files will be recovered successfully. After you preview files and determined that the data is in good shape, you're almost ready to save the files you wish to keep. Please copy your files to a safe location other than the source. This means DO NOT save recovered files to the location you lost data from. Once you have selected a destination to copy data to, the Recovering dialog will appear. The Recovering dialog is similar to the Scanning dialog, providing a continuous progress report. You can stop the copy in process by clicking the "Cancel" button. When the recovering completes, the "Report" screen appears. The Recovery Summary screen appears presenting a Report of the directory where the found files are saved. You may click this directory to get into the folder to check the saved files. Select "BACK TO FILE LIST" to return to the File List Page. - 19 - EaseUS Partition Master User guide Destination Selection After you preview files and determined that the data is in good shape, you're almost ready to save the files you wish to keep. If the Data Recovery Wizard requires you to copy your files to a safe location other than the source partition, you will be given the option to copy the recovered files to a different partition, or even a completely different physical location. This is the preferred destination recommendation, and it could be another physical Hard Disk, a network drive, a Zip, a floppy (for a few small files), or other removable drive. You can also enter the destination path in the text edit box. The pie chart will let you know how much space is available in the save location you have chosen. The "Free Space" indicator tells you how much space left in the folder and the "Required Space" indicator tells you how much space you need for saving all recovered data. If you need to create a new folder in the folder tree, select the existing folder in which you want to create the new folder and then enter the folder name in the text edit box, click "NEXT", and then you will be prompted to create a new folder. WARNING: If you have more than one damaged partitions on your system, DO NOT copy files from one partition to another damaged partition. Always use removable media (e.g., an external USB Hard Disk) or a second, undamaged Hard Disk, as the destination in these cases. The Data Recovery tools will try to detect if you are trying to select the source partition as a destination. Report Once the copy completes, the Recovery Summary screen appears presenting a Report of the directory where the found files are saved. You may click this directory to get into the folder to check the saved files. Select "BACK TO FILE LIST" to return to the File List Page. - 20 - EaseUS Partition Master User guide Recover data from system partition/disk How to recover data from system partition/disk When you lost data from system partition or you cannot boot computer, generally there are two ways to recover data: 1. Connect the hard disk to another healthy computer as a slave, and run Data Recovery Wizard on that computer to recover data. 2. Create a WinPE bootable disk to help you retrieve lost files. Attention: The running of operating system will generate some temporary files which may overwrite the lost data. So generally we do not suggest you recover data from system partition while operating system is running. WinPE Bootable Disk About WinPE bootable disk WinPE bootable disk will help you recover data from the device when you cannot boot the computer, or you need to recover data from system partition. Since the WinPE version is a single license, you need to contact Sales Department ([email protected]) for purchase. Create WinPE bootable disk After you get the executable file, run it to get the main window. Choose USB you can create the bootable USB device; select CD\DVD will help you create bootable CD\DVD. Please select proper device and then click Proceed to begin the creation. However, please make sure you have a CD burner and a blank CD\DVD or usable USB device connect to the computer first. If you want to create the bootable device using your own burning tool, please select Export ISO to export the .iso image file; click Browse to specify the location where save the image file. - 21 - EaseUS Partition Master User guide Add Device Driver If you want to recover data from RAID or SCSI device when booting from the WinPE bootable disk, please choose Add Device Driver to add the driver of the device to make sure the program can recognize it correctly. Support FAQ Q: Can I recover data from a formatted disk? A disk can be formatted in three different ways: Quick, Standard and Low-Level (physical) format. Quick Format enables you to format a disk quickly by simply initializing the directory entry information in the root directory area and the FAT information. The data area during this proves to be still intact. On the other hand, Standard Format examines the data area, and maps the bad sectors. Since each sector head must be read to determine whether it is bad, the process takes a long time. If a bad sector is detected, clusters containing that sector are marked in the FAT to prevent them from future application. Just like quick format, full format does not overwrite the data area, and the data content is preserved. However, the data will not be recovered in Windows 7 full format. Finally, Low-Level Format modifies the surface molecule arrangement, initializes the entire disk, and records sector identifiers to each track (creating addresses to identify sectors within each track). All of the data contained in the disk are initialized, preventing any future recovery attempts. If file system information such as directory entries or FAT is lost, the file cannot be opened by the Windows Operating System. However, Data Recovery Wizard is capable to directly read data from the data area to recover files after a quick or a standard format. For the Hard Disk, a quick or standard format is generally carried out as a high-level format, where data areas are not overwritten. Therefore, even though the FAT or the root directory is initialized, Data Recovery Wizard can still recover the data remaining in the data area. - 22 - EaseUS Partition Master User guide On the other hand, for disk media that cannot be partitioned with FDISK, such as a floppy disk, a standard format is comparable to a low-level (physical) format process, rendering the original data on the floppy as unrecoverable. Q: Can I recover files deleted from a floppy disk? Files deleted from a floppy disk can be recovered. Files saved in subfolders, rather than in the root directory, have a higher recovery rate. You can also recover files after formatting a floppy disk. However, you can only recover data if the floppy disk is quick-formatted. Unlike a Hard Disk, data cannot be recovered after a standard format has been performed on a floppy. Files that were saved in sub-directories of a quick-formatted floppy disk can be recovered from [Lost Folders], whereas ones in the root directory must be restored from [Raw Files]. Q: Can I recover my data after performing FDISK? Even if your partitions have been deleted with FDISK, you can use "Partition Recovery" and select a physical drive to scan for the lost partitions and then recover the data from it. Furthermore, even if you have created new partitions after removing the old ones, you can still recover your data with Data Recovery Wizard. Please refer to "Partition Recovery". Q: Where can I buy this software? You can use the online shop (http://www.easeus.com/buynow.htm). Q: I have more questions - who should I write to? Please send your additional questions to [email protected]. Q: I have recovered a file, but I cannot open it. In some cases, files recovered by using Data Recovery Wizard cannot be opened properly. Microsoft Office (Excel, Word, and Power Point) files and large files such as MPEG files often run into this problem. Please consider the following points: Damaged Files After a file is deleted, it could be damaged by another file, overwriting, disk defragmentation, virus attack, or hacking activity. (Microsoft Office files are particularly susceptible) Fragmented File - 23 - EaseUS Partition Master User guide Some large files are saved in discrete locations because they cannot be allocated in contiguous Hard Disk space. When one of these files is deleted, the recovery can be very difficult. Even though the file's start location is available, the location information of other fragments is usually lost. Q: Is tech support service free? Yes! It's free for all. Q: What kinds of virus damage can Data Recovery Wizard cope with? Data Recovery Wizard is effective against viruses such as CIH, which initialize the file system information including MBR and FAT. Furthermore, Data Recovery Wizard can recover data attacked by viruses that alter the directory entry information such as WormExploreZip. These powerful features are implemented in Data Recovery Wizard's [Raw Files] category. The WormExploreZip virus destroys the entire directory information and FATs, thus it completely eliminates file information, extension, and file size data. Consequently, only the data area remains unaffected. Even in these extreme cases, Data Recovery Wizard provides a miraculous recovery result. Data Recovery Wizard cannot recover data damaged by viruses that directly attack a file data area. Q: Why the found files are green or blue? There might be two different colors when you find the files. If the color of the found files is blue, that means that the attributes of file is compressed. If the color of the found file is green, that means that the attributes of file is encrypted. Q: Why cannot I get the right file name from RAW recovery? As the application of RAW only recover files in the form of document head scanning, but not in the form of system info, so your recovered file often has a file name different from the previous one. Your recovered file is shown in the order of file type. Q: What should I do if the program crashes every now and then? Please send the error information that our program is collecting to us for a further analysis. You may do as below: When the program crashes, the system will prompt a message "EaseUS Data Recovery Wizard has encountered a problem and needs to close. We are sorry for the - 24 - EaseUS Partition Master User guide inconvenience; please fill in the detailed information of the problem in the rectangular blank and press "Click here" to check the files ready to be sent. Once you have confirmed these files, please press "Send Error Report". Afterwards, you will be guided to use the email program on your machine to send this information by this wizard. However, a few problems may not prompt the error message box, in this situation, please do like this: Get into the installation folder and you will find a DRWReport.exe, run it and get through the rest steps the same as the upper operations. Besides, there is a DRW0.zip file in the installation directory and send it to us as an attachment by other email programs as you wish. We recommend that you'd better check these files first, and then press "Send Error Report" to add these files in the compressed package. Troubleshooting My computer can't see my Hard Disk, what shall I do? Options: (1) BIOS report the device at system power on. Try demo version of Data Recovery Wizard, Free! Does Data Recovery Wizard recognize the device? To determine this, use a working computer where the Bad Device is setup as slave, download and install Data Recovery Wizard, start the application. Once started, select the RECOVERY MODE. Once selected, you'll be presented with a list of recoverable devices that Data Recovery Wizard can read. Data Recovery Wizard can do a good job of locating and recovering your data, and it's free to try, so that you can see the actual results BEFORE you spend any money. If you've tried everything we offer, but your data is still lost, we kindly suggest that you use a professional data recovery service. (2) BIOS does NOT see my device at system power on. Select this option if your system BIOS DOES NOT see your device when you power it on. Are you sure that the device is setup and connected properly to your system? Check the following: CablesPowerDevice ID - 25 - EaseUS Partition Master User guide Check Device Settings Is bus enabled? Does Data Recovery Wizard recognize the device? When all else fails... If this is an internal device, be sure that the bus is enabled. In DEVICE MANAGER, select the bus to which that the device is connected, double click, and make sure that it's enabled. If you need additional help on this topic, please contact the computer or device manufacturer. (3) My device is clicking or smoking when I power my system on. It's URGENT that you turn off the power of the device immediately! You will not be able to recover the device with any commercially available tools, and you should consult a professional data recovery service provider. I'm getting a blue screen when my device is connected at the start of Window, help! This happens when the boot sector is corrupt, or when there is partition damage. This can be caused by virus, power failure or incorrect read/write on the device. Here's the solution: First of all, connect your Hard Disk to another healthy PC as slave. Then run Data Recovery Wizard, select recovery mode and perform the scan. Soon you'll be delightfully amazed with the listing of all the data that you could not previously get. This does not work with damaged drives, or drives not listed in BIOS. As always, please use the advice, tips and tricks at your own discretion and risk. Data Recovery Wizard Slow Scans Symptoms: Data Recovery Wizard scans for data very slowly on the selected device. This is a result of read errors. Possible solutions: 1. Check device configuration. Be sure that it's properly setup for use in your system (cabling, id, etc). - 26 - EaseUS Partition Master User guide 2. Install the device directly in the system (removes the device from any external enclosures, and installs it as the secondary master in a desktop system). 3. Use the Disk Copy application to copy the Bad Device to a new and Good Device. Once you've gotten a copy of the Bad Device to the Good, run Data Recovery Wizard again. Your recovery session should be very quick and run without further delay. Need Further Assistance Technical Support: We want to help you get your data back! If you still need help after reading this guide, you can contact us via Email: "[email protected]" We will work at our utmost to offer you the best support! Question on Purchase: If you have questions about purchasing our products, please: 1. Read the details on the purchase page (http://www.easeus.com/buynow.htm). 2. Email us at "[email protected]" if the above steps fail or in case of urgent problems. Good Luck! And thank you for your purchase! Upgrade Data Recovery Wizard The software will automatically check newer version every week! You can also click "Upgrade" button on the main interface to check the newer version anytime. Current updates of Data Recovery Wizard are (only) obtainable via the Internet. - 27 - EaseUS Partition Master User guide Glossary Dynamic Disk A Dynamic disk is a physical disk that provides features the basic disks do not have, such as support for volumes spanning multiple disks. Dynamic disks use a hidden database to track information about dynamic volumes on the disk and other dynamic disks in the computer. Dynamic disk management is a data/Hard Disk management method on Microsoft Windows platforms, first introduced with Windows 2000 Operating System. The basic concept was put to use on UNIX platforms years earlier. There are five types of Dynamic volumes: Simple Volume, Striped Volume, Spanned Volume, Mirrored Volume, and RAID-5 Volume. HDD It is the short form of "Hard Disk Drive", a HDD helps to manage the transfer of data to and from your computer's Hard Disk. Because these two items always come as a single unit and "Hard Disk" are usually used to refer to the same thing. Bad Device This is the storage device that contains the data you want to recover. A Bad Device can be any disk-like storage media, such as your computer's Hard Disk, an external HDD, Flash card or any other form of removable media. Good Device This is a storage device that is in perfect working order onto which you want Data Recovery Wizard to save the data recovered from the Bad Device. The Good Device may be located on the computer where you've installed Data Recovery Wizard (the "host" computer). The Good Device can be any of the storage media listed for the Bad Device. The Good Device is used to save recovered data from the Bad Device. Host Computer This is the computer on which you have installed Data Recovery Wizard. The Host Computer is used to recover the lost data from the Bad Device, which should be connected to the Host Computer as an additional drive (second, third or fourth - in addition to the existing drive(s) on the Host Computer). This means that the Host - 28 - EaseUS Partition Master User guide Computer will have at least two disks: Bootable HDD from which is used to boot Windows; The Bad Device is set as an additional drive. If you are using removable media such as a Zip disk or a Flash card, you should insert the device before launching Data Recovery Wizard. FAT It is the short form of "File Allocation Table", a FAT is a table stored on your storage device that tells the computer where to look over when it needs to find a file stored on this device. When you save data, it is stored in chunks of information called "clusters". The clusters for a single file may actually be located in several different areas on your storage media. The FAT is the way for your computer to record the locations of those clusters for each file you save. The term FAT is often used to refer to the file systems which use File Allocation Tables - FAT12, FAT16, and FAT32. NTFS It is the short form of "New Technology File System", this is basically the Windows NT equivalent of the FAT described above. EXT2/EXT3 It is the short form of "The Second/Third Extended File System", and it is used in Linux/UNIX Operating System. It carries out the semantic file and supports the advance extended characteristics in Linux/UNIX Operating System. Partition A partition is a logical division of a Hard Disk that creates the impression that you have more than one Hard Disk. If you want to run two different Operating Systems on the same Hard Disk, you should create a two-partition drive when you format the disk. Partitioning a disk is just a way to divide it into independent sections. Remarks: Compressed files are those documents compressed by Windows under NTFS partition. By means of compressed files, folders or procedures can decrease their sizes and occupied spaces in the drivers or removable memory devices. And compressing the driver can decrease the spaces of files or folders on it. Encrypted files are those documents encrypted by Encrypting File System of Windows. The Encrypting File System (EFS) provides the core file encryption technology for storing encrypted files on NTFS volumes. EFS keeps files safe and stops intruders who might - 29 - EaseUS Partition Master User guide gain unauthorized physical access to sensitive, stored data (for example, by stealing a portable computer or external disk drive). - 30 -