1
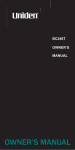
EDC™ Tactical™ Flashlight
Advanced User’s Guide
HDS SYSTEMS
™
EDC Tactical Flashlight Advanced User's Guide
Copyright 2015 by HDS Systems, Inc. All rights reserved.
Congratulations for purchasing a superior flashlight. The HDS
Systems EDC (everyday carry) Tactical flashlight is a best-of-class
flashlight, providing regulated output at your desired brightness for
extended periods. The rotary control provides a convenient and
precise way to select the desired mode of operation, providing
momentary for “flash and dash” tactical operations or click on, click off
for navigation, investigation or filling out paper work with a rotary
control to select the desired brightness level. You can customize your
flashlight’s operation and output levels for added utility. Lithium-ion
rechargeable batteries are fully supported and recommended for a
lower operating cost. Finally, your flashlight is built tough and water
resistant to provide a lifetime of dependable service – all in a small,
rugged and easy to carry package.
Introduction
Tactical use is fundamentally different from utilitarian use. The EDC
Tactical is the first small high power flashlight to combine both
functions in a single EDC flashlight without compromise. The
combination of a rotary control selection with single button operation
makes this the most advanced tactical flashlight available. And it is
simple to operate with one hand – because your other hand is
probably busy doing something else.
Tactical usage requires a momentary mode of operation for “flash and
dash” techniques, and to ensure your flashlight will turn off if it is
accidentally dropped. You can select either Maximum or Tactical
Strobe. Both can be quickly and reliably selected under stress with
heavy gloves in a noisy environment – using only gross motor skills.
There are many utilitarian situations where a conventional click on,
click off interface is desired. A traffic stop. Navigating the woods.
Investigating a crime scene. Filling out paperwork. In this mode of
operation, we allow you to adjust your light output from bright to dim
using the convenient rotary control.
1
Contents
1. Basic Operation
2. Low Battery Indication
3. Installing a New Battery
4. Thermal Limits
5. Disabling the Switch
6. Cleaning and Maintenance
7. Additional Notices and Cautions
8. Advanced Operation
9. Customizing Your Flashlight
10. Restoring Factory Settings
11. Enabling Customization
12. Internal Brightness Levels
13. Customizing the Brightness Presets
14. Customizing Optional Features
15. Warranty
1. Basic Operation
The rotary control selects the basic mode of operation:
•
Fully clock-wise: momentary Maximum.
•
Mostly clock-wise: momentary Tactical Strobe.
•
Counter clock-wise: constant ON adjustable brightness level.
Momentary
Tactical Strobe
Constant ON
Adjustable
Brightness
Level
(Click On,
Click Off )
Momentary
Maximum
In the Momentary Maximum position, when the button is pressed, your
flashlight is on; when the button is released, your flashlight is off. This
method of operation is used for “flash and dash” tactical techniques.
This method of operation also ensures that if you should accidentally
2
drop your flashlight, your flashlight will not provide your opponent with
a ready target.
Momentary Maximum can be selected quickly and reliably by rotating
the knob clockwise all the way to the stop.
In the Momentary Tactical Strobe position, when the button is pressed,
your flashlight is on; when the button is released, your flashlight is off.
This method of operation is used for disorienting and subduing a
person without the use of deadly force. This method of operation also
ensures that if you should accidentally drop your flashlight, your
flashlight will not provide your opponent with a ready target.
Momentary Tactical Strobe can be selected quickly and reliably by
rotating the knob clockwise all the way to the stop and then rotating
the knob a quarter turn away from the stop.
In the Constant ON Adjustable Brightness Level position, clicking the
button (a quick press and release of the button) will turn on your
flashlight. The rotary control is used to select any desired brightness
level from bright to dim – including Tactical Strobe and Maximum.
Clicking the button a second time will turn off your flashlight.
While your flashlight is on, you can press and hold the button to
momentarily activate Maximum – releasing the button returns to the
previous brightness level.
While your flashlight is on, you can double-click to toggle between
the selected brightness level and Maximum.
While your flashlight is on, you can also click, press-hold-release to
activate Maximum and double-click to return to the previously
selected brightness level.
In the Constant ON Adjustable Brightness Level position, when your
flashlight is off, you can press and hold from off to use the
adjustable brightness levels in a momentary fashion. When you
release the button, your flashlight will turn off. Click, press and hold
from off works in a similar momentary fashion but turns on to
Maximum instead. This pseudo-momentary feature can be disabled in
the Option menu.
In Constant ON Adjustable Brightness Level position, you can
temporarily lock the current brightness level, allowing the rotary control
3
to be moved to either Momentary position while the light remains on
the selected level. The next button press clears the lock and the light
continues to operate as if the lock had never been set. Rapidly click 3
times when off to set the temporary lock and leave the light on with the
selected brightness level.
Please see Advanced Operation in section 8 for more details.
Please also check our web site for updates to this manual.
2. Low Battery Indication
Your flashlight will turn off momentarily and then back on one level
below the previous brightness level when the battery is unable to
supply enough power to run the current brightness level. This process
is repeated as needed as the battery’s power is depleted.
Your flashlight will double-blink once every two minutes to remind you
that the battery needs to be changed when the battery is no longer
capable of maintaining a 50 lumen output level and you are asking for
an output lever higher than the battery can maintain.
Your flashlight restricts the output to the highest brightness level the
battery can maintain. However, if you turn off your flashlight and turn
it back on again to a higher level, your flashlight will slowly step up
through the brightness levels testing the battery again.
Your flashlight will blink slowly once a second on the lowest brightness
level when the battery is no longer capable of powering any of the
steady brightness levels.
Caution: your flashlight will eventually turn itself off to preserve what
little battery power remains if you continue to use your flashlight after
your flashlight begins blinking once a second on the lowest brightness
level. You may turn on your flashlight again when needed for a short
period. This behavior maintains your options in an emergency.
3. Installing a New Battery
Unscrew the battery compartment from the head and remove the old
battery from the battery compartment. Insert the new battery into the
battery compartment with the positive terminal out. Align the head
and battery compartment, press them together to overcome the spring
pressure and screw the battery compartment and head back together.
4
As you screw the battery compartment and head back together and if
the battery compartment has been removed for an extended period,
your flashlight comes on dimly for 7 seconds following a battery
change to indicate that a reset has taken place and that your flashlight
is functioning correctly. If you change the battery quickly enough, your
flashlight will not reset and no reset indication will be displayed. A
reset does not change any of your flashlight’s settings.
No special actions are needed to use rechargeable Lithium-ion
batteries. Your flashlight detects them automatically.
However, if you have been using rechargeable Lithium-ion batteries
and want to return to using regular (non-rechargeable) batteries, you
must perform a reset. The simplest way to perform a reset is to turn
on your flashlight and open the battery compartment until your
flashlight turns off and then replace the battery compartment. If you
fail to perform a reset when returning to using non-rechargeable
batteries, your flashlight will act as if the new non-rechargeable battery
needs replacing – just do a reset to restore normal operation.
In general, primary (non-rechargeable) batteries provide longer
runtimes. However, rechargeable batteries provide a lower cost of
operation and allow you to always leave home with a full battery.
4. Thermal Limits
Your flashlight monitors the LED temperature and the external
flashlight temperature to protect the LED and to prevent the exterior
from becoming too hot to safely handle. If either temperature nears
the safety limits, your flashlight will automatically step down to a lower
power setting to control the temperature. This is typically only
necessary on the maximum continuous level when Burst is disabled.
Your flashlight will automatically reset the thermal limit when it is
turned off and back on again.
5. Disabling the Switch
The switch can be disabled by unscrewing the battery compartment
from the head one half turn. This will leave the O-ring completely
covered.
You restore operation of the switch by screwing the battery
compartment completely into the head.
5
6. Cleaning and Maintenance
Periodically clean the open end of the battery compartment, the
battery compartment threads and O-ring with a clean lint-free cloth
lightly moistened with isopropyl alcohol. Apply a coat of nonconductive silicon or petroleum grease to these surfaces.
Replace the battery compartment O-ring if it becomes worn or
damaged. O-ring: 1.5mm x 20.5mm, 70 durometer Nitrile (Buna-N).
The recessed electrical contacts and interior threads in the head can
be cleaned using a lint-free swab lightly moistened with isopropyl
alcohol.
Recessed contacts and threads should be cleaned in a
counter-clockwise direction to prevent snagging the swab in the
threads. Be sure to remove any particles or fibers that may be left
behind. Apply a coat of non-conductive silicon or petroleum grease to
the interior threads and contacts.
The exterior can be cleaned with a mild soap and water. Rinse well
and dry with a soft cotton cloth.
Note: the anti-reflective coating on the lens can be abraded by
excessive rubbing or cleaning. Never use paper tissues or paper
towels to clean or dry the lens as the fibers are abrasive.
7. Additional Notices and Cautions
Notice: your flashlight protects rechargeable batteries from overdischarge under most conditions. However, we still recommend
rechargeable Lithium-ion batteries with built-in over-discharge
protection for an added level of safety.
Notice: only install fully charged rechargeable batteries. Using a
partially charged battery may result in the battery not being properly
recognized as a rechargeable Lithium-ion battery. This can lead to the
rechargeable battery being damaged due to over-discharged or
sudden darkness when the battery’s protection circuit activates.
Caution: some individuals may be sensitive to the effects of flashing
lights. Be ready to render assistance if an individual should have a
seizure induced by your flashing light.
6
Caution: your flashlight is very bright on the higher brightness levels.
You should avoid looking directly into the reflector as the light can be
intense enough to injure your eyes.
Caution: a sudden total failure is unlikely but is still possible. We
recommend you always carry a second flashlight during critical
situations (e.g., caving). We also recommend you carry enough spare
batteries to cover your lighting requirements plus a reasonable safety
margin. It is not necessary to start each trip with a new battery in your
flashlight as long as you have spare batteries along.
Caution: do not attempt to recharge a rechargeable battery if you
think it has been over-discharged or otherwise damaged. Dispose of
the damaged battery immediately. An over-discharged or otherwise
damaged battery can vent or explode when the battery is recharged or
when the battery is subsequently used.
Caution: water – especially salt water – in the battery compartment
will cause electrolysis, giving off hydrogen and oxygen – an explosive
gas mixture. Electrolysis will also cause corrosion. If water gets
inside of the battery compartment, immediately open the battery
compartment, rinse the battery compartment and battery with fresh
water and allow your flashlight and the battery to completely dry
before reassembling your flashlight.
8. Advanced Operation
You communicate with your flashlight through a sequence of clicks
and/or a press-hold-release or a press and hold. These sequences
are called commands and are simple and easy to learn. It will take a
few minutes of practice to become proficient with them.
The term “click” indicates a quick press and release of the button.
Think of it like a mouse click on your computer or a tap on a touch
screen. The button must be released in less than 1/3 of a second to
be recognized as a click. The term double-click indicates two clicks
in rapid succession and the term triple-click indicates three clicks in
rapid succession.
The term “press-hold-release” indicates that the button should be
held down for an extended period – longer than 1/3 of a second – to
allow your flashlight to tell the difference between a click and a presshold-release. The term “press and hold” indicates that you should
continue to hold the button down until you are told to release it. A
7
click, press-hold-release and a click, press and hold represents a click
followed by the press in rapid succession. There is no pause or delay
between the click and the press. The same applies to double-click,
press-hold-release and triple-click, press-hold-release.
Please refer to Customizing Your Flashlight in section 9 for detailed
instructions on customizing your flashlight.
Note: your flashlight uses Burst whenever you select the Maximum
brightness setting. The output is reduced by one brightness level – to
the one-hour output level – 40 seconds after the button is released to
maximize battery runtimes with minimal visual impact. Maximum
output is always used for as long as the button is held down. Burst
may be disabled in the Option Menu.
9. Customizing Your Flashlight
You may customize your flashlight so you can perform common tasks
more efficiently. You can customize the brightness presets through
the Brightness Menu and you can customize the optional features
through the Option Menu. Together these features allow you to build
a specialized flashlight optimized for the tasks you perform on a
regular basis – and even tasks you rarely perform. To begin the
customization process, see Enabling Customization in section 11.
10. Restoring Factory Settings
Please feel free to experiment. You can always restore the original
factory settings by following these steps:
•
Reset your flashlight - i.e., remove the battery for 60 seconds and
reinstall. Alternatively, you can turn on your flashlight, remove the
battery compartment (your flashlight will turn off) and then reinstall
the battery compartment without waiting. Your flashlight will light
dimly for 7 seconds to indicate that a reset has taken place. You
must begin the next step before your flashlight turns off.
•
Press and hold the button before the dim reset indication turns off.
Your flashlight will become brighter for 10 seconds and then turn
off. Release the button when your flashlight turns off.
•
Note: your flashlight will display 5 rapid flashes and no settings are
changed if you release the button before your flashlight turns off.
8
•
Note: your flashlight will display 10 very rapid flashes if there is
insufficient power to memorize the original factory settings.
Note: anytime the battery is removed for an extended period (>60
seconds) your flashlight will reset. A reset by itself will not change any
settings and thus there is little reason to force a reset in normal use.
11. Enabling Customization
Your flashlight is shipped with Customization disabled. Follow these
steps to enable Customization:
•
Reset your flashlight - i.e., remove the battery for 60 seconds and
reinstall. Alternatively, you can turn on your flashlight, remove the
battery compartment (your flashlight will turn off) and then reinstall
the battery compartment without waiting. Your flashlight will light
dimly for 7 seconds and turn off to indicate a reset has taken place.
You have 15 seconds following the reset indication to begin the
next step. After 15 seconds, you will need to start over.
•
Perform a 20-click, press and hold from Off with the rotary control
in the click on/off position. You don’t have to count the clicks
because you are allowed to enter more than 20 clicks prior to the
press and hold. After the 20th click your flashlight stops turning off
and on with every other click. Remember: do not pause between
clicks or between the last click and the press and hold.
•
Hold the button down until your flashlight turns off. Your flashlight
will display a dim-to-bright sequence to indicate it is enabling
Customization and then turn off. Release the button after your
flashlight turns off. Customization is now enabled.
•
Note: your flashlight will display 5 rapid flashes and Customization
is not enabled if you release the button before your flashlight turns
off.
•
Note: your flashlight will display 10 very rapid flashes if there is
insufficient power to memorize the setting.
We recommend you disable Customization after you finish
customizing your flashlight. This allows you to hand your flashlight to
anyone without fear that someone will accidentally modify your
settings. See Option Menu item #5 in section 14.
9
12. Internal Brightness Levels
Your flashlight includes 24 internal brightness levels.
These
brightness levels are visually spaced so that the difference between
any adjacent brightness levels will appear to be a small equal change.
This visual spacing takes advantage of the logarithmic nature of your
eyes to see a huge dynamic range – from very bright midday summer
scenes to dim moonlit scenes. Your flashlight can produce a range of
brightness levels that spans over 15,000:1, depending on the
maximum output of your flashlight. Each brightness level is separated
by a ratio of roughly 1.5:1 – enough to provide a small but noticeable
difference between brightness levels.
The amount of power your flashlight consumes is related to the
amount of light being generated. The more light generated, the more
power consumed.
You can dramatically reduce the power
consumption and dramatically increase the runtimes by reducing the
light output by a single level at the higher output settings. And
because your eyes perceive light logarithmically, you will notice only a
slight difference between the two brightness levels.
Your flashlight contains a unique feature called Burst to help extend
battery life at the maximum brightness level. When you select the
maximum brightness level, you receive maximum output for an
additional 40 seconds after releasing the button and then your
flashlight drops one level. If you are not paying attention, you may not
notice the drop but your batteries will last much longer as a result.
You may disable Burst in the Option Menu.
Note: The Burst feature is disabled during momentary Maximum
operation. You will continue to receive the maximum output for as
long as you hold down the button.
In addition to the 24 regular brightness levels, there are three
additional light show brightness levels: Tactical Strobe (rapid flashing),
Emergency Strobe (slow flashing) and SOS (46CFR161.013-7
compliant). Tactical Strobe runs at brightness level 24, Emergency
Strobe runs a brightness level 23 and SOS runs at brightness level 22.
The brightness levels are arranged in a circular menu to make
scrolling through all of the brightness levels easier. The maximum
brightness level is followed by the Rotary brightness level, Tactical
Strobe, Emergency Strobe, SOS and then the minimum brightness
level, and vice versa.
10
The following graph allows you to determine the brightness of each
level. Draw a straight line between level 1 at 0.02 lumens and level 24
at the maximum brightness. Lines have been provided for 140, 200
and 250 lumens for your convenience.
24
20
15
10
5
1
0.01
0.05 0.1
0.5
1
5
10
50
100
500
13. Customizing the Brightness Presets
Your flashlight comes with 3 brightness presets. They are referred to
as presets A, B and C. A is fully clock-wise against the stop and is the
press and hold preset, B clock-wise away from the stop, C is the
counter clock-wise half of the rotary control rotation.
Follow these steps to customize a brightness preset:
•
See Enabling Customization in section 11 to enable customization.
•
Turn on your flashlight with the rotary control in the click on/off
position. Then select the preset you want to customize using the
rotary control.
•
Double-click, press-hold-release. Your flashlight will display the
current brightness level. If the current brightness level is the
minimum or maximum level, the displayed level will start with a
double-blink.
•
Click to move to the next brightness level. Double-click to reverse
direction and move to the previous brightness level. The menu is
circular – the last item is followed by the first and the first is
11
preceded by the last. When you get to the minimum or maximum
level, the displayed level will start with a double-blink.
•
Note: the rotary brightness level is only available in preset C and
does not appear in the brightness menu for presets A and B.
•
Press and hold the button to select the current brightness level.
Your flashlight will display a dim-to-bright sequence to indicate you
are setting the brightness level. Release the button after your
flashlight turns off and your flashlight will return to the selected
preset with the newly selected brightness level.
•
Note: your flashlight will exit the Brightness Menu with 5 rapid
flashes without changing the preset if an error is detected.
Possible errors include entering an unknown command, not
entering a command for 10 seconds and not holding the button
down until your flashlight turns off when selecting a brightness
level.
•
Note: your flashlight will exit the Brightness Menu with 10 very
rapid flashes if there is insufficient power to memorize the setting.
14. Customizing Optional Features
Your flashlight offers the following features through the Option Menu:
1.
2.
3.
4.
5.
6.
Swap Positions A and B – indicated by <quick flashes, long flash>
Automatic Turn Off – indicated by <bright-to-dim ramp>
Locator Flash – indicated by <dim flash>
Pseudo Momentary – indicated by <long flash, short flash>
Burst – indicated by <brighter-dimmer>
Customization – indicated by <dim-to-bright ramp>
Follow these steps to enable or disable an optional feature from the
Option Menu:
•
See Enabling Customization in section 11 to enable customization.
•
Turn on your flashlight with the rotary control in the click on/off
position.
•
Triple-click, press-hold-release. Your flashlight will display the
indication for the first menu item (Automatic Turn Off – indicated by
<bright-to-dim ramp>).
12
•
Click to move to the next menu item. Double-click to reverse
direction and move to the previous menu item. The menu is
circular – the last item is followed by the first and the first is
preceded by the last.
•
Press and hold the button to select the current menu item. Your
flashlight will display a dim-to-bright sequence to indicate you are
enabling the feature or a bright-to-dim sequence to indicate you
are disabling the feature. Release the button after your flashlight
turns off and your flashlight will return to the selected preset
brightness level.
•
Note: your flashlight will exit the Option Menu with 5 rapid flashes
without changing the setting if an error is detected. Possible errors
include entering an unknown command, not entering a command
for 10 seconds and not holding the button down until your flashlight
turns off when selecting a setting.
•
Note: your flashlight will exit the Option Menu with 10 very rapid
flashes if there is insufficient power to memorize the setting.
Option Menu Item #1
Swap Positions A and B – <quick flashes, long flash>
The Swap Positions A and B feature allows you to swap the positions
of the A and B presets on the rotary control. Thus the fully clock-wise
position becomes momentary Tactical Strobe while the mostly clockwise position becomes momentary Maximum.
Option Menu Item #2
Automatic Turn Off – <bright-to-dim-ramp>
The Automatic Turn Off feature allows your flashlight to turn itself off
after 10 minutes of inactivity. This can be handy if you carry your
flashlight in your pocket and it gets accidentally turned on or if you fall
asleep with your flashlight turned on.
Your flashlight will turn off gradually, dimming one brightness level
each second. When the minimum brightness level has been reached,
your flashlight will blink slowly 10 times and then turn off. You can
click the button at any time during the sequence to return your
flashlight to the original brightness level and to reset the Automatic
Turn Off timer for another 10 minutes.
13
Option Menu Item #3
Locator Flash – <dim flash>
The Locator Flash feature allows your flashlight to emit a short flash of
dim light every three seconds when turned off. The periodic short
flash makes it easier to find your flashlight in the dark. Enabling the
Locator Flash turns on the Locator Flash following a reset.
The Locator Flash may be toggled on and off using a quad-click when
enabled, your flashlight is turned off and the rotary control is set to the
click on/off position.
Option Menu Item #4
Pseudo Momentary – <long flash, short flash>
The Pseudo Momentary feature allows your flashlight to differentiate
between a click and a press and hold when your flashlight is turned
off. A press and hold from off will act in a momentary fashion when
Pseudo Momentary is enabled – i.e., turning off your flashlight when
the button is released. A press and hold from off acts like a click when
Pseudo Momentary is disabled – i.e., your flashlight remains on when
the button is released.
Option Menu Item #5
Burst – <brighter-dimmer>
The Burst feature allows you to control the behavior of the maximum
level to conserve power and extend runtimes. Your flashlight will drop
by one level 40 seconds after the button has been released when
Burst is enabled. Maximum always stays at full power for as long as
the button is held down.
Note: the runtime on the maximum level will be reduced when Burst is
disabled. You will also notice that your flashlight becomes quite warm
on the maximum setting and may automatically reduce power due to
thermal limiting. This is normal.
Option Menu Item #6
Customization – <dim-to-bright-ramp>
The Customization feature allows you to control access to the
Brightness Menu and Option Menu commands. This menu item can
14
only be used to disable Customization. See Enabling Customization
in section 11 to enable customization.
15. Warranty
Your flashlight (Product) is warranted to the original owner to be free
from defects in materials and workmanship for the life of Product. This
warranty does not include cosmetic blemishes, damage, modifications
and normal wear. We will repair Product, replace Product with an
equivalent product or refund the original purchase price for the
defective Product – at our discretion. You are solely responsible for
determining Product's suitability for your application and you take sole
responsibility for Product's use. In no case shall HDS Systems, Inc.
be liable for more than the original retail price of Product.
Updated April 16, 2015
Specifications subject to change without notice.
15
Notes
HDS Systems, Inc.
P.O. Box 42767
Tucson, Arizona 85733
USA
520-325-3004
[email protected]
www.HDSsystems.com