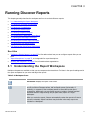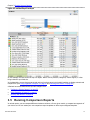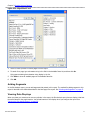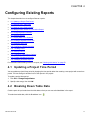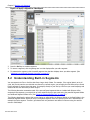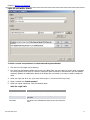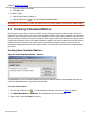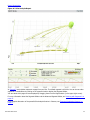
1
Discover™
Advanced Analysis and
Segmentation
2.8 USER MANUAL
© 2004-2009 Omniture, Inc. All rights reserved.
550 East Timpanogos Circle
Orem, UT 84097
A trademark symbol (®, ™, etc.) denotes an Omniture trademark. An asterisk (*)
denotes a third-party trademark. All third-party trademarks are the property of their respective
owners.
Contact Information
[CORPORATE
ADDRESS]
[PHONE]
[FAX]
[TOLL FREE]
[SUPPORT E-MAIL]
[SALES E-MAIL]
[INFORMATION EMAIL]
[CORPORATE URL]
[LOG-IN URL]
Omniture
550 East Timpanogos Circle
Orem, UT 84097
1.801.722.7000
1.801.722.7001
1.877.722.7088 (support, billing and sales)
[email protected]
[email protected]
[email protected]
http://www.omniture.com
http://my.omniture.com
v2.8 10052009
OMNITURE DISCOVER USER MANUAL
II
Table of Contents
Preface
System Recommendations . . . . . . . . . . . . . . . . . . . . . . . . . . . . . . . . . . . . . . . . . . . . . . . . . . . . . . . I
Account Support . . . . . . . . . . . . . . . . . . . . . . . . . . . . . . . . . . . . . . . . . . . . . . . . . . . . . . . . . . . . . II
Service and Billing . . . . . . . . . . . . . . . . . . . . . . . . . . . . . . . . . . . . . . . . . . . . . . . . . . . . . . . . . . . . II
Chapter 1 - Introduction to Omniture Discover . . . . . . . . . . . . . . . . . . . . . . . . . . . . . . . . . . . . . . 1
Example: Using Discover for Web Site Analysis . . . . . . . . . . . . . . . . . . . . . . . . . . . . . . . . . . . . . . . . . 1
Features of Discover
........................................................... 3
Reports . . . . . . . . . . . . . . . . . . . . . . . . . . . . . . . . . . . . . . . . . . . . . . . . . . . . . . . . . . . . . . . . . . . 3
Segments . . . . . . . . . . . . . . . . . . . . . . . . . . . . . . . . . . . . . . . . . . . . . . . . . . . . . . . . . . . . . . . . . 4
Metrics . . . . . . . . . . . . . . . . . . . . . . . . . . . . . . . . . . . . . . . . . . . . . . . . . . . . . . . . . . . . . . . . . . . 5
Comparisons . . . . . . . . . . . . . . . . . . . . . . . . . . . . . . . . . . . . . . . . . . . . . . . . . . . . . . . . . . . . . . . 5
Visualization Reports . . . . . . . . . . . . . . . . . . . . . . . . . . . . . . . . . . . . . . . . . . . . . . . . . . . . . . . . . . 5
Chapter 2 - Getting Started with Discover . . . . . . . . . . . . . . . . . . . . . . . . . . . . . . . . . . . . . . . . . . 6
Accessing Release Notes . . . . . . . . . . . . . . . . . . . . . . . . . . . . . . . . . . . . . . . . . . . . . . . . . . . . . . . . . 6
Configuring Users in Discover . . . . . . . . . . . . . . . . . . . . . . . . . . . . . . . . . . . . . . . . . . . . . . . . . . . . . 6
Granting Users Access to Discover . . . . . . . . . . . . . . . . . . . . . . . . . . . . . . . . . . . . . . . . . . . . . . . . . . 6
Managing Queues . . . . . . . . . . . . . . . . . . . . . . . . . . . . . . . . . . . . . . . . . . . . . . . . . . . . . . . . . . . . 7
Logging in to Discover . . . . . . . . . . . . . . . . . . . . . . . . . . . . . . . . . . . . . . . . . . . . . . . . . . . . . . . . . . 7
Logging in from the Omniture Suite . . . . . . . . . . . . . . . . . . . . . . . . . . . . . . . . . . . . . . . . . . . . . . . . . 7
Logging in using a URL . . . . . . . . . . . . . . . . . . . . . . . . . . . . . . . . . . . . . . . . . . . . . . . . . . . . . . . . . 7
Configuring Display Settings . . . . . . . . . . . . . . . . . . . . . . . . . . . . . . . . . . . . . . . . . . . . . . . . . . . . . . 8
General Settings . . . . . . . . . . . . . . . . . . . . . . . . . . . . . . . . . . . . . . . . . . . . . . . . . . . . . . . . . . . . . 8
Site Analysis
............................................................... 8
Starting a Project . . . . . . . . . . . . . . . . . . . . . . . . . . . . . . . . . . . . . . . . . . . . . . . . . . . . . . . . . . . . . . 8
Opening a Project . . . . . . . . . . . . . . . . . . . . . . . . . . . . . . . . . . . . . . . . . . . . . . . . . . . . . . . . . . . . 8
Starting a New Project . . . . . . . . . . . . . . . . . . . . . . . . . . . . . . . . . . . . . . . . . . . . . . . . . . . . . . . . . 9
Saving and Deleting Projects . . . . . . . . . . . . . . . . . . . . . . . . . . . . . . . . . . . . . . . . . . . . . . . . . . . . . 9
Chapter 3 - Running Discover Reports . . . . . . . . . . . . . . . . . . . . . . . . . . . . . . . . . . . . . . . . . . . . 11
See Also . . . . . . . . . . . . . . . . . . . . . . . . . . . . . . . . . . . . . . . . . . . . . . . . . . . . . . . . . . . . . . . . . 11
Understanding the Report Workspace
. . . . . . . . . . . . . . . . . . . . . . . . . . . . . . . . . . . . . . . . . . . . . . 11
Running a Conversion Funnel Report . . . . . . . . . . . . . . . . . . . . . . . . . . . . . . . . . . . . . . . . . . . . . . . 12
See Also . . . . . . . . . . . . . . . . . . . . . . . . . . . . . . . . . . . . . . . . . . . . . . . . . . . . . . . . . . . . . . . . . 14
Running a Trended Report . . . . . . . . . . . . . . . . . . . . . . . . . . . . . . . . . . . . . . . . . . . . . . . . . . . . . . 14
Running a Ranked Report . . . . . . . . . . . . . . . . . . . . . . . . . . . . . . . . . . . . . . . . . . . . . . . . . . . . . . . 15
Running Comparison Reports
OMNITURE
. . . . . . . . . . . . . . . . . . . . . . . . . . . . . . . . . . . . . . . . . . . . . . . . . . . . 16
III
Creating a Custom Comparison Report . . . . . . . . . . . . . . . . . . . . . . . . . . . . . . . . . . . . . . . . . . . . . . 17
Running a Comparison Report . . . . . . . . . . . . . . . . . . . . . . . . . . . . . . . . . . . . . . . . . . . . . . . . . . . 18
Running a Pre-Configured Comparison Report . . . . . . . . . . . . . . . . . . . . . . . . . . . . . . . . . . . . . . . . . 19
Configuring the Advanced Fall-out Report . . . . . . . . . . . . . . . . . . . . . . . . . . . . . . . . . . . . . . . . . . . . 19
Assigning Pages to the Fall-out report . . . . . . . . . . . . . . . . . . . . . . . . . . . . . . . . . . . . . . . . . . . . . . 19
Using Groups and Categories . . . . . . . . . . . . . . . . . . . . . . . . . . . . . . . . . . . . . . . . . . . . . . . . . . . . 22
Running the Next Page Flow Report . . . . . . . . . . . . . . . . . . . . . . . . . . . . . . . . . . . . . . . . . . . . . . . . 23
Accessing the Next Page Flow Report . . . . . . . . . . . . . . . . . . . . . . . . . . . . . . . . . . . . . . . . . . . . . . . 23
Working with the Next Page Flow Report . . . . . . . . . . . . . . . . . . . . . . . . . . . . . . . . . . . . . . . . . . . . 24
Other Features Available with Next Page Flow . . . . . . . . . . . . . . . . . . . . . . . . . . . . . . . . . . . . . . . . . 26
Running the Previous Page Flow Report . . . . . . . . . . . . . . . . . . . . . . . . . . . . . . . . . . . . . . . . . . . . . 26
Running the Site Analysis Report . . . . . . . . . . . . . . . . . . . . . . . . . . . . . . . . . . . . . . . . . . . . . . . . . . 28
Configuring the Site Analysis Display Settings and Alerts . . . . . . . . . . . . . . . . . . . . . . . . . . . . . . . . . . . 29
Adding Pages to the Site Analysis Report . . . . . . . . . . . . . . . . . . . . . . . . . . . . . . . . . . . . . . . . . . . . 30
Adding Segments . . . . . . . . . . . . . . . . . . . . . . . . . . . . . . . . . . . . . . . . . . . . . . . . . . . . . . . . . . . 31
Viewing Data Displays . . . . . . . . . . . . . . . . . . . . . . . . . . . . . . . . . . . . . . . . . . . . . . . . . . . . . . . . 31
Navigating the Site Analysis Report . . . . . . . . . . . . . . . . . . . . . . . . . . . . . . . . . . . . . . . . . . . . . . . . 32
Running the Virtual Focus Group Report . . . . . . . . . . . . . . . . . . . . . . . . . . . . . . . . . . . . . . . . . . . . . 32
Selecting Metrics . . . . . . . . . . . . . . . . . . . . . . . . . . . . . . . . . . . . . . . . . . . . . . . . . . . . . . . . . . . . 34
Chapter 4 - Configuring Existing Reports
. . . . . . . . . . . . . . . . . . . . . . . . . . . . . . . . . . . . . . . . . 35
Updating a Project Time Period . . . . . . . . . . . . . . . . . . . . . . . . . . . . . . . . . . . . . . . . . . . . . . . . . . . 35
Breaking Down Table Data . . . . . . . . . . . . . . . . . . . . . . . . . . . . . . . . . . . . . . . . . . . . . . . . . . . . . . 35
Breaking Down Graphical Data
. . . . . . . . . . . . . . . . . . . . . . . . . . . . . . . . . . . . . . . . . . . . . . . . . . . 37
Adding Success Events to a Conversion Report . . . . . . . . . . . . . . . . . . . . . . . . . . . . . . . . . . . . . . . . 37
Configuring Report Columns . . . . . . . . . . . . . . . . . . . . . . . . . . . . . . . . . . . . . . . . . . . . . . . . . . . . . 38
Changing Reports
. . . . . . . . . . . . . . . . . . . . . . . . . . . . . . . . . . . . . . . . . . . . . . . . . . . . . . . . . . . . 38
Copying Data to the Clipboard . . . . . . . . . . . . . . . . . . . . . . . . . . . . . . . . . . . . . . . . . . . . . . . . . . . . 39
Creating a Segment from a Row . . . . . . . . . . . . . . . . . . . . . . . . . . . . . . . . . . . . . . . . . . . . . . . . . . 39
Extracting Visitor IDs . . . . . . . . . . . . . . . . . . . . . . . . . . . . . . . . . . . . . . . . . . . . . . . . . . . . . . . . . . 40
Configuring Column Properties
. . . . . . . . . . . . . . . . . . . . . . . . . . . . . . . . . . . . . . . . . . . . . . . . . . . 40
Trending a Row . . . . . . . . . . . . . . . . . . . . . . . . . . . . . . . . . . . . . . . . . . . . . . . . . . . . . . . . . . . . . . 41
Sorting Columns
. . . . . . . . . . . . . . . . . . . . . . . . . . . . . . . . . . . . . . . . . . . . . . . . . . . . . . . . . . . . . 41
Configuring Data Delivery Options . . . . . . . . . . . . . . . . . . . . . . . . . . . . . . . . . . . . . . . . . . . . . . . . . 42
Creating Scheduled Deliveries . . . . . . . . . . . . . . . . . . . . . . . . . . . . . . . . . . . . . . . . . . . . . . . . . . . . 44
Managing Scheduled Reports
. . . . . . . . . . . . . . . . . . . . . . . . . . . . . . . . . . . . . . . . . . . . . . . . . . . . 45
Chapter 5 - Working with Segments . . . . . . . . . . . . . . . . . . . . . . . . . . . . . . . . . . . . . . . . . . . . . 47
Using Segments in Reports . . . . . . . . . . . . . . . . . . . . . . . . . . . . . . . . . . . . . . . . . . . . . . . . . . . . . . 47
®
OMNITURE 2008
IV
Adding a Segment as a Column . . . . . . . . . . . . . . . . . . . . . . . . . . . . . . . . . . . . . . . . . . . . . . . . . . 47
Applying a Segment to the Entire Workspace . . . . . . . . . . . . . . . . . . . . . . . . . . . . . . . . . . . . . . . . . . 48
Understanding Built-in Segments . . . . . . . . . . . . . . . . . . . . . . . . . . . . . . . . . . . . . . . . . . . . . . . . . . 49
First Time Visitors . . . . . . . . . . . . . . . . . . . . . . . . . . . . . . . . . . . . . . . . . . . . . . . . . . . . . . . . . . . 50
Loyal Visitors . . . . . . . . . . . . . . . . . . . . . . . . . . . . . . . . . . . . . . . . . . . . . . . . . . . . . . . . . . . . . . 50
Non-Purchasers . . . . . . . . . . . . . . . . . . . . . . . . . . . . . . . . . . . . . . . . . . . . . . . . . . . . . . . . . . . . 51
Purchasers . . . . . . . . . . . . . . . . . . . . . . . . . . . . . . . . . . . . . . . . . . . . . . . . . . . . . . . . . . . . . . . . 51
Single Page Visits . . . . . . . . . . . . . . . . . . . . . . . . . . . . . . . . . . . . . . . . . . . . . . . . . . . . . . . . . . . 52
Visitors with Campaign Tracking Code . . . . . . . . . . . . . . . . . . . . . . . . . . . . . . . . . . . . . . . . . . . . . . 52
Visitors with Persistent Cookies . . . . . . . . . . . . . . . . . . . . . . . . . . . . . . . . . . . . . . . . . . . . . . . . . . . 52
Visits from Paid Search . . . . . . . . . . . . . . . . . . . . . . . . . . . . . . . . . . . . . . . . . . . . . . . . . . . . . . . . 53
Visits referred by Google . . . . . . . . . . . . . . . . . . . . . . . . . . . . . . . . . . . . . . . . . . . . . . . . . . . . . . . 53
Visits referred by Yahoo! . . . . . . . . . . . . . . . . . . . . . . . . . . . . . . . . . . . . . . . . . . . . . . . . . . . . . . . 54
Visits referred by MSN . . . . . . . . . . . . . . . . . . . . . . . . . . . . . . . . . . . . . . . . . . . . . . . . . . . . . . . . 54
Visits referred by Microsoft Live . . . . . . . . . . . . . . . . . . . . . . . . . . . . . . . . . . . . . . . . . . . . . . . . . . 54
Visits that Contain Pages . . . . . . . . . . . . . . . . . . . . . . . . . . . . . . . . . . . . . . . . . . . . . . . . . . . . . . . 55
Visits with No Referrer . . . . . . . . . . . . . . . . . . . . . . . . . . . . . . . . . . . . . . . . . . . . . . . . . . . . . . . . 55
Visit with Ordered Product . . . . . . . . . . . . . . . . . . . . . . . . . . . . . . . . . . . . . . . . . . . . . . . . . . . . . . 56
Visit with Product . . . . . . . . . . . . . . . . . . . . . . . . . . . . . . . . . . . . . . . . . . . . . . . . . . . . . . . . . . . 56
Using the Segment Builder Tool . . . . . . . . . . . . . . . . . . . . . . . . . . . . . . . . . . . . . . . . . . . . . . . . . . . 56
Displaying and Using Segments . . . . . . . . . . . . . . . . . . . . . . . . . . . . . . . . . . . . . . . . . . . . . . . . . . 57
Adjusting Pre-configured Segment Properties . . . . . . . . . . . . . . . . . . . . . . . . . . . . . . . . . . . . . . . . . . 57
Using the Advanced Segment Builder . . . . . . . . . . . . . . . . . . . . . . . . . . . . . . . . . . . . . . . . . . . . . . . 58
Using the Rule Builder . . . . . . . . . . . . . . . . . . . . . . . . . . . . . . . . . . . . . . . . . . . . . . . . . . . . . . . . 63
Using the Select Item Tool . . . . . . . . . . . . . . . . . . . . . . . . . . . . . . . . . . . . . . . . . . . . . . . . . . . . . . 65
Using Segment Folders . . . . . . . . . . . . . . . . . . . . . . . . . . . . . . . . . . . . . . . . . . . . . . . . . . . . . . . . . 66
Creating and Organizing Segment Folders . . . . . . . . . . . . . . . . . . . . . . . . . . . . . . . . . . . . . . . . . . . . 66
Chapter 6 - Working with Metrics . . . . . . . . . . . . . . . . . . . . . . . . . . . . . . . . . . . . . . . . . . . . . . . 69
Metric Calculations . . . . . . . . . . . . . . . . . . . . . . . . . . . . . . . . . . . . . . . . . . . . . . . . . . . . . . . . . . . . 69
Metric Definitions . . . . . . . . . . . . . . . . . . . . . . . . . . . . . . . . . . . . . . . . . . . . . . . . . . . . . . . . . . . . . 70
Adding Metrics . . . . . . . . . . . . . . . . . . . . . . . . . . . . . . . . . . . . . . . . . . . . . . . . . . . . . . . . . . . . . . . 71
Organizing Metrics . . . . . . . . . . . . . . . . . . . . . . . . . . . . . . . . . . . . . . . . . . . . . . . . . . . . . . . . . . . . 72
Creating Calculated Metrics . . . . . . . . . . . . . . . . . . . . . . . . . . . . . . . . . . . . . . . . . . . . . . . . . . . . . . 73
Creating New Calculated Metrics . . . . . . . . . . . . . . . . . . . . . . . . . . . . . . . . . . . . . . . . . . . . . . . . . . 73
Appendix A - Report Descriptions . . . . . . . . . . . . . . . . . . . . . . . . . . . . . . . . . . . . . . . . . . . . . . . . 75
Site Metrics Reports . . . . . . . . . . . . . . . . . . . . . . . . . . . . . . . . . . . . . . . . . . . . . . . . . . . . . . . . . . 75
Site Content Reports . . . . . . . . . . . . . . . . . . . . . . . . . . . . . . . . . . . . . . . . . . . . . . . . . . . . . . . . . 78
®
OMNITURE 2008
V
Mobile Reports . . . . . . . . . . . . . . . . . . . . . . . . . . . . . . . . . . . . . . . . . . . . . . . . . . . . . . . . . . . . . 79
Paths Reports . . . . . . . . . . . . . . . . . . . . . . . . . . . . . . . . . . . . . . . . . . . . . . . . . . . . . . . . . . . . . . 81
Traffic Sources Reports . . . . . . . . . . . . . . . . . . . . . . . . . . . . . . . . . . . . . . . . . . . . . . . . . . . . . . . . 89
Campaigns Reports . . . . . . . . . . . . . . . . . . . . . . . . . . . . . . . . . . . . . . . . . . . . . . . . . . . . . . . . . . 90
Products Reports . . . . . . . . . . . . . . . . . . . . . . . . . . . . . . . . . . . . . . . . . . . . . . . . . . . . . . . . . . . . 91
Visitor Retention Reports . . . . . . . . . . . . . . . . . . . . . . . . . . . . . . . . . . . . . . . . . . . . . . . . . . . . . . . 92
Visitor Profile Reports . . . . . . . . . . . . . . . . . . . . . . . . . . . . . . . . . . . . . . . . . . . . . . . . . . . . . . . . . 93
Custom Conversion Reports . . . . . . . . . . . . . . . . . . . . . . . . . . . . . . . . . . . . . . . . . . . . . . . . . . . . . 95
Custom Traffic Reports . . . . . . . . . . . . . . . . . . . . . . . . . . . . . . . . . . . . . . . . . . . . . . . . . . . . . . . . 95
Test&Target Reports . . . . . . . . . . . . . . . . . . . . . . . . . . . . . . . . . . . . . . . . . . . . . . . . . . . . . . . . . . 95
Survey Reports . . . . . . . . . . . . . . . . . . . . . . . . . . . . . . . . . . . . . . . . . . . . . . . . . . . . . . . . . . . . . 96
Appendix B - Advanced Topics . . . . . . . . . . . . . . . . . . . . . . . . . . . . . . . . . . . . . . . . . . . . . . . . . . 97
Discover Security – Ensuring the Security of Customer Data . . . . . . . . . . . . . . . . . . . . . . . . . . . . . . . 97
Network Security . . . . . . . . . . . . . . . . . . . . . . . . . . . . . . . . . . . . . . . . . . . . . . . . . . . . . . . . . . . . 97
Hosting Facility Security . . . . . . . . . . . . . . . . . . . . . . . . . . . . . . . . . . . . . . . . . . . . . . . . . . . . . . . 98
Corporate Office Security . . . . . . . . . . . . . . . . . . . . . . . . . . . . . . . . . . . . . . . . . . . . . . . . . . . . . . 98
Internet Explorer 6.0 Cookie Handling . . . . . . . . . . . . . . . . . . . . . . . . . . . . . . . . . . . . . . . . . . . . . . 99
About Cookies . . . . . . . . . . . . . . . . . . . . . . . . . . . . . . . . . . . . . . . . . . . . . . . . . . . . . . . . . . . . . 99
How Discover Uses Cookies . . . . . . . . . . . . . . . . . . . . . . . . . . . . . . . . . . . . . . . . . . . . . . . . . . . . . 99
About Internet Explorer 6.0 and Cookie Handling . . . . . . . . . . . . . . . . . . . . . . . . . . . . . . . . . . . . . . . 99
How IE 6.0 Affects Discover . . . . . . . . . . . . . . . . . . . . . . . . . . . . . . . . . . . . . . . . . . . . . . . . . . . . 100
About P3p Compliance, and the Red Warning Icon on Pages with Discover . . . . . . . . . . . . . . . . . . . . . . 101
Visitor Opt-outs and the Omniture Privacy Policy . . . . . . . . . . . . . . . . . . . . . . . . . . . . . . . . . . . . . . 101
Privacy Policy for Visitors to Sites Tracked by Discover – a Web Analytics Product by Omniture, Inc. . . . . . . 101
We Do Not Collect Personal Information . . . . . . . . . . . . . . . . . . . . . . . . . . . . . . . . . . . . . . . . . . . . 101
We Do Not Aggregate Individual Visitor Traffic Patterns . . . . . . . . . . . . . . . . . . . . . . . . . . . . . . . . . . 101
Collection of Non-Personally Identifiable Information . . . . . . . . . . . . . . . . . . . . . . . . . . . . . . . . . . . . 101
Anonymous Use of Cookies . . . . . . . . . . . . . . . . . . . . . . . . . . . . . . . . . . . . . . . . . . . . . . . . . . . . 102
We Do Not Create Individual Profiles . . . . . . . . . . . . . . . . . . . . . . . . . . . . . . . . . . . . . . . . . . . . . . 102
Third-Party Access . . . . . . . . . . . . . . . . . . . . . . . . . . . . . . . . . . . . . . . . . . . . . . . . . . . . . . . . . . 102
Opt Out of Tracking Cookies
. . . . . . . . . . . . . . . . . . . . . . . . . . . . . . . . . . . . . . . . . . . . . . . . . . . 102
For More Information . . . . . . . . . . . . . . . . . . . . . . . . . . . . . . . . . . . . . . . . . . . . . . . . . . . . . . . . 102
Appendix C - Glossary . . . . . . . . . . . . . . . . . . . . . . . . . . . . . . . . . . . . . . . . . . . . . . . . . . . . . . . 103
Glossary of Terms . . . . . . . . . . . . . . . . . . . . . . . . . . . . . . . . . . . . . . . . . . . . . . . . . . . . . . . . . . . 103
®
OMNITURE 2008
VI
Preface
The Discover User’s Guide is intended to familiarize you with the interface features of Omniture Discover, as well as
provide information on advanced navigational and reporting features. This guide includes the following chapters:
•
“Introduction to Omniture Discover” on page 1
•
“Getting Started with Discover” on page 6
•
“Running Discover Reports” on page 11
•
“Configuring Existing Reports” on page 35
•
“Working with Segments” on page 47
•
“Working with Metrics” on page 69
•
“Report Descriptions” on page 75
•
“Advanced Topics” on page 97
•
“Glossary” on page 103
User Manual Purpose
This User Manual provides comprehensive coverage of Omniture Discover by familiarizing you with the product, This
manual begins with a system introduction and easy-to-follow setup instructions, followed by general navigation and
user interface tips. Details for each reporting type comprise the majority of the manual. It also has appendixes that
cover reference material. If you have additional questions about Discover, using Discover with your site technology, or
any other technical issue, please contact your account support manager.
As you read this manual, keep in mind that each report is just one tool to help you optimize your Web site. Discover
was designed to provide multiple ways to analyze and optimize your Web site. This diverse set of reports not only helps
you better understand the reasons behind your site activity, but also presents this vital data in very granular detail.
Because there are thousands of possible report options, this document does not attempt to list each one or to cover all
of the ways that you can obtain and view your site data. Instead, you should familiarize yourself with the basic reports
and navigation concepts covered in this manual. Then you can use these basics and your imagination to manipulate
and drill down through the reports to discover even more information that is important to your site.
Discover Prerequisites
The following prerequisites are necessary for Discover to function properly.
System Recommendations
Though Omniture Discover reports should function appropriately with most popular Web browsers, reports look and
function best on systems that meet the following recommendations:
•
Browser: Microsoft® Internet Explorer® version 5.5 and later or Mozilla Firefox 1.5 and later.
•
Cookies: Required
•
JavaScript: Enabled
•
Operating System: Windows-based
•
Macromedia Flash Player: version 6 or later
•
Monitor Resolution: 800x600 (1024x768 recommended)
DISCOVER USERS GUIDE
I
Chapter 1Preface
•
Color Depth: 16-bit or greater
•
Java version:
•
Java -1.6 Update 6
•
Javaws - 1.6 Update 6
If you don’t have the correct version of Java installed, it is installed for you. If you have a non-compatible version of
Java installed, Discover downloads and prompts you to install the updates.
Account Support
Omniture’s support team is available if you have questions or concerns. Support representatives can:
•
Answer specific product questions.
•
Show you how to utilize the reports to their maximum capacity.
•
Help resolve any technical difficulties you may have.
Service and Billing
Depending on the service level you have purchased, some of the options described in this manual may not be available
to you. Additionally, each account has unique billing needs. Please refer to your contract for pricing, due dates, terms,
and conditions. If you would like to upgrade or otherwise change your service level, or if you have questions regarding
your current service, please contact your Omniture support representative.
Suggestions or feedback you may have regarding Omniture Discover or this manual are welcome. Please send
comments to your account support manager.
DISCOVER USERS GUIDE
II
CHAPTER 1
Introduction to Omniture Discover
Omniture Discover lets you perform instantaneous, advanced analysis on Web site activity. You can:
•
View multiple reports simultaneously
•
Apply segments across multiple dimensions including campaigns, products, pages, or other objects
•
Analyze the data from both micro and macro perspectives to view their impact on the target metrics.
These features enable you to answer questions about site traffic, visitor demographics, revenue, and product
movement. You can then filter, sort, and segment your data to find the answers to very precise questions. The results
are returned almost instantaneously, enabling you to quickly discover and analyze the effects of combinations of
factors.
For example, if you want to know how many Spanish speakers running Linux in Los Angeles purchased a specific
product, Discover can answer that for you.
This following sections describe the purpose of this manual, and contain an introduction to several of the main features
in Discover:
•
1.1 Example: Using Discover for Web Site Analysis
•
1.2 Features of Discover
1.1 Example: Using Discover for Web Site Analysis
The marketing department of an electronics company wants to increase their sales in Taiwan, and needs to know:
•
The advertising delivery tools that are most effective in that country.
•
The types of products generating the most revenue in Taiwan, in order to target this product category with their
ads.
•
The Web browsers most commonly used by visitors, so that the company can optimize the ads for best display in
those browsers.
As a Web site analyst in this company, you have been asked to provide the marketing department with this data. Using
Discover, you can generate one report that answers all of these questions, as shown in Figure 1.1.
DISCOVER USERS GUIDE
1
Chapter 1 Introduction to Omniture Discover
Figure 1.1: Example Report
Your report shows data for:
•
Various countries of the world
•
The default number of visitors
•
Columns to show data for revenue and number of units sold
In Taiwan the company has sold 705 units to 23,222 visitors for a gross revenue of just over $410,000. The blue
column shows a breakdown report of the type of product has sold the most. Personal computers have sold the most
units and generated more than half the revenue. Additional breakdown reports show which advertising delivery tool
has been most effective in the sale of personal computers, and which browser is most commonly used.
Segmentation
You can also apply segments to the report to show data only for purchasing visitors, loyal visitors, first-time visitors,
and a host of other options. Additionally, you can create reports that show data for specific cities in Taiwan, search
DISCOVER USERS GUIDE
2
Chapter 1 Introduction to Omniture Discover
engine keywords that generated the most traffic, net revenue, or any of many other reports. Each of these reports can
contain breakdown data to create many thousands of reports that can answer very specific business questions.
1.2 Features of Discover
The following Discover features help you analyze your Web site data to increase visitor retention and conversion:
•
Reports
•
Segments
•
Metrics
•
Comparisons
•
Visualization Reports
The Reports group uses expanding arrows to let you navigate through the report set, while the Segments, Metrics,
and Comparison groups are comprised of objects that you can use to modify your reports.
Reports
The standard report set that comes with Discover cover topics common to every Web site. These include (but are not
limited to):
•
Web site data
•
Visitor data
•
Traffic patterns
•
Referral data
•
Advertising campaigns
•
Visitor retention
•
Product information
You can gather custom data to create reports specific to your Web site. For example, if you have a search feature on
your Web site, you can track the search terms submitted, and create a report that shows these terms and the results
of the searches.
All reports are accessed from the Reports tool pane. The divisions in the pane are very similar to the SiteCatalyst report
divisions, but Discover adds further depth to the report data. From the Reports group, you can run reports and then
access tools to create, use, and define the segments, metrics, and report comparisons. Discover reports are
categorized by the following types:
Table 1.1: Report Types
REPORT TYPE
DESCRIPTION
Summary
Includes reports such as the Totals report, which shows data designed for quick
overviews. These are intended for executives who want a general overview of the data.
Conversion
Shows revenue gained from different aspects of your Web site. You can see reports that
show revenue from ad campaigns, revenue from loyal customers compared to revenue
from new customers, a breakdown of revenue by product, and many other revenue
reports. Conversion reports can also show other success events such as ad clicks,
downloads, or other events.
DISCOVER USERS GUIDE
3
Chapter 1 Introduction to Omniture Discover
REPORT TYPE
DESCRIPTION
Traffic
Shows numbers of Web page hits. Everything from most popular pages to visitor
geographic locations to browsers used to access your Web site is available in these
reports.
Pathing
Shows traffic flow within your Web site. You can see data that tells you the order in
which visitors access the Web pages on your site and the order in which they navigate
around your Web pages.
Reports that you can generate are grouped as follows:
Table 1.2: Report Groups
REPORT GROUP
DESCRIPTION
Site Metrics
Contains the most commonly accessed traffic and conversion reports that give the most
commonly used data about your Web site. This includes data about visits, visitors,
purchases, products, and totals.
Site Content
Contains traffic reports that tell you about numbers of hits of your Web pages and Web
servers.
Mobile
Contains mobile reports that improve visitor identification by collecting data about
mobile devices used to view your site. Mobile reports can identify a device’s
manufacturer and capabilities, such as screen sizes, video, audio, and cookie support,
and other metrics. Mobile reports are available for all report suites and are view-only
reports.
Paths
Contains reports that show you how visitors navigate around your Web sit and the order
in which they view pages in it.
Traffic Sources
Contains reports that tell you about how visitors find your site and which sites and
search engines are referring the most visitors.
Campaigns
Contains reports that show data on the results of your sales campaigns to gauge their
effectiveness. The reports can also show data on additional success events.
Products
Contains reports that let you monitor sales of individual products and product
categories. It tells you which items sell the best and which are less-frequently
purchased.
Visitor Retention
Contains reports that let you know whether people who access your site return to it
later, and the time between visits.
Visitor Profile
Contains reports that have data on visitor demographics. You can see where your visitor
come from and what type of software and equipment they use to visit your Web site.
Custom Conversion
Lets you set up your collection configuration to gather information about conversion
events that are specific to your business or Web site.
Custom Traffic
Contains reports about traffic data that might be specific to your site. For example, you
might want to record the search terms used in and internal site search feature, and the
effectiveness of the search results.
For report configuration information, see “Running Discover Reports” on page 11.
Segments
Segments let you select subsets of your data for pinpoint analysis. You can use them in the following ways:
DISCOVER USERS GUIDE
4
Chapter 1 Introduction to Omniture Discover
•
Filter the data in your reports to see data for only a selected portion of visitors, such as data about first-time
visitors.
•
Configure segments. An example of a configurable segment is the Visitors from Geoseg Region segment, that lets
you select the geographic region of the world that you want to see.
•
Segments can be combined to show data for visitors who fall into any specified segment or all specified segments.
For more information, see “Working with Segments” on page 47.
Metrics
Metrics are the specific data that you can display in the columns of your report. Standard metrics include:
•
Traffic metrics: Show data about the volume of visitors to your Web site.
•
Conversion metrics: Show data about success events on your Web site. Success events may include purchases,
downloads, or any other action that you want users to take on your Web site.
•
Calculated metrics: Customizable metrics created by combining other metrics. For example, you could create a
metric that subtracts the keyword cost and the cost of goods from the revenue to get net revenue. You could then
divide this by the total number of orders to get average net revenue per order.
For more information, see “Working with Metrics” on page 69.
Comparisons
Comparisons let you put information about multiple segments in a side-by-side format so you can compare and
contrast differences for multiple segments of visitors. Like segments and metrics, Discover provides you with a tool
that lets you create your own comparisons for use in your reports.
For more information, see “Running Comparison Reports” on page 16.
Visualization Reports
In addition to the reports that show you chart and table information, Discover offers a variety of specialized
visualization reports that let you look at your Web site data from different perspectives. Some of these include:
•
Fallout Reports: Show how many of your visitors progressed through your Web site to the destination you want.
•
Page Flow Reports: Show which pages were most frequently visited before and after a designated page.
•
Site Analysis Report: Graphically displays traffic and revenue patterns for your entire Web site.
•
Virtual Focus Group Report: Graphically recreates Web site visits for visitors toy your Web site, including time
spent on page and other data
For more information, see “Running Visualization Reports” on page 57.
DISCOVER USERS GUIDE
5
CHAPTER 2
Getting Started with Discover
The following topics are discussed in this chapter:
•
2.1 Accessing Release Notes
•
2.2 Configuring Users in Discover
•
2.3 Logging in to Discover
•
2.4 Configuring Display Settings
•
2.5 Starting a Project
2.1 Accessing Release Notes
For information about the latest enhancements, see the Discover Release Notes.
2.2 Configuring Users in Discover
To obtain user licenses, contact your Omniture Account Representative. The following sections assume you have
purchased your Discover user licenses:
•
Granting Users Access to Discover
•
Managing Queues
Granting Users Access to Discover
Before a user can log in to Discover, that user must be granted a user license. Omniture Discover user licenses are
concurrent-use licenses. The user licenses can be shared by many users, but the number of users at any given time is
limited to the number of user licenses purchased.
Local SiteCatalyst administrators can grant user licenses via the SiteCatalyst permissions system.
To grant an Omniture Discover user license:
1. Log in to the Omniture Suite.
2. Click Admin > Admin Console.
3. In the Admin Console main menu, click Admin Console > User Management.
4. Click Edit Groups.
If your company has purchased Discover user licenses, the Discover License Users group under Group Name. The
number of available licenses for user logins is also shown.
5. Click Discover License Users.
6. Select the users you want to add to the group, then click Add.
7.
Click Save Group.
TIP: The licensing system does not limit the number of users that may be added to a group; Discover limits concurrent
usage to the number of user licenses purchased. For example, if a company purchases 5 Omniture Discover user
DISCOVER USERS GUIDE
6
Chapter 2 Getting Started with Discover
licenses, the ACME administrator can add 50 or more users to the Discover User License group, but only 5 of those
users can use the Discover application concurrently.
See “User Management” in the Administration Console User Guide for more information about permissions.
Managing Queues
When the number of logged-in users exceeds the number of available licenses, a dialog box notifies the user that all
available licenses are currently in use. Their position in the queue is shown along with a link to re-check the queue
position. When a license becomes available, Discover notifies the user with an email message and a pop-up dialog box
indicating that Omniture Discover is available for access. The user then has 15 minutes to respond before losing the
position in the queue.
2.3 Logging in to Discover
You can access Discover using the Discover tab on the Omniture Suite home page. Usually, you log in to Discover from
the Omniture Suite, but you might occasionally need to log in from a URL:
•
Logging in from the Omniture Suite
•
Logging in using a URL
Logging in from the Omniture Suite
To access Discover through the Omniture Suite:
1. In a browser, go to the Omniture Web page at www.omniture.com.
2. Click Customer Login.
3. Type your company name, your username, and your password, then click Login.
4. Click the Discover icon or tab.
5. In the introduction screen that displays, click Launch Discover.
NOTE: If the Discover Unavailable page displays, either your company has not purchased Discover Licenses, or you
have not been added to the Discover License Users Group. If you see this page, contact your Omniture SiteCatalyst
Administrator to arrange access. To add users to the Discover License Users Group, see “Granting Users Access to
Discover” on page 6.
Logging in using a URL
If you log in from SiteCatalyst, you are automatically logged in to Discover. The information in this section is necessary
only if you access the Discover URL from another location, such as a link or from a favorites menu.
To log in using a URL:
1. In a browser, type the Discover URL provided to you by your Omniture administrator.
2. Type your SiteCatalyst login credentials.
3. Click OK.
Discover displays the login process indicator.
DISCOVER USERS GUIDE
7
Chapter 2 Getting Started with Discover
2.4 Configuring Display Settings
The display settings let you configure the display settings for locality and font, activate debugging output, and
configure page size and color attributes. Omniture customer support may ask you to activate this option in the event of
a problem.
To configure Discover display settings:
1. Log in to Discover.
2. Click Settings > Display Options, then configure the options on the following tabs:
•
General Settings
•
Site Analysis
General Settings
Use these options to specify languages, font, and to activate debugging.
Select a locale: Specifies the interface language.
Select a font: Specifies the interface font.
Activate debug output: Enables you to send data to Omniture ClientCare.
Site Analysis
You configure these settings for the Site Analysis report. (For more information about the Site Analyst settings,
“Running the Site Analysis Report” on page 28.)
On the Metrics tab, you can select the metrics represented by cylinder width and cylinder height, determine which
metric is displayed using color, determine the colors that represent low value and high value for that metric, establish
the metrics for the X and Y axis, and add any other metrics you want in to appear in the report’s pop-up text. You can
also invert any of the selected metrics for the display.
On the General and Alerts tab lets you enable and disable certain graphical elements of the report, and configure
alerts that display in the report when metrics associated with the pages represented by cylinders pass a specific value.
2.5 Starting a Project
A project defines the set of data that Discover imports. It is comprised of a report suite and a date range. When you
have logged in to Discover, you must create a project to define the data set you want to use. You can begin a new
project, load a saved project, or load the project that Discover automatically saves.
This section describes the following topics:
•
Opening a Project
•
Starting a New Project
•
Saving and Deleting Projects
Opening a Project
After logging in to Discover, you see a screen from which you can chose a project. If you select a new project, you can
then select the report suite and the time frame for the project. If you have saved a project, you can use the Open
Project folder to select from among your saved projects. Discover automatically saves your projects at set intervals, so
DISCOVER USERS GUIDE
8
Chapter 2 Getting Started with Discover
if your computer unexpectedly shuts down or loses power, you can click Auto Saved Project to open the project you
were most recently using.
You can click What’s New in Discover open a document that lists the new features in the latest version of Discover, and
Help Manual to open this manual.
To open a project
1. Login to Discover.
2. Click one of the following options:
•
New Project: Lets you start new project (see Starting a New Project).
•
Open Project: Opens a saved project.
•
Auto-Saved Project: Opens the most recently closed project. Projects closed before you saved them are
typically found here.
3. Click Close to close this window and go directly into Discover.
To open a saved project
1. Do one of the following:
•
When you log in, click Open Project from the project selection menu.
•
Click File > Open from the File menu.
2. Select a project and click Open.
Starting a New Project
To start a new project:
1. Do one of the following:
•
Log in, then click New Project.
•
In the Discover tool bar, click File > New.
2. Select a Report Suite.
3. Specify a date range by doing one of the following:
NOTE: The Discover default date range is from the first of the previous date to the current date.
4. Click OK.
NOTE: After you select a project, a display shows you the progress of the project as it loads. Discover times out if
the project does not load within 20 minutes.
Saving and Deleting Projects
you can save your project for later access. When you save a project, you save all open reports as well as the date
range and the report suite.
DISCOVER USERS GUIDE
9
Chapter 2 Getting Started with Discover
To save a project
1. In the File menu, click File > Save.
2. In the Save in field, type a name for your project.
3. Click Save.
To delete a project
1. Select a project from the list.
2. Click Delete.
DISCOVER USERS GUIDE
10
CHAPTER 3
Running Discover Reports
This chapter generally describes the workspace and how to run basic Discover reports.
•
3.1 Understanding the Report Workspace
•
3.2 Running a Conversion Funnel Report
•
3.3 Running a Trended Report
•
3.4 Running a Ranked Report
•
3.5 Running Comparison Reports
•
3.6 Configuring the Advanced Fall-out Report
•
3.7 Running the Next Page Flow Report
•
3.8 Running the Previous Page Flow Report
•
3.9 Running the Site Analysis Report
•
3.10 Running the Virtual Focus Group Report
See Also
•
“Configuring Existing Reports” on page 35 for information about how you can configure reports after you run
them.
•
“Report Descriptions” on page 75, in the Appendix for report descriptions.
•
“Working with Segments” on page 47 for information about segmentation.
3.1 Understanding the Report Workspace
Multiple workspaces are available so that you can compare and contrast them. Tool bars in the report headings and in
the report workspaces let you resize and adjust the reports.
Table 3.1: Workspace Icons
ICON
FUNCTION
Full screen: Displays the report in full screen.
View multiple reports: Lets you view multiple reports in the same workspace. You
can fill the entire workspace canvas, half workspace canvas (horizontally or
vertically), or a quarter of the workspace canvas to allow side-by-side report
comparisons. Additionally, you can modify reports to include or exclude graphical
and table elements. Page scrolling lets you place many reports in a single
Workspace.
When you resize the reports, Discover automatically resizes the reports to fit two to
a screen horizontally. Report load times may be slower when many reports are
included in a Workspace.
DISCOVER USER GUIDE
11
Chapter 3 Running Discover Reports
ICON
FUNCTION
Options > Granularity: You can set the columns shown in the trended reports to
show data for Day, Week, or Month. When you set the time granularity, the columns
in the graph show data for the entire period.
Options > Chart by: Lets you display values or percent values in the graph.
Resize and move: Lets you resize and move reports. When you resize the reports,
Discover automatically resizes the reports to fit two to a screen horizontally. Report
load times may be slower when many reports are included in a Workspace.
Add, name, and rename workspaces: When you add a new workspace, by
default, the workspaces are names Workspace 1, Workspace 2, and so forth. You
can change your workspace names to describe the reports you place in them. If you
close all the workspaces, you can create a new workspace by opening a report from
the reports menu.
Copy a report: Lets you copy reports to other workspaces.
Fit to screen: Lets you resize the report so that it fits the screen.
Breakdown: Lets you break down data in the table. For example, in a Visits report,
you can break down the data by clicking the icon, then clicking Visitor Profile >
GeoSegmentation > Countries to see the number of visits from each nation for
the selected day.
Search: Lets you search for words, phrases, and names.
Show: Lets you specify how many rows of data to display in the table. Previous
and Next let you jump to the next block of data. By default, Discover shows 50
items in a report table, but you can increase this to 50,000 rows in a table. If there
are more rows available but not currently displayed, you can scroll through the
additional pages.
Graph type: Lets you change the graph type to a line graph, bar chart, stacked
area graph, and so on.
Date filter: Located at the bottom of a report. This date slider by default is set at
the period from the first day of the preceding month up through the end of the
business day, two days earlier than the current day.
You can change the date range for the report by dragging the left and right bars to
the desired date.
3.2 Running a Conversion Funnel Report
Conversion Funnel reports show success rates for each of the steps in the conversion process on your Web site, as well
as averages for your conversion metrics. For example, for a Web site devoted to selling products, a Conversion Funnel
report shows the number of product views that convert to shopping cart adds and then to orders.
To run a Conversion Funnel report, navigate to any of the following reports:
•
Site Metrics > Purchases
•
Site Metrics > Cart
DISCOVER USER GUIDE
12
Chapter 3 Running Discover Reports
•
Site Metrics > Custom Events (if implemented)
•
Campaigns
•
Products
Figure 3.1: Conversion Funnel Report
Each conversion funnel report contains default metrics based on the reporting section to which it belongs. You can
change the metrics presented in these reports by clicking the Selected Events link. (See “Adding Success Events to a
Conversion Report” on page 37.)
Each conversion funnel report is divided into three basic sections:
•
Graphic Overview
•
Conversions
•
Averages
Graphic Overview
The graphic is a visual summary of the information contained in the rest of the report. This information is presented in
an image showing how many visitors proceed through the conversion steps on your Web site to the intended result
(purchase of a product, download content, view data, or another success event.)
DISCOVER USER GUIDE
13
Chapter 3 Running Discover Reports
In Figure 3.1, for example, you can see how the numbers of visits funneled down result in product orders. You can also
see the percentages representing the conversion statistics for these metrics shown on the light green bars in the
funnel. In this example 385,976 Web site visits resulted in:
•
6,770 orders
•
$4,636,898 in revenue
•
4.25% carts to orders conversion
NOTE: All averages and percentages are displayed to two decimal places.
Conversions
The Conversions section shows conversion information for all events in the graphic overview. The percentages shown
are based on only the two events surrounding the percent figure. The Revenue and Units data is displayed in the
Events column to show figures associated with other orders.
Averages
The Averages section presents various averages for the events displayed in the Overview section. For example, in
Figure 3.1 the Averages section shows averages for all statistics, including Average Revenue per Visit, Average
Revenue per Order, Average Units per Order, and Average Orders per Cart.
NOTE: Data in the conversion funnel reports indicate downward trends when they display data for the current time
period (such as the current month, current week or current day), if the current time periods are not yet completed
when you view the data, and all information for equivalent lengths of time may not have been collected. Thus, the
report might accurately represent that there are fewer visits this week than last week, but only because the rest of this
week’s statistics have yet to occur.
See Also
•
“Using Segments in Reports” on page 47
•
“Adding Success Events to a Conversion Report” on page 37
3.3 Running a Trended Report
To run a typical trended report, click Site Metrics > Page Views.
Trended reports consists of a graph and a details table. Graphs in the reports present the information in a chart, with
the vertical axis showing the items being tracked and the horizontal axis showing the timeline.
DISCOVER USER GUIDE
14
Chapter 3 Running Discover Reports
Figure 3.2: Trended Report Example
The table shows the data and the data associated with the events, the number of occurrences in the day (in this case,
the number of orders) and a percentage of the total of the selected period.
The bottom pane of the report contains a slider bar that lets you select a date range for the report. Click and drag the
slider on either side of the bar to narrow the date range. The maximum date range is determined by the dates set
when you create a project.
3.4 Running a Ranked Report
To run a typical Ranked report, click Products > Products > Brands.
The following example shows a product report with an added First Time Visitors segment, and added metrics for each
product.
DISCOVER USER GUIDE
15
Chapter 3 Running Discover Reports
Figure 3.3: Ranked Report Example
In this example, the chart shows the top five objects. Metrics can be products, categories, search engines, or other
things related to your Web site.
In the data table, you can drag segments and metrics from their panes into the table headings to display contrasts and
comparisons. (See “Using Segments in Reports” on page 47 and “Working with Metrics” on page 69.)
A Ranked has several features that you can configure. See:
•
“Configuring Existing Reports” on page 35
•
“Using Segments in Reports” on page 47
•
“Working with Metrics” on page 69
3.5 Running Comparison Reports
In ranked reports, you can compare differences between columns or for any given metric, or compare two segments of
your visitor set. You can create your own comparison report templates or select a pre-configured template.
DISCOVER USER GUIDE
16
Chapter 3 Running Discover Reports
After you create comparison templates, you can organize them similarly to how you organize segments and metrics.
(See “Creating and Organizing Segment Folders” on page 66 for more information.)
Comparison Example
You can compare product revenue for two segments of your population. Or you can compare sales for first-time visitors
to sales for loyal visitors. In Figure 3.4 sales are compared between two groups: first time visitors and loyal visitors.
When you add this comparison to a ranked product, you get a display similar to Figure 3.4:
Figure 3.4: Sample Comparison Report
For each product, the report shows the total sales for first-time visitors (A) and loyal visitors (B). The A - B Revenue
column shows the numeric difference between the two groups.
You could create a similar comparison for Web page visits. When you create a comparison, you can select visits as your
metric. If you want to see the difference in numbers of visitors referred from Google and Yahoo!, you can select those
as your segments. When you add this comparison to a ranked report that lists Web pages, you can see how many
visitors who accessed your Web pages come for each of those search engines.
If you added the second comparison to a product report, you would see for each product the number of visitors who
purchased that product that were referred from Google and the number that came from Yahoo!, along with a numeric
difference.
For information about the ways you can compare data (using percentages and normalizing) see “Creating a Custom
Comparison Report” on page 17.
This section includes the following topics:
•
“Creating a Custom Comparison Report” on page 17
•
“Running a Comparison Report” on page 18
•
“Running a Pre-Configured Comparison Report” on page 19
Creating a Custom Comparison Report
You can create and save a comparison to use as a template. Comparisons that you create are saved in the Favorites
folder.
To create a custom comparison report:
DISCOVER USER GUIDE
17
Chapter 3 Running Discover Reports
1. In the Comparison group, click Comparison Builder.
2. On the Comparison Builder, configure the following fields:
Name: The name of your comparison report. You can also locate an existing or pre-configured comparison report
template (see “Running a Pre-Configured Comparison Report” on page 19).
Comparison type: The type of comparison you want to build. You can select
•
Difference (B-A): A numeric comparison that shows simple differences in the total metric counts. The report
shown in Figure 3.4 is an example of this type of comparison.
•
% Difference ((B-A)/A): A difference that changes the numeric value into a percentage. For example, if
revenue for a product for loyal visitors is $1000 and the revenue for first-time visitors is $900, the percentage
difference is 10 percent.
•
% Difference Normalized ((B-A)/A): Normalizes the data, which means that it takes numeric differences
into account before calculating the percentage. For example, 1000 purchasers from one location may have
purchased $10,000 worth of products, while 500 purchasers from another place may have purchased $8,000
worth of products. The purchasers from the first location purchased an average of $10 per purchaser while
purchasers from the second place purchased an average of $16 per purchase. A standard percentage
difference shows that the first location has 20 percent more revenue in total, but a normalized percentage
difference shows that each purchaser from the second location purchased 37.5 percent more product.
Metric to compare: The metric you want to compare between reports. You can browse to select a metric.
Segment A: One of two segments you want to compare.
Segment B: One of two segments you want to compare.
3. Click Save As, then click OK.
Running a Comparison Report
You can run a comparison report from a saved (or pre-configured) template, or run a new report without saving it.
To run a comparison report:
1. Right-click anywhere in the table heading of a ranked report, then click Compare Columns.
2. On the Comparison Builder window, create a comparison (see Creating a Custom Comparison Report) or locate an
existing one.
3. Click OK.
DISCOVER USER GUIDE
18
Chapter 3 Running Discover Reports
Running a Pre-Configured Comparison Report
Discover has several default comparisons in the Pre-Configured folder. Each of these uses first-time visitors and loyal
visitors as the segments. You cannot delete the Pre-Configured folder.
To run a pre-configured comparison:
1. Right-click anywhere in the table heading of a ranked report, then click Compare Columns.
2. On the Comparison Builder window, click Load Comparison next to the Name field.
3. On the Load Comparison window, select one of the following values:
Revenue Difference: A numeric comparison that uses revenue for the metric.
Revenue Normalized: A normalized comparison that uses revenue for the metric.
Visitors Difference: A numeric comparison that uses visitors for the metric.
Visitors Normalized: A normalized comparison that uses visitors for the metric.
4. Click OK.
5. On the Comparison Builder window, click OK.
3.6 Configuring the Advanced Fall-out Report
The Fall-Out report allows you to track your visitors’ fall-out points during the buying process. You select a beginning
point and a conclusion point, then add intermediate points to create a Web site navigation path.
The report displays percentages of people who navigated from the start point to the end point (conversions) and
locations where people left your Web site before to arriving at the conclusion point (fall-out). You can also see a
trended path that shows you a graph of your fallout over a specific period. You can set single Web pages as the report
checkpoints, or you can create groups of pages as your checkpoints. You can also use categories that you configure in
SiteCatalyst as checkpoints in your report.
•
Assigning Pages to the Fall-out report
•
Using Groups and Categories
Assigning Pages to the Fall-out report
Initially, the Fall-out report shows a cone with two spaces that read: Drag and Drop Page Here. In this window, you
need to add pages, servers, or site sections.
To assign pages to the Fall-out report:
1. From the Menu, click Paths > Pages > Pages Fall-out.
2. Click Show.
3. Do one of the following:
•
Enable the Begin with All Site Visits to automatically add all visits to the first drag and drop area.
•
Drag a start page from the Checkpoint Selector list to the first drag and drop area.
DISCOVER USER GUIDE
19
Chapter 3 Running Discover Reports
Figure 3.5: Apply Pages to Fall-out Screen
4. Drag the destination page onto the second drag and drop area.
A slider displays as shown in Figure 3.6. The red box to the right of the slider displays the top five pages that users
clicked immediately after clicking the home page (or whatever page you place in the first drag and drop area.)
5. Click the arrow.
A box displays that shows the top five pages seen after the page directly above the arrow for users who eventually
went on to access the destination page.
DISCOVER USER GUIDE
20
Chapter 3 Running Discover Reports
Figure 3.6: Select a Continuing Page
Top five pages accessed after the initial page.
A slider bar icon shows the ratio of users who exited the Web site prior to accessing the destination page.
Click this bar to show the top five continuing pages.
Shows the top five next pages that were accessed by users who went on to access the destination page.
Shows the highest and lowest daily conversion percentages for the selected time frame.
6. To display a new intermediate page in the report do one of the following:
•
Check a box next to a continuing page in the list, and then click Update. Click multiple boxes to group these
pages together.
•
Drag another page from the checkpoint selector to a location between, before, or following an existing page.
NOTE: When you group pages together, the Group Editor tool displays. To use this, see “Using Groups and
Categories” on page 22.
DISCOVER USER GUIDE
21
Chapter 3 Running Discover Reports
Figure 3.7: Intermediate Page
7.
Click the new slider bar icon to access another list of continuing pages.
Continue to add intermediate pages, or groups of pages until you reach your destination page.
8. To remove a page, right-click a page name, then click Remove from the menu.
To change trending information
1. To change the trended metric from number of conversions to number of fallouts, and vice-versa, right click any
blue area on the report and click the appropriate option from the menu.
2. The green and red arrows show the high and low conversion values for the time period.
To see the conversion number for a specific date, place your mouse pointer over a point on the trend graph. A popup text shows the date and the conversion number for that day.
Figure 3.8: Trend Graph Line
Using Groups and Categories
Rather than using a single pages in your report, you can group multiple pages, or you can use categories for starting,
intermediate, or destination location in the Fall-out report. You can edit groups from the main menu, or from within the
DISCOVER USER GUIDE
22
Chapter 3 Running Discover Reports
report. Categories that you have created in SiteCatalyst also appear in the Checkpoint Selector list. Figure 3.5 shows a
report with groups displayed in the Checkpoint Selector.
To create a group
1. From the Main tool bar, click View > Group Manager.
2. In the Group Manager, click New.
3. In the Group Editor, type a name for the new group.
4. Highlight the pages you want to add to the new group, and than click the arrow buttons to add then to or remove
them from the group.
5. Click OK.
To edit a group
1. From the Main tool bar, click View > Group Manager.
2. In the Group Manager, select a group from the list, and then click Edit in the upper -left of the window.
3. Use the Group Editor to edit your group.
To edit groups from within a Fall-out report
1. After a group has been added to a report, right-click the group name in the report, and then click Edit from the
pop-up menu.
2. Use the Group Editor to edit your group.
Edited groups have immediate effect in your reports.
3.7 Running the Next Page Flow Report
You can find where your visitors went after coming to your home or landing page. You can see the top pages accessed
immediately following any page you select. You can then do the same for subsequent pages to create a Web page tree.
This report shows the 10 most popular subsequent pages for each page you select by default. You can modify this
number. You can use it to see popular flow paths in your Web site and learn about the general navigation habits of your
visitors.
Features of the report let you zoom into and out of the report, and fit the report to the size of the screen. You can also
apply segments to the report to filter it to your specifications.
•
Accessing the Next Page Flow Report
•
Working with the Next Page Flow Report
•
Other Features Available with Next Page Flow
Accessing the Next Page Flow Report
To access the Next Page Flow report:
1. From the Reports menu, click Paths > Pages > Next Page Flow.
2. Click Select Page to begin your report.
3. In the Select Page window, do one of the following:
•
Select a page from the list.
DISCOVER USER GUIDE
23
Chapter 3 Running Discover Reports
•
Type a page name in the search field if you do not see your page immediately in the list of available pages.
4. Select a number from the Number of branches menu.
This shows how many branches of subsequent pages display in your report. You can select from three to ten
branches.
5. Click OK.
Working with the Next Page Flow Report
After you run the report, you can follow any branch further to see additional branches. The report flows from left to
right across the screen.
Figure 3.9: Next Page Flow Report
As the size of the report increases, you can click Zoom In, Zoom Out, and Fit to Screen to adjust the size of the report
in your window. You can click Clear Screen to begin a new report.
To expand branches
1. Click any underlined object in the report to expand it.
As you place your cursor over an object, the report displays information about the object in a pop-up display. The
most recently clicked object is highlighted in green.
2. Click an expanded object to close the branches.
DISCOVER USER GUIDE
24
Chapter 3 Running Discover Reports
Figure 3.10: Expanded Pages
To search displayed text
1. Type a string in the search field.
The search searches for matching words. For example, typing the letter a in the search field matches all pages
where any word begins with the letter a. Matching objects are highlighted in pink.
Figure 3.11: Marked Pages from Search
DISCOVER USER GUIDE
25
Chapter 3 Running Discover Reports
To reposition the report
Click any white space in the report and drag it to reposition the report.
Other Features Available with Next Page Flow
Additional features you can use with the Next Page Flow report are described in the following sections.
FEATURE
DESCRIPTION
Dynamic Date Filter
You can use the dynamic date filter at the bottom of the
report to adjust the dates for which you want to display
data.
Zoom In/Out
You can right-click your mouse to zoom in and out of the
report, or click the Zoom In or Zoom Out buttons.
Segments
The Next Page Flow report lets you use segments that apply
to only this report. You can drag a segment from the
segment pane to the report’s Segment drop space to filter
the report. If a segment is also in the Segments drop box in
the work space, both segments are applied.
• Press Ctrl while dragging a second segment to combine
segments.
• Drag the All Visits segment to see all data.
Viewing General Data for
Segments
When you hover your mouse cursor over the segment
name, a small display shows you the general amount of
segmented data as compared to the whole for Page Views,
Visits, and Visitors.
3.8 Running the Previous Page Flow Report
The Previous Page Flow report is identical to the Next Page Flow report except that rather than showing a subsequent
page, it shows the pages from which the visitor came. For a detailed explanation of this report, see “Running the Next
Page Flow Report” on page 23.
To run the Previous Page Flow report, click Paths > Pages > Previous Page Flow.
DISCOVER USER GUIDE
26
Chapter 3 Running Discover Reports
Figure 3.12: Previous Page Flow Report
DISCOVER USER GUIDE
27
Chapter 3 Running Discover Reports
3.9 Running the Site Analysis Report
To run the Site Analyst report, click Paths > Site Analysis.
Figure 3.13: Site Analysis
The Site Analysis report displays cylinders that represent your Web pages, with size, color and other graphical data
showing you page metrics. By default, it is configured with the following information:
•
Cylinder Width: Number of page views.
•
Cylinder Height: Number of visits.
•
Color: Average Page Views per Visit.
DISCOVER USER GUIDE
28
Chapter 3 Running Discover Reports
•
X-Axis: Average Page Views per Visit.
•
Y-Axis: Average Page Views per Visit.
•
Invert: Average Page Depth.
•
Color: Average Page Views per Visit
You can modify each of these metrics.
The report shows 11 pages by default, but can display up to 25. The default 11 pages are selected as follows:
•
The three most common site entry pages.
•
The five most popular pages.
•
The three highest converting pages.
The three highest converting pages (the same as the x-axis default metric) are calculated using the number of visits
that participated in an order event divided by the total visits that viewed the page.
If one of the top five most popular pages is also one of the top three entry pages, the report only shows one cylinder
for that page.
•
Configuring the Site Analysis Display Settings and Alerts
•
Adding Pages to the Site Analysis Report
Configuring the Site Analysis Display Settings and Alerts
In the Legend, click the Edit Settings to show the Site Analysis Display Settings tool. It has two tabs:
•
The Metrics tab
•
The General and Alerts tab
Metrics Tab
Using the Metrics tab, you can select the metrics represented by cylinder width and cylinder height, determine which
metric is displayed using color, determine the colors that represent low value and high value for that metric, establish
the metrics for the X and Y axis, and add any other metrics you want in to appear in the report’s pop-up text. You can
also invert any of the selected metrics for the display.
General And Alerts Tab
The General and Alerts tab lets you enable and disable certain graphical elements of the report, and configure alerts
that display in the report when metrics associated with the pages represented by cylinders pass a specific value.
Animation on: Enables or disables the animation for the arrows that display movement and direction.
Show grid: Enables or disables the report grid.
DISCOVER USER GUIDE
29
Chapter 3 Running Discover Reports
1. To configure alerts, click Add.
2. Type a new name for the alert.
3. Select an alert metric from the menu.
4. Establish your Condition:
a. Select Greater than or Less than logic from the If value is menu.
b. Type a value in the field to the right of the logic menu.
5. Choose your icon to go with this Alert, either
select passes the metric value you set.
or
. The icon displays in the report when the metric you
6. Click OK.
7.
To edit an existing alert, select the alert name in the General and Alerts settings, then click Edit.
8. To delete an alert, select the alert name in the General and Alerts settings, then click Edit.
Adding Pages to the Site Analysis Report
To Add pages to the Site Analysis Report:
1. Click Page Selector.
2. Select one or more pages from the Available Items list, and use the arrows to add them to the Selected Items list.
DISCOVER USER GUIDE
30
Chapter 3 Running Discover Reports
Figure 3.14: Page Selector Tool
3. Use the reverse process to remove pages from the report.
4. To search for a page, type a character string in the field in the Available Items list, and then click Go.
Only pages containing that character string display in the list.
5. Click Clear to show all available pages in the Available Items list.
6. Click OK.
Adding Segments
In the Site Analysis report, you can add segments that pertain to this report. The method for adding segment to this
report is identical to the method described for the Next page Flow report. See “Working with Segments” on page 47.
Viewing Data Displays
When you place your mouse cursor over any cylinder in the report, the Site Analysis report shows a display a that lists
the exact values for the page’s metrics. You can add metrics to this display when you configure the report. See
“Running the Site Analysis Report” on page 28.
DISCOVER USER GUIDE
31
Chapter 3 Running Discover Reports
Navigating the Site Analysis Report
The navigation control panel gives you several tools that you can use to adjust the position of the Site Analysis report.
Figure 3.15: Navigation controls
Collapse/open arrows: Collapses and expands the Controls display.
Fit To Screen: Sizes the report so all data fits on the screen.
Zoom Controls: move the slider to zoom in and out of the report.
Pan Arrows: Moves the report in the direction the arrow points.
Aerial View: Shows the report from directly above it at a 90 degree angle.
Relevancy Slider: Move the slider to dim or enhance the arrows that connect the cylinders.
Grid Toggle: Enables and disables the grid display.
Adjusting Report Position with the Mouse
You can use your mouse to reposition the Site Analysis report:
•
Zoom in and out with the mouse wheel.
•
Rotate the report by grabbing and dragging it with the mouse.
•
Move the report by clicking both mouse buttons and dragging it.
•
Hover your cursor over a cylinder to see metric values for the page.
•
Click a cylinder zoom in on it.
•
Right-click a cylinder to see a menu that lets you:
•
Remove the cylinder
•
Edit the report display settings. (See “Configuring the Site Analysis Display Settings and Alerts” on page 29.)
•
Access one of four reports:
Next page flow: See “Running the Next Page Flow Report” on page 23.
Previous page flow: See “Running the Previous Page Flow Report” on page 26.
Referring Domain: See “Referring Domains Report” on page 90.
Fall-out: See “Running the Previous Page Flow Report” on page 26.
3.10 Running the Virtual Focus Group Report
The Virtual Focus Group report shows the site path taken by a randomly selected visitor. The report shows:
DISCOVER USER GUIDE
32
Chapter 3 Running Discover Reports
•
Each page the visitor accessed
•
The order in which the pages were accessed.
•
The time spent on each page.
•
The top five previous and next pages for each page
•
Atable with metric data about the visit
You can run a slide show of the pages, increase the speed of the slide show, and scroll through the pages manually.
You can also click any metric in the table to see another visit with that metric value.
You can use segments with the virtual focus group to see visit experiences for specific groups. For example, if you
create a segment for visitors that saw a specific error page, you can see how your visitors got to the error page.
When used in combination with Omniture Survey, you can see visit experiences for visitors who answered a survey
question in a certain way.
To run the Virtual Focus Group report
Click Paths > Virtual Focus Group
DISCOVER USER GUIDE
33
Chapter 3 Running Discover Reports
Click the icon next to the metric in the metric list to see a new visit from another visitor with the same attribute. You
can lock in as many metrics as you want.
New Visit: Displays an additional visit from a visitor with the selected metric attributes.
Save: Saves the current visit for future reference
Open: Lets you access a list of saved visits.
Selecting Metrics
The Virtual Focus Group report lets you select the metrics you want in your report through the use of segments. You
can drag a segment to the segment drop box, or to the segments link at the top of the report. If you add a segment to
the drop box, it applies to all reports in the work space, if you add it to the link, it only applies to the current report.
You can add a preconfigured segment, or you can customize a segment for use in the report. For example, if you want
to focus on visitors who looked at a specific product, you can configure a visits with product metric to include the
product, then apply it to the report.
See “Using the Segment Builder Tool” on page 56 for more information.
DISCOVER USER GUIDE
34
CHAPTER 4
Configuring Existing Reports
This chapter describes how to configure Discover reports.
•
4.1 Updating a Project Time Period
•
4.2 Breaking Down Table Data
•
4.3 Breaking Down Graphical Data
•
4.4 Adding Success Events to a Conversion Report
•
4.5 Configuring Report Columns
•
4.6 Changing Reports
•
4.7 Copying Data to the Clipboard
•
4.8 Creating a Segment from a Row
•
4.9 Extracting Visitor IDs
•
4.10 Configuring Column Properties
•
4.11 Trending a Row
•
4.12 Sorting Columns
•
4.13 Configuring Data Delivery Options
•
4.14 Creating Scheduled Deliveries
•
4.15 Managing Scheduled Reports
For information about adding metrics to a report, see “Working with Metrics” on page 69.
4.1 Updating a Project Time Period
You can update a project’s time period by changing the time period rather than creating a new project with a new time
period. The time change is reflected in all of the reports in the project.
To update a project time period:
1. Click File > Change Project Dates.
2. Specify a date range, then click OK.
4.2 Breaking Down Table Data
Certain reports let you break down the table data so that you can see sub-related data in the report.
To break down table data, click the Breakdown icon.
DISCOVER USER GUIDE
35
Chapter 4 Configuring Existing Reports
Figure 4.1: Expand to Reveal a Sub-report
In this example, the laptop product is being expanded to show a search engine sub-report. The resulting report shows
the search engines that users who purchased laptops used to access your Web site.
Figure 4.2: Sub-Report Data
The default report shows the revenue generated, but data accessed via this method is also available for added metrics
and segments. As shown in Figure 4.2, the laptop product has been expanded to reveal the search engine data.
Additionally, an added metric shows the data for first time visitors.
You can expand each search engine object in a similar way to see additional sub-reports.
DISCOVER USER GUIDE
36
Chapter 4 Configuring Existing Reports
4.3 Breaking Down Graphical Data
You can break down the graphical areas of a pie chart to see sub-related pie charts. Whether you expand your data
from the table or in the graphical area, the information displays in the table and the graphical area.
To break down graphical data:
1. In a ranked report, right-click the portion of the pie you wish to segment.
2. Select the information you want to see from the menus.
A second pie chart displays. You can also break this chart down. (You cannot expand the all others part of the pie
chart.)
4.4 Adding Success Events to a Conversion Report
You can add or change the success events (Selected Events) that are displayed in your Conversion reports. Adding
success events lets you see more than just the default metrics contained in each reporting section.
For example, the Purchases Conversion report shows data for visits, carts, orders, revenue, and units by default. You
can add additional events to this report, such as checkouts, or other events that are part of the conversion process.
You can also add custom events. Additionally, you can select the order in which the events display in the overview
section to see different combinations of conversion events.
To add success events:
1. In the report, click Selected Events.
2. In the Metric Selector, select and arrange the available metrics.
3. Enable the Order Event Attributes:
Display Revenue Associated with Orders: Shows the revenue in the Overview and Averages sections of the
report, based on the orders that were placed.
Display Units Associated with Orders: Shows the Units metric in the Overview and Averages sections of the
report, based on the orders that were placed.
DISCOVER USER GUIDE
37
Chapter 4 Configuring Existing Reports
NOTE: The revenue and unit associations might not be relevant if the orders metric (or another metric that is
associated with revenue and units) is removed from the report.
Because you often have many more visits than orders, the funnel shape of the Conversions & Averages graph
shows how the more common events funnel down to those that are less common. So, to accurately see how the
events with larger statistics translate to those with smaller numbers, you should order your events as they occur in
the purchasing process. Additionally, because Discover lets you use any metric in this type of report, you can
combine metrics and customize the report to find unique relationships between the metrics.
4. Click OK.
4.5 Configuring Report Columns
To configure report columns:
1. Right-click a column heading the table of the report to see an options menu.
2. Select an available option:
Lock Table Width: When columns are added, Discover resizes all columns to fit the width of the table.
Chart Column: Shows the selected column in the pie chart.
Compare Columns: Lets you contrast the values between two columns of your report. When you select this
option, the Comparison Builder lets you configure the comparison. (See “Running Comparison Reports” on
page 16.)
Remove Columns: Lets you remove the selected columns from the report.
Edit Segment: Displays a tool that lets you define specifics for the selected segment. (See “Segment Builder” on
page 50.)
Select Metrics: Displays a tool the lets you add multiple metrics to a segment column. (See “Working with
Metrics” on page 69.)
Extract Customer IDs: Displays a took that lets you make a data warehouse request to see the exact customer
IDs. (See “Extracting Visitor IDs” on page 40.)
4.6 Changing Reports
For ranked reports, you can change the report to a different type of report while preserving the segments, metrics, and
comparisons that you set up in the original report. This expedites the process of gathering data, because there is no
need to segment and configure successive reports.
If you want to retain the original report for comparison, you can copy the report before you change to the new report.
(See “Understanding the Report Workspace” on page 11.)
To change a report:
1. Open and modify a ranked report.
DISCOVER USER GUIDE
38
Chapter 4 Configuring Existing Reports
2. Right-click the report name heading in the table, then use the menus to select the report you want.t
4.7 Copying Data to the Clipboard
You can copy data in the table of a ranked report to the clipboard. You can then paste this data in a spread sheet or
another application.
To copy data to a clipboard:
1. Use your keyboard keys (on Windows, Shift and Ctrl) to select the data you want.
2. Right-click inside the shaded data, and then click Copy to Clipboard from the menu.
4.8 Creating a Segment from a Row
In ranked reports, you can create a segment from a row of data. This can be useful for quickly examining data about a
specific group. For example, in a Product report, you can select a specific product and make a segment from it. Then,
if you want to see what search engines referred people who bought a specific product, you can add a metric to a
report, or change reports to the search engines report. (See “Changing Reports” on page 38.)
To create a segment from a row, click a row and drag it to the column heading.
DISCOVER USER GUIDE
39
Chapter 4 Configuring Existing Reports
4.9 Extracting Visitor IDs
In SiteCatalyst, you can set a field to contain user ID data. If you configured this option in SiteCatalyst, the Extract
Visitor IDs option becomes available. If you do not enable this option in SiteCatalyst, but you decide to enable it later,
you cannot go back and extract historical visitor IDs.
To extract visitor IDs:
1. Use a segment to create a filter.
2. Right-click the filter and select Extract Visitor IDs.
3. Type the filter name.
4. In the Data Warehouse screen that displays, click Request Report.
4.10 Configuring Column Properties
You can change the look and color of your columns with the Column Properties function.
1. Right-click a column heading.
2. Choose Column Properties.
In the table cells of a ranked report there are bar graphs that graphically display the numbers shown in the table.
By default, ranked report tables display numeric values, percentage totals, and bar graphs that represent the
values.
Behind number: Places the table graph before the number in the cell.
Behind percent: Places the table graph before the percent in the cell.
Full width: Extends the bar across the table cell.
3. Click OK.
DISCOVER USER GUIDE
40
Chapter 4 Configuring Existing Reports
4.11 Trending a Row
When viewing a ranked report, such as a products report, you can see the trend data for a value you pick. For
example, you can see that a product made $10,000 in gross revenue for the selected time period. If you want to see
how much revenue that product generated for each day of the time period, you can show a trend graph for the
product, or open a separate trended report.
To trend a row:
1. Open a ranked report.
2. Click the trend icon
to see a small pop-up graph of the trend.
Figure 4.3: Trend Graph
3. Click Launch Trend Report to see a full report for the data.
4. Alternately, right-click the cell, and click Trend Cell to see the trend report for the row.
NOTE: Multiple cells can be applied to a single trend report by selecting multiple cells before right-clicking and
selecting trend cell.
4.12 Sorting Columns
You can sort on any column, up or down. The default sort is descending, keyed on your initial segment.
To sort columns:
1. Click anywhere in the bar that displays sort icon ( ) in a column heading.
If you clicked any column other than the default key column, the arrow changes color and all items in each column
are re-sorted, keyed to that column’s rankings.
2. Click the same column again to reverse the sort to ascending.
DISCOVER USER GUIDE
41
Chapter 4 Configuring Existing Reports
3. Click another column to reassign the sorting key to this new column.
4.13 Configuring Data Delivery Options
You can send your information as displayed in the currently selected report to the file destination you select. You can
send it one time or set up a delivery schedule, and specify the file format you prefer. You can create and send a digital
signature to assure the receiver of the file that it is authentic. You can send the file to an email address or upload it to
an FTP server.
You can also set up a delivery schedule to automatically send reports to an email address or an FTP server. These can
occur for a selected period and are generally sent on the first day of the following period, but will not be sent any later
than the morning of the second day. You can modify or stop these scheduled deliveries at any time. See “Managing
Scheduled Reports” on page 45.
WARNING: When a user account is disabled, any scheduled report deliveries created by that user are suspended.
To send a report via email or FTP
1. Open any report.
2. Click Delivery Options.
or press Ctrl + D.
3. Select the file format.
DISCOVER USER GUIDE
42
Chapter 4 Configuring Existing Reports
a. To specify email, click Email, then type the email information:
i.
Type the recipient’s email address.
ii.
Type a subject.
iii. Type a body text message.
b. To specify FTP, click FTP, then type the FTP server information:
i.
Type the host URL or data.
ii.
Type the port number. Discover uses the default if no number is included.
iii. Type the directory path on the server where you want to place the data.
iv. If applicable, type a user name and password to access the FTP server.
v.
(Optional) Select the menu option and type an email address to send a confirmation email, or the report.
4. Select the scheduling value.
If you select Monthly, Quarterly, or Yearly, the report is sent on the first day of the next period for the previous
period. Your options are:
•
Send Now
•
Daily
•
Weekly (Starting Monday)
•
Monthly
•
Quarterly
•
Yearly
NOTE: Occasionally, when dealing with large data transfer delays may cause data for the last one or two days of a
reporting period to be unavailable on the first day of the period. If this occurs, your report may be delayed until the
second day of a period.
5. Click Send.
DISCOVER USER GUIDE
43
Chapter 4 Configuring Existing Reports
To use the advanced formatting options
1. In the Delivery Options screen, click Advanced.
2. Type a name for the file and add optional comments.
3. Select Append date to file name to automatically put the date of the report on the end of the file name.
4. Select a language for the report. You can send the report in any of the following languages regardless of the
language that you use:
•
English
•
Spanish
•
Simplified Chinese
•
Traditional Chinese
•
French
•
German
•
Japanese
If you want to use a specific encoding type for the language you select, select it from the menu.
5. (Optional) Enable the box to compress or zip the file.
6. (Optional) Enable the box to create a digital signature to be sent with the email.
4.14 Creating Scheduled Deliveries
You can customize the delivery schedule to stop the delivery at a certain time, or specify the number of times you want
to send a report. When you do this, the settings override the settings you chose in the Report Range and Delivery
Schedule pane of the Delivery Options report.
DISCOVER USER GUIDE
44
Chapter 4 Configuring Existing Reports
To create a delivery schedule:
1. In the Delivery Options screen, click Custom.
2. Select a report time span from the menu.
This may differ from the delivery schedule. It gives a period to date report. For example if you select month for the
report time span, and week for the delivery schedule, Discover sends you a month-to -date report each week of
the month. Additionally, the date range to the right of the field shows you an example of what the date range for
the next report will be.
3. Select a delivery schedule option from the menu. These correspond to the options in the Delivery Options screen.
4. Select a option to end delivery:
•
Select Never to send the report indefinitely.
•
Click the End After option, and then type the number of times you want to send the report before stopping.
•
Click End By and type a date or use the calendar tool to select a date when you want the Discover to stop
sending the report.
4.15 Managing Scheduled Reports
You can use edit or delete scheduled reports that are automatically delivered to an email account or an FTP server. To
create schedules, see “Configuring Data Delivery Options” on page 42.
To edit schedules:
1. From the menu, click View > Schedule Manager.
2. Click a schedule to highlight it.
3. Click the Edit tab to change the schedule.
See “Configuring Data Delivery Options” on page 42.
DISCOVER USER GUIDE
45
Chapter 4 Configuring Existing Reports
4. Click the Delete tab to remove the schedule.
5. If a report is open, click New to create a new schedule for the report in focus.
NOTE: Schedules for automatic report delivery are removed automatically if the user who created the schedule is
removed from the list of Discover users.
DISCOVER USER GUIDE
46
CHAPTER 5
Working with Segments
Omniture Discover uses segments to let you to quickly access information based on specific characteristics of visitors.
For example, you can create segments that display data for anything from visitors in specific age ranges to visitors who
used specific payment methods. Other possibilities include:
•
Visitors who searched for specific products
•
Visitors who accessed the site following a specific ad campaign
•
Visitors with various operating systems and Web browsers
•
Visitors who removed items from their online shopping carts.
Discover provides several pre-configured segments that you can use or edit. Segments can also be created using the
Segment Builder, the Advanced Segment Builder, or different functions of Discover such as the Virtual Focus Group
report.
Creating segments with more complex requirements is also possible via the Advanced Segment Builder wizard. Each of
these Segment Builders discussed in this section.
•
5.1 Using Segments in Reports
•
5.2 Understanding Built-in Segments
•
5.3 Using the Segment Builder Tool
•
5.4 Using the Advanced Segment Builder
•
5.5 Using Segment Folders
5.1 Using Segments in Reports
You can use segments in reports in two ways. You can add a segment as a column to a report, or you can apply a
segment to a report workspace. This section describes the following topics:
•
Adding a Segment as a Column
•
Applying a Segment to the Entire Workspace
Adding a Segment as a Column
All reports let you add segments as columns, which lets you compare data for different segments. For example, in the
a Revenue report, you can add the First Time Visitors segment to your report and compare the revenue from first time
visitors to total revenue.
After you add a Segment column to a report, you can add metric columns to the newly-added segment column. If you
add the same metric to the new column and the existing ones, you can compare data for various segments. For
example, you can add an Orders column in the All Visits column, and also put it in the First Time Visitors column to
compare the number of orders for each group.
You can also combine segments in a column by dragging the segment into a column heading. For example, you can
combine First Time Visitors with Visits Referred by Google to see all first time visitors that came from Google.
To add a segment as a column
1. Open any report.
DISCOVER USERS GUIDE
47
Chapter 5 Working with Segments
2. Drag a segment from the Segments pane to the heading of the report.
You can place it to the left, to the right, or between any columns in the report. A blue indicator shows you where
the column displays.
Figure 5.1: Adding a Segment Column
3. Drag additional segments into the column heading to combine the segments.
Applying a Segment to the Entire Workspace
You can apply a segment to the entire workspace, and it affects all reports in the workspace. For example, in a Visits
report, you can apply the Purchasers segment to the workspace and the All Visits column displays only the visits for
purchasers. If you place another segment column in the report, such as the Visits Referred by Google segment, the
column displays a combined segment for purchasers who were referred by Google. Segments applied affect only a
single workspace. Reports in additional workspace tabs are not affected.
To apply a segment to a workspace
1. Drag a segment from the Segments pane to the segment drop box.
The box is entitled Drop segment here to filter workspace.
DISCOVER USERS GUIDE
48
Chapter 5 Working with Segments
Figure 5.2: Apply a Segment to a Workspace
2. Press the Ctrl key to combine segments.
3. To remove a segment, click the garbage can icon that displays after you add a segment.
4. To customize the segment, click the modify segment icon that also displays when you add a segment. (See
“Adjusting Pre-configured Segment Properties” on page 57.)
5.2 Understanding Built-in Segments
You use segments to filter or limit the data from a larger body of data. For example, if the original data is set to all
visits, but you only want to see visits that are referred by a search engine, you can apply the Visit Referred by a Search
Engine segment to remove those that came, for example, directly to your site by a link from your email campaign and
others that were not referred by a search engine.
The following discussion summarizes each of the pre-configured segments that are included with Discover. After
analyzing these segments, you might think of other variations that you can create using the powerful Segment Builder
and Advanced Segment Builder tools. (See “Using the Segment Builder Tool” on page 56.)
The following describes the values that you can change or adjust within the Segment Builder or the Rule Builder in the
Advanced Segment Builder. Several of the pre-configured segments have their success events set in SiteCatalyst; for
example the Order segment. Therefore, purchasers and non-purchasers are defined in Discover using the success
events in SiteCatalyst.
DISCOVER USERS GUIDE
49
Chapter 5 Working with Segments
NOTE: Because you can alter the default settings and values of all segments, these descriptions may not accurately
reflect segments that have been altered.
•
“First Time Visitors” on page 50
•
“Loyal Visitors” on page 50
•
“Non-Purchasers” on page 51
•
“Purchasers” on page 51
•
“Single Page Visits” on page 52
•
“Visitors with Campaign Tracking Code” on page 52
•
“Visitors with Persistent Cookies” on page 52
•
“Visits from Paid Search” on page 53
•
“Visits referred by Google” on page 53
•
“Visits referred by Yahoo!” on page 54
•
“Visits referred by MSN” on page 54
•
“Visits referred by Microsoft Live” on page 54
•
“Visits that Contain Pages” on page 55
•
“Visits with No Referrer” on page 55
•
“Visit with Ordered Product” on page 56
•
“Visit with Product” on page 56
First Time Visitors
Description: View data for visitors that have visited a maximum of [1] times.
Segment Builder
A slider is used to set the number of times a visitor can visit and still be considered a first time visitor. The default value
is 1.
Advanced Segment Builder
Container: Visits
Include canvas logic: Uses the Include canvas
Statement: Visit number equals 1
Rule Builder Data
Name: Visits
Match: All of the rules
Rule List: Visit number equals 1
Loyal Visitors
Description: View data for visitors that return more than, or equal to, the amount of times set below.
DISCOVER USERS GUIDE
50
Chapter 5 Working with Segments
Segment Builder
A slider is used to set the number of times a visitor must visit before considered a loyal visitor. The default value is 2.
Advanced Segment Builder
Container: Visit
Include canvas logic: Uses the Include canvas
Statement: Visit Number is greater than 2
Rule Builder Data
Name: Visit
Match: All of the rules
Rule List: Visit number is greater than 2
Non-Purchasers
Description: View data for visitors that have not participated in an order event.
Segment Builder
A slider is used to set the number of times a visitor has not participated in an order event. The default value is 2.
Advanced Segment Builder
Containers: Visitor holding Orders
Include canvas logic: Uses the Exclude canvas
Statement: An orders event has not occurred.
Rule Builder Data (edit rule)
Name: Orders excluded
Match: All of the rules
Rule List: An orders event has not occurred.
Purchasers
Description: View data for visitors that have participated in an order event.
Segment Builder
This segment cannot be adjusted in the Segment Builder. If a visitor has participated in an order event, then that
visitor is a purchaser.
Advanced Segment Builder
Containers: Visitor container holding an undefined Orders event
Include canvas logic: Uses the Include canvas
Statement: Orders is not defined.
Rule Builder Data (edit rule)
Name: Orders
DISCOVER USERS GUIDE
51
Chapter 5 Working with Segments
Match: All of the rules
Rule List: Orders is not defined.
Single Page Visits
Shows data for visitors who only viewed one page in your Web site in a single visit.
Segment Builder
This segment cannot be adjusted in the Segment Builder.
Advanced Segment Builder
Container: Visit
Include canvas logic: Uses the Include canvas
Statement: Persistent Cookies equals 1
Rule Builder Data (edit rule)
Name: Visitor
Match: All of the rules
Rule List: Persistent Cookies equals 1
Visitors with Campaign Tracking Code
View data for visitors that have that have responded from a selected campaign tracking code.
Segment Builder
A drop-down window allows you to select from current Campaign Tracking Codes. The default value is <top listed
code>.
Advanced Segment Builder
Container: Visitor
Include canvas logic: Uses the Include canvas
Statement: Tracking Code equals <code name>
Rule Builder Data (edit rule)
Name: Visitor
Match: All of the rules
Rule List: Tracking Code equals <code name>
Visitors with Persistent Cookies
This segments for only users that have a persistent cookie from your Web site.
Segment Builder
This segment cannot be adjusted in the Segment Builder.
DISCOVER USERS GUIDE
52
Chapter 5 Working with Segments
Advanced Segment Builder
Container: Visitor
Include canvas logic: Uses the Include canvas
Statement: Persistent Cookies equals 1
NOTE: To see users without persistent cookies, place this in the exclude canvas.
Rule Builder Data (edit rule)
Name: Visitor
Match: All of the rules
Rule List: Persistent Cookies equals 1
Visits from Paid Search
This segments for only users that have a persistent cookie from your Web site.
Segment Builder
This segment cannot be adjusted in the Segment Builder.
Advanced Segment Builder
Container: Visitor
Include canvas logic: Uses the Include canvas
Statement: Paid Search equals 1
NOTE: To see users without not from a paid search, place this in the exclude canvas.
Rule Builder Data (edit rule)
Name: Visitor
Match: All of the rules
Rule List: Paid Search equals 1
Visits referred by Google
View data for visits that have visited from [Google].
Segment Builder
A drop-down window allows you to select a search engine from the drop-down list. The default value is Google.
Advanced Segment Builder
Container: Visitor
Include canvas logic: Uses the Include canvas
Statement: Search Engines equals Google.
DISCOVER USERS GUIDE
53
Chapter 5 Working with Segments
Rule Builder Data (edit rule)
Name: Visitor
Match: All of the rules
Rule List: Search Engines equals Google
Visits referred by Yahoo!
View data for visits that have visited from [Yahoo!].
Segment Builder
A drop-down window allows you to select a search engine from the drop-down list. The default value is Yahoo!
Advanced Segment Builder
Container: Visitor
Include canvas logic: Uses the Include canvas
Statement: Search Engines equals Yahoo!
Rule Builder Data (edit rule)
Name: Visitor
Match: All of the rules
Rule List: Search Engines equals Yahoo!
Visits referred by MSN
View data for visits that have visited from [MSN].
(Process is essentially the same as with Yahoo!, above.)
Segment Builder
A drop-down window allows you to select a search engine from the drop-down list. The default value is MSN.
Advanced Segment Builder
Container: Visitor
Include canvas logic: Uses the Include canvas
Statement: Search Engines equals MSN
Rule Builder Data (edit rule)
Name: Visitor
Match: All of the rules
Rule List: Search Engines equals MSN
Visits referred by Microsoft Live
View data for visits that have visited from [Microsoft Live].
(Process is essentially the same as with Yahoo!, above.)
DISCOVER USERS GUIDE
54
Chapter 5 Working with Segments
Segment Builder
A drop-down window allows you to select a search engine from the drop-down list. The default value is Microsoft Live.
Advanced Segment Builder
Container: Visitor
Include canvas logic: Uses the Include canvas
Statement: Search Engines equals Microsoft Live
Rule Builder Data (edit rule)
Name: Visitor
Match: All of the rules
Rule List: Search Engines equals Microsoft Live
Visits that Contain Pages
View data for visits that contain a specific page or pages.
Segment Builder
A menu from which you can select a page.
Advanced Segment Builder
Container: Visit
Include canvas logic: Uses the Include canvas
Statement: Page contains <page name>
Rule Builder Data (edit rule)
Name: Visit
Match: All of the rules
Rule List: Page contains <page name>
Visits with No Referrer
Visit that came to your site directly without clicking a link on another site.
Segment Builder
This segment cannot be adjusted in the Segment Builder.
Advanced Segment Builder
Container: Visit
Include canvas logic: Uses the Include canvas
Statement: Referring Domain = 0
Rule Builder Data (edit rule)
Name: Visit
DISCOVER USERS GUIDE
55
Chapter 5 Working with Segments
Match: All of the rules
Rule List: Statement: Referring Domain = 0
Visit with Ordered Product
View data for visits that have ordered a selected product.
Segment Builder
A drop-down window provides selections from various products from which visitors have ordered.
Advanced Segment Builder
Container: Orders
Include canvas logic: Uses the Include canvas
Statement: Products equals <product>
Rule Builder Data (edit rule)
Name: Orders
Match: All of the rules
Rule List: Products equals <product>
Visit with Product
View data for visits that have interacted with a selected product.
Segment Builder
A drop-down window provides selections from various products with which visitors have interacted.
Advanced Segment Builder
Container: Visit
Include canvas logic: Uses the Include canvas
Statement: Products equals <product>
Rule Builder Data (edit rule)
Name: Visit
Match: All of the rules
Rule List: Products equals <product>]
5.3 Using the Segment Builder Tool
You can configure the predefined segments, or combine them to create new segments. For example, if you want to see
a report that shows data for non purchasers who came from a paid search, you can combine these two segments in
the Segment Builder tool.
DISCOVER USERS GUIDE
56
Chapter 5 Working with Segments
Displaying and Using Segments
Figure 5.3: Segments Pane
The segments shown in the Segments pane can use either their pre-configured name or the name you assign when
you create them. You can see additional segments by selecting folders from the folders menu. You can create new
folders using the Organize tool then select them to display their content.
You can place a segment in your report tables to create a new column to see segmented data, or you can add a
segment to your workspace to apply a segment to every report in the workspace.
To add a segment column to a report table
1. In the Segments pane, select the folder that contains the segment you want to use.
2. Drag a segment from the segment pane into the report table.
To add a segment to your workspace
1. In the Segments pane, select the folder that contains the segment you want to use.
2. Drag the segment into the box labeled Drop segment here to filter workspace.
3. Hold the Ctrl key to combine segments.
4. To remove segments from the workspace, do one of the following:
•
Place the All Visits segment in the box
•
Click the remove icon.
Adjusting Pre-configured Segment Properties
Pre-configured segments are listed in the left-hand column. You can modify segment properties by moving them into
the Selected field, then highlighting them.
To configure segments
1. Do one of the following:
•
In the Segments pane, click the Segment Builder icon.
•
In the segment box in the workspace tool bar, click the edit icon.
DISCOVER USERS GUIDE
57
Chapter 5 Working with Segments
This displays when a segment is in the box, and opens the segment placed in the box.
•
If you have added a segment column to a report table, right-click the segment heading in the report table and
from the drop-down menu, click Edit Segment.
Figure 5.4: Segment Builder Tool
2. Do one of the following:
•
To select a segment from a folder other than the pre-configured segments folder, Click Load.
•
In the window that displays, select the folder, then select the segment, and click Load.
•
Select a segment from the list, and use the arrow keys to place it in the list of selected segments.
3. Click a segment from the selected segments list. While the segment is selected, the Edit Settings area of the tool
activates as shown in Figure 5.4.
4. Edit the segment using the tool set provided. Tools vary depending on the segment you select.
NOTE: Some segments cannot be edited with the Segment Builder tool.
5. If you have combined segments or you want to save a new segment setting under a different name, click Save.
6. Click OK to save the segment and close the window.
For a segment that is applied to a workspace, you can click Apply to see changes in the report without closing the
segment builder tool. Clicking Apply saves the segment.
5.4 Using the Advanced Segment Builder
The Advanced Segment Builder uses the same methodology as the SiteCatalyst ASI Segment Definition Builder to
create new segments or edit existing segments. This tool allows you to define visitor segments based upon visitor
behavior, and allows you to apply a more targeted segment to use with your Omniture Discover report data.
NOTE: Because of the complexity that you can create with the Advanced Segment Builder, when creating very complex
segments, you should diagram how you want your segments to look before you create them.
DISCOVER USERS GUIDE
58
Chapter 5 Working with Segments
When you use the Advanced Segment Builder, you can define a segment in very specific terms. For example, one predefined segment is called loyal visitors. By default, this segment is defined by the number of times a user has accessed
your Web site. You can change this number using the Segment Builder tool. See “Using the Segment Builder Tool” on
page 56.
However, you may need to modify this segment beyond a simple adjustment of the number for additional analysis. For
example you may want a segment defined by loyal visitors who have purchased from your site or accessed specific
content on your site more than one time. The Advanced Segment Builder lets you create segments that are defined
with more complex relationships.
Perhaps you want to define a segment that lets you see loyal purchasers that came from Paris. If you want to exclude
people who purchased a specific item, the Advanced Segment Builder can also do this. There are many ways that you
can create and use segments with this tool.
When you use the Advanced Segment Builder, you have the option of using containers and events. Depending on the
placement of the containers and events, Discover filters things differently.
There are three types of containers in the Advanced Segment Builder. Table 5.1 describes these containers.
Table 5.1: Advanced Segment Builder Containers
CONTAINER
DESCRIPTION
Visitor
This container shows all data for all visits of any visitor who performed an event during
any of the visits
Visit
This container shows data for only the specific visits in which the event occurred.
Page View
This container shows data for only specific pages on which the event occurred
No Container
When using no container, the segment is essentially querying for data that occurred only
on Web pages where the event occurred. So, if you use an order event with no
container, and set it to a product name, and then put the resulting segment in a revenue
report, the report only shows revenue that occurred on pages that where the event also
occurred.
For example, assume that you have created three segments as follows:
•
A Visitor container that you have edited to display page views for the About Us Web page.
•
A Visits container that you have edited to display page views for the About Us Web page.
•
A Page Views container that you have edited to display page views for the About Us Web page.
If you run a Page Views report and apply each of these segments, you get the following results:
•
For the Visitor container, you see the number of page views for all page views for any visit of all visitors who
happened to see the About Us page during any of the visits.
•
For the Visits container, you see the number of page views of any visit in which the About Us page was seen.
•
For the Page Views container, you see the number of page views for the About Us page only.
Additionally, Discover lets you edit the events or the containers for selected metrics. When you edit a container, you are
specifying a value that is applied to all metrics in the data set. For example, if you set up a segment where you define
the Visitor container with revenue equal to or greater than 75, and you run it in a page views report, you see all page
views for any visitor who has ever spent a combined total of $75 or more at any time on any number of orders.
However, if you place an Orders event in the visitors container, and define the event with revenue equal to or greater
than 75, you see all page views for visitors who spent $75 or more in a single order. If you place the same event in a
Page Views container, you see only the number of page views on pages where the order actually occurred. The
following tables may help to illustrate this concept.
DISCOVER USERS GUIDE
59
Chapter 5 Working with Segments
Table 5.2: Web Site Visits
VISITOR
FIRST PAGE
VISITED
SECOND PAGE
VISITED
THIRD PAGE
VISITED
FORTH PAGE
VISITED
Visitor 1
Page A
Page C
Page F
Page G ($75
purchase)
Visitor 2
Page A
Page D
Page B
Page H ($10
purchase)
Visitor 3 (first visit)
Page B
Page C
Page G ($25
purchase)
Page I
Visitor 3 (second Visit)
Page A
Page E ($50
purchase)
Page D
Page I
For the following examples assume that the visits shown are the only visits to a Web site. Results in Table 5.3 refer to
the segment applied to a page views report.
Table 5.3: Segment Results
SEGMENT
RESULTS
A segment with a Visitors container that is
configured with the page set to Page B.
Because it is a visitors container, it includes all page views for
any visitor who ever visited Page B. Visitor 2 and visitor 3 both
visited Page B. The total number of page views for visitors 2 and
3 is 12, so that is the number shown in the Page Views report
when the segment is applied.
A segment with a Visits container that is
configured with the page set to Page B.
Because it is a visits container, it includes all page views for any
visit that includes Page B. Two visits, (from Visitor 2 and Visitor
3) included Page B. The total number of page views for those
specific visits is eight, so that is the number shown in the Page
Views report when the segment is applied.
A segment with a Page Views container that is
configured with the page set to Page B.
Because it is a page views container, it includes only page views
page views for Page B. Page B was visited twice, therefore two is
the number shown in the Page Views report when the segment
is applied.
An orders event in no container set to revenue =
75.
This only shows page views where there was an event in which
revenue was $75. Visitor 1 made a $75 purchase on page G, so
the number of page views is 1.
An orders event in no container that has not
been edited
Orders events occurred on four pages, so the number of page
views is four.
A Visitors container that is set to revenue = 75
with no events in it.
Visitor 1 made a $75 purchase, and the sum of purchases for
Visitor 3 is $75. The number of combined page views for those
visitors is 12.
An orders event in a visitor container and the
orders event is set to revenue = 25
Visitor 3 made a $25 purchase on page G, and the total number
of page views for this visitor is eight. Therefore, 8 displays in the
page views report.
An orders event in a visits container and the
orders event is set to revenue = 25
Visitor 3 made a $25 purchase on page G, and the total number
of page views for the visit in which the purchase was made is
four. Therefore, 4 displays in the page views report.
DISCOVER USERS GUIDE
60
Chapter 5 Working with Segments
SEGMENT
RESULTS
An orders event in a page views container and
the event is set to revenue = 75
Only one page has a $75 purchase in it, therefore the number of
page views is one.
NOTE: Containers are holders for events or other containers as you build your segment definition. Containers may be
nested. For example, the Visitor container may contain the Visit and Page View containers with their respective events,
and the Visit container may hold the Page View container with its respective events. However, the Page View container
can only contain events. In the Advanced Segment Builder tool, the size of the center of each container icon shows
these relationships.
To use the Advanced Segment Builder
1. Do one of the following:
•
From the Segment Builder tool, click Advanced Segment Builder to use it with a selected segment. The
segment’s properties are imported into the Advanced Segment Builder.
See “Adjusting Pre-configured Segment Properties” on page 57.
•
Open the Segment Builder tool, click Advanced Segment Builder without selecting a segment and begin
with a clear canvas.
•
Click Load in the Advanced Segment Builder to bring up a previously created segment.
NOTE: A new segment is entitled Untitled Segment until you save it. You can rename the segment during the save
process.
DISCOVER USERS GUIDE
61
Chapter 5 Working with Segments
Figure 5.5: Advanced Segment Builder
2. Establish relationships between the containers and the events needed for the segment you are building:
a. Choose initially whether you want to use an include canvas or an exclude canvas. (You can switch back and
forth during the build process.)
b. Select from the drop-down menu to set the logic to any or all of the criteria you create.
c.
Drag a container or event to the area in the canvas labeled Drag and Drop Here. You can drag them either
directly on the canvas or within another container.
DISCOVER USERS GUIDE
62
Chapter 5 Working with Segments
d. Add additional containers and events as needed.
3. In each container or event, click Click here to define additional rules in the Rule Builder.
See “Using the Rule Builder” on page 63.
4. Follow the same procedure with the Exclude Canvas, if one is needed.
5. Do any of the following as needed:
•
To remove an element, click the X icon.
•
If your canvas becomes too full, either use the slider bar to maneuver around the canvas, or grab the bottom
of the window and pull down to increase the size.
•
To start over completely from a fresh canvas, click Clear Canvas. Both the include and exclude canvases are
cleared.
•
Click Apply as often as you wish to save the segment to Discover.
6. Click Save to name the segment, and save it to either the SiteCatalyst folder, your Favorites folder, or another
folder you have created in Discover.
7.
Click OK.
NOTE: If you see a Segment Error message when you save to SiteCatalyst, this indicates that the segment’s format is
not compatible with SiteCatalyst. The message tells you which elements are in conflict. Fix those problems, then click
Save again. When the segment name displays in the Title space, click the OK button to close the tool.
Using the Rule Builder
The Rule Builder tool (Figure 5.6) is accessed from the Advanced Segment Builder.
See “Using the Advanced Segment Builder” on page 58.
You use the rule builder to define events and containers that you configure in the Advanced Segment Builder. When
you define containers, you use traffic metrics, and when you design events, you use commerce metrics.
DISCOVER USERS GUIDE
63
Chapter 5 Working with Segments
Figure 5.6: Rule Builder window
To define events and containers in the Advanced Segment Builder
1. Click the link in the object you are defining.
2. The name from the Segment Builder carries over to the Name field. You may change it, but this does not change
the core properties for the event or container. Change the name to account for the definitions you have added if
necessary. Because the modifications display in the object after you modify it, you may not need to change the
name.
3. Select your logic rule: All or Any. (Any works like the logic ‘or’; All works like the logic ‘and’.)
4. Select a variable from Include events if.
5. Select your logical relationship. Table 5.4 describes these.
Table 5.4: Logic Table
OPERATOR
DESCRIPTION
equals
The selected item must exactly equal the value you enter.
is greater than
The value of selected item must be greater than the value
you enter.
is less than
The value of the selected item must be less than value you
enter.
DISCOVER USERS GUIDE
64
Chapter 5 Working with Segments
OPERATOR
DESCRIPTION
is greater than or equal
to
The selected item must equal or be greater than the value
you enter.
is less than or equal to
The selected item must equal or be less than the value you
enter.
contains
The item must contain the value you enter.
contains all of
The selected item must contain all of the values you enter.
contains at least one of
The item must contain at least one of the values you enter.
6. Type a property for the rule in the third field. Click Select Item for a list of valid values. Select Item does not
apply to values that use numbers. The Select Item window also lets you search for specific items.
See “Using the Select Item Tool” on page 65.
7.
Click Add to display your rule in the rule list. Repeat the previous steps to add multiple rules.
8. When a rule displays in the list, click Edit to modify the rule; click Delete to remove it.
9. Click OK to apply all rules shown in the rule list to the object.
Using the Select Item Tool
The Select Item tool helps you list valid values that are available when you are creating rules for your advanced
segments. You access the tool from within Rule Builder. You can also search for specific items from within this tool.
NOTE: If the list is blank, there are no items that meet your search criteria.
Figure 5.7: Select Item Window
To use the Select Item tool
1. Select a value from the list.
DISCOVER USERS GUIDE
65
Chapter 5 Working with Segments
2. To search for a value, do one of the following:
•
Type a search string in the Search field, then click Search.
•
Click Advanced Search, then fill in the fields to refine your search. Table 5.5 lists and describes these fields.
Table 5.5: Advanced Search Options
TYPE
TERMS
all
Filters the report by loading data for only those items that contain all of the words
entered in this text box (functions as an and search). Multiple words are separated by
spaces.
exact phrase
Loads data for items that only match the exact phrase (similar to a contains this and
that search, where multiple words are enclosed by quotes). You should not enter
quotes here unless items you are searching for have quotes.
at least one
Filters the report based on any of the words entered in this text box (functions as an or
search). Multiple words are separated by spaces.
none
Excludes data for any items that contain the searched word(s). Multiple words are
separated by spaces.
3. Click OK to insert the item and close the tool.
5.5 Using Segment Folders
Discover has two default segment folders: Pre-Configured and SiteCatalyst. The Segments pane has a menu from
which you can select the folder you need. The Organize Segments tool lets you create new folders and organize your
segments within the folders.
To select segment folders
1. Click an option from the View menu that you want to display in the list. The Segments contained in that folder are
displayed in the pane.
Figure 5.8: Segment View drop-down selections
Creating and Organizing Segment Folders
You can create new folders, populate them with pre-configured segments, and delete folders using the Organize
Segments tool.
DISCOVER USERS GUIDE
66
Chapter 5 Working with Segments
To organize your segments
1. In the Segments pane, click the Organize Folders icon.
Figure 5.9: Organize Segments Window
2. Click a folder to select it. The Segments it contains display in the right-hand column.
3. To create a new folder, click New. A folder entitled New Folder displays in the left-hand column.
4. Rename the new folder:
a. Right-click the New Folder.
b. Select Rename from the menu.
c.
Type a new name and press Enter.
To add segments to a folder:
1. Select a folder that contains segments. Its contents appear in the right-hand column.
2. Drag each segment you want from the list to the new folder.
Figure 5.10: Organizing Segments
DISCOVER USERS GUIDE
67
Chapter 5 Working with Segments
NOTE: Read Only folders have a crossed-circle symbol. You cannot revise them in this tool.
3. To delete a custom folder, click the name of a folder to highlight it. Click Delete.
4. To delete a segment from a custom folder, right-click the segment and select Delete.
NOTE: Segments are copied, not deleted, when you drag them from one folder to another.
DISCOVER USERS GUIDE
68
CHAPTER 6
Working with Metrics
Metrics are quantitative information about visitor activity, such as views, click-throughs, reloads, average time spent,
dates, units, orders, revenue, and so on. Metrics and associated data are displayed in the columns of reports. Standard
metrics include:
•
Traffic metrics: Show data about the volume of visitors to your Web site.
•
Conversion metrics: Show data about success events on your Web site. Success events may include purchases,
downloads, or any other action that you want users to take on your Web site.
•
Calculated metrics: Customizable metrics created by combining other metrics. For example, you could create a
metric that subtracts the keyword cost and the cost of goods from the revenue to get net revenue. You could then
divide this by the total number of orders to get average net revenue per order.
This chapter described metrics in the following sections:
•
6.1 Metric Calculations
•
6.2 Metric Definitions
•
6.3 Adding Metrics
•
6.4 Organizing Metrics
•
6.5 Creating Calculated Metrics
6.1 Metric Calculations
Within the Conversion folder are metrics that are calculated using standard, participation, recent, and linear allocation
methods. Each of these methods calculates values differently based on the formulas described in Table 6.1.
Table 6.1: Metric Calculations
METRIC TYPE
CALCULATION
Standard
Events associated with the current Web page are given full credit.
Participation
Full credit is given equally to each Web page that associated with an event.
Recent
The most recent Web page associated with the event gets full credit.
Linear
Credit is divided equally among each associated Web page visited on the path to
the event.
For example when determining revenue in each method, assume that a user visited an online retailer. The user looked
at a toaster, then a watch, then the toaster again, and finally a lamp, which was purchased for $12. The following
credit would be made using each method:
•
Standard: If the purchase is made on a Web page associated with the Lamp, then that page receives all $12 of
credit. If the purchase of the lamp is made on a page not expressly associated with any product, then no credit is
assigned to any product.
•
Participation: The pages associated with the watch, the toaster, and the lamp each receive $12 worth of credit.
•
Recent: The lamp receives $12 worth of credit regardless of whether the page where the purchase happened is
directly associated with any product. If, for example, the user looked at the watch most recently, and then went to
a page not associated with any product and purchased the lamp, then the page associated with the watch gets $12
worth of credit and the lamp gets no credit because the watch was the most recently visited page.
DISCOVER USERS GUIDE
69
Chapter 6 Working with Metrics
•
Linear: The user visited four pages on the way to purchasing the lamp. Each page visit is counted regardless of
whether a page is visited multiple times. Therefore, the revenue is divided by four and equal amounts allocated for
each page visit. This leaves the toaster with $6 worth of credit, and the lamp and watch each with $3 worth of
credit.
The metrics you see in the Metrics pane are derived from the folder you select from the menu. The standard folder
contents are identical to SiteCatalyst. The default metrics are designed to be used in reports of the same category.
6.2 Metric Definitions
When you add the default metrics to your reports, they display with both numeric values and as percentages of the
total. (Custom metrics display as you define them to display.) Each of the default metrics is described in the following
tables. However, other metrics that you have defined or are available in SiteCatalyst appear as default metrics as well.
Table 6.2: Traffic Metrics
METRIC
DESCRIPTION
Page Views
The number of times any user accesses a Web page in your site,
regardless of whether the same user accesses it multiple times.
Occurrences
The number of times a specific value is captured. For example, if eVar1 is
set to girl, each time the value girl is captured, an instance is counted.
Visits
The number of times a user accesses your Web site. A visit may consist of
multiple page views. A visit persists until 30 minutes of inactivity have
passed, or more than 12 hours of continuous activity have elapsed.
Visitors
The number of users who come to your Web site. This does not require a
persistent cookie.
Reloads
The number of times that pages on your Web site are reloaded or
refreshed during a single visit.
Single Page Visits
Visits in which a user only views a single page of your site.
Entries
The number of times that a user initially entered your Web site on a
specific page. These are recorded for each page on your site individually.
Exits
The number of times that a user exited your Web site from any page.
These are also recorded for each page on your site individually.
Average Page Depth
Shows on average how many pages a user visited prior to accessing a
particular page on your site. The first page has a value of one, the second
a value of two, and so forth. Pages accessed sooner in a visit have lower
numbers assigned. However, if a page is the 1st, the 3rd, and the 35th
page accessed during a single visit, then the value assigned for the visit
will be 13 for that page.
Average Page Views per
Visit
The average number of times that a page is visited during any visit where
a user accesses the page. If a page is not accessed during a visit, then the
visit is not counted for the page. Therefore, the average can never fall
below 1.
Table 6.3: Commerce Metrics
METRIC
DESCRIPTION
Product View
Occurs when a product details page is viewed.
DISCOVER USERS GUIDE
70
Chapter 6 Working with Metrics
METRIC
DESCRIPTION
Click-Through
This increments when a user accesses a Web page from a link in an
advertising campaign, such as a link in an email, or a link in a banner ad.
Cart Removals
Occurs for a product when a user removes it from a shopping cart.
Cart Additions
Occurs for a product when a user adds it to a shopping cart.
Checkout
Occurs when a user arrives at the checkout stage of a purchase. The
checkout stage usually occurs just before a purchase is finalized, and
usually involves the customer entering personal information (such as their
shipping and billing information.)
View Shopping Cart
Occurs for a product when a user views it while it is in a shopping cart.
Open Shopping Cart
Occurs for a product when a user adds it to a shopping cart in conjunction
with the creation of the shopping cart.
Revenue
The amount of currency received from the sale of a product.
Orders
The number of times one or more of a specific product was requested in a
single order
Units
The number of actual units of a product sold.
6.3 Adding Metrics
Metrics display in the lower left-hand area of your screen. Different metrics are associated with the view that you select
from the menu. The default Metrics Views match those that you are familiar with in SiteCatalyst and any metrics that
you have created in SiteCatalyst are imported into these views in Discover.
To add a metric to a ranked report
1. Drag a metric from the metrics panel into the heading of the table of the report.
2. To remove a metric, right-click the heading of the column, then click Remove Columns.
To add multiple metrics
1. Right-click the column heading of the segment column to which you want to add the metrics, and then click Select
Metrics.
DISCOVER USERS GUIDE
71
Chapter 6 Working with Metrics
2. Select the metrics from the left side of the Metric Selector and use the arrows to add them to the right side.
3. Use the up and down arrows to arrange the order of the metrics.
4. Click OK.
6.4 Organizing Metrics
You can use the Metrics Organizer to create new folders for your metrics. You can then group metrics any way you
want. The Metrics Organizer lets you copy existing metrics into your custom folders using a simple drag-and-drop
method. While you can create folders, name them, and organize the metrics into them however you want, you cannot
make any changes to the default folders with the exception of the favorites and the Calculated Metrics folders. When
you create new metrics, they are placed by default into the Calculated Metrics folder, and the Favorites folder may be
treated the same as any custom folder you create.
To create new Metrics View folders, or to delete existing ones, click the Organizer icon (
Organize Metrics tool, shown in Figure 6.1.
) which displays the
Figure 6.1: Metrics Organizer
1. To create or add new Metrics View folders:
a. Click the New Folder icon (
).
b. Right-click the New Folder that displays in the list and click Rename.
DISCOVER USERS GUIDE
72
Chapter 6 Working with Metrics
c.
Type a new name for the folder.
d. Click OK to save.
2. To delete a folder:
a. Click the folder name to highlight it.
b. Click the Delete icon (
). You cannot delete the default folders.
WARNING: All of the metrics in a folder are deleted from your currently-selected project when you delete a folder.
6.5 Creating Calculated Metrics
Discover gives you the option to create new metrics to more thoroughly analyze your Web site data. This lets you
create ratios for specific metrics, or do various other quantitative analysis of your data. For example, you may want to
determine a ratio of entries to exits for each of your Web pages. You can use the Metrics Builder to create a formula
where you divide the number of entries by the number of exits. A high number means that many more people enter on
a specific page than leave, while a low number indicates the opposite. You can do the same with units and orders to
determine the ratio of units per order. Another option you can create is average revenue per order. This can be
calculated by dividing total revenue by the number of orders. You can literally create thousands of metrics based on
your needs.
Creating New Calculated Metrics
Figure 6.2: Calculated Metrics Builder - Screen 1
Calculated Metrics is one of the folders available from the menu. Nothing displays in the associated pane until you
create new calculated metrics or import them into this folder.
To create a new metric:
1. Click the Metrics Builder icon (
). The Calculated Metrics Manager (as shown in Figure 6.2) displays.
2. Click Define New Metric or Edit Metric; the Calculated Metrics tool screen displays.
3. Select a metric, then click Delete to remove it.
DISCOVER USERS GUIDE
73
Chapter 6 Working with Metrics
Calculated Metrics Manager
Figure 6.3: Calculated Metrics Builder - Screen 2
4. Type a name for your new Metric.
5. Select a metric type from among the radio buttons (Numeric, Percent or Currency).
6. Specify the number of decimal places.
7.
Create your metric in the Formula field by combining Standard Metrics and Total Metrics from the two
columns. Scroll to find the metric, then click the metric name.
NOTE: Standard metrics use the values for a specific element in Discover (such as a Web page or a product), while
total metrics give values for all elements within your site. For example, you can subtract visitors from total visitors
and apply that metric to a traffic report to see the number of visitors who came to your Web site, but did not visit
a particular Web page. You can use the Metrics Builder to convert this value to a percentage and see the
percentage of visitors not accessing a specific Web page as well.
8. In the Add Item list click the operator symbol or type the operator.
9. Click Save Formula.
10. To start over, click the Clear Form.
DISCOVER USERS GUIDE
74
APPENDIX A
Report Descriptions
The following are descriptions of the reports you can find in Discover. There are several report types in Discover,
including trended reports, ranked reports, conversion funnel reports, and other unique reports. Information on
configuring and adding metrics to these reports is discussed in “Working with Metrics” on page 69.
The reports descriptions are arranged in the order in which they are found in the menu. these include:
•
Site Metrics Reports
•
Site Content Reports
•
Mobile Reports
•
Paths Reports
•
Traffic Sources Reports
•
Campaigns Reports
•
Products Reports
•
Visitor Retention Reports
•
Visitor Profile Reports
•
Custom Conversion Reports
•
Custom Traffic Reports
•
Test&Target Reports
•
Survey Reports
Site Metrics Reports
This group contains the most commonly accessed traffic and conversion reports that give the most relevant data about
your Web site. This includes data about visits, visitors, purchases, products, and totals.
Page Views Report
A trended report that displays the number of times your Web site pages were viewed for the selected time period. If a
single visitor views 15 pages during a visit, it is counted as 15 page views. If the same page is viewed three times
during a visit, it is counted as three page views. This report gives you an aggregate of page views for your entire Web
site.
This report can be used to:
•
See how many people view your site and the success of your site pages.
•
See recent traffic patterns for your entire site and each individual page.
•
Learn how many visits promotional, sign up, or order pages received to measure marketing effectiveness.
Visits Report
Shows the number of visits that occurred for your entire Web site. Visits is defined by number of sessions in which a
visitor accesses, and leaves your site. Multiple visits that occur within a 30 minute time period are counted as a single
visit. Visits lasting longer than 12 hours of continuous activity are counted as multiple visits. If the same person visits
your site 10 times, it counts as 10 visits.
DISCOVER USERS GUIDE
75
Report Descriptions
You can use this report to:
•
See total number of visits to your site during a selected time period.
•
Identify impact of site modifications, including possible changes to total number of visits, average pages per visit,
and average time per visit.
Unique Visitors
The Unique Visitors report is a trended report that shows you the number of unique visitors who accessed your site.
Each visitor is counted once regardless of how many times the person visits your Web site.
Omniture uses a patent-pending cookie-handshake technology to distinguish a unique visitor from a return visitor. The
cookie handshake overcomes limitations in Internet browser cookie technology.
You can use this report to:
•
See the number of different people that viewed your Web site during any given time period.
•
View recent traffic patterns and learn how promotions are bringing unique visitors to your site.
•
Compare the number of your unique visitors to the number of page views.
Time Spent per Visit
The Time Spent per Visit report is a ranked report that shows you the most common time periods that customers
spend on your site. You can see the number visits for each time period to see the approximate time that users spend
on your Web site, and determine whether customers who spend more time on your site generate more revenue.
You can use this report to:
•
See possible problems in the purchasing process.
•
Target certain advertisements or promotions to those who spend the most time on your site.
•
Show the number of units purchased during different time periods by customer loyalty.
•
View the number of cart removals within campaigns for individual time periods.
Purchases Conversion Funnel
The Purchases Conversion Funnel report shows summary data for five metrics in the Purchases reporting group by
default: Visits (Buying Opportunities), Carts, Orders, Revenue and Units.
Conversion Funnel reports show key conversions between important data in each reporting group and standard
conversion metrics (for example, revenue and orders). The Overview section gives a visual summary of this conversion
data. The Conversion Funnel sections show statistics for all events in the Overview section based on orders and up to
two other metrics: revenue and units. You can add metrics and custom events from other reporting groups to these
reports by clicking the Selected Events link. See “Running a Conversion Funnel Report” on page 12.
NOTE: Because the current time periods are not yet completed when you view data, the Conversion Funnel reports
can accurately indicate a downward trend from the previous to the current time period in that there are fewer visits
today than yesterday, but only because the rest of the time period's statistics have yet to occur.
Revenue Report
The Revenue report is an over-time report that shows total revenues for your Web site during the selected time period.
For example, if you view the Revenue report for the February date range, it shows you revenue for each day in that
month. If you choose to view data for a single day, the report shows the revenue generated during that day by the
hour. Additionally, you can break down individual time periods by other metrics to show how much revenue individual
products, campaigns, and other metrics generated during that time frame. The information in this report can be useful
to help you determine patterns, peaks or valleys in the revenue generated on your site.
DISCOVER USERS GUIDE
76
Report Descriptions
Orders Report
The Orders report is a trended report that shows the total number of orders for your Web site. You can use segments
in this report to see which set of visitors made the most orders during the selected time period. This report can help
you determine the times when your orders are the greatest and least, and whether there are regular cycles in the
patterns of your orders for the various segments.
Units Report
The Units report is a trended report that shows the total number of Units for your Web site. You can use segments in
this report to see which set of visitors purchased the most units during the selected time period. This report can help
you determine the times when your unit volumes are the greatest and least, and whether there are regular cycles in
the patterns of your unit volumes for the various segments.
Cart Conversion Funnel
The Cart Conversion Funnel report shows conversion and average statistics for five metrics related to shopping carts.
By default these are: Visits, Carts, Checkouts, Orders and Revenue. in its default state, this report shows the number of
visits, and the number of visits that resulted in carts. Next you see the number of carts resulting in checkouts, and the
number of checkouts resulting in orders. It also gives revenue and unit number data. The Overview section gives a
visual summary of this conversion data. You can add metrics and custom events from other reporting groups to these
reports by clicking the Selected Events link.
NOTE: Because the current time periods are not yet completed when you view data, the Conversion Funnel reports
can accurately indicate a downward trend from the previous to the current time period in that there are fewer visits
today than yesterday, but only because the rest of the time period's statistics have yet to occur.
Carts Report
The Carts report is a trended report that shows the number of cart creation events that occurred on your Web site for
the selected time period. You can use segments in this report to see which set of visitors had the most cart events
during the selected time period. This report can help you determine the times when your cart volumes are the greatest
and least, and whether there are regular cycles in the patterns of your cart volumes for the various segments.
Cart Views Report
The Cart Views report is a trended report that shows the number of times visitors view an item that has been placed in
a shopping cart on your Web site for the selected time period. You can use segments in this report to see which set of
visitors had the most cart view events during the selected time period. This report can help you determine the times
when your cart view volumes are the greatest and least, and whether there are regular cycles in the patterns of your
cart view volumes for the various segments.
Cart Additions Report
The Cart Additions report is a trended report that shows the number of times visitors add a product to a shopping cart
on your Web site for the selected time period. You can use segments in this report to see which set of visitors had the
most cart addition events during the selected time period. This report can help you determine the times when your cart
addition volumes are the greatest and least, and whether there are regular cycles in the patterns of your cart addition
volumes for the various segments.
Cart Removals Report
The Cart Removals report is a trended report that shows the number of times visitors remove an item from a shopping
cart on your Web site for the selected time period. You can use segments in this report to see which set of visitors had
the most cart removal events during the selected time period. This report can help you determine the times when your
cart removal volumes are the greatest and least, and whether there are regular cycles in the patterns of your cart
removal volumes for the various segments.
DISCOVER USERS GUIDE
77
Report Descriptions
Checkouts Report
The Checkouts report is a trended report that shows the number of times visitors initiate a checkout event for items
placed in a shopping cart on your Web site for the selected time period. You can use segments in this report to see
which set of visitors had the most cart view events during the selected time period. This report can help you determine
the times when your cart view volumes are the greatest and least, and whether there are regular cycles in the patterns
of your cart view volumes for the various segments.
Custom Events Reports
The Custom Events reports are trended reports that show data for success events specific to your Web site. Usually
these reports are configured when you initially begin to use Discover, but you can change these to track additional
events at any time. An example of custom events might include member registrations, blog submissions, or other
events. To add custom events, you must contact your Omniture account representative so that Omniture can add the
additional custom events reports. Report data cannot be added retroactively.
Custom Events reports show you the number of times visitors engage in a custom event on your Web site for the
selected time period. You can use segments in these reports to see which set of visitors had the most custom events
during the selected time period. These reports can help you determine the times when your custom event volumes are
the greatest and least, and whether there are regular cycles in the patterns of your custom event volumes for the
various segments.
Totals Report
The Totals Report is an executive-level report that shows bottom-line figures. It contains data for total revenue, page
views, and orders. You can segment the report and add additional metrics to view additional data.
This report is unique in that it is an overview report. Information on how to configure and add metrics to this report is
provided here. Information on configuring trended and ranked reports is given later in this chapter.
Figure A.1: Totals Report
Site Content Reports
This group contains traffic reports that tell you about numbers of hits to your Web pages and Web servers. You might
have additional custom reports in your menu that are not listed here.
DISCOVER USERS GUIDE
78
Report Descriptions
Pages Report
The Pages Report is a ranked report that shows you the number of views for each tracked page on your Web site and
tells you which pages are being visited the most. You can use this report to:
•
Identify important pages that are getting missed, so you can highlight them more prominently
•
Measure page views to promotional, sign up, or order pages for marketing effectiveness
•
Monitor all traffic to all pages in one easy-to-read report
•
Learn the pages/products in which your visitors are most interested
Site Sections Report
The Site Sections report is a ranked report that lets you view your Web traffic according to groups of similar Web pages
that you have put together. The Site Section report shows you combined page views for all pages places in a site
section. You can use this report to:
•
Determine which areas of your Web site get the most traffic
•
Determine which content or types of products are most popular on your site
•
See whether valuable areas of your site are being under utilized
•
Determine whether groups of related pages with moderate individual page counts are actually popular as a whole.
Servers Report
The Servers report is a ranked report that shows you which of your Web site servers are must heavily used. If you have
multiple or clustered Web servers, you can use the report to see whether server load is equal. If the load is not equal,
you can use the report to determine which servers need additional hardware resources.
Links Reports
Links Reports show you the number of times that visitors to your Web site click on links that you define. The reports
show figures for downloaded files, exit links and custom links. The data that displays in this report is specified in the
JavaScript files that are associated with your Web pages. See the Link Tracking white paper for more information on
setting up this feature.
File Downloads
This report displays information about the files that visitors have downloaded from your Web site. By default the report
shows the path on your Web server to the downloaded link, and the number of downloads for each file.
Exit Links
If your Web site has links to partner or other third-party Web sites, you can track these links and see the number of
times visitors to your site exited the site using one of these links. The report shows the URL to which the link leads,
and the number of times users clicked each of these links.
Custom Links
The Custom Links report shows you data about any link on your Web site you want to track. For example, if you want
to see the number of times users click a help link, or ‘purchase now’ link, this report shows you that data.
Mobile Reports
Mobile reports give you information about the mobile devices that access your Web site. Report data includes
information on device type, properties, and file support.
DISCOVER USERS GUIDE
79
Report Descriptions
Devices
This report lists the various types of mobile devices that access your Web site. It lists the device name, and the number
of pages accessed by each type of device.
Manufacturer
This report lists the names of the manufacturers of the mobile devices that access your Web site.
Screen Size
This report shows the height and width dimensions in pixels of the screens on the mobile devices that access your Web
site. You can use this data to optimize images and content for viewing with mobile devices.
Screen Height
This report shows the height in pixels for the screens on the mobile devices that access your Web site.
Screen Width
This report shows the width in pixels for the screens on the mobile devices that access your Web site.
Cookie Support
This report shows the percentage of mobile devices that accept cookies. You can use this report to determine how
effective cookies are on your Mobile device Web site.
Image Support
This report shows the number of mobile devices that accessed your Web site that support various image types. You
can use this report to determine what type of graphics to place on your mobile Web site.
NOTE: Because a single mobile device can support multiple image types, the sum of all page views in this report might
exceed the actual total of page views.
Color Depth
This report shows the number of colors supported by the mobile phones that access your Web site. You can use this
report to optimize color levels on your Web site.
Audio Support
This report shows the number of mobile devices that accessed your Web site that support various audio file types. You
can use this report to determine what type of audio files to place on your mobile Web site.
NOTE: Because a single mobile device can support multiple file types, the sum of all page views in this report might
exceed the actual total of page views.
Video Support
This report shows the number of mobile devices that accessed your Web site that support various video file types. You
can use this report to determine what type of video files to place on your mobile Web site.
NOTE: Because a single mobile device can support multiple file types, the sum of all page views in this report might
exceed the actual total of page views.
DISCOVER USERS GUIDE
80
Report Descriptions
Paths Reports
Paths let you view your site traffic as it flows from one page or item to the next, break down visits to discover new
patterns and popular paths, or go far beyond traditional metrics to search out the specific paths your visitors take from
a selected page.
General Reports Group
Typical of the General category of Paths report is this one of the Page Views metric for All Visits to the reporting site,
showing how much time was spent on a Page.
Path Length Report
The Path Length report is a ranked report that shows you the number of visitors that accessed a specific number of
pages on their visits. For example, how many visitors viewed only 1 page, how many viewed 2 pages, haw many
viewed 3, and so forth. You can use this report to see whether visitors you your site access few or many pages during
their visits.
Reloads Report
The Reloads report shows the number of times individual pages were reloaded by page visitors. A reload event is
defined as any time the same page is viewed twice in a row in less than 30 minutes, and without any intervening
pages.
Some events that would cause the report to register a page reload include:
•
A visitor views a page and then clicks the refresh button, causing a page reload (the first page view is not a
reload).
•
A person visits a site page, clicks a link that takes him/her to an external site, and then clicks the back button to
see your site page again, resulting in two page views and one reload. This is because the person saw no
intervening pages on your site between the two page views.
•
Because the pageName variable is used to identify unique pages by name, rather than URL, if a person views two
different pages that are identically named, the Reloads report could register these two page views as one reload.
Report Uses:
•
Help locate problems with connectivity and server capacity.
•
Discover problem areas that arise when your visitors load your Web pages.
•
Identify pages that are too large or need to have images optimized.
•
Maintain rapid download speeds for your entire Web site.
Single-page Visits Report
This report shows you the page names ant the number of times that a visitor came to your site, viewed only that single
page, then left. You can use this report to:
•
Identify the entry pages that are least likely to compel a visitor to explore your web site further
•
Determine how many of your web site pages are Single-page Visits and get an overview of pages on your site
affected by this tendency
•
Optimize the content and navigation of Single-page Visits to reduce visitor exits
•
Replicate searches used by your visitors to see where you're listed
DISCOVER USERS GUIDE
81
Report Descriptions
Time Spent on Page Report
This report displays the length of time that visitors browse individual pages or spend on a visit in your site. The time
spent is divided into 11 categories: 0 seconds, less than 15 seconds, 15-30 seconds, 30-60 seconds, 1-3 minutes, 3-5
minutes, 5-10 minutes, 10-15 minutes, 15-20 minutes, 20-30 minutes and greater than 30 minutes.
Report Uses:
•
Identify the length of time that visitors remain viewing on your individual Web site pages.
•
Identify site content or promotions that trigger visitor interest.
Page Value Report
The Page Value report shows how pages within your site affected your site’s various success metrics. You can use this
report to see such things as how much revenue or orders were generated on each page.
Report Uses:
•
Identify important groups that are getting missed so you can highlight them more prominently
•
Evaluate marketing effectiveness by comparing views between promotional, sign up or order pages
•
Monitor traffic to all pages/channels/categories in one easy-to-read report
•
Identify the pages, products, channels or categories in which your visitors are most interested
Entries Reports
There are three similar ranked reports in this group. Each of the reports shows the number of entries that occurred in
specific areas of your Web site. These reports are:
•
Entry Page Report - This report shows the names of the Web pages and the number of site entries that occurred
on that page.
•
Entry Section Report - This report shows the names of the your site sections, and the number of site entries that
occurred on any page in the site section.
•
Entry Server Report - This report shows the names of the your Web servers and the number of entries for each
server.
Report Uses:
•
Identify which of your Web pages are the most frequent points of entry.
•
Optimize the primary entry points on your site.
•
Drive entry traffic to your key messages.
Exit Reports
The Exit reports show you, by percentage and by total visits, which locations on your site were the last that visitors
viewed before leaving your site. There are three similar ranked reports in this group:
•
Exit Page Report - This report shows the names of the Web pages and the number of site exits that occurred on
that page.
•
Exit Section Report - This report shows the names of the your site sections, and the number of site exits that
occurred on any page in the site section.
•
Exit Server Report - This report shows the names of the your Web servers and the number of exits for each server.
Report Uses:
•
Identify which of your Web pages are the most frequent exit points.
•
Determine where adjustments can be made to increase visitor retention.
DISCOVER USERS GUIDE
82
Report Descriptions
Fall-Out Report Group
The Fall-Out report group has three reports that you can use to gauge the percentage of visitors who proceeded
through a specific set of events to a destination point. For example, you can see the number of visitors interested in a
product for sale on your Web site. You can see from the report, the number of visitors, and then gauge the percentage
of visitors who accessed a page displaying the product. Then, of the visitors who looked at the product page, you can
see the number of visitors who visited the checkout page associated with the purchase of the product. These reports
let you gauge your retention and fall-out percentages for each step in the process
Fall-out
The Fall-Out report shows the number of visitors that successfully visited a set path of pages in order. It also shows
conversion and fall-out rates between each step. The Fall-Out Report Builder allows you to define the specific order of
pages that you want to include in a path process. After running the Fall-Out Report Builder, the resulting report displays
information for visitors that enter the first page (or node) and continue unconstrained through each subsequent page.
Users successfully traverse defined paths when they successfully visit all steps in the path in the correct order within a
single session (without regard for the pages that were visited between steps).
Fall-Out reports have many settings and tools that you can use to configure and customize your report.
See “” on page 57.
Figure A.2: Fall-Out Report
Section and Server Fall-out
The primary difference between Fall-Out, Section Fall-Out and Server Fall-Out is in the choices available from the
Checkpoint Selector, shown in Figure A.2. The Fall-Out report shows Web pages, the Section Fall-Out report shows site
sections (groups of related Web pages), and the Server Fall-Out report shows names of Web servers.
Next Flow Report Group
The Next Flow report group has three reports in it - Next Page Flow, Next Section Flow, and Next Server Flow. The
reports in this group show you the most common pages, site sections, and servers that a visitor accessed after
DISCOVER USERS GUIDE
83
Report Descriptions
accessing the page, site section, or server you specify. These reports show you the most common paths taken through
your Web site.
There are several tools you can use to configure this report. See “Running the Next Page Flow Report” on page 23.
Next Page Flow Report
Figure A.3: Next Page Flow with Search Markers
When viewing this report, you read from left to right, beginning with the selected section on the far left of the graph.
The pages that users viewed after to the selected page are illustrated as branches extending to the right of the
selected page. Percentages for each page are displayed beside the name of the page. The width of the line connected
to each next-page graphically depicts this relative percentage of visits.
The term path views is used to indicate the number of times a page was viewed, given the constraints of the displayed
paths. For example, the Privacy Policy page might have 10,000 total page views, but only 500 of those page views
occurred immediately before the Home Page, and so would have 500 path views.
Continuing from left to right, a branch extends from each of the pages in the middle column, denoting the pages that
were viewed next. Similarly, the relative percentage is depicted by the relative width of the line.
By default, this report displays the top 10 pages that users went to following the page you select. You can click on any
underlined page to further expand the graph. There is no limit to the number of pages you can have on the graph,
however, doing so increases the size of the report, requiring you to scroll to view the entire graph. However, you can
click Fit to Screen to size the report to your screen. Additionally, you can hover over a page to see visit and revenue
data for the page.
Report Uses:
•
Understand what steps are taken most frequently after viewing a selected page.
•
Optimize your site path design to funnel your traffic to a desired goal page.
•
Identify where visitors are going instead of your desired goal pages.
DISCOVER USERS GUIDE
84
Report Descriptions
Figure A.4: Opening Screen for Flow Reports
Each of the Flow type of reports starts with this page, asking you to identify a starting. Clicking on the Select Page link
displays the following window from which you can search for and select your desired page.
Figure A.5: Selecting Page for the Next Page Flow
DISCOVER USERS GUIDE
85
Report Descriptions
Next Section Flow Report
The Next Section Flow report is similar to the Next Page Flow report, but is displays data for Site Sections (groups of
related Web pages.) If a page is contained in more than one site section, then the report displays data for all site
sections. For example, an online retailer might have site sections for its products and site sections for product brands.
In this case, a product Web page can fall under multiple sight sections. Though a product page has only been viewed
once, the Next Section Flow report shows a page view for each sight section associated with the page.
Next Server Flow
This report shows you the navigation data between servers on your site. When you select a server name from your
site, the report shows you the number of visitors who navigated from that server to each of the other servers on your
site within a single visit. For example, if you have specific data on different servers or have mirrored data on separate
servers, the report shows you the path between servers that the users hit during their visits to your site. This is also
true of domains within your Web site. For example, you can see how many user went from a www.mysite.com to
info.mysite.com or sales.mysite.com.
Previous Flow Group
Previous Flow reports are similar to Next Flow reports, except rather than seeing where visitors when after a selected
peg, you see where visitors were prior to visiting a specified page. The controls for using the report are identical to the
controls for the Next Flow reports.
Previous Page Flow Report
Figure A.6: Paths - Previous Flow Reports
The Previous Page Flow report graphically illustrates multiple levels of the most popular pages that your visitors view
prior to the selected page. The report also highlights pages from which visitors enter your site.
The report should be read from right to left. The pages that were viewed prior to the selected page are illustrated as a
branch extending to the left of the selected page. The percentage each page was viewed prior to the selected page is
displayed beside the name of the page. The width of the line connected to each previous-page graphically depicts this
relative percentage.
The term path views is used to indicate the number of times a page was viewed, given the constraints of the displayed
paths. For example, if the Privacy Policy page has 10,000 total page views, but only 500 of those page views occurred
immediately before the user visited the Home Page, the report displays 500 path views for the home page.
DISCOVER USERS GUIDE
86
Report Descriptions
Continuing from right to left, a branch extends from each of the pages in the middle column, denoting the pages that
were viewed previously. The relative percentage is depicted by the relative width of the line.
By default, this report displays the top 10 pages from which users traversed to the page you select. You can click on
any underlined page to further expand the graph. There is no limit to the number of pages you can have on the graph,
but, doing so increases the size of the report, requiring you to scroll to view the entire graph. However, you can click Fit
to Screen to size the report to your screen. Additionally, you can hover over a page to see visit and revenue data for
the page.
Report Uses:
•
Understand what steps are taken most frequently prior to viewing a selected page.
•
Optimize your site path design to funnel your traffic to a desired goal page.
Previous Section Flow Report
The Previous Section Flow report is similar to the Previous Page Flow report, but is displays data for Site Sections
(groups of related Web pages.) If a page is contained in more than one site section, then the report displays data for
all site sections. For example, an online retailer might have site sections for its products and site sections for product
brands. In this case, a product Web page can fall under multiple sight sections. Though a product page has only been
viewed once, the Previous Section Flow report shows a page view for each sight section associated with the page.
Previous Server Flow Report
This report shows you navigation data between servers on your site. When you select a server name from your site,
the report shows you the number of visitors who navigated to that server from each of the other servers on your site
within a single visit. For example, if you have specific data on different servers or have mirrored data on separate
servers, the report shows you the path between servers that the users hit during their visits to your site. This is also
true of domains within your Web site. For example, you can see how many user went from a www.mysite.com to
info.mysite.com or sales.mysite.com.
Site Analysis Report
The Site Analysis report is a visual representation of your Web site. It has several features and provides you with a
large amount of information at a glance. By default:
•
The cylinders represent Web pages. The taller the cylinder, the larger the number of page views; the wider, the
larger the number of visits. You can add Web pages with the Page Selector tool.
•
The arrows show traffic flow. The larger the arrow, the greater the volume of flow between the two connected
pages.
•
The color shows a success metric of the Web page; in this case, revenue. A change in color shows a change in the
number of times the page took part in the selected success event.
•
The X any Y axes show additional metrics. The placement of the cylinder corresponds to the value for the metric.
•
Each of these can be changed.
DISCOVER USERS GUIDE
87
Report Descriptions
Figure A.7: Site Analysis Report
In Figure A.7 each cylinder represents a page from your Site. The default segment is All Visits. You can choose other
segments or combinations by clicking on the segments label to display the Segment Builder.
You can select which pages to have displayed by dragging them from the Page Selector (in the upper-right corner).
For more information about the Segment Builder and the Advanced Segment Builder, see “Working with Segments” on
page 47.
For a complete discussion of the powerful Site Analysis function in Discover, see “Running Visualization Reports” on
page 57.
DISCOVER USERS GUIDE
88
Report Descriptions
VIrtual Focus Group Report
The Virtual Focus Group report takes a visit at random from your visits and shows you an extensive amount of data
about the visit. You can take the report and create focus groups from your visitor population. An image of the report is
displayed in Figure A.8. More information about the report is detailed later in this manual. See “Running the Virtual
Focus Group Report” on page 32.
Figure A.8: Virtual Focus Group Report
Traffic Sources Reports
Traffic Sources reports show you information about the search engines and Web sites that drive traffic to your Web
site. Additionally, you can see information about your campaigns designed to bring visitors to your site.
DISCOVER USERS GUIDE
89
Report Descriptions
Search Keywords Report
The Search Keywords report is a ranked report that shows the search keywords (or search phrases) that customers
used to arrive at your site, and how those customers affected your site’s Success Metrics. This can help you determine
how to better tailor your site code, such as META tags, or which keywords to register with search engines. You can see
if certain keywords resulted in more orders or if other keywords caused higher instances of cart additions.
Search Engines Report
The Search Engines report shows the search engines that your site customers used to find your Web site, and how
they affected your various site success metrics. This can help clarify the specific search engines customers used to
arrive at your site, allowing you to tailor various Web initiatives to that information. You can see the amount of revenue
generated by customers from certain search engines or discover whether customers from a particular search engine
are responsible for more cart removals than those from other search engines.
Paid Searches Report
This report can help you determine which keywords to register with search engines. You can see if certain keywords
resulted in more orders or if other keywords caused higher instances of cart additions or revenue. The report shows all
paid search keywords that visitors used to arrive at your site with the accompanying statistics. Additionally, you can
break down all or individual search keywords by search engines, allowing you to view the relationship between the
search engine and the keyword.
Referring Domains Report
The Referring Domains report shows the domains that referred the customers that most impacted your site’s success
metrics. For example, you can see which referring domains were responsible for the most revenue, orders or
checkouts. By identifying this information, you can further target effective domains for campaigns, concentrate your
marketing efforts on less effective referring domains, etc.
Referrers fall into two main categories: Domains and URLs. Domains refer to the domain name, and appear as the
base domain without the query string or subdirectories attached. Examples of a domain referrer could include aol.com,
yahoo.com or google.com. URLs include the base domain name, as well as any query strings or subdirectories.
Examples of a URL referrer could include aol.com/subdirectory, aol.com/search string, or aol.com/subdirectory/search
string. Because the number of unique referring URLs is huge and therefore less valuable than referring domains, the
Referring Domains report references referrers only by their base domain.
Original Referring Domains Report
The original referring domains report shows the original referrers that produced the customers on your site. Customers
can visit your site multiple times, and have a different referrer for each visit. This report shows which referrer was the
first referrer to direct them to your site. This can help you see if they continued to use the same referrer and view
patterns in how customers are referred to your site. You can view the number of visitors generated by an original
referrer or discover how much revenue each original referrer was responsible for producing.
As explained in the report above, referrers can fall into two main categories: domains and urls. because the number of
unique referring urls is huge and therefore less valuable than referring domains, the original referring domains report
references referrers only by their base domain.
Campaigns Reports
Campaigns reports show you the effectiveness of your efforts to get people to visit your Web site. Because Campaigns
are so unique to each organization, several custom reports can appear in your menu. These might show you data
about your campaign costs, ad types, time frames, and other data. If you use SAINT to create campaign classifications
from your campaign tracking codes, then these classifications are imported as reports in Discover.
DISCOVER USERS GUIDE
90
Report Descriptions
Campaign Conversion Funnel Report
Conversion Funnel reports show key conversions between important data in each reporting group and standard
conversion metrics. By default, this report shows you the number of click-throughs that generated sales, and the
number of units sold. The graphical section gives a visual summary of this conversion data. The table shows statistics
for average sales per click-through, and average units sold per click-through. You can add metrics and custom events
from other reporting groups to these reports by clicking the Selected Events link near the top of the report.
NOTE: Because the current time periods are not yet completed when you view data, the Conversion Funnel reports
can accurately indicate a downward trend from the previous to the current time period in that there are fewer visits
today than yesterday, but only because the rest of the time period's statistics have yet to occur.
Tracking Code Report
The Tracking Code report is a ranked report that correlates the tracking codes with the campaign names and shows
you the sales amounts for the different tracking codes. Put simply, the report shows you the sales generated by each of
your campaigns.
The common object names associated with the tracking codes (such as campaign names or creative element objects)
in Site Catalyst are imported and displayed in the Discover report. If these configurations aren’t in place, the actual
tracking code numbers display. Campaigns are set through the campaign variable in the tracking code and are stored in
cookies that are used with purchases and other events that happen later. Campaigns expire after purchase events, or
when a new campaign overwrites an older campaign.
Campaigns Report
The campaigns report shows you the effectiveness of your entire campaign. You might have several facets of a
campaign, such as an email marketing effort, a on-site banner effort, and a search engine ad-words effort. The
campaign report combines all of these efforts, while the tracking code report shows each of them individually. You can
use this report to gauge the overall effectiveness of your campaign.
Creative Elements Report
The creative elements report shows toy the success rates the creative elements of your online campaigns. Within an
online camp0aign, you might have several creative elements such as top banners, side column ads, window screens,
and other items. This report shows you how effective each of these are in generating sales revenue.
Products Reports
Products reports show you how well each product sold on your site is doing and the revenue each is generating. You
can use these reports to help you determine amounts of product to order, and whether to add new product lines similar
to ones that sell well, or whether you should discontinue certain products.
Products Conversion Funnel Report
By default, the Products Conversion Funnel report shows you the number of product views on your Web site that
converted to sales, and the revenue generated. Additionally, it shows you the total number of units sold. A table in the
report shows you the average revenue per product view, and the average number of units sold per product view.
NOTE: Because the current time periods are not yet completed when you view data, the Conversion Funnel reports
can accurately indicate a downward trend from the previous to the current time period in that there are fewer visits
today than yesterday, but only because the rest of the time period's statistics have yet to occur.
DISCOVER USERS GUIDE
91
Report Descriptions
Products Report
The Products report lists each product sold on your Web site and shows you the revenue generated by each product.
You can use this report to see which products are creating the most revenue for your company. You can also add a Unit
metric to this report to see the numbers of products sold.
Categories Report
The Categories report is similar to the products report except that it displays revenue for product categories (similar
products placed together). For example, if your site sells janitorial supplies, you can have a category for cleaners, one
for buckets and containers, one for brooms and mops, and so forth. This report shows the revenue for each of your
product categories.
NOTE: If a product resides in more that one category, revenue for that product displays in each associated category.
For example, if a product fell into two categories such as bulk items and cleaners, and you made $35 form each sale of
the product, each product sale adds $35 in revenue to both the bulk items and the cleaners categories.
Visitor Retention Reports
Visitor retention reports show you how often the same people return to your Web site, or whether much of your traffic
is generated by new visitors.
Return Frequency Report
This report shows you the length of time that passes between visits from returning visitors, and then number of visits
that fall into each time length category. By default, this report has the following time lengths:
•
Less than one day
•
One to three days
•
Three to seven days
•
Seven to fourteen days
•
Fourteen days to one month
•
Longer than one month
The report shows how many return visits fell into each of these time periods.
Visit Number Report
The Visit Number report is a ranked report that shows you the visit number as an incremented sum for each visit. The
report shows you number and percentages for each the visit number. You can use this report in several ways. You can
use it as a fallout report to see whether Visitors who visit you site are returning. You can also add a revenue metric to
see whether you generate more revenue from initial visits or subsequent visits.
NOTE: If the same visitor visits you Web site multiple times in the same time period, each specified visit number is
incremented for each visit.
Customer Loyalty Report
The Customer Loyalty report shows the revenue earned from customers in three categories:
•
New Customers - Revenue from the initial purchase of a customer
•
Return Customers - Revenue from the second purchase of a customer
•
Loyal Customers - Revenue from all additional customer purchases after the second.
DISCOVER USERS GUIDE
92
Report Descriptions
You can use this report to see whether your revenue is most significantly affected by initial purchases or by repeat
purchases.
Visitor Profile Reports
The reports in this group give you information about your visitors. Using these reports you can see where your visitors
live, what type of computers they use, what languages they use to access the Internet, and so forth.
GeoSegmentation Report Group
GeoSegmentation reports help you understand the geographic dynamics of your Web audience, including the
countries, states and cities from which they are browsing.
The reports in the GeoSegmentation section give you important insight into the technology and preferences of your
Web site's audience. This information can help you:
•
Know how to optimize your site to meet the technological preferences of your visitors.
The reports in the GeoSegmentation section include Countries, States, DMA®, and Cities.
Countries Report
The Countries Report shows you the countries from which visitors are accessing your site. In addition to the standard
Ranked and Trended views available on most reports, there is also a Map view that color-codes the countries according
to their relative contribution to your total traffic. Darker colors indicate greater numbers of daily unique visitors from
that country visiting your site.
While this report cannot show the individual site pages that were viewed by people from each country, you can use this
report in conjunction with the Property reports in the Segmentation section to do so.
Report Uses:
•
See the parts of the world from which visitors are coming.
•
Track your international exposure.
Regions Report
The Regions report, displays the geographic region from which your visitors come. These are not confined to US states,
but can include regions throughout the world such as Tokyo, Ontario, Shanghai, and others.
Report Uses:
•
See the international regions from which visitors are coming.
•
Track your international exposure.
Cities Report
The Cities Report shows you the all cities from which visitors are accessing your site.
Report Uses:
•
See the parts of a state from which visitors are coming.
•
Track your intrastate exposure.
U.S. DMA Report
The DMA (Designated Market Area) Report shows you the marketing areas within the United States from which visitors
are accessing your site. The DMA boundaries and DMA data for this report are effective for the period 2004-2005.
DISCOVER USERS GUIDE
93
Report Descriptions
Report Uses:
•
See the major marketing areas from which visitors are coming.
•
Identify the top market areas in which your site is used.
Domains Report
The Domains report lists the organizations and ISPs that customers browsed the Internet under as they engaged in
various commerce activities on your site. Similar to the Domains report in the Traffic group, this report lists the
secondary domain rather than the full domain (for example, in the full domain http://proxy02.sko.aol.com, the
secondary domain is aol.com). This information helps you see which general organizations or companies provide ISP
service to your site customers. This report can help you choose where to direct your marketing or promotional
campaigns, etc.
The Domain report shows the number of customers from different top-level domains that most impacted your Success
Metrics. This can be helpful to allow you to tailor content on your site to people from the top-level domains that
generate the majority of your revenue, or could convince you to even create different instances of your entire site.
The report identifies world regions that visitors come from based on their originating domain extension. Domains
ending in Commercial (.com), Network (.net), Education (.edu), Government (.gov) and Organization (.org) are usually
based in the United States, and are listed separately from the rest of the countries. All countries have specific domain
extensions, such as Brazil (.br) and the United Kingdom (.gb). Discover recognizes all of these country extensions.
Technology Report Group
The Technology report group shows tells you information about the computers, software, and settings that your
visitors use when they access your Web site.
Browsers
The Browsers report identifies the types and versions of browsers that are used by each of your customers. This data
can give you an understanding of your audience's Web sophistication level. For example, 80% of your customers might
be using an antiquated browser, or perhaps 90% use a very recent release. Information in this report can be used to
justify site optimization for particular browser features.
Browser Width / Browser Height
Given in increments of 100 pixels, this report shows the percentage of visitors using browsers of specified dimensions.
For example, if you find that less than 2% of your visits came from visitors using browsers pixel sizes of less than 500
pixels, and that over 25% came from browsers set to display 800-899 or 1000-1099 pixels, you can determine which
screen size to target with your graphics.
Operating Systems
The Operating Systems report shows you which operating systems are being used by your site visitors. This report
covers most operating systems including Windows 95, Windows 98, Windows NT, Mac OS, Linux, WebTV (now MSN
TV) and Sun, among others. Because different operating systems tend to display Web pages differently, this report can
be used to help you optimize your site to the most common operating systems that your Visitors use. They can also
give you insight into your visitors’ spending preferences. For example, if several of your visitors are using older
operating systems, this might indicate that your visitors have spend-thrift attitudes.
Monitor Color Depths
When your messages need to deal with various color depths, it is good to know what percentage of your visitors use
each of the different depths. Specifically, this reports on the 2-bit, 12-bit, 15-bit, 16-bit, 24-bit, and 32-bit color
settings of your customers. These colors can also be known as 4, 4,096, 32,768, 65,536, 16 million, and so forth.
DISCOVER USERS GUIDE
94
Report Descriptions
Monitor Resolutions
The Monitor Resolution report shows the screen resolutions your Web site’s customers most commonly use, as
configured on their computers. Resolution refers to the number of pixels that can be displayed going across and down
the screen. Settings include 640 x 480, 800 x 600, 1024 x 768, 1152 x 864 and 1280 x 1024, among others. By seeing,
for example, if certain monitor resolutions resulted in more cart views, you can help identify such things as problems
with your cart view page or how you alert customers as to what their carts currently contain as they shop.
Java
This report helps you determine how many or what percentage of visitors have Java enabled on their computer. You
can use this to determine whether you want to use Java-based applications on your Web site.
Cookies
This report shows what percentage of your visitors have cookies enabled. You can use it to determine whether to use
cookies technology on your Web site.
Connection Type
This report displays the connection types visitors use to access your Web site, such as LAN or modem. If many of your
Web site visitors use a faster or slower type of connection, you can optimize your site content for that type of
connection.
Custom Conversion Reports
Custom Conversion reports are specific to your Web site. Because all business are different, success metrics for your
site may be different from others. For example, a site that registers users may want a report on the number of visitors
who register on their Web site. You may also want to track ad clicks for sites that advertise on your Web site as custom
conversion events. You may have several Custom Conversion reports under this menu option.
Custom Traffic Reports
Like Custom Conversion reports, Custom Traffic reports are also specific to your Web site. An organization may have a
custom traffic report that lets them monitor a search feature their your Web site. The report may show data about the
search terms that users type and the results of the search. Another organization may use have a report on which user
log in to their site. You may have several custom traffic reports in this menu option.
Test&Target Reports
Omniture Test&Target data provides more robust visitor profile information when analyzed using the Discover reports.
You can leverage the insight gained from Test&Target campaign data when viewed against other dimensions such as
traffic sources, pages, products, and so forth. Additionally, you can build visitor segments to include rules based on
Test&Target data. For example, a segment defined by an less-effective Test&Target campaign may help you
understand site navigation patterns more fully. Additionally, a segment defined by a successful Test&Target campaign
may help you better understand why specific traffic sources contributed more to product conversion.
See “Using the Advanced Segment Builder” on page 58.
NOTE: Test&Target reports only display if you are an Omniture Test&Target customer, and you have configured
Test&Target to export data into SiteCatalyst and Discover. See the Test&Target User’s Guide for more information about
configuring Test&Target to export data to Discover.
DISCOVER USERS GUIDE
95
Report Descriptions
Campaign > Recipe
This report shows you data for your Test&Target recipes grouped in their respective campaigns. You can apply all
Discover metrics to the report to customize the data to show you the exact information you need to know.
Campaign
This report shows you combined data for each of your campaigns. You can see the recipes for each campaign if you
open the recipes report from the table.
Recipe
This report shows you data for each recipe in Test&Target irrespective of campaigns. You can use this report to
compare recipes for effusiveness across campaigns. You can incorporate elements from the best recipes into all of your
campaigns. You can see the campaigns that correspond with each recipe if you open the campaign report from the
table.
Survey Reports
Omniture Survey data provides more robust visitor profile context when analyzed using the Discover reports. You can
leverage the insight gained from Survey attitudinal data when you view it against other dimensions such as traffic
source, page, product, and so forth. Additionally, you can build visitor segments to include rules based on attitudinal
data. For example, a segment that shows visitors who responded poorly to a specific survey question may help you
understand why site conversion is down. Additionally, a segment that shows visitors who responded favorably to a
specific survey question may help you to better understand why marketing campaigns are successful.
See “Using the Advanced Segment Builder” on page 58.
NOTE: To display Survey reports in Discover, you must be an Omniture Survey customer.
Survey > Question > Response
This report shows you on each line, the name of the survey, the question, the response, and the number of people who
chose the response. An example may look like this:
Survey 1 > How helpful were the customer representatives? > Very helpful/94
Survey 1 > How helpful were the customer representatives? > Somewhat helpful/18
Survey 1 > How helpful were the customer representatives? > Unhelpful/4
In this survey, for the question “How helpful were the customer representatives?” 94 people answered ‘Very helpful’.
The other responses had 18 and 4 responses respectively.
Survey
This report shows combined data for all surveys. You can view this information for associated questions and responses
by selecting those reports from the tables.
Question
This report shows data for all survey questions. You can view this information for associated surveys and responses by
selecting those reports from the tables.
Response
This report shows data for all survey responses. You can view this information for associated surveys and questions by
selecting those reports from the tables.
DISCOVER USERS GUIDE
96
APPENDIX B
Advanced Topics
B.1 Discover Security – Ensuring the Security of
Customer Data
To ensure your data security, Omniture employs a qualified Information Systems and Network Operations staff. This
group has identified three important areas around which our security efforts are focused: the network, the hosting
facility, and the corporate office. This section describes the proactive approach and procedures followed by Omniture to
maximize the security of each of these areas.
Network Security
The Internet connects millions of users to millions of machines scattered across the globe. This allows unprecedented
access to information. Unfortunately, it also presents a security problem. Authorized individuals need access to
information, but unauthorized parties should not have access. Additionally, software being run on machines that are
connected to the Internet is often vulnerable to exploitation by attackers. Omniture addresses these issues with the
following policies. (While a much smaller combination of these policies would likely be sufficient to keep intruders from
the system, strong, redundant systems are the best way to prevent unauthorized access.)
•
Intrusion detection system. All servers run intrusion detection software that detects unauthorized or irregular
connections, such as port scans and common back door attempts. It responds to these attempts by making the
server appear to be a black hole to the offending machine. Any network connections attempted by the machine in
question will be ignored, and the server will appear not to exist to the machine making the connections. This
system works in real-time, blocking attacks immediately as they occur.
•
Non-routable, off-net addressing. Omniture maintains all servers containing customer data on IP addresses
that are not routable across the Internet. Because all connections must be made through a network bridge or
proxy server, this severely limits the ability of individuals to connect to these machines.
•
Load balancers. In addition to distributing Web traffic among the servers in the cluster, the load balancers
perform important security-related tasks. All connections other than those to allowed ports (80 and 224 for HTTP
and SSL respectively) are filtered out, never even reaching the servers they are destined for. The load balancers
also perform Network Address Translation (NAT). NAT is a process that masks the true IP address of a server from
the client connecting to it. The true IP address of the machine is never revealed, thus limiting the attacks that can
be performed against it.
•
Secure management. All management connections to the servers occur over encrypted protocols such as SSH.
Access via these protocols is denied by default unless the connection originates from a list of trusted IP addresses.
Telnet, FTP and other non-encrypted protocols are not allowed from any Internet address.
•
Private management line. Omniture has deployed a private T1 connection from the corporate offices to the
main data center in Sunnyvale, CA. Not only is this line completely private, connecting the Omniture offices directly
to the production machines, but all data transmitted over this private connection is also encrypted.
•
Password protected user access. Customers wanting to access their data must authenticate their identity with
a username and password. All users are required to transmit this information over SSL-encrypted channels to
prevent it from being intercepted.
•
Service monitoring. All servers, routers, switches, load balancers and other critical network equipment are
monitored 24 hours a day. The software responsible for monitoring this system performs over 6,000 health checks
per hour, probing for security, data integrity and service interruptions and automatically sends notifications to the
on-call staff member. Should the on-call member fail to acknowledge the problem, it is automatically escalated to
DISCOVER USERS GUIDE
97
Advanced Topics
other members of the Network Operations staff. Omniture also employs ASP monitoring services such as Keynote
and Web master Solutions to provide several layers of monitoring redundancy.
•
Denial of service attacks. Rather than attempt to compromise a machine, sometimes an individual will launch
an attack designed to prevent others from legitimately accessing a site. These Denial of Service (DOS) attacks and
Distributed Denial of Service (DDOS) attacks typically flood a group of servers with illegitimate traffic to bog them
down and prevent them from responding to legitimate requests. DDOS attacks can be very complicated, as are the
methods of protecting servers from them. Omniture servers have enabled SYN cookies (prevents DOS from SYN
packet flooding) and have delayed-binding enabled in the load balancers. In addition, Omniture’s network provider
has deployed special rate-limiting filters designed specifically to filter out DOS traffic. Finally, the T1 line connecting
our data center with the corporate office is a direct, private connection. In a worst-case scenario it would still allow
Omniture to access the servers to diagnose the problem. This is true even if the DDOS attack should successfully
disallow alternative means of access.
Hosting Facility Security
Omniture uses the strictest security standards when choosing data-hosting partners. The security measures we look
for (and achieve) when choosing a partner include:
•
Physical facility security. Items in this area include: 24-hour on-site security personnel who require credentials
for facility admittance, biometric scanners that authorize data center access, remotely monitored video cameras
that provide continuous surveillance and equipment racks located such that another ID check and signature with
security personnel are required for entry.
•
Fire suppression. The standard use of oxygen-consuming chemicals to extinguish a fire is preferable because
they are dry and computer safe. A backup wet sprinkler system must be available, but should also be kept dry until
the last minute to prevent accidental deployment.
•
Controlled environment. The facility must be environmentally controlled for temperature, humidity and fluid
detection. An HVAC system that is completely redundant, with environmental response teams available 24 hours a
day to deal with irregularities are also necessary.
•
Backup power. A facility that can provide 100% of the power necessary to run independently of any other power
supply is desired. Fail-over systems, such as battery backup systems that continue to supply power until the power
generators come online, should be automatic, occurring in a matter of seconds.
•
Data backups. Data backups must be taken every night, and should be stored and secured on a drive on the
local network as well as on a tape system. Backup tapes should be removed from the data center and stored in an
off-site vault by security personnel only. Mission-critical data is also sent to Omniture’s corporate office nightly via
an encrypted connection.
Corporate Office Security
Omniture’s corporate offices are currently located in Orem, Utah. Many companies adequately secure both their
hosting facilities and network, but fail to recognize the importance of adequate security at the corporate offices. The
following procedures represent the processes that Omniture has implemented to protect against security threats:
•
Virus protection. Omniture has taken an extremely aggressive position in eliminating virus infections and
preventing the introduction of new viruses. All incoming and outgoing e-mail messages must pass through two
independent virus filters. These filters block and quarantine all known viruses as well as any attachments with
suspicious extensions (such as .VBS). Virus databases are updated automatically each night. All workstations run
real-time virus scanning software to provide yet another layer of protection. This software works as an ASP and
automatically updates itself with new virus definition files nightly. The system requires no intervention from IS staff
nor end users.
•
Facility access. All employees are issued key cards for building access, which also log access events. Each
employee's access requirements are individually evaluated, and structured to allow access to the building during
the necessary times only. Visitors must enter through the front entrance and pass the receptionist. Visitors must
DISCOVER USERS GUIDE
98
Advanced Topics
sign in and out and must be accompanied by an employee at all times. Server equipment, development machines,
phone systems, file and mail servers and other sensitive systems are kept locked at all times in an environmentcontrolled server room accessible only to IS staff and members of the executive team.
•
Alarm system. An alarm system is activated during periods where no employees are in the building. Both door
and motion sensors are deployed. The alarm system will automatically call authorities when tripped. Authorized
employees must have both a key card and a security code to enter the building during non-business hours.
•
Backups. All data contained on file servers, finance servers and mail servers is backed up to tape each night.
Copies of backup data are periodically taken and stored off-site to guard against all backups being destroyed with
the originals in case of a disaster. Permanent (CD-ROM) copies are made of employee's e-mail messages and files
upon any termination events. All employee e-mail is also retained for 30 days after being deleted by the employee.
B.2 Internet Explorer 6.0 Cookie Handling
About Cookies
A cookie is a small piece of information that a Web server can give to a Web browser. The browser then returns this
information to the Web server with every additional request that is made.
Cookies are most commonly used to differentiate between users and to personalize Web sites. For example,
Amazon.com can differentiate between shopper accounts (shopping carts) thanks to the cookie it sets on your
computer. This cookie identifies you as a unique anonymous visitor, distinguishing you from all other anonymous
visitors browsing their site at the same time, and allows Amazon.com to correctly assign you to the correct shopping
cart.
Cookies cannot be used to magically identify you as an individual by your e-mail address, street address or any other
personal information. The only exception to this is information that you explicitly give a particular Web site. If you give
a Web site your name, the Web site can then store your name or some other identifier that links you to your name, so
that the next time you visit your name will be known to the site. Cookies cannot discover any information that you did
not already give to the site. However, if you do disclose personal information to a site, a cookie can then be used to link
you to that information on all subsequent visits.
For security purposes, a cookie can only be returned to the domain that set it. This means that cookies set by
Yahoo.com cannot be read when you are visiting Microsoft.com. In fact, if you pull up Microsoft.com in your browser,
there is no way for the Web servers to even see that you have Yahoo.com cookies, or that Yahoo.com has ever been
visited. More importantly, Microsoft.com cannot recover private information you may have disclosed to Yahoo.com
through the use of cookies.
How Discover Uses Cookies
Discover uses cookies to anonymously distinguish unique visitors from one another, as well as determine the last time
that customer visited the site. Discover does not use cookies to link Web site visitors with any personally identifiable
information.
While cookies are not essential for Discover to function correctly, they increase the accuracy of the data. For example,
if two users are surfing from behind a firewall they will both have the same IP address. Without cookies, these two
users share an IP address and would be indistinguishable as two unique users. Setting cookies allows Discover to
accurately determine that there are two different users visiting the site.
About Internet Explorer 6.0 and Cookie Handling
Customer concern about Internet data privacy has been steadily growing. As a result, an emerging standard called P3P
(Platform for Privacy Preferences) has been introduced to give end-users automated control over which cookies the
DISCOVER USERS GUIDE
99
Advanced Topics
browser will accept or reject. P3P ties the privacy policy of an organization to the cookies that the organization sets on
your machine and allows you to create rules that will accept or reject cookies.
Figure B.1: Internet Explorer 6 and later Privacy Options
P3P-compliant cookies include a summary of the privacy policies of the Web site with every request to set a cookie. If
the cookie complies with the rules set by the user, the browser allows the cookie to be set. If it does not, the cookie is
rejected.
Microsoft Internet Explorer 6.0 was the first browser to implement the P3P standard, and has been available since the
end of August 2001.
Microsoft's implementation includes a Privacy tab in the Internet Options window. The privacy option can be set to one
of six settings. The default setting is Medium. Additional advanced options are available to the user to fine-tune P3P
policies.
Should a user encounter a site where a cookie is being set that either lacks a P3P policy, or where the privacy rules set
by the customer do not comply with the summary of the privacy policy, a small red notification icon is displayed in the
IE status bar (
).
Double-clicking this icon will show a list of URLs that attempted to set a cookie that either did not have a privacy policy,
or where the privacy policy conflicted with a user's P3P settings.
How IE 6.0 Affects Discover
Privacy is an important issue to us at Omniture. We have long anticipated the inclusion of the emerging P3P standard
in IE 6.0 and have worked with Microsoft to ensure that the cookies set by Discover are fully P3P compliant.
DISCOVER USERS GUIDE
100
Advanced Topics
Additionally, since Discover does not attempt to uniquely identify a user by name or other personally identifiable
attribute, the Discover P3P privacy policy is fully compliant with IE 6.0's default privacy settings. The introduction of
P3P technology in IE 6.0 should not adversely affect tracking accuracy or the end-user's experience.
About P3p Compliance, and the Red Warning Icon on Pages with
Discover
Cookies set on a machine before it was upgraded to IE 6.0 have been termed as Legacy Cookies. Microsoft has decided
to block all legacy cookies because they were set before P3P, and therefore have no privacy policy associated with
them. Adding to the confusion is the fact that the privacy report that displays when you double-click the icon fails to
identify the fact that only legacy cookies are being blocked. As a result, visitors returning to your site who have
installed IE 6.0 since their last visit will see a red warning icon in the status bar. After the first page is loaded, the
legacy cookie will be replaced with a P3P compliant cookie, and the privacy warning will not show up again.
B.3 Visitor Opt-outs and the Omniture Privacy Policy
A link to Omniture’s Privacy Policy can be placed in your own Web site’s privacy policy statement, which allows visitors
to exclude themselves from Discover tracking. When users click the link in Omniture’s Privacy Policy, they have the
option to be excluded from site statistics (enabled by installing a cookie in their browser that identifies them as one not
to be tracked). They can also click a link that allows their actions on your site to be tracked, or to remove the opt-out
cookie if it was set during a previous visit.
The following is Omniture’s privacy policy with respect to tracking information about your site visitors. The same policy
can be found at www.omniture.com/policy.html.
Privacy Policy for Visitors to Sites Tracked by Discover – a Web Analytics
Product by Omniture, Inc.
Discover considers privacy one of our highest priorities. In order to honor that priority, and to maintain the confidence
of our customers, Omniture® conducts its Discover business in accordance with the following policies.
We Do Not Collect Personal Information
Discover does not collect any personal information such as names, ages, phone numbers, addresses or e-mail
addresses from visitors to our customer's Web sites.
We Do Not Aggregate Individual Visitor Traffic Patterns
Discover does not collect individual profile information for visitors across multiple sites and does not aggregate
information from other sources about browsing patterns of individual visitors across multiple sites.
Collection of Non-Personally Identifiable Information
Discover collects anonymous visitor information like IP addresses, browser types (such as Internet Explorer or
Netscape), referring pages, pages visited and time spent on the Web site. Discover collects this non-personally
identifiable information for the following purposes: (1) to provide anonymous statistical analysis of Web page traffic
patterns to our customers for their Web sites; (2) to administer our Web site and servers, (3) to allow for auditing of
our services by third parties, and (4) to improve our services.
DISCOVER USERS GUIDE
101
Advanced Topics
Anonymous Use of Cookies
It is Omniture’s policy to use cookies only for more accurate anonymous traffic analysis. We use cookies to more
accurately track the time/date of the visit, the page viewed, the referrer, and transaction information for Commerce
pages. The cookie information does not include personal data such as name, age, phone number, e-mail address or
mailing address. In addition, Discover does not link cookies to personal data such as name, age, phone number, e-mail
address or mailing address.
As we do not build a database of individual visitors, the data that we do collect is never stored in any individual user
profile; the data collected serves only to update aggregate counts allowing our customers to monitor traffic on their
site. Most browsers are initially set up to accept cookies. If you would prefer, you can set your browser to reject
cookies.
Discover customers use customized JavaScript tracking code provided by Omniture® to track anonymous information
about their Web site visitors' activity. This code contacts Omniture's servers, receives a response, and loads a 1x1 clear
pixel image on the page. This JavaScript tracking code does not collect personal information such as name, age, phone
number, mailing address or credit card numbers from visitors to our customers' Web sites. Visitors may elect to opt out
of receiving tracking cookies for all sites using Discover services.
We Do Not Create Individual Profiles
Discover does not create individual profiles of visitors. We do not have a database of individual profiles of each visitor.
Discover collects data in aggregate form and data is not recorded or stored about individual visitors.
Third-Party Access
Our customers control access to Discover traffic reports. Discover anonymous traffic data for a customer's Web site
may be provided to an auditing service upon request from such customer.
Opt Out of Tracking Cookies
You may elect to opt out of receiving tracking cookies for all sites using Discover services. To do so, you will need to
accept a cookie indicating your choice. Please visit our opt-out page for more information.
For More Information
If you have any questions or comments about this policy, our services, or your experience with Discover, you can use
the Feedback link on our site, send an email to [email protected], or write to us at:
Omniture Corporation
Attn: Customer Service
1358 W Business Park Dr.
Orem, UT 84058
(801) 722-7000
DISCOVER USERS GUIDE
102
APPENDIX C
Glossary
C.1 Glossary of Terms
TERM
DEFINITION
404-Error
See Pages Not Found.
Acquisition
The attraction, enticement, gain or addition of new visitors to your site. SiteCatalyst® calculates
a Cost Per Acquisition report, which determines the cost required to acquire each new visitor.
ASP (Application
Service
Providers)
Third-party providers of software-based services and solutions. Distribution is made from one
central data center across a wide area network. ASPs are a common tool companies use to
outsource their various information technology needs.
Base Report Type
The basic commerce statistics that are tracked on your site, such as products, campaigns or
visit depths. Base Report Types appear in Products reports as the main category under which
the graphed items fall.
Browser
An application that provides a way to look at and interact with all the information on the World
Wide Web (also called a Web browser). It is technically a client program (such as Microsoft
Internet Explorer or Netscape Navigator) that uses Hypertext Transfer Protocol (HTTP) to send
requests to Web servers throughout the Internet on behalf of the user.
Cache
A temporary storage location from which data can be retrieved. Data retrieval from cache is
usually much faster than from the server. The Internet makes predominant use of the following
two caching mechanisms:
The Web browser stores recently downloaded pages in a temporary location on your hard drive.
When you return to a page you've recently viewed, the browser quickly retrieves it from this
local cache rather than the original server. You can usually change the size of your cache,
depending on the browser you use.
Most ISP’s utilize caching servers on their network. When a browser requests a page, the page
is downloaded to the individual’s computer and also saved on the caching server. If a different
user then requests the same page, it is then retrieved from one of the caching servers rather
than the site servers.
Many analysis tools (especially log file analyzers) fail to count page views from cached pages.
SiteCatalyst’s proprietary cache-busting technology counts cached page views the same way it
counts page views that have not been retrieved from cache, resulting in much more accurate
Web site usage data.
Cart Open
Events in which the cart object is created for a customer. Cart opens usually occur when a
customer selects an item for purchase, but can occur without an item as well.
Cart View
Event in which contents of the shopping cart are viewed by customers.
Categories
Similar groups of products, such as electronics or music (much like channels or content groups
in the Traffic reports). Categories can contain multiple products. For example, the electronics
category can contain many products including televisions, radios and computers.
Channel
Defined sections, or categories, of your site. Web sites that have two main categories, such as
weather and news, have two channels. SiteCatalyst® enables you to group statistics for all
page views that occur within any channel in your site.
DISCOVER USERS GUIDE
103
TERM
DEFINITION
Checkout
An event where customers arrived at the checkout stage of a purchase. Though the checkout
stage usually occurs just before a purchase is finalized, and usually involves the customer
entering personal information (such as their shipping and billing information), you have
complete control over which events on your site qualify as checkouts.
Click-through
Occurs when a user clicks on a link (the event takes the customer to a new place). Clickthroughs are typically used with promotional activities. They may originate internally, such as
for a site composed of many different areas, or they may originate on partner sites that have
ads for your site or your product.
Click-through
Rate
Occurs when a user follows a hyperlink (usually a Web advertisement). The click-through rate is
a measurement of the effectiveness of a Web advertisement.
Color-depth
The number of colors that can be displayed on the screen: most commonly 256, 65,536, or 16
million colors.
Content Group
Similar to the Traffic channels. They show the areas of your site that were visited most by your
site customers. Content groups could include (but are not limited to) groups of products, help,
support, or registration pages.
Conversions
The translation of one metric to another.
Cookie
A text file that uniquely identifies and is stored in the user’s browser. Cookies are most
commonly used to identify individuals and remember general user preferences. Web sites using
cookies often ask users to complete a form providing information such as their name and
interests. This information is packaged into a cookie and stored in the Web browser for later
reference. When the same Web site is viewed again, the browser sends the cookie to the Web
server, which uses the data to present Web pages customized to the user’s preferences (such
as a welcome page with your name on it).
CPM
An acronym standing for Cost Per Thousand (the M is the roman numeral for 1000).
CSV (commaseparated value)
Stores information in text format, allowing for more data at a much smaller file size. If you are
trying to download your data for analysis, CSV is definitely the preferred method. For example,
you can get up to 5000 rows of information in CSV, but only 2000 in Excel (due to file size).
Customer
A Web site visitor who has completed a transaction on your site.
Domain
A group of computing devices on a network that share common IP ranges.
Domain Name
The text-named mask for an individual IP address. Every computer that is connected to the
Internet has a unique IP address associated with it. When you log on to the Internet, your ISP
assigns you an IP address. This number is a four-part number such as 207.159.140.20
(SiteCatalyst®’s IP address). Each IP address usually has a Domain Name that is assigned to it.
The Domain Name for 207.159.140.20 happens to be SuperStats.com. The SiteCatalyst®
statistics program will always try to match an IP address with its Domain Name so you can see
who is visiting your pages. For example, john.pr.ibm.com is probably a person working at IBM
in their Public Relations department. If the server cannot find an associated Domain Name for
an IP address, then the IP address will be shown instead.
Encryption
Any method used to scramble data into secret code. It is the best way to achieve high levels of
security. Data that is encrypted cannot be decrypted unless a special key or password is used.
Entry Page
The first page viewed by a person on the same visit a success event occurred. Whereas an
entry page is the first page accessed by a person on the same visit a success event occurred,
an original entry page captures the first page accessed by a person on their first (original visit)
to the site.
DISCOVER USERS GUIDE
104
TERM
DEFINITION
Exit Page
The last page customers viewed before leaving your site.
Expiration Trigger
Sets the lifetime of a variable value by letting you tell the system when to expire the variable’s
value. Until a value expires, it will be used as a modifier to the purchase events. Expiration
triggers can be dates, time periods or commerce events.
Expire
Termination of variable values. Until a value expires, it will be used as a modifier to purchase
events.
Firewall
A program or device used to filter and block information as it passes through an Internet
connection, according to security rules set by the network administrator.
Frequency
How often an event occurs. In SiteCatalyst®, the number of times a visitor returns to your site.
This information is used in the Return Frequency report, which shows how often unique visitors
return to your site.
FTP (File Transfer
Protocol)
Used to upload or download files to and from servers on the Internet.
GMT (Greenwich
Meridian Time)
The international time zone standard. GMT is five hours ahead of Eastern Standard Time (EST).
For example, 1:00 A.M. EST would be 6:00 A.M. GMT.
Hit
Every time a server is called to retrieve an image, text, frame, or other information for a Web
site, a hit is registered. Depending on site content, you could have 10 hits or more for one fullpage view.
HTTP (HyperText
Transfer Protocol)
A protocol that determines how Web servers and Web browsers should respond to various
commands. For example, when you enter a URL in your browser, your browser sends an HTTP
command to the Web server instructing it to retrieve the requested Web page.
Impression
Similar to a hit, though most commonly used in advertising. Every time a server is called to
retrieve a Web page advertisement, an impression is registered. In the case of sites monitored
by SiteCatalyst®, the words hit and impression are used almost synonymously.
Instance
The number of times a unique event occurs, such as the number of times any visitor spends X
amount of time viewing one page on your site. For example, 10,000 visitors spending between
10 and 15 minutes on a specific page would be 10,000 instances of people visiting for that
duration.
Internet Average
The average value for a given statistic, taken across thousands of business Web sites. It
provides a baseline against which site data is compared. SiteCatalyst® uses the Internet
Average for all reports in the Technology Section, as well as the Search Engines, Countries,
Languages, and Domains Reports.
IP (Internet
Protocol) Address
Every computer or device that connects to the Internet has a unique identifier (IP address)
associated or assigned to it. IP addresses are four-part numbers separated by periods. Each
number ranges from 0 to 255. An example of a valid IP address is 207.159.140.20, which is
SiteCatalyst’s IP address.
ISP (Internet
Service
Provider)
Companies that provide end-user Internet access via dial-up, cable modem or other accounts.
Some ISPs also provide other services such as Web site hosting, domain name registration, etc.
Java
A programming language used for Internet applications. It is often used to create complete
applications, increase animation detail and real-time updates and allow visitor interaction with
Web pages through small applications called Java applets.
DISCOVER USERS GUIDE
105
TERM
DEFINITION
JavaScript
An interpreted programming or scripting language used to do many things such as:
Automatically change a formatted date on a Web page
Cause a linked-to page to appear in a window
Cause text or a graphic image to change during a mouse rollover
Keyword
See Search Keyword, below.
Load Balancer
Any device or software package that balances the load of incoming or outgoing items to
maintain an even server load distribution. For the Web, a load balancer is a computer that sits
between the Internet and two or more Web servers and processes the incoming requests to
balance the load to each.
Log File
Text files used by server software to store data relating to when files are retrieved from a Web
site. Some of the information that is collected include: date/time stamp, URL served, IP
address, status of the request, etc.
Module
Though not consistently used, generally refers to new areas within the product, such as the ecommerce module. In this sense, it combines the reports but also all of the database and back
end data required to generate the reports. The user usually sees reports and sections of
reports, but isn’t exposed to module anywhere else.
Network
A group of two or more computer systems linked together. There are many types of computer
networks, including:
Local-Area Networks (LANs), where the computers are geographically close together (in
the same building).
Wide-Area Networks (WANs), where the computers are farther apart and are connected by
telephone lines or radio waves.
Computers on a network are sometimes called nodes. Computers and devices that allocate
resources for a network are called servers.
Node
In networks, a node is a processing location. A node can be a computer or some other device,
such as a printer. Every node has a unique network address.
Object-Oriented
Programming
A programming model in which data structures become objects that include both data and
functions. Programmers can also create relationships between multiple objects.
One of the principal advantages of object-oriented programming over procedural programming
is that programmers can create modules that do not need to be changed when a new type of
object is added. They can simply create a new object that inherits many of its features from
existing objects. This makes object-oriented programs easier to modify.
Operating System
(OS)
The program that is initially loaded into the computer when it first starts up and manages all
other programs in a computer. Examples include Microsoft Windows, Unix and Linux.
Original Referrer
Customers can visit your site multiple times, and have a different referrer for each visit. The
original referrer is the referrer customers used the first time they arrived at your site.
Outsource
To use an outside provider or manufacturer to provide services (work, for example) in order to
cut costs.
Over Time Report
Used in the Purchases, Shopping Cart and Custom Events reporting sections. Similar to the
Page Views report, each of these reports displays data for one Success Metric over a specific
time period, such as a day, week, month, etc.
P3P (Platform for
Privacy
Preferences
Project)
Developed to provide a simple, automated way for individuals to gain more control over the use
of personal information on Web sites they visit. P3P enhances user control by putting privacy
policies where users can find them, in a form users can understand, and in a way in which they
can act on what they see. (See http://www.w3.org/P3P for more information.)
DISCOVER USERS GUIDE
106
TERM
DEFINITION
Page View
One complete Web page load in a user’s browser. Page Views count the number of times an
entire page has been accessed rather than individual site elements.
Page Not Found
Commonly referred to as a 404-error. A 404-error page is a default page that Web servers
display when a page or file that has been requested does not exist. This means that the server
did not find anything matching the requested URL. No indication is given of whether the
condition is temporary or permanent.
Plug-ins
Programs that work together with the Web browser to increase functionality and add special
features that are otherwise unavailable. The Netscape Plug-Ins report displays the plug-ins
being used by site visitors.
PNG
An image format similar to GIF.
Property
Sub-groups or subsections of channels. For example, assume a Web site has two channels:
news and weather. The news channel may then have the following four sub-groups, or
Properties: national, local, sports and politics.
Protocol
A standard procedure or format for transmitting data between devices. Computer protocols
typically determine procedures for the type of error checking to be used, the data compression
method (if any), how the sending device will indicate that it has finished sending a message,
and how the receiving device will indicate that it has received a message.
Proxy Server
A server located between a user’s browser and Web site servers. By intercepting all requests to
the actual Web server, the proxy server can:
Improve performance by saving all requested Web pages during a set time period (see cache,
above).
Filter requests, such as to prevent certain people from accessing certain Web sites.
Referrer
Locations from which visitors to your site come. They can be Web sites with search engines or
advertisements, e-mail messages, Web sites with links to your site, or a shortcut on your own
computer. For example, if a visitor clicks on an ad banner or link of any kind from site A and
arrives at site B, site A refers you to site B. Site B’s SiteCatalyst® account will register site A as
a referrer and log one page view for site B.
Referrers fall into two main categories: Domains and URLs. Domains refer to the domain name,
and appear as the base domain without the query string or subdirectories attached. Examples
of a domain referrer could include aol.com, yahoo.com or google.com. URLs include the base
domain name, as well as any query strings or subdirectories. Examples of a URL referrer could
include aol.com/subdirectory, aol.com/search string, or aol.com/subdirectory/search string.
Reload
Instead of merely repainting the Web page on your screen (refresh), reloading a page sends a
fresh request to the server to retrieve a new copy of the Web page you are currently viewing.
Report-specific
Success Metrics
Refer to elements that apply only to the report you are viewing. They can also be described as
happens events, such as the number of times a product is viewed (Product Views) or a
campaign is clicked (Click-throughs). These metrics appear at the bottom of the Item Summary
report and are also displayed in the Commerce Base reports when selected from the Success
Metrics menu.
Resolution
The fineness of detail with which images are displayed on your monitor, and is determined by
the total number of pixels that can be displayed on your screen horizontally and vertically.
Generally speaking, the more pixels displayed on your screen, the finer (and smaller) the
image.
DISCOVER USERS GUIDE
107
TERM
DEFINITION
Router
The computers on the Internet that direct packets of information to the correct destinations.
For example, when a user types in www.omniture.com, this request goes first to a router which
finds the physical location of the address typed in and directs that user’s request to the
appropriate servers.
Scalability
The capacity of a system to adapt to increased demands. A highly scalable system is one that
can easily grow with a company.
Search Engine
A coordinated set of programs that receive a search request, compare it to the entries in the
index, and return results to the visitor. These coordinated programs include:
A spidering program (also called a crawler or a bot) that reads each page or representative
pages on every Web site that wants to be searchable. The spider uses hypertext links on those
pages to read every page in those sites.
A program that creates a huge index (sometimes called a catalog) from the pages that have
been read.
A program that receives your search request, compares it to the entries in the index, and
returns results to you.
An alternative to using a search engine is to explore a structured directory of topics. Yahoo,
which also lets you use its search engine, is the most widely used directory on the Web. A
number of Web portal sites offer both the search engine and directory approaches to finding
information.
Search Keyword
Used by search engines as reference points for finding other words or information. For
information on how this works, read the text under Search Engine.
Server
A computer program that provides services to other computer programs in the same or other
computers. When taken in the context of the World Wide Web, a server serves Web pages to
the requesting computer.
Spider
A program that reads individual pages within a Web site in order to create entries for a search
engine index. It is also known as a crawler or a bot. Spiders are typically programmed to read
sites that have been submitted by their owners as new or updated. Entire sites or specific
pages can be selectively visited and indexed. Spiders are called spiders because they usually
read many sites concurrently, their legs spanning a large area of the Web.
SiteCatalyst® does not track spiders since they do not load images. Spiders that do happen to
slip through appear in the Other category.
SSL (Secure
Sockets
Layer)
A protocol that uses a private key to encrypt and transmit private documents over the Internet.
Many Web sites use SSL to securely obtain confidential visitor information, such as credit card
numbers. URLs of Web pages that use an SSL connection usually begin with https: instead of
http:.
Sticky
(Stickiness)
The tendency of a Web site to influence a person to increase the amount of time they spend
browsing the site, and to increase the visitor's desire to repeatedly return to the site. It is
usually measured by the duration of a visit.
Success Event
Allow you to define and track events that are unique to your site. For example, you could track
such custom events as steps in a sign-up process, bids or demo views. Success events can also
be used to augment other reports, such as tracking additional steps in your checkout process
that are not covered by the Shopping Cart group.
Summary Report
Present an executive overview of assorted commerce information. Each reporting section uses
at least one Commerce Summary report, which presents a synopsis of the information
contained in the other reports in that group. SiteCatalyst® Commerce employs three distinct
versions of the Commerce Summary report: Conversions & Averages, Most Improved and Item
Summaries.
DISCOVER USERS GUIDE
108
TERM
DEFINITION
Switch
Operates within LANs and is used to filter and forward packets to their correct LAN segments.
T1
A dedicated Internet connection that supports data transfer rates of up to 1.54 megabits per
second.
TCP/IP
(Transmission
Control Protocol/
Internet Protocol)
Represents the suite of communications protocols used to connect hosts to the Internet. TCP/IP
is the de facto standard for transmitting data over networks. Even network operating systems
with their own protocols, such as Netware, support TCP/IP.
Telnet
A terminal emulation program for TCP/IP networks which runs on your computer and connects
to servers on the network. The Internet is a large TCP/IP network. A telnet session is initiated
as the user types in the host and the host’s port and enters a valid username and password.
Once connected the telnet user can run commands as if he/she were physically at that server.
Transaction
Any process set by the Web site owner that begins with an order variable and ends with a
success variable. This could mean a product purchase, newsletter signup or e-mail request for
information after going through a preset process.
Unique Customer
A unique customer is registered when a person makes a purchase from your site for the first
time within a specified period of time. In other words, while one person may buy from your site
three times, this person would be recorded as one unique customer so you can tell exactly how
many individual people are purchasing from your site.
There are five different time frames SiteCatalyst® uses to define unique customers: daily,
weekly, monthly, quarterly and yearly. A daily unique customer may purchase from your site
twice on February 7th, and then again on February 8th. This customer will register as two daily
unique customers, because only the first purchase on the 7th and the purchase on the 8th
would count as unique purchases for their respective days. This same standard is used to
determine monthly and yearly unique customers for their respective time frames. It can be
helpful to ask the following question to see how SiteCatalyst® determines who is a unique
customer: How many different people purchased from my site during this time period?
NOTE: The sum of all daily unique customers is not equal to the total monthly unique customers for that
month. This is because a customer who purchases twice in a given month will count as two daily unique
customers – one for each day they purchased – but only as a single monthly unique customer. The same
relationship holds true for monthly unique customers and yearly unique customers.
URL (Uniform
Resource
Locator)
The method used to give an address to documents and other resources on the World Wide
Web. The first part of a URL indicates what protocol to use, and the second part specifies the IP
address or the domain name where the resource is located. For example, the first section of the
URL
http://www.Omniture.com specifies that the Web page that should be fetched using the HTTP
protocol. The second section directs the main page in the Omniture domain to be retrieved.
Usenet
A worldwide bulletin board system with over 14,000 news groups.
Variable
User-defined variables that allow you to correlate your custom data with specific commerce
events, such as the number of registered or unregistered visitors that opened a shopping cart
or the amount of revenue generated by business partner leads. Variables go beyond just
counting the number of page views that your custom data generates.
DISCOVER USERS GUIDE
109
TERM
DEFINITION
Visit
The number of times a visitor browses to your site. A visit begins when a person first views a
page on your company’s Web site, and lasts until that person stops all activity on the site for a
period of 30 minutes (Web analytics general industry standard). The industry assumes that,
given the length of time, the person likely closed their browser and reinitiated a separate visit.
A unique visitor could be responsible for multiple visits (or sessions) during a day, month, and
year.
Visit Depth
The depth to which customers to your site browse. For example, if a customer views three
pages on your site before making a purchase, that visit depth would be three.
Visitor
Registered each time a person visits your site. For example, if three people visit your site, three
visitors are recorded.
DISCOVER USERS GUIDE
110