1
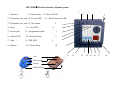
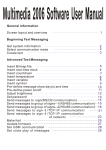
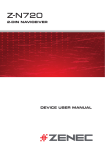
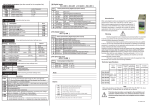
JFX-2005-I Wireless
Security Alarm System
User’s Manual
Please read particulars before you use it.
JFX-2005-II Wireless Security Alarm System
4
1 Antenna
9 Panic button 17 Record LED
2 Telephone wire jack 10 Power LED
18
12 Arm LED
5 Power jack
13 programme button
7
6 Alarm LED
14 Record button
8
7 Arm
15 PIR LED
8 Disarm
16 Clear button
Disarm
PIRarm/disarm
1
5
4 Siren
Panic button
2
Protection area LED
3 Telephone wire jack 11 Set button
Arm
3
44
6
9
10
11
12
13
14 15 16 17
18
Main functions:
1.This system calls you no matter where you are when any illegally burglar or any dangerous things to be happeded.
2.No wiring is required and it is easy to installation. Built-in 85dB siren.
3.Set alarm telephone. “set+1+*+telephone numbers +set”
4. Delete7 groups of alarm telephone. “set+1+* +clear”
5. Open compound siren by remote controller.: “set+9+* +91+set”
6.Close compound siren by remote controller. “set+9+* +90+set”
7.Alarm record“record+what you want to say+record”
8, Alter the passwords“programme+0+#+unused passwords +#+new passwords+ programme”
9,Alarm with siren“programme+1+#+1 +programme”
10.Mute alarm“programme+1+#+0 +programme”
11.Set network ID“programme+2+#+ID +programme”
12.Set siren alarm time “programme+3+#+time(1-30) +programme”
13.Clear all “programme+4+#+password+clear”
14.Need password when the main device disarm“programme+5+#+password+programme”
15.No any password when the main device disarm“programme+6+#+password+programme”
16.Extend arm “programme+7+#+password+#+(0-99)+programme”
17.Extend alarm“programme+8+#+password+#+(0-99)+programme”
18.Open anti-cutting telephone line “programme+9+#+password+#+1+programme”
19.Close anti-cutting telephone line“programme+9+#+password+#+0+programme”
Working Elements
Host: It is the main part for the system,
receiving processing, identifying signals
automatically and inputting, storing, and
outputting alarm messages.
Siren: It can send out 120db when host alarms.
2
Wireless Infrared motion detector: Monitoring
the moving action at any position, it is usually
used with the alarm host to double safe.
Wireless gas leakage detector: It can be alarmed immediately
when the gas density reaches the degree which can be easy to
cause fire , so it can void the accident usually used with host
or alone.
Door magnetic detector: It consists of main
part and assistant to control the door, window,
cabinet and other important places . It can be
alarmed and send the sign to host once it detect
the above places are moved, pushed, drawn and
etc.
Wireless Smoke detector It use to avoid the fire . It can be
alarmed and send the sign to host when it detect the smoke
dirt . It is usually used with host or alone.
Adaptor: .DC9V 300MA
Remote manipulator: We manipulate this
system including arm/disarm, emergency help
by it, it is very important part .
Main device installment
A, Put the alarm host aside with telephone, and insert external wire and telephone wire into two jacks of the alarm host (no sequence). Additional, Please insert the
alarm host directly into telephone extension insert if it is anti-steal dialing telephone.
B, Insert the siren into the “siren”jack in the back of the alarm host.
C, Insert 9V power supply with the “power” jack, then the power LED indicates working with a beep. The host will remind the owner to input numbers and record
every per 30 seconds if you don’t do it.
Door gap sensor installation(as bellows)
3
It is consisted of two parts: transmitter part and magnetic part .You can fix them by screws or adhesive .You need check the LED side of transmitter part against
the magnetic part .the maximum limit is 15mm between them.
Open from right
1
double open
2
open from left
slide window
3
4
Motion detector installation
Firstly peel off the cover , then fill with the battery . It must be installed 1.6m high, face the monitoring area , inner house to avoid the direct sun light .
Gas detector
A Firstly install it 4m far away from the gas source .
B, Inner 0.3m high from the ground if Liquid petroleum gas ;inner 0.3m from the ceiling if coal and natural gas.
C,It need pre-heat 3 minutes after inserted power, it will send out “du du” during pre-heat.
D,Users should check if it OK regularly and clear dirty to ensure the effect.
Smoke detector installation
Fill the battery firstly , press the black “Test “ button over 3 seconds, or flow the smoke into the detectors, it means normally if hear beeps. Regularly , install it on
the ceiling to avoid closely to the door or window.
How to use
1 ARM/DISARM: Press “
”on the remote controller to close the main unit when at home, press “
”to arm after locked the door.
Press the “ ” on the remote controller to disarm the unit to enter. Press “ ” on the remote controller or “arm” on the main device to arm the unit when sleeping at
night.
2 Infrared arm/disarm independently: Press “ ” on the remote controller two times when the main device arms, the infrared detector will disarm
independently , the system is still normal , so that to be convenient to move inner house. Press “ ” to make the infrared arm again when the main device arm. Press
“ ”on the remote controller one time to arm again when the system disarm.
3 Emergency alarm: Press “ ” on the remote controller when accident happened at home, the alarm will hoot and the system will dial the telephone numbers
4
pre-set automatically.
4 How to deal with the alarm calling: When alarm call coming, the siren will continue to hoot to inform neighbors, the system will dial the telephone numbers
pre-set automatically. After the owner receive the call, they can press “#”to confirm, the main unit will stop dialing and close the siren and arm again;
If the owner do not press “#” or the telephone is occupied , the system will hang up after two times of record and then dial the left pre-set alarm numbers circlely
until press “disarm”(stop alarm and siren to arm again)
5 How to control when alarm calling come: When receive the alarm telephone, press “7” to monitor , press “5” to start the siren when you heard any abnormity ,
press “6” to close the siren, press “8” to exit monitoring, press “1” to arm, press “2” to disarm, press “*” to listen to record again.
6 How to deal when far away: You can dial the telephone connected with main device when you forget arm, you can hear two “didi” after 6 bells, input the
password (Di.Di.Di means wrong password, three times later, hang-up) ,one “Di” ,10 seconds later to press button.
“1” arm
“2” disarm
“3” siren alarm
“4” mute alarm
“#” exit
“5”start the siren “6” Close the siren “7” Begin monitor
“8” Close monitor
How to set the system
Note: You can set the followings no matter arm or disarm, The record LED will twinkle (LED will be indicated sostenuto when record) when set, it meant wrong
input if you hear several beeps , then set again, until two beeps continuously .
How to set the alarm telephones:
1st telephopne number:“set+1+*+telephone +set”, totally 7 groups. Please input as followings: “set+1+*+telephone+*+extension telephone +set” if extension
telephone.
Example: to set the 2nd telephone number 03-12345678
“set+2+*+03-12345678 +set”
Delete alarm telephone : “set+1+* +clear” (please delete the unused telephone number before you set new numbers)
Alarm record : “record+what you want to say+record”(Press “record”, the record LED indicates, you can leave messages against inner speaker of the main device
no more than 20cm for10 seconds’ message).
Change password: “rogramme+0+#+unused passwords +#+new passwaors+programme”(Original password is 1234, the new passwords must be four numbers)
Alarm with siren: “programme+1+#+1 +programme”
Mute alarm: “programme+1+#+0 +programme”(the siren will be mute when alarm)
Set the ID of intellectual report center: “programme+2+#+ID +programme” (The ID must be 6 numbers , it is used when it need be networked with the
intellectual report center)
Siren alarm time: “programme+3+#+time(1-30) +programme” (This function can be customized from 1 minutes to 30 minutes .You must disarm the system if you
input the time over 30 minutes, so that the siren can be closed.)
Clear function: “programme+4+#+password+clear”( all set will be original set, the passwords is 1234, arm and alarm on time, no password when disarm, 1
minutes siren ,no anti-cutting function.)
5
Set password when main device disarm: “programme+5+#+password+programme” (press “disarm” and password when disarm) .The remote controller can
disarm at any time.
Disarm without password: “programme+6+#+password+programme”(press “disarm” when disarm)
Extend arm time : “programme+7+#+password+#+(0-99)+programme” ( This function is compared to the “immediate arm”, which is meant that arm will be
delayed for the time you set, optional time from 0-99 seconds) You must clear the last set before you want to set.
Extend alarm time : “programme+8+#+password+#+(0-99)+programme” ( This function is compared to the “immediate alarm”, which is meant that the siren will
be delayed for the time you set after the main device receive the alarm signal from infrared,door gap sensor, active infrared intrusion detector. optional time from
0-99 seconds)
You must clear the last set before you want to set.
Start anti-cuttiing wire function: “programme+9+#+password+#+1+programme” (the siren will be started once the telephone troubled or the wire was cut or
broke off)
Close anti-cuttiing wire function: “programme+9+#+password+#+0+programme” (the siren will be mute once the telephone troubled, the wire was cut or broke
off, original set)
Resolve simple problems
Trouble
Alarm unavailable
Cause
1,unarm
2,Maybe you didn’t set the tel. Numbers
3,Install wrong, distance too long
4,Code unmatch
System set unavailable
1,Check if press the record button when operate
2,Check if the telephone wire connect well
No record reminded
Maybe you didn’t record
Remote controller doesn’t 1, The code doesn’t match host
work
2,Power is not enough
3,Battery shrapnel connects badly or rust
4,It doesn’t match with the host
Infrared detector doesn’t work Power is not enough
Infrared
against-emitter 1, Check the working power
doesn’t work
2,Chech if it is short circuit or off
3,Check if emitter tube position is correct
6
Resolve
1,Arm again
2,Set again according to the manual
3,Adjust the position of the part
4,Match the code again
1, Insert again
2,Set according to the manual
Record again per the manual
1, code again
2,Change the same type battery
3,clean shrapnel’s rust
4,Change remote controller with the dealer
Change the same type battery
1,Connect the power
2,Conncet the circuit again
3,Adjust emitter tube
Siren is mute
1, Jack insert of the siren is short circuit or off
2,Connection is bad between Insert and jack
3,Insert wire is off
4, The siren is shut
The distance gets shorter from 1,Maybe there is another remitter is working
Host to infrared detector, door 2,The receiving part of the host exists problems
gap detector and remote 3,Check if the power wire is OK
controller
Record volume is too low
1,It is too far from the host when record
2,Host power is not enough
Host gives off a beep per 30 Unset record or alarm telephone No.
seconds
The defence zone code of JFX-2002-I wireless security alarm system
Defence zone
Code numbers
ID
From which zone
1
2122
05
Panic button
2
2211
06
Infrared detector
3
1111
07
Door magnetic
4
2112
08
Gas detector
5
2121
09
Smoke detector
6
1211
10
Defence 6th
7
1122
11
Defence 7th
8
1112
12
Defence 8th
9
1212
13
Defence 9th
10
2222
14
Defence 10th
11
2111
15
Defence 11th
12
1221
16
Defence 12th
13
1121
17
Defence 13th
14
0101
18
Defence 14th
15
0100
19
Defence 15th
16
0102
20
Defence 16th
1,Repair or change jack ,insert
2,Change jack wire
3,Set into alarm state by telephone
1,Find the interfere point and debar it.
2,Post to factory to repair
3, Change into the same type battery.
4,Check if the host power inserts well
1,Closer to the host when record
Set again according to the manual
Notes
All the code number will be matched with the defence zone after you
backout the the resistor connected with PT2262IC
pin NO.
10,11,12 ,(The code numbers are not listed will not alarm)
7
17
0121
21
Defence 17th
18
0120
22
Defence 18th
19
0122
23
Defence 19th
20
0011
24
Defence 20th
21
0010
25
Defence 21th
22
0012
26
Defence 22th
23
0001
27
Defence 23th
24
0000
28
Defence 24th
25
0002
29
Defence 25th
26
0021
30
Defence 26th
27
0020
31
Defence 27th
28
0022
32
Defence 28th
29
0211
33
Defence 29th
30
0210
34
Defence 30th
31
0212
35
Defence 31th
32
0201
36
Defence 32th
The 1st ,4th and 5th defence area activates all day, and the 2nd denfence area could be disactivated indivially,
TECHNICAL SPECIFICATIONS:
Alarm host:
(a) Operating voltage: DC9V
(b) Average power: AC/DC exchanger 600mA.
(b) Operating Frequency: 433.92MHZ/315 MHZ
Remote controller
(a) Operating voltage: DC12V
(b) Emission Distance: > or =30m
( c) Operating Frequency: 433.92MHZ/315 MHZ
Wireless Door Gap Sensor:
(c) Operating voltage: DC12V
(b) Emission Distance: > or =30m
(d) Operating Frequency: 433.92MHZ/ 315MHZ
8
Wireless Smoke Detector :
(a) Operating Voltage: DC9-15V
(b) Static Current: <20uA
(c) Alarming Operation Current<20mA
(d) Smoke Sensitivity: Min. 3.2%/ft weak cigarette smoke
(e)
Operating Frequency: 433.92MHZ/315 MHZ
Wireless gas leakage Detector
(a) Operating Voltage: DC12V
(b) Operating Current: 150-300mA
(c) Alarm concentration: 2000-5000ppm
(d) Operating Frequency: 433.92MHZ/315 MHZ
Infrared Detector:
(a) Operating voltage: DC9V
(b) Detecting Surroundings: Verticcally: 60 degree, Horizontally: 110 degree
(c) Operating Frequency: 433.92MHZ/315 MHZ
(d) Detecting Distance: 8-10m
9