1
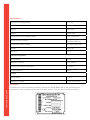
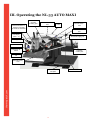
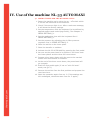
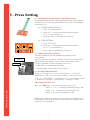
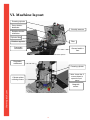
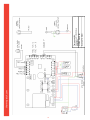
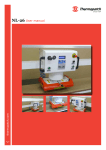
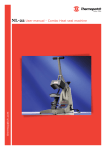
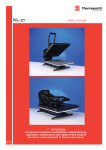
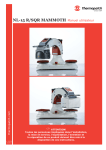
thermopatch.com NL-33 AUTO MAXI User manual Apr 2013 ENG Copyrights © 2013, Thermopatch bv, Almere, The Netherlands. No part of this publication may be reproduced by any means without the prior written permission of Thermopatch bv, The Netherlands. thermopatch.com Thermopatch and the Thermopatch logo, Thermoseal and Thermocrest are registered trademarks of Thermopatch. 2 Preface Dear user, Welcome to the growing group of Thermopatch users. The product you have purchased has been carefully designed and manufactured to ensure that you, the user, will gain the maximum benefit. All Thermopatch products are specifically designed to ensure ease of use with particular attention to safety requirements. thermopatch.com Should you discover any fault or damage upon receipt of this product, you should immediately contact your local Thermopatch establishment. 3 Table of Contents Preface 3 EC-Declaration of Conformity 5 I. Introduction 6 1.1 What did you receive? 6 1.2 Your supplier 6 1.3 Specifications of the Thermoseal NL-33 AUTO MAXI 6 1.4 Safety 8 1.5 Conditions of warranty and product liability 8 II. Installation 9 2.1 Instruction for handling 9 2.2 Installing and connecting the NL-33 AUTO MAXI 9 2.3 Assembly 9 III. Operating the NL-33 AUTO MAXI IV. thermopatch.com V. VI. 10 3.1 Starting up 11 3.2 Safety 11 Use of the machine NL-33 AUTO MAXI 12 4.1 12 Instructions for the running cycle Press Setting 13 5.1 TEMPERATURE SETTINGS / PRESSING TIME 13 a) TEMPERATURE SETTING 13 b) TIME SETTING 13 5.2 PRESSURE ADJUSTMENT 13 5.3 BOARD PARAMETERS 13 5.4 Press head rotation speed adjustment 15 Machine layout 16 VII. Electric and Pneumatic Diagram 17 VIII. Service 19 8.1 PARTS SUBJECTED TO WEAR AND TEAR 19 8.2 REPLACEMENT OF WORN PARTS 20 8.3 MAINTENANCE 20 8.4 ERROR CODE LISTING 21 8.5 POSSIBLE BREAKDOWNS 22 4 EC-Declaration of Conformity We, Thermopatch B.V. Draaibrugweg 14 1332 Almere The Netherlands herewith declare, on our own responsibility, that the machinery: marking machine Thermopatch Thermoseal NL-33 AUTO MAXI, which this declaration refers to, is in accordance with the conditions of the following Directive(s): 2006/42/EG 2004/108/EG (Machinery directive) (EMC directive) The Netherlands, Almere, 01-01-2013 thermopatch.com Jan Bausch, Director 5 I. Introduction 1.1 What did you receive? The Thermoseal NL-33 AUTO MAXI has been packed in a wooden crate and fixed to a pallet. The following items are included: • Thermoseal NL-33 AUTO MAXI heatsealmachine • Water condenser and pressure regulator • Foot pedal • Power cord • CD with manual • CE declaration of conformity If one or more of the above are missing, please contact your Thermopatch supplier. 1.2 Your supplier Please look at our website, www.thermopatch.com to find your supplier. E-mail: [email protected] 1.3 Specifications of the Thermoseal NL-33 AUTO MAXI The pneumatic machine Thermoseal NL-33 AUTO MAXI is practical and universally applicable. It can be used to apply patches, textile emblems, heat seal transfers, in short all Thermopatch materials suited for marking and mending of textiles and technical fibres. The Thermoseal NL-33 AUTO MAXI is to be operated with the fitted foot pedal. Temperature, time and pressure are presented on the display and can be adjusted. thermopatch.com The Thermoseal NL-33 AUTO MAXI has been manufactured in accordance with the European guideline for Machines, 2006/42/EC and the EMC guideline 2004/108/EC. This is declared with a general declaration added to this manual and uniquely serial number based to this machine. 6 Specifications Weight in running order 137 kg Height 627 mm Depth 840 mm Width 1071 mm Dimension of the heating plate 400 x 500 mm Electric power supply 230 V single phase + ground 50/60 Hz Pneumatic power supply 10 bars maximum Power 2500 W Ampere 11 A Thermoregulator Accurate to ±1% Range of control 0 to 250°C Working pressure (Min-Max) 2-8 bar Pressing effort 580 g/cm2 under 10 bars Timer Accurate to ± 1% Range of control 0 sec. to 30 min Attention! thermopatch.com To obtain the required sealing pressure, the NL-33 AUTO MAXI has to be connected to a compressor with a working pressure of at least 6 bars. The air has to be clean and dry. 7 1.4Safety At normal usage no problems are to be expected. Regardless that, we state underneath a few pointers which will limit existing risks to a minimum. • Unplug the machine from the wall socket whenever you are maintaining or cleaning the machine. • Make sure there is enough working space around the machine. Although the heat radiation of the press is very low, it is still necessary to have enough room for cooling down. Extensions and connections must not get snagged. • Avoid contact with the press arm and the heating element. • Pull the fabric tightly over the sealing pad. 1.5 Conditions of warranty and product liability thermopatch.com Thermopatch points to its warranty and product liability conditions as laid down in our sales conditions. These can be obtained at your Thermopatch supplier. 8 II. Installation 2.1 Instruction for handling The NL-33 AUTO MAXI has been packed in a wooden crate and fixed to a pallet. If you need to relocate the machine at a later point, we advise you to pack the machine in a similar fashion. Let the machine cool down completely before packing and moving it. 2.2 Installing and connecting the NL-33 AUTO MAXI Take the Thermoseal NL-33 AUTO MAXI from its box and place it on a stable worktop near an earthed wall socket. Connect the machine with the supplied power cord to the electrical current (230 Volt, alternating current). The NL-33 AUTO MAXI is earthed and provided with a fuse (11 Amps). thermopatch.com 2.3 Assembly To ensure a problem-free operating of your NL-33 AUTO MAXI, it is essential to work with dry, clean compressed air. The supplied pressure regulator with water condenser is only an added protection of the machine. The user has to make sure that the pressure on the machine does not exceed 6 Bars. Connect a 6 mm air tubing with the compressor or the local compressed air system and connect this subsequently to the water condenser / pressure regulator mounted on the NL-33 AUTO MAXI. The NL-33 AUTO MAXI is fitted with a foot pedal for its operation. Connect the foot pedal by inserting the connector into its slot, which is placed underneath power entry on the back of the machine. Fasten the securing ring after inserting the connector. 9 III. Operating the NL-33 AUTO MAXI Pressure regulator Pressing jack Bi-manual buttons to lower the heat plate of the NL33 Auto Maxi Cover + Electronic card Filter General switch + fuse Communication port LCD display (time + T°) Pneumatic supply join Keypad Manometer Emergency off button Automatic rotation jack Init Heat plate safety cover thermopatch.com Removable lower cold plate 10 Silicon rubber 3.1 Starting up You can start operating the NL-33 AUTO MAXI as soon as it is connected to the electricity mains. Set the air pressure. Take note of the conditions and working instructions as stated in Chapter 2. Switch on the NL-33 AUTO MAXI by pressing the on/off (I-0) switch, which is placed on the back of the machine, to “On (I)”. Make sure the screen is on. After the welcome message, it will show the factory presets. Set the temperature with the temperature adjustment key, according to the type of transfer you are using. Tweak the sealing time with the key pad according to the type of transfer you are using. 3.2 Safety - The machine has been designed for single use only. - Please take note of the contents of this manual. Please follow below safety guidelines: Avoid touching the hot parts of the equipment while in use. Do not put your hands between the plates once the NL-33 AUTO MAXI is activated. Carry out a daily inspection of the machine before starting the production. Make sure to keep the direct surroundings of the machine free from unauthorized personnel while operating it. When the machine malfunctions, please switch off the power supply and refer to the manual's chapter “Service”. thermopatch.com Do not modify the safety devices and protective measures that have been provided on this machine. Make sure these are reinstated as intended, after maintenance or repairs. 11 IV. Use of the machine NL-33 AUTO MAXI 4.1 INSTRUCTIONS FOR THE RUNNING CYCLE 1.Power the machine up by using the on - off switch which is on the left hand side of the machine. 2.Check if the screen light is on. After a welcome message, it will show the factory settings. 3.Set the temperature with the keyboard (to be defined by applied product and underlying textile), See Chapter V. PRESS SETTING § 1. 4.Set the application time with the keyboard See V. PRESS SETTING § 1. 5.Set the pressure by adjusting the air filter pressure regulator. See V. PRESS SETTING § 2. 6.Place the article on the lower plate. 7.Place the transfer or emblem. 8.Activate the NL-33 AUTO MAXI by pressing the foot pedal. 9.As soon as the press head is in position it will lower onto the lower platen and the timer will count down. 10.Prepare other lower platen with the next to be marked textile item and transfer or emblem. 11. At the end of the timer count down, the press head will go up again. 12.Press the foot pedal again (if not on “with full auto” mode, see §V-3). 13. Remove the article from the first position and prepare the next item here. thermopatch.com 14. Start the operation again from no. 9 (if the settings are left unchanged, otherwise start from no. 3 again). 12 V. Press Setting 5.1 Temperature settings / Pressing time These parameters have to be programmed with the keyboard situated on the front (the parameters will scroll on the display unit next to it). a) TEMPERATURE SETTING • Press on “Temperature”, • Press on “-” to decrease the indicated value, or on “+” to increase it, • Press on “OK” to validate your choice. b) TIME SETTING • Press on “Time”, • Press on “-” to decrease the indicated value or on “+” to increase it, • Press “OK” to validate your choice. Pressure regulator Manometer 5.2 PRESSURE ADJUSTMENT The jack pressure can be modified according to the user’s need. Use the pressure regulator situated on the filter, on left side. The pressure will appear on the front manometer’s dial. Pull the regulator’s head upwards, then turn: • clockwise to increase the pressure, • anticlockwise to decrease the pressure. 5.3 BOARD PARAMETERS Press on “Set up” key to enter parameters, “+” to scroll parameters, “OK” to enter in and validate, “Set up” to exit. “Set up” > 2PLATEAUX > program (T°+s) > resetable counter > permanent counter > pre-heating > standby > code thermopatch.com thermopatch.com PREFERENCES SET UP: (+)Press + to scroll programs (P1 to P5) press , + or – to modify preheating time, OK press + or – to modify time pressure, OK press to modify temperature, OK NOTE: the selected program at start will be the edited one in parameters. You need to enter in parameters to change and keep the new program. 13 TO SET UP RESETABLE COUNTER: press - > reset counter > press OK (or Set up to cancel) TO SET UP PERMANENT COUNTER: : not modifiable TO SET UP PRE-HEATING: press OK, then + to modify ON/OFF Note: pre-heating time will be able only if pre-heating parameter is ON. TO SET UP STANDBY: : press to modify > + activate (ON) > OK > + to modify standby temperature, OK > + to modify start standby time > OK > + to modify wake-up time CODE : press OK to enter a code, + for next digit, ok to confirm and swap to next. 100 : time setting : to enter in, + to modify, OK to confirm 300 : Δ > ok to enter in offset temperature setting > to modify offset > +/- to change value. > ok to enter in ALARM parameters at end cycle > to modify > +/- to change value. °C/°F > ok to modify temperature UNIT > + to modify > ok to confirm > Set up > Set up to exit. thermopatch.com Adr. MODBUS : > ok to see communication port (switch on board). DETAIL OF THE FULL AUTO OPTION: If you have this option, you can change the cycle of the machine. • Normal Mode : After you push the pedal, the press platen moves to the other plate and press. • One plate mode : After you push the pedal, the press platen moves to the other plate, press and come back to its starting plate. • Automatic mode : After you push the pedal, the press platen moves to the other plate and starts the heat sealing cycle. At the end of the « sealing timer » it automaticaly switches platens and heat seals again. This will continue until you push the pedal or the touch OK/ STOP, which will end the automatic cycle. Choice of Functioning mode : Push Set up --> (2 PLATES) --> OK -->() --> +-->OK : push “+” , to activate « YES » ,or deactivate « NO » , the AUTOMATIQUE mode. Push on OK to validate your choice and pass to the next parameter. 1P : push “+” , to activate « YES » ,or deactivate « NO » , the ONE PLATE mode. Push on OK to validate your choice. 14 If the automatic mode and the one plate mode are deactivated, the machine will run in normal mode. Push 3 times on Set up to go back to the main screen. Regulation of « the timer after pressing » : used only in automatic mode: Push Set up --> (2 PLATES) --> OK --> : Push on OK, the time’s flashing, use the + or – touches to modify it. Push OK to validate the new entry. Push twice on Set up to go back to the main screen. 5.4 Press head rotation speed adjustment Upper platen rotation L R Speed adjusting screw Drop shot adjusting screw Sensor adjusting screw Sensor thermopatch.com By means of a screwdriver, periodically adjust the swinging speed. It varies as a function of lubrication and wear of mechanical parts. • clockwise to reduce • counterclockwise to increase If the plate bounces before/after sealing, reduce the damping (hex wrench) • • clockwise to reduce counterclockwise to increase 15 VI. Machine layout Pressing cylinder Press electrodistributor Security sensors Rotation electrodistributor Cylinder Stop Filter Rotation regulator Pneumatic connection General switch + fuse NOTA : electronic board is under cover removed on picture Regulation mainboard Pressing cylinder Nota: Leave the 2 screws down to open the front panel Cylinder piston crossing sensor thermopatch.com Magnetic sensor 16 thermopatch.com 17 NL-33 AUTO MAXI PNEUMATIC DIAGRAM Draaibrugweg 14 1332 AD Almere Netherlands Thermopatch B.V. VII. Electric and Pneumatic Diagram 18 thermopatch.com NL-33 AUTO NL33 MAXI AUTO MAXI WIRING DIAGRAM WIRING DIAGRAM Draaibrugweg Draaibrugweg 14 1332 AD Almere 14 1332 AD Almere Netherlands Netherlands Thermopatch Thermopatch B.V. B.V. VIII. Service UNPLUG THE MACHINE FROM THE ELECTRICITY AND AIR SUPPLY BEFORE SERVICING! It is recommended to have the following tools within reach: • Phillips - and bit screwdrivers; • A set of end wrenches and box spanners; • Small adjustable pliers; • Circlip pliers; • Long and fine pliers with insulating handle; • A set of Allen keys; • A multimeter. Before any handling, check that the heating plate temperature is lower than 25°C on the display unit. 8.1 PARTS SUBJECTED TO WEAR AND TEAR On any order: state the reference, the description and the quantity. Reference Description Quantity ELECTRIC PARTS Regulation board 1 Back-Lighted Screen 1 CLA-371 Keypad 1 RES-682 NL-33 Auto X Heat Element Mica 480X380 2500W 1 SON-189 Temperature sensor 1 FUS-153 Fuse 5X20mmt 16 A 250V 2 Board fuse 1A 1 CAR-RS2 AFF-RS thermopatch.com PNEUMATIC PARTS VER-286 Jack Ø125 C50 (Pressing) 1 VER-JO4 Jack Ø40 C160 1 FIL-013 Filter 1 ELE-SM3 Electrodistributor 5/2 12V 1 FRAME DRESSING MOU-001 Silicon rubber 9 mm 2 TOI-5040 Teflon sheet 400X500 1 19 8.2 REPLACEMENT OF WORN PARTS - Silicone rubber mat: a) check that the platen is cold. b) make sure that the surface of the platen is quite clean. Possibly use a soft solvent such as White Spirit with individual protections. c) use a tube of glue RTV-1 to stick the rubber to the aluminium platen (NB: read the instructions on the tube packaging). d) the cover and the platen must be clean and dry before you start gluing. e) spread a fine, even coat of glue on the plate and immediately apply the cover making sure that there is no air lock (NB: An indented spatula similar to the one used to lay tiles would suit perfectly). f) leave to settle overnight at room temperature with slight pressure and without heat. - Other parts: Get in touch with your supplier to evaluate their change or their repair. 8.3 MAINTENANCE The heat seal press NL-33 AUTO MAXI requires hardly any maintenance. To ensure a good functioning, follow the preventive notice indicated below: - D o not heat up objects which could deteriorate or even cut the silicone rubber or damage the teflon surface of the heating plate. - Every so often and when the plate is cold, clean the machine with a clean cloth and white spirit (NB: As this product is flammable, use with care and keep it away from any heat source) using personal protection measures. thermopatch.com - W hen the heating plate is hot and unused, keep it in open position. EVERY DAY: When still cold, clean the heating plate with a clean, dry cloth. Check the air filter at the back of the press; drain condensated fluids regularly. EVERY MONTH: Check the column and apply some grease to it. ACCORDING TO THE USE: Change the rubber mat every six months. 20 8.4 ERROR CODE LISTING SSH/B : HEAT SENSOR DEFECT High/Bottom RRH/S : RESISTOR out of service High/Bottom DDD : Overshoot 30°C of order CCC : Fall out of 30°C of order FDC: Sensor still activate at end cycle TRIAC : TRIAC defect : Time out to get temperature order, heating defect thermopatch.com TIME OUT 21 8.5 POSSIBLE BREAKDOWNS UNPLUG THE MACHINE FROM THE ELECTRICITY AND AIR SUPPLY BEFORE SERVICING! Symptoms The machine will not switch on Possible breakdowns • The plug is not in. • The switch is not connected. • The general fuse is out of order. • The card fuse is out of order. • The display unit is faulty. • The emergency off button has been pressed. • The resistors are defective. The plate will not heat • Card problem. • Temperature value too low. thermopatch.com The plate overheats Repairs • Put the plug into the wall socket. • Switch the On - Off switch to “ON”(I). • It is situated in a casing next to the power cable plug. To access it, pull the power cable out, with the tip of a screwdriver lift the fuse casing. You will find in the square tube a replacement fuse to put instead of the one in the clip. • It is situated at the bottom left of the card (1A). • Check if the flat cable is properly connected otherwise the display unit is out of order. • Unlock the emergency off button. Switch the ON/OFF push button to OFF. Wait for a few seconds and switch the ON/OFF push button to ON. Move the swing arm to and fro and back to its initial position above a lower plate. • Check the connections and the state of the electric wiring. To remove the heating plate, get in touch with your supplier. • See messages displayed on the screen and refer to the card manual. • To modify this value, see chapter V. • See messages displayed on the LCD screen and refer to the card manual. Get in touch with your supplier. • Sensor or card problem. The timer will not count down • The detector placed on a jack • Check its connections. is not activated or defective. • See messages displayed on the screen • Card problem. and refer to the card manual. The plate will not go down • The push buttons will not work. • Check their connections. • Check the joints and all the connections. • Leak on the jack. Get in touch with your supplier. • The electrical distributor is • Check its connections. Get in touch with faulty. your supplier to possibly change it. • Check if the pressure of your network • The compressed air pressure is > 3 bar. is not enough. The plate will not go up • The electrical distributor is faulty. • Leak on the jack. The plate stays • The timer will not count in lower position down. after pressing • Check its connections. Get in touch with your supplier to possibly change it. • Check the joints and all the unions. Get in touch with your supplier. • See above. 22 thermopatch.com Thermopatch Corporate Headquarters USA Thermopatch European Headquarters The Netherlands Thermopatch Australia Pty Ltd Australia Thermopatch Canada Inc Canada Kannegiesser UK Ltd. United Kingdom T T T T T +1 315 446-8110 F +31 36 549 11 11 F +61 395325722 F +1 519 748-5027 F +44 1539 722122 F +1 315 445-8046 +31 36 532 03 98 +386 2 80 55 232 +1 519 748-1543 +44 1539 721000 [email protected] [email protected] [email protected] [email protected] [email protected]