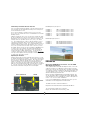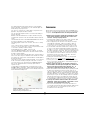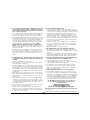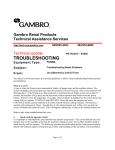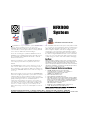
1
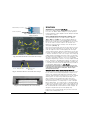
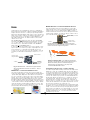
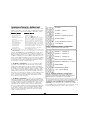
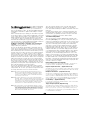
HFX900
System
HFX900 manual v0.98
Congratulations on your purchase of the HFX900 R/C
System. These instructions cover the use of the
HFX900 transmitter (Model 1 and Model 2), Micro9
s e ries actuator receivers (Generation 1 and 2), Micro9
servo receivers, Bahoma cells and charger.
There are several types of Micro9 900Mhz receivers
available for the HFX900 Transmitter and all of them
are compatible with HFX900 Air Model 1 and Air
Model 2 transmitters.
With the introduction of the HFX900 Air Model 2,
more RF frequencies and new features have been
added.
The MICRO9-3CH receiver is the easiest to set up. It
has 1.27mm Nano connectors for connecting motor,
and 2 actuators, and magnetic “Bahoma” battery terminals. The MICRO9-4CH receiver is also an easy one
to set up.
Our lowest weight receivers such as the MICRO9-BFLY2CH save weight by elimination of the Nano connector
p a rts and also by using a reduced number of components and reduced thickness of the printed circuit board
(PCB) Soldering fine wires to small PCB pads is
required for these lightest of receivers. If you have no
ex p e rience in Micro R/C or soldering we suggest that
you start with our receivers that include the Nano-connectors - to make it easy for you to build up an airplane without any need to do small surface mount soldering.
The HFX900 transmitter has a few extra features builtin - you can use your transmitter with the included Freeware FMS flight simulator and learn to fly on your PC !
Lithium Polymer airplane cells can be charged and
stored right on the transmitter with Plantraco’s patent
pending Bahoma magnetic battery connector. State-ofthe-Art Pure Digital 900Mhz RF link means solid radio
control, no more long antennas, and you’ll have plenty
of radio range for indoor and outdoor Micro R/C flying.
FINE PRINT
Battery discharging, charging, electric motors, spinning propellers,
and flying models all have the potential for serious injury to persons
and damage to property. In purchasing these products, the user
agrees to accept responsibility for all such risks, and not to hold the
manufacturer, distributors, or retailers responsible for any accident,
injury to persons, or damage to property.
PRODUCTS COVERED IN THIS INSTRUCTION MANUAL
• HFX900 (HFX868 in Europe) Proportional R/C
Transmitter/Charger “Air Model 1” and “Air Model 2” Centering Throttle or Non Centering Throttle
(900Mhz-USA, 868Mhz-Europe)
• Micro9 0.9 Gram 3CH Receiver
• Micro9 0.38 Gram 2CH Butterfly Receiver
• FMS Flight Simulator Interface Cable and FMS Software CDROM
with Computer Models of the Plantraco MicroScout and Butterfly
(FMS is a freeware R/C Flight Simulator - bundled with permission
from the author - you can also download it and all the Plantraco
FMS flight sim model files from links at:
http://www.plantraco.com/FMS/
• Buddy Box Cord for HFX900 Air Model 2 (DIN to RJ-12)
• LP90 - 90mAh Lithium Polymer Bahoma Cell
CHECK FOR UPDATES TO THIS MANUAL ON OUR WEBSITEhttp://www.plantraco.com/hobbies/help.html
PLANRITE TRADING COMPANY • 1105 8TH STREET EAST • SASKATOON, SK • CANADA • S7H 0S3
Web Page www.plantraco.com www.microflight.com Email [email protected] Orderline 306-955-1836 Fax 306-931-0055
GETTING STARTED
-
Magnetic Battery Terminals
Add Batteries to Transmitter (See Fig. 4)
Remove the rectangular battery cover from the back of the Transmitter. Insert 4 “AA” Alkaline batteries taking note of proper polarity of
positive and negative contacts (Negative end of the battery should make
contact with the “spring”).
+
Plastic Safety Guard
Fig. 1. Bahoma Battery Connector
(patent pending)
Throttle Joystick
(non centering style)
The included lithium polymer cell features Plantraco’s Bahoma
(BAttery HOlder using MAgnets) connector (patent pending). The
Bahoma connector system uses strong plated magnets to hold the
battery onto the charger and onto the Micro900 receiver. These magnets are also used as electrical conductors. The terminals of the
Bahoma cell are protected from shorting to each other by a plastic
safety guard. (See Fig. 1)
Joystick
(centering style)
Trimmer Wheels
Transmitter LED
Magnetic Charger Terminals
Charge Lithium Polymer Rechargeable “Bahoma” Cell
3 Position
Switch
On the front of the transmitter, slide the 3 position switch to the middle position to put the transmitter into it’s “Charge” mode. The LED
inside the charger door will be blinking rapidly. Slide the hinged
clear polycarbonate plastic charger door downwards to unlock it, and
then lift it open. Attach the Bahoma cell to the corresponding magnetic terminals. The Bahoma cell will “click” into place on the charger by
magnetic attraction and with good electrical contact. The LED inside
the charger will now glow brightly. Close the clear charger door, and
slide it up to shut it with a small click. Your cell is now charging,
and when the bright LED goes dim, the cell is fully charged and ready
for use. Charge time is about 60 minutes typically. The charger is set
to charge at 75mA for the 10mm Bahoma standard for LP90 cell and
is set for about 22mA rate for the 5mm Bahoma spacing for LP30 cell
as found with the Butterfly RTF sets. (See Fig. 2)
Charger LED
Fig. 2 HFX900 Air Model 2 Transmitter with Charger.
RJ-12 - Buddy Box Jack
Periodically clean the magnetic electrical terminals of your cells
to ensure good electrical contact. See the troubleshooting section
of this manual for instructions on doing that - they do require
cleaning from time to time.
FMS Flight Sim Jack
Mono Plug
Important Notes about Lithium Poly mer Batteries
The lithium polymer rechargeable battery should not be used if it has
become swollen or has been physically damaged, crumpled, or cut.
Always use the supplied charger built into the transmitter. Always
charge the LP90 cell with the clear charger door closed. The supplied
lithium polymer cell can provide you with many discharge cycles
when used properly, but eventually it will require replacement.
Replacement cells are available from your dealer or from Plantraco
directly at www.plantraco.com. Always dispose of used or damaged
batteries appropriately. If you need to dispose of a damaged Lithium
Polymer cell, you can make a solution of about 2 cups of water and 1 cup
of table salt in a disposable container outdoors. Put the damaged cell in
this concentrated salt water solution and leave it outside overnight. The
damaged cell may then be disposed of in the garbage safely.
Fig. 3 HFX900 Air Model 2 Transmitter with Charger.
Fig. 4 Insert “AA” Batteries with Correct Polarity
Replacement cells are always available from your dealer or from the
plantraco website www.plantraco.com
2
MICRO9-BFLY-2CH - 0.38 Gram 2CH Actuator Receiver
This lower weight receiver version has outputs for 1 motor and 1
magnet actuator. This receiver is installed on the Butterfly RTF. The
software on this receiver uses PFM instead of PWM for control of
actuators which has the unusual side effect of making unusual robot
sounds from the actuators. You need to be able to solder to connect
your motor and actuators to this receiver.
RECEIVERS
The 0.9 gram receiver is intended to be easy to use, and the 0.38
gram model has been produced on thinner PCB material and without
magnets and microconnectors - resulting in a good weight savings.
Most of this manual will apply to both of these receivers, but there are
always a few exceptions. Other receiver variations (Generation 2 - G2)
are in the works as well - we will have a 3 channel Butterfly receiver
with weight near 0.4 grams, a 4 channel actuator receiver, and a 4
channel servo receiver.
Note that all Plantraco Micro9 receivers can sync to the HFX900
(American model) AND HFX868 (European) transmitters on frequencies 1, 2 and 3. New “G2” receivers will also be able to sync to the
new frequencies 4, 5, and 6 that are available on the HFX900 Air
Model 2 but not on HFX900 Air Model 1.
It can be important to know whether your receiver is capable of syncing to frequencies 4, 5 and 6. If you forget, it’s probably best to just
use the frequencies 1, 2 and 3 which are available on all of our
receivers. If you can’t sync your receiver, the first thing to check out
is whether your transmitter is transmitting on frequencies 1, 2 or 3
first.
Bahoma 10mm
Magnetic Battery Connector
Antennae 78mm
To Motor
To Rudder actuator
Fig. 6 MICRO9-BFLY-2CH - 2 Channel 0.38 gram
receiver.This one has 5mm Bahoma and no Nano-connectors for the low weight configuration
Antennae 78mm
Bahoma 10mm
Magnetic Battery Connector
To Motor
Plantraco Butterfly RTF - This briefcase aircraft can
be flown in the livingroom with full proportional control.
Behold the beauty and find craftsmanship of this
model. Easy to fly because it’s very very slow!
It uses the MICRO9-BFLY-2CH
To Rudder
actuator
To Elevator
actuator
Fig. 5 MICRO9-3CH - 3 Channel 0.9 gram receiver
with 10mm Bahoma and Nano connectors - easy to
configure!
Low Battery Protection - built in failsafe.
MICRO9-3CH - 0.9 Gram 3CH Actuator Receiver This small circuit board receiver has microconnector outputs for 1
motor and 2 magnet actuators. 2 magnetic battery terminals (Bahoma
-spaced 10mm apart). Magnets are 3mm diameter X 1.5mm thickness. The 2 short wires on the top side of the receiver are the dipole
antenna. The receiver can report status to the user by use of an LED
indicator light, and also by making high frequency tones emitted
through the magnetic actuator itself (earlier G1 models emit the tones
from the elevator actuator only and use PWM to control the actuators
- new G2 models send tones through both actuators and use PFM to
control the actuators) You will find these audible tones useful - they
can tell you if you have successfully started your receiver, synced to
your transmitter, and what frequency you have synced to.
2
3
The Lithium Polymer Bahoma battery should not be discharged lower
than about 2.7 Volts. The low battery failsafe function of the Micro9
receiver will ensure that you do not over discharge your lithium polymer battery. It will warn you when your battery is low and needs to be
recharged by cutting the throttle to 60% when cell voltage is getting
low. You can continue to fly if you wish - the attenuated throttle usually allows the lithium cell voltage to rise, so maybe you can still fly
for a little bit longer. When the cell voltage drops even lower, the
throttle will then be cut to 30% and you will most certainly have to
land your model. If cell voltage is too low, or there is a poor electrical
contact, the LED will blink an S-O-S pattern and you’ll have to check
the connection, recharge the cell or replace the cell.
The receiver measures cell voltage while your are flying, and the LED
will blink a series of flashes to indicate the general state of the battery
voltage. You won’t notice this when you are flying, but this functionality is built in if you want to do some bench testing etc. If you leave
the battery on the receiver for too long (like overnight) you may over
discharge and damage the cell - so be sure to disconnect it and
recharge when you are done
CONFIGURATION OF TRANSMITTER - AIR MODEL 1 AND 2
CHANNEL 1
With the introduction of the HFX900 Air Model 2 transmitter we have
added several features, some of the steps to configure the transmitter
have changed as compared to the Air Model 1 transmitters as well:
CHANNEL 2 DEFAULT
HFX900 Air Model 1
CHANNEL 3
Grey case
3 or 4 Trimmers present
FMS mono jack
Right Stick UP for FMS mode
3 Frequencies
Freq. Selection non-sticky *
Mix function sticky
Center deadband present
Throttle Stick Centering
No Throttle Arming
Single Charge Rate
No charge while fly
No Buddy Box function
*
HFX900 Air Model 2
Black case
4 Trimmers present
FMS mono jack a n d RJ12 jack I/O
FMS is Auto- Detect (Right Stick UP for frequency
"bank" selection - toggling freqs 1,2,3 or 4,5,6)
6 Frequencies (2 “banks” of 3 freq. 123 and 456)
Freq. is “sticky” function = remembers last freq.
Mix function sticky - and negative-expo sticky too
Minimal deadband around center = more sensitivity
Non-Centering Throttle Stick=Normal Throttle Stick
Throttle Arming Procedure (0%-100%-0% = Armed)
Single Charge rate (hackable - solder jumper)
No charge while fly (hackable - solder diode)
Built-in Buddy Box Tx Function
NEGATIVE EXPONENTIAL MIXING
NORMAL MIXING
FLIGHT SIM MODE (NON XMIT)
V-TAIL MIXING
Fig. 7 - HFX900 Air Model 1 Configuration
Configure Transmitter functions by holding stick
positions while switching transmitter ON
STICKY FUNCTIONS ARE FUNCTIONS THAT ARE “REMEMBERED” BY THE TRANSMITTER EVEN
WHEN THE TRANSMITTER IS SWITCHED OFF OR BATTERIES REMOVED - THEY ARE STORED IN
COMPUTER MEMORY.
CHANNEL 1 - (CHANNEL 4)
Plantraco HFX 900Mhz R/C System (868Mhz in EU), can be configured for use on one of 6 radio frequencies “channels” with the Air
Model 2 Transmitter, and on one of 3 radio frequencies with the older
Air Model 1 transmitter. The older Air Model 1 transmitters will continue to function with new Plantraco receivers but only on the original
3 frequencies. Likewise, your older generation 1 receivers capable of
only 3 frequencies will work fine with the new Air Model 2 transmitters, but again, only on the 3 original frequencies.
CHANNEL 2 - (CHANNEL 5)
CHANNEL 3 - (CHANNEL 6)
NEGATIVE EXPONENTIAL MIXING
BUDDY BOX CALIBRATION (RJ-12 PLUGGED IN)
For Air Model 1 Transmitters - you select your frequency when
you switch on your transmitter. The position of the Left joystick at
startup controls what frequency you will use. When you startup the
Transmitter, you can hold the Left stick to the Left, leave it in the middle (default), or hold it to the Right, to configure operation on Channels 1, 2 and 3 respectively. Default is Channel 2 (left stick is in the
middle position). Every time you restart the Air Model 1 transmitter
you need to select your frequency number. If you do nothing, you will
get the “default” CH 2 frequency - which is fine if you are flying
alone. You only need to worry about transmitter frequencies when
you fly with others in the same area.
NORMAL MIXING
TOGGLE FREQUENCY BANKS
V-TAIL - ELEVON MIXING
Fig. 8 - HFX900 Air Model 2 Configuration
Configure Transmitter functions by holding stick
positions while switching transmitter ON. Note that Air
Model 2 has automatic flight sim cord detection
For Air Model 2 Transmitters - you can access another bank of 3
frequencies (designated as 4, 5, and 6) by holding the Right Joystick
UP at startup. Both the “bank” and the particular frequency are held in
memory - even when you switch off the transmitter. Once you have
selected the “bank” of frequencies you want to use, switch off the
transmitter and you can then hold the Left Stick to a particular position to select which channel you want and switch the transmitter back
on - when the left stick is release, you’ll be transmitting on that particular channel. Channel 1 and 4 correspond to each other, as do
Channels 2 and 5, and Channels 3 and 6 - the difference being the
“bank” of frequencies you are in.
The sticky channel function is very nice when used with Generation 2
“G2”Plantraco receivers (manufacture date after April 2006), since the
receiver will also remember the last frequency it was
synced to. So you can set up all your receivers to your “number” at
home and when you go to fly with friends, your receivers will sync up
to your transmitter by preference, which is quite convenient.
4
The HFX900 transmitter Air Model 1 is capable of transmitting
on CH 1, 2 and 3 ONLY, whereas the new Air Model 2 is capable of
transmitting on 3 new frequencies as well, (a second “bank” of frequencies) designated 4, 5 and 6. The European HFX868 Air Model 1
and Air Model 2 transmitter is capable of transmitting on 3 frequencies ONLY.
When selecting a frequency on startup, you can hold the Left joystick
in a position for about 2 seconds and let it spring back to center when
you are ready to transmit. Channel 2 is the “default channel” on Air
Model 1 transmitters, because the stick will return to center position,
so this channel is always selected by default if you switch on the
transmitter without holding the Left joystick in any particular position.
If you are flying alone, you will probably be transmitting on channel 2
(CH 2) most of the time with Air Model 1 transmitters.
Air Model 2 Transmitters “remember” the last frequency
selected, so you can set it once and forget it until you need to
change it when you fly with others.
Receiver sync-up with the older Air Model 1 Transmitters works as
follows: The receiver (generation 1 or generation 2) will look for the
lowest channel number first and will lock-on (sync) to the transmitter
that is broadcasting on the lowest channel number. When you are flying in the same room as others, The first user to start up his airplane
should use channel 2 or 3, and the second user can use channel 1.
Therefore up to three people can fly in the same room simultaneously.
The first person should use CH 3, the second should use CH2 and the
third person should use CH1. All three channels can be used together
without risk of interference from the others. If the 3 people flying in
the same room are aware of what channel they are using, they will be
able to allow a new flyer to join in, so long as the new user can select
a lower channel number than what is currently being used. If you are
flying with your friends, put the longest flying airplane on CH 3, and
then let the other airplanes use the lower channels.
Receiver Sync-up with Air Model 2 Transmitters works in a similar
manner for first generation “G1” Plantraco receivers, but with the second generation “G2” receivers, sync-up has been improved in a number of ways, and follows a set of rules in order as follows:
These rules allow G1 and G2 receivers to operate with each other,
while delivering a good measure of convenience for Air Model 2
users, and continued usability of Air Model 1 transmitters in the same
flying area.
It’s still good to keep track of who is running on what channel, but
with the Air Model 2 transmitters, once you have figured out who is
on what channel, you probably won’t have to worry too much about
frequencies or stepping on each other’s channel number.
Transmitter Mixing Modes
There are several user-selectable “Mixing Modes” available on the
transmitter. (See Fig.8 ) You select your “mixing mode” when you
switch on your transmitter The mixing mode you choose will be saved
in memory until you make another selection - even if you switch it off.
The position of the Right joystick at startup controls what mixing
mode will be selected. The factory default mixing mode is “Normal”
rudder and elevator mixing, this can also be selected at startup by
holding the Right joystick to the right for about 2 seconds. When you
startup the Transmitter, you can hold the Right joystick to the left to
select “Negative Exponential” mixing that might be useful to dampen
your joystick controls for squirrely models. When you startup the
Transmitter, you can hold the Right joystick down to select “V-Tail”
mixing for elevon style planes. If you want V-Tail and Negative Exponential mode - you can do that with 2 programming steps. Note that
the flight sim FMS mode is automatically detected with Air Model 2
transmitters - just plug in the cord and power up the transmitter and it
will be in the non-transmitting FMS mode and you can plug the other
end of the cord into our computer.
Normal Mixing (Right Stick to Right)
This style of mixing is for 3 channel rudder and elevator. The Left stick controls the motor throttle. The Right stick controls rudder and elevator.
Negative Exponential Rate - (Right Stick to Left)
This makes the control response milder around the joystick center point, but it
becomes increasingly stronger as the input approaches 100%. This can help
for taming squirrely models.
Rule #1. G2 receivers remember the last channel they have synced to, so
Buddy Box Calibration - (Right Stick to Left)
when the receiver starts up it will listen on the frequency channel
stored in memory. If there is no transmitter broadcast on this fre
quency, the receiver will then search for a transmitter broadcast to
sync to and proceed to rule #2.
This selection is only active when you have plugged in the RJ-12 Buddy Box
cord into the side of the HFX900 Air Model 2 Transmitter. Once selected, you
switch on your HiTec or Futaba transmitter and move the sticks to the extreme
ranges to calibrate. Then you can cycle the HFX900 power select a frequency
and start using your HiTec or Futaba transmitter as a 900Mhz transmitter.
Rule #2. G2 receivers, with then try to sync to any “unarmed” transmitter
broadcast - that is - a transmitter that has just been powered up, and
whose throttle has not yet been “armed”. This allows an Air Model 2
transmitter to be set to any frequency and sync up to his receiver
even though there may be other transmitters operating in the same
area. If there are no “unarmed” transmitters proceed to rule #3
V-Tail Mixing - (Right Stick Down)
For models that combine elevator and aileron function on two control surfaces,
like flying wings and V-tail planes.
Toggle Frequency Banks (Right Stick Up)
Rule #3. G2 receivers that do not detect transmitter broadcasts on the last
This toggles access to frequency channels 1, 2 and 3 in one “bank” and 4, 5
and 6 in another “bank”. It helps to remember what “bank” you are in - you’ll
know once you sync up to your receiver. If you find that you can’t sync up
your old G1 receiver, it could be because you are transmitting on CH4, 5 or 6 so remember that this could happen.
synced frequency (rule #1), and do not detect transmitter broadcasts
from “unarmed” transmitters (rule #2) will then search for any other
active transmitter frequency broadcast, and will sync to the lowest
channel number. Rule #3 is the rule that is followed for syncing Air
Model 1 transmitters with G1 or G2 receivers.
5
Establishing Transmitter-Receiver R/C Link
Turn on your transmitter by pushing the 3 position switch all the way
to the far right. The main transmitter LED will glow. It is always best
to turn the transmitter on first.
The receiver should have 2 actuators and one motor connected.
The receiver can communicate to the user with audible tones and LED
blinking sequence.
Attach the LP90 cell to the receiver, you will notice a distinctive audible musical arpeggio tone sequence (musical notes C-E-G-C-G-E-C)
that indicates successful microprocessor startup. This arpeggio is followed by a two-tone repetitive sequence (C-E,,,C-E,,,C-E -- and so
on). This repeating two-tone sequence indicates that the receiver is
scanning for a transmitter signal - it will continue to repeat until a
valid transmitter signal is received. Once a valid transmitter has been
found, the Channel number will be indicated by a series of tones (G
note). Once you hear and see the final count of “G” notes, you will
know what channel you have synced to and that your HFX900 system
is ready for action. The actuators may start moving and buzzing.
Your motor will not begin to move until you “Arm” your throttle by
moving it from 0% to 100% and back to 0%. You will be able to
control the actuators by using the Transmitter Joysticks, (See Fig.9)
You may need to adjust the trim by moving the small trimmer wheels
located near the transmitter joysticks.
Adjusting the Trimmers
Rotate the trimmer wheels with your thumb until you have successfully stopped any buzzing of the actuators. If your model needs trimming
in the air, you can adjust this while flying too. Most experienced R/C
pilots will have no problems with this, but if you are a beginner, it
might seem strange for now. Basically you will want the trimmer
wheels to be positioned near the middle of their full range of motion.
Make sure you know what mixing mode your transmitter is configured
to. If you are confused, remove the Bahoma cell from the receiver,
and review the transmitter mixing functions and start again.
FULL THROTTLE
HFX900 (Americas) Frequencies
CHANNEL 1
CHANNEL 2
CHANNEL 3
CHANNEL 4
CHANNEL 5
CHANNEL 6
HFX868 (Europe)Frequencies.
CHANNEL 1
CHANNEL 2
CHANNEL 3
868.105 Mhz HFX868 Air Model 2
868.385 Mhz HFX868 Air Model 2
869.910 Mhz HFX868 Air Model 2
FMS FLIGHT SIM
Using the HFX900 Transmitter for the FMS
R/C Flight Simulator
To use your transmitter in the FMS R/C Flight Sim mode, connect the
supplied serial cable to your Windows PC and insert the mono plug
into the jack on the left side of the transmitter. Air Model 2 transmitters
sense that the cord has been plugged in, and will automatically go to a
“non-transmitting” mode so you can use the R/C flight sim functions
without broadcasting any RF at this time.
We have included a CDROM that has the FMS Flight simulator, and
also has the Plantraco MicroScout FMS model and the Butterfly FMS
model and other items to the CDROM such as video’s and helpful documents - so be sure to check the CDROM out.
If you lose the CDROM that was included with your system, you can
download the freeware Flying Model Simulator "FMS"
DOWN
RIGHT
LEFT
904.4775 HFX900 Air Model 1 and 2
915.9975 HFX900 Air Model 1 and 2
927.5175 HFX900 Air Model 1 and 2
912.1575 HFX900 Air Model 2 Only
923.6775 HFX900 Air Model 2 Only
908.3175 HFX900 Air Model 2 Only
ZERO THROTTLE
The Windows Installer can be downloaded here:
http://www.n.ethz.ch/student/mmoeller/fms/beta/fmsdisk01.exe
UP
The official website for FMS can be found here:
http://n.ethz.ch/student/mmoeller/fms/index_e.html
Fig 9 . Basic R/C Aircraft Control
6
TROUBLESHOOTING
Once downloaded launch the installer and choose your installation
directory (Normally "C:\Program Files\" ) This should already be the
default, and you can just press next.
You can choose to put an Icon on the desktop for easy launch of the
application. The program should be installed.
You can Launch the program from the icon located on the desktop or
from the start menu.
With the Serial Cable attached to the computer, and the mono plug
inserted into the jack on the side of the transmitter switch the transmitter ON.
The transmitter will now be in the NON TRANSMITTING mode and can
be used as an input device for the flight simulator.
In the FMS program click the menu "Controls" then click on " Analog
controls…" .
Select "Serial PIC Interface" and then click the button marked
"Resources". Then you will need to select the com port which the cable
is connected to. (Probably COM1 or COM 3)
For the Baud Rate Choose "19200" . Then Press OK
Then Click "Mapping/Calibration" then click "Calibrate" you should
now move both sticks in all directions to allow the software to adjust to
the range of motion available
You can see the blue bars moving up and down to confirm full range of
motion. Two or three big circles with both sticks should be fine. Return
your sticks to the center position. Click OK, And then click OK again at
the next menu prompt.
The aircraft on screen should now start rolling ahead - You should now
be able to affect the aircraft by moving the control sticks. If controls
seem to be reversed - you can go back to the “Mapping/Calibration”
and select the appropriate channel reversing to get the model to
respond correctly.
To switch back to a transmitting mode, just pull the plug out of the
HFX900 Air Model 2 transmitter - hold the right stick to the right and
simultaneously switch the transmitter from off to ON again, and you are
back in Normal transmitting mode.
We hope that you won’t have any problems with your HFX900 system,
but if you do, check this Troubleshooting list first, then contact plantraco by Email [email protected], or calling 306-955-1836.
1. My Receiver played the startup tones through my actuator at startup, but then it just plays the C-E tones over
and over - it keeps beeping forever.
• Check transmitter - Make sure the switch is all the way to the right
in the ON position and the transmitter LED is glowing.
• If this is happening on an older G1 receiver and you are using a
new Air Model 2 transmitter, Toggle your frequency “bank” to
ensure that you are transmitting on a frequency that your older
receiver can receive. ie: you need to be on CH 1, CH 2, or CH 3.
• Is your Air Model 1 transmitter in FMS mode? Switch the Tx off
for a few seconds and then startup with the Right joystick held to
the right for 2 seconds - Let the stick go and you should be in normal rudder elevator R/C mode again. Now remove the battery from
the receiver and start it up again. You should hear the arpeggio
tones, and then the C-E tones and then a few G tones to tell you
what channel you have just locked-on (synced) to. This won’t
apply if you have Air Model 2 transmitter
• Change your Transmitter batteries for fresh ones and try again
• Make sure your cell is charged and the terminals are clean.
• Check if your receiver still has it’s antennas - have they been broken off or cut? replace and try again or contact Plantraco by phone
or Email and we’ll help you out.
2. When I charge my LP90 cell on the built-in charger of
the transmitter, the LED goes out right away, but the cell
doesn’t seem to have much power anymore.- Or - It
seems to be taking forever to charge my LP90 cell.
• Replace the AA batteries in the transmitter- they are probably low and
we have to have greater than 4.4 Volts left in the 4 AA cells in
order to charge up the LP90 cell. A normal Charge will take about
60 minutes With fresh AA cells in the transmitter, you should be able
to get about 10 charges of your LP90 cell - you may get more, depending on how you use your cells, but eventually, the AA cells of the transmitter will become depleted, so be mindful of the charger LED. It can
be a good idea to use a digital volt meter (these are often available for
less than $15.00 these days) to check your cell voltage once in a while.
3. I sync up fine, but the controls seem to be reversed or
something - when I give it elevator, I get rudder - it’s all
messed up, but it worked before just fine.
• You are in V-Tail mixing mode. Power off the transmitter for 5
seconds and restart the transmitter while holding the Right joystick
to the right for about 2 seconds and when you release it, you
should have normal control again.
Carbon Butterfly - A nearly indestructible Ready to Fly
livingroom flyer coming soon!
Keep checking www.plantraco.com
7
4. I sync up fine, when the model is throttled up or is shaken, the battery seems to lose it’s connection, Throttle
cuts out, and the receiver starts up again, I can hear the
tones - what’s happening?
• This sounds like a poor electrical contact between the battery and
the receiver. It can also be caused by faulty or worn out battery
chemistry. You could try a different cell if you have a spare one.
• Try squeezing the Bahoma battery magnet terminals of the cell and
slide the battery around on the receivers magnets when you make
a connection - this will help to clear any debris that might be preventing the Bahoma magnets from getting a good electrical contact. If the magnets are well apposed to each other, they should
stick fine and you won’t shake them loose anymore. Don’t
squeeze too hard - you don’t want to crack the circuit
board. Clean the magnetic terminals with a Q-tip and alcohol, or
scrape them with a probe to get them clean and able to provide a
good electrical contact.
• You can also try using a small piece of tape to securely affix the
battery to the receiver if your airplane is a bit shaky in the air. If
your gearbox and prop are well balanced, you will have less shaking of your model in the air - you can check that too to reduce
vibration.
5. I crashed my plane, and now when I start up the receiver, I don’t hear any tones at all and I can’t seem to sync
anymore
• Check your actuator wiring - broken wire?
• Check the LED on the receiver - does it blink when the receiver is
powered up with the cell? It should
• Does the LED blink in an S-O-S pattern for about 10 seconds and
then it does play some tones? If it does, this means your cell needs
to be recharged, or you may have a poor battery contact. Clean the
magnetic battery contacts - they can get dirty and pick up all sorts
of magnetic debris. They need to be cleaned periodically - this is
very important.
• Check magnets on your cell and on the receiver - are they all still
attached and intact? If they have broken off of the cell, you’ll need to
replace or repair it - If a magnet has broken off of the receiver, contact Plantraco
• Check the magnet terminals to see if there is any magnetic debris
coating the cells, preventing a good electrical connection. If there
is, clean them off with a Q-tip, toothpick, small flathead screwdriver
etc Dip your Q-tip in rubbing alcohol, this can clean the crud off
your magnet terminals
• Check the bahoma cell - measure volts with voltmeter. You should
be above 4 Volts for a fully charged cell
• Perhaps in the crash, you broke a solder joint on the PCB - if you
know how to solder, you can try to reheat the solder joints of all
components until you fix the problem, or you can contact Plantraco
for more advice or repair services.
8
6. I can’t get FMS to work properly
• If you have an older Air Model 1 transmitter, Make sure you put
your transmitter in FMS mode. Do this by holding the Right Stick
in the up position at startup of the transmitter. You can check that
the transmitter is in FMS mode by starting up your receiver - it
should keep beeping without syncing to the transmitter since the
transmitter should be in the non-transmitting FMS mode now. If
your receiver can still sync to your transmitter, you are not in FMS
mode. For Air Model 2 transmitters, the FMS mode is automatic just make sure the cord is plugged in - power on the transmitter
and you’ll be in FMS mode
• Follow the directions on the CDROM carefully. Re-install FMS, or
call your local computer guru to help you. It’s easy, but maybe
your system is messed up. We’ll have more tips on FMS mode on
our website, just go to
http://www.plantraco.com/hobbies/help.html
7. My actuator moves one way, but not the other way
• Check the mechanical linkage of the actuator to the control surface
and ensure that it can move freely - is anything binding or causing
friction?
• You may have a “half-blown FET” or a cracked solder joint or
cracked circuit board. It may be possible to repair it by replacing
the part, or by reflowing the solder - Better contact Plantraco.
8. What are some good ways to clean the magnetic electrical contacts of my receiver and Bahoma cell?
• Q-tip with rubbing alcohol - do both receiver and cell
• Scrape any crud with a small probe - like a toothpick or small flat
head screwdriver or broken tip of a hobby knife
• Use Stabilant 22 electrical contact enhancer liquid - it can help
• Squeeze the cell on the charger terminals to get the magnets nice
and true - the magnet surfaces should be in the same geometric
plane for best electrical contact
9. I broke something I think, and I can’t fix it myself
• Contact Plantraco by Email or Phone - we can help in most cases
• If your unit is damaged, we can probably fix it under the 30 day
warranty or for a reasonable service charge. If it’s damaged by
your fault, you pay shipping to and from us. If it’s a defect that
is our fault, we’ll pay shipping back to you, you pay shipping to
us. Its a basic common sense warranty policy that we follow,
and we hope it works well for you. We do our best for You!
To Re-Order Spare Parts etc. Call your
Local Dealer or Plantraco Direct at:
1-306-955-1836
www.plantraco.com
www.microflight.com
Email us at:[email protected]
Any changes or modifications (including the antennas) made to this device that are
not expressly approved by the manufacturer may void the user’s authority to operate the equipment.
HFX900 Manual v 0.98 Copyright 2006 All Rights Reserved