1
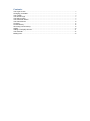
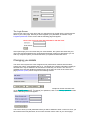
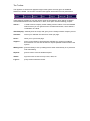
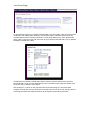
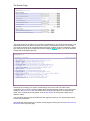
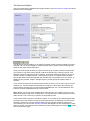
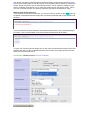
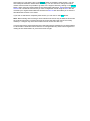
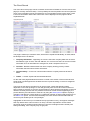
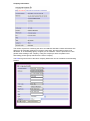
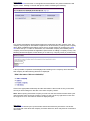
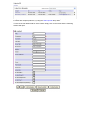
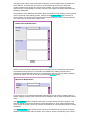
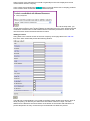
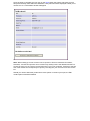
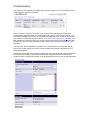
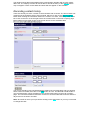
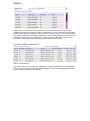
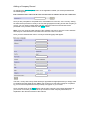
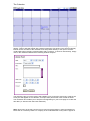
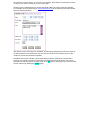
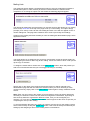
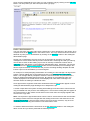
CRM/ SOP System
USER MANUAL
Introduction
The CRM / SOP (contact relationship manager / sales order processing) system has been
developed to address a company's requirement for a contact management and order
processing solution. Whilst this has been particularly aimed at the company's sales force,
there is no reason why it could not be universally adopted by all staff having similar contact
history requirements.
As this manual has been produced at the initial development stage, it is possible that some
functionality may change and the example screen shots may differ slightly from those in the
implemented system.
Conventions
Throughout the manual, links and filters are shown in blue (unfortunately not obvious if printed
in black and white) as they appear on screen and buttons are highlighted with a coloured
background such as Save.
Useful or important notes are shown in italics preceded by Note:.
Contents
The Login Screen .................................................................................................................................. 3
Changing you details ............................................................................................................................. 3
The Toolbar ............................................................................................................................................ 4
Your Home Page ................................................................................................................................... 5
The Search Page ................................................................................................................................... 6
The Advanced Search........................................................................................................................... 7
The Client Record ................................................................................................................................ 10
Contacts ................................................................................................................................................ 13
Contact History ..................................................................................................................................... 18
Recording contact history ................................................................................................................... 19
Orders .................................................................................................................................................... 20
Adding a Company Record ................................................................................................................ 21
The Calendar ........................................................................................................................................ 22
Mailing Lists .......................................................................................................................................... 24
The Login Screen
At this screen input your user name and your password to be logged into the system and be
taken to your home page. Should you have forgotten your password, click where it says
Forgotten password? on the screen and the following page will appear:
At this point input your user name and your email address, the system will check that your
user name and email address are recognised and will then email your password to you. As
with any computer system you should not share your password with other users.
Changing you details
The users of this system are each assigned a user profile which contains their full name,
system user name, email address and so on. The profile also contains information relating to
what that user may be allowed to do and which records they can access. The user can
maintain some of these details themselves and to do so there is a link on the user's home
page (Edit user profile) which will open the following window:
At this point you can change your name, email address or telephone number and then click
on the Update profile button. To change your password, click on the Change password button
and the following screen will appear:
You have to enter your old password before you will be allowed to enter a new one. Once you
have entered the new password, click on save and then exit to return to your home page.
The Toolbar
This appears on all the main pages throughout the system and may grow as additional
features are added. The number of buttons that appear will be linked to user permissions.
These buttons will take you into the various areas of the software, which will be covered in
more detail elsewhere in this manual but, in brief, each option has the following purpose:
Search -
is used to find a company record utilising various criteria. From the standard
search screen you can gain access to an advanced search, which allows a
combination of criteria.
Add Company - basically does as it says and gives you the facility to add a company record.
Calendar -
shows your calendar of events as a month per page.
Home -
takes you to your home page.
Support -
gives you the facility to email support staff with any queries or problems
encountered. This can also be used to request possible enhancement to the
system.
Mailing Lists - gives the facility to set up mailing lists to either email directly or to produce a
snail mail mailing.
Reports -
gives access to various standard reports.
Admin -
high level user access to set up users, rates, etc.
Logout -
pretty obvious what this means.
Your Home Page
On successfully logging in you will be presented with your home page, which shows the items
contained in the system diary relating to your tasks for today. It will also show a list of any
overdue tasks that have not been closed off. To look at the detail of any of the tasks shown
simply click on the icon at the end of the item and you will be presented with a pop up window
showing the details of the task.
Contained in this window is a field called closed, which if ticked, means that this item has
been dealt with. Once you have dealt with the item in question simply open this window click
on the box next to where it says closed.
Also showing in a column on the right hand side of the home page is a list of the latest
company records that you have accessed. The idea of this is so that you can quickly return to
a recently accessed record without have to go through the usual search procedure.
The Search Page
This page allows you to search for a company record based on one of the criteria shown. This
simple search does not allow more than one criteria to be selected at a time. If for example
you chose to search for all companies where the name contains the word "chemicals", simply
type chemicals in the box provided and click the adjacent Search button. You will be returned
a page that would appear like this -
Assuming the company you require is listed simply click on the name to retrieve that
companies record. There could be multiple pages representing the results of your search and
clicking on the previous or next links at the top of the page will enable you to page through
these. If the company does not appear, click on New search at the top of the page to try a
different criteria.
You will notice that the company addresses also appear so that you can find the right one for
a multi-site organisation.
The advanced search facility is accessed via this page by clicking where it says Click here for
advanced at the top of the page.
The Advanced Search
This is accessed via the standard search page where it says Click here for advanced and the
following screen will appear:
The advanced search enables you to restrict the search results to those meeting the criteria
selected. You can choose single or multiple journals and/or regions and/or product groups
together with order history information.
Firstly you must choose whether you wish to search for all company records only that meet
your criteria or only those where named contacts are linked to the company records. The
simplest of these is searching for all companies, which then needs as a minimum for you to
choose a single or multiple journals. This will give you a list of companies (see standard
search) that have been associated with the journal/s that you specified. You can choose, in
addition to the journal/s, single or multiple regions, product groups and order criteria, if
required.
If you choose to search for records that have named contacts, you can then choose one per
company (i.e. the first contact record within the company) or all contacts and whether you
want to restrict the search to only those with email addresses, etc. The resultant list in this
instance will be an alphabetical list by contact name.
Note: Where you wish to select multiple items within the lists, this software uses the usual
Windows application approach of being able to use the shift key to select sequential records
within the list or the control key to select non sequential records.
If your search does not give the results you expect, or no results at all, it would suggest that
the criteria you have chosen is either not quite right, there are no matching records or there
has been no activity or contacts present that link to the journal/s specified. Under these
circumstances you can use the Change criteria link that appears on the results page in order
return to modify your selected criteria. Should you wish to start again click on the Clear button
at the bottom of the page.
The results of searches made through the advanced option can be saved (choose the Save
as link on the results page) so that the search can be repeated without having to reselect the
criteria. Saved searches, if they include named contacts, can be used as a mailing list (see
section on Mailing Lists) but be sure to check the mailing field on the search screen. When
you click on the Save as link you will be prompted to give the saved selection a name.
Working with saved selections
If you have previously saved a selection, you can rerun this by clicking on the Load button at
the bottom of the advanced search page and you will be presented with a page similar to the
following:
If you have selections saved where the name starts with the letter a, they will be listed here.
For others, click on the first letter of the name and those selections will be listed.
To rerun one of these searches simply click on the name and the advance search screen will
reappear but with a couple of additional buttons at the bottom of the page and the selection
name in the top left hand corner.
At this point you can simply click on the Search button to repeat the same search. You can
also modify the selection criteria before searching. You can choose to change the search
criteria at this time but it is possible to go back to the original criteria by clicking on the Revert
button. When rerunning saved searches the results page will show a Save link as well as the
Save as link. Please be aware that if you have changed the criteria using the Save link will
overwrite your original saved selection whereas the Save as link will enable you to save the
amended search under a new name.
If you wish to start with a completely fresh search you can click on the New button.
Note: When loading and rerunning a saved selection the results may be different from when
the original search was run/saved because the search will reflect the data as it currently
stands (i.e. changes may have been made since the search was last run).
It is also important to appreciate that saved searches that are intended for use with mailings
to clients will not allow the search criteria to be changed after they have been assigned to a
mailing list and authorisation to process has been sought.
The Client Record
The main client record page can be accessed via the search facilities or from the users home
page (for recently viewed records). This is probably the most important area of the system as
much of the information held is accessed from or input windows opened via this page. There
is far more information behind the scenes than can be displayed on this page as will be
explained below.
This page is made up of 4 distinct areas, which will be explained individually, in detail, below
but briefly there are as follows:
1. Company Information - Appearing on screen is the basic company data such as name
and address, type of client, web site address, etc. but from here there is access to further
information such as associations to ad agencies, sister companies and so on.
2. Contacts - Named contacts within this client company showing primary contact
information but with links to further information.
3. Contact History - A record of communication with the company with links to further
detail.
4. Orders - A record of past and forward-booked items.
On this and other pages/windows that will be covered in this section of the manual where a
small printer symbol appears this enables the user to print the listing or record as it appears
on the screen.
The layout of this page is the same for all users but the content that appears will be
dependent on the user privileges. A user will generally have access to a limited number of
their company's products so only the records relating to those products will appear. If their job
relates to several products then it is possible for the user to filter the lists appearing by the
product that they are interested in at the time by using the Select journal options. Equally a
manager could filter the contact history by a particular member of his/her staff through use of
the Select user option. All users have the ability to access various links and filters but the
choice may be limited by their user privileges.
Highlighted on this screen (in red towards the top right hand corner), can appear messages
that may state that the client account is on stop, has been suspended or closed. Sales
personnel using the software should obviously note such messages as there is little point
selling something, if the company may not get paid.
Company Information
This section, apart from containing the name and address and basic contact information also
allows you to associate members of a group to each other, but also link this record, if an
advertiser, to an advertising agency or agency to an advertiser. There is provision for some
general notes relating to the company, noting this company's direct competitors and
associating product groups relevant to the user's company.
The Edit link gives access to the basic company data which can be amended via the following
window:
Associations
The Associations link if shown in red signifies that associations are present otherwise it will
appear in blue. Clicking on the link will open a window containing the following.
Any existing associations will be listed showing the relationship and the company type. The
company record page for associated companies can be accessed by clicking on the company
name. New or additional associations can be set up via this window by clicking on the Add
new link at the top. To make an association, the associated company must already have a
company record set up within the application (See section on adding a company record). The
following window will appear, which allows you to search by company name (or partial name).
A list of possible companies will be displayed and clicking on the company name will select
that company and the following will then be displayed:
Click on the appropriate relationship and the association is then made not only in the initial
record you were linking from but also in the other company chosen.
Note: When opening associated company records from the associations window these open
other windows which should be closed by clicking on the X in the top right hand corner until
the original record or associations window is displayed again.
Site Notes
The Site notes link will open up the window shown below that may be used to view and/or
record general notes about the company for future reference, which may also be of interest to
other users.
Simply type the relevant note and click on the Save button.
Product Groups
The Prod Groups link will open a window similar to the associations window showing a listing
of product groups associated with the company record concerned. The window appears as
The product groups are set by and are relevant to the user's company products, which are
then associated with the client record. The user will only have access to product groups
related to the products he/she is associated with. The Add button allows additional product
groups to be linked to the record.
Competitors
The Competitors link operates in exactly the same way as linking an associated company with
the exception that it will not ask for the relationship. This link will also appear in red if a
competitor list has been created.
This option (requested by users) allows a quick access to the direct competitors held on the
database.
Contacts
The contacts section of the page shows the basic contact information for each named contact
in the company that is relevant to the user.
It is possible to restrict this list to the contacts relevant to an individual product, if the user is
involved with multiple products, by using the Select journal drop down.
To look at the full details held for each contact simply click on the name and the following
window will open:
The page shown above gives a little more information on the individual such as job title and
home address. There are also a number of contact flags that can be set to reflect the
contact's wishes such as they do not wish to be emailed. Any such preferences will be
reflected in the contact listing on the main company record page and will be respected when
setting up mailing lists.
It is possible to store additional information about the contact through setting up some general
notes or personal notes relating to them. Clicking on the Contact notes button will open a
window where you can input general information about the person, which could be helpful to
you in the future as well as other system users.
Simply complete the known information and click on Save.
Where you know a person particularly well you may also wish to record some more specific
information about the person. For example, the salutation for mailing purposes for the
individual maybe Robert but because of your relationship with him you may wish to address
him as Rob or Bob. This can be set up by clicking the My notes button.
If you choose to set up a different salutation here this will only be used on mailings that you
initiate, mailings set up by other users will use the salutation set up under the general contact
notes.
The Left company button should be used where a contact has left the client company. This
does not actually remove the contact record but simply flags it, which means that the name
will no longer be shown in the list of contacts but all history of communication with this contact
will remain.
The Record contact button showing in the contact record window can be used to record the
details of communication with the contact. This, however, will be covered fully in the contact
history section of this manual as this would not generally be the route employed to record
communication with the company.
In the contact record window the Products button is used to link the user's company products
to this contact. When clicked the following window will open:
This shows what products may already be linked to the contact and, via the drop down, you
can link other products. Users of this software are also linked to one or more products and the
combination of these links is used to determine the information presented on screen for the
user and is also used in the advanced search routine.
Adding a contact
Going back to the contacts section of the main company record page there is an Add new
link, which when clicked will present the following window:
The Add new contact window is very similar to the Edit contact window seen above, which is
hardly surprising, as obviously the same basic information needs to be input. The main
differences are that there are fewer buttons at the bottom of the window and that there is a
product drop down as every contact set up must be linked to at least one product.
Once the input is complete and you click on the Save button the system will check to see if
this person already exists within the database. Likely matches will be displayed enable you to
choose one or a confirmation window will appear
Click on the button to add the new record.
Note: When setting up a new contact it can be quicker to fill in the minimum information,
forename, surname and product as the contact may already exist in the database linked to a
product to which you do not have access because of your user privileges. If he/she is new the
rest of the details can subsequently be input by choosing the your new user from the contact
list.
Should you need to add other product links to this person or amend your input, the Edit
contact option should be followed.
Contact History
This section of the Company information page shows the history of communication with the
contact with the company concerned.
When you open a company record the contact history listing will appear with the latest
communication appearing at the top of the list with all types of contact being included. The
information showing on the screen is somewhat self-explanatory but, as this list can become
very lengthy, the links showing above the list, Tel | Email | Fax | Visit | Letter | All allow you to
filter the list to the communication type chosen. Restricting the list to communications made
by a specific user can further reduce the length, which can be achieved via the Select user
drop down.
The listing can also be ordered by the date of the communication or next contact date by
moving your mouse pointer to over the column header and clicking the left button once a
small hand appears.
Because of limited space on the screen, this list can only really show that communication has
existed with the company with the briefest detail. But the full information related to each
contact is easily accessible by clicking on the looking glass icon to the right of each listed item
This window shows that original detail of the communication together with he next contact
date if set. The majority of users will not be able to amend the entry so the Change button
may not appear. Future contact dates and times will also appear on the Calendar.
Recording contact history
There are two ways to enter a record of communication with a contact. The first of these was
mentioned in the Contacts section of this manual, which is to click on the Record contact
button when viewing the information held on the contact. The other, more likely used, would
be to click on the icon on the far right next to the contact name on the main company page.
Either will bring up a blank version of the screen shown on the preceding page
This screen should be fully completed with the detail of the communication and any planned
future contact recorded, then click on the Add button to save. The title field should contain a
very brief description, which will appear in the contact history listing on the main company
page. The notes field related to the future contact can act as a useful aide memoire when the
day arrives for the action recorded.
Note: Be careful to check your input before clicking on the Add button as you may not be able
to change this later.
Orders
Similar to the Contact history, this section shows brief order information for the current
company and there are a number of ways to filter this list. It can be restricted to an individual
product via the Select journal drop down or the links Bookings | History | All. Bookings refers
to forward booked orders and history those already invoiced. By placing the mouse cursor on
the column headings of Issue, Order date or Net the list can be ordered by that column's
information. The Detailed link will present you with window similar to this
This as the link name suggests gives more detail on each of the orders and the list can be
filtered in a similar way.
The initial release of this system reflect data that is regularly imported from an external sales
order processing system but with the planned addition of order processing facilities the data
will eventually be integral to this software.
Adding a Company Record
On selecting the Add Company button on the application toolbar you will be presented with
the following page:
Here you are prompted for the postal town, if the address is in the UK, or the country. Asking
for this first has proved to be a way to ensure that geographical coding of this new company is
correct. You can input a partial name and then select the town from the list that will be
presented once you have clicked on the search button.
Note: If you are using the initial release of the software and wish to set up a London address
then the post code should be used rather than the town name of London.
Once you have selected the town or country the following page will appear
The town, county and country fields will be pre-populated as appropriate and you simply need
to complete the other fields shown. Note: The SunAccount code will normally be completed
by your accounts department and will probably not appear on your screen.
Once complete click on the Save button and the main company record page will appear on
your screen. From here you can now set up contacts or other company information, as
explained in the relevant sections of this manual.
The Calendar
On choosing the Calendar option from the toolbar the current month's calendar page will
appear. Today's date will appear with a lighter background (not shown in the above example).
Events can be recorded on the calendar in two ways either directly or the input of a future
contact date when recording communication with a company. To enter an item directly, simply
click on the underlined date and the following window will open:
This shows the day you have chosen and enables you to choose the event type, a title for the
event (this will appear on the calendar, so keep it brief!) and further notes as well as times.
The closed tick box enables you to stop the item appearing on your home page on or after the
due date (i.e. after the item has been dealt with).
Note: Direct entry to the diary should only be used to show holidays or other miscellaneous
items that do not directly relate to a company in the CRM database as they will not appear in
the company's contact history. If you enter your holidays, these will be automatically "closed"
so they do not show on tasks list on your home page.
Clicking on the underlined title can access the detail relating to entries within the calendar.
For example, click on where it says Contact Mr Rob Fuchs in the calendar shot above would
open the following window:
This shows you the event type you intended, at what time (if appropriate) and some notes as
an aide memoire. From this window you can also see the last contact history entry for this
contact or access the contact's information.
Navigation around the calendar can be achieved by using the arrows in the top left hand
corner to move back or forward a month at a time otherwise the month and/or year can be
selected from the drop downs and then click on the Go button. Returning to the current month
can be achieved by clicking the Reset button.
Mailing Lists
The mailing list option utilises a saved advance search to send an email (will incorporate a
printed letter option in a later release) to selected contact/s within the selected client
companies. On choosing the option from the toolbar the following page will appear:
This will list all mailing lists set up that have not yet been sent but also allows you, by clicking
where it says Click here at the top of the page to set up a new mailing. This option simply
prompts you to set up a name for the new mailing and save it so it will now appear on the of
unsent mailings list. This page also contains a link to a list or previously sent mailings.
Clicking on the mailing list name will take you onto the mailing list administration page, which
appears as follows:
This page allows you to assigned your previously saved search results as well as setting up
and assigning the email or letter copy to this mailing. It does not matter in which order you set
up the copy or selection.
To assign the saved search results click on the Add selection button, which will present you
with a list of saved searches that you have flagged as being for a mailing.
Simply click on the name of the required saved search and you will be returned to the
administration page that will now reflect the selection name you chose. Should you have
chosen incorrectly, simply click on the Add selection button again to assign a different saved
search.
Note: Each user has a limit to the number of records linked to their login which determines
what they are allowed to select and mail, without management authorisation, depending on
their seniority within the organisation. Because of this, once you have assigned your
selection, you may have a Request Authorisation button appear but this does not prevent you
completing the set up of the mailing.
To set up and assign the letter copy, firstly you need to give the copy for the mailing a name,
which is achieved by clicking the Assign copy button. This works in exactly the same way as
setting up and assigning a name to the mailing list as covered above.
Once you have assigned the copy name you can create the copy by clicking on the Edit copy
button. This will present you with a word processor type page:
Your can now type your letter and include a subject line, which will appear in the emails. Once
complete click on the Save button in the bottom corner. The copy can be saved and viewed or
edited at any time prior to authorisation by clicking on the Edit copy button in the mailing list
administration page.
Having now completed the set up a proof copy of the email can be sent to you and/or
colleagues to check content and any email or internet links. Assuming all is well you will only
now be able to send out this mailing if your level of seniority is sufficient in which case a
Authorise button will appear on the mailing list administration page. Otherwise, you will now
need to click on the Request Authorisation button and this will email your line manager who
has the required authority to tell him/her that you have a mailing awaiting despatch and will
include a proof of the email/letter you have assigned.
On receipt of an email prompting authorisation of a mailing, the line manager can log into the
system, choose mailing lists on the toolbar and click on the Management Authorisation
button. The manager will be prompted to select the user and will then be presented with a
listing of unapproved mailing lists for that user. By clicking on the mailing list name, the
criteria employed for the saved search will be displayed in order that the manager can
ascertain whom the mailing is intended to reach.
Once approved the originator will be auto emailed and have the Send button appear on their
mailing list administration page allowing them to despatch the job.
A record is kept within the system recording what mailings have been sent to whom with the
copy accessible from the previous sent mailings list. A record of the mailing will also appear in
the contact history or the contact record shown on the main client record page together with
access to the copy used.
Note: It is important to appreciate that the criteria used for saved searches that are intended
for mailings clients cannot be changed after the mailing list has been self authorised or the
Request authorisation button has been clicked. The saved search, however, may be rerun
immediate prior to sending the mailshot so the latest data is used.
To send an attachment with the email click on the Set Attachment button in the mailing list
admin screen and you will be presented the following window:
If the file you wish to attach has already been loaded onto the server simply click on the file
name, otherwise you can upload a file from your PC. To upload a file either type the path and
file name in the box provided or click on the Browse button to find the file. Once selected,
click on the Upload button, which will copy the file onto the main server ready for selection.
Note: There is a limit on the file size that can be used as an attachment that will be
determined by the IT staff at each individual site. The software will tell you if your attachment
has exceeded this limit and will not allow you to assign it.
Once the mailing has been sent the attachment file will be removed from the listing of
available files but retained on the server for future reference.