1
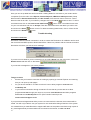
Revolution
User Manual Setup
Setup Contents
3.
Tips for using this manual and Revolution
4.
PC Setup
Local Server
Backups
5.
Backups
Performing a backup
Networks
6.
Revolution - The Main Menu
General Maintenance
7.
General Maintenance, Setup and General Information: Location: Name and
address, Defaults, VAT/Nominal, Insurance, Text boxes.
8.
General Maintenance, Setup and General Information: Text boxes, Price List
Bands.
9.
General Maintenance, Setup and General Information: System, Passwords,
Monthly Summaries, Backups, Price tariff, VAT Calculator.
10.
General Maintenance, Setup and General Information: Price tariff,
Extras, Source Codes.
11.
General Maintenance, Setup and General Information: Utilities.
General Maintenance, Breakdown cover.
General Maintenance, Makes and models.
12.
General Maintenance, Makes and models continued.
13.
General Maintenance, Fleet Management.
14.
General Maintenance, Fleet Management continued.
General Maintenance, Service History.
General Maintenance, Customer Special Rates.
15.
General Maintenance, Customer Special Rates continued.
General Maintenance, Renter database
Renter Database, Bad Renters
16.
General Maintenance, Label Formats
Trouble-shooting: Connection problems
17.
Trouble-shooting: Excesses raised or insurance declined, connecting to remote
server, not connected to internet during month end, cannot open Revolution,
Manual agreements.
2
Tips for using this manual and Revolution
•
You must submit your MID once a week. Select Submit MID from the main menu. You will be
prompted Do you want to submit the MID report, click on Yes. A message will tell you that
the file was sent successfully. If the MID report is due you will be asked if you want to submit it
as soon as you enter Revolution.
•
Keys to be pressed on your computer keyboard will be displayed in Bold throughout this
manual.
•
Use tab to navigate throughout Revolution. The tab key will automatically take you to the next
box to be filled in. Shift and tab will allow you to move back a box.
•
When shift is highlighting a button, press enter to select it.
•
Red fields are mandatory and must be completed.
•
When making changes in Revolution, click on the Hand
to save your changes or
to
reject them.
•
The blue book
•
The F1 Key on the keyboard will display Help for your version of Revolution.
•
The F7 Key on the keyboard will display a quick conviction checker. Useful to check quickly if a
button will always take you back to the previous menu.
rental is likely to be accepted.
•
The F9 Key on the keyboard will assist you in calculating prices with or without VAT, to two
decimal places.
•
If you are not sure what function a button performs, hover the mouse over it and a pop-up tip
will appear:
•
If you wish to reject a renter at any point click on the No entry
button. You will be asked
Do you want to decline this agreement. Click on Yes and the following message will be
displayed:
This is a good way to decline a renter you are not sure of as it appears that it is the program
that has rejected the renter, not you!
•
In order to check connection to the remote server: select About from the main menu. This section displays some basic program and system information. If you have doubts that you are connecting to the rival server correctly, click on the Remote server tab. Make sure you are connected to the internet and click on the Check remote server connection button and Check
internet connection button. Both should be successful. If not, see the next page for troubleshooting tips. If you still have no success, call Rival Support on 0800 328 8833.
3
PC Setup
As well as being of a high enough specification, your PC also has a few other
requirements in order to use Revolution:
•
Your PC must have an internet connection. If you have a dial-up connection you will also have
the Revolution local server installed. This will enable you to validate rentals without being connected to the internet every time, you must however make sure that you connect to the internet
at least once a week (see Local Server below). If you have a constant internet connection
such as broadband or ISDN you do not need the local server as your rental agreements can be
validated by the Remote server through the internet every time.
•
Your internet connection should have a firewall, this becomes even more important if you have
a constant internet connection. If you have a firewall in place you must ensure that it is setup to
allow Revolution through to the internet. You must ensure that program evrun.exe is allowed
through port 44444 to rival.idoink.com and programs evrun.exe and evobackup.exe must be
allowed to FTP (File Transfer Protocol) to site www.revolutionsupport.co.uk. You will also
require normal internet access to site www.revolutionsupport.co.uk.
•
You must ensure that your PC is protected against viruses, check if you are already protected.
The latest Norton Antivirus software is highly recommended. If you are unable to buy a good
anti-virus package you can download Avast using the link on the Revolution Support website
www.revolutionsupport.co.uk which, although not as good as Norton, will offer some level of
protection.
•
You must ensure that your PC is protected against adware. You can download an adware
remover package, Ad-aware using the link on the revolution support site.
•
You must ensure that your PC is protected against Spyware. You can download spyware
remover package, Spybot using the link on the revolution support site.
Local Server
The local server is useful for sites without a constant internet connection (sites with a dial-up connection). It enables rentals to be validated on your pc, without requiring the internet connection every
time. However it is still necessary for you to connect to the internet at least once a week. Connect to
the internet, open Revolution, click on About from the main menu, click on the Remote server tab
and click on the Check remote server connection button.
If you change your internet connection to a constant connection such as broadband or an ISDN line,
call Revolution Support who will inform you of how to remove the local server from your PC.
Backups
It is essential that you keep backups of your Revolution system in case of any problems. Revolution
will take a backup of the system the first time you open it each day. This backup is saved to the hard
drive and is useful for when your software goes wrong. If the computer itself is not working you may
not be able to access these backups and so external backups are also recommended.
4
Backups
Revolution Support recommends that you take a daily backup to an external device, such as floppy
disk, CD-ROM, zip drive, memory stick etc.. It is recommended that you use a separate disk/tape/
stick for each day of the week. This way if one of your disks fails, you will still have several other
backups available to you. Make sure that you keep your backups in a safe place such as a water and
fire proof safe.
If you do not keep backups you are at risk of losing all of your renter and company database, price
tariffs, personal settings, rental agreements and reports.
Performing a backup
Close Revolution.
Open Revolution Backup or Revolution Toolbox, you will find it in the list of programs in the start
menu.
Click on Backup your data
The default place for the backup to be saved is in the Backup folder within the PCVRData folder.
Usually the location of this is C:\PCVRData\Backup\. This saves the backup to your PC. You will see
a warning telling you that if you save here any previous backups will be lost. Click on Proceed.
To save the backup to another drive, such as the floppy disk drive, click in the Drive drop-down box.
Click on the drive you wish to save to e.g. a:[]. Make sure your disk is in the drive and click on OK.
You will see a message telling you when the backup is complete.
If you are using a PC running on a network using a server and the PCVRData folder is held on the
server, you may already have your own backup procedure.
Networks
•
In Windows Regional Settings ensure that the long date style is applied as ddMMMMyyyy.
•
If you have Revolution on more than one pc, make sure that the date and time are set the
same on all machines.
•
If your PC is on a network, it is recommended that your data is held on a server.
If you do not have the skills on site to solve your own software, network and hardware problems you
need a local easily and quickly accessible maintenance service.
5
Revolution
When Revolution is installed onto your PC, a shortcut to the program
will be placed either in
your program list in the Start Menu or directly onto your desktop. Double-click on this to start the
rental software. A log-in screen will appear, just type in your name and press Enter. This name will be
logged on any reports that you process.
The first time you open the program each day a backup will be performed.
The Main Menu
Agreement processing
General maintenance
Reports
Month/year end
Submit MID
Reservations calendar
About
Exit
Please read on for a detailed discussion of each Main Menu option, or use the
Contents page to skip to the section required.
Real-time
As you look at the screen notice that the time and date is displayed in the bottom right hand corner.
The name of the user who logged in is shown as well. You will also see the version number in the
bottom left hand corner, e.g. 1.09.37. If you are on a network ensure that the time and date are set
the same on all PCs. You must not change the system clock once it is set, this will lock up Revolution.
Revolution - General Maintenance
Most of your initial program setup will be completed by the person who comes to
install Revolution. This setup is carried out within 1.Setup and general information and you may
occasionally need to make adjustments to this section. From the main menu, click on General
maintenance, then click on 1.Setup and general information.
6
Revolution - General Maintenance
Setup and general information
You will see that this section is split into many different tabs, just click on the tab
required to view that screen.
Any changes made and saved within Setup and general information will only take effect after you
have exited and re-opened General maintenance.
Location
Name and address - Contains information relating to your company such as name, address, contact
details, bank details and internet connection type. It is ESSENTIAL that you have an internet
connection type entered in order to connect to the Rival server for insurance validation. Licencee
name - The business name should be the same name as on the Licence Agreement. This appears on
the rental agreement and if it is wrong could bounce back in Court as a judge could deem the rental
agreement not to be legally enforceable. It also has Data and Consumer Protection implications.
Defaults - These will be entered on initial setup and should not need to be changed.
VAT/Nominal - Here all of your VAT/Nominal codes are set up. These are already setup and should
not need to be changed unless the government advises changes.
Insurance - Your insurance rates are set up here, as well as your Remote server site ID and Remote
server IP address (essential for connecting to the Rival server). These will be entered on initial setup
and should not need to be changed unless you are advised to do so by Rival support.
Text boxes - You can use this section to set up the text that will appear at the
bottom of various documents.
7
Revolution - General Maintenance
Setup and general information
Text boxes - For example, you wish to enter the text ‘Thank you for renting with Car & Van Hire’ at
the bottom of original invoices. Click on the Invoice tab, type your text into the large white text box,
and click on the Hand
button in order to save your changes.
Price list bands - Price bandings need to be set to mirror the price tariff you quote to your customers
e.g. 1-6 days , 7-28 and 29 plus. This is a matter of local preferences but if it does not match the tariff
quoted over the phone you will get a lot of invoices wrong. Mileage allowances are already in pence
and do not need a decimal point.
The standard excesses are also set here. These are just the defaults you will see when you are setting up your price tariff, and can be changed. Set the excesses to the lowest excess you expect to
allow. Normal settings are £250 basic minimum excess for cars and £350 vans, £1500 Theft excess
for all. 200 Free miles per day with 10p inc VAT for cars and 15p in VAT for vans inclusive.
This section is split into two, Cars and MPVs on the left, Vans and minibuses on the right. The
Number of days in charge band X sets the number of days in each charge group of your price tariff.
For example, if you want to charge a set price for rentals for 1 day, a weekly price, a monthly price, a
price for rentals over a month and a weekend rental price, the Price list bands would look like this:
Remember if you make any changes, click on the Hand
8
button to save your changes.
Revolution - General Maintenance
Setup and general information
System - Use System to view information about your Revolution system and dates of when reports
were last run.
Passwords - If you already have passwords set up, you can clear them all by clicking on the button.
To set up a password for a section of the program, choose the section you wish to password protect
by clicking on the option from the drop-down menu, press the tab key and type your password in the
Enter password box. Click on the Hand
button to save your changes. Make sure that you
remember any passwords that you set up!
Monthly summaries - This section displays summary statistics for every rental month, useful for analysing what is happening with your rental revenue, insurance that is being charged, and work in progress figures.
Backups - This section displays information on any backups and/or restores that have taken place on
the system.
Price tariff
The price tariff is set up here for use in agreement processing. If you already have a price list at the
time Revolution is installed, this will be set up for you.
You should set up as many groups as you have different vehicle types on your rental fleet. Similar
vehicles can be grouped together i.e. Mix makes but not models of differing engines sizes, doors,
specs and age.
All prices must be set for each group. Missing prices in the Price Tariff will make WIP incorrect when
rental agreements get extended and prices revert to the price list.
You must set the vehicle to the correct vehicle type in Price Tariff. If you do not you could declare
wrongly on the MID report. As this is a legal requirement it must be accurate. Failure here could
jeopardise your insurance cover. The choices are Car, Van, Minibus, MPV or 7.5 tonner.
VAT Calculator
All prices that are entered into Revolution must be excluding VAT. The VAT calculator can help you
work out the amounts to be entered onto the system.
Press the F9 key on your keyboard and the calculator will
appear. You can enter your
total price including VAT in the Gross (total) amount
box, press enter and the amount minus VAT (the amount
to enter onto Revolution) will be displayed in the Net
(goods) amount box.
9
Revolution - General Maintenance
Setup and general information
Price tariff
button. Read the pop-up
To create a new price group - click on the Insert a new vehicle group
questions and click on Yes or No accordingly. You must then enter information for the new vehicle
group, including the minimum excesses you wish to impose, MOT information, and the price tariff (all
ex vat) for the new group. The prices you input will be charged on a rental agreement when you rent a
vehicle in that Group.
Whatever excess (Damage or Theft) is set here will be printed unless it is raised by an individual
agreement. It will be overridden by the Remote server if it is set too low or if the renter is a high
insurance risk. The days charged groups are displayed depending on how they were set up in
Location, Price list bands. Once you have entered all the information required, click on the Hand
button to save the new vehicle group tariff.
To adjust an existing pricing group - Click on the group you wish to adjust from the list at the bottom
of the screen. You can adjust your hire charges by deleting an amount, entering the correct amount,
and clicking on the Hand
button.
To delete an existing price group - click on the tariff you wish to delete from the list at the bottom of
the screen. Click on the Dustbin
button.
The price list you create can be printed from General Reports, 1. Price Tariff.
Extras
This section displays the list of extras you can choose from in agreement processing. It is a list of all
charges other than time and mileage. You can pre-set charges as you see fit.
Click on an extra from the list to view details. To adjust values, click in the appropriate box, delete the
value, enter the required value, and click on the Hand
wish to save your changes, click on the Reject changes
button to save the changes. If you do not
button.
It is possible to set common extras with an auto-prompt feature so that they are applied to every
rental agreement where they may be deleted if not required.
You can print or view the list of extras from Reports, 4. Extra charges list.
If you require a new extra, please contact your Account Manager or Revolution Support on 0800 328
8833.
Source codes
Here you can adjust existing source codes, delete, and add new ones. The source codes are used in
agreement processing, to find out how a new renter has heard of you. This can be useful for
marketing purposes.
To delete a source code, click on the code from the list and click on the Dustbin
button to delete
it. You may only delete source codes that you have created.
To add a new source code, click on the Insert a new source code
button. You will be asked
Do you wish to add a new source code, click on Yes. Enter a new code and description and click
on the Hand
button to save the new code, click on
to reject it.
You can print or view the list of source codes from Reports, 5. Customer source code list.
10
Revolution - General Maintenance
Setup and general information
Utilities
You should not use this section of the program unless advised to do so by Revolution Support staff. If
you are using Revolution across a network, make sure that all other PCs are logged out of Revolution.
The utilities section is used to change the status of vehicles when for some reason they have been
stuck in the wrong status group, for example, if Revolution displays that a vehicle is booked out when
you know that it is not.
You can return from Setup and general information to the main menu at any time by clicking on:
Breakdown cover
You can setup and edit the breakdown cover list here, for use in Fleet Maintenance when adding
vehicles to your fleet. From the Revolution main menu click on General maintenance, 2.Breakdown
cover. Here you can adjust existing breakdown covers and add and delete new ones.
To delete a breakdown cover, click on the breakdown agency from the list and click on the Dustbin
button to delete it.
To add a new breakdown cover, click on the Insert a new breakdown code
button. You will be
asked Do you wish to add a new breakdown code, click on Yes. Enter a new code, description and
emergency telephone number and click on the Hand
button to save the new code, click on
to reject it.
Makes and Models
You can edit, add and delete makes and models here. From the Revolution main menu click on
General maintenance, 3. Makes and models.
To edit an existing make/model click on it from the list displayed and the information for that make/
model will be displayed in the edit boxes in the top half of the screen. Click in the box you wish to
change, delete the value and enter your new value. Click on the Hand
to save your changes or
to reject them.
To delete an existing make/model, click on it from the list displayed and click on the Dustbin
button. You can only delete it if it has never been used.
To add a new make/model click on the Insert a new vehicle type
button. Tab through all of the
boxes, entering all of the information for the make and model you are adding. Model description is
your own way to describe the model e.g. Focus 5dr 1.4. The number of miles to the first service and
how many miles between services and number of weeks will prompt reminders later. Enter the
accurate model type e.g. Focus.
11
Revolution - General Maintenance
Makes and Models
It is important to set the correct Insurance type in Makes and models for MID purposes and
discriminate between Private car, MPV/Minibus or Commercial Vehicle/Van. If you do not, you
could declare wrongly on the MID report, as this is a legal requirement it must be accurate. Failure
here could jeopardise your insurance cover. If your Makes and Models are set up correctly in the
beginning your mandatory report will always be accurate and involve no extra work to produce.
The derivative fields should be set up as below.
The Vans and Buses Derivatives need to show:
The Wheelbase LWB/SWB/MWB etc
The Body type HITOP/Luton/BUS/Curtainside etc
Tail lifts T/L
The Derivative for a car needs to show things like:
LX, Ghia etc
EST/SAL/Hatch
A for Auto, M for Manual
If the vehicle is a Bus a box is revealed to enter the number of passenger seats e.g. 12
If the vehicle is a Van a box is revealed to enter the Weight (tonnes) e.g. 3.5
Click on the Hand
to save your changes or
to reject them.
Fleet Management
Putting a vehicle ‘on the fleet’ is the way your vehicles are accepted by your insurer and logged by the
MID, Motor Insurance Database. All vehicles covered by an Insurer are notified to the MID in order
that insured drivers are protected. This is a Europe wide Directive so that uninsured drivers can be
immediately identified in cases of fraud and accidents.
You can add, edit and delete vehicles from your fleet as well as adding insurance claims, by clicking
on General maintenance, 4. Fleet management, from the main menu. These are the vehicles you
will choose from when you are producing rental agreements. Ensure you have the correct Make/
Model and Derivative set up, otherwise you will need to set up a new one.
To add a new vehicle click on the Insert a new vehicle
button. You will be prompted Do you
wish to add a new vehicle, click on Yes.
You have the choice of 3 types of vehicle: Owned- i.e. purchased for the Rental fleet, this is a permanent vehicle.
Leased- i.e. leased for the rental fleet for a fixed term.
Temporary- sub-hired in to supplement the fleet, usually for one specific rental only, these vehicles
are signalled by the Egg timer
12
button.
Revolution - General Maintenance
Fleet Management
The next prompt is Is this vehicle going to be on fleet for more than one rental Click on Yes for a
permanent vehicle, No for a temporary vehicle.
If you choose a permanent vehicle you will be prompted Is this vehicle leased. Click on Yes or No.
Now enter the registration number, making sure it is correct as this cannot be altered later, only
deleted.
Click in the Price Tariff drop-down box to choose the appropriate charging group depending on
whether the vehicle is a Car/MPV or VAN/Bus. This cannot be altered later.
C ar/M P V ’s
V an/M inibus’s
M in i
1000cc
M ini
7-8 cw ts
E conom y
12000cc
E conom y
SW B O ne T onners
C om pact
13000cc
C om pact
LW B O ne T onners
Interm ediate
1600cc
Interm ediate
1-3.5 T onners
LW B /H igh R oof
S tan dard
1800cc
S tan dard
3.5 T onners
F ull S ize
2000cc
F ull S ize
7.5 T onners
P rem ium
M P V ’s*
P rem ium
M inibuses (all seats)
Each vehicle inputted will be allocated a Unit Number, this number cannot be altered once a vehicle
has been accepted. At the end of its rental life it must be disposed of on the day it is no longer insured
from.
All additions and disposals must be declared to your Insurer within 7 days. This is done weekly by
submitting the MID report to Rival, who will then notify the MID.
Tab down, entering all of the information that you have. Please note that unless you have all of the
required information you will not be able to add the vehicle. The Remote server group is set correctly according to the make and model and the tariff group that the vehicle has been set to. Ensure
that the Insurance type of the make and model you have selected matches the type of vehicle on the
price tariff or you will get an error.
The Companies listed in the Breakdown provided by drop-down box are set up in General
maintenance, 2.Breakdown cover.
Insurance Value is a rough guess at the CAP Book price.
Once you have finished entering the information, tab to the Add vehicle button and press Enter on
the keyboard. Alternatively press Escape on the keyboard to reject the new vehicle.
If the vehicle you are adding is a leased vehicle you will now have to enter the lease costs and return
mileage. Click on the Hand
13
button to save your changes.
Revolution - General Maintenance
Fleet Management
If the vehicle is not a leased vehicle you will now have to enter the depreciation amount per month. If
you wish to enter the depreciation yearly percentage, place a tick in the box:
Click on the Hand
button to save your changes.
To edit an existing vehicle click on it from the list displayed and the information for that vehicle will be
displayed on various tabs across the screen. Click in the box you wish to change, delete the value
and enter your new value. Click on the Hand
to save your changes or
to reject them.
To delete an existing vehicle from your fleet, double-click on it from the list displayed. If the vehicle is
an owned vehicle and the vehicle is NOT currently out on an agreement, you will see a Dispose of
vehicle tab. Click on the tab, if the vehicle is written off, place a tick in the box. Enter the amount the
vehicle was sold for and who to, and click on the Dispose button. You will be asked Do you really
wish to dispose of this vehicle, click on Yes. If the vehicle is a temporary vehicle you will not see
the Dispose of vehicle tab. Instead, click on the egg timer
button at the top of the screen. You
will be asked Do you really wish to remove this temporary vehicle, click on Yes.
To reinstate a temporary vehicle to your fleet, click on the Key
button from the Fleet
maintenance menu. You will be asked Do you wish to reinstate a temporary removed vehicle,
click on Yes. You must type in the full registration of the vehicle you wish to reinstate and press Enter
on the keyboard. If you have entered the registration of a previously removed vehicle, the vehicle details will be displayed and Revolution will prompt Do you wish to reinstate this removed temporary
vehicle, click on Yes and the vehicle will be put back on the fleet list.
To add an insurance claim the vehicle must be available. Click on the insurance claim button
and follow the insurance claim instructions listed in the Agreement Processing manual.
Service History
You can add new service history item by clicking on General maintenance, 5. Service History, from
the main menu. You can view your fleet in the grid at the top-right of the screen. Click on the vehicle
you wish to view or add service history items for and you will see the details of that vehicle appear in
the bottom section of the screen. Click on the Service history tab to view previous service history
items. To add a new service history item click on the General tab and click on the Insert a new service history item for this vehicle
button. In the Inventory type drop-down box select the ser-
vice history type, then fill in any other relevant information and click on the Accept this inventory
item button. You will be asked if you really wish to add the service history, click on Yes.
Customer special rates
Once familiar with Revolution you may want to enter Special Rates for your regular customers rather
than quoting ‘off the cuff’ prices, as this makes things much easier for other members of staff. You
can set up special rates by clicking on General maintenance, 6. Customer Special Rates, from the
main menu. Any existing special rates will be displayed to the right hand side of the screen, click on
one to edit it. If you make any changes make sure you click on the Hand
button to save them.
Once a renter has rented using a Special Rate, next time they rent the same group of vehicle the previously used special rate will be applied.
14
Revolution - General Maintenance
Customer special rates
To enter a new special rate click on the Insert a new special customer rate
button, and click
Yes when asked if you are sure you wish to add a new rate. Select the group for which you wish to
add a new special rate from the drop-down box, enter a code for the new tariff, and click on the Add
code button. You can then fill in the mileage and rental charges for the new tariff and click on the
Hand
to save. To delete an existing special rate, click on it in the table on the right and click on
button.
the dustbin
Renter database
When you enter a rental agreement for a new company or person, they will automatically be entered
into your renter database. You can also view, edit and enter new renters into your renter database by
clicking on General maintenance, 7. Renter database, from the main menu. You will be presented
with the renter database, if you wish to view the company database, remove the tick from the renter
maintenance box on the menu bar:
To add a new renter, make sure you are in renter database view, and click on the Insert a new
renter
button. When asked Do you wish to add a new renter select Yes. Enter as much infor-
mation as you can, ensuring to enter the renter’s first and middle names as they appear on the driving
licence. Once you have finished, click on the Hand
button to save. You can enter a new com-
pany in the same way in company database view.
To find an existing renter or company, you can type the name or beginning of the name into the
box and the names which
search surname or company name
match the letters you have typed will be displayed. Once you have clicked on the name of the renter/
company, their details will displayed in the bottom half of the screen. You can then add or edit information and click on the Hand
button to save changes.
To delete a renter or company, that renter/company must not have ever been on a rental agreement.
Select the name from the list and click on the Dustbin
button.
You can transfer a renter into a company but also only if they have never been on a rental agreement.
You will see a Transfer this renter to be a company
button. Click on this,
you will be asked if you are sure, click yes and the renter will move into the company database.
Please note Payment details do not appear in renter database. If you rent to a person who wants their
Credit Card number deleted you must raise a new Rental to that person, when asked whether you are
using the same CC details say YES, alter all fields to 0 and proceed the rental ‘on account’. Close
and invoice it immediately [within 59 mins] at £0 hire charge, it will not incur any fee or revenue days.
Bad Renters
You can tag a renter as being a ‘bad renter’ by placing a tick in the Bad renter box on the General
tab within the renter database. This will ensure that if this renter is selected for an agreement you will
get a large Insurance Risk Potential message on your screen to remind you.
15
Label Formats
Here you can set up label formats for use when creating labels for mail shots to your renters and/or
companies (From the main menu Reports, General Reports, 8.Mailshot labels print tool). Setup
label formats in General maintenance, 8. Label formats, from the main menu. Click on a current
label from the list to edit it. If you make any changes click on the Hand
new label format click on the Insert a new label format
button to save. To add a
button. Enter a new label format code
for your own reference and click on Accept. Enter the measurements for the labels you wish to use
and click on the Hand
and click on the Dustbin
button to save. To delete an existing label format, click on it from the list
button.
Trouble-shooting
Connection Problems
Revolution needs an internet connection in order to contact the Rival server for validation and to send
the month end and MID reports to Rival Head Office. If there is a problem with the internet connection
Revolution will inform you with an error message:
If you are not sure whether you are connecting or not, select About from the main menu, click on the
Remote server tab and click on the button:
If you see this message then you have a problem:
Things to check:
•
Ensure that your internet connection is working by opening up Internet Explorer and checking
that you can open up web pages.
•
Do you have a firewall? If so make sure that it is set to allow programs evrun.exe and
evobackup.exe.
•
Is your internet connection through a network? Ensure that any routers are set to allow
program evrun.exe through port 44444 to our server rival.idoink.com and allow programs
evrun.exe and evobackup.exe to FTP (File Transfer Protocol) to site
www.revolutionsupport.co.uk.
If you process rental agreements while you are not connected to the internet, the excesses will be
raised. You will only be able to use your system for one week before being locked out of the system.
It is essential that you make Revolution support staff aware of the problem and fax through copies of
any rental agreements processed whilst not connected to the internet, to 0121 773 1875.
16
Trouble-shooting
Excesses are raised by Rival or insurance is declined - Scoring
Each rental is validated by the Rival Server which applies points to certain important pieces of information. If a rental does not score over a certain number of points then the excesses for the agreement
will be raised. This is because Rival deems the renter to be of a higher insurance risk. If the rental
scores even less points the rental may be rejected altogether because the insurance risk is too high.
If your excesses are raised or the rental is rejected and there is no obvious reason why, check all of
the information you have entered. Employment type, Personal ID, convictions and payment method
have a lot of points allocated to them and so it is important to pay a lot of attention to these fields. For
example, the more ID you have for the renter, the more points you are able to score, making it more
likely that Rival will accept the rental. If you are still rejected and cannot see why, call Rival on 0800
328 8833 and choose the insurance option.
Message when you are not connected to the internet
You will see the following message along the top bar of the program when you are not constantly connected to the internet:
This reminds you that you must connect to the internet within the number of days specified, in this
case 7 days. If you have connected to the internet but this message has not cleared, select About
from the main menu, click on the Remote server tab and click on the Check remote server connection button. If you see a message saying the check was successful, exit Revolution and open it again.
The message will have cleared.
If you are not connected to the internet when you run the Month End
To resend a month end, go back to the Monthend option on the main menu where you will be
prompted to resend, a message will ask you to make sure you are connected to the internet, click on
Proceed. A message will display when it is sent and then you will be able to produce new Agreements.
To reprint a month end report, select Reports, Stored month end reports from the main menu.
If you are not connected to the internet when you try to submit the MID
The MID report requires an internet connection to be sent through to Rival Head Office. If you were
not connected when you run the MID Report, make sure that you run it the next day when you have an
internet connection. The report can only be submitted once in a day and so the option to select this
report from the drop-down box will disappear after you have ran it and appear again the next day. If
you have an internet connection problem ensure that you fax the report through to 0121 773 1875 until
the connection is working again.
Cannot open Revolution
Make sure that the computer or server that the Revolution Data ( PCVRData folder) is held on is
switched on and working correctly. Check the network connections between the two machines.
Manual agreements
If you cannot use Revolution and Revolution Support advise you to use a manual agreement, always
ensure that you enter the manual agreement onto Revolution as soon as possible and inform Rival
Insurance on 0800 328 8833.
17