1
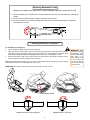
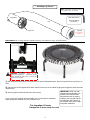
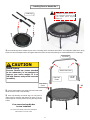
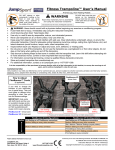
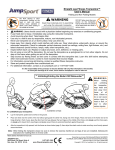
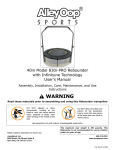
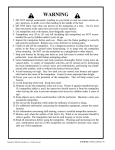
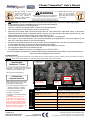
Fitness Trampoline™ User’s Manual
Arched Leg, Folding Models
DO NOT attempt or allow
somersaults. Landing on the
head or neck can cause
serious injury, paralysis or
death, even when landing in
the middle of the bed.
•
•
•
•
•
•
WARNING
Read these materials prior to assembling
and using this rebounder trampoline
DO NOT allow more than one
person on the trampoline.
Use by more than one person
at the same time can result in
serious injury.
Use trampoline only with mature, knowledgeable supervision.
WARNING: Users should consult with a physician before beginning any exercise or conditioning program.
If user feels faint or dizzy, immediately stop using the rebounder trampoline.
Avoid bouncing when tired. Take breaks often.
Use only in a well lit area by responsible, mature, non-intoxicated persons.
Only use trampoline on a level surface, and only use when dry.
Keep away from objects which could interfere with safe use. Clear obstructions underneath, above, or around the
rebounder trampoline. Check for adequate vertical clearance (avoid low ceilings, ceiling fans, light fixtures, etc.) and
lateral clearance (avoid furniture, lamps, walls, other trampolines, etc.).
Inspect before each use. Replace or adjust any loose, worn, defective, or missing parts.
Do not jump on and off the trampoline. Do not use the trampoline as a springboard to or from other objects. Do not
step on the frame when getting on and off the trampoline.
Stop bounce by flexing knees as feet come in contact with the trampoline bed. Learn this skill before attempting other more advanced moves. Control is more important than bounce height.
For information concerning skill training, contact a qualified fitness trampoline instructor.
Store and protect trampoline from unauthorized use.
For additional information, contact us at JumpSport.com or 1-877-507-1399.
•
•
•
•
•
•
It is the responsibility of the purchaser to become familiar with all of the information in this booklet, to convey the warnings to all
users, and to enforce JumpSport’s rules for safe use.
Commercial Use
Only models in our 300 and 500 Series are for commercial use, and are subject to shorter warranty periods (see Warranty section).
Stacking: Use 2 people when stacking or unstacking units. Stack 8 units max, with feet down.
FlexBounce VII
shown here
How to Adjust
FlexBounce™ Cords
If you wish to change the firmness of your rebounder, turn it upside down. Pull cord tighter
to different knot, according to chart.
See picture for firmness settings.
A Note About
Expected Cord Life
FlexBounce
connector
Elastic cords are wear items that need
to be replaced from time to time. Their
life expectancy is determined by:
• The way the trampoline is being used
(jumping for height vs. controlled,
fitness-style bouncing vs. jogging)
• The user weight and height
•
•
FlexBounce III
Configurations
FlexBounce VII Configurations
Soft Setting on all FlexBounce connectors
Medium Setting on every other
connector
Medium Setting on every other connector
Soft / Medium / Medium Settings (repeat pattern)
Medium Setting on every connector
Medium Setting on every connector
Firm Setting on every other connector
Medium / Firm / Firm Settings (repeat pattern)
Firmer
Firm Setting on every connector
Retain address information for future use.
JumpSport, Inc.
2055 South 7th Street, Suite A
San Jose, CA 95112 U.S.A.
Firm
Setting
Softer Soft Setting on all FlexBounce
connectors
Frequency of bouncing
The type of cords used (standard or
extra-firm)
We are often asked how long your
cords will last. The answer is, it depends. Some of our customers use a
set for 9 months, while most will use a
set for many years. Similar to running
shoes or car tires, the more you use
them and the harder you use them, the
faster they need to be replaced.
Medium
Setting
Soft Setting
(factory setting)
Covered by one or more of the following US Patents: No.6.840,891, No.D666,266, and
No. D680,609. Other US and International Patents Pending.
Instruction Manual P/N: INS-P-20487-00(E)
Copyright © 2003-2014, by JumpSport, Inc. All rights reserved.
1-877-507-1399
www.fitnesstrampoline.com
1
Replacing Endurolast Cords
Replace your elastic cords when there is visible damage or when the cords feel too soft.
1) Remove existing cord. Take the new cord and first secure each knot into the respective openings as
shown.
2) Pull the loop end out and over the frame, securing it in the top slot.
3) Be sure to center the cord along U-shaped mat connector, to insure the cord tension is equal on
both sided of connector.
2
1
** Unfolding/Folding the Trampoline **
To unfold/fold your trampoline:
• Lay the trampoline upside down and flat on the ground.
• Place both knees near the center of the mat without them going past the center line, about shoulderwidth apart, and with the hinges directly to the left and right of you. Place hands on top side of frame
(also about shoulder-width apart), and slowly push the frame open, or slowly pull it closed.
• After the trampoline is fully opened, lock the frame as shown below, then adjust the elastic cords to
make sure they are all evenly spaced around the frame.
Note: When folding the trampoline closed, be sure to remove the handlebar and legs (if any are installed),
following the instructions for installing them in reverse order.
WARNING: When
folding and unfolding
the trampoline, keep
head and face away
from frame at all
times. Failure to do
so can cause serious injury to head or
face, or lead to other
serious injuries.
IMPORTANT: Be careful to hold the frame securely and ease it shut as it closes.
(Centerline of mat)
Lock hinges when using trampoline
Unlock hinges to fold frame
2
** Installing Leg Pieces **
Note: Keep Allen wrench to remove
or re-tighten legs, as needed.
Leg socket
6mm Allen wrench
6mm Hex drill bit
(not shown)
Leg
Leg cap
Leg screw
(may not be preinstalled)
IMPORTANT: Be sure leg caps are installed securely over bottom of legs, as shown above.
Notch in leg socket
Pin on stud
WARNING: Periodically check all leg
screws and retighten if
necessary. All leg
screws should be tight prior to using the
rebounder trampoline.
1) With trampoline upside-down, fit leg sockets over stud on trampoline frame. Notch in leg socket lines up with pin on
stud.
2) Insert the end of the supplied 6mm Allen wrench into the hole in the rubber leg plug and engage the Allen bolt head
inside the leg.
3) Securely tighten Allen bolts with 6mm Allen wrench.
If you are going to install an exercise handle, turn to next page for installation.
When all legs are installed, turn your rebounder over.
The JumpSport Fitness
Trampoline is now ready for use!
3
IMPORTANT: Bolts may offer
resistance when tightening. No
threads of the bolt should be
exposed when bolt is properly
installed. Use leverage with the
provided 6mm Allen wrench or
use a power drill to ensure safe
and proper installation.
** Installing Exercise Handle Bar **
WARNING: If you have handle
legs attached, do NOT attempt to
use the rebounder without the rest
of the handle pieces properly
installed first.
Handle legs
1) The 2 handle legs will be installed in place of the normal legs at the 2 locations shown above. Turn trampoline upside-down, fit leg
socket over stud on trampoline frame, and tighten bolts. Be sure the Fitness Trampoline logo is centered between the 2 handle legs.
Top handle
CAUTION
Avoid Injury.
Exercise handle bar
to the rebounder) is
support your entire
aid with balance and
versatility.
(when attached
not designed to
weight. It is to
provide exercise
Small thumb screws
Right side
handle
Large thumb
screws
2) Connect side handles to top handle, and secure with small
thumb screws to create a “top assembly”.
3)
Lower top assembly into handle legs. You may have to
rotate entire top assembly 180 degrees for holes to line up.
Adjust height as necessary before securing with large thumb
screws.
Your exercise handle bar
is now installed!
To remove the handle, follow the installation
instructions in reverse order.
4
Left side
handle
Limited Warranty
What is covered by this warranty? This warranty covers a one-time replacement of any defects in materials or
workmanship on all of the components of the JumpSport Fitness Trampoline, and is extended exclusively to the original retail
purchaser.
How long does this coverage last? Warranty coverage for each component begins from the original date of purchase and
lasts as follows:
Private Use
Commercial Use
(300/500 Series only)
Steel Frame & Legs
Lifetime
5 years
Jumping Surface
5 years
1 year
EnduroLast 2 Elastic Cords
2 years*
n/a
EnduroLast 3 Elastic Cords
3 years*
12 months*
EnduroLast 4 Elastic Cords
4 years*
18 months*
All other components
1 year
1 year
* Cord warranty is limited to only one (1) usage replacement during applicable period.
What will JumpSport do? If you return the defective part to JumpSport, as instructed below, JumpSport will either repair or
replace such part, at JumpSport’s discretion, and return it to you.
What is not covered by this warranty? This warranty does not cover expenses of on-site labor, shipping costs, travel,
assembly or disassembly, or other charges associated with the repair or replacement of covered components. This warranty
also does not cover any problem that is caused by abuse, misuse, commercial or public use of 200 Series models, ordinary wear
and tear, outdoor use, weathering, acts of God (such as wind and lightning), failure to follow directions, improper installation,
improper maintenance, or any silk screened graphics. Rust is a natural occurrence with any steel product and is likewise not
covered by this warranty, to the extent that it does not affect the structural integrity of the part.
JUMPSPORT IS NOT RESPONSIBLE OR LIABLE FOR INDIRECT, SPECIAL, OR CONSEQUENTIAL DAMAGES ARISING
OUT OF OR IN CONNECTION WITH THE USE OR PERFORMANCE OF THE PRODUCT OR OTHER DAMAGES WITH
RESPECT TO ANY LOSS, INCLUDING BUT NOT LIMITED TO ECONOMIC LOSS, LOSS OF PROPERTY, LOSS OF
REVENUE OR PROFITS, LOSS OF ENJOYMENT OR USE, COST OF REMOVAL, INSTALLATION OR OTHER
CONSEQUENTIAL DAMAGES. SOME STATES DO NOT ALLOW THE EXCLUSION OR LIMITATION OF INCIDENTAL OR CONSEQUENTIAL DAMAGES. ACCORDINGLY, THE ABOVE LIMITATION MAY NOT APPLY TO YOU.
THE WARRANTY EXTENDED HEREUNDER IS IN LIEU OF ALL OTHER WARRANTIES AND ANY IMPLIED WARRANTY
OF MERCHANTABILITY OR FITNESS FOR A PARTICULAR PURPOSE IS LIMITED IN ITS SCOPE AND DURATION TO
THE TERMS SET FORTH HEREIN. SOME STATES DO NOT ALLOW LIMITATIONS ON HOW LONG AN IMPLIED
WARRANTY LASTS. ACCORDINGLY, THE ABOVE LIMITATION MAY NOT APPLY TO YOU.
How to get a defective part replaced:
1)
2)
3)
Call the JumpSport Customer Service department at 1-877-507-1399 to obtain a Return Authorization number. All returns
must be pre-authorized.
Send the part(s) to the designated Service Center, along with a copy of your original sales receipt and a brief written
description of the problem, including how it occurred. You must pay freight and insurance to return the part to JumpSport. At JumpSport’s sole discretion, we may ask you to send photographs in addition to or in lieu of returning the part.
After inspecting the returned part(s), JumpSport will make a final determination whether the part is covered by this
warranty. We reserve the right to examine photographs or physical evidence concerning parts claimed to be defective prior
to making a final determination concerning the claim. A repaired or replacement part will be returned to you. Please allow
3 to 4 weeks for delivery.
This warranty gives you specific legal rights. You may also have other rights which vary from state to state.
* Only the models in our 300 and 500 Series of Fitness Trampolines are approved for commercial use. When used in a commercial setting, the commercial warranty applies.
5
JumpSport, Inc.
2055 South 7th Street, Suite A
San Jose, CA 95112
1-877-507-1399
http://www.fitnesstrampoline.com
6