1
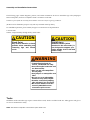
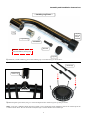
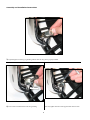
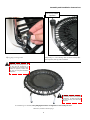
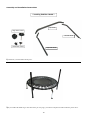
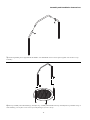
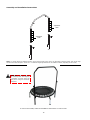
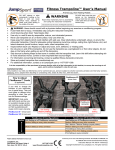
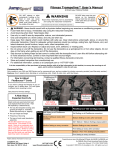
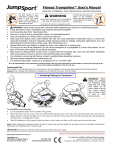
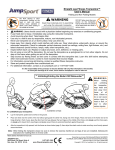
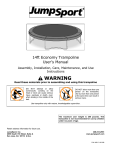
The JumpSport Fitness Trampoline
User’s Manual
(All Models)
Assembly, Installation, Care, Maintenance, and Use
Instructions
WARNING
Read these materials prior to assembling and using this rebounder trampoline
DO NOT attempt or allow
somersaults. Landing on the
head or neck can cause serious
injury, paralysis or death, even
when landing in the middle of the
bed.
DO NOT allow more than one
person on the trampoline.
Use by more than one person
at the same time can result in
serious injury.
Use trampoline only with mature, knowledgeable supervision.
The recommended user weight is up to 250 pounds.
This rebounder trampoline is not recommended for
use by children under six years of age.
Retain address information for future use.
1-877-507-1399
www.fitnesstrampoline.com
JumpSport, Inc.
2055 South 7th Street, Suite A
San Jose, CA 95112 U.S.A.
1
P/N: INS-P-11656-01H
Copyright Notice
This material is protected by United States copyright laws and is proprietary to JumpSport, Inc. Disclosure, reproduction, translation,
modification, or use of this document by anyone other than authorized employees, authorized users, or licensees of JumpSport
without the prior written consent of JumpSport, Inc. is prohibited.
The information in this document is subject to change without notice. JumpSport, Inc. shall not be liable for any damages resulting
from technical errors or omissions, which may be present in this document, or from use of this document.
Copyright © 2003-2010, by JumpSport, Inc. All rights reserved.
Printed: 2010
Instruction Manual P/N: INS-P-11656-01H
The JumpSport Fitness Trampoline JumpSport Model FT 220 P/N: RBJ-S-20158-00
The JumpSport Fitness Trampoline JumpSport Model FT 250 P/N: RBJ-S-20188-00
The JumpSport Fitness Trampoline JumpSport Model FT 250i P/N: RBJ-S-20189-00
The JumpSport Fitness Trampoline JumpSport Model FT 350 P/N: RBJ-S-20196-00
The JumpSport Fitness Trampoline JumpSport Model FT 350i P/N: RBJ-S-20154-00
The JumpSport Fitness Trampoline JumpSport Model FT 370 P/N: RBJ-S-20190-00
The JumpSport Fitness Trampoline JumpSport Model FT 370i P/N: RBJ-S-20191-00
The JumpSport Fitness Trampoline JumpSport Model FT 570 P/N: RBJ-S-20192-00
The JumpSport Fitness Trampoline JumpSport Model FT 570i P/N: RBJ-S-20193-00
Trademarks
JumpSport®, ExtraLife™, EnduroLast™, and FlexBounce™ are trademarks of JumpSport, Inc.
All other brand or product names are trademarks or registered trademarks of their respective companies or organizations.
Patents
This product includes technology associated with one or more of the following U.S. Patents:
No. 6,053,845
No. 6,261,207
No. 6,840,891
No. 6,846,271
No. 7,060,001
Additional Patents Pending.
How to Contact Customer Support
Should you require customer service or technical support for the JumpSport Fitness Trampoline, please contact JumpSport’s
Customer Service department at:
1-877-507-1399
6:00am—5:00pm Monday through Friday, Pacific Time
2
Contents
Chapter 1
Chapter 2
Assembly and Installation Instructions
5
Preparation
Rebounder Placement
Assembly
Installing Leg Pieces
Installing Stabilizer Handle
Adjusting Elastic Cords
5
5
7
7
10
13
Care and Maintenance Instructions
Inspection
Replacement Parts
Care
Chapter 3
15
15
16
Warning Information
Points of Safety
Bouncing off the Rebounder Trampoline
Stepping on and off the Rebounder Trampoline
Landing Incorrectly on the Mat
Chapter 4
15
Use Instructions
17
17
17
17
17
19
Safety Rules
19
Warranty Information
3
Last Page
(This page left intentionally blank.)
4
Assembly and Installation
Instructions
1
Congratulations on purchasing the JumpSport Fitness Trampoline! We sincerely believe that you have purchased one of
the finest rebounder trampolines on the market. It has been engineered with safety, durability, and performance in
mind.
Preparation
Before you begin using the Fitness Trampoline, make sure your rebounder trampoline is in a proper location.
Rebounder Placement
Caution: When deciding on where to place your rebounder trampoline, consider the following:
WARNING
Overhead Clearance
Adequate overhead clearance is essential. Provide clearance for lights, ceiling fans, and
other possible hazards.
Lateral Clearance
Lateral clearance is essential. Place the rebounder trampoline away from walls,
windows, doors, structures, furniture, and other potential dangers. Maintain a clear
space on all sides of the rebounder trampoline.
Level Surface
Place the rebounder trampoline on a level surface before use.
Lighting
Use the rebounder trampoline in a well-lit area. Artificial illumination may be required
for indoor or shady areas.
Security
Secure the rebounder trampoline against unauthorized and unsupervised use.
Ground Clearance
Remove any obstructions from beneath the rebounder trampoline.
Note: The owner and supervisors of the rebounder trampoline are responsible to make all users aware of practices
specified in the Use Instructions.
It is the responsibility of the purchaser to become familiar with all of the information in this booklet, to
convey the warnings to all users, and to enforce JumpSport’s rules for safe use.
This product is intended primarily for indoor, private home use. If it is used in a commercial setting, it
will be subject to shorter warranty periods, as described in the Warranty section.
This unit is not intended for commercial or public use, and such use is strictly prohibited.
The recommended user weight is up to 250 pounds.
This rebounder trampoline is not recommended for use by children under six years of age.
5
Assembly and Installation Instructions
The following pages contain diagrams, pictures, and written instructions for how to attach the legs to the JumpSport
Fitness Trampoline, and how to adjust the elastic cord tension on the mat.
Familiarize yourself with the Assembly and Installation Instructions before beginning installation.
(Pictures are for illustration purposes only and may not match actual product.)
For installation questions, please contact JumpSport’s Customer Service department at:
1-877-507-1399
6:00am—5:00pm Monday through Friday, Pacific Time
CAUTION
CAUTION
Pinch Point.
Avoid Injury.
Pay careful attention to hand
position when attaching and
removing legs and elastic
cords.
Stabilizer handle (when
attached to the rebounder) is
not designed to support your
entire weight. It is to aid with
balance only.
WARNING
• Trampoline designed for
indoor, residential use only.
• Use with ample headroom and
no obstructions.
• Step on and off trampoline—
do not jump.
• One jumper on trampoline at a
time.
• Do not use as a rebounding
surface to any other object.
• Practice controlled jumping;
take a break if you are tired.
• Be sure all elastic cords are
securely attached to mat
connectors prior to use.
Tools
Installation of the rebounder legs requires a 6mm Allen wrench, which is included in the box. Safety glasses and gloves
are also recommended for safety.
Note: The Fitness Trampoline comes with a spare elastic cord.
6
Assembly and Installation Instructions
** Installing Leg Pieces **
Leg
Leg cap
(may not
be preinstalled)
Leg bushing
Lock washer
Allen bolt
Note: Some pieces may be inside
of leg and hidden by the leg plug.
Leg plug
1) Familiarize yourself with the leg pieces. Then install leg caps over bottom of legs, as shown above.
Handle legs
Notch in leg
Pin on stud
2) With trampoline upside-down, fit leg over stud on trampoline frame. Notch in leg lines up with pin on stud.
Note: If you have a stabilizer handle and wish to install it, the 2 handle legs will be installed in place of the normal legs at the
2 locations shown above. Be sure the Fitness Trampoline logo is centered between the 2 handle legs.
7
Assembly and Installation Instructions
3) Leg bushing fits inside of leg. Leg bushing will not stick out of leg when properly installed.
Lock washer
4) Lock washer and Allen bolt fit inside of leg bushing.
5) Securely tighten Allen bolt with supplied 6mm Allen wrench.
8
Assembly and Installation Instructions
Make sure all leg caps
are securely installed,
if applicable
6) Leg plug covers leg socket.
7) Repeat Steps 1—6 at remaining studs on bottom of trampoline.
When completed, all 6 legs will be installed.
WARNING: Periodically check all
elastic cords by pushing them all
the way into the connectors on
the jumping mat. All elastic cords
should be properly seated this
way prior to using the rebounder
trampoline.
WARNING: Periodically check all
leg mounting bolts and retighten
if necessary. All bolts should be
tight prior to using the rebounder
trampoline.
If no handle legs are installed, The
JumpSport Fitness Trampoline is now ready for use!
Otherwise, continue to the next page.
9
Assembly and Installation Instructions
** Installing Stabilizer Handle **
Top handle
Large thumb screws
Left side handle
Small thumb screws
Right side handle
1) Familiarize yourself with the handle pieces.
2) If you installed the handle legs as described on the previous pages, your Fitness Trampoline should look like the picture above.
10
Assembly and Installation Instructions
3) Connect top handle piece to right and left side handles. Use small thumb screws to secure pieces together. You now have a “top
assembly”.
4) Place top assembly into both handle legs, and adjust top assembly until bottom hole in top assembly lines up with hole at top of
each handle leg. You may have to rotate entire top assembly 180 degrees for holes to line up.
11
Assembly and Installation Instructions
Adjustment
holes
Adjustment
holes
Note: To change height of stabilizer handle, remove large thumb screws, move top assembly to desired height, then screw large
thumb screws back into place. There are 4—6 different height adjustments for the stabilizer handle, depending on the model.
WARNING: Periodically check all
leg mounting bolts and retighten
if necessary. All bolts should be
tight prior to using the rebounder
trampoline.
Your stabilizer handle is now installed!
To remove the handle, follow the Installation Instructions in reverse order.
12
Assembly and Installation Instructions
** How to Adjust FlexBounce Models **
(if applicable)
First knot
(softer)
Second knot
(firmer)
The JumpSport Fitness Trampoline models equipped with adjustable elastic cords come configured for a softer bounce. However, if
you decide that you want to make the Fitness Trampoline feel firmer, use the chart below to find the setting you want, then perform
following steps:
1) Turn trampoline upside down.
2)
Find elastic cord with multiple knots in it. Pull cord toward center of mat and out of plastic connector. Then pull elastic cord
further toward center of mat until desired knot passes plastic connector. Now push cord into connector. Make sure cord is securely
seated in connector, so that it does not come loose.
Choose your preferred firmness setting from the chart below. Repeat with additional knots/cords, if you want to make the trampoline
even firmer.
Configuration Chart
FlexBounce III
Softer 1 / 1* on all cords (standard configuration)
FlexBounce VII
1 / 1* on all cords (standard configuration)
1 / 2 on every third cord (1 / 1 on all other cords)
1 / 2 on every other cord (1 / 1 on all other cords)
1 / 2 on every other cord (1 / 1 on all other cords) 1 / 2 on every cord
2 / 2 on every third cord (1 / 2 on all other cords)
2 / 2 on every other cord (1 / 2 on all other cords)
2 / 2 on every cord
Firmer 1 / 2 on every cord
• * Different knot combinations are going to be listed as 1/1, 1/2, or 2/2 to represent which knots on each end of the cord are being
•
•
•
•
secured to the mat connectors
Knot closest to either end of elastic cord is referred to as knot “1”
Knot that is second from the end of either elastic cord is referred to as knot “2”
It does not matter which end uses knot 1 or knot 2; the tension of the bungee will be the same either way.
These are the recommended FlexBounce configurations for your Fitness Trampoline. You can also come up with your own
configuration that works best for you!
13
Assembly and Installation Instructions
(This page left intentionally blank.)
14
Care and Maintenance
Instructions
2
The JumpSport Fitness Trampoline, is made using quality materials and is finely-crafted to provide you with many
years of enjoyment and exercise. Proper maintenance and care will help to prolong the life of the rebounder trampoline
and reduce the possibility of injury.
All rebounder trampolines require maintenance at some point. The following maintenance guidelines should always be
observed.
Inspection
Inspect the rebounder trampoline before each use and replace any worn, defective, or missing parts. The following
conditions could represent potential hazards:
•
•
•
•
•
•
•
Missing, improperly positioned, or insecurely attached frame padding or cover, if any
Punctures, extensive frays, tears, or holes worn in the bed, elastic cords, or other components
Deterioration in the stitching or fabric of the bed, elastic cords, or other components
Ruptured elastic cords
A bent or broken frame
A sagging bed
Sharp protrusions on the frame or suspension system
Note: The “bed” mentioned above and elsewhere in this manual, refers to the jumping surface (generally referred to
as the “mat”).
If any of the above conditions exist, the Fitness Trampoline must be protected against use until the condition is
remedied.
Periodically check all leg mounting bolts and retighten if necessary. All bolts should be tight prior to using the
rebounder trampoline.
Replacement Parts
All replacement parts should be ordered through JumpSport. Stores that repair shoes, awnings, or tents, as well as
upholstery shops, do not have the proper materials, equipment, or methods for the proper/safe repair of rebounder
trampoline mats and frame pads.
Call JumpSport at 1-877-507-1399 if you need replacement parts, or have any questions.
If any warning labels or signs become unreadable or missing, call JumpSport for free replacements.
Rebounder trampoline mats should be completely replaced if any tear or hole is greater than one inch in length. Patches
over larger holes will eventually fail, creating a potential for hazardous injury.
Caution: Do not repair rebounder trampoline mats with holes greater than one inch.
15
Care and Maintenance Instructions
Care
Do not allow family pets on the rebounder trampoline, as claws may snag and pull the trampoline mat material or
damage the frame pad.
The JumpSport Fitness Trampoline is intended to be used by one person at a time, weighing up to 250 pounds. The user
should either be barefoot or wearing gymnastic slippers or non-cleated athletic shoes. The user should remove all sharp
objects from their person that may cause injury or damage to the trampoline mat. Heavy, sharp, or hard pointed objects
should not contact the mat surface.
16
Warning Information
3
WARNING
DO NOT attempt or allow
somersaults. Landing on
the head or neck can cause
serious injury, paralysis or
death, even when landing in
the middle of the bed.
DO NOT allow more than one
person on the trampoline.
Use by more than one person
at the same time can result in
serious injury.
Use trampoline only with mature, knowledgeable supervision.
Points of Safety
It is essential that rebounder trampoline users follow a carefully planned safety program so that the trampoline can be
fully enjoyed. Most accidents can be classified into the following:
•
•
•
Bouncing off the rebounder trampoline
Stepping on and off the rebounder trampoline
Landing incorrectly on the mat
These are covered in detail in the following sections.
Bouncing off the Rebounder Trampoline
Bouncing off of the rebounder trampoline can be controlled, if not completely eliminated, through:
•
•
•
Strictly forbidding any “aerial mounts” (i.e. jumping onto the trampoline from another object or the ground)
Strictly forbidding any “flying dismounts” (i.e. jumping off of the trampoline onto another object or the ground)
Using the trampoline only with mature, knowledgeable supervision
Keep objects away from the rebounder trampoline. It is dangerous to jump from the trampoline to the floor or ground.
Do not jump from the trampoline onto a piece of furniture or any other object.
Stepping on and off the Rebounder Trampoline
The safest way to get on to your rebounder trampoline is to step from the ground directly onto the center of the mat. The
safest way to get off of your rebounder trampoline is to step directly from the center of the mat onto the ground.
Do not step on the frame or elastic cords when stepping on or off the trampoline.
Landing Incorrectly on the Mat
Landing incorrectly on the mat creates great risk of a serious injury, with most injuries resulting from attempted
somersaults/flips. It is strongly recommended that somersaults/flips are not performed.
17
Warning Information
(This page left intentionally blank.)
18
Use Instructions
4
Safety Rules
It is the responsibility of the owner to become familiar with the safety rules and to convey these rules to all users.
WARNING
•
•
•
•
•
•
•
•
•
•
•
•
•
•
•
•
•
•
•
•
•
This product is intended for indoor use only.
You should consult with a physician before beginning any exercise or conditioning program.
If you feel faint or dizzy, immediately stop using the rebounder trampoline.
DO NOT attempt or allow somersaults. Landing on your head or neck can cause serious injury, paralysis, or death,
even when landing in the middle of the bed.
DO NOT allow more than one person on the rebounder trampoline. Use by more than one person at the same time
can result in serious injuries.
Use rebounder trampoline only with mature, knowledgeable supervision.
Rebounder trampolines are not recommended for use by children under 6 years of age.
Inspect the rebounder trampoline before each use. Make sure any frame padding or cover is correctly and securely
positioned. Replace any worn, defective, or missing parts.
Step on and off the rebounder trampoline. It is a dangerous practice to jump from the trampoline to the floor or
ground when dismounting, or to jump onto the trampoline when mounting. Do not use the trampoline as a springboard to other objects.
Stop bounce by flexing knees as feet come in contact with the trampoline bed. Learn this skill before attempting
others.
Learn fundamental bounces and body positions thoroughly before trying more advanced skills. A variety of
rebounder trampoline activities can be carried out by performing the basic skills in various series and combinations,
performing one skill after another.
Avoid bouncing too high. Stay low until bounce control and repeated landing in the center of the rebounder
trampoline can be accomplished. Control is more important than height.
While keeping the head erect, focus eyes on the rebounder trampoline toward the perimeter, or on a stationary
object across the room. This will help control bounce.
Avoid bouncing when tired. Take breaks often.
Properly secure the rebounder trampoline when not in use. Protect it against unauthorized use.
Keep objects away which could interfere with the performer. Maintain a clear area around the rebounder
trampoline.
Do not use the rebounder trampoline while under the influence of alcohol or drugs.
For additional information concerning the rebounder trampoline equipment, contact the manufacturer.
For information concerning skill training, contact a certified rebounder trampoline instructor.
Bounce only when the surface of the bed is dry.
Read all instructions before using the rebounder trampoline. Warnings and instructions for the care, maintenance,
and use of this trampoline are included to promote safe, enjoyable use of this equipment.
Note: The “bed” mentioned above and elsewhere in this manual, refers to the jumping surface (generally referred to
as the “mat”).
IMPORTANT: If you have a stabilizer bar (handle), be sure to read and follow the Warning Information and Use
Instructions provided in that manual.
19
Use Instructions
(This page left intentionally blank.)
20
Use Instructions
(This page left intentionally blank.)
21
Use Instructions
(This page left intentionally blank.)
22
Limited Warranty
What is covered by this warranty? This warranty covers any defects in materials or workmanship on all of the components
of the JumpSport Fitness Trampoline, and is extended exclusively to the original retail purchaser.
How long does this coverage last? Warranty coverage for each component begins from the original date of purchase. The
warranty period for commercial use is shorter and is listed in parenthesis:
Steel frame – lifetime (5 years)
Steel legs (not including removable parts) – lifetime (5 years)
Jumping surface (mat) – 5 years (2 years)
ExtraLife Cords – 1 year (6 months)
EnduroLast Cords – 3 years (1 year)
All other components of the rebounder trampoline – 1 year (6 months)
•
•
•
•
•
•
What will JumpSport do? If you return the defective part to JumpSport, as instructed below, JumpSport will either repair or
replace such part, at JumpSport’s discretion, and return it to you.
What is not covered by this warranty? This warranty does not cover expenses of on-site labor, shipping costs, travel,
assembly or disassembly, or other charges associated with the repair or replacement of covered components. This warranty
also does not cover any problem that is caused by abuse, misuse, commercial or public use, ordinary wear and tear, outdoor
use, weathering, acts of God (such as wind and lightning), failure to follow directions, improper installation, improper
maintenance, or any silk screened graphics. Rust is a natural occurrence with any steel product and is likewise not covered by
this warranty, to the extent that it does not affect the structural integrity of the part.
JUMPSPORT IS NOT RESPONSIBLE OR LIABLE FOR INDIRECT, SPECIAL, OR CONSEQUENTIAL DAMAGES ARISING
OUT OF OR IN CONNECTION WITH THE USE OR PERFORMANCE OF THE PRODUCT OR OTHER DAMAGES WITH
RESPECT TO ANY LOSS, INCLUDING BUT NOT LIMITED TO ECONOMIC LOSS, LOSS OF PROPERTY, LOSS OF
REVENUE OR PROFITS, LOSS OF ENJOYMENT OR USE, COST OF REMOVAL, INSTALLATION OR OTHER
CONSEQUENTIAL DAMAGES. SOME STATES DO NOT ALLOW THE EXCLUSION OR LIMITATION OF INCIDENTAL OR
CONSEQUENTIAL DAMAGES. ACCORDINGLY, THE ABOVE LIMITATION MAY NOT APPLY TO YOU.
THE WARRANTY EXTENDED HEREUNDER IS IN LIEU OF ALL OTHER WARRANTIES AND ANY IMPLIED WARRANTY
OF MERCHANTABILITY OR FITNESS FOR A PARTICULAR PURPOSE IS LIMITED IN ITS SCOPE AND DURATION TO
THE TERMS SET FORTH HEREIN. SOME STATES DO NOT ALLOW LIMITATIONS ON HOW LONG AN IMPLIED
WARRANTY LASTS. ACCORDINGLY, THE ABOVE LIMITATION MAY NOT APPLY TO YOU.
How to get a defective part replaced:
1)
2)
3)
Call the JumpSport Customer Service department at 1-877-507-1399 to obtain a Return Authorization number. All returns
must be pre-authorized.
Send the part(s) to the designated Service Center, along with a copy of your original sales receipt and a brief written
description of the problem, including how it occurred. You must pay freight and insurance to return the part to JumpSport. At JumpSport’s sole discretion, we may ask you to send photographs in addition to or in lieu of returning the part.
After inspecting the returned part(s), JumpSport will make a final determination whether the part is covered by this
warranty. We reserve the right to examine photographs or physical evidence concerning parts claimed to be defective prior
to making a final determination concerning the claim. A repaired or replacement part will be returned to you. Please allow
3 to 4 weeks for delivery.
This warranty gives you specific legal rights. You may also have other rights which vary from state to state.
23
JumpSport, Inc.
2055 South 7th Street, Suite A
San Jose, CA 95112
1-877-507-1399
http://www.fitnesstrampoline.com
24