1
MP3 Player
Add an MP3 module to the board and design a user interface.
Contents
•
•
•
•
Overview
Challenge 1: Control the MP3 Module with Your Computer
o Collecting Your Components
o Stocking the USB Flash Drive
o Building the Circuit
o Setting up a Terminal Emulator
o Sending Commands to the MP3 Module
Challenge 2: Control the MP3 Module with the Microcontroller
o Collecting your Components
o Building the Circuit
o Playing Songs
o Changing Volume
o Using Custom MP3 Commands
o Playing a Specific File
o Reading File Names
o Playing Files by Variable Name
o Counting the Files in a Directory
Challenge 3: Use Buttons to Control the MP3 Player
o Adding the Buttons
o Adding New Files
o Navigating to a Specific Directory
o Putting It All Together
Overview
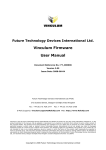
In this project, you will build an MP3 player, using the Vinculum VMUSIC2 MP3
module and a USB flash drive. You will add the MP3 module to the Atmega board, and
then program it to play music files from the flash drive. By adding additional buttons to
the board, you can create your own interface for the device, with inputs for file selection,
play and pause, fast forward and reverse, and volume adjustment.
Figure 1. Vinculum VMusic2 MP3 Module.
Challenge 1: Control the MP3 Module with Your Computer
The first challenge is to use your computer to send commands to and
receive data from the Vinculum module. The module is capable of
responding to more than 100 different predefined commands, which can be
sent directly from a terminal emulator window. Likewise, the module can
return strings of text, which are easier to view initially on a full computer
screen than on the Atmega board's LCD screen.
Collecting Your Components
In order to connect the MP3 module to your computer, you will need the following
components:
Part
Quantity
Description
A
1
VMUSIC2 MP3 module
B
1
Modified connector harness (6-pin)
C
1
Bent header (6-pin)
D
1
Bent header (4-pin)
E
1
USB flash drive (thumb drive)
Stocking the USB Flash Drive
You should save at least five MP3 music files on your USB flash drive before testing the
MP3 module. If you don't have any MP3 files on your computer, you can purchase or
find free downloads of MP3 files at a variety of Internet sites. Note that, when naming
files or directories on the flash drive, you may use any name you like, but the module will
only recognize the first eight characters of any title.
1.
2.
3.
4.
5.
Insert your USB flash drive into any open USB port on your computer.
Navigate to the USB flash drive directory and delete all files on the drive.
Create a directory called TEST on your flash drive.
Copy at least five MP3 music files into the TEST directory.
Rename your MP3 files M1.mp3, M2.mp3, M3.mp3, M4.mp3, and M5.mp3.
Building the Circuit
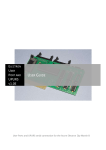
Using Figure 2 as a guide, connect your MP3 module to your Machine Science
programming board. Figure 3 shows an example of a completed board for this circuit.
You may use the picture as a guide, but note that it demonstrates only one of many
possible ways of wiring this circuit on a breadboard.
Figure 2. Schematic for testing the MP3 module.
Figure 3. One possible configuration on the breadboard.
Setting up a Terminal Emulator
Connected as shown in Figure 2, the MP3 module can receive commands from and return
data directly to your computer. To control the module this way, you will need to run a
terminal emulator--a program that emulates an older-style, text-only computer terminal.
Depending on your operating system, your computer may already have a terminal
emulator, or you may need to download one from the Internet:
•
Windows (Vista): TeraTerm Pro Web is available here:
http://www.ayera.com/teraterm/
•
•
•
Windows (pre-Vista): HyperTerminal is available in the Start menu under
Programs >
Accessories > Communication.
Macintosh: ZTerm comes pre-installed with OSX and above.
Linux: CuteCom can be found at: http://cutecom.sourceforge.net/
The instructions in this section are for installing TeraTerm Pro Web, but should give you
enough information to help you set up any of the other programs listed above.
1. Determine which COM port your Machine Science programming board is using
by viewing the Options menu in the Programming Window.
2. Download TeraTerm Pro Web from http://www.ayera.com/teraterm/
3. Unzip the .zip file to a convenient location on your hard drive.
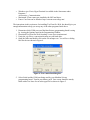
4. Open the folder and double click on the file ttermpro.exe. You will see a dialog
box like the one shown in Figure 4.
Figure 4. New connection dialog box.
5. Select Serial and the COM port being used by your Machine Science
programming board. Turn on your battery pack. Your screen should be mostly
blank with a few lines of text in the upper left as shown in Figure 5.
Figure 5. Terminal Window 1.
6. Turn off your battery pack.
7. Select “Terminal...” from the Setup menu. You should now see a dialog box like
the one shown in Figure 6.
Figure 6. Serial port setup.
8. Select CR+LF for receive and Local Echo, as shown in Figure 6. CR and LF stand
for carriage return and line feed and will make sure that each new text string sent
from the MP3 module is displayed on a new line. Local echo will allow you to see
the commands you type to send to the MP3 module. Click OK.
9. Turn on your battery pack. After about a two-second delay, your screen should
look like Figure 7. Note that the version number may be different.
Figure 7. Terminal emulator window.
10. Turn off your battery pack.
Sending Commands to the MP3 Module
The following table shows an abbreviated list of commands that can be used with the
MP3 module. For a more complete list, download the Vinculum Firmware User Manual
from the Vinculum website at http://www.vinculum.com. For each command in the table,
there is an extended command set version and a short command set version. The
extended commands are easier to read, because they comprise ASCII characters. The
short commands, which comprise hexadecimal codes, are more difficult to read but more
efficient. The first few code examples in this document use the extended set, while later
examples use the short command set. Note that a carriage return (the Enter key), is
required after every command in the extended set. Also note that the extended commands
are not case sensitive, 'DIR' is equivalent to 'dir'.
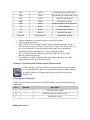
Extended Command Short Command (Hex Codes)
Function
DIR
01 0D
Lists files in current directory
CD file
02 20
file 0D Change current directory
CD ..
02 20 2E 2E 0D
Move up one directory
VPF file
1D 20 file 0D
Play a single file
VRP file
89 20
file 0D
Repeatedly play a single file
VST
20 0D
Stop playback
V3A
21 0D
Play all MP3 files in a directory
VRA
8A 0D
Repeatedly play all MP3 files
VRR
8F 0D
Repeatedly play random MP3 files
VSF
25 0D
Skip forward one track
VSB
26 0D
Skip back one track
VSD
8E 0D
Skip forward one whole directory
VP
8B 0D
Pause playback
VF
8C 0D
Fast forward 5 seconds
VB
8D 0D
Rewind 5 seconds
VSV byte
88 20 byte 0D
Set playback volume
1. Connect headphones or external speakers to your MP3 module.
2. Turn your battery pack on.
3. Type CD TEST in your terminal window and press Enter to navigate into the
TEST directory. Again, you may use either lower or upper case letters when you
type your commands. The module should acknowledge your command by
returning the following characters D:\> to your terminal window.
4. Type V3A followed by the Enter key and the first MP3 file in your TEST
directory should begin to play.
5. Try sending a few other commands from the terminal window to to the MP3
module before moving on to the next section.
Challenge 2: Control the MP3 Module with the Microcontroller
In this challenge, you will construct a circuit to connect your MP3 module
to your Atmega Board. Then, you will program the chip to send commands
to the MP3 module and display data from the module on the Atmega
Board's LCD.
Collecting your Components
In order to connect the microcontroller to the MP3 module, you will need the following
components:
Part
Quantity
Description
A
1
VMUSIC2 MP3 module
B
1
Modified connector harness (6-pin)
C
1
Bent header (6-pin)
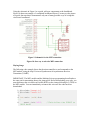
Building the Circuit
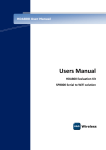
Using the schematic in Figure 9 as a guide, add your components to the breadboard.
Figure 10 shows an example of a completed breadboard layout. You may use the picture
as a guide, but note that it demonstrates only one of many possible ways of wiring this
circuit on a breadboard.
Figure 9. Schematic for the MP3 connection.
Figure 10. One way to wire the MP3 connection.
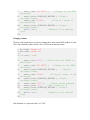
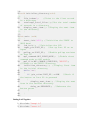
Playing Songs
The following code example directs the the microcontroller to send commands to the
MP3 module, using the chip's Universal Synchronous & Asynchronous Receiver
Transmitter (USART).
IMPORTANT: The MP3 module and the Machine Science programming board both use
the same pin for transmitting data to the Atmega168. Before downloading your code, you
must disconnect the wire between Port D0 (RXD) on the Atmega168 and pin 5 (TXD) on
the MP3 module. You can immediately reconnect this wire once the code has been
downloaded.
1. #include "mxapi.h"
2. #include "usart.h"
3.
4. int main (void)<br>
5. {
6.
usart_init(9600)
9600 baud
//Initialize the USART to
usart_text("CD TEST");
//Change to the TEST
directory
8.
usart_write(CARRIAGE_RETURN); //Send a
carriage return
9.
usart_text("V3A");
//Play all songs in
the directory
10.
usart_write(CARRIAGE_RETURN); //Send a
carriage return
11.
while(1==1);
//Remain in an endless
loop
12. }
7.
Changing Volume
The next code sample shows you how to change the volume on the MP3 module. A value
of 0 is the maximum volume, and a value of 250 is the minimum volume.
1. #include "mxapi.h"
2. #include "usart.h"
3.
4. int main (void)
5. {
usart_init(9600); //Initialize the USART to
9600 baud
7.
usart_text("CD TEST");
//Change to the TEST
directory
8.
usart_write(CARRIAGE_RETURN);
//Send a
carriage return
9.
usart_text("V3A");
//Play all songs in the
directory
10.
usart_write(CARRIAGE_RETURN); //Send a
carriage return
11.
usart_text("VSV ");
//Send volume command
12.
usart_write(70);
//Set volume to 70
13.
usart_write(CARRIAGE_RETURN); //Send a
carriage return
14.
while(1==1);
//Remain in an endless
loop
15. }
6.
Note that there is a space after the V in "VSV ".
Try sending a few more commands from the Atmega to the MP3 module before moving
on to the next section.
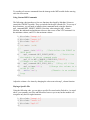
Using Custom MP3 Commands
The following code introduces a few new functions developed by Machine Science to
control the VMUSIC2 module. They are included in the mp3.h header file. To use any of
these functions, you will need to initialize short command mode using the function
mp3_command(MP3_SHORT_MODE). Note that, when using the mp3_volume
function, the minimum and maximum values are the reverse of the VSV command: 0 is
the minimum volume, and 255 is the maximum volume.
1. #include "mxapi.h"
2. #include "usart.h"
3. #include "mp3.h"
4.
5. int main (void)
6. {
usart_init(9600);
//Initialize the USART to
9600 baud
8.
mp3_command(MP3_SHORT_MODE);
//Initialize
the module to short command mode
9.
mp3_file(MP3_CHANGE_DIRECTORY,"TEST");
//Change to the TEST directory
10.
mp3_command(MP3_PLAY_ALL); //Play all files
11.
mp3_volume(200);
//Change the volume to a
value of 200
12.
while(1==1);
//Remain in an endless
loop
13. }
7.
Adjust the volume a few times by changing the value sent to the mp3_volume function.
Playing a Specific File
Using the following code, you can play a specific file stored on the flash drive. As noted
above, you can name your files and directories however you want, but the module will
recognize only the first eight characters.
1. #include "mxapi.h"
2. #include "usart.h"
3. #include "mp3.h"
4.
5. int main (void)
6. {
usart_init(9600);
//Initialize the
Atmega168's USART to 9600 baud
8.
mp3_command(MP3_SHORT_MODE);
//Initialize
the module to short command mode
7.
9.
mp3_file(MP3_CHANGE_DIRECTORY,"TEST"); //Change
to the TEST directory
10.
mp3_file(MP3_PLAY_FILE,"M2.mp3");
//Play the
M2.mp3 file
11.
mp3_volume(200);
//Change the volume to a
value of 200
12.
while(1==1);
//Remain in an endless
loop
13. }
Try playing a few different songs in the TEST directory.
Reading File Names
In the next code example, file names in the TEST directory are read and stored in an
array. This way, file names can be displayed on the LCD, and files can be referenced by
their position in the directory. Prior to this point, you needed to specify the exact name of
the file in order to play it. Note that, in the directory structure on the flash drive, the first
entry in any directory is always ".. DIR". This is a link back to the directory above the
selected directory and will be important for later code.
1.
2.
3.
4.
#include
#include
#include
#include
"mxapi.h"
"usart.h"
"mp3.h"
"lcd.h"
5.
6. int main (void)
7. {
char count=0;
//Initialize a counter for
keeping track of names
9.
char name[9];
//Initialize a string for
storing file names
10.
char type;
//Initialize a variable for
storing file types
11.
usart_init(9600); //Initialize the USART to
9600 baud
8.
12.
13.
lcd_init(); //Initialize the LCD
mp3_command(MP3_SHORT_MODE);
//Initialize
the module to short command mode
14.
mp3_file(MP3_CHANGE_DIRECTORY,"TEST"); //Change
to the TEST directory
15.
while(1==1)
16.
{
17.
mp3_file_name(name, &type, ++count);
//Read file in the count position and increment
count by 1
18.
if(count==5) count=0;
//If count
exceeds no. of files in TEST, set count to 0
19.
lcd_text(name);
//Display
name on the LCD
20.
delay_ms(1000);
//Display the name
for 2 seconds
21.
lcd_clear();
//Clear the LCD
22.
}
23. }
Add a new directory to your flash drive and try this code with the new directory
Playing Files by Variable Name
The following code plays a file based on the name retrieved by the mp3_filename
function.
1.
2.
3.
4.
5.
#include
#include
#include
#include
int main
"mxapi.h"
"usart.h"
"mp3.h"
"lcd.h"
(void)
6.
7. {
8.
char name[9]; //Initialize a string for
storing file names
9.
usart_init(9600); //Initialize the
Atmega168's USART to 9600
10.
baud char type; //Initialize a variable for
storing file types
11.
lcd_init(); //Initialize the LCD
mp3_command(MP3_SHORT_MODE); //Initialize
the module to short command mode
13.
mp3_file(MP3_CHANGE_DIRECTORY,"TEST");
//Change to the TEST directory
14.
mp3_file_name(name, &type, 2); //Retrieve
the second file name from TEST
15.
lcd_text(name); //Display file name on the
LCD
16.
mp3_file(MP3_PLAY_FILE, name); //Play the
file stored in name
17.
mp3_volume(200); //Set the volume to value
of 200
18.
while(1); //Remain in an endless loop
19. }
12.
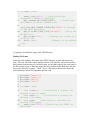
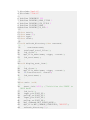
Counting the Files in a Directory
As a next step, a function is introduced for counting the number of files in a directory.
This way, the code does not have to change to accommodate directories with different
numbers of files.
1.
2.
3.
4.
#include
#include
#include
#include
"mxapi.h"
"usart.h"
"mp3.h"
"lcd.h"
5.
6. int main (void)
7. {
8.
char total=0;
//Declare a variable to store
the number of files
9.
usart_init(9600); //Initialize the Atmega168's
USART to 9600 baud
10.
lcd_init(); //Initialize the LCD
11.
mp3_command(MP3_SHORT_MODE);
//Initialize
short command mode
12.
mp3_file(MP3_CHANGE_DIRECTORY,"TEST"); //Change
to the TEST directory
13.
total=mp3_total_files();
//Read the
number of files in TEST
14.
lcd_decimal(total);
//Display the number
on the LCD
while(1);
loop
16. }
15.
//Remain in an infinite
Try changing the number of files in your directory, and then run the code again.
Challenge 3: Use Buttons to Control the MP3 Player
In this challenge, you will add two buttons to your MP3 player and use
these buttons to scroll through and play selected songs stored on your flash
drive. The code for this challenge will use everything you have learned so
far and is significantly more complex than the previous code samples. Don't
expect to understand everything at first!
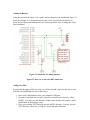
Adding the Buttons
Using the schematic in Figure 11 as a guide, add two buttons to the breadboard. Figure 12
shows an example of a completed board for this circuit. You may use the picture as a
guide, but note that it demonstrates only one of many possible ways of wiring this circuit
on a breadboard.
Figure 11. Schematic for adding buttons.
Figure 12. One way to wire the MP3 connection.
Adding New Files
In order take advantage of the new code you will need to add a top level directory to your
flash drive and additional lower level directories.
1. Insert your USB flash drive into your computer's USB port.
2. Navigate to the flash drive's top level directory and add a new directory, called
MUSIC. (You may give this directory another name, but this will require a small
modification to the example code.)
3. Place your existing TEST directory into the MUSIC directory. You may give the
TEST directory a new title, as long as it is less than nine characters.
4. Create at least two additional directories and place them under the MUSIC
directory.
5. Add at least three MP3 files to each of your new directories.
Navigating to a Specific Directory
The following code enables you to scroll through your MUSIC directory using one of the
buttons on your board. This code puts together features of the previous examples and
allows you to have up to 128 different directories in MUSIC. Two new custom functions
are introduced: display_next_item and initialize_directory. The display_next_item
function returns the name and type of the next file/directory in the current directory, and
then display the name on the LCD. The initialize_directory function determines the
number of files in a directory and calls display_next_item.
1.
2.
3.
4.
#include
#include
#include
#include
"mxapi.h"
"usart.h"
"mp3.h"
"lcd.h"
5.
6. #define
7. #define
8. #define
9. #define
10. #define
DEBOUNCE 500
READING_SONG_TITLE 1
READING_DIR_TITLE 2
PLAYING_SONG 3
READING_UP_DIR 4
11.
12. char total; //The total number of songs in a
directory
13. char name[9];
//Storage for file and directory
names
14. char state; //A record of the state of the
program
15. char file_index; //An index of files in the
directories
16.
17. void display_next_item(void)
18. {
19.
lcd_clear();
//Clear the LCD
20.
mp3_file_name(name, &state, ++file_index);
//Return the name and type of file/directory
21.
if(file_index >=total) file_index=0;
//If
the index is larger than the total, reset
22.
lcd_text(name);
//Display the
name of the file/directory
23. }
24.
25. void initialize_directory(void)
26. {
27.
file_index=1;
//Point to the first record
in a directory
28.
total=mp3_total_files();//Get the total number
of records in a directory
29.
display_next_item(); //Display the next item
in the directory
30. }
31.
32. int main (void)
33. {
34.
usart_init(9600); //Initialize the USART to
9600 baud
35.
lcd_init(); //Initialize the LCD
36.
input_pin(PORT_D5); //Set up Port D5 as an
input
37.
pullup_on(PORT_D5); //Enable pullup resistor
on Port D5
38.
mp3_command(MP3_SHORT_MODE); //Enable short
command mode on MP3 module
39.
mp3_file(MP3_CHANGE_DIRECTORY, "MUSIC");
//Change to the MUSIC directory
40.
initialize_directory(); //Display first item
in the initial directory
41.
while(1==1)
42.
{
43.
if((pin_value(PORT_D5))==LOW) //Check if
the button on Port D5 is pressed
44.
{
45.
display_next_item(); //Display the next
item in the current directory
46.
delay_ms(DEBOUNCE); //Debounce the
button press
47.
}
48.
}
49. }
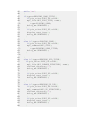
Putting It All Together
1. #include "mxapi.h"
2. #include "usart.h"
3. #include "mp3.h"
4. #include "lcd.h"
5.
6. #define
7. #define
8. #define
9. #define
10. #define
DEBOUNCE 500
READING_SONG_TITLE 1
READING_DIR_TITLE 2
PLAYING_SONG 3
READING_UP_DIR 4
11.
12. char total;
13. char name[9];
14. char type;
15. char count;
16.
17. void refresh_directory(char newcount)
18. {
19.
count=newcount;
20.
total=mp3_total_files();
21.
lcd_clear();
22.
mp3_file_name(name, &type, ++count);
23.
lcd_text(name);
24. }
25.
26. void display_next_item()
27. {
28.
lcd_clear();
29.
mp3_file_name(name, &type, ++count);
30.
if(count>=total) count=0;
31.
lcd_text(name);
32. }
33.
34. int main (void)
35. {
36.
usart_init(9600); //Initialize the USART to
9600 baud
37.
lcd_init();
38.
input_pin(PORT_D5);
39.
pullup_on(PORT_D5);
40.
input_pin(PORT_D6);
41.
pullup_on(PORT_D6);
42.
mp3_command(MP3_SHORT_MODE);
43.
mp3_file(MP3_CHANGE_DIRECTORY, "MUSIC");
44.
refresh_directory(2);
45.
46.
47.
48.
49.
50.
51.
52.
53.
54.
55.
56.
57.
58.
59.
60.
61.
62.
63.
while(1==1)
{
if(type==READING_SONG_TITLE){
if(pin_value(PORT_D6)==LOW){
mp3_file(MP3_PLAY_FILE, name);
type=PLAYING_SONG;
delay_ms(DEBOUNCE);
}
if(pin_value(PORT_D5)==LOW){
display_next_item();
delay_ms(DEBOUNCE);
}
}
else if(type==PLAYING_SONG){
if(pin_value(PORT_D6)==LOW){
mp3_command(MP3_STOP);
type=READING_SONG_TITLE;
delay_ms(DEBOUNCE);
}
64.
65.
66.
67.
68.
69.
70.
71.
72.
73.
74.
75.
76.
77.
78.
79.
80.
81.
82.
83.
84.
85.
86.
}
else if(type==READING_DIR_TITLE){
if(pin_value(PORT_D6)==LOW){
mp3_file(MP3_CHANGE_DIRECTORY, name);
refresh_directory(1);
delay_ms(DEBOUNCE);
}
if(pin_value(PORT_D5)==LOW){
display_next_item();
delay_ms(DEBOUNCE);
}
}
else if(type==READING_UP_DIR){
if(pin_value(PORT_D6)==LOW){
mp3_command(MP3_UP_DIRECTORY);
refresh_directory(1);
delay_ms(DEBOUNCE);
}
if(pin_value(PORT_D5)==LOW){
display_next_item();
delay_ms(DEBOUNCE);
}
87.
88.
89.
}
}
}