1
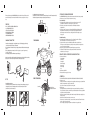
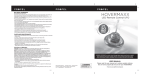
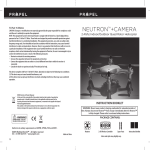
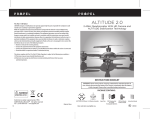
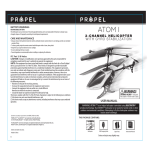
URBAN RENEGADE
SAFETY WARNINGS!
UNDERSTANDING TRIM ADJUSTMENTS
Turn Left/Right Trim
• If your car cannot run straight, you may need to utilize the LEFT AND RIGHT TRIM buttons.
• From time to time you may have to adjust the LEFT AND RIGHT TRIM to ensure the car runs straight and
responds accurately to control commands.
Forward/Backward Trim
• If your car is moving forwards or backwards automatically, you may need to adjust the
FORWARD/BACKWARD TRIM buttons.
• From time to time you may have to adjust the FORWARD/BACKWARD TRIM to ensure the
car will stay and respond accurately to your commands.
• Improper use of batteries may lead to overheating, breakage or leaking.
- Do not mix old and new batteries.
- Do not mix different battery brands.
- Install batteries with correct polarity. The flat side (negative terminal) of the battery should rest
against the spring.
- Remove dead batteries immediately.
- Avoid liquids, which can short circuit the batteries.
- The car or remote will become unresponsive when batteries are low, at which point you should replace
High Speed Racer
all batteries with new ones.
- Remove the batteries if you will not use the car for a long time.
• Avoid using near furniture or glass to prevent damage to these objects.
• Do not use car on roads where real cars are in use. Serious physical harm or death may result.
• Do not use car in areas crowded with people as this may result in harm to car and/or people. Choose
a safe location free of people and real cars.
• Do not use car during a storm or when lightning or thunder are present.
• Do not use in a wet , sandy or muddy environment as car may become damaged.
• Do not bend the antenna. It may break, exposing sharp metal that can cause injury.
WARNING
DO NOT USE YOUR URBAN RENEGADE IN FOUL WEATHER!
TROUBLESHOOTING
Before sending your car in for repair, please check for a solution below.
Problem
Possible Cause(s)
Solution
Car will not move
Weak batteries; no batteries
Install new batteries in remote
control and recharge the car battery
Car does not respond properly
to remote control
Car and remote not synced properly
Refer to sync section and resync
your car and remote
Move to a new location where no
other RC cars are present
Another RC car may be transmitting
on the same radio frequency
Car loses connection to
remote control
Car battery has fully charged,
but slower than normal
Using car in a small enclosed area
Using car indoors
Low batteries in Transmitter or
Vehicle
Move outdoors to a large open area
Driving car for too long at high
speeds, causing motor to overheat
Turn car off for 10-15 minutes
Install new batteries in remote
control or recharge your car
• Do not pull on any wires that are part of the car. Such action may cause the wires to break and the car
to malfunction.
• Keep fingers, hair and clothes away from the car’s spinning tires. Failure to do so may result in
physical injury.
• Never aim the car at other people.
• Do not throw the car or purposely hit it with any object.
• Store car in a cool environment, away from high-temperature sources such as fires, stoves, radiators, etc.
• This car has no user-serviceable parts. Do not attempt to modify components or circuit board.
FCC Part 15 B Notice
CAUTION: Changes or modifications not expressly approved by the party responsible for compliance
could void the user’s authority to operate the equipment.
NOTE: This equipment has been tested and found to comply with the limits for a Class B digital device,
pursuant to Part 15 of the FCC Rules. These limits are designed to provide reasonable protection against
harmful interference in a residential installation. This equipment generates, uses and can radiate radio
frequency energy and, if not installed and used in accordance with the instructions, may cause harmful
interference to radio communications. However, there is no guarantee that interference will not occur in a
particular installation. If this equipment does cause harmful interference to radio or television reception,
which can be determined by turning the equipment off and on, the user is encouraged to try to correct the
interference by one or more of the following measures:
• Reorient or relocate the receiving antenna.
• Increase the separation between the equipment and receiver.
• Connect the equipment into an outlet on a circuit different
from that to which the receiver is connected.
• Consult the dealer or experienced radio/TV technician for help.
This device complies with Part 15 of the FCC Rules. Operation is subject to the following two conditions :
(1) This device may not cause harmful interference, and
(2) this device must accept any interference received, including interference that may cause undesired
operation.
Conforms to safety requirements of ASTM, CPSIA and FCC.
PROPEL RC™ and Urban Renegade TM are trademarks of Rooftop Brands.
15760 W Hardy Rd Suite 400 Houston Texas 77060 tel: 949.566.9573
© 2013 Rooftop Brands™. All Rights Reserved. www.propelrc.com .
Made in China
INSTRUCTION MANUAL
Thank you for choosing Propel RC TM Urban Renegade TM. With proper care, your new
Urban Renegade will provide you with many hours of enjoyment. Please read this
instruction manual completely before using the product for the first time, and then
keep this manual in a handy place for future reference.
14
Colors and styles may slightly vary.
Thank you for purchasing the URBAN RENEGADE™ High Speed Racer from Propel RC. Please read this
user manual carefully as it contains valuable information on how to properly use and care for your
racer.
2. Installing the batteries into the remote controller.
Open the battery cover on the bottom of the remote control (see diagram D). Insert 4 “AA” batteries (not included)
into the battery compartment, ensuring to match polarity. Replace the battery cover.
OPEN
AA
AA
AA
• R-2-R, COMPLETELY ASSEMBLED AND READY TO RUN
• 2.4 GHZ HOBBY GRADE RC TRUCK
• SPEEDS UP TO 40 MILES PER HOUR
• DIGITAL PROPORTIONAL STEERING
• 100 METER DRIVING RANGE
• GREAT BEGINNER HOBBY RC TRUCK
AA
FEATURES
BATTERY NOT INCLUDED (4XAA)
D
CAR DIAGRAM
CHARGING THE BATTERY
Shell Clip
1. Insert the battery charging plug (the 3-wire plug) into the charger's socket. The charging plug and the charger's
socket fit only one way. Dot not force them (see illustration A).
2. Plug the charger into a wall outlet. The charger's red charging indicator should flash to show that charging is in
progress.
3. Average charging time is approximately 4 hours. The high speed car operates for approximately
10 minutes on full charge.
4. The red charging indicator turns off when the battery is fully charged.
Shell
Note: the adaptor should be periodically examined for conditions that may result in the risk of fire, electric shock, or
injury to persons. In such an event, the adaptor should not be used until properly repaired.
Antenna
ON/OFF
CHARG
BATTERY
A
SET-UP
Battery Compartment
REMOTE DIAGRAM
1. Installing the battery into the car.
Pull off the battery cover lock on the bottom of the car (see diagram B). Connect the battery power plug (the
3-wire plug) into the car socket. The battery plug and the car’s socket fit only one way. Dot not force them
(see illustration C). Secure lock on battery cover.
Antenna
Control Knob
Left & Right Trim
Forward & Backward Trim
ON/OFF
C
For Multi Person Play:
4. Before starting, make sure that the power on all Cars and Controllers are in the OFF position.
Make sure that there are no other 2.4G devices in the area as well.
5. Each person will have to sync their car individually at a different time to avoid interference.
Follow steps 1 to 3 above making sure to keep away from other people while also making sure that
no one else is syncing at the same time.
6. After syncing a players car, it should be left ON until all players have synced their cars.
7. Should there be a mistake/interference, all players must turn off their controllers and cars
and start the process all over again.
REMOTE CONTROL SPECIFICATIONS AND FUNCTIONS
OPERATION
Throttle
B
Your URBAN RENEGADE™ High Speed Racer utilizes an automatic 2.4G channel selection system that
allows up to 8 people to race side by side in the same wireless range.
For One Person Play:
1. Before starting, make sure that the power on both your controller and car are in the OFF
position. Make sure that there are no other 2.4G devices in the area as well.
2. Turn ON the car and set it down on a flat surface. The red LED indicators inside the car
body should flash.
3. Turn ON your remote. The remote power indicator light will flash, then pull the throttle all the
way down and the remote will beep one time. The power indicator light should turn on. This
indicates that your car and remote have successfully synced. Should this not happen, repeat
all steps again.
1. Remote control functions:
- forward straight
- forward left
- forward right
- backward straight
- backward left
- backward right
- stop
2. Maximum speed: 40 MPH
3. Wireless transmission range: Up to 100 meter.
E
POWER
SYNCING YOUR HIGH SPEED RACER
Power Indicator
THIS IS A HIGH-SPEED OUTDOOR RC CAR. DO NOT PLAY INSIDE YOUR HOME OR OTHER SMALL ENCLOSED AREAS.
1. Turning your car on:
• Pick-up your car and turn over exposing the under carriage. Make sure the battery is properly installed and
the battery compartment door is properly closed and locked.
• Sync your car and remote properly and set the car on the ground.
2. Driving your car:
• If you are right handed, use your left hand to hold the remote control with one finger on the throttle.
Use your right hand to operate the control knob. If you are left handed, hold the remote in your right hand
and operate the knob with your left hand.
• Pull the remote’s throttle back halfway to drive forward at low speed. Pull the throttle completely back to
drive at high speed.
• Push the remote’s throttle forward to make car move in reverse.
• Turn the remote’s control knob to the left (i.e., counterclockwise) to turn the car left. Turn the knob to the
right (i.e., clockwise) to turn the car right.
• To break or quickly stop simply pull or push the remote’s throttle in the opposite direction.