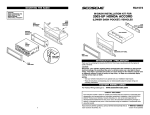
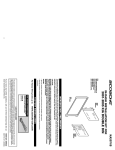
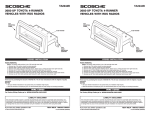
1
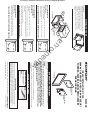
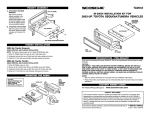
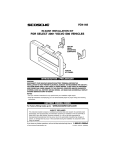
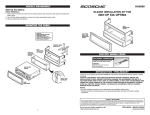
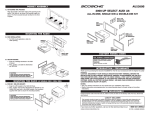
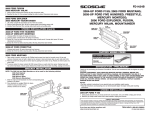
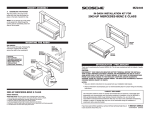
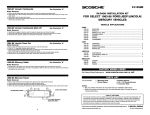
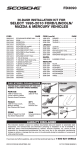
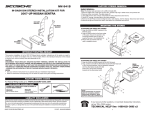
(044)361-05-06
ICQ:495-089-192
(067)469-02-12
ICQ:613-211-859
(099)048-99-03
(093)672-77-76
User's Manual
Facia Plate Scosche SI2223B for Chevrolet Aveo
In the online store Winauto you also can buy Facia Plate Scosche SI2223B Chevrolet Aveo. Delivery in Kyiv and
throughout Ukraine with payment upon receipt!
winauto.ua
Sale - Car Receivers - Facia Plates - Head Units - Car TVs and Monitors - Antennas - Car Audio - DVR - GPS Navigation - Trip Computers - Car
Alarm Systems - Mechanical Locking - Parking Systems - Car Cameras - Xenon and Lights - Established Optics - Tuning - Car Heating and Cooling Sound Marine and Electronics - Car Accessories - Isolation - Installation Components - Batteries, Power - Oils and Fluids -
a
to
.u
ASSEMBLING THE KIT
IN-DASH INSTALLATION KIT FOR
6191L MOUNTING
BRACKET
SI2223B
6191R MOUNTING
BRACKET
2004-06 CHEVROLET AVEO; 2004-06 SUZUKI
FORENZA; 2005-06 SUZUKI RENO; 2004-05
SUZUKI VERONA
6191 TRIM RING
INTRODUCTION / PRELIMINARY
CAUTION:
DISCONNECT YOUR VEHICLE'S NEGATIVE BATTERY TERMINAL BEFORE THE INSTALLATION TO HELP PREVENT ELECTRICAL DAMAGE. WE RECOMMEND THE USE OF A VOLT/
OHM METER OVER A TEST LIGHT TO CHECK WIRING. A TEST LIGHT OR GROUNDED WIRE
PROBE CAN CAUSE DAMAGE TO THE VEHICLE'S COMPUTER AND/OR DIAGNOSTIC
SYSTEMS. AVOID ALL FACTORY AIR BAG WIRING - AIR BAGS CAN ACCIDENTALLY DEPLOY
CAUSING SERIOUS INJURY OR DEATH.
Thank you for purchasing the Scosche SI2223B Kit. This kit was manufactured with the highest of
quality standards.
in
au
ISO DIN MOUNT
6191R MOUNTING
BRACKET
ISO DIN STEREO
1. Align right side ISO Mounting Bracket 6191R and left side
ISO Mounting Bracket 6191L with kit panel 6190. Place
mounting brackets with matching locating slots on kit
panel (two locations on each side of mounting hole).
2. Align ISO DIN aftermarket stereo with assembled kit
panel. Use hardware supplied with aftermarket stereo to
6191L/R.
6191L
MOUNTING
BRACKET
6190 KIT PANEL
RADIO REMOVAL
2004-06 CHEVROLET AVEO
1. Using a panel removal tool, remove both side trim pieces, one on each
side of the stereo and HVAC.
2. Extract (4) 10mm Philips head screws securing the stereo to the dash.
Disconnect and remove.
(USE SHADED AREAS ON BOTH MOUNTING BRACKETS)
2004-06 SUZUKI FORENZA
2005-06 SUZUKI RENO
RADIO REMOVAL
(USE SHADED AREAS ON BOTH MOUNTING BRACKETS)
1. Remove temperature control cable located on left side of glove box
under dash.
2. Remove AC vent controller cable under steering column on right side.
3. Using a panel removal tool, pry out dash panel surrounding stereo and
AC controls.
4. Disconnect plugs and gently pull away.
5. Remove (4) Philips head screws, unplug stereo and gently lift away.
2004-05 SUZUKI VERONA
RADIO REMOVAL
1. Using a panel removal tool, remove trim around the factory stereo.
2. Extract (4) Phillips Head Screws, unplug stereo and gently lift away.
(USE SHADED AREAS ON BOTH MOUNTING BRACKETS)
SI03B
1996-UP Harness
© 2007 SCOSCHE INDUSTRIES, INC.
SI03B
SI -02/07 - SI2223 (3000003)
If you have any further questions, call our toll free technical help line at: 1-800-621-3695x3
This instruction booklet is based on carefully documented data and research of automobile dash disassembly, wire
harness/codes and information pertaining to installation of this kit (si2223B) in 2004-06 Chevrolet and Suzuki
Vehicles. Scosche Industries, Inc. can not be held responsible for discrepancies/inconsistencies that may occur due
to the automobile manufacturing changes or options, or damage that may occur in the automobile during the
installation of components while using this booklet.
LIABILITY DISCLAIMER
PROVIDE EASY CONNECTION OF YOUR CAR
STEREO TO FACTORY WIRING HARNESS.
CAR STEREO CONNECTORS
FACTORY WIRING CODES
• Read all instructions accompanying your car stereo/cassette player for proper wiring and mounting
instructions.
NOTES:
• See your vehicle's instructions for any special tools your installation might require.
w
Интернет-магазин автозвука и автотоваров Винавто