1
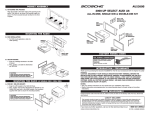
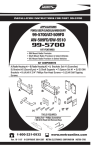
FJ1550B
1983-87 Lincoln Continental
See Illustration "A"
Radio Removal:
1. Remove two #8 Phillips head sheet metal screws from radio trim panel directly beneath radio.
2. Open ashtray door, remove ashtray and remove two outermost #8 Phillips head sheet metal screws from cavity. Leave
center screw.
3. Gently pull on radio trim panel and remove.
4. Remove four 7/32" hex head sheet metal screws from radio, pull radio out of cavity, disconnect two wire harnesses,
antenna wire, and remove radio.
IN-DASH INSTALLATION KIT
FOR SELECT 1983-96 FORD/JEEP/LINCOLN/
MERCURY VEHICLES
VEHICLE APPLICATIONS
1984-89 Lincoln Continental Mark VII
See Illustration "A"
Radio Removal:
1. Carefully pull on edges of aluminum radio trim panel to release clips, and remove trim panel.
2. Remove four 5MM hex head sheet metal screws which secure radio to dash, and slide radio out of dash.
3. Disconnect power, antenna, speaker, and all electrical connections, and remove radio.
FORD
1985-91
1983-88
1987-91
1987-91
1983-88
1986-89
1983-88
AEROSTAR .....................................................................................................................
BRONCO II .....................................................................................................................
BRONCO FULL SIZE .....................................................................................................
F-SERIES PICKUP ..........................................................................................................
RANGER ..........................................................................................................................
TAURUS ...........................................................................................................................
THUNDERBIRD ................................................................................................................
2
2
2
2
2
3
3
CHEROKEE ....................................................................................................................
COMANCHE ...................................................................................................................
GRAND WAGONEER .....................................................................................................
WRANGLER ...................................................................................................................
3
3
3
4
JEEP
1984-89 Lincoln Town Car
See Illustration "A"
Radio Removal:
1. Remove three #8 Phillips head sheet metal screws from radio trim below dash.
2. Snap out 11/2" wide plastic trimpiece above radio trim.
3. Remove three phillips head sheet metal screws from behind trim. Pull instrument cluster trim away from dash and pull
radio trim panel out from beneath instrument cluster trim panel.
4. Remove three 7/32" hex head sheet metal screws which secure the radio and radio brackets to dash.
5. Disconnect two wiring harnesses, antenna lead, and harness retaining clip. Remove radio.
1984-96
1985-92
1988-92
1984-96
LINCOLN
1983-87
1984-89
1984-89
CONTINENTAL ............................................................................................................... 4
CONTINENTAL MARK VII .............................................................................................. 4
TOWN CAR ..................................................................................................................... 4
MERCURY
1986-89 Mercury Sable
See Illustration "B"
Radio Removal:
1983-88
1986-89
1988-90
1. Carefully pull on the edges of the radio trim panel to release the plastic clips, and remove the trim panel.
2. Remove four screws which secure the radio to the dashboard, slide the radio out of the dash, disconnect the harnesses
and antenna, then remove radio.
COUGAR .......................................................................................................................... 3
SABLE ............................................................................................................................. 4
TRACER ........................................................................................................................... 4
FACTORY WIRING CODES
For Factory Wiring Codes go to:
PARTS LIST
1988-90 Mercury Tracer
Radio Removal:
1.
2.
3.
4.
www.scosche-cars.com or call
Your kit includes:
Remove three screws from the underside of the upper lip of the radio/console trim panel.
Remove ashtray and remove two screws from inside the ashtray cavity.
Gently unsnap the trim panel, disconnect the wiring and remove the panel.
Remove four screws securing the radio pull the radio out of the cavity and disconnect the wiring, and remove the radio.
ATTACH THIN SPACER
USE BRACKETS SHOWN
CUT LOWER BRACKETS
ALONG CUT LINES
• 1 Mounting Panel
• 1 Shroud Spacer
• 2 Bracket Spacers
• 4 #8 x 1/2" Mounting Screws
• 1 Instruction Book
NOTES:
• See your vehicle's instructions for any special tools your installation might require.
• Read all instructions accompanying your car stereo/cassette player for proper wiring and
mounting instructions.
LIABILITY DISCLAIMER
This instruction booklet is based on carefully documented data and research of automobile dash disassembly, wire
harness/codes and information pertaining to installation of this kit (#FJ1550B) in 1983-96 in Select Ford/Mercury,
Jeep and Lincoln Vehicles. Scosche Industries, Inc. can not be held responsible for discrepancies/inconsistencies
that may occur due to the automobile manufacturing changes or options, or damage that may occur in the
automobile during the installation of components while using this booklet.
If you have any further questions, call our toll free technical help line at: 1-800-621-3695x3
4
© 2006 SCOSCHE INDUSTRIES, INC.
SI 1/06-FJ1550B (3000412)
1986-89 Ford Taurus
See Illustration "A"
See Illustration "B"
Radio Removal:
"A"
RIGHT
"A"
LEFT
A SPACER
ATTACH "A" SPACERS BEHIND SHADED BRACKETS
1.
2.
3.
4.
Remove two screws from the bottom of the radio trim panel.
Carefully pry on the edges of the trim panel to release the plastic clips and pull the panel away from the dash.
Disconnect the power wire for the antenna switch and remove the radio trim panel.
Remove four screws from the radio mounting brackets, slide the radio out from the dash, disconnect all electrical, and
remove the radio.
A SPACER
USE THE SHADED MOUNTING TABS AND THE INDICATED BRACKETS. CUT OFF THE REMAINING TABS AND DISCARD.
1983-88 Ford Thunderbird
1983-88 Mercury Cougar
See Illustration "A"
Radio Removal:
USE THIS BRACKET
1. Remove two Phillips head sheet metal screws from tray area just forward of radio trim. Remove tray.
2. Remove two Phillips head sheet metal screws from top of radio trim and two Phillips head sheet metal screws from
bottom of radio trim panel.
3. Carefully pull radio trimpanel off.
4. Remove four Phillips head sheet metal screws from radio mounting panel and gently pull radio out of cavity.
5. Disconnect two wiring harnesses at back of radio and disconnect antenna lead. Remove radio.
See Illustration "B"
USE THIS BRACKET
USE THE SHADED MOUNTING TABS AND THE INDICATED BRACKETS. CUT OFF THE REMAINING TABS AND DISCARD.
1985-91 Ford Aerostar
See Illustration "A"
Radio Removal:
1. Remove two #8 Phillips head sheet metal screws from the bottom edge of the radio trim panel.
2. Pull down two snaps above air-conditioning outlet vents and remove radio trim panel.
3. Remove four #8 Phillips head sheet metal screws from radio mounting bracket. Disconnect wiring, and remove radio.
1983-88 Ford Bronco II
1983-88 Ford Ranger
1984-96 Jeep Cherokee
1985-92 Jeep Comanche
1988-92 Jeep Grand Wagoneer
Radio Removal:
1. Remove two screws from the instrument panel, one from above the cigarette lighter, and one from above the
headlight switch. Unsnap and remove the lower steering column trim piece and remove the trim panel.
2. If equipped with a factory radio, remove the two screws securing the radio brackets to the dashboard.
3. Pull the radio out of the cavity, disconnect
all electrical connections, then remove the
radio.
USE BRACKETS
SHOWN
USE BRACKETS SHOWN
See Illustration "A"
Radio Removal:
1.
2.
3.
4.
5.
6.
Remove knobs from radio.
Remove four screws from top leading edge of instrument cluster trim panel. Carefully pry top edge loose.
Carefully pry out trim strip below dash pocket, right and left of ashtray strip.
Depress spring clips behind light switch knob and remove knob. Carefully pry out trim strip from this location.
Remove remaining four screws from bottom edge of instrument cluster trim panel, and remove.
Remove four screws securing radio assembly to dash. Pull radio outward, disconnect power, antenna, speaker
USE THE SHADED MOUNTING TABS AND THE INDICATED BRACKETS. CUT OFF THE REMAINING TABS AND DISCARD.
1984-96 Jeep Wrangler
USE THESE BRACKETS
Radio Removal:
1987-91 Ford Bronco Full Size
1987-91 Ford F-Series Pickup
See Illustration "A"
Radio Removal:
1. Firmly pull on the edges of the radio trim panel to release the trim panel clips and remove the panel.
2. Remove four screws from the radio mounting bracket. Slide the radio out of the dash, disconnect the wiring harnesses,
and remove the radio.
3. Secure the radio/kit assembly to the dash using the four screws removed earlier.
4. Reassemble dash by reversing steps in the radio removal.
1.
2.
3.
4.
Remove three screws from the lower edge of the dash trim.
Extract three screws from the upper edge of the dash trim.
Remove the dash trim.
If the vehicle is not equipped with a factory radio, remove two
screws securing the pocket and remove the pocket. If the vehicle
is equipped with a factory radio, remove two screws from the
radio mounting bracket.
5. Pull the radio out of the cavity, disconnect all electrical connections,
then remove the radio.
USE THE SHADED MOUNTING TABS AND THE INDICATED BRACKETS. CUT OFF THE REMAINING TABS AND DISCARD.
2
3