1
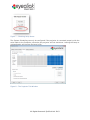
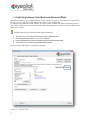
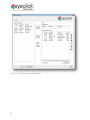
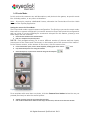
USER MANUAL EYECLICK SUPPORT EyeClick Support can be reached at: Email: [email protected] Phone North America: +(1) 888-864-1730 http://www.eyeclick.com E Table of Content Contents Title....................................................................................................................................... 2 Table of Content .............................................................................................................................3 Introduction .......................................................................................................................... 4 Overview ............................................................................................................................... 4 Initial setup (Advanced mode) ............................................................................................... 4 1.1. 1.2. Configuring the Projector Tab....................................................................................................................4 Switching between User Mode and Advanced Mode ...............................................................................6 Ongoing Operations (User Mode) .......................................................................................... 7 1.3. 1.4. Configuring the Games and Playlists .........................................................................................................7 Events Mode ..............................................................................................................................................9 Troubleshooting .................................................................................................................. 11 All Rights Reserved. EyeClick Ltd. 2013 INTRODUCTION This document outlines the necessary steps to operate the EyePlay System. Including the different software configuration for a first time use and the configuration for the ongoing operations. The last paragraph includes a troubleshooting for common issues. OVERVIEW We can start setting our games playlist only after we have finished the installation and powered up all devices. There are two types of modes EyePlay can run in: User Mode and Advanced Mode. The User Mode – will be the default setting when the computer is powered up for the first time. You will only see two tabs open: the Applications tab and the Events tab. This is the mode the customer needs for the ongoing management of the games. You should switch back to User Mode, after you finish configuring the system in Advanced Mode for the customer. The Advanced Mode – has all the tabs needed for the configuration of the system in addition to the games: the projector, the camera, and different reporting and monitoring tools. This document presents only the Projector settings which is relevant for your use. The Advanced Mode will be locked for unauthorized users and therefore, for these users, the corresponding specification description is obsolete. INITIAL SETUP (ADVANCED MODE) 1.1. Configuring the Projector Tab The Projector tab is visible only in "Advanced mode". It allows you to control the powering down and powering up of the projector. This is crucial for maintaining the health and lifespan of the projector’s lamp. 1. 2. 3. 4. Check the Enable System Scheduling box. In the Daily Schedule section, set the day/hour in the timeline. Click a square and drag your mouse, holding down the left button, to extend the time along the grid. To delete a square, right click on it. To copy the same time from one day to another, hold down the ctrl key and drag the mouse downwards. The projector comes connected to the computer with a Serial cable. In the Project Control section (bottom left section) you see the type of connection to the projector. The projector name and Serial Port number will be displayed. 1. 2. 3. At the bottom left, choose Serial. Check to see the projector name, (for example BenQ) and COM1 is displayed. At the bottom right, under Test Projector Control, you can test turning on and off the projector manually. Under the Test Projector Control, click the Status button to check the Lamp Timer, for the amount of hours the lamp has operated. An alternate option to see this information is using the projector’s remote control. 4 E Figure 7 - Checking Lamp Hours The System Scheduling can only be configured if the projector is connected properly with the serial cable to the Computer, otherwise the projector will not shut down. Leaving the lamp on unintentionally will shorten the lamp’s life. Figure 8 - The Projector Tab Window All Rights Reserved. EyeClick Ltd. 2013 1.2. Switching between User Mode and Advanced Mode Password protection is an added feature which needs a license. If it’s part of the customer’s license, you will see the Create Password button, in the System tab. To protect the Advanced Mode setting, you can create a password, before switching back to User Mode. Make sure you keep and remember the password, in order to enter the Advanced Mode in the future. The password must include at least eight characters. 1. 2. 3. 4. Click the Advanced Mode button at the bottom of the Applications tab. Go to the System tab, click the Create Password button. Enter and Confirm the password, click OK to close the little password window. Click on the User Mode button to go back to the User Mode. Now the Advanced Mode is password protected. Figure 11 - System Tab 6 E ONGOING OPERATIONS (USER MODE) 1.3. Configuring the Games and Playlists In the Applications tab, choose the games from the list of Installed Applications on left side. The right side displays the two types of Playlist options: Single Application and Multiple Applications. For Single Application: 1. From the Installed Applications list, highlight one game, click the Set >> button. The game you chose will be available for playing. For Multiple Applications: 2. From the Installed Applications list, highlight a few games (hold down the ctrl button, same as in Windows) to choose a few games at the same time. Click the Add>> button to move them to the Playlist. a. Note – you can drag & drop instead of using the Add button 3. Set duration for controlling the play time of each game. The number represents seconds and comes with default of 60 seconds per game. 4. To change the order the games will appear, in the Playlist, click the . 5. Click the icon to delete the game from the Playlist. You can choose another game from the Installed Applications list. 6. Click the 7. 8. Click the icon, enter a name and save the Playlist. A new window opens, type the name of the Playlist and click Save. 9. To choose another saved Playlist, click the double click it. icon to delete all games from the Playlist. This does not remove the games from the system. icon. From the dialog window, pick a Playlist file and In case you want to return to the original suggested playlist 1. Choose the saved Playlist, click the click it. icon. From the dialog window, pick the Playlist file and double All Rights Reserved. EyeClick Ltd. 2013 Figure 10 - The Applications Tab Window 8 E 1.4. Events Mode In this service the customer can add decorations, and photos to the games, at special events like: birthday parties, or any other celebrations. Note – this service requires a dedicated license; otherwise the Events tab will not be visible as part of the EyePlay application. Setting the camera for Event Mode: The Event Mode needs a special camera configuration. The first time you use the event mode, there will be no camera configured. You need to access the Event Tab to test this configuration and run a test. If you are installing for a customer who paid for this feature, please go over these steps with the customer. 1. Check the box: Enable Events Customization. 2. Click on a template from the left panel. N O T E : Each template allows you to use a different number of pictures and text inputs; hence some of the Picture and Text boxes, on the bottom part of the screen will be inactive. In the Pictures section, at the bottom of the screen, click the camera icon. 3. In the window that opens, shoot a demo snapshot, clicking again on the camera icon. 4. Crop the desired picture area using the red dots. 5. Check the Flip box, if you want to rotate the image in the template. Figure 12 - Live Camera View For a template with more than one photo, click the Camera Icon button below the one you pressed previously to take the second picture. 6. 7. Add the greetings using the Text Editor (bottom right). Click on the Font button to define the font style, size and color, click OK to exit the Font window. All Rights Reserved. EyeClick Ltd. 2013 Figure 13 - Font Editing for Events Figure 14 - Events Tab with Customized Text and Photo 10 E TROUBLESHOOTING Issue There are no games projected Solution Look up and check if the projector has a beaming light coming out, if not do the following: Using the projector’s remote: point it towards the mirror on the EyePlay System and press the power button Comments To check lamp usage status, refer to: Error! Reference ource not found., under “Maintaining the Equipment”, in this document Wait around 30 seconds until you see a beam of light coming out of the projector If the projector still does not work, check the following: Check if lamp has not reached its maximum usage limits Check projector's power connection Check EyePlay power connection Check VGA cable connection from the computer to the projector Games are projected, but there is no sound The interaction is not accurate, for example: There is no interaction on the upper/lower side of the projected surface The interaction is not aligned with where the kids are playing Use the keyboard to adjust volume levels. Check the Mute key You need to let the system re-calibrate. Make sure no one is under the projection area during this process 1. Press Ctrl+Q to exit the games, 2. Click the Launch button In the Camera Configuration Wizard, the camera zone is defined by four yellow circles, forming a perimeter. All four circles need to be shown on the image in order for calibration to be complete The System turns itself off In the Projector Tab, check the system scheduler, and make sure it is set to be turned on the moment you are after it is launched. attempting to launch the system All Rights Reserved. EyeClick Ltd. 2013 If after the system recalibrates there is still no change in the projected area , please contact EyeClick Support When does the projector’s lamp need replacement? There is a “No Signal” sign projected The replacement recommendation for BenQ MX618ST projector lamp is every 3500 hours “No Signal” means the projector is not receiving input from the computer. Power-off the computer by pressing the power button. Wait 5 seconds and press the power button again to restart the computer Check that the VGA cable connecting the computer to the projector is connected in the back The projector’s remote control is not working How do I check the projector’s lamp status? Replace the batteries Exit the games. In EyeClick Admin, go to the Projector tab, and click on the “Status” button (bottom right side of the window) Using the projector’s remote control 1. Press MENU/EXIT and then press / to highlight the SYSTEM SETUP: Advanced menu 2. Press to highlight Lamp Settings and press MODE/ENTER. The Lamp Settings page displays The system is turning ON/OFF on incorrect hours When I open the system there are no applications to launch 12 In the Projector tab , check the current schedule, and modify the hours to your preference Check on the computer if the Windows clock is in the correct time zone In the Applications Tab, click the Load Playlist icon ( choose a play list, from the available options ), and A playlist must first be generated in order to proceed. Please refer to "Configuring the Games and Playlists" E The keyboard is not working , nothing responds when I press the keys Make sure the keyboard is powered on. Look for the off/on switch located on the top section Replace the batteries All Rights Reserved. EyeClick Ltd. 2013 If keyboard is not responsive after taking both actions, please contact EyeClick Support