1
Training Guide
Managing Your Staff in
Employee Manager
Managing Your Staff in
Employee Manager
© Copyright 2014
TABLE
OF
CONTENTS
Unit 1: Creating Default Shifts or Positions
4
Adding a Position
4
Establishing Shift Rules
6
Creating Quickpicks
8
Creating Shifts and Staffing Quickpick Lists
9
Unit 2: Creating a Default List of Employees
11
Adding Employees
11
Filling Out the Address Tab
12
Adding Additional Employee Information
12
Assigning a Position
13
Adding Employee Related Files
14
Making an Employee Inactive
15
Setting an Employee Work Schedule
16
Setting a Work Schedule That Varies
17
Setting Employee Vacation Days
18
Clearing Selected Vacation Dates
19
Clearing All Vacation Dates
20
Adding Vacation Notes
20
Showing an Employee's Scheduled Events
21
Viewing Employees by Position
22
Viewing Employees by Weekday Availability
23
Unit 3: Staffing Events in Event Manager
25
Adding Shifts to an Event
25
Selecting an Employee to Work an Event
26
Selecting Unavailable Employees
27
Adding Additional Employee Compensation
28
Unit 4: Managing Multiple Shifts
29
Displaying a Day/Date Range of Shifts
29
Batch E-mailing a Confirmation Request
30
Confirming Staff for an Event
31
Unit 5: Tracking Employee Information
33
Viewing Staffing in a Calendar
33
Creating Groups of Staffing Calendars
33
Printing an Employee Staffing Schedule
34
Printing a Scheduled Shifts Report
36
Running a Staffing Activity Query
37
Creating Default Shifts or
Positions
Unit 1: Creating Default Shifts or Positions
Employee Manager is where you go to establish all the positions or shifts your employees might be
scheduled to work. After adding the position ("Waitstaff," "Bartender," etc.), you can then designate
other relative details: an optional price to charge the customer; an estimated cost to you; default event
times; and even event rules to determine how many employees each position will require.
Objectives:
Upon completing this unit, you will be able to:
l
l
l
l
l
Add a position to Employee Manager.
Assign a “price” to the position.
Assign additional default position requirements.
Assign multiple shift rules to a position.
Create Employee Manager quickpick lists.
Adding a Position
You can create and store as many event staff positions as you’d like, such as wait
staff, bartenders, busers, hosts/hostesses, delivery drivers, setup staff, etc., and then
assign each position its own set price, uniform, or even an employment agency.
1. Click the Main button from the Caterease sidebar area.
2. Click the Employee Manager button located on the left-hand side of the
screen.
3. Click the Tools button, located at the top of the Employee Manager window,
towards the middle.
4. Select Shifts Setup.
Result: The Shift Wizard Setup window opens.
5. Click the Add Position button
, located at the top left-hand side of the
window.
Result: A new line is added to the bottom of the Position grid.
6. Type the name of the new position into the Position field, located in the General pane on the right-hand side of the screen.
7. Press [Enter] or [Tab] to move to the next field.
8. [Optional] In the Uniform field, type the name of the uniform or click the
down arrow and select an option from the drop-down quickpick list.
-4-
Unit 1: Creating Default Shifts or Positions
Note: Employee Manager quickpick lists are set up in Setup > Quickpicks >
Employee Manager.
9. [Optional] In the Agency field, type the agency name or click the down
arrow and select an option from the drop-down quickpick list.
10. [Optional] Click into the Est Cost field and type the estimated cost (per
hour) for the position.
Note: You can also enter an estimated shift price by clicking the down arrow
and accessing the drop-down calculator.
11. Click into the Price field and type a default price (per hour) for the shift.
Note: You can also enter a shift price by clicking the down arrow and accessing the drop-down calculator.
12. [Optional] Click the Flat Rate checkbox to designate the shift price as a flat
rate.
13. [Optional] Set the Default Shift Times by selecting the desired options from
the drop-down quickpick list.
Note: The Default Shift Times are set to Start and End times associated with
the sub-event.
14. [Optional] Click into the Notes text block and type position notes as desired.
15. [Optional] Establish any desired shift rules. (See the topic below.)
16. Click the Save button
, located at the top left-hand side of the window.
Result: The Shift is saved.
17. Click Close to close the window.
-5-
Unit 1: Creating Default Shifts or Positions
Establishing Shift Rules
Once you’ve created your shift position, you can apply various rules to the shift.
Maybe you want to establish a rule that, whenever you book a wedding, you want to
assign one wait-staff for every ten guests. Choose to add a new shift based on a set
number of guests, then apply your shift rule to a certain theme or event category.
Once you add an event, Caterease will apply your shift rules based on the guest
count, and will give you the total required amount of staff needed for the event.
Establishing Shift Rules
1. Click the Main button from the Caterease sidebar area.
2. Click the Employee Manager button.
3. Click the Tools button, located at the top left-hand side of the Employee Manager screen.
4. Select Shifts Setup.
Result: The Shift Wizard Setup window opens.
5. Click a position in the Position grid in the left-hand pane, or add a position,
as described above.
-6-
Unit 1: Creating Default Shifts or Positions
6. Click the Add Rule button
, located at the bottom right-hand side of the
Shift Wizard Setup window, in the Wizard Rules area.
Result: The Shift Wizard Rule window opens.
7. Click the down arrow in the first field beneath Create a new Wizard Rule
that applies to…
l
all new events (Select this to apply the shift rule to all events)
l
events with a theme of
l
events with a category of
8. If selecting the Theme or Category option, click the down arrow in the
second field and make a selection from the quickpick list.
Note: The second field is not active for “All new events.”
9. In the Rule For…section, type the number of guests to add for every shift, or
use the up-and-down arrows to adjust the number of guests.
10. [Optional] Click into the checkbox under Options to round the shift count up,
if needed.
11. [Optional] Click into the Comments text block and type any desired shift
rule comments.
12. Click OK to close the Shift Wizard Rules window.
13. Click the Save button
, located at the top of the Shift Wizard Setup window.
Result: The Shift and Shift Rules are saved.
14. Click Close at the bottom of the Shift Wizard Setup window.
-7-
Unit 1: Creating Default Shifts or Positions
Creating Employee Manager Quickpick Lists
Throughout your Caterease program, there are several drop-down lists (or quickpick
lists) to assist you in data entry. These lists, which are under your control and which
can be edited at any time, exist to save you the tedium of double entry and to keep
your data consistent.
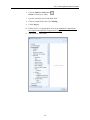
Creating Quickpicks
1. From the Setup sidebar, click the Quickpicks button.
Result: The Setup Quickpick Lists window opens.
2. Click the expand button to the left of Employee Manager.
3. Click Department.
4. Click the Add New Item button
the window.
Result: A blank field is added.
-8-
, located on the upper right-hand side of
Unit 1: Creating Default Shifts or Positions
5. Type the quickpick item into the blank field.
6. Follow steps 4 and 5 for Rank, Uniform; Status; Agency; and Account.
7. When finished adding quickpicks, click Close.
Creating Shifts and Staffing Quickpick Lists
1. From the Setup sidebar, select Quickpicks.
Result: The Setup Quickpick Lists window opens.
2. Click the expand button to the left of Event Manager to expand the selection.
3. Click the expand button to the left of Sub-Event.
4. Click the expand button to the left of Shifts.
5. Click Category.
-9-
Unit 1: Creating Default Shifts or Positions
6. Click the Add New Item button
Result: A blank line is added.
.
7. Type the quickpick item into the blank field.
8. Click the expand field to the left of Staffing.
9. Click Category.
10. Follow steps 6-7 to add quickpick items to the Additional Compensation
Description and Additional Compensation Category fields.
11. When finished, click Close.
- 10 -
Creating a Default List of
Employees
Unit 2: Creating a Default List of Employees
Once you have added shifts or positions for your employees to work, you can add your specific list of
employee names. In addition to standard contact information, you can also include such details as which
positions each employee works, his or her wage, and even optional external computer files (PDFs,
images, spreadsheets, documents) that relate to the employee.
Objectives:
Upon completing this unit, you will be able to:
l
l
l
l
l
l
l
l
l
l
Add employees to Employee Manager.
Store general and personal employee information.
Assign a position or positions to an employee.
Assign an hourly employee wage and overtime wage.
Add employee-related files to an employee record.
Designate an employee as inactive.
Set an employee work schedule.
Establish employee vacation days.
Show an employee's scheduled events.
View employees by position or by weekday availability.
Adding Employees
1. Click the Main button from the sidebar area on the left-hand side of your
Caterease screen.
2. Click the Employee Manager button.
3. Click the Add Record button
, located at the top of your Caterease
screen.
Result: A confirmation window opens.
4. Click Yes to confirm your choice.
Result: A new employee field is added to the top of the list, with the cursor in
the Last field.
Note: The Employee #, located above the Last field, is auto-assigned by
Caterease.
5. Type the employee’s last name into the Last field.
6. Press[Enter] or [Tab] to move to the next field.
7. Fill out the remaining General tab fields by typing directly into the field or
by selecting the quickpick items from the corresponding drop-down lists.
Note: Press [Tab] or [Enter] to move from field to field.
- 11 -
Unit 2: Creating a Default List of Employees
8. [Optional] Add any extra fields to your screen, remembering to click the
Save Current Window Settings button
to save your new view.
Filling Out the Address Tab
1. Click the Address tab, located to the right of the General tab, on the main
Employee Manager screen.
2. Under Home Address, click into the Address field and type the employee’s
home address.
3. Press [Enter] or [Tab] to move to the next field.
4. Continue to complete the home address information by typing into each field
and pressing [Enter] or [Tab] to move to the next field.
5. Under Mailing Address, click into the Address field and type the
employee’s mailing address.
6. Continue to complete the mailing address information by typing into each
field and pressing [Enter] or [Tab] to move to the next field.
Adding Additional Employee Information
1. [Optional] Click the Notes tab, located at the top right-hand side of the
screen.
2. Click into the white text block and type any notes associated with the
employee.
Note: You may also access the Scratch Pad to insert pre-typed notes by clicking the Scratch Pad button
the Insert Text button.
, selecting (highlighting) the text, and clicking
3. [Optional] Click the Skills tab, located to the right of the Notes tab, at the
top of the screen.
4. Click into the white text block and type employee skills information, or use
the Scratch Pad to insert pre-formatted text.
Note: You may format your text in both the Notes and Skills tabs by rightclicking into the text block and selecting Font or by using the Format toolbar
at the top left-hand side of the screen.
5. [Optional] Click the Emergency tab, located at the top of the screen, click
into the white text block, and enter employee emergency contact information
or medical-related information.
- 12 -
Unit 2: Creating a Default List of Employees
6. [Optional] To add a picture of the employee, click into the Picture tab, located at the bottom of the screen, right-mouse click into the empty text block,
select Load From File from the pop-up, then browse to a stored employee
picture.
7. [Optional] To attach the employee’s employment application, click into the
Application tab, located at the bottom of the screen, right-mouse click into
the text block, select Load From File from the pop-up, then browse to a
stored application.
Assigning a Position to an Employee
Once you’ve entered your basic employee information into Employee Manager, you
must assign that employee a position if you want to be able to select the employee
for an event. You can assign an employee multiple positions and then select the
employee for the event according to the desired position you are filling.
Assigning a Position
1. From the Employee Manager main screen, click the Positions tab, located at
the bottom of the screen.
2. Click the Select Positions for Employee button
hand side of the screen, towards the middle.
Result: The Select Position window opens.
, located on the right-
3. Double-click on a position to select it.
Result: The position is selected and appears in the Positions tab grid.
4. Click the X at the top of the Select Position window.
5. [Optional] Click into the Uniform field and select the required uniform from
the drop-down list.
Note: Uniform information will default if already assigned in the Shift Setup
area.
6. Press [Tab] or [Enter] to move to the next field.
7. Click into the Reg Wage field and type the employee regular hourly wage.
Note: You may also click the down arrow to the right of the field to access
the drop-down calculator.
8. [Optional] Click into the Overtime field and type the employee overtime
wage.
Note: You may also click the down arrow to access the drop-down calculator.
9. If the wage is a flat rate, click into the Flat field to place a check mark.
- 13 -
Unit 2: Creating a Default List of Employees
Adding Employee Related Files
If you have any computer files (Word documents, Excel spreadsheets, PDF files,
etc.), that are somehow related to an employee, you can associate those files to the
employee in Employee Manager. You can choose to embed a copy of each file into
the Caterease database or, if you plan to make future changes to the file, you can
establish a link to the file itself.
Adding Employee Related Files
1. Select an employee from the grid in Employee Manager by clicking on the
employee name.
2. Click the Employee Related Files button
, located at the top right-hand
side of the Employee Manager window.
Result: The Employee Related Files window opens.
3. Click the Add File button
, located on the right-hand side of the
Employee Related Files window.
Result: A confirmation message appears.
4. Choose to “Embed the existing file into the database” or “Establish a link to
the existing file” by clicking the corresponding radio button.
Note: Embedding the file into the database copies the file in its current form
- 14 -
Unit 2: Creating a Default List of Employees
and attaches it as a permanent record; establishing a link to a file will connect this file to a file on your computer or network that you may change over
time. (When establishing a link to a file that is not saved on your computer,
you will only be able to review that file when your computer has access to
it.)
5. Click Yes.
Result: A Browse window opens.
6. Browse your way to the file you want to associate with this employee, and
select it.
7. Click Open.
Result: The selected file is associated with this employee.
8. [Optional] Enter a Comment to describe the file or its relationship to the
event.
9. When finished, click the X at the upper right-hand side of the window.
Making an Employee Inactive
You have event staff that are seasonal or are in school and work only during the
times they are out of school. Instead of keeping these employees in your available
event staffing list all the time, you can make certain staff members inactive, and
they will be removed from your event staffing selection list. When the inactive
employees return to work, you can then reactivate them.
Making an Employee Inactive
1. Click the Main sidebar item from your main Caterease screen.
2. Click the Employee Manager button.
3. Click the Display Full Grid button
, located at the top right-hand side of
the screen.
Result: The Employee Manager is displayed as a full grid.
4. Click the Quick Column Customizing button , located on the upper lefthand side of the screen, to the left of the Last field.
Result: A drop-down list displays.
5. Click into the Inactive checkbox.
Result: A check appears in the checkbox and the Inactive column displays in
the grid.
- 15 -
Unit 2: Creating a Default List of Employees
6. Select an employee and click into the corresponding Inactive checkbox.
Result: A check appears in the checkbox, indicating the employee is now
inactive and will not be displayed for any future events.
7. Click the Save Current Window Settings button
if you would like the
new layout (reflecting the Inactive column) to serve as your default.
Setting a Defined Employee Work Schedule
With Employee Manager, you are able to designate the days and times an employee
is unavailable for work. You can mark an employee as unavailable all day or
unavailable within a time range on a given day of the week. Once these days or
time ranges are established, you will be able to view which employees are available or unavailable for an event.
Setting an Employee Work Schedule
1. From the Tools button at the top of your Employee Manager screen, select
Work Times.
Result: The Enter Weekdays And Times Employee CANNOT Work window
opens.
2. Click into a Weekdays checkbox.
- 16 -
Unit 2: Creating a Default List of Employees
3. Click either the All Day or Within Times radio button.
Note: Selecting Within Times will enable access to the Time Ranges From
and To fields.
4. If Within Times is selected, type a From and a To time.
Note: You are able to set two daily time ranges per day.
5. Continue establishing days/times the employee is unable to work, as
described above.
6. When finished, click OK to close the window.
Setting an Employee Work Schedule That Varies from Week to Week
What if you have employees who are students or staff members who work other
jobs and their availability varies on a week-by-week basis? Via the Vacations section of Employee Manager, you can mark the individual dates and times an
employee cannot work.
Setting a Work Schedule That Varies
1. Click on the name of the employee whose weekly availability you would like
to set.
2. From the Tools button at the top of your Employee Manager screen, select
Vacations.
Result: The Employee Vacation Days window opens.
3. Click and hold the left mouse button on the desired start date.
4. Hold down your left mouse button, drag to the end date, and release the
mouse button.
- 17 -
Unit 2: Creating a Default List of Employees
5. Click the Set Selected Dates button
, located on the upper left-hand side
of the window.
Result: The Save Vacation Days window opens.
6. Click the Off All Day radio button or the Between Times radio button.
Note: If Between Times is selected, the From and To time fields are activated.
7. [Optional] Click in the Vacation Day Notes text block and type any relevant
notes.
8. When finished, click OK.
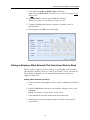
Establishing Employee Vacation Days
The Vacations section allows you to create and store vacation days for your employees. When vacation days are set, the employee will be marked as unavailable to
work events during the assigned vacation dates. Once an employee’s vacation dates
have passed, you can clear all the vacation days, with one click of the mouse button.
Setting Employee Vacation Days
1. From the Employee Manager screen, click on the name of the employee
- 18 -
Unit 2: Creating a Default List of Employees
whose vacation dates you would like to set.
2. Click the Tools button at the top of your Employee Manager screen and
select Vacations.
Result: The Employee Vacation Days window opens.
3. Click and hold the left mouse button down on the vacation start date.
4. Drag the mouse to the end date and release the mouse button.
5. Click the Set Selected Dates button
from the top of the screen.
Result: The Save Vacation Days window opens.
6. Click either the Off All Day radio button or the Between Times radio button.
Note: If Between Times is selected, the From and To time fields are
enabled.
7. [Optional] Click in the Vacation Day Notes text block and type any relevant
notes.
8. When finished, click OK.
Clearing Selected Vacation Dates
1. From the Employee Manager screen, click on the name of the employee
whose vacation dates you would like to clear (remove).
- 19 -
Unit 2: Creating a Default List of Employees
2. Click the Tools button at the top of your Employee Manager screen and
select Vacations.
Result: The Employee Vacation Days window opens.
3. Click and hold the left mouse button on the vacation start date you would like
to clear.
4. Drag the mouse to the vacation end date you would like to clear.
5. Click the Clear Selected Dates button
.
Note: To remove only one vacation day, click on the desired day you would
like to clear and click the Clear Selected Dates button
.
6. Click the X at the top right-hand side of the screen to close the window.
Clearing All Vacation Dates
1. From the Employee Manager screen, click on the name of the employee
whose vacation dates you would like to clear (remove).
2. Click the Tools button at the top of your Employee Manager screen and
select Vacations.
Result: The Employee Vacation Days window opens.
3. Click the Clear All Calendar Vacation Days button
vacation days for a particular employee.
Result: A confirmation prompt appears.
to remove all
4. Click Yes to confirm your choice.
5. Click the X at the top right-hand side of the screen to close the window.
Adding Vacation Notes
1. From the Employee Manager screen, click on the name of the employee you
would like to add a vacation note for.
2. Click the Tools button at the top of your Employee Manager screen and
select Vacations.
Result: The Employee Vacation Days window opens.
3. Click the Notes button.
4. Type into the text block as desired.
5. [Optional] Right-click into the field, highlight the text, and select Font if you
would like to format the text.
6. Click the X at the top right-hand side of the screen to close the window.
- 20 -
Unit 2: Creating a Default List of Employees
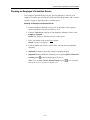
Showing an Employee's Scheduled Events
You can print a grid that displays all past, present, and future events for each
employee. From this grid you can sort, group, and filter the grid data, add or remove
columns, or print or export the grid as a custom report.
Showing an Employee's Scheduled Events
1. From the Employee Manager screen, click on the name of the employee
whose scheduled events you would like to view.
2. From the Tools button at the top of your Employee Manager screen, select
Employee Schedule.
Result: The Employee Scheduled Events window opens.
3. Place your mouse cursor on the Date column.
Result: A funnel icon appears.
4. Click the funnel icon, select a relative date, and click the corresponding
checkbox.
5. [Optional] Customize the grid by sorting or grouping the grid.
6. [Optional] Display additional columns by accessing the Quick Column Customizing button
on the left-hand side of the screen.
Note: Click the Save Current Window Settings button
this layout to serve as your new default view.
- 21 -
if you would like
Unit 2: Creating a Default List of Employees
Viewing Employees by Position
You can print a grid that displays the position or positions associated with a particular employee. From this grid you can sort, group, and filter the grid data, add or
remove columns, or print or export the grid.
Viewing Employees by Position
1. From the Tools button at the top of your Employee Manager screen, select
Employees by Position.
Result: The Employees by Position window opens.
2. [Optional] Customize the grid by sorting or grouping the grid data.
Note: See the Queries and Detail Grids user manual for more information
about the various ways you can customize Caterease grids.
3. Click the plus sign to the left of a field to expand the selection.
4. [Optional] Display additional fields by accessing the Quick Column Customizing button .
Note: Remember to click the Save Current Window Settings button
you would like the new layout to serve as your default view.
- 22 -
if
Unit 2: Creating a Default List of Employees
Viewing Employees by Weekday Availability
You can generate a list of available employees for a particular day of the week so
you will know, at a glance, who has been designated in Employee Manager as
being available to work a shift, as well as any employees who have work conflicts
on a given day.
Viewing Employees by Weekday Availability
1. From the Tools button at the top of your Employee Manager screen, select
Employees by Weekday Availability.
Result: The Employees by Weekday Availability window opens.
2. Click the drop-down arrow next to Day of Week to select a day of the week
for which you would like to create a list of available employees.
Result: The window automatically adjusts to reflect your selection.
3. Click the X at the top right-hand side of the window to close the window.
- 23 -
Unit 2: Creating a Default List of Employees
- 24 -
Staffing Events in Event
Manager
Unit 3: Staffing Events in Event Manager
The Staffing tab in the Event Manager allows you to select individual employees for an event, including
waitstaff, bartenders, bus staff, hosts/hostesses, etc. In addition, the Staffing tab can simply be used to
determine how many position shifts are required to fully staff the event. You can select a position, then
select employees to book them for a shift. When an employee affirms he/she can work the shift, you can
then mark them as confirmed.
The Start and End times you have entered for the sub-event will default as the Start and End times for
each employee, although you can change those times, if desired. The program will automatically calculate total wages and total staff pricing based on employee and shift information that you are free to
set up in advance and/or modify on-the-fly.
Objectives:
Upon completing this unit, you will be able to:
l
l
l
l
l
l
l
l
Select employees to work an event.
View employee staffing conflicts.
Select unavailable employees to work an event.
Customize the staffing grid.
Add additional employee compensation.
Select a position for an event.
Book an employee to a position shift.
Confirm an employee to a position shift.
Adding Shifts to an Event
1. Open Event Manager by clicking the Event Manager button from the Main
Caterease sidebar.
2. Select an event using the Event Manager search tools.
Note: Refer to the Booking Your First Event user manual for detailed information about searching for and selecting an event in Event Manager.
3. On the Sub-Event display, select a sub-event (if more than one) to which
you will be adding staff.
4. Click the Staffing tab at the bottom of the screen.
5. Click the Select Staff button
screen.
- 25 -
at the top right-hand side of the Staffing
Unit 3: Staffing Events in Event Manager
Result: The Select Staffing For Event window opens.
Note: Remember, you can optionally establish Wizard rules for each of your
shifts.
6. Click any position (waiter/waitress, bus boy, bartender, etc.), from the lefthand side of the screen, or optionally hold your [Ctrl] key down to select
other positions simultaneously.
Note: You can also simply double-click an individual position to retrieve it.
7. [Optional] Click the View Shift Rules button
to see the specific rule (if
you created one) that the program used to calculate the required number for a
particular shift.
8. When finished adding shifts, click OK.
Selecting an Employee to Work an Event
1. Open Event Manager.
2. Select an event using the Event Manager search tools.
3. On the Sub-Event display, select a sub-event (if more than one) to which
you will be adding staff.
4. Click the Staffing tab at the bottom of the screen.
5. Click the Select Staff button
at the top right-hand side of the Staffing
screen.
Result: The Select Staffing For Event window opens.
6. Select any available employee from the right-hand side of the screen, under
Employee (drag your mouse or use your [Ctrl] key to select more than one
employee at a time).
7. [Optional] Click the View Staffing Conflicts button
, located at the top
right-hand side of the window, to view any staffing conflicts.
Note: Review the text which displays for employee conflict details. (If an
employee has a staffing conflict, his/her name will appear in red text.) Possible conflicts include employees not able to work during a particular time of
day, on a particular day, on a particular date, or perhaps the employee is
working another event.
8. When finished adding staff, click OK.
9. Edit any fields (time, wage, price, etc.), as desired.
10. Click OK to close the window or opt to allow selection of unavailable
employees (see next section).
- 26 -
Unit 3: Staffing Events in Event Manager
Selecting Unavailable Employees
1. From the Sub-Event display in Event Manager, select a sub-event (if more
than one) to which you will be adding staff.
2. Click the Staffing tab at the bottom of the screen.
3. Click the Select Staff button
at the top right-hand side of the Staffing
screen.
Result: The Select Staffing For Event window opens.
4. Click on the name of the "unavailable" employee you would like to select.
Note: An unavailable employee's name appears in red text.
5. Click the Settings button at the top of the Select Staffing For Event window.
6. Select Staff Selection and choose Allow Selection of Unavailable Employees.
7. Click the name of an unavailable employee to select him/her.
8. Click the Select Staff button.
Note: Alternatively, you may simply double-click the selection.
9. Click OK to close the window.
- 27 -
Unit 3: Staffing Events in Event Manager
Adding Additional Employee Compensation
What if you split additional gratuities with your staff? Or what if you offer travel
reimbursements to employees? You can store these additional employee wages separately from event wages.
Adding Additional Employee Compensation
1. From the Sub-Event display in Event Manager, click the Staffing tab and
then click on any employee name within the Event Staffing grid.
2. Click the Show Staffing Details button
Result: The Employee window opens.
.
3. Click the Compensation tab, located at the bottom of the window.
4. Click the Add Record button
screen.
, located at the upper right-hand side of the
5. Type into the Description field or click the down arrow and select from the
drop-down quickpick list.
6. [Optional] Click into the Include checkbox to include the additional wage.
7. [Optional] Type into the Category field (not displayed by default) or click
the down arrow and select from the drop-down quickpick list.
8. Type the additional compensation amount into the Amount field, or click the
down arrow to the right of the field to access the drop-down calculator.
9. Click the X at the top right-hand side of the window to close the window.
- 28 -
Managing Multiple Shifts
Unit 4: Managing Multiple Shifts
The Shift Manager (available if you own the Professional version of Caterease) allows you to manage a
day or date range of multiple shifts at one time. From here you can book employees to multiple shifts,
send out e-mail confirmation requests, and confirm the employee to work, all with one click of the
mouse.
Objectives:
Upon completing this unit, you will be able to:
l
l
l
Display a day or date range of shifts in the Shift Manager grid.
Send confirmation request via batch e-mail.
Confirm staff to multiple event shifts.
Displaying a Day/Date Range of Shifts
1. Click the Tools sidebar item from the left-hand side of your Caterease
screen.
2. Click the Shift Manager button.
Result: The Shift Manager screen opens.
3. Click the Tools button, located at the upper left-hand side of the screen, and
choose Set Date Range.
Result: The Shift Manager window opens, where you can set your date
range.
4. Select the desired parameter by clicking the corresponding radio button.
Choose from among the following options:
l
Less Than Or Equal To
l
Greater Than Or Equal To
l
Within Date
l
Relative Date Range
Note: Click the down arrow to the right of the Relative Date Range field
and select a relative date range from the drop-down list.
5. Click OK to generate the query.
- 29 -
Unit 4: Managing Multiple Shifts
Batch E-mailing a Confirmation Request
1. Click the Tools sidebar item from the left-hand side of your screen.
2. Click the Shift Manager button.
3. Set a date range by clicking the Tools button, located on the upper left-hand
side of the screen, and clicking Set Date Range.
4. Click on a shift in the grid.
5. Click the Locked button, located on the upper right-hand side of the window.
Result: A confirmation prompt appears.
6. Click Yes to confirm your choice.
Result: The Staff section is unlocked and employees can be booked for the
event.
7. Click on an employee name from the right-hand (Staff) pane or hold your
[Ctrl] key down and click multiple employee names (or click [Ctrl] [A] to
select all employees).
8. Click the Email button from the main toolbar at the top of your screen.
Result: An e-mail window opens.
- 30 -
Unit 4: Managing Multiple Shifts
9. Type an e-mail subject into the Subject field or click the down arrow and
select an e-mail subject from the drop-down quickpick list.
10. Click into the text block and type the body of the e-mail.
Note: If you own the Marketing Tools Package, you can click the Merge Doc
button and select a custom merge document as the body of the outgoing email.
Confirming Staff for an Event
1. Click the Tools sidebar item from the left-hand side of your screen.
2. Click the Shift Manager button.
3. Set a date range by clicking the Tools button, located on the upper left-hand
side of the screen, and clicking Set Date Range.
4. Click on a shift in the grid.
5. Click the Locked button.
Result: A confirmation prompt appears.
6. Click Yes to confirm your choice.
Result: The Staff section is unlocked and employees can be booked for the
event (from the right-hand side of the screen).
- 31 -
Unit 4: Managing Multiple Shifts
7. Click the Conf. (Confirm) checkbox to confirm the employee or employees
will work an event.
8. [Optional] Edit employee work times, if needed.
9. When finished, click the Unlocked button to lock staff selection.
10. Click the X at the top right-hand corner of the window to save the changes
and close the window.
- 32 -
Tracking Employee Information
Unit 5: Tracking Employee Information
Objectives:
Upon completing this unit, you will be able to:
l
l
l
l
l
l
View employee staffing using multiple calendar views.
Create groups of employee staffing calendars.
Generate an employee staffing schedule report for any date range.
Generate an employee staffing schedule in a diary format.
Generate a report of all scheduled shifts within a day or date range.
Track all staffing activity for any date range.
Viewing Staffing in a Calendar
You can view your scheduled staffing in multiple calendar displays: a day-at-aglance; week-at-a-glance; a custom work-week-at-a-glance; month-at-a-glance;
year-at-a-glance; or a daily timeline view.
1. Click the Scheduler button, located on the Main Caterease sidebar.
2. Click the Display button, located at the top of the screen, and select
Staffing.
Result: The Staffing calendar opens, by default, to the month-at-a-glance
view.
Note: You can also view staffing information in the Staffing calendar grid.
You can add/remove columns, sort grid data, group grid data, print the grid,
or export the data.
Creating Groups of Staffing Calendars
The powerful grouping option in the Scheduler tool lets you create separate calendars based on a variety of staffing details.
1. Click the Scheduler button, located on the Main Caterease sidebar.
2. Click the Display button and select Staffing.
3. Click the down arrow next to the Group By option at the top of the screen.
4. Select one of the following fields from the list to separate your staffing into
groups: Status; Sales Rep; Business Type; Operation; Employee; Position;
Department; or None.
- 33 -
Unit 5: Tracking Employee Information
Result: The Staffing calendar is grouped into separate calendars.
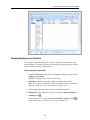
Printing an Employee Staffing Schedule
The Employee Staffing Report will allow you to print an employee schedule based
on a day or date range for an individual employee or for all employees. Information
in this report includes the assigned position; the event client; the event theme; the
assigned room; the employee start and end times; and the total number of event
work hours. In addition, the report will identify employees that are confirmed to
work their assigned event.
Printing an Employee Staffing Schedule
1. Click Reports > Management > Employee Staffing.
Result: The Employee Staffing window opens.
2. Set a date range for your report by choosing the option Less Than Or Equal
To, Greater Than Or Equal To, Within Date Range, or Relative Date
Range.
3. [Optional] Change the title of the report by typing over the words "Employee
Staffing."
4. Select from among Employee Staffing Schedule, Employee Staffing Schedule
(No Wage Details), or Employee Diary.
Note: Selecting Employee Diary enables you to print separate employee
schedules in diary format rather than in a grid layout. With diary format,
each print will include the event date; the assigned position; employee start
and end times; the client’s name, address, and phone number; the assigned
room; the confirmed date; and the time, party name, and event theme. Offpremise caterers can choose to include the site location information as well.
5. [Optional] Click the checkboxes under Sort Order and choose to group
Staffing items by a certain detail.
Note: You can drag and drop these fields to create a sort order.
6. [Optional] Click the Include Site Directions checkbox if you would like to
include the directions to the site location in the report.
- 34 -
Unit 5: Tracking Employee Information
7. [Optional] Exclude any desired statuses by selecting the status from the
Exclude Status drop-down list. Choose from among Closed, Prospective,
Tentative, Cancelled, and Definite.
8. [Optional] For an individual employee schedule, click the Specific
Employee checkbox and then click the corresponding down arrow and select
an employee.
9. Click OK to generate the report.
Result: The Employee Staffing Report is generated, incorporating the parameters you established.
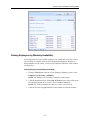
Printing a Scheduled Shifts Report
The Scheduled Shifts Report is a powerful tool which allows you to print a schedule
of a shift or all shifts based on a day or date range. You can even choose to display
the name or names of the employees assigned to work the shift, along with addi-
- 35 -
Unit 5: Tracking Employee Information
tional staffing information. Additionally, the Scheduled Shifts Report will even give
you the option of grouping the report based on selected event information.
Printing a Scheduled Shifts Report
1. Click Reports > Management > Scheduled Shifts.
Result: The Scheduled Shifts window opens.
2. [Optional] Change the title of the report by typing over the words "Scheduled
Shifts."
3. Set a date range for your report by choosing the option Less Than Or Equal
To, Greater Than Or Equal To, Within Date Range, or Relative Date
Range.
4. [Optional] Exclude an desired statuses by selecting the status from the dropdown list. Choose from among Closed, Prospective, Tentative, Cancelled,
and Definite.
5. [Optional] Group by Date, Shift, Sales Rep, or Client by selecting the
respective option from the Group By drop-down list.
6. [Optional] Click the Specific Shift checkbox, then the corresponding down
arrow and select a position from the drop-down list.
7. [Optional] Click the Show Staffing Details checkbox to include the assigned
employee information.
8. [Optional] Click the Suppress Fully Booked & Confirmed Shifts checkbox
to show just the shifts that require staffing.
9. Click OK to generate the report.
Result: The Scheduled Shifts report is generated, incorporating the parameters you established.
- 36 -
Unit 5: Tracking Employee Information
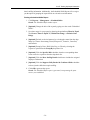
Running a Staffing Activity Query
The Staffing Activity Query is designed to track all employees you have booked for
any day or date range. As with other activity queries, you can sort, group, or filter
your data and answer various questions about your employee staffing activity.
Running a Staffing Activity Query
1. Click the Queries button from the Main Caterease sidebar.
2. Click the Staffing Activity button on the left-hand side of the screen.
Result: The Staffing Activity Query window opens.
Note: A Staffing Activity Query for a particular event can be generated by
clicking the Staffing Activity for Event button from the Staffing tab in Event
Manager.
3. Set a date range for your query by choosing the option Less Than Or Equal
To, Greater Than Or Equal To, Within Date Range, or Relative Date
Range.
- 37 -
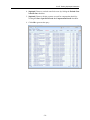
Unit 5: Tracking Employee Information
4. [Optional] Choose to exclude cancelled events by clicking the Exclude Cancelled Events checkbox.
5. [Optional] Choose to display separate records for compensation details by
clicking the Show Separate Records for Compensation Details checkbox.
6. Click OK to generate the query.
- 38 -