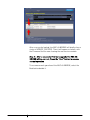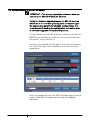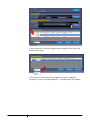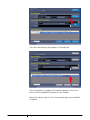
1
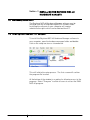
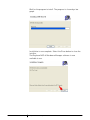
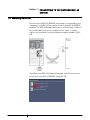
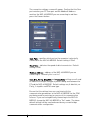
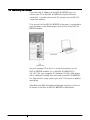
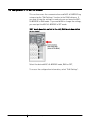
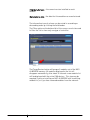
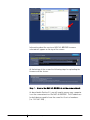
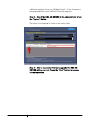
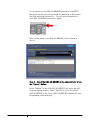
NGC-40 Hardware Manager USER MANUAL INSTALL-193 INDUSTRIAL HEAT TRACING SOLUTIONS EN-RaychemNGC40HWManager-IM-H58450 04/15 1/39 TABLE OF CONTENTS Section − 1 Introduction ........................................................... 3 1.1 Welcome .................................................................................3 1.2 Technical Support ...................................................................3 1.3 System Requirements ............................................................3 Section − 2 Installing the Raychem NGC-40 Hardware Manager ................................................................................................. 4 2.1 Downloading the software ......................................................4 2.2 Installing the Software on Your Computer .............................4 Section − 3 Connecting to the Raychem NGC-40 System ......... 8 3.1 Connecting via RS-232 ............................................................8 3.2 Connecting via Ethernet .......................................................11 3.3 Configuration of the NGC-40-BRIDGE ..................................15 Section − 4 Working with Connected Devices......................... 23 4.1 Identifying Connected Devices..............................................23 4.2 Upload Firmware to an NGC-40-BRIDGE.............................26 4.3 Uploading Firmware to Multiple NGC-40-BRIDGE Modules .....................................................................................................30 4.4 Upload Firmware to an NGC-40-Module..............................34 Section − 5 About Screen ....................................................... 38 INDUSTRIAL HEAT TRACING SOLUTIONS EN-RaychemNGC40HWManager-IM-H58450 04/15 2/39 Section − 1 INTRODUCTION 1.1 Welcome This manual provides instructions for use of the Raychem NGC-40 Hardware Manager software. This software provides the ability to manage communications parameters and firmware updates for NGC-40 Heat-Tracing Controllers and other NGC-40 devices. 1.2 Technical Support For technical support, contact the Technical support group at (800) 545-6258 or email: [email protected] 1.3 System Requirements The following equipment will be necessary to use the firmware upgrade and parameter upload utilities presented in this manual. INDUSTRIAL HEAT TRACING SOLUTIONS A mouse or other compatible pointing device Microsoft Windows® XP Pro and Windows XP Home Network connectivity EN-RaychemNGC40HWManager-IM-H58450 04/15 3/39 Section − 2 INSTALLING THE RAYCHEM NGC-40 HARDWARE MANAGER 2.1 Downloading the software The Raychem NGC-40 Hardware Manager software may be installed from the G:\Engineering\NGC-40 Product folder. Installing the software on your computer will require administrative rights which can be obtained from IT. 2.2 Installing the Software on Your Computer To install the Raychem NGC-40 Hardware Manager software to your computer, open the hardware manager folder and doubleclick on the setup.exe icon as shown below. This will initiate the setup process. The first screen will confirm the program file location. At the bottom of the window is an option for allowing access to the program. Select “Everyone” to allow all users to access the DHM NGC-40 program. INDUSTRIAL HEAT TRACING SOLUTIONS EN-RaychemNGC40HWManager-IM-H58450 04/15 4/39 When the file location and access options have been selected, press the Next button to continue installation. INDUSTRIAL HEAT TRACING SOLUTIONS EN-RaychemNGC40HWManager-IM-H58450 04/15 5/39 Wait for the program to install. The progress is shown by a bar graph. Installation is now complete. Select the Close button to close the installer. The Raychem NGC-40 Hardware Manager software is now available to use. INDUSTRIAL HEAT TRACING SOLUTIONS EN-RaychemNGC40HWManager-IM-H58450 04/15 6/39 During installation a program icon will be placed on your desktop. Double-click this icon to open the Raychem NGC-40 Hardware Manager. The program can also be accessed from the Start Menu. Select the Start button in the bottom left corner of the windows desktop, then All Programs, then DHM NGC-40. INDUSTRIAL HEAT TRACING SOLUTIONS EN-RaychemNGC40HWManager-IM-H58450 04/15 7/39 Section − 3 CONNECTING TO THE RAYCHEM NGC-40 SYSTEM 3.1 Connecting via RS-232 Ensure that the NGC-40-BRIDGE in the panel is connected to your computer via the RS-232 port on the front of the NGC-40-BRIDGE module. The NGC-40 Bridge COM 3 port is an RS-232 port and can be connected directly to the computer with a cable. If a patch cable is not available, it can be ordered using part number 10332005. Open Raychem NGC-40 Hardware Manager and click on the icon to connect to an NGC-40-BRIDGE using RS-232. INDUSTRIAL HEAT TRACING SOLUTIONS EN-RaychemNGC40HWManager-IM-H58450 04/15 8/39 The connection settings screen will appear. Confirm that the Com port matches your PC Com port and the Modbus® Address matches the NGC-40-BRIDGE you are connecting to and then press the Connect button. Com Port specifies which port on the computer is physically connected to the NGC-40-BRIDGE. Default setting is Com1 Baud Rate indicates the speed of data transmission. Default setting is 9600 Modbus Address address of the NGC-40-BRIDGE you are connecting to. Normally this is set to 1 Data Bits, Parity, Stop Bits and Frame Rate settings are all used to indicate the length and type of packets being sent between the PC and the NGC-40-BRIDGE. Default settings are, 8 data bits, no Parity, 2 stop bits and RTU frame type. Ensure that the settings here are consistent with the communication parameters in the NGC-40-BRIDGE for the COM port being used. Inconsistencies may result in communication failures. If you are having difficulty connecting to the NGC-40BRIDGE, change the NGC-40-BRIDGE to “Set” mode. The above default settings will be used and override any current bridge communications configuration. INDUSTRIAL HEAT TRACING SOLUTIONS EN-RaychemNGC40HWManager-IM-H58450 04/15 9/39 Once you have successfully connected to the NGC-40-BRIDGE you will see the following screen: . The top portion of the screen shows the NGC-40-BRIDGE information. The NGC-40-BRIDGE Tag is a short name that can be given to a module for easy recognition To change the NGC-40-BRIDGE communications parameters go to Section 3.3 – Configuration of the NGC-40-BRIDGE To load firmware into the NGC-40 devices go to Section 4.4 – Upload Firmware to a NGC-40 Module. You must connect to the NGC-40-BRIDGE using the Ethernet connection to load new firmware. INDUSTRIAL HEAT TRACING SOLUTIONS EN-RaychemNGC40HWManager-IM-H58450 04/15 10/39 3.2 Connecting via Ethernet If you know the IP address of the NGC-40-BRIDGE, you can connect your PC to the NGC-40-BRIDGE using the Ethernet connection. If you do not know the IP, you must use the RS-232 connection method. First ensure that the NGC-40-BRIDGE in the panel is connected to your computer via the Ethernet port on the front of the NGC-40BRIDGE module. Set your computer IP so that it is in the same network as the NGC-40-BRIDGE module. (i.e. if the NGC-40-BRIDGE IP is 192.168.1.100, your computer IP should be 192.168.1.XXX, where XXX is a different number than that used in the NGC-40-BRIDGE). For help with this setup, contact your local IT resource or product marketing. Open Raychem NGC-40 Hardware Manager and click on the icon to connect to an NGC-40 NGC-40-BRIDGE using Ethernet. INDUSTRIAL HEAT TRACING SOLUTIONS EN-RaychemNGC40HWManager-IM-H58450 04/15 11/39 The program will automatically detect the NGC-40-BRIDGE module and display it in on screen. Select the appropriate NGC40-BRIDGE module from the list provided and press the Connect button. If the NGC-40-BRIDGE you are trying to connect to is not displayed and you know the IP address of the NGC-40-BRIDGE module, there is an option to manually enter the IP address. Select “Click here to enter a specific IP Address”. INDUSTRIAL HEAT TRACING SOLUTIONS EN-RaychemNGC40HWManager-IM-H58450 04/15 12/39 A window will appear. Enter the IP Address of the desired NGC40-BRIDGE and select OK. The top right corner has a refresh button that allows you to scan the Ethernet network again for NGC-40-BRIDGE modules that may not be picked up at first. The Raychem NGC-40 Hardware Manager is now connected to the NGC-40-BRIDGE and all NGC-40 modules currently connected to that NGC-40-BRIDGE will be listed as shown in the image below. INDUSTRIAL HEAT TRACING SOLUTIONS EN-RaychemNGC40HWManager-IM-H58450 04/15 13/39 The top portion of the screen shows the NGC-40-BRIDGE information. The NGC-40-BRIDGE Tag is a short name that can be given to a module for easy recognition. INDUSTRIAL HEAT TRACING SOLUTIONS EN-RaychemNGC40HWManager-IM-H58450 04/15 14/39 3.3 Configuration of the NGC-40-BRIDGE This section covers the communications and NGC-40-BRIDGE tag setup using the “Edit Settings” function in the DHM software. If you want to view the settings in read-only you can leave the NGC40-BRIDGE in RUN mode. If you would like to change the settings, you must put the NGC-40-BRIDGE in SET mode. (SET mode has slide switch to the left, RUN mode has switch to the right) Select the desired NGC-40-BRIDGE mode, RUN or SET, To access the configuration information, select “Edit Settings”. INDUSTRIAL HEAT TRACING SOLUTIONS EN-RaychemNGC40HWManager-IM-H58450 04/15 15/39 The Edit Settings screen includes all the communication parameters for the NGC-40-BRIDGE, including the settings for each COM port, as well as the Ethernet communication settings. The user can also enter up to 40 characters as a NGC-40-BRIDGE Tag, to more easily identify which NGC-40-BRIDGE they are connected to. You will see a popup text when you enter the configuration screen. The popup will differ based on the NGC-40-BRIDGE mode: If the switch is in RUN mode: If the switch is in SET mode: INDUSTRIAL HEAT TRACING SOLUTIONS EN-RaychemNGC40HWManager-IM-H58450 04/15 16/39 IMPORTANT: After making changes to the communication parameters the RUN/SET switch MUST be returned to RUN mode for the changes to take effect. Most of the General Information fields are read-only and are shown to provide more information about the NGC-40-BRIDGE. Firmware Version - shows which version is currently installed in the NGC-40-BRIDGE. This can be updated with DHM NGC-40 by selecting “Upload Firmware to an NGC-40-BRIDGE” from the main screen. Ethernet MAC Address - is a unique address used for communications over Ethernet. This value cannot be changed. Operating System Version - shows which OS is currently being run in the NGC-40-BRIDGE. This value also cannot be changed. INDUSTRIAL HEAT TRACING SOLUTIONS EN-RaychemNGC40HWManager-IM-H58450 04/15 17/39 Number of Installed Devices - shows how many modules are currently being monitored by the NGC-40-BRIDGE. This number includes all devices that are stored in memory, even if they are no longer connected or not communicating properly. Fields shown in white can be edited, and fields in black are readonly. Changes to the NGC-40-BRIDGE tag can be made any time, but changes to the communication parameters can only be made if the RUN/SET switch is in the SET position. Upon entering the “Edit Settings” screen, the program will detect the position of the RUN/SET switch and display a message. Each COM Port has its own set of parameters. Each COM Port being used must have a Modbus Address that is different from the other devices that are on the same network. The valid range is 1- 247. It is suggested that you record this address either on the module, or in a visible location within the panel. Ensure that the settings for Baud Rate, Data Bits, Parity, Stop Bits and Frame Type are consistent between NGC-40-BRIDGE and the device that is being connected to that COM Port. Inconsistencies can cause communication failures. If an RMM (Remote Monitoring Module) is intended to be used with the NGC-40-BRIDGE, the Com 2 field "RMM" must be set to "Enabled". While "Enabled", all Com 2 parameters are ignored except for "TX Delay". The default settings are shown in the picture above. INDUSTRIAL HEAT TRACING SOLUTIONS EN-RaychemNGC40HWManager-IM-H58450 04/15 18/39 COM 1 and COM 2 are the RS-485 ports and Com 3 is the RS-232 port. Refer to the diagrams below for the proper connection techniques. Connecting via RS-232: The COM 3 port is an RS-232 port and can be connected directly to the computer with a cable. If a serial port is not installed on your computer, you will need to order a USB/RS-232 converter. This converter will connect between your computers’ USB port and the NGC-40-BRIDGE 9-pin serial cable. Connecting via Ethernet: INDUSTRIAL HEAT TRACING SOLUTIONS EN-RaychemNGC40HWManager-IM-H58450 04/15 19/39 The Ethernet port can be connected to any Ethernet upstream devices. COM1, COM 2 – RS-485 Wires are connected to COM 1 or COM2 via an RS-485/RS-232 converter, and from there to a computer. After all the desired changes have been made, press the APPLY button to save the changes or OK to save and exit. INDUSTRIAL HEAT TRACING SOLUTIONS EN-RaychemNGC40HWManager-IM-H58450 04/15 20/39 If you are done making changes, return the switch to RUN mode. All the communication parameter changes will be implemented. You can access the “Edit Settings” again to confirm the changes; all fields will now be black. INDUSTRIAL HEAT TRACING SOLUTIONS EN-RaychemNGC40HWManager-IM-H58450 04/15 21/39 Press the OK button to return to the Connection screen. If all configuration changes have been made, you can return to the main screen by pressing the Main Menu button. INDUSTRIAL HEAT TRACING SOLUTIONS EN-RaychemNGC40HWManager-IM-H58450 04/15 22/39 Section − 4 WORKING WITH CONNECTED DEVICES Once you are connected to the NGC-40-BRIDGE via Ethernet or RS-232, you can perform some basic functions and gather information about the modules on the CAN network. 4.1 Identifying Connected Devices The Test button shown next to each module will cause that module to execute an LED display test and all other modules’ LED’s to turn off. Each LED of the module under test will flash in sequence. This can be used to quickly identify the module in a panel, or for testing the LEDs. Modbus Address - the address of the particular module. Each module will have a unique address Device Type – Displays the NGC-40 module type (IO, HTC, HTC3) Module ID – the unique CAN ID number used to identify each module in hexadecimal format. INDUSTRIAL HEAT TRACING SOLUTIONS EN-RaychemNGC40HWManager-IM-H58450 04/15 23/39 Firmware Version – the current version installed on each module. Manufacture date - the date that the module was manufactured. The information in each column can be sorted in ascending or descending order by clicking the field header. The Filter option on the bottom left of the screen can also be used to filter the list to show only one type of controller. The Purge Devices button will purge all modules out of the NGC40-BRIDGE memory. All modules displayed in the list will disappear momentarily, after about 30 seconds a new module list will be displayed with the active CAN devices. This step may be required if you are installing an NGC-40-BRIDGE with an existing module list, or if you have removed modules from the network. INDUSTRIAL HEAT TRACING SOLUTIONS EN-RaychemNGC40HWManager-IM-H58450 04/15 24/39 INDUSTRIAL HEAT TRACING SOLUTIONS EN-RaychemNGC40HWManager-IM-H58450 04/15 25/39 4.2 Upload Firmware to an NGC-40-BRIDGE IMPORTANT – This process can only be performed when you connect to the NGC-40-BRIDGE via Ethernet. From the DHM NGC-40 main screen select “Upload Firmware to an NGC-40-BRIDGE”. When this screen is initially opened the NGC-40-BRIDGE will not appear. First, choose the firmware file to upload. Select the folder beside Firmware Location. A file selection window will open. Select the proper file and Open it. INDUSTRIAL HEAT TRACING SOLUTIONS EN-RaychemNGC40HWManager-IM-H58450 04/15 26/39 Information about the version of NGC-40-BRIDGE firmware selected will appear on the top of the screen. At the bottom of the screen the following steps for uploading the firmware will be shown: Step 1 Ensure the NGC-40-BRIDGE is on the same network As described in Section 3.2, you will need to ensure your computer is on the same network as the NGC-40-BRIDGE. The IP addresses for both devices need to have the same first 3 sets of numbers. (i.e. 192.168.1.XXX) , INDUSTRIAL HEAT TRACING SOLUTIONS EN-RaychemNGC40HWManager-IM-H58450 04/15 27/39 Step 2 Cycle Power on the NGC-40-BRIDGE To cycle power on the NGC-40-BRIDGE either press the RESET button on the top right using the end of a paperclip, or disconnect the CAN cable then reconnect it. After cycling power in the NGC-40-BRIDGE, it will show up in the list. IP Address - shows the current IP address for that NGC-40BRIDGE. Firmware Version - shows the version currently installed in the NGC-40-BRIDGE. If the version appears as 0.0.0 the NGC-40BRIDGE may be on a different network than the computer. Check the IP Address. Status - shows the current status. When connected to a NGC-40BRIDGE on the same network the status is “Device connected”. On INDUSTRIAL HEAT TRACING SOLUTIONS EN-RaychemNGC40HWManager-IM-H58450 04/15 28/39 a different network it may say “Bridge Found”. As the firmware is being uploaded the status field will show the progress. Step 3 Select the NGC-40-BRIDGE in the above list and press the “Upload” Button The status of the upload is shown in the status field. Step 4 After a successful firmware upgrade the NGC-40BRIDGE will re-connect, Press the “Boot” button to resume normal operation INDUSTRIAL HEAT TRACING SOLUTIONS EN-RaychemNGC40HWManager-IM-H58450 04/15 29/39 After the “Boot” command is sent, the firmware upload is complete. Select “Main Menu” to exit to the main menu screen. You can verify the firmware by connecting to the NGC-40-BRIDGE again via RS-232 or Ethernet. 4.3 Uploading Firmware to Multiple NGC-40-BRIDGE Modules There may be times where several NGC-40-BRIDGE modules are in close proximity and all need to be updated. The update procedure is the same as outlined above for each of the NGC-40BRIDGE modules Step 1 Ensure the NGC-40-BRIDGEs are on the same network As described in Section 3.2, you will need to ensure your computer is on the same network as the NGC-40-BRIDGE. The IP addresses for all devices need to have the same first 3 sets of numbers. (i.e. 192.168.1.XXX) , Step 2 Cycle Power on the NGC-40-BRIDGE INDUSTRIAL HEAT TRACING SOLUTIONS EN-RaychemNGC40HWManager-IM-H58450 04/15 30/39 To cycle power on the NGC-40-BRIDGE either press the RESET button on the top right using the end of a paperclip, or disconnect the CAN cable then reconnect it. This will need to be done for each NGC-40-BRIDGE you wish to update. After cycling power in the NGC-40-BRIDGE, it will show up in the list. Step 3 Select the NGC-40-BRIDGE in the above list and press the “Upload” Button Select “Upload” for the first NGC-40-BRIDGE; the status bar will show the upload process. Select “Upload” for each successive NGC-40-BRIDGE in the list; all NGC-40-BRIDGE modules will now be uploading simultaneously. INDUSTRIAL HEAT TRACING SOLUTIONS EN-RaychemNGC40HWManager-IM-H58450 04/15 31/39 After a successful upload, the NGC-40-BRIDGE will briefly show a status of UPDATE_SUCCESS. Then it will appear as before, with the Firmware Version now showing the new version number. Step 4 After a successful firmware upgrade the NGC-40BRIDGE will re-connect, Press the “Boot” button to resume normal operation To resume normal operation of the NGC-40-BRIDGE, select the Boot button beside it. INDUSTRIAL HEAT TRACING SOLUTIONS EN-RaychemNGC40HWManager-IM-H58450 04/15 32/39 Once the NGC-40-BRIDGE has been booted it disappears from the list, and when the list is clear you can return to the main menu by selecting the Main Menu button. INDUSTRIAL HEAT TRACING SOLUTIONS EN-RaychemNGC40HWManager-IM-H58450 04/15 33/39 4.4 Upload Firmware to an NGC-40-Module IMPORTANT – This process can only be performed when you connect to the NGC-40-BRIDGE via Ethernet. During the firmware upgrade process, the NGC-40 modules will not be in their normal operating state and depending on the upgrade may go to Factory Default configurations. It is recommended to back up the configuration parameters prior to a firmware upgrade via Raychem Supervisor. To load firmware into the NGC-40 devices, connect to the NGC-40BRIDGE using the Ethernet connection. For more information on this process, consult Section 3.2. Once you are connected, you will need to first select the firmware file. Select the folder icon, shown below, and choose from the popup menu. Select the appropriate file for the NGC-40 module type you wish to update. Each NGC-40 module type will need to be updated separately. INDUSTRIAL HEAT TRACING SOLUTIONS EN-RaychemNGC40HWManager-IM-H58450 04/15 34/39 After you have selected the file it will show up in the Firmware Location bar. The other boxes will now be filled in as well. The Version box shows the firmware version selected, and the Creation Date is the day that firmware was created. The Description box may also include a brief description of the firmware. Now, select the correct type of controller to upload to by clicking on the box to the left of the list. In this example, an NGC-40-HTC was selected. INDUSTRIAL HEAT TRACING SOLUTIONS EN-RaychemNGC40HWManager-IM-H58450 04/15 35/39 It may be easier to filter by module type using the filter box in the bottom left corner. Once you have selected all the modules you want to upload firmware to, press the Upload button. The upload will then begin. INDUSTRIAL HEAT TRACING SOLUTIONS EN-RaychemNGC40HWManager-IM-H58450 04/15 36/39 The status bar displays the progress of the upload. Once the upload is complete, the module appears in the list as before, with the updated firmware version number. Repeat the above steps for all of the module types you would like to update. INDUSTRIAL HEAT TRACING SOLUTIONS EN-RaychemNGC40HWManager-IM-H58450 04/15 37/39 Section − 5 ABOUT SCREEN The “About” screen gives you the version number of the DHM that you currently have installed. To view the about screen, select About from the main screen, then DHM NGC-40 The About screen will appear, showing the version number and copyright information. Exit this screen by selecting the OK button. INDUSTRIAL HEAT TRACING SOLUTIONS EN-RaychemNGC40HWManager-IM-H58450 04/15 38/39 WWW.PENTAIRTHERMAL.COM NORTH AMERICA EUROPE, MIDDLE EAST, AFRICA ASIA PACIFIC LATIN AMERICA Tel: +1.800.545.6258 Fax: +1.800.527.5703 Tel: +1.650.216.1526 Fax: +1.650.474.7711 [email protected] Tel: +32.16.213.511 Fax: +32.16.213.603 [email protected] Tel: +86.21.2412.1688 Fax: +86.21.5426.2937 [email protected] Tel: +1.713.868.4800 Fax: +1.713.868.2333 [email protected] Pentair is owned by Pentair or its global affiliates. All other trademarks are the property of their respective owners. Pentair reserves the right to change specifications without prior notice. © 2011–2015 Pentair. INDUSTRIAL HEAT TRACING SOLUTIONS EN-RaychemNGC40HWManager-IM-H58450 04/15 39/39