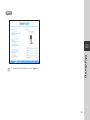
1
SAMSUNG SMARTCAM
User Manual
0678
!
SNH-1011N
SPECIFY SERVICE INSTRUCTIONS AND WARRANTY TERMS
This device complies with Part 15 of the FCC Rules.
Operation is subject to the following two conditions: (1) this device may not cause
harmful interference, and (2) this device must accept any interference received, including
interference that may cause undesired operation.
FCC NOTE:
THE MANUFACTURER IS NOT RESPONSIBLE FOR ANY RADIO OR TV INTERFERENCE
CAUSED BY UNAUTHORIZED MODIFICATIONS TO THIS EQUIPMENT.
SUCH MODIFICATIONS COULD VOID THE USER'S AUTHORITY TO OPERATE THE
EQUIPMENT.
Samsung SmartCam
User Manual
Copyright
©2012 Samsung Techwin Co., Ltd. All rights reserved.
Trademark
is the registered logo of Samsung Techwin Co., Ltd.
The name of this product is the registered trademark of Samsung Techwin Co., Ltd.
Other trademarks mentioned in this manual are the registered trademark of their
respective company.
Restriction
Samsung Techwin Co., Ltd shall reserve the copyright of this document. Under no
circumstances, this document shall be reproduced, distributed or changed, partially or
wholly, without formal authorization of Samsung Techwin.
Disclaimer
Samsung Techwin makes the best to verify the integrity and correctness of the contents
in this document, but no formal guarantee shall be provided. Use of this document
and the subsequent results shall be entirely on the user’s own responsibility. Samsung
Techwin reserves the right to change the contents of this document without prior notice.
Operational Description
The operational description shall fulfil the requirements of Rule Part 2.1033(b)(4). The rule
part requires, "A brief description of the circuit functions of the device along with a
statement describing how the device operates. This statement should contain a
description of the ground system and antenna, if any, used with the device".
The above requirement has been further interpreted by the FCC to mean that the
description shall:
a. be an operational or technical description of how the device operates, is modulated
and meets requirements;
b. describe the EUT completely. What is it (in plain English as well as technical terms)?
Give a clear, concise functional description of device operation.
c. always describe the signal, such as modulation type, pulse repetition rate, signal type
and information being sent. Describe all modulation types and all data rates.
Instructions & Warranty
The manufacturer is not responsible for any loss or radio/TV interference caused by
unauthorized modification of the product.
Such modification will void the warranty of the product as well as the user’s right of use.
WARNING
• The product must be assembled and installed by an adult.
• Before using, read all instructions on this manual thoroughly and follow operational
instructions, warnings on this manual and printed on the product.
• To avoid entangled power cord, do not place it around the baby bed or other infant
furniture. Keep this product and its power cord out of children’s reach.
• Especially, the power cord should be installed carefully while keeping it out of
children’s reach.
• Never use the product near bath tub, sink, washing machine and in wet basement to
avoid moisture.
• The product is designed for indoor use.
• The product is not designed for medical monitoring, and requires a grown-up’s
protective supervision on its use.
• To avoid overheating of the product, do not expose the product to direct sunlight; do
not install or use near a heat source such as heater, radiator, cooking devices (ex:
electric stove or oven) and other warming devices (ex: audio amplifier, TV, etc.).
• Make sure to keep ventilated while using the product.
Avoid pillar or furniture that may block ventilation, when installing the product.
• Make sure to use the power adaptor provided. If used with unidentified adaptor, it
may damage the product. The power adaptor must be used with regular household
electric supply.
• Avoid sharp, pointed objects around the adaptor’s cable, not to damage the cable.
• Be warned and never hold the cable’s stripped part when connecting / disconnecting
the adaptor to/from the wall outlet.
• To avoid entangled cable lines, avoid using cable extension for adaptor’s power cord.
• The product’s servicing is allowed only to authorized Samsung Techwin’s service
personnel.
• When using the product for children’s care, be careful to keep the product out of
children’s reach.
• The product partially contains component which might cause respiration difficulty.
Accessories and small parts of the product should be stored keeping out of children’s
reach.
• The product is not designed to replace responsibility of human supervision on
children.
• The product is not equipped with device of immediate notification to adult with
accidental/sudden children‘s move; it requires periodic checks and human
supervision.
• This appliance and its antenna must not be collocated or operation in conjunction
with any other antenna or transmitter. A minimum separation distance of 20 cm must
be maintained between the antenna and the person for this appliance to satisfy the
RF exposure requirements.
Contents
Getting Started
Features………………………………………………………… 4
What’s Included………………………………………………… 5
Getting to know your Monitoring system……………………… 6
Installation & Network Connection
Installation……………………………………………………… 8
Network Connection and Settings……………………………… 13
Monitoring
Registration……………………………………………………… 16
Setup …………………………………………………………… 25
Admin Setup …………………………………………………… 27
Information……………………………………………………… 28
Appendix
Specifications…………………………………………………… 30
Troubleshooting………………………………………………… 33
01
Getting Started
Features4
What’s Included
5
Getting to know your Monitoring
system6
Power Supply
Network connection 4 · English
7
7
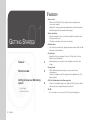
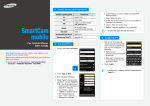
Features
• Easy to install
-- With the help of WPS (Wi-Fi Protected Setup), wireless sharing and easy
connection are enabled.
-- Simply visit the home page (www.samsungsmartcam.com) and download and
install the program without a separate installer program.
• Remote monitoring
-- Whenever and wherever if you are in the Internet enabled environment, remote
monitoring is ready for you.
-- PC, laptop or smart phone can be used for monitoring.
• Real-time alarm
-- Detect motion and sound before outputting the alarm in real time via Google Talk
Messenger or with smart phone.
• Cloud Storage
-- Upload the event video and images to the user’s YouTube (video) or Picasa
(images) account automatically.
-- Anytime anywhere you can enjoy the video and images stored in the cloud
storage.
• Two-way Audio
-- With the built-in speakers and microphone, you can make Two-way
communications.
However, it is available only with the smart phone. (Not applicable to the PC or
laptop computer.)
• SNS (Social Networking Service) Alarm supported
-- Provide the event alarm (message, video, image) via YouTube, Picasa or Twitter.
-- Share special video footage and images with your friends.
• IR LED
-- In a low contrast scene, you can use IR LED for the monitoring purpose.
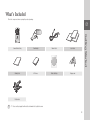
What’s Included
Check for components when opening the product package.
01
Power Adaptor
Network Cable
Quick Guide
Warranty Card
GPL Lisence
Double Sided Tape
Tapping screw
Getting Started
Camera & Bracket body
Plastic anchor
nn `` Please save the packaging. You will need the serial number later to register the camera.
5
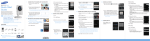
Getting to know your Monitoring system
DC 5V Power Input
Built-in IR LEDs for night vision
DC IN 5V
High quality camera lens
Luminance Sensor
NETWORK
Detects light levels where the camera is placed.
Night vision mode changes according to detection
result.
SAMSUNG SMARTCAM
RESET
Power / Wi-Fi status LED
Built-in Mic
Network port
Used if WPS is not supported on the Wireless
Access Point or if you do not have a Wireless
Access Point
Built-in speaker
Produces sound transferred from a smart phone.
Reset button
Resets the camera settings to the default.
Press and hold for about 5 seconds to reboot the
system.
WPS button
Used to pairing the camera with the Wireless Access
Point.
6 · English
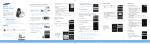
Power Supply
Network connection
Plug-in the camera power adapter to the wall outlet and connect the camera as
shown.
It will take about 1min for the camera to boot-up completely.
When the boot-up is complete, the power LED color will change from red to blue.
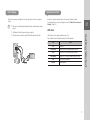
LED status
LED indicator shows operational status with colors.
Refer to table below for detailed meaning of the LED indicator.
Color
Red
DC IN 5V
Red Blinking
NETWORK
SAMSUNG
Green
SMARTCAM
RESET
01
For further details on network configuration, refer to “Network Connection and
Settings”. (Page 13)
Getting Started
Blue Blinking
CK◀
▶ LOCK
``
``
Make sure to use the provided power adaptor. Otherwise, the product may not operate
properly.
UNLO
nn ``
Connect the provided network cable to the camera’s network terminal.
Blue
Magenta
Booting up
Status
Booting completed / Establishing network connection
Connection to server completed / Normal operation
Pairing WPS (0.5 seconds) / In Network Setting (1 second)
Local connection established
Updating firmware
7
02
Installation &
Network Connection
Installation8
Precautions8
Wall Mounting Using Double-sided adhesive tape
9
Wall Mounting with Screws
11
Desktop mounting
12
Network Connection and Settings 13
Precautions13
Connecting via network cable
13
Connecting via Wi-Fi without WPS feature
14
Conneting using Wi-Fi WPS feature
14
8 · English
Installation
Precautions
1. Install the camera in a place where the Wi-Fi signal can be reached and
without interference.
2. Keep it away from humidity such as around the humidifier.
3. Keep it away from direct sunlight, strong light or dust; install it in a place with
clear view.
4. Do not install it in a place where there are a lot of obstacles.
5. Keep the lens clean at all times.
Wipe off the dust with a soft cloth.
6. Switching between day and night time is done according to detection result
of the luminance sensor on the left side.
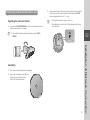
Wall Mounting Using Double-sided adhesive tape
Separating the wall-mount bracket
1. Press and hold [PUSH TO RELEASE] on the left side of bracket and turn the
bracket counterclockwise to separate it.
3. Hold the adhesive tape's holder and remove the protective film, and attach it
to the desired spot of the wall-mount bracket while making the [▲ TOP]
marker point upwards (direction of 12 o’clock).
nn `` The tape will lose adhesiveness if used once, do not re-use.
``
Before attaching tape, clean dust / water / oil off the wall-mount bracket’s adhesive
spot for better result.
may turn the bracket body counterclockwise without pressing the [PUSH TO
nn `` You
RELEASE].
TOP
UN
02
TOP
LOC
K◀
▶
LOC
K
▶ LOCK
Assembling
1. Take out tape for wall mounting from the zipper bag.
2. Remove the rectangular protective film from
the adhesive tape and attach it to the
bottom of the wall-mount bracket.
9
Installation & Network Connection
UNLOCK ◀
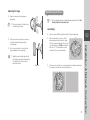
4. Run the provided adaptor wire through the
6. Fix the body bracket by turning it clockwise until it clicks.
groove prepared on the wall-mount bracket.
adaptor’s plug part to the direction of 12
nn `` Match
o’clock.
UNLOCK ◀
▶ LOCK
Grooves on the
body bracket
TOP
7. Connect the adaptor’s plug to the power
5. Arrange the wire by using two grooves on the body bracket.
both body bracket’s [UNLOCK LOCK] and wall-mount bracket’s [▲ TOP] marks
nn `` Make
face the same direction.
10 · English
terminal on the camera’s rear side.
nn ``
DC IN 5V
When done, remove the protective film from
the lens.
NETWORK
SAMSUNG
RESET
M
SMARTCA
Adjusting the Angle
Wall Mounting with Screws
1. Adjust the camera’s shooting angle as
appropriate.
nn ``
UNLOCK
◀
▶LOCK
Do not put excessive force. Otherwise, it may
cause damage to the camera.
more information about step of Separating the wall-mount bracket, refer to “Wall
nn `` For
Mounting Using Double-sided adhesive tape”.
Assembling
02
1. Take out screws (M3xL20) and Anchor (Φ5x25) from the zipper bag.
2. On a wooden wall, use screws to fix the
2. Turn the part shown in the figure clockwise to
UNLOCK
3. Turn it counterclockwise to unlock the ball
hinge and adjust the shooting angle.
JJ ``
Turning the camera counterclockwise while the
bracket body is locked may turn the bracket knob
too, and fail to fix it. In such cases, turn the
bracket knob clockwise.
Bracket knob
◀
▶LOCK
wall-mount bracket as shown in the figure.
Place the wall-mount bracket on the desired
spot while setting its [▲ TOP] mark towards
direction of 12 o’clock and fasten screws
through the 4 holes using screwdriver.
3. If fixing on a concrete wall, use screws and anchors to fix wall-mount bracket.
First, mark on the wall as shown in the figure below.
TOP
11
Installation & Network Connection
lock the bracket’s ball hinge and fix the
shooting angle.
4. Use drill bit of 5mm diameter and drill on the
marked positions, drill to have 3 cm depth
holes. Clean the holes after drilling.
JJ ``
Be careful not to get injured while drilling.
Desktop mounting
more information about step of Separating the wall-mount bracket, refer to “Wall
nn `` For
Mounting Using Double-sided adhesive tape”.
Assembling
1. Assemble body bracket and wall-mount bracket while matching the [▼] and
5. Insert an anchor for each hole. Fully insert
[▲] marks.
anchors by hammering lightly the anchor
head with a hammer/rubber hammer.
6. Place the wall-mount bracket on the desired
spot while setting its [▲ TOP] mark towards
direction of 12 o’clock and fasten screws
through the 4 holes using screwdriver.
further steps, refer to the instructions for
nn `` For
“Wall Mounting Using Double-sided adhesive
tape”.
2. Turn the body bracket clockwise until it clicks, use the groove on the body
bracket.
3. Connect the adaptor’s plug to the power terminal on the camera’s rear side.
DC IN 5V
NETWORK
SAMSUNG
SMARTCAM
RESET
UNLO
CK◀
▶ LOCK
12 · English
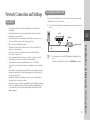
Network Connection and Settings
Precautions
If you do not have a Wireless Access Point, you must connect the camera using
LAN cable directly to your home router.
1. Connect the network cable to the camera and to the home router as shown
below.
<Hub>
DC IN 5V
NETWORK
SAMSUNG SMARTCAM
RESET
OR
02
<Modem>
Internet Service
is recommended to set the router to DHCP(Dynamic Host Configuration Protocol)
nn `` Itserver.
If you want to use static IP address, please refer to <Wired Network> on page 26.
13
Installation & Network Connection
• The wireless network access may fail, depending on the communications
environment.
• For details about the network settings and password, contact your network
administrator or service provider.
• For a specific Internet service requiring user authentication, you may not access
the service. If this is the case, contact the service provider.
• Do not access the unauthorized network.
• The farther the distance from the Wireless Access Point, the longer time the
network connection may take.
• If you fail to access the selected wireless network, try a different Wireless
Access Point to make access.
• For more information about the router or the wireless connection, refer to the
documentation of the router or contact the router manufacturer.
• If the camera is connected to a multiple-Wireless Access Point network
environment, some video packets may be lost, depending on the network traffic
load.
• According to the network policy (blocking UDP) of the service provider, the video
transmission can be limited to 3 minutes and prompt you to extend another 60
seconds up to three times.
• In addition to the above two situations, you may encounter a network delay or
interruption due to the network conditions.
• This product has gone through the compatibility test with worldwide top ranking
routers in the market but you may still have a problem in compatibility with some
conventional routers or other routers manufactured by other than the industry
leading companies.
Connecting via network cable
Connecting via Wi-Fi without WPS feature
Conneting using Wi-Fi WPS feature
If you want to connect the camera using a non-WPS Wireless Access Point,
change the network setting to Wire and try the wireless network.
1. Use the network cable (LAN cable) to connect the LAN port of the unit to the
LAN port of the Wireless Access Point.
What is WPS?
WPS enables to make connection between the camera and the Wireless Access
Point with a simple click of the button.
1. When you apply the power, the power status LED is lit red, and it will change
to red blinking when the booting is completed.
2. Press the WPS button on the camera for 1sec.
Press the WPS button on the Wireless Access Point within 2min.
DC IN 5V
<Wireless Access Point>
NETWORK
SAMSUNG SMARTCAM
RESET
<Modem>
WPS Button
NETWORK
Internet Service
2. Register and select the camera according to guide of 03. Monitoring.
3. Set your wireless network environment using the guideline <Wireless
Network> on page 26.
nn `` When the wireless network settings are completed, remove the LAN cable.
``
If you fail to connect to the Internet service, contact the service provider for details.
WPS Button
SAMSUNG SMARTCAM
DC IN 5V
RESET
NETWORK
SAMSUNG SMARTCAM
RESET
Wi-Fi
Indicator LED
Internet Service
<Wireless Access Point>
<Modem>
3. The Wi-Fi status LED will become steady blue once the camera is connected
to the Wireless Access Point. (may take up to 30sec).
If the Wi-Fi status LED (blue) is not lit, repeat steps 2 through the end and
check it again.
4. The Wi-Fi status LED will became steady green once the camera is
connected to server.
14 · English
the Wireless Access Point do not support WPS or you do not have wirelss router,
nn `` Ifplease
go to Wired Connection.
``
``
``
If no WPS button is displayed or visible on the display, see the Wireless Access Point’s
manual or contact the manufacturer of your Wireless Access Point for technical
assistance.
On some routers, you may need to log in to the web interface and click on an
on-screen button to activate the WPS feature.
02
If you fail to connect to the Internet service, contact the service provider for details.
Installation & Network Connection
15
Monitoring
03
Registration16
Account Setup and Adding Camera 16
Alarm Settings
22
Live Video
Setup General Setting
Network Setting Time Setting
18
25
25
26
27
Admin Setup 27
Update Firmware
28
Private Key
27
Information28
My Account
28
Support29
16 · English
Registration
Account Setup and Adding Camera
Once you register the product with the site, you can monitor the camera video on
the PC or laptop computer.
Web browser requirements
Windows
Mac
- Windows 7, XP supported
- Internet Explorer 7 or 8
(The 64-bit Internet Explorer 8 is not
supported.)
- Firefox
- Safari
- Firefox
- Chrome
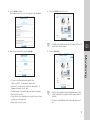
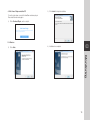
1. Enter www.samsungsmartcam.com on the web browser’s address field.
2. Select <Sign Up> to register.
After reading the terms of use, check on “I agree with”, and click <Next>.
4. Enter the <Serial No> and click the check.
number can be found the label on the side of the packaging or on the rear of the
nn `` Serial
product. Show the side of the packaging.
3. Enter the requested information, and click <Sign Up>.
XXXXXXXXXXXXXXX
Key is like a password for the camera to prevent unauthorized access to the
nn `` Private
camera. You should create the same private key for all the cameras so you will not
``
03
Monitoring
• ID : Enter the user ID and perform the duplicate check.
Fill in the user ID in 8 ~ 14 alphanumeric characters and ‘.’.
• Password : For security reason, provide the user password in 8 ~ 14
alphanumeric characters except ‘-’and ‘,’.
• Confirm Password : Please enter the password again for confirmation.
• Name : Enter the user name.
• E-mail : Enter the correct email address as it is used for reference in case
you forgot the user ID or password.
• Nation : Please select your country.
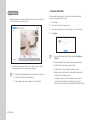
5. Create a <Private key>.
forget them.
You can use one to eight length strings of letters, numbers, and characters except ‘-’
and ‘,’.
17
6. Create a <Camera Name>.
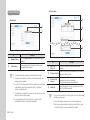
Live Video
1. From the <Camera List>, select the camera to monitor and click < >.
XXXXXXXXXXXXXXX
• Camera Name : Camera name is used to easily identify the camera when
you have more than one. i.e., Living room, Kitchen, Bedroom.
XXXXXXXXXXXXXXX
can use one to fifteen length string of letters, numbers, and characters
nn `` You
‘~`!@#$%^&*()_-|{}[];’,./?’.
7. When done, click <Add>.
nn `` The <
> icon indicates the camera is inactive so you cannot monitor it right now.
2. Enter the Private Key and select preferred language.
nn `` If you want to change the private Key, please refer to <Private Key> on page 27.
8. Once the camera is successfully registered, you can check the camera in the
<Camera List>.
3. When done, click <OK>.
XXXXXXXXXXXXXXX
18 · English
❖❖ Web Viewer Plugin-uninstalled PC
3)
Click <Install> to begin the installation.
4)
Installation has completed.
To view the video stream, you need the SmartCam web viewer plug-in.
Please install the web viewer plug-in.
1)
Click <Download Plugin>, run the setup file.
For Windows
2)
Click <Next>.
03
Monitoring
19
For Mac
2)
3)
4)
Enter password, and click <Install Software>.
5)
Installation has completed.
Click <Continue>.
Click <Install>.
20 · English
4. Select <Video> <Live> to display the live feed from the selected camera.
• <
• <
> : Takes a picture of current live image you are viewing.
> : When enabled, you can hear what’s happening around the
camera.
on the policy of the Internet service provider, the sound output may not be
nn `` Depending
supported. (in either UDP or Relay mode)
• Flip : You can flip over the video image.
• <
> : Disable the screen rotation.
> : Horizontally mirrors the video image against the vertical axis.
• <
> : Vertically flips over the video image against the horizontal axis.
• <
> : Rotate the screen by 180°
• <
• Brightness : You can adjust the brightness of the screen image.
>:S
elect frame rate based on your network speed.
Profile Name
Resolution
Frame rate
Recommended
bandwidth
Low Speed Network
VGA
5 fps
768Kbps
Mid Speed Network
VGA
10 fps
1Mbps
High Speed Network
VGA
30 fps
2Mbps
is relay mode?
nn `` What
Depending on your network connection, peer to peer connection may not be available.
``
``
When peer to peer connection is not available, the camera will connect in Relay Mode,
which limits the viewing to 3 minutes initially and will prompt you to extend another 60
seconds up to three times.
Relay mode is added feature where the video from the camera is transmitted to
Samsung server then retransmitted to the user's computer.
If you have trouble connection to the camera, visit "http://www.samsungsmartcam.
com", go to support page, and refer to “Troubleshooting” on it.
provided by the cable service provider is lower than recommended,
nn `` Ifyouthemaybandwidth
encounter a blurry image or a temporary loss of video signal.
21
Monitoring
• <
03
Alarm Settings
Camera has ability to send event notifications when motion or audio is detected.
See the notification bar below the live view.
<Youtube> Notification
When enabled, the camera creates 30 second video clip and automatically
uploads to your private YouTube account.
1. Select Enable.
2. Enter your YouTube user ID and password.
3. Select public or private folder to save. By default, it’s set to private folder.
4. Click [Apply].
can check the recorded video at the YouTube homepage “Video Manager”
nn `` You
“Uploaded”.
1. From the bottom menu bar of the live screen, select to click one of SNS,
Messenger, and Email. The context menu should appear.
nn `` Provide the user ID and password that you have created and set in the previous site.
``
``
22 · English
If you fail to synchronize time, no event alarm will occur.
In order to synchronize time, the device should be connected to the Internet.
``
``
``
``
``
Note that depending on the policies of YouTube, the video may not be uploaded.
If setting to “Public”, the video may be exposed to the public.
It is advisable to create and use one YouTube account for each camera.
Even when you have set the YouTube alarm, the video will not be transferred if the
event alarm is not set to Enabled (see page 25).
If a continuous motion is detected or the audio alarm occurs, the camera can
recognize the next event only after the uploading to YouTube is completed.
(In other words, it does not recognize any event until the YouTube upload is finished.)
<Picasa> Notification
When enabled, camera will send a picture of the event to your Picasa account.
1. Enter your Picasa user ID and password.
samsungsmartcam.com). When an alarm occurs, the PUSH alarm will be
notified to the respective smart phones via the Web site.
• If you want to receive the notification with Google Talk, follow the instructions
below to configure the Google Talk settings.
2. Select either public or private folder to save. By default, it’s set to private
folder.
3. Click [Apply].
1. [email protected]
❖❖ <Google Talk> Notification
1)
<My Friends> Notification
When enabled, camera will send event notifications to listed user IDs.
Notifications can be viewed in Smartcam App or Google Talk.
• If this is set to <Enable>, the video and image link recorded in YouTube and
Picasa will be transferred to the listed friends in real time in the event of an alarm.
• The video/image alarm will be transferred only if you have set the Youtube and
Picasa enabled. Otherwise, no alarm will be triggered.
• You will have no video displayed if you don’t have any Youtube ID and access a
private content.
• Even when you access the Youtube site, no video will be played automatically.
Be sure to click the Play icon to play a video.
If you fail to play the video, log into the Youtube site and install Flash Player and try again.
• The Friend list will have user IDs registered at the Web site (www.
2)
3)
4)
5)
6)
When enabled, you can receive real-time event notification through Google
Talk messenger and Smartphone push service.
To receive instant event notification, add the camera as a friend to your
Google Talk messenger account. You have to add the following user ID.
(camera serial [email protected]) (i.e., XXXXXXXX@
xmpp.samsungsmartcam.com)
Once camera is invited, you will receive an instant message to enter the private
key for authentication. Enter the private key of the camera you are adding.
Once completed, you can see the Google Talk messenger ID in the camera
My Friends list.
Click [Apply].
23
03
Monitoring
you have set the private setting of the video image, no image will be found in portal sites.
nn ```` IfRefer
to the policy of Picasa for the maximum number of uploaded images.
The friend's list, it shows the IDs that camera is registered to and Google Talk
friends that receives real-time notification from the camera.
<Twitter> Notification
When enabled, camera will send a notification as a message to your twitter account.
1.
2.
3.
4.
<E-mail> Notification
<Receiver
email address>
Click on “Request URL”.
Clcik [Move].
Twitter web page will pop-up for authorization.
Enter your Twitter user ID and password and click on “Authorize app” to get
the Access Token.
5. You will see the pin number generated. Copy the pin numbers and go back
to the camera page and paste the pin number in the Access Token section.
6. Click [Apply].
1. Please see the below table for the popular email server information.
Gmail
The alarm notification will be sent to the specified user account via Twitter.
Yahoo Plus
plus.smtp.mail.
25
465
Server Address
smtp.gmail.com
Use SSL.
Use
User
Authentication
on
on
on
ID
Full email address
Password
Email password
Only ID without
“@yahoo.com”
Only ID without
“@yahoo.com”
Full email address
Full email address
Port
nn ``
Yahoo
smtp.mail.yahoo.
com
Sender
465
Full email address
Don’t Use
Email password
yahoo.com
Use
Email password
2. If your email provider is not listed, you need to get the email server
information from your email provider.
3. Add above information and receiver full email address.
4. Click [Add] button.
Now, the receiver full email address will be shown in the List Box. If you want
to register more than one email address, you can just repeat the same
procedure.
5. Click [Apply].
24 · English
No.
Setup
d
Description
Flickerless
This will prevent possible screen distortion due to a mismatch between
the vertical sync frequency and the blinking frequency of the lighting.
Adjust the volume of the built-in microphone and speaker of the
camera as appropriate.
General Setting
e
If you set Mic to ‘0’, it will not record sound for alarm notification of
YouTube.
Audio
Note that the Two-way audio transfer function is available only with the
smart phone application.
a
e
b
d
display more than one live video with the Web browser, they can be overlapped
nn `` Ifinyou
some portion. It is recommended to use one browser at one time.
``
No.
Description
a
Event Alarm
Specify whether to trigger the alarm or not, and specify the sensitivity.
The higher the sensitivity is, the subtler motion/audio events will be
detected.
b
Night Vision
Set the IR lighting.
If you set it to <OFF>, the camera will not switch to the Night Vision
mode.
c
Event schedule
You can activate the motion and audio detection at a desired time.
Always: It will work at all times.
Scheduled: You can select the time of activation.
25
03
Monitoring
``
c
The Night Vision video produces a different visibility according to the distance between
camera and subject.
If camera is capturing a close object, the video analysis capability may degrade. In the
following cases, the video analysis function may not produce a proper result on the
default event and motion detections.
- The object color or brightness is similar to the background.
-M
ultiple movements continue occurring at random due to a scene change or other reasons.
- A fixed object continues moving in the same position.
- An object hides other objects behind.
- Two or more objects overlap or one object divides in multiple portions.
- Too fast object (for a proper detection, one object should be found overlapping
between contiguous frames).
- Reflection / blur / shadow due to a strong light such as direct sunlight, illumination,
or headlamp.
- In severe snow, rain, wind or in dawn / dusk.
- A moving object comes close to the camera.
<Wireless Network>
Network Setting
<Wired Network>
a
a
b
b
c
d
No.
a
b
Description
Dynamic IP Address
If you select “Dynamic IP Address”, the IP address will be obtained
automatically.
Static IP Address
You must manually provide the information of: IP address, subnet
mask, gateway, DNS server address.
nn ``
``
``
``
``
26 · English
If any of the manual settings is wrong, the network settings will not be applied.
If you have both cable and wireless network connections simultaneously, the cable
network connection is prioritized.
Press WPS to set the network connection to Wireless regardless of the current network
settings. When the system reboots, it will switch to Cable if the cable network
connection is already established.
If you switch from the current wireless connection to the cable connection, the network
will switch to cable connection accordingly.
For more information about the router or the wireless connection, refer to the
documentation of the router or contact the router manufacturer.
No.
Description
Wireless On/
Wireless Off
You can select to activate or deactivate the wireless network
connection.
b
AP (Access Point) list
c
AP (Access Point)
password
If you select a secured AP (Access Point), you must enter the
password before you can access the network.
For the password, contact your network administrator.
d
Hidden SSID
a
You will see a list of APs (Access Point) available. Select a desired one
from the list of APs (Access Point).
If your SSID is hidden, select the type of security you have. Enter the
name of the SSID and the password.
you select a non-secured AP (Access Point), you just can access the network without
nn `` Ifproviding
a specific password.
``
``
If you entered a wrong password, you cannot access the network whatsoever.
When the wireless network settings are completed, remove the LAN cable. If you do
not remove the LAN cable, the wireless network will not be available.
Time Setting
Admin Setup
a
Private Key
b
03
a
No.
Description
Time Zone
Select your region.
b
Summer Time
Check this option if you live in a country or region where DST(Daylight
Saving Time) is applied.
nn `` The time will synchronize with the NTP(Network Time Protocol) server automatically.
``
``
``
For this, Internet connection is required.
You need to set the timezone correctly to obtain the exact time setting.
The time displayed without Internet connection may not be accurate.
No.
a
Description
Change Private Key
You can change the private Key.
Enter the current private Key, and type a new private Key.
you change the private key, you will be logged out and return to the private key input
nn `` Ifpage.
``
``
The private key can be changed only in admin mode.
Keep the private key in a safe place as it is used for viewing the live screen of the
camera or for changing the display settings.
27
Monitoring
a
Update Firmware
Information
XXXXXXXXXXXXXXX
No.
a
XXXXXXXXXXXXXXX
a
Description
Update Firmware
My Account
Please update your current software version if it is lower than the
final version.
If the final version is the same as or lower than the current version, the
“Update Firmware” button will not be active. No update will proceed.
nn `` Use the cable network if possible to update the firmware.
``
``
28 · English
If the power is off during the update, it will cause a fatal damage to the product.
The duration of the firmware update depends on the size of the firmware file and the
network connection speed.
want to change your information, move to “My account” page and select an
nn `` Ifitemyou(password
and/or email address) and make changes as necessary.
Support
03
Monitoring
nn `` If you want to know more information of camera, move to "Support" page.
29
Appendix
04
Specifications30
Specifications30
Product Appearance
32
Troubleshooting33
Specifications
Specifications
Item
Description
Video
Imaging Device
1/5" 3M CMOS
Effective Pixels
2,048(H) x 1,536(V)
Scanning System
Progressive
Synchronization
Internal
Lens
Focal Length (Zoom Ratio)
2.87mm
Angular Field of View (D/V/H)
65.1°/ 42.9°/ 54.1°
Min. Object Distance
300mm ~ ∽
Focus Cotrol
Fixed
Zoom Movement Speed
Not Support
Lens Type
3 Plastic lens
Pan / Tilt / Rotate
30 · English
Pan Range
-15°~15° (Manual)
Tilt Range
0°~120° (Manual)
Item
Description
Operational
Item
Description
Audio Communication
2-Way (Built-in Microphone, Speaker)
On Screen Display (Web Browser,
Local page)
English, French, Germany, Spanish, Italian, Korean
Protocol
TCP/IP, DHCP, SMTP, DNS, RTSP, RTCP, RTP, HTTP, TCP, UDP,
STUN, XMPP, SIP, uPNP, ICE, SNTP, IPv4, ICMP
Day & Night
Auto(Infra-red Cut Removable), Color, B./W (850nm), 5m
Streaming Method
Unicast
OS
Linux
Max. User Access
5 users at Unicast Mode
Audio Detection
Support
Motion Detection
Video Motion Detection
Web Viewer
Supported Browser :
Internet Explore (7,8), Safari, Firefox, Chrome (Silverlight prefered)
White Balance
Auto
Mobile application support
Digital Zoom
Not Support
iPhone 3Gs/4, Galaxy S/S2 (Recommended Smartphone),
Galaxy Tab 10.1, iPad 2 (Recommended Tablet PC)
Environmental
Flip / Mirror
Yes
Operating Temperature / Humidity
Network
RJ-45 (10/100BASE-T)
Wireless
Wi-Fi 802.11 b/g/n
WPS (Wi-Fi Protected Setup)
Support WPS Button
Video Compression Format
H.264, MJPEG
Resolution
640x480, 320x240
Max. Framerate
30fps (640x480)
H.264: Compression Level
MJPEG : Quality Level Control
Streaming Capability
Multiple Streaming (Up to 4 Profiles)
Audio Compression Format
G.711
Input Voltage / Current
5V DC / 2.2A
Power Consumption
Max. 7W
Indication
1 LED (Power, Status, Link)
CPU & Memory
TI DM365 (216Mhz), SDRAM : 256MB, NAND : 128MB
Appendix
Ethernet
Video Quality Adjustment
04
0°C ~ +40°C (+32°F ~ +104°F)/ ~ 80% RH
Electrical
Mechanical
Color / Material
White/Plastic
Dimension (WxHxD)
54 x 90 x 30.07 mm (w/o Bracket)
Weight
140g
31
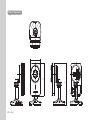
Product Appearance
114
90
54
32 · English
Problem
Troubleshooting
If you encounter a problem with your system, see the table below to solve the problem
as quickly and easily as possible. Please follow the instruction below:
Problem
Action
I failed to connect
wirelessly with the
camera.
-- If you encounter a frequent turn off of the wireless Internet LED, this may be
caused by an improper place for the wireless Internet network. Come closer
to the AP and try again.
-- If the wireless network is unstable, you can still make connection via the
cable network.
After logged in, I
failed to register the
camera.
-- Check if the entered serial number matches with the label on the rear of
the camera.
-- Please re-enter the valid private key and try again.
-- If the problem persists, reset the camera to the factory default and start all
over again.
(To reset the camera to the factory default, press and hold the reset button
on the rear of the camera. The camera will reboot when the factory reset is
completed.)
The camera is
registered, but is not
ready for network
connection.
-- Check if the front LED on the camera turns on.
-- If the wireless LAN LED turns off, follow the applicable instructions to make
the wireless LAN connection using WPS.
-- If the problem persists even if the wireless LAN LED turns off, move the
camera near the wireless AP and try again.
-- If you use the cable LAN network, the wireless LAN LED should turn off.
If the cable LAN is connected, the product will be connected to the server
automatically by the AP.
-- Move to Setup General Setting Motion/Audio and adjust the sensitivity
as necessary.
-- From the Notification settings page on the bottom of the live screen,
configure the Picasa notification settings. (See page 23 of the manual)
The capture images in
-- Picasa has different service policies according to the country. The policy for
the camera will not be
your country may prohibit uploading to Picasa. Please first check the Picasa
uploaded to Picasa.
policy for your country.
-- According to the Picasa policy, it may limit the uploading size. Check the
allowable free space of your Picasa account, and if insufficient, delete the
exiting images or increase the upper limit.
Notification from
the camera is not
transferred to Twitter.
-- Move to Setup General Setting Motion/Audio and adjust the sensitivity
as necessary.
-- From the Notification settings page on the bottom of the live screen,
configure the Twitter notification settings. (See page 24 of the manual)
The video from the
camera is temporarily
lost.
-- The video from the camera will be affected by the illumination of the
installation site of the camera. This is why the video from the camera looks
lost if the camera is installed in a low illumination environment.
-- The video from the camera can be delayed according to a network delay.
Please check if the camera is installed in a place of proper wireless Internet
communications.
33
04
Appendix
I forgot my user ID/
password.
-- Move to “Log-in page Find ID/PW”, and enter the registered e-mail
address to which we will send you the user ID and/or a new password.
It can be spammed out depending on the policy of the email server.
After logged in, it is advisable to change the temporary password provided.
The camera video
is not uploaded to
YouTube.
Action
-- Move to Setup General Setting Motion/Audio and adjust the sensitivity
as necessary.
-- From the Notification settings page on the bottom of the live screen,
configure the YouTube notification settings. (See page 22 of the manual)
-- YouTube has different service policies according to the country. The policy
for your country may prohibit uploading to YouTube. Please first check the
YouTube policy for your country.
-- According to the YouTube policy, it may limit the uploading size. Check the
allowable free space of your YouTube account, and if insufficient, delete the
exiting video clips or increase the upper limit.
Problem
Action
No sound is output
from the video.
-- Adjust the volume of the microphone or audio sound in the Setup page of
the camera.
-- Click the Voice icon in the video playback page, or check if the voice is
turned On in your smart phone app.
-- Depending on the policy of the Internet service provider, the sound output
may not be supported. (in either 3G UDP or Relay mode)
I forgot my Private
key.
-- You must create a new private key.
-- Press and hold the reset button in the rear of the product for at least
5 seconds to reset to the factory default.
-- After the factory reset, access the camera and set the Private key again.
I want to change my
password and/or
email address.
-- After logging in, move to the “My account” page, select an item (password
and/or email address) and make changes as necessary.
Samsung Techwin cares for the environment at all product manufacturing stages, and
is taking measures to provide customers with more environmentally friendly products.
The Eco mark represents Samsung Techwin’s devotion to creating environmentally
friendly products, and indicates that the product satisfies the EU RoHS Directive.
Correct Disposal of This Product
(Waste Electrical & Electronic Equipment)
(Applicable in the European Union and other European countries with separate
collection systems)
This marking on the product, accessories or literature indicates that the product and
its electronic accessories (e.g. charger, headset, USB cable) should not be disposed
of with other household waste at the end of their working life. To prevent possible
harm to the environment or human health from uncontrolled waste disposal, please
separate these items from other types of waste and recycle them responsibly to
promote the sustainable reuse of material resources.
Household users should contact either the retailer where they purchased this
product, or their local government office, for details of where and how they can take
these items for environmentally safe recycling.
Business users should contact their supplier and check the terms and conditions
of the purchase contract. This product and its electronic accessories should not be
mixed with other commercial wastes for disposal.
34 · English
SALES NETWORK
SAMSUNG TECHWIN CO., LTD.
Samsungtechwin R&D Center, 701, Sampyeong-dong, Bundang-gu, Seongnam-si, Gyeonggi-do, Korea, 463-400
TEL : +82-70-7147-8740~60 FAX : +82-31-8018-3745
SAMSUNG TECHWIN AMERICA Inc.
100 Challenger Rd. Suite 700 Ridgefield Park, NJ 07660
Toll Free : 1-877-349-3149
www.samsungsv.com
SAMSUNG TECHWIN EUROPE LTD.
Samsung House, 1000 Hillswood Drive, Hillswood Business Park Chertsey,
Surrey, UNITED KINGDOM KT16 OPS
TEL : +44-1932-45-5300 FAX : +44-1932-45-5325