1
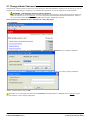
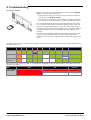
IP Office PARTNER Version
PARTNER Version Quick Installation
Guide
- Issue 1b - (22 February 2010)
© 2010 Avaya All Rights Reserved.
Notice
While reasonable efforts were made to ensure that the information in this document was complete and accurate at the time of
printing, Avaya Inc. can assume no liability for any errors. Changes and corrections to the information in this document may be
incorporated in future releases.
Documentation Disclaimer
Avaya Inc. is not responsible for any modifications, additions, or deletions to the original published version of this
documentation unless such modifications, additions, or deletions were performed by Avaya.
Link Disclaimer
Avaya Inc. is not responsible for the contents or reliability of any linked Web sites referenced elsewhere within this
Documentation, and Avaya does not necessarily endorse the products, services, or information described or offered within
them. We cannot guarantee that these links will work all of the time and we have no control over the availability of the linked
pages.
License
USE OR INSTALLATION OF THE PRODUCT INDICATES THE END USER’S ACCEPTANCE OF THE TERMS SET FORTH
HEREIN AND THE GENERAL LICENSE TERMS AVAILABLE ON THE AVAYA WEBSITE AT
http://support.avaya.com/LicenseInfo/ (“GENERAL LICENSE TERMS”). IF YOU DO NOT WISH TO BE BOUND BY THESE
TERMS, YOU MUST RETURN THE PRODUCT(S) TO THE POINT OF PURCHASE WITHIN TEN (10) DAYS OF DELIVERY
FOR A REFUND OR CREDIT.
Avaya grants End User a license within the scope of the license types described below. The applicable number of licenses and
units of capacity for which the license is granted will be one (1), unless a different number of licenses or units of capacity is
specified in the Documentation or other materials available to End User. “Designated Processor” means a single stand-alone
computing device. “Server” means a Designated Processor that hosts a software application to be accessed by multiple users.
“Software” means the computer programs in object code, originally licensed by Avaya and ultimately utilized by End User,
whether as stand-alone Products or pre-installed on Hardware. “Hardware” means the standard hardware Products, originally
sold by Avaya and ultimately utilized by End User.
License Type(s): Designated System(s) License (DS).
End User may install and use each copy of the Software on only one Designated Processor, unless a different number of
Designated Processors is indicated in the Documentation or other materials available to End User. Avaya may require the
Designated Processor(s) to be identified by type, serial number, feature key, location or other specific designation, or to be
provided by End User to Avaya through electronic means established by Avaya specifically for this purpose.
Copyright
Except where expressly stated otherwise, the Product is protected by copyright and other laws respecting proprietary rights.
Unauthorized reproduction, transfer, and or use can be a criminal, as well as a civil, offense under the applicable law.
Third-Party Components
Certain software programs or portions thereof included in the Product may contain software distributed under third party
agreements (“Third Party Components”), which may contain terms that expand or limit rights to use certain portions of the
Product (“Third Party Terms”). Information identifying Third Party Components and the Third Party Terms that apply to them is
available on Avaya’s web site at: http://support.avaya.com/ThirdPartyLicense/
Avaya Fraud Intervention
If you suspect that you are being victimized by toll fraud and you need technical assistance or support, call Technical Service
Center Toll Fraud Intervention Hotline at +1-800-643-2353 for the United States and Canada. Suspected security
vulnerabilities with Avaya Products should be reported to Avaya by sending mail to: [email protected].
For additional support telephone numbers, see the Avaya Support web site (http://www.avaya.com/support).
Trademarks
Avaya and the Avaya logo are registered trademarks of Avaya Inc. in the United States of America and other jurisdictions.
Unless otherwise provided in this document, marks identified by “®,” “™” and “SM” are registered marks, trademarks and
service marks, respectively, of Avaya Inc. All other trademarks are the property of their respective owners.
Documentation information
For the most current versions of documentation, go to the Avaya Support web site (http://www.avaya.com/support) or the IP
Office Knowledge Base (http://marketingtools.avaya.com/knowledgebase/).
Avaya Support
Avaya provides a telephone number for you to use to report problems or to ask questions about your contact center. The
support telephone number is 1 800 628 2888 in the United States. For additional support telephone numbers, see the Avaya
Web site: http://www.avaya.com/support.
PARTNER Quick Install
IP Office PARTNER Version
Page 2
- Issue 1b (22 February 2010)
Contents
Contents
1. Introduction
1.1 IP Office Manager
..................................................................... 8
............................................................................
9
1.1.1 Installing
Manager
1.2 System Constraints
..................................................................... 10
2. Getting Started
2.1 Unpacking ..................................................................... 14
2.2 Cabling and
.....................................................................
Cables
15
3. System Installation
3.1 Control Unit
.....................................................................
3.1.1 Grounding
............................................................................
3.2 SD Card .....................................................................
3.3 Fitting Base
Cards
.....................................................................
3.4 Going Live.....................................................................
3.5 Manager Responses
.....................................................................
3.6 Connecting.....................................................................
the System
3.7 Change Admin
Password
.....................................................................
3.8 Set System.....................................................................
Password
3.9 Final Actions
.....................................................................
19
20
21
22
23
24
25
26
28
29
4. Troubleshooting
Index
...............................................................................37
PARTNER Quick Install
IP Office PARTNER Version
Page 3
- Issue 1b (22 February 2010)
Chapter 1.
Introduction
PARTNER Quick Install
IP Office PARTNER Version
Page 5
- Issue 1b (22 February 2010)
Introduction:
1. Introduction
The Avaya IP Office Essential Edition - PARTNER® Version is a telephone system software that runs on the Avaya IP
Office 500 V2 hardware platform. It is designed for small businesses and more specifically retail stores, manufacturers,
and professional offices; generally with 5 to 25 users.
IP Office Essential Edition - PARTNER Version, although physically different, provides the same features and behavior as
the Avaya PARTNER Advanced Communication System (ACS).
This quick guide explains how to install the IP Office Essential Edition - PARTNER Version system. It is intended that
installation should be carried out by an Avaya trained technician using a laptop PC with IP Office Manager R6.0+
software installed. When this quick installation is completed systems running with analog trunks, should place and receive
calls with no further programming or setup.
·
The IP Office PARTNER Version system is a converged voice and data communications system. It should
therefore only be installed by persons with telephony and IP data network experience.
·
Installers must be trained on IP Office systems. Through its Avaya University (AU), Avaya provides a range of
training courses including specific IP Office implementation and installation training. It also provides certification
schemes for installers to achieve various levels of IP Office accreditation.
·
It is the installer’s responsibility to ensure that all installation work is done in accordance with local and national
regulations and requirements. It is also their responsibility to accurately establish the customer’s requirements
before installation and to ensure that the installation meets those requirements.
·
You should read and understand this documentation before installation. You should also obtain and read the
Avaya Technical Bulletins relevant to recent IP Office software and hardware releases to ensure that you are
familiar with any changes to the equipment and software.
Limitations
This document contains only basic information for systems using standard analog telephone equipment.
Essential Edition - PARTNER Version is an out of the box installation and is meant to be operational for analogue
telephone users when it is switched on, without requiring any setting up or pre configuration.
For telephones that require system configuration such as SIP or Trunk settings, or if you are not fully familiar with the
Avaya IP Office system, you should refer to the installation and configuration instructions contained in the Avaya IP
Office Essential Edition - PARTNER Version, Installation and Reference Manual and the Avaya IP Office Essential Edition PARTNER Version, Administrator PC Tool.
Note: IP Office PARTNER Version can be installed without using Avaya IP Office Manager software but only if it is a
very basic system. If this method of installation is used, only those sections of this document listed below are
relevant.
Chapter 1 - Introduction (this section) and System Constraints
Chapter 2 - Getting Started
12
only.
; all
Chapter 3 - System Installation
and Final Actions 29 .
PARTNER Quick Install
IP Office PARTNER Version
10
18
; all except Manager Responses
24
, Changing Remote/Administration password
26
Page 7
- Issue 1b (22 February 2010)
1.1 IP Office Manager
This data is provided for information only. It is not part of the installation procedure.
The Essential Edition - PARTNER Version Admin Tool (IP Office Manager) is an application for viewing and editing an IP
Office system configuration. It is a tool meant primarily for system installers and maintainers. Manager runs on a
Windows™ PC and connects to the Essential Edition - PARTNER Version equipment via Ethernet LAN connections. It is the
recommended tool you should use during installation.
When Manager is used with Essential Edition - PARTNER Version, the PC running Manager is connected directly to the IP
Office 500v2 control unit being installed or updated. Manager detects that an Essential Edition - PARTNER Version
configuration is present and automatically starts in its Essential Edition - PARTNER Version mode, designed to manage
the system.
Manager is part of the IP Office Admin suite of programs.
and has its own user manual for Essential Edition PARTNER.
You should note that the software level of Manager application is 2 higher than the software level of the IP Office 500
system core software with which it is released. For example IP Office Manager R8.0 was released with IP Office R6.0 core
software.
Manager can be used to change, or introduce changes, to the Essential Edition - PARTNER Version system configuration.
Easy to use hot links initiate administrator tasks
IMPORTANT
Manager is an off-line editor. It loads a copy of the IP Office PARTNER Version system current configuration settings.
Changes are made to that copy and it is then sent back to the IP Office 500v2 control unit for those changes to
become active. This means that changes to the active configuration in the system that occur between Manager
receiving and sending back the copy may be overwritten. For example this may affect changes made by users
through their phone or voicemail mailbox after the copy of the configuration is received by Manager.
PARTNER Quick Install
IP Office PARTNER Version
Page 8
- Issue 1b (22 February 2010)
Introduction: IP Office Manager
1.1.1 Installing Manager
This data is provided for information only. It is not part of the installation procedure.
Manager 8 is a component of the IP Office Admin Suite of applications. This suite is supplied on the IP Office
Administrator Applications DVD. In addition to Manager, the suite includes:
· System Monitor
This is a tool for system installers and maintainers. Interpreting the information output by System Monitor requires
detailed data and telecoms knowledge.
· System Status Application
This application that can be used to monitor the status of an IP Office system such as extension, trunks and other
resources. It displays current alarms and most recent historical alarms.
PC Requirements
Minimum PC Requirements
Operating System Support
RAM
256MB
Server OS:
Hard Disk Free Space
1GB*
Windows 2003 Server
Processor:
Windows 2008 Server
- Pentium
PIII 800MHz
Client OS:
- Celeron
Celeron 3 800Mhz
2000 Professional
- AMD
Athlon Opteron, Athlon64/XP
XP Professional
Additional Apps:
- .NET2
Vista Business/Enterprise
Installed with Manager if not
already present.
Vista Ultimate
Windows 7
*Includes disk space required for .NET2 component.
PARTNER Quick Install
IP Office PARTNER Version
Page 9
- Issue 1b (22 February 2010)
1.2 System Constraints
This data is provided for information only. It is not part of the installation procedure.
Max allowed in
system
IP Office Essential Edition - PARTNER Version
Base Cards:
Phone 8 - Base
3
Phone 2 - Base
3
DS 8 - Base
3
ETR-6 – Base (new)
3
6DS+2POTS+VCM10 LE Combination (new)
2
IP Office 500 Daughter Cards:
ATM 4 Uni - daughter
3
PRI 1 Uni - daughter
1
IP Office 500v2 Expansion Modules:
IP Office 500v2 PHONE 16
1
IP Office 500v2 DIGITAL STATION 16
1
System capacity for the Essential Edition - PARTNER Version is flexible and can use combinations of the following
hardware components:
· Control unit (4 available slots – maximum of 4 of the following cards):
· The first (left hand) slot of the control unit must have a DS or ETR ports base card fitted. This is because in the
Essential Edition - PARTNER Version, extensions 10 and 11 (ports 1 and 2) must support digital supervisor
telephones.
• Up to 2 Combination cards (each provides 6 DS ports; 2 POTS station ports; 4 POTS line ports; and supports up to
10 SIP lines)
• Up to 3 ETR-6 cards (each provides 6 ETR station ports)
• Up to 3 DS8 cards (each provides 8 digital station ports)
• Up to 3 Phone 8 cards (each provides 8 POTS station ports)
o Maximum of 3 because a combination card; DS-8 or ETR-6 must be present in system
• Up to 3 Phone 2 cards (each provides up to 2 POTS station ports)
o Maximum of 3 because a combination card; DS-8 or ETR-6 must be present in system
An ATM4 daughter card can be added to any ETR6 card or DS card, or Phone card increasing POTS line capacity. 1 PRI/
T1 daughter card may be added to any ETR-6 card or DS card or Phone card, increasing digital line capacity.
One expansion module may be added to the main control unit; providing additional growth capability. The supported
expansion modules are:
• DS16 Expansion Module (adds 16 additional digital station ports.)
• Phone 16 Expansion Module (adds 16 additional analog station ports)
Based on these configurations; an Essential Edition - PARTNER Version may support up to 56 lines (1-PRI; 3 ATM4; up to
10 SIP trunks) and up to 48 stations (Up to 18 ETR stations and/or 46 digital ports + 2 POTS). Maximum growth
capabilities are software blocked in the system.
IP Office PARTNER Version will support up to 10 SIP trunks, which can be assigned across multiple SIP service providers.
The following features are pre-assigned on the ETR-18D and 34D telephones:
· Last Number Redial
· Drop
· Voice Mail Access. Each extension has voice mailbox assigned with Automatic Voice Mail Coverage turned on.
· Recall (CO hook flash)
· Auto Line Selection – L1, L2, etc.
PARTNER Quick Install
IP Office PARTNER Version
Page 10
- Issue 1b (22 February 2010)
Chapter 2.
Getting Started
PARTNER Quick Install
IP Office PARTNER Version
Page 11
- Issue 1b (22 February 2010)
2. Getting Started
This chapter describes preparation work that should precede installation of the Essential Edition - PARTNER Version
equipment and software.
System components
Pre requirements
· IP Office 500v2 control unit with power lead
· Base and daughter cards fitted to base cards as necessary, to fulfill customer system requirements
· Minimum of 1 digital (supervisor) telephone provided by the customer
· Avaya SD Card registered to customer
· Mounting kits installed if units are not to be freestanding.
Tools Required
1. Phillips No. 1 screwdriver for removal of module covers.
2. Cutter for cable ties.
3. Phillips No. 4 screwdriver.
4. Flat screwdriver No 5 medium size.
5. Wrist-strap for anti-static grounding or similar.
6. PC running Windows XP/2003.
During the Staging Installation later in this manual, we recommend that you use a Laptop PC that has the IP Office
Manager Essential Edition - PARTNER Version Administration Tool (Manager) application installed with a LAN cable for
direct connection to the control unit, to enable changes to be made in the basic configuration or to set up user lists.
7. Indelible marker for cable labeling.
PARTNER Quick Install
IP Office PARTNER Version
Page 12
- Issue 1b (22 February 2010)
Getting Started:
Parts Required
1. Cable ties.
2. Cabling labels.
3. Technical Bulletins
Each IP Office PARTNER Version software release is normally accompanied by a Technical Bulletin detailing special
installation requirements, known issues, etc. Various software releases and their associated Technical Bulletins can also
be obtained from http://support.avaya.com.
Pre-installation activity involves the following:
· Evaluating the environmental requirements
· Connecting lines and extensions
· Identifying telephone type to be installed at each extension
· Mounting and connecting auxiliary equipment
· Obtain a Laptop PC which has IP Office Manager R6.0
8
or above installed
· Ensure you have a pre programmed Avaya SD card that is compatible with the system you are about to install.
Note: The pre-installation tasks listed above should have been completed before installing the hardware
PARTNER Quick Install
IP Office PARTNER Version
Page 13
- Issue 1b (22 February 2010)
2.1 Unpacking
Use the following procedure when unpacking any equipment supplied by
Avaya or an Avaya reseller or distributor.
Objective - To check that the correct equipment has been supplied and
that no damage has occurred during transit.
Information Required
· Equipment Checklist.
Obtain an installation checklist of the parts and equipment expected.
· Identify the SD memory Card
The serial number is printed on the SD, prefixed with either SN or FK
.
· Check for Package Damage.
Before unpacking any equipment, check for any signs of damage that may have occurred during transit. If any
damage exists bring it to the attention of the carrier.
· Check the Correct Parts Have Been Delivered.
Check all cartons against the packing slip and ensure that you have the correct items. Report any errors or
omissions to the equipment supplier.
· Retain All Packaging and Documentation.
While unpacking the equipment, retain all the packaging material. Fault returns are accepted only if repackaged in
the original packaging. If performing a staged installation, the original packaging will also assist when repacking
equipment to be moved to the final install site.
· Ensure that Anti-Static Protection Measures are Observed.
Ensure that anti-static protection measures are observed at all times when handling equipment with exposed
electrical circuit boards.
· Check All Parts.
Visually inspect each item and check that all the necessary documentation and accessory items have been
included. Report any errors or omissions to the dealer that supplied the equipment.
· Check All Documentation.
Ensure that you read and retain any documentation included with the equipment.
PARTNER Quick Install
IP Office PARTNER Version
Page 14
- Issue 1b (22 February 2010)
Getting Started: Unpacking
2.2 Cabling and Cables
The Essential Edition - PARTNER Version system is designed primarily for use within an RJ45 structured cabling system
using CAT3 unshielded twisted-pair (UTP) cabling and RJ45 sockets.
A structured cabling system is one where cables are run from a central RJ45 patch panel in the communications/data
room to individual RJ45 sockets at user's desk. All wires in each cable between the patch panel and the desk socket are
connected straight through. This arrangement allows devices connected at the patch panel to be swapped to match the
type of device that needs to be connected at the user socket. For example, making one user socket a phone port and
another user socket a computer LAN port, without requiring any rewiring of the cables in between.
· Traditional IDC Punchdown Wiring Installations
Where necessary, the far end RJ45 plug can be stripped from IP Office cables and wired into traditional wiring systems
using punch-block connectors. This type of installation should be performed by an experienced wiring technician.
· Trunk Connections
The majority of IP Office trunk ports use RJ45 connectors for acceptance of an RJ45-to-RJ45 cable. However,
connection at the line providers end may require use of a different plug type in order to match the line providers
equipment.
· RJ11 Phone Connectors
Many phones use RJ11 sockets and are supplied with RJ11-to-RJ11 cables. RJ11 plugs can be inserted into RJ45
sockets and in many case the connection will work. However this is not recommended or supported as the connection
lock is not truly positive and may become disconnected. An RJ45-to-RJ11 cable should be used for these connections.
PARTNER Quick Install
IP Office PARTNER Version
Page 15
- Issue 1b (22 February 2010)
Standard IP Office Cables
The following are Avaya standard cables available for use with IP Office systems. The maximum length is applicable if the
standard Avaya cable is replaced with an alternative cable.
Cable
Description
Part
Standa Maximu
number rd
m
Length Length
9-Way DTE Cable
Connects to control unit RS232 DTE port. 9-Way D-type plug –
to 9-way D-type socket.
2m/6'6' 2m/6'6''.
'.
Structured Cabling DS Line Connects from RJ45 sockets to RJ11 socketed digital station 7000478 4m/13' See table
Cable
and analog phones.
71
2''.
below.
PRI Trunk Cable
Connects PRI trunk ports to the line providers network
termination point. RJ45 to RJ45. Red.
7002134 3m/9'1 –
40
0''.
Expansion Interconnect
Cable
Connects the control unit to expansion module. RJ45 to
RJ45. Blue.
7002134 1m/3'3' 1m/3'3''.
57
'.
LAN Cable
Connects from IP Office LAN ports to IP devices. RJ45 to
RJ45. Grey.
7002134 3m/9'1 100m/32
81
0''.
8'.
The table below details the maximum total cable distances for DS and analog extensions using different cable types.
Unshielded Twisted-Pair (UTP) - 50nf/Km
Telephone
CW1308
AWG22
(0.65mm)
AWG24
(0.5mm)
AWG26
(0.4mm)
1400 Series
1000m/3280'.
1000m/3280'.
400m/1310'.
400m/1310'.
ETR
1000m/3280'.
1000m/3280'.
400m/1310'.
–
Analog Phones
1000m/3280'.
1000m/ 3280'.
400m/1640'.
800m/2620'.
PARTNER Quick Install
IP Office PARTNER Version
Page 16
- Issue 1b (22 February 2010)
Chapter 3.
System Installation
PARTNER Quick Install
IP Office PARTNER Version
Page 17
- Issue 1b (22 February 2010)
3. System Installation
The procedures detailed in this section take you through an installation of Essential Edition - PARTNER Version. The
instructions should all be completed in the order they are given.
Objective - To prepare and connect the major units of an Essential Edition - PARTNER Version system so that it is
capable of being used for making and receiving telephone calls.
This installation section assumes that phones are being connected to IP Office PARTNER Version within an existing RJ45
structured cabling system. If phone connections are being made through older punchdown wiring systems then the
installer is expected to be qualified and approved for that type of installation.
The basic installation procedure described in following sections of this document is as
follows:
1. Equip 22 the control unit 19 with base cards fitted with daughter cards where needed. Insert base cards
from left to right and do not leave unoccupied slots between cards.
2. Insert the supplied SD
3. Connect the Manager
working
card
21
8
22
laptop PC to the control unit
19
4. Connect telephones to extensions 10 and 11 (Admin users)
5. Apply power to the control unit. The control unit automatically configures the connected system.
6. Start up the PC and run the Manager application. Ignore the splash screen display because as yet, it has not
discovered an Essential Edition - PARTNER Version system to manage.
7. Manager software on the PC displays the Welcome screen, identifies basic system components and system settings.
8. Plug in telephone
25
connectors to the remaining extensions.
9. Apply simple housekeeping rules to cables by tying them in associated and clearly labeled bundles.
10. Route cables carefully so that they do not intrude the working area or create a hazard.
11. Manager 8 can be used to prepare user lists, permissions, group memberships and other administration tasks or the
customer may do this through handset (TUI) actions detailed in the Essential Edition - PARTNER Version - ETR
Telephone System Programming and User Guide.
The procedures identified above are elaborated in the following sections.
Note: Connection to analog and digital phones not located in the same building as the IP Office PARTNER Version is
only supported with the addition of additional protective equipment and additional installation requirements.
See "Out of Building Telephone Installations" in the Avaya IP Office IP Office PARTNER Version Installation and
Reference Manual.
PARTNER Quick Install
IP Office PARTNER Version
Page 18
- Issue 1b (22 February 2010)
System Installation:
3.1 Control Unit
The IP Office 500v2 slots are numbered 1 to 4 from left to right. They can be used in any order. (See Constraints 10 )
However, if the capacity for a particular type of card is exceeded, the card in the rightmost slot will be disabled. The
control unit must not be used with uncovered slots as this would affect unit cooling.
Removable Base Cards
Typical Card Complement
Feature
Capacity
Maximum
Extensions
Up to 48 extension ports of which there may be a maximum of 18 ETR ports.
Conference
Parties
Maximum 64 in any individual conference. Silence suppression is applied to conferences with more
than 10 parties.
Trunks Cards
Four. Any combination of IP500 trunk daughter cards and up to two IP400 trunk cards.
VCM Card Slots
Four. Up to a maximum of 128 channels using two IP500 VCM cards.
Locales
Supported in Canada, United States, plus Countries that support North American telephony (US)
standards
Software Level
· IP Office core software level R6.0 minimum.
· Bin file =
ip500v2.bin.
Power Supply
Internal power supply unit.
Mounting
Free-standing, rack mounted (requires IP500 Rack Mounting Kit) or wall mounted (requires IP500
Wall Mounting Kit).
Dimensions
Width: 445mm/17.5". Depth: 365mm/14.4". Height: 73mm/2.9"/2U.
Clearance: 90mm minimum all sides, 220m at front. 500mm all side when wall mounted.
Memory
Maximum configuration file size: 2048KB.
PARTNER Quick Install
IP Office PARTNER Version
Page 19
- Issue 1b (22 February 2010)
3.1.1 Grounding
Use of ground connections reduces the likelihood of problems in most telephony and data systems. This is especially
important in buildings where multiple items of equipment are interconnected using long cable runs, for example phone
and data networks.
All IP Office control units and external expansion modules must be connected to a functional ground. In some cases, such
as ground start trunks, in addition to being a protective measure this is a functional requirement for the equipment to
operate. In other cases it may be a locale regulatory requirement and or a necessary protective step, for example areas
of high lightning risk.
·
WARNING
During installation do not assume that ground points are correctly connected to ground. Test ground points before
relying on them to ground connected equipment.
The ground point on IP Office control units and external expansion modules are marked with a
or
symbol.
Ground connections to these points should use a 14 AWG solid wire with either a green sleeve for a functional ground or
green and yellow sleeve for a protective ground.
· Additional protective equipment
In addition to grounding, additional protective equipment will be required in the following situations. Refer to "Out of
Building Telephone Installations" in the main Avaya IP Office IP Office PARTNER Version Installation and Reference
Manual.
· On any Digital Station or Phones external expansion module connected to an extension located in another building.
PARTNER Quick Install
IP Office PARTNER Version
Page 20
- Issue 1b (22 February 2010)
System Installation: Control Unit
3.2 SD Card
The IP Office 500v2 control unit used in Essential Edition - PARTNER Version has two SD card slots on the rear panel
labeled System SD and Optional SD.
Various IP Office 500v2 features and applications including a license key are required for the system configuration. These
are stored on the SD card.
The serial number, also known as the feature key, is printed on the SD, prefixed with either SN or FK.
Except during maintenance the System SD slot must contain an Avaya SD card at all times. The files on that card are
used when the Essential Edition - PARTNER Version system is started because the Feature Key serial number only present
on Avaya cards is used for the licensing of IP Office features.
The Optional SD slot can be used for an optional second card to store occasional copies of the System SD card or
individual files. Non-Avaya cards can be used for this as long as they conform to the standard below:
Format rules: SDHC minimum 4GB FAT32 format (Single partition, SDHC, class2+, FAT32, SPI & SD bus).
SD Card Removal
SD cards should never be removed while being used. Though the SD card slot LEDs indicate when data is being
written to an SD card, lack of flashing LED is not a sufficient safeguard. If the System SD card is removed, licensed
features will continue operating for up to 2 hours. This allows card replacement on a live system. However the
control unit is not fully functional until 2 hours after SD card re-insertion.
The System SD card contains the following folders:
· primary
Contains the firmware files for the control unit, external expansion modules and supported phones.
The folder can also contain music on hold files and license key files. This is the main set of files used
by the IP Office system when booting up. Also contains the stored copy of the Essential Edition PARTNER Version configuration.
· backup
Contains a copy of the primary folder at some previous point. A backup copy of the primary contents
to this folder can be invoked manually (using Manager or SSA) or as part of the IP Office software
upgrade using Manager.
· lvmail
Contains the prompts used by embedded voicemail and the mailbox messages.
· dynamic
Contains files used by the Essential Edition - PARTNER Version and retained through a reboot of the
system.
· temp
Contains temporary files used by the Essential Edition - PARTNER Version and not retained through a
reboot of the system.
The Optional SD card can contain a similar set of folders. These are used as an additional backup or they can be used as
the source for upgrading the contents of the System SD card.
The SD Card can be backed up and copied. The Manager application 8 enables updates and changes to be made to the
SD Card content. Separate instructions for these tasks are contained in the IP Office Administrator PC Tool (Manager)
user manual.
PARTNER Quick Install
IP Office PARTNER Version
Page 21
- Issue 1b (22 February 2010)
3.3 Fitting Base Cards
General Notes
· Fit all the internal IP Office 500 cards before powering up the control unit.
· The first (left hand) slot of the control unit must have a DS or ETR ports base card fitted. This is because in
the Essential Edition - PARTNER Version, extensions 10 and 11 (ports 1 and 2) must support digital supervisor
telephones.
· Remaining cards can be fitted in any order into any available slots. The only exception is the IP Office 500 4Port Expansion card which can only be installed in right hand slot 4.
· It is recommended that cards are fitted from left to right, otherwise automatic system number allocation could
be inconvenient.
· There are restrictions to the number of supported cards of some types. When such a limit
right-most card of that type will not function.
10
is exceeded, the
· Ensure that you use the labels supplied to identify the card fitted into the control unit.
Warnings
· Correct anti-static protection steps should be taken while handling circuit boards.
· Cards must never be added or removed from the control unit while it has power connected.
· Tools Required
·
5mm Flat-blade screwdriver.
·
Anti-static wrist strap and ground point.
Installing Base Card
1. Check that there is no power to the control unit.
2. Using a flat-bladed screwdriver, remove the cover from the slot on the front of the control unit that will be used for
each card being installed. This cover is no longer required but should be retained until installation has been
completed.
3. Starting at the left hand slot, insert cards. Allowing the card to rest against the bottom of the slot, begin sliding it
into the control unit. When half inserted, check that the card rails have engaged with the slot edges by trying to
gently rotate it. If the card rotates remove it and begin inserting it again.
4. The card should slide in freely until almost fully inserted. At this point apply pressure at the base of the front of the
card to complete insertion of the connector.
5. Using a flat-bladed screwdriver secure the card.
PARTNER Quick Install
IP Office PARTNER Version
Page 22
- Issue 1b (22 February 2010)
System Installation: Fitting Base Cards
3.4 Going Live
During installation it is recommended that the control unit
is started without it being connected to any other unit. This
ensures that the <%SHORT NAME%> defaults to a known
set of IP address settings.
1. With power off, insert the SD card in the first (System SD)
control unit rear panel slot.
2. Connect the installation laptop via an R45 lead to the LAN socket
on the control unit rear panel.
3. Apply power to the control unit
4. As the control unit goes through its start-up cycle, make the
following checks:
· The CPU LED changes to green (rear of unit)
· The System SD LED changes to green (rear of unit)
· The LAN connection LED flashes and then settles to steady
green (rear of unit)
· Card module front lamps light randomly but after
approximately 30 second the No.1 lamps flash together
once every 5 seconds (front of unit)
· If the control unit does not behave as above power it down
and ensure all base card connectors are fully engaged.
· If retry fails, call Avaya support or refer to the Avaya IP
Office IP Office PARTNER Version Installation and Reference
Manual for more detailed installation instructions and
technical information.
5. Start up Manager on the installation laptop.
The splash screen displays briefly as Manager application starts.
No response or action is required
PARTNER Quick Install
IP Office PARTNER Version
Page 23
- Issue 1b (22 February 2010)
3.5 Manager Responses
Manager, running on the laptop will detect Essential Edition - PARTNER Version has started up correctly
During start-up
This is called the Welcome view and is
presented briefly during application start,
followed by log-in session and presentation
of the Administration screen.
This view remains displayed if Manager
is unable to find a configuration file that is
compatible with Essential Edition PARTNER Version. This can be because the
control unit is not powered up, or incorrect
connection, thus preventing the manager
application accessing the contents of the
SD card. . Refer to the separate Admin tool
user manual for further instructions
The login dialog is displayed
Default Service User password is
Administrator
After successful login the welcome
screen is replaced by the Administrator
home page
After start-up
The Manager screen changes to this
Admin home page as soon as the
control unit has completed booting.
This view confirms that
installation of the Essential
Edition - PARTNER Version
system has been successful
PARTNER Quick Install
IP Office PARTNER Version
Page 24
- Issue 1b (22 February 2010)
System Installation: Manager Responses
3.6 Connecting the System
If the site already has a patch panel for all outside lines and extensions, you should be able to use the existing wiring to
install the system hardware and connect telephones to the system yourself.
During control unit startup
· Extensions and Users
A user is automatically created for each physical extension port detected in the system. Users are assigned
extension numbers starting from 10. User names take the form Extn10, Extn11, ........
· Hunt Group
A single hunt group 1 called Main is created and the first 10 users are placed into that hunt group as members.
There are 1 to 6 hunt groups available.
· Incoming Call Routes
Two default incoming call routes are created. Voice calls are routed to the hunt group Main.
Installing Telephones
After you have installed the IP Office 500v2 control unit and have connected the line and extension cords and gone live
23 , you are ready to install the telephones. Installing the telephones includes assembling, connecting and testing, the
telephone. As desired, you also can connect an Intercom Autodialer to certain telephones
Assembling PARTNER Telephones
All PARTNER telephones are shipped with a stand for either desk-mounting or wall-mounting the telephone. For other
telephones, see the instructions that are provided with the telephone.
Gather the line and extension cords hanging from the control unit and twist-tie or wire-wrap them.
Testing the modules
1. Test the base card modules by doing the following:
a. Plug a system telephone into the first port on each module.
b. Press the line button on the telephone for each outside line and listen for a dial tone.
Connecting handsets
1. For telephone systems that are based on a patch (intermediate) connection system:
2. Connect line cords to the line jacks on the modules.
3. Connect the free end of each line cord to the appropriate telephone network interface jack
4. Fill each module before moving to the next module to the right
As each handset is connected any necessary software it contains is automatically checked and updated as necessary.
PARTNER Quick Install
IP Office PARTNER Version
Page 25
- Issue 1b (22 February 2010)
3.7 Change Admin Password
This password controls remote or local access to the system to make administrative changes to the overall set-up such as
changes to the configuration or equipment. The administration password can only be changed by an administrator.
·
WARNING - Administration Password Change Required
New Essential Edition - PARTNER Version systems use default security settings. These settings must be changed to
make the system secure. As a minimum, you must change the default Remote/Administrator Password. Failure to
do so will render the Essential Edition - PARTNER Version system potentially unsecured.
Change Remote/Administrator Password using Manager
1. Start Manager.
2. From the Manager home page select Change Remote / Administration Password. A log in dialog is displayed.
3. Provide login detail and enter Administrator (case sensitive) as default password. The change dialog is displayed.
4. Make required changes and click OK.
Remember you are changing the password for accessing the Essential Edition - PARTNER Version system to which
you are attached, not the manager application.
PARTNER Quick Install
IP Office PARTNER Version
Page 26
- Issue 1b (22 February 2010)
System Installation: Change Admin Password
Change remote administration password from a ETR 18D/34D phone
1. At a system administration extension (10 and 11); with the phone idle press Feature 0 0 followed by two presses
of Intercom 1. System Administration: is shown on the display.
2. Dial #730.
3. If a system password
password.
28
has been set, the prompt Enter Sys Password: is displayed. Enter the four digit system
4. The current password (default for new systems is Administrator) is displayed.
5. Enter or change the password.
· Enter a character by pressing the indicated button until that character is displayed. If you pause more than 1
second after press a button, the cursor will move onto the next space.
1
1!”$%&’()+,-./
2
2abcABC
3
3defDEF
4
4ghiGHI
5
5jklJKL
6
6mnoMNO
7
7pqrsPQRS
8
8tuvTUV
9
9wxyzWXYZ
*
*:;<=>?@[\]^_`
0
0Space
#
#
6. To save the password, press Enter. The bottom line of the display shows the password as it has been entered.
7. Exit programming by pressing Feature 00. You can also exit programming mode by lifting the handset, then place
it back in the cradle.
Change remote administration password from a 1408/1416 phone
1. At either of the system administration telephones (extensions 10 and 11), with the phone idle press Admin.
up or down
2. Use the
Select.
arrow buttons to scroll the display to System Administration. When displayed, press
3. Dial #730.
4. If a system password
proceed.
28
has been set for the system, you will be prompted to enter that password before you can
5. The display will show Remote password:.
· Enter a character by pressing the indicated button until that character is displayed. If you pause more than 1
second after press a button, the cursor will move onto the next space.
1
1!”$%&’()+,-./
2
2abcABC
3
4
4ghiGHI
7
7pqrsPQRS
*
*:;<=>?@[\]^_`
3defDEF
5
5jklJKL
6
6mnoMNO
8
8tuvTUV
9
9wxyzWXYZ
0
0Space
#
#
4. Use the dial pad to enter an password of up to 8 characters. When completed press Enter. To remove the
characters entered so far press Clear.
5. Exit programming by pressing PHONE/EXIT. Alternatively use the Back button to move to another menu.
PARTNER Quick Install
IP Office PARTNER Version
Page 27
- Issue 1b (22 February 2010)
3.8 Set System Password
The system password is a four-digit password that users can enter from their telephones to override dialing restrictions if
the extension has access to an outside line. Through system administration you can set and change the system password
from extensions 10 or 11.
· The password overrides all dialing restrictions.
· Once a password is programmed, you must enter it to turn Night Service on and off. Additionally, if night service
is on, users in the Night Service Group must enter the password to make any outgoing calls except calls to
numbers on the Emergency Phone Number List and marked system speed dial numbers.
· Dialing restrictions for extensions not in the Night Service Group remain the same as during normal daytime
operation.
Set/Change System Password using Manager
Once Essential Edition - PARTNER Version is installed, the responsibility for setting this password rests with the customer.
You should point this fact out and if required, make the change using manager before you leave as follows:
1. In the System Parameters box, change system password (Field accepts digits only)
2. Click the hot link "Change System Settings"
Set/Change System Password from an ETR 18D/34D phone
1. At a system administration extension (10 and 11); with the phone idle press Feature 0 0 followed by two presses
of Intercom 1. System Administration: is shown on the display.
2. Dial #403. The phone displays Set System Password.
3. Enter a four-digit password.
4. Exit programming by pressing Feature 00. You can also exit programming mode by lifting the handset, then place
it back in the cradle.
Set/Change the system password from a 1408/1416 phone
1. At either of the system administration telephones (extensions 10 and 11), with the phone idle press Admin.
2. Use the
Select.
up or down
3. Use the
up or down
press Select.
arrow buttons to scroll the display to System Administration. When displayed, press
arrow buttons to scroll the display to Restrictions/Permissions. When displayed,
· Alternatively, dial # and the same code as used by ETR phones for system administration.
4. Use the
Select.
up or down
arrow buttons to scroll the display to Set System Password. When displayed, press
5. The current setting is displayed.
6. Enter the new four digit system password. Use Default to return to the default setting of no password.
7. Exit programming by pressing PHONE/EXIT. Alternatively use the Back button to move to another menu.
PARTNER Quick Install
IP Office PARTNER Version
Page 28
- Issue 1b (22 February 2010)
System Installation: Set System Password
3.9 Final Actions
You may be required to compile calling lists, build groups and allocate permissions etc. before leaving the customer
premises. This depends on arrangements made between your local office and the customer. If required, use Manager to
create any lists. Changes to the basic Essential Edition - PARTNER Version configuration, setting up trunks, adding
licenses etc. are detailed in the Avaya IP Office IP Office PARTNER Version Administrator PC Tool User Guide identified in
the Introduction 7 .
As you use Manager to make changes to the IP Office PARTNER Version setup, you are forced to save or discard
changes you have made before leaving any set-up screen to go on to another task. However, you should remember that
you are accumulating these changes in a COPY of the control unit configuration file which must be saved back to the SD
card before changes are effective. Similarly, system changes such as plugging in handsets during this time are
recognized by the IP Office PARTNER Version system but are undetected by Manager which is working with a copy of the
configuration file. Avaya recommend that whilst using Manager you save the configuration file at frequent intervals to
ensure the working copy and Manager copies of the configuration file remain as compatible as possible.
Do not leave the Manager application open for long periods and particularly when it is not being used.
Do not power down the system after changes, until a backup is taken. Backup instructions may be found
in the IP Office PARTNER Version Administration PC Application User Guide.
Check system operation and gather all packing materials for disposal.
If appropriate, obtain sign-off signature from the customer.
PARTNER Quick Install
IP Office PARTNER Version
Page 29
- Issue 1b (22 February 2010)
Chapter 4.
Troubleshooting
PARTNER Quick Install
IP Office PARTNER Version
Page 31
- Issue 1b (22 February 2010)
4. Troubleshooting
Install problems
· Have you inserted the correct Avaya System SD card into the System
SD slot on the rear of the control unit.
· Ensure that you have the correct card. There are three versions, ALaw, Mu-Law and Partner Version.
· Ensure that the card has the level of software required. If necessary
the card can be upgraded to match a version of IP Office Manager.
· The control unit loads firmware from the System SD card with which it
uses to upgrade itself and the components installed in the control unit.
· This process takes approximately a minute. The end of this process is
indicated by LED1 on each base card flashing every 5 seconds. LED9 on
each base card fitted with a trunk daughter card also flashes every 5
seconds.
· The control unit then begins upgrading the external expansion module
(if fitted). This is indicated by the red center LED on each module
flashing red. The process is completed when the LED changes to steady
green.
The LEDs on the rear of the control unit go through the following sequence during a normal start up. Note that the times
are approximately only:
LED
4s
4s
12s
5s
2s
5s
5s
10s
10s
Finished
CPU
Orange
Green
Green
Green
Green
Green
Green
Green
Green
Green
Green
Red
System SD
Orange
Off
Green
Green
Green
Off
Green
Green
Green
Optional SD
If present.
Orange
Off
Green
Green
Green
Off
Off
Green
Green
Flash
Green
On the front of the control unit, LED1 on any IP500 base cards fitted is used as follows. LED9 is also used for any trunk
daughter cards fitted.
LED
30s
30s
Finished
LED1/LED9
Red
Red
Red
Fast Flash
Flash every 5
seconds
PARTNER Quick Install
IP Office PARTNER Version
Page 32
- Issue 1b (22 February 2010)
Troubleshooting:
Checking the LEDs
Control Unit LEDs
LED
Description
Optional SD System SD
Green on = OK, Flashing Green = reading or writing, Red = card not inserted correctly or
missing
CPU
· Alternate red/green = Starting up.
· Green on = Okay.
· Red on = No software.
· Flashing Red = Error/Shutdown.
Base Card LEDs
Base Card
LEDs 1 to 8 Usage
All Cards
· LED1 is used for base card status:
· Red On = Error
· Red Slow Flash = Initializing.
· Red Flash every 5 seconds = Card okay.
· Red Fast Flash = System shutdown.
IP500 Analog Phone
No status LEDs are used for analog phone extensions.
IP500 Digital Station
· Green On - Phone detected.
IP500 VCM
· LEDs 1 to 8 are unlabelled. They are used to indicate voice compression channel usage.
Each LED lit represents 12.5% of the available voice compression channel capacity in
use (total card capacity rather than licensed capacity).
IP500 4-Port Expansion
LEDs 1 to 8 are used for the expansion ports on the rear of the control unit. LEDs 9 to 12
are used for the card's own expansion ports.
IP500 Combination
Green
On
Expansion module present.
Red
Flashing
Initializing.
Red
On
Error.
Orange
Regular Flash
Base card okay.
LEDs 1 to 6
· Green On - Phone detected.
Trunk Daughter Card LEDs
Trunk Daughter Card
LEDs 9 to 12 Usage
All cards
· LED 9 is used for daughter card status.
· Red On = Error
· Red Slow Flash = Initializing.
Analog Trunk
· Green on: Card fitted.
· Green flashing: Trunk in use.
PRI Trunk
· Off: No trunk present.
· Green on: Trunk present.
· Green flashing: Trunk in use.
· Red Flash every 5 seconds = Card okay.
· Red Fast Flash = System shutdown.
· Red/Green Fast Flash (port 9) or Green Fast
Flash (port 10): Alarm indication signal (AIS)
from the trunk remote end.
· Red with Green Blink (port 9) or Green Blink
(port 10): Port in loopback mode (set through
IP Office System Monitor).
External Expansion Module LEDs
· Green on = Module okay.
· Red on = Error.
· Red flashing = Module starting up.
PARTNER Quick Install
IP Office PARTNER Version
Page 33
- Issue 1b (22 February 2010)
Telephone Problems
Problem...
Telephone does not ring
Display shows only 16 characters per
line
Display time and date are not correct
Caller ID does not work
Telephone does not Work
Intercom Autodialer does not work
Cannot record a call
Standard phone message waiting
light does not light
Cannot make outside calls
Check this...
Ringer volume may be too low.
Do Not Disturb or Call Forwarding may be turned on.
Line Ringing may not be set to Immediate.
Telephone may be faulty; switch telephones and try again.
Possible power outage; unplug the modular telephone cord and replug.
Is your system clock correct?
Use System Date (#101) and System Time (#103) to set the date and time.
Are you subscribed to Caller ID?
Is the line connected to a module that supports Caller ID?
Did someone activate Call Coverage? If so, their extension number will
appear.
Is the telephone cord plugged into the right jack on the bottom of the
telephone?
Telephone may need to be reset; unplug the cord, and with the handset
hung up, re plug.
Telephone cord may be defective; switch cords and try again.
Telephone may be defective; switch telephones and try again.
There may be a problem with the control unit; switch to a different port and
try again.
Is the telephone cord plugged into the correct jack of the DSS?
Is the Intercom Autodialer plugged into an electric outlet?
Telephone cord may be defective; switch cords and try again.
Two calls may already be recording.
Make sure you have a four-port mail system.
You may not have enough ports programmed in Hunt Group.
Telephone may be part of a combination extension that includes a system
telephone with Background Music on; turn it off.
The message waiting light may not be compatible with the system; only
phones with LEDs, not neon lights, support message waiting lights. Or, the
telephone may not be connected to the proper module.
Is Forced Account Code Entry assigned to this extension?
Has someone changed the Outgoing Call Restriction for the extension?
Did someone lock the extension with Station Lock? Use Station Unlock from
extension 10 or 11 to unlock it.
Local telephone company may not be receiving signals accurately. If
problem is on just one telephone, see “Telephone does not Work” above.
Too many tip/ring devices may be trying to dial at once.
Local telephone company line may be faulty; unplug each line from its
module and test it by using a single-line telephone:
• If the trouble does not occur on the single-line telephone, the problem is in
your control unit.
• If the trouble occurs on the single-line telephone, switch the line cord and
try again. If this does not work, call the telephone company.
Cannot make outside calls from pool
buttons on pooled extensions
Is Forced Account Code Entry assigned to this extension?
Is your dial mode incorrect? Use Dial Mode (#201) to reset it.
Has someone changed the Pool Access Restriction for the extension?
Pool may not be assigned to the extension.
There may not be enough lines assigned to the pool to support the usage.
One or more local telephone company lines may be faulty; test each line
from extension 10.
Calls are answered automatically (a
call rings once then disappears as if
answered)
Automatic System Answer and/or Direct Extension Dial is turned on, turn it
off.
an auxiliary device (fax, modem, voice messaging system, answering
machine) answers when it should not; either:
• Check the device and adjust it to answer on a later ring or turn off autoanswer.
• Set the extension’s Line Ringing to Delayed Ring.
Auxiliary device does not answer
Device may not recognize the system ringing pattern:
• Change the extension’s ring pattern by using Distinctive Ring (#308).
• Change the setting for Intercom Dial Tone (#309) to Machine; the system
will generate an outside dial tone for the extension.
PARTNER Quick Install
IP Office PARTNER Version
Page 34
- Issue 1b (22 February 2010)
Troubleshooting:
Problem...
Check this...
Trouble hearing the person you called
If you are using a speakerphone, try using the handset.
If you have touch-tone dialing, you may have a faulty telephone or cord.
Automatically dialed calls beginning
with star codes are miss dialed
Setting may not be inserting a long enough pause; increase setting.
Recall feature is not working. Increase Recall Timer Duration (#107) by 100
milliseconds. If using the feature disconnects the call, decrease Recall Timer
Duration by 100 milliseconds.
Calls on hold are disconnected
CO Disconnect Time (#203) setting may be too short.
Call on Hold hangs up, but line does
not disconnect
CO Disconnect Time (#203) may be too long; try resetting it.
Local telephone company does not send a hold release signal; you may need
the help of our hotline.
All telephones dead; no dial tone or
lights
Power may have been interrupted to the control unit;
check the power cord, the on/off switch, and the LEDs on the modules.
Power outlet may be faulty; test the outlet with an appliance like a lamp.
Multiple telephones dead; no dial tone one or more system modules may be out; try reseating the module in the
or lights
control unit.
PARTNER Quick Install
IP Office PARTNER Version
Page 35
- Issue 1b (22 February 2010)
Index
Index
A
Admin tool user manual 24
Administrator 26
Analog lines 25
Antistatic 22
Applying power 23
Associated documents 7
ATM4 daughter card 10
system 18
telephone 25
IP Office
admin suite, selecting 9
administrator applications CD
DVD 9
Manager application 8
selecting 9
IP500 Installation
Check Card LED 32
B
J
Base card 10, 19, 22
Basic install 7
Bulletins technical 12
Java 9
C
Cable ties 12
Cable, RJ45 15
Card
base 10, 19, 22
combination 10
daughter 10
ETR 10
expansion 22
folders 21
format 21
front lamps 23
insertion 22
reinsertion 21
removal 21, 22
SD 14, 21, 23, 24
serial number 21
slots 19, 22
trunk 19
VCM 19
Change password 26
Combination card 10
Connection, grounding 20
Control unit 19, 21, 24
grounding 20
rear 23
slot cover 22
CPU LED 23
Customer handover 29
D
Daughter card 10
Default password 24
Dial tone 25
Dimensions 19
E
Expansion module 10
Extension port 19
Extensions 25
G
Grounding control units 20
H
Hard Disk Space 9
Hardware components 10
Home page 24
I
Install
basic 7, 12
confirmation 24
Manager 9
pre requirements 12
PARTNER Quick Install
IP Office PARTNER Version
9
L
LAN socket 23
Laptop 7, 23
LED CPU 23
Lines
analog 25
cord 25
Log-in session 24
M
Maximum units 10
Mounting 19
N
NET2 9
O
Operating systems 9
P
Part number 15
Password
administration 26
changing 26
default 24
remote access 26
system 26
Patch panel 25
PC requirements 9
Power application 23
Pre requirements 12
R
Rack mounting 19
RAM 9
Recall 10
Remote access 26
RJ45 connector 15
S
SAP code 15
Screen
home 24
splash 23, 26
SD card 14, 21, 24
SD card insertion 23
Servers 9
setup.exe 9
Signoff 29
SIP trunk 10
Slot cover 22
Socket, LAN 23
Software level 8, 19
Splash screen 23, 26
Start-up 23, 24
Station ports
analog 10
Page 37
- Issue 1b (22 February 2010)
Station ports
digital 10
System
checks 23
operating 9
telephone 25
T
Technical bulletins 12
Telephone
connection 12
install 25
stand 25
system 25
Temporary files 21
Tie-wrap 25
Tools 12, 22
Trunks SIP 10
U
Unpacking 14
V
Voicemail 10, 21
W
Welcome screen 24
Windows servers 9
Wrist strap 22
PARTNER Quick Install
IP Office PARTNER Version
Page 38
- Issue 1b (22 February 2010)
PARTNER Quick Install
IP Office PARTNER Version
Page 39
- Issue 1b (22 February 2010)
Performance figures and data quoted in this document are typical, and must be
specifically confirmed in writing by Avaya before they become applicable to any
particular order or contract. The company reserves the right to make alterations
or amendments to the detailed specifications at its discretion. The publication of
information in this document does not imply freedom from patent or other
protective rights of Avaya or others.
Intellectual property related to this product (including trademarks) and registered
to Lucent Technologies have been transferred or licensed to Avaya.
All trademarks identified by the ® or ™ are registered trademarks or trademarks,
respectively, of Avaya Inc. All other trademarks are the property of their
respective owners.
This document contains proprietary information of Avaya and is not to be
disclosed or used except in accordance with applicable agreements.
Any comments or suggestions regarding this document should be sent to
"[email protected]".
© 2010 Avaya Inc. All rights reserved.
Avaya
Unit 1, Sterling Court
15 - 21 Mundells
Welwyn Garden City
Hertfordshire
AL7 1LZ
England.
Tel: +44 (0) 1707 392200
Fax: +44 (0) 1707 376933
Web: http://marketingtools.avaya.com/knowledgebase
PARTNER Quick Install
IP Office PARTNER Version
Page 40
- Issue 1b (22 February 2010)