1
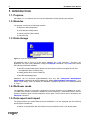
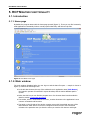
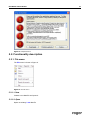
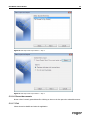
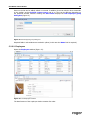
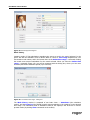
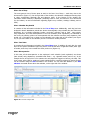
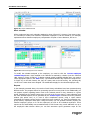
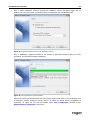
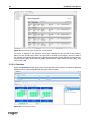
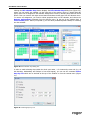
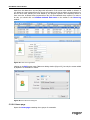
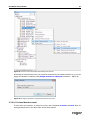
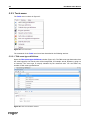
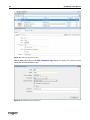
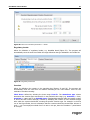
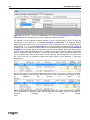
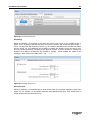
RCP MASTER USERS MANUAL
ver. 1.5.0
Rev. A
2
RCP Master User Manual
TABLE OF CONTENTS
Table of contents .................................................................................................................................. 2
1. Introduction....................................................................................................................................... 4
1.1. Purpose ..................................................................................................................................... 4
1.2. Modules ..................................................................................................................................... 4
1.3. Data storage ............................................................................................................................... 4
1.4. Multiuser mode ........................................................................................................................... 4
1.5. Data export and import ................................................................................................................ 4
2. Requirements ................................................................................................................................... 6
3. Installation and first use ..................................................................................................................... 7
4. Use scenarios ................................................................................................................................... 8
4.1. Preparing for work after installation .............................................................................................. 8
4.2. Work time analysis and reporting ................................................................................................. 8
5. RCP Master functionality ................................................................................................................... 9
5.1. Introduction ................................................................................................................................ 9
5.1.1. Home page .......................................................................................................................... 9
5.1.2. Main window ............................................................................................................................ 9
5.1.3. Reporting errors.................................................................................................................. 10
5.2. Functionality description ............................................................................................................ 11
5.2.1. File menu ........................................................................................................................... 11
5.2.1.1. New ............................................................................................................................. 11
5.2.1.2. Open ........................................................................................................................... 11
5.2.1.3. Save as........................................................................................................................ 12
5.2.1.4. Logout ......................................................................................................................... 12
5.2.1.5. Import and export.......................................................................................................... 12
5.2.1.6. Recent documents ........................................................................................................ 13
5.2.1.7. Exit .............................................................................................................................. 13
5.2.2. View menu ......................................................................................................................... 14
5.2.2.1. Employee groups.......................................................................................................... 14
5.2.2.2. Employees ................................................................................................................... 15
Reports................................................................................................................................. 21
5.2.2.3. Calendars .................................................................................................................... 24
5.2.2.4. Control points ............................................................................................................... 26
5.2.2.5. T&A event log............................................................................................................... 26
5.2.2.6. Home page .................................................................................................................. 27
5.2.2.7. Navigation tree ............................................................................................................. 29
5.2.2.8. Previous/Next document ............................................................................................... 31
5.2.3. Tools menu ........................................................................................................................ 32
5.2.3.1. T&A event type definitions ............................................................................................. 32
5.2.3.2. T&A type definitions ...................................................................................................... 33
5.2.3.3. Calendar day type definitions......................................................................................... 35
5.2.3.4. Program operators ........................................................................................................ 40
5.2.3.5. Operator action history .................................................................................................. 42
5.2.3.6. Verify data completnes.................................................................................................. 43
5.2.3.7. Find work regulation discrepancies ................................................................................ 43
5.2.3.8. Data file menu .............................................................................................................. 44
5.2.3.8.1. Change file access password .................................................................................. 44
5.2.3.8.2. Encrypt file ............................................................................................................. 44
5.2.3.8.3. Compact/repair file.................................................................................................. 44
5.2.3.9. Language ..................................................................................................................... 44
5.2.3.10. Change license ........................................................................................................... 45
5.2.3.11. Options ...................................................................................................................... 45
5.2.4. Help menu.......................................................................................................................... 46
5.2.4.1. About ........................................................................................................................... 46
5.2.4.2. Program function description ......................................................................................... 47
RCP Master Users Manual
3
5.2.4.3. FAQ............................................................................................................................. 47
5.2.4.4. Troubleshooting............................................................................................................ 47
5.2.4.5. Release history............................................................................................................. 47
5.2.4.6. Roger home page ......................................................................................................... 47
5.2.4.7. Send feedback ............................................................................................................. 47
5.2.4.8. Check for updates......................................................................................................... 47
6. GLOSSARY.................................................................................................................................... 48
4
RCP Master User Manual
1. INTRODUCTION
1.1. Purpose
RCP Master 1.x. is a software tool for Time and Attendance (T&A) reporting and analysis.
1.2. Modules
The program consists of the following modules:
t
employee data configuration
t
work calendars configuration
t
control point list (T&A readers)
t
T&A event log
1.3. Data storage
Figure 1. Roger RCP Master datafile
All application data is stored in a MS Access database file (*.rta extension). Therefore, the
application may open many databases (using the File/Open command). The Tools menu makes
the following commands available:
t
data file encryption/decryption (please note that working with an encrypted file can slow
the application down by about 15%),
t
setting password for access to data file,
t
data file compacting/repair.
Databases can be accessed programmatically from any IDE (Integrated Development
Environment) supporting MS Access databases or ODBC (Open Database Connectivity) — e.g.
Delphi, Visual Studio, Java). By default, the database is password-protected. The default password
is „roger”.
1.4. Multiuser mode
The application allows for concurrent connections of several operators to one database at a time.
To enable such a mode of operation, database should be shared on a networked location, and the
operators should be given relevant read/write access rights. The file shared can be opened by the
File/Open command.
1.5. Data export and import
The program allows for manual data input and modification. It is also equipped with the following
import/export mechanisms:
t
Import of configuration data and T&A event log from RACS version 4.2.5.38 and higher.
RCP Master Users Manual
t
Import of T&A event log from T&A Access Pro file format.
t
Import/export of configuration data and T&A event log from RCP Master in XML.
t
Export of all the reports in Adobe Acrobat (.pdf), Microsoft Excel (.xls), Microsoft Word
(.doc), Rich Text Format (.rtf) and Crystal Reports (.rpt) formats.
t
Additionally export of work time reports in XML.
5
6
RCP Master User Manual
2. REQUIREMENTS
RCP Master requires installation of the Microsoft .NET Framework 2.0 (available for download on the vendor’s
site at http://www.microsoft.com/downloads/details.aspx?displaylang=pl&FamilyID=0856eacb-4362-
4b0d-8edd-aab15c5e04f5).
The .NET Framework 2.0 requirements are listed below:
Supported operating systems: Windows 2000 Service Pack 3; Windows 98; Windows 98 Second
Edition; Windows ME; Windows Server 2003; Windows Vista Business; Windows Vista Enterprise;
Windows Vista Home Basic; Windows Vista Home Premium; Windows Vista Starter; Windows Vista
Ultimate; Windows XP Service Pack 2
Software requirements:
t
Windows Installer 3.0 (except of Windows 98/ME which requires Windows Installer 2.0 or
higher). The Windows Installer 3.1 or newer is reccommended.
t
Internet Explorer 5.01 or higher: For all the installations of .NET Framework, the Microsoft
Internet Explorer 5.01 or higher also must be installed.
t
In case of Windows Vista the Service Pack 1 must be installed.
Disk space requirements: 280 MB (x86), 610 MB (x64).
RCP Master Users Manual
7
3. INSTALLATION AND FIRST USE
To install RCP Master you need to execute the installer (setup.exe). In order to install RCP Master
properly, the installation process must be initialized from the user account with administrative
rights. After the installation is complete, the user’s rights can be changed. When the program is run
for the first time after the installation, it displays a question if the sample data from Demo.rta
should be loaded. If you answer Yes, the sample database will be read. Each time a data file gets
opened, the application displays a login dialog box as shown in Figure 2:
Figure 2. Login dialog box
In the demo file (Demo.rta), password for the ADMIN operator is empty (no password), so click
OK.
You can define any number of operators for the specific data file. For all of them you need to
configure passwords and set up access rights for performing particular application commands.
8
RCP Master User Manual
4. USE SCENARIOS
4.1. Preparing for work after installation
In order to prepare program for work, it needs to be properly set up. You need to perform the
following steps:
1. Create a new data file using File/New menu command.
2. Enter data on groups, employees, control points and T&A event types. You can do it
manually or import from PR Master (using Backup.zip or Config.xml files). To import data
use File/Import and export command.
3. Define calendar day types — choose Calendar day type definitions command from the
Tools menu.
4. Define work calendars – choose View/Calendars menu command.
5. Assign calendars to employee groups (or individual employees) – choose Assign calendar
to employees command from the shortcut menu.
6. Finally you can run a command for checking if work calendars have beeen assigned to all the
employees — select Tools/Verify data completness.
4.2. Work time analysis and reporting
One of the typical uses of RCP Master is to generate time an attendance (T&A) reports based on
employee T&A event registrations. Correct calculation of working hours requires that complete data
of arrivals/departures events is registered. The program is capable of detecting incomplete events
(by using the aforementioned Verify data completness command). They are indicated in any
report by an appropriate warning (red icon with exclamation mark together with a comment). Such
missing entries must be completed by the operator manually, i.e. by marking the entry as an
absence or manually inserting a missing T&A event (in the Work history window).
To generate T&A reports, you should typically perform the following steps:
1. Import T&A events log from file.
2. Use Verify data completness command.
3. Send notices to employees, for whom missing/incomplete entries exist in the event log, and
ask them for explanation.
4. Correct data manually (by entering an absence or inserting missing events to the T&A
events log).
5. Generate reports (you can use wizard for selected employee groups). After generation, the
wizard will send to every employee her/his reports using e-mail address configured in
employee’s data.
RCP Master Users Manual
9
5. RCP MASTER FUNCTIONALITY
5.1. Introduction
5.1.1. Home page
By default the program starts with the home page opened (Figure 3). There you can find commonly
used application’s commands, links to recently opened data files, and links to help files.
Figure 3. RCP Master home page
5.1.2. Main window
The main window (displayed after the user logs on and the data file opens — sample is shown in
Figure 4) contains the following items:
t
In the title bar shown at the top of the window there is application name (RCP Master),
the logged in operator ID enclosed in square brackets, and the active database path in
quotes.
t
Below the title bar you can find the program menu. Its elements have been described in
detail in section Functionality description.
t
The toolbar, which is located below the menu, contains shortcuts to the application's most
common commands and functions.
t
The panel on the left side of the window contains a tree with hierarchical structure of the
data elements. Each section of the tree is assigned a shortcut menu with commands
relevant to the particular item (to show the menu you need to click the item with right
10
RCP Master User Manual
mouse button). When you double-click the item with left mouse button, the window is
opened with the document assigned to the item.
t
On the right hand side of the window there are documents shown as tabs. Some
documents are split into two parts. The upper section contains the list, and the lower —
the detailed view of the selected list item. The windows contain buttons for invoking
commands.
t
In the bottom of the main window there is application’s status bar containing information
about operations being performed as well as a progress bar.
Figure 4. RCP Master’s window layout
5.1.3. Reporting errors
RCP Master features error reporting mechanism. In case of unexpected error, the program displays
window similar to the one shown in Figure 5. It contains necessary information relevant to the
context and the source of the error. To send an error report you need to click Send report button.
The program invokes then a MS Outlook window containing e-mail with error report. The only thing
you need to do is to click the Send button in Outlook.
RCP Master Users Manual
Figure 5. Unexpected error
5.2. Functionality description
5.2.1. File menu
The File menu is shown in Figure 6.
Figure 6. The File menu
5.2.1.1. New
Creates a new data file and opens it.
5.2.1.2. Open
Opens an existing *.rta data file.
11
12
RCP Master User Manual
5.2.1.3. Save as
Saves currently opened data file in the file under different name.
5.2.1.4. Logout
Closes all the editing windows of the current data file and displays the home page of the program.
5.2.1.5. Import and export
Opens the data import/export wizard. When the user has selected Import T&A event
registration from another software action, the wizard performs the following steps (shown in
figures 7–9 below):
t
Step 1. Select T&A data import/export action (Figure 7).
Figure 7. Data import and export wizard — step 1
t
Step 2. Select data file format (when importing data from PR Master — Figure 8).
t
Step 3. Select location to your T&A event file (Figure 9). Using available options you can
choose a method of resolving conflicts in case, the imported value is already in database.
If you choose Replace duplicates with imported items, duplicate values existing in
the database will be overwritten by the imported values. The Do not import duplicates
option skips duplicated records. Two T&A events are assumed equal, if their date/time,
reader ID and event type are identical.
RCP Master Users Manual
13
Figure 8. Data import and export wizard — step 2
Figure 9. Data import and export wizard — step 3
5.2.1.6. Recent documents
Shows a list of recently opened data files. Clicking an item on the list opens the selected document.
5.2.1.7. Exit
Closes the active datafile and exits the application.
14
RCP Master User Manual
5.2.2. View menu
The View menu is shown in Figure 10.
Figure 10. The View menu
5.2.2.1. Employee groups
Opens the Employee groups window. As mentioned above, the document window is composed of
two parts — the upper section is usually a list (e.g. a list of employee groups), and the lower — the
detail section, where information related to selected list item is shown (in Figure 11 it is the group
Administration). The detail pane can be closed at any time by clicking the cross icon on blue
background located in the right side of detail pane’s title bar. To reopen it, click the Show details
button on the right side of the upper pane.
Figure 11. Employee groups window
RCP Master Users Manual
15
Items on the list can be added, edited or removed. In addition, there can also be other commands
on the toolbar, such as Refresh, Create report, and so on. They can be different depending on
the particular window selected. Clicking the Edit button displays the Edit employee group
dialog box (Figure 12).
Figure 12. Edit employee group dialog box
Required fields in edit windows are marked in yellow (in this case the Name field is required).
5.2.2.2. Employees
Opens the Employees window (Figure 13).
Figure 13. The Employees window
The detail section of the employee window contains four tabs:
16
RCP Master User Manual
Details
The Details tab contains the following data about employee (Figure 14):
t
Photo — employee’s picture (automatically resized to save space in the database).
Pictures (as any other data) are stored in the currently opened datafile.
t
T&A ID — employee’s unique ID. An employer is identified in the program using this
unique identifier. Thanks to this, there can be employees of the same first name and last
name in the database, Moreover, changing names has no influence on the proper
employee’s identification.
t
First name and Last name.
t
Group — indicates the employee group, the employee belongs to. Grouping accelerates
calendar assignments, reporting, etc.
t
Calendar — used for employee work schedule assignment. T&A calculations are based on
calendar contents as well as a T&A event log.
t
Hire date and Dismissal date — (optional fields) are used to determine a time interval
for T&A calculations for the particular employee. For example, if you create a report for
an employee, who was dismissed in mid January, you should enter a dismissal date as
well. Otherwise the program will report missing entries in the event log.
t
E-mail — the field contains an e-mail address, which will be used to deliver generated
reports (as attachements in PDF format).
t
Comments — additional data.
Figure 14. The Details tab of the Employees window
Clicking the Edit button displays the Edit employee dialog box (Figure 15), where you can modify
employee’s data. Required fields are highlighted in yellow. Red icon with an exclamation mark
shown on the right of the Calendar field indicates that employee’s data is invalid. When you move
the mouse cursor over the icon, the message is displayed that the calendar has not been assigned
to the employee. Such red icon accompanied with appropriate comment indicate invalid data also in
other editing windows.
RCP Master Users Manual
17
Figure 15. Edit employee dialog box
Work history
Contains results of T&A calculations regarding time spent at work in the period selected. In the
pane’s title bar the calendar’s name is shown. Next to it there is Time range dropdown list. The
list contains month names, and in the bottom there is the Select time range... command. Clicking
the month name causes recalculation for the month selected. When you select the Select time
range... command (Figure 16), you will be presented with the dialog box, where you can more
accurately determine calculation period (up to minutes):
Figure 16. The Select time range... dialog box
The Work history window is composed of two basic views — Attendance (the calculation
results), and the Event log (the filtered list with events pertaining to the employee in the selected
time range. The calculation result of attendance data for the employee can be shown in various
preview modes (by clicking View commands on the toolbar).
18
RCP Master User Manual
View: List of days
The most generic view of hours spent at work in the form: list of days — total time, time to be
accounted for (Figure 17). On the right side of the window, the calendar is displayed showing days
in colors representing particular day and absence types. In the bottom of the window the
calculation results summary is displayed (remaining hours to work, the total time to be accounted
for, the balance, as well as information regarding night hours, overtime, sundays, holidays, and so
forth).
View: Calendar day details
It contains all the information included in the List of days view. Additionally, each day has been
analyzed in detail. Attendance periods are shown chronologically using calendar day and T&A event
definitions. So, it includes compulsory breaks, work time, overtime, and so forth. Late arrivals,
early departures, and other discrepancies to the work schedule (work regulations) are indicated in
the list by the warning yellow icon accompanied with the relevant comment (early departure, late
arrival, etc.). The same icon is shown on the calendar in the right side of the window (see Figure
18). If you click a date on the calendar, the list is scrolled to the day selected.
View: Total time
It contains all the information included in the List of days view. In addition for each day, the total
time for the specific attendance types are shown: such as total time of cigarette breaks, other type
of breaks, work time, hours outside the office, and so on (Figure 19).
View: Discrepancies
In this view, all the discrepancies to the employee’s work schedule (work regulation) are shown
(late arrivals, early departures, exceeded break limits — e.g. cigarette breaks, and so on). In the
example shown in Figure 20 it is for instance the early departure logged on January, the 24th. This
view is most often used for employee’s work analysis and for correction missing log entries. Events
can be inserted using the Add command in the toolbar. You can also edit absence by the Edit
absence command shown above the calendar, on the right side of the window.
Figure 17. The List of days view
RCP Master Users Manual
Figure 18. The Calendar day details view
Figure 19. The Total time view
19
20
RCP Master User Manual
Figure 20. The Discrepancies view
Leave entitlements
According to the labour code, employees are entitled to paid or unpaid leaves. In the Leave
entitlements tab (Figure 21), you can enter values describing yearly leave limits for the particular
types (leave types can be defined using Tools/T&A type definitions command). In addition, in
this window the number of days for the specific leave type and the remaining number of days are
displayed.
In the program the user must separately enter entitlement for vacation leave and for leave on
request. But according to the Polish Law Code, the leave on request is included in vacation leave
entitlement. In order the program accounts for this, your must assign specific attendance types in
the Define vacation leave and leave on request counted as vacation leave dialog available
in Attendance types tab.
Figure 21. Define vacation leave and leave on request counted as vacation leave
The „Left from previous years column” contains number of vacation leave days left from previous
year and it is automatically copied while assigning a new calendar for a year.
In case of vacation leave and leave on request the column “Number of days to be used in a year”
is automatically updated taking into account the number of days left from the previous year.
RCP Master Users Manual
21
Figure 22. Leave entitlements tab
Work calendar
All the employees have work calendars assigned to them (Figure 23). However, from time to time,
it is necessary to modify work calendar of particular employee. It can be caused by, for example,
replacements done between employees, compensation for past or future absences, and so on.
Figure 23. Selected employee’s work calendar
To modify the calendar assigned to the employee, you need to click the Correct employee
calendar days button. Days modified in the calendar are marked by a border (note the 16th and
18th January in Figure 22 above). To display original or(and) modified calendar days, you need to
select appropriate option in the View menu). The modified calendar days replace the original ones.
In Figure 22, to the 16th January the „Day off” status, and to the 18 January, the „Working day
14:00-22:00” status have been assigned. The modifications apply for the selected employee only.
Reports
In the example presented above, the results of work history calculations have been presented using
different views. The program allows for generating reports from every kind of view. Additionally you
can prepare reports regarding leaves used in the selected period of time, absences in a given
period, entitlements for specific leaves types (as well as the current state of leave utilization) and
the work calendar.Reports can be generated by the Create report command from the particular
window (the printer icon) or, in case of more complicated reports, using a report wizard.
Commands for creating reports can be invoked from many locations, e.g. from the navigation tree,
group window, employee’s detail pane. Using the wizard, you can generate summary reports (for
selected employee groups or for all the employees) as well as for individual employees. These
reports can be automatically sent as attachements in PDF format using e-mail addresses set up in
the employee’s data window. Below you can find successive report generation steps for the
22
RCP Master User Manual
individual employee (to invoke the wizard, you need to click Report command in the employee’s
detail pane — the first tab — or in the navigation tree, from the shortcut menu of the selected
employee — the Report wizard... command).
Step 1. Select report types to generate. In the example below (see Figure 24), the generic report
on work time, the report on discrepancies to work regulations (late arrivals, exceeded break limits
— e.g. cigarette breaks, and so on), absences in the selected period and the work calendar report,
have been selected.
Figure 24. Selecting report types to be generated
Step 2. Choose period, for which the reports selected are to be prepared (Figure 25).
Figure 25. Selecting time range for generating selected reports
RCP Master Users Manual
23
Step 3. Select destination directory for PDF files containing reports generated (Figure 26). In
addition, you can select option for sending reports to employees as e-mail attachements.
Figure 26. Selecting destination directory for generating reports
Step 4. Displaying a progress window for the process of generating reports (Figure 27). After
generation, the summary message is displayed.
Figure 27. Report generation progress window
Apart from reports generated as PDF files using report wizard (most often for list of elements such
as calendars, readers, employees, groups, and so on) there are reports which are displayed as
documents. In Figure 28 you can find sample report List of employees (invoked by the
Reports/Report "employees" menu item).
24
RCP Master User Manual
Figure 28. Report "Employees" displayed in document window
The report is ordered by the employee group name (displayed on the left side of the window).
When you click specific group name, the report will be scrolled to the location, where the data of
the selected group begins. Reports can be printed and exported in many different formats such as:
Crystal reports (.rpt), Adobe Aprobat (.pdf), Microsoft Excel (.xls), Microsoft Word (.doc), Rich
Text Format (.rtf).
5.2.2.3. Calendars
Opens the Calendars window (Figure 29). On the right side of the window, the legend is displayed
explaining colors representing particular day types on the calendar.
Figure 29. The Calendars window
RCP Master Users Manual
25
Clicking the Edit calendar days button displays the Edit calendar days dialog box (Figure 30),
where you can modify the calendar. On the right side of the window, there is a legend with day
types, which can be assigned to the calendar. Assignment is done by selecting days with left mouse
button. Then you need to click right mouse button and select the day type from the shortcut menu.
To remove an assignment, you need to select apropriate days on the calendar, and choose the
Remove assingnment command from the shortcut menu. At the top of the window there is
Insert holiday menu. When you expand it, you can select predefined public holidays for inserting
into the calendar.
Figure 30. Edit calendar days dialog box
In order to make selecting days within the whole year easier — for instance by some rule (e.g. all
the Mondays, Wednesdays and Fridays in June and August), you can use the command Select
days by rule which can be invoked at the top of the window or from the context menu (Figure
31).
Figure 31. Selecting days by rule
26
RCP Master User Manual
5.2.2.4. Control points
Opens the Control points window (Figure 32).
Figure 32. The Control points window
Clicking the Edit button displays the Edit control point dialog box (Figure 33), where you can
modify the control point. T&A Point ID determines an unique control point’s ID. Thanks to this
ID, the change of the control point name will not influence the calculation results. T&A Point ID is
an arbitrary string. By default, when configuration is imported from PR Master, it gets the following
values: subsystem ID/controller ID/reader ID.
Figure 33. The Edit control point dialog box
5.2.2.5. T&A event log
Opens the T&A event log window (Figure 34). In the top section of the window there is an event
list displayed in chronological order. By selecting dates Interval from: and To: in the upper
section of the window you can narrow down the time interval. In the details pane all information
relevant to the event is displayed, i.e: employee’s T&A ID, first and last names, pictures (where
assigned), group, time, control point and T&A event type.
RCP Master Users Manual
27
Apart from this data there are two flags with information if the events were added or deleted. If
you delete an event imported from file, then it will remain on the list as striken out and grayed-out.
On the other hand, deleting an event added by the program operator will completely remove it
from event list. A deleted event (imported from file) can be undeleted when required. In order to
do this, you should click on Undelete deleted T&A event on the toolbar in the Event log
window.
Figure 34. T&A event log window
Clicking on the Edit button opens T&A event editing window (Figure 35), but only the events added
by Operator are available for edition.
Figure 35. Edit T&A event dialog box
5.2.2.6. Home page
Opens the Home page containing three groups of commands.
28
RCP Master User Manual
The Common tasks group (Figure 36) contains shortcuts for most commonly used program’s
commands:
t
Open data file... – opens dialog box for selecting .rta data file.
t
Create new data file... – opens dialog box for saving a newly created data file.
t
Import T&A events — opens T&A data import wizard.
t
Verify data completness... — invokes function for checking data completness
(assignment of calendars for all the employees, completness of arrivals and departures
registration) and displays results in the pane at the bottom of the main window.
t
Find discrepancies against work regulation... — invokes function for checking
discrepancies against the work regulation (late arrivals, early departures, missing log
entries, exceeded minimum or maximum time limits) and displays results in the pane at
the bottom of the main window.
t
Employee report wizard — opens report wizard window for all the employees.
t
Find employee... — opens the Find employee dialog box (Figure 37).
Figure 36. Common tasks area on the home page
Figure 37. Finding employee dialog box
If you enter the employee’s name (full or part) or the T&A ID, the program finds the employee in
the navigation tree, expands the group branch, the employee belongs to, selects the employee’s
branch and opens the employee’s document window.
The Recently opened group (Figure 38) contains paths for recently opened data files (*.rta):
Clicking the path will display a logon window and load data from the file selected.
RCP Master Users Manual
29
Figure 38. Area Recently opened on the home page
The Help group (Figure 39) contains commands for displaying program documentation and for
getting help:
t
Function description — opens document window with program’s function description.
t
FAQ — opens document window with program functionality description in the form of
questions and answers.
t
Troubleshooting — opens document window with problems description together with its
solutions.
t
Open example (demo) file... — loads sample data file (configuration and T&A events of
fictitious company) for testing program;s functionality.
Figure 39. Area Help on the home page
5.2.2.7. Navigation tree
Opens Navigation tree window (Figure 40) representing data as a hierarchical tree. The main
branches of the tree are the main RCP Master modules, namely: employee groups with employees,
work calendars, control points, and T&A event log. To quickly find an element of particular name in
the tree, you need to type the name (or its part) in the Find field (at the top of the window), and
press Enter, or click Search button located on the right side of the field (to find next occurences
of the name in the tree, you need to click the Search button as many times as the name is found).
Moving from element to element in the tree can be done using mouse or the keyboard (arrow
keys). Pressing Enter or double clicking the element in the tree opens the document assigned to
this element (i.e. clicking employee name opens employee’s document window).
30
RCP Master User Manual
Figure 40. Navigation tree
To display command list associated with the particular tree element, you need to right click it — the
context (shortcut) menu will be displayed (Figure 41).
RCP Master Users Manual
31
Figure 41. Shortcut menu associated with selected tree element
By clicking the selected menu item, we invoke the command for the element selected (e.g. you can
assign the calendar to employee using Assign calendar to employees command — Figure 42).
Figure 42. Assigning calendar to employee from the shortcut menu
5.2.2.8. Previous/Next document
If more than one document is opened at a time, then commands Previous and Next allow for
moving between them in the same order as they were opened.
32
RCP Master User Manual
5.2.3. Tools menu
The Tools menu is shown in Figure 43.
Figure 43. The Tools menu
The commands of the Tools menu have been described in the following sections.
5.2.3.1. T&A event type definitions
Opens the T&A event type definitions window (Figure 44). The T&A event type determines how
the event logged by the control point will be interpretted, for example: arrival, departure, going out
on business. The event type is uniquely identified by the numerical code. You can define any
number of T&A event type definitions
Figure 44. T&A event definition window
RCP Master Users Manual
33
Clicking the Edit button displays the Edit event type dialog box (Figure 45), where you can
modify the particular event type.
Figure 45. Edit event type dialog box
5.2.3.2. T&A type definitions
Opens the T&A type definitions window (Figure 46). T&A type is used to determine attendance
type of the employee in the particular time. Sample attendance types are as follows: Work, Going
out on business, Breakfast, Overtime, On vacation, Sick leave, and so on. You can define
any number of attendance types.
The Details pane contains the following data about attendance type:
t
Code — unique code identifying attendance type.
t
Name — textual name.
t
Color — color displayed in the calendar.
t
Time period — it can get two values: Interval (it means, that the attendance type
determines time interval up to minutes — e.g. work, breakfast break, cigarette break,
overtime, etc.) or Day (indicates that the attendance type applies to the whole working
day e.g. vacation, sick leave, business trip, etc.).
t
Start — (optional) determines the event type which start counting time for the particular
attendance type (e.g. the event — Arrival can begin the attendance type Work; the
event Going out on business can start the attendance type Out on business).
t
Included into working hours — determines if the particular attendance type will be
included into working hours (e.g. breakfast break is included into working hours whereas
lunch break is not included; sick leave is included, but unpaid leave is not, and so forth).
t
Leave — determines if the particular attendance type indicates leave — i.e. it is shown in
the Leave entitlements window for the particular employee.
t
Comments — additional info.
34
RCP Master User Manual
Figure 46. T&A type definitions window
Clicking Edit button displays the Edit attendance type dialog box (Figure 47), where you can
modify the selected attendance type.
Figure 47. Edit attendance type dialog box
RCP Master Users Manual
35
5.2.3.3. Calendar day type definitions
Opens the Calendar day type definitions window (Figure 48). Calendar day type is a pattern
(schedule) of work in the particular day — e.g. workday from 8:00AM to 5:00PM with a lunch break
(unpaid) from 1200PM to 1:00PM. Calendar day types, as the name suggests, are used for work
calendar definitions. Work calendar creation is the process of assigning day types to selected days
in the calendar — e.g. for all days from Monday to Friday the type: Workday 08:00AM-04:00PM can
be assigned. More about calendars can be found in the Calendars section.
Figure 48. Calendar day type definition window
Clicking the Edit button displays the Edit calendar day type dialog box, where you can modify
the selected calendar day type (Figure 49). The day type definition consists of the following fields:
t
Code — unique code identifying day type.
t
Name — unique name of day type.
t
Color in calendar — color for representing the type of day assigned to the calendar.
t
Comments — additional info.
t
Type — it can get the following values: Working (indicates compulsory attendance at
work); Extra working (means extra working day which is not compulsory); Holiday
(means a public holiday); Day off (free day not counted in the calculations).
36
RCP Master User Manual
t
Hours — it can get two values determining the way of work: Fixed (work from defined
time to defined time); Flexible working hours (work type, where the start and the end
of the workday is not set; it is possible to define daily hours limit and the time of start/end
the workday — e.g. for accounting the flexible working hours during the night shift).
Figure 49. Edit calendar day type dialog box
In addition, the day definition may contain configuration items which will be shown after clicking
the Show details button (Figure 50). Additional options are divided into the following tabs:
Options tab contains several options related to work time calculation, and showing information
related to the work regulation (schedule):
t
Include early stay at work... — you can define the point of time (before the usual
working hours), from when the early stay at work will be included into working hours.
t
Include late stay at work... — you can define the point of time (after the normal
working hours), until when the late stay at work will be included into working hours.
t
Mark as late arrival... — you can define the point of time, from when the employee’s
arrival will be counted as late coming.
t
Mark as early departure... — you can define the point of time, before when the
employee’s departure will be counted as early.
t
Night hours — indicates the range which will be counted as night hours.
RCP Master Users Manual
37
Figure 50. Work time calculation parameters — details
Regulatory breaks
Allows for definition of regulatory breaks, e.g. breakfast break (Figure 51). The program will
automatically count the work time within the range defined as the type indicated in the breaks list.
Figure 51. Regulatory breaks tab
Overtime
Allows for definition the overtime in the particular day (Figures 52 and 53). The program will
automatically count the work time as overtime according to the rules defined. There are two
methods of overtime counting:
Fixed hours: defined by selecting the hours range From-To. The Attendance type column
determines the overtime type accounted for in the particular time range (e.g. Overtime 1 – 50%,
Overtime 2 – 100% and so on).Variable hours: calculated dynamically (after the specific number
of hours has been worked through). Defined by indicating the number of hours worked through
after which the system should start counting the specific overtime type. For example: in the first
row of the Figure below, there is information that the overtime should be counted after 8 hours of
work — e.g. if an employee worked from 7:00 am to 4:00 pm, then the “Overtime 1” period starts
at 3:00 pm.
38
RCP Master User Manual
Figure 52. Overtime tab — variable hoursAdditionally, the column If an employee has worked at
least for allows for defining even the most complicated overtime definition.
For example: we are supposed to define overtime in such a way that after 8 hours of work, the
overtime 50 % be counted (i.e., for example, Overtime 1). Additionally, if an employee worked
longer than two overtime hours (i.e more than 10 hours in total), then 100 % overtime should be
accounted for (i.e., for instance, Overtime 2) from the beginning of overtime period, so after 8
working hours. The method of defining this kind of overtime has been described below.Definition
example: In the window above, two overtime types have been defined. Both begin after 8 hours
of work. As an additional condition there is a statement, that the first overtime period should start
after an employee worked at least for 8 hours, the second after she/he worked at least for 10
hours. In Figure below there is work history for an employee who worked form 7:00 am to 4:50
pm. As you can see, the employee worked more than 8 hours, so the “Overtime 1” type were
accounted for.
On the other hand, if an employee worked more than 10 hours (e.g. from 7:00 am to 5:40 pm),
then the “Overtime 2” type should be accounted for him. This is according to the setting in the If
an
employee
has
worked
at
least
for
column.
Allows for definition of overtimes in the particular day (Figure 51). In the current version, overtime
can be defined in the fixed time range. The program will automatically count the work time as
overtime,
according
to
the
defined
rules.
RCP Master Users Manual
39
Figure 53. Overtime definition tab
Rounding
Allows for definition of roundings for the start and end of work times. In the sample shown in
Figure 54, the counting of the start has been set every 30 minutes, and the allowed time margin —
5 min. It means, that the employee’s arrival, e.g. at 7:50AM or 8:04AM will be rounded to 8:00AM,
but the arrival, e.g. at. 8:08AM will be rounded to 8:30AM. The options set for the end of work
have the following meaning: if departure took place at 3:55PM, it will be rounded to 3:45PM, but
departure at 3:59PM or 4:08PM will be rounded fo 4:00PM. Times rounded are visible in the
employee’s work history with a tilde mark — e.g. ~ 8:00.
Figure 54. Rounding definition tab
Hours at work
Allows for definition of constraints list for times spent within the particular attendance types (see
Figure 55). For example, we can define maximum total cigarette break time, lunch breaks time or
define minimal expected work time hours.
40
RCP Master User Manual
Figure 55. Hours at work tab
Additionally, the Do not count when above maximum option allows limiting attendance time of
a specific type to the given maximum value. The time above this value will not be counted to the
total work time.
Sample 1. If we define that a maximum attendance time for the attendance time „Breakfast” is 10
minutes, and we check this option, but the employee stays at breakfast 30 minutes, then the
program will subtract the time above 10 minutes (i.e. 20 minutes) from the total work time. So, in
this scenario, if the employee stays at work 8 hours, the program will count him only 7 hours and
40 minutes.
Sample 2. If we define that a maximum attendance time for the attendance type „Work” is 8
hours and we check this option, then the program will not count the time exceeding 8 hours to the
total work time of the employee. So that, if the employee who works from 7:00 AM to 3:00 PM
started her work at 7:00 AM and finished at 3:45 PM, then the program will count her only 8 work
hours (despite the fact that she stayed at work for 8 hours and 45 minutes).
5.2.3.4. Program operators
Opens the Program operators window (Figure 56). In the top section of the window there is
operator list. The bottom section displays rights to execute particular program’s command defined
for the selected operator.
RCP Master Users Manual
41
Figure 56. The Program operators window
Clicking the Edit button displays the Edit operator data dialog box (Figure 57). You can change
there the operator’s password, and select program’s commands available for her(him). In order to
do this you need to select relevant checkboxes in the program commands tree.
42
RCP Master User Manual
Figure 57. Editing operator data
5.2.3.5. Operator action history
Opens the Operation history by operators window (Figure 58). In this window you can track
operator’s activities and commands which they invoked from the time they logged on, until the
moment of ending work with the application. The history contains also errors logged during
application’s activity. The operation history can be saved in .csv format (comma separated text file)
using the Save as... command.
RCP Master Users Manual
43
Figure 58. Operator action history window
5.2.3.6. Verify data completnes
Invokes function for checking data completness (i.e. assignment calendars for all the employees;
completness of arrivals and departures registration) and displays results in the pane at the bottom
of the main window. In the results window (Figure 59) you can click the Edit button and correct
data selected in the list.
Figure 59. Results of data completness check
5.2.3.7. Find work regulation discrepancies
Invokes function for checking discrepancies against the work regulation (late arrivals, early
departures, missing log entries, exceeded minimum or maximum time limits) and displays results in
the pane at the bottom of the main window (Figure 60). When you double-click data selected in the
list in the result window, the employee’s document window is opened showing the discrepancies
details.
44
RCP Master User Manual
Figure 60. Discrepancy list pane
5.2.3.8. Data file menu
5.2.3.8.1. Change file access password
Displays password change window (Figure 61), where you can change password for the current
data file. The default password for newly created file is „roger”.
Figure 61. Change file access password dialog box
5.2.3.8.2. Encrypt file
Displays a dialog box containing a question about encrypting or decrypting file. If you confirm, the
action selected will be performed.
5.2.3.8.3. Compact/repair file
Displays a dialog box containing a question about compacting and repairing file. If you confirm, the
action selected will be performed.
5.2.3.9. Language
Opens the RCP Master language selection window (Figure 62). The drop-down list contains all
the languages available for the program. After you select language, all the opened windows will be
translated, without closing them.
RCP Master Users Manual
45
Figure 62. RCP Master language selection dialog box
5.2.3.10. Change license
Displays a dialog box containing a question about removing the current license. If you confirm, the
current license is removed, and the program restarts in order to provide a new license in the start
window. The command is used e.g. for moving from one-user to multiuser license.
5.2.3.11. Options
Displays the Options window (Figure 63). The Mail settings tab is used for configuring mail
account for sending e-mail reports to employees.
Figure 63. Options dialog box
The T&A event import tab (Figure 64) allows for configuration of quick event import from given
location after the operator logs on.
46
RCP Master User Manual
Figure 64. T&A event import tab
5.2.4. Help menu
The Help menu is presented in Figure 65.
Figure 65. Help menu
5.2.4.1. About
Displays dialog box with information about the program version.
RCP Master Users Manual
47
5.2.4.2. Program function description
Opens the RCP Master User Manual (PDF) in a built-in document view window. Acrobat Reader is
required for this functionality.
5.2.4.3. FAQ
Opens document window with program functionality description in the form of questions and
answers.
5.2.4.4. Troubleshooting
Opens document window with problems description together with its solutions.
5.2.4.5. Release history
Opens a document window with RCP Master release notes.
5.2.4.6. Roger home page
Displays the Roger Web site using the RCP Master's dokument window.
5.2.4.7. Send feedback
Opens default e-mail client with the vendor’s e-mail address and the subject, allowing for sending
feedback to the vendor.
5.2.4.8. Check for updates
Establishes connection with update server in order to check, if newer program version is available
for download.
48
RCP Master User Manual
6. GLOSSARY
t
Time and Attendance — set of technical and information technology media for
attendance control (presence/absence) during working hours (see also:
(http://en.wikipedia.org/wiki/Time_and_attendance).
t
Control point – a device for employee identification purposes using PIN codes readers,
code cards, proximity crds, biometric methods (fingerprints), etc.
t
T&A event log — a list of events registered by control points.
t
Data file compacting — deleting records in databases is performed by setting a flag
indicating that the particular record is deleted, not by physically removing the record
(physical removing records is very time-consuming operation). In order to delete records
physically, you need to invoke Tools/Data file/Compact/repair file command.
Compacting is performed mainly for lowering the size of data file.
t
T&A event type — determines how the event logged by the control point will be
interpretted, for example: arrival, departure, going out on business. The event type is
uniquely identified by the numerical code.
t
T&A type — used to determine the attendance type of the employee in a particular time
range. Sample attendance types are: Work, Going out on business, Breakfast,
Overtime, On vacation, Sick leave, and so on.
t
Calendar day type — a pattern (schedule) of work in the particular day — e.g. workday
from 8:00AM to 5:00PM with a lunch break (unpaid) from 1200PM to 1:00PM.
Contact
Roger sp. j.
82-400 Sztum
Gościszewo 59
Tel.: +48 55 272 01 32
Fax: +48 55 272 01 33
Technical support PSTN: +48 55 267 01 26
Technical support GSM: +48 664 294 087
e-mail: [email protected]