1
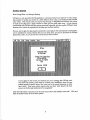
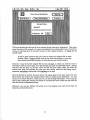
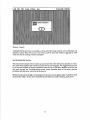
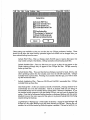
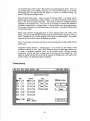
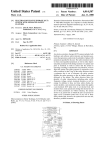
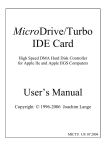
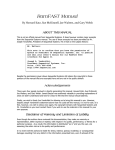
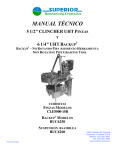
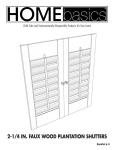
GSTape
Copyright (c) 1991-1992 by Tim Grams
County Line Technology
All Rights Reserved
"The Apple nGS Tape Backup Program"
This is a commercial program protected under the copyright
laws of the United States of America.
County Line took great care and pride in the writing and testing
of this program. However the user assumes all risk and liability
with regard to use of the program. In no case shall County Line
and it.s licensed distributors be liable for any damages caused
by the use of this program.
Introduction and Overview .................................................................................................................. 3
Fe.atures and Requirements ............................................................................................ :..................... 4
Installation ........................................................................................................................................... 5
Getting Started .................................................................................................................................... 6
Setup Menus ........................................................................................................................................ 16
Program ................................................................................................................................. 16
Backup Rules ......................................................................................................................... 16
Timed Backup ................................................................................................. ;..................... 18
Tape Menus ......................................................................................................................................... 20
Generic Drives ....................................................................................................................... 20
Apple (3M) Drives ................................................................................................................. 20
Archive Menus .................................................................................................................................... 22
File Backup............................................................................................................................ 22
Volume Select. ......................................................................................................... 22
Volume Scan ............................................................................................................ 23
File Select ................................................................................................................ 23
Pre-Backup Options ................................................................................................. 24
Backup Status ........................................................................................................... 24
File Restore ............................................................................................................................ 25
Backup Set Selection ................................................................................................. 25
File Select ................................................................................................................ 25
Pre-Restore Options ................................................................................................. 26
Destination directory selection ................................................................................. 27
Restore Status ........................................................................................................... 27
Image Backup ........................................................................................................................ 27
Volume Selection ..................................................................................................... 28
Pre-Backup Options ................................................................................................. 28
Backup Status Window .......................................................................................... ,.28
Image Restore .................................................. :..................................................................... 28
Volume Selection ..................................................................................................... 28
Restore Confirmation ............................................................................................... 28
Restore Status Window ............................................................................................ 29
Scripts .................................................................................................................................... 29
Creating Scripts ........................................................................................................ 29
Loading Scripts ........................................................................................................ 29
Running Scripts ....................................................................................................... ·.30
Timed Backup .......................................................................................................... 30
Troubleshooting ................................................................................................................................... 31
Registration ............................................................. o.
o. o.
32
0 0
2
0 0 0 . . . 0 0 . . 0 . . . . . 00.0 . . . 0 0 . . . . . 0 . . . . 0 0
0 0.0 . .
0 ..... 0 0 .................
Introduction and Overview
Welcome to GSTape and the convenience of tape backup. It is our hope that you will enjoy
GSTape and use it religiously. Remember, you can never have enough backups. Ever!
The 'Good Old Days'
GSTape is the direct descendant of a program known as HDTape, the first commercially
available, non-proprietary (meaning you didn't have to buy a certain vendor's drive) SCSI tape
backup program for the Apple II. HDTape ran under ProDOS 8, worked only with the nonDMA Apple Rev C SCSI card, and performed "image" (full volume block by block) backups to
tape systems using drives manufactured by 3M-the Apple tape drive is a notable example.
HDTape was quite usable, but it had some limitations, among them that restored volumes were
the same size as the originals, and that any directory structure problems were blindly copied
over to the backup. Doing backup or restores of individual folders and files was very time
consuming at best... and often was j':lst not possible.
A New Era
GSTape is a completely new program that uses a tape drive the way it is supposed to be used.
The program maintains its own backup set and file structure on the tape, optimized for the way
a tape is accessed: sequentially, one block after another. GSTape's advanced structure allows
backup and restore of whole volumes or just parts (that is, individual folders and even
individual files), and multiple backups may exist on individual tapes. It's almost as though a
backup tape is just a huge floppy disk ...but not quite.
Tape Is Different
GSTape does not attempt to emulate a disk drive literally, because data on tape are not easily
accessed in a random manner--everything on the tape is referenced from the beginning of the
tape. In general, a tape system cannot overwrite existing data in the middle of the tap~, but
instead must always append new data to the end of the "used" section. (There are some
exceptions, of course.)
Since what's on the tape is referenced to the beginning of the tape, there are instances in using
GSTape that the tape must be advanced to the beginning... or to the first available place where
new data can be written without destroying other backups. Usually, you'll see the access light
on your tape deck come on for a noticeable period, and a message on the screen will advise that
the tape's being moved. This is an aspect of tape operation that is quite a bit different from what
you're used to with floppy disks and hard drives. Nevertheless, you'll soon find that using
GSTape for backup and restore is much faster than using floppy disks, and, of course, a single
tape can hold the same amount of data as 50 to nearly 200 3-1/2" floppy disks!!! (Depending on
the size of the tape, of course.)
Because GSTape is so convenient ad easy to use, you'll find yourself getting in the habit of
making backups more frequently, and that's a good habit to develop.
3
Features and Requirements
GSTape is dedicated to data integrity and user convenience. Here's an overview of its many
features:
•
•
•
•
•
•
•
•
•
•
•
•
Full GS/OS desktop compatibility
File oriented, incremental operation
ProDOS and HFS volume support
Individual folder/file selection
Multiple backups per tape
Multiple tapes per backupl
Multiple volumes per backup
Sparse file and resource fork support
Image backup operation
Backup script files
Timed backups2
User friendly prompts
To use GSTape, you need this hardware and software:
•
•
•
•
•
•
•
•
Apple Iigs with 1.5 megs of RAM minimum (2 megs recommended)
GS / OS System 6
Apple Rev C SCSI interface ... OR...
Apple High Speed DMA SCSI interface .... OR...
C.V. Technologies RamPAST (rev 3 required)
Apple tape drive (or 3M clone) ...OR. ..
Generic SCSI tape drive (including Teac and Archive) ... OR. ..
SASI tape drive (including FCP Sider and CMS)3
Note l : RamPAST support does not include multiple tapes per backup except when
using the Apple (3M) drive. Do not exceed the tape capacity when backing up with
the RamFAST unless you have a 3M drive. Backups that go beyond the end of the
media using the RamPAST will be incomplete or unusable, especially when using block
mode backups.
Note 2: Timed backups can not be performed with an Apple (3M) tape drive attached
to an Apple controller. However, Apple tape drives can perform timed backups when
attached to the RamPast.
Note3: Many Sider and CMS tape drives use SASI type mechanisms instead of SCSI. It
is very common in 60 megabyte and lower capacity Teac assemblies. A RamPAST is
required to interface SASI drives. Because such drives do not support the full SCSI
command set, GSTape cannot sense whether a tape is properly inserted in a SASI drive.
You must have a tape loaded before starting backup and restore operations if you use
. SAS! tape drives.
4
Installation
GSTape does not come on a bootable system disk. To install it you must move the following
files found on the distribution disk to your hard drive. Be sure to use a GS/OS copy utility since
GSTape uses extended resource forks in many of the files.
1) GSTape - This is the application file you will launch to run GSTape. Create a new
directory for this file on your hard drive where GSTape will create other files in the
course of normal operation.
.
2) GSTape.Driver - This file is used by GSTape to communicate with the tape drive. It
should be placed in the *:System:Drivers directory of your boot disk.
3) GSTape.Timer - This file is used to initiate timed backups. It should be placed in the
*:System:System.Setup directory of your boot disk.
In order to run with the Apple SCSI cards, the GS/OS SCSI Manager must also oe installed in
the Drivers directory. Installing the GS/OS SCSI disk driver using Installer will do this if you
have not already done so. Installer is located on the:Install disk that is part of the GS/OS
System disk set.
GSTape RarnFast support requires that the RamFast GS/OS driver be installed. To do so, move
the RarnFAST.DRNER file from the CVTECH.ROM partition, or use the Install option in the
RamFAST lSCSI Utilities program as described in the RamFAST user manual.
It is a good idea to construct a bootable 3.5 system floppy disk containing the above files in case
you need to recover your hard drive. The easiest way to do this is make a copy of the GS/OS
system.disk and replace the Start file in the System directory with the GSTape program. Make
sure that all necessary SCSI drivers are also installed in the Drivers directory of the floppy disk.
To complete the installation you should reboot the hard drive system.
At this time, take a minute to fill out and send in the attached registration page. Record the
serial number from the GSTape distribution disk along with your name and address and
version number of the program that appears when the program starts up. If we don't know
about you, we can't help you if trouble occurs. You will also be first in line for program
updates, etc.
5
Getting Started
First Things First - An Example Backup
GSTape is a very powerful GS/OS application, with many features and options-as well, using a
tape system to backup and restore is a little different from using a conventional disk-oriented
copy utility. This section takes you step-by-step through a straightforward backup and restore
of most of the files from a single volume in order get you going right away. As you become
comfortable with GSTape and tape system operation in general, you can explore GSTape's many
features, all of which are explained in the Setup and Archive sections.
By now, you've got your tape system connected to your Iigs per the manufacturer's instructions,
you've installed the various GSTape files on your hard drive, and you've launched the GSTape
application, itself. So, you should now see the screen shown below:
Copuright 1992
bU Tim Grams
Countu Line Technologu
P.O. Box~62283
Garland, TX 750Q6
USA
Version 2.0.5fO
If you don't see this screen, but instead you see a message that GSTape can't
find your tape system, you'll need to re-check your installation: does the tape
system require a special 'driver' file? ... and is it in the correct directory on your
hard drive? Does your system require that you boot 'cold' (power off, then
power on) for the tape hardware to be recognized?
Click the OK button to proceed, and the next screen shows the familiar 'menu bar'. Click and
hold the Archive entry to show these options:
6
[Please do not go exploring around in the other menu bar entry areas yet-if you do, you may
change something so that all the rest of the following example won't be true!!!]
Select File Backup, which will bring up a standard scroll list of the volumes available for backup,
similar to this:
Type:
@Normal
Incremental
Compound
Select:
@All Files
Choose Files
o
o
(
o
Cancel)
Ok
J
For this first time, leave the Tape and Select options at their default settings, Normal and All
Files, respectively.
Use the mouse or the arrow keys to highlight the volume you care to use and either double-click
or press Return to select it. A message will appear that GSTape is reading the directory
7
structure of the selected volume, and when that process is completed, a screen similar to the one
below will appear.
.
FND
TXT
SYS
$F6
LFSTs
LDrivers
LS9stem.Setup
LDesk.Accs
LTools
LFonts
LCDevs
LSounds
[8] Auto Directoru
(
13-F B-92
27-AUG-92 22:15
16-APR-90 10:08
13-FEB-92 1:00
5-SEP-9218:45
Find
Notice that the volume and all the directories (sometimes called folders) appear in the left scroll
list, while the right scroll list shows only files--in fact, the files are those contained in the item
that's highlighted in the left scroll list. In this example, it's the main directory of the volume
GSl...and the directory's pathname appears above the right scroll list.
Next, notice that. the default is for all the files and directories to have been selected, as noted by
the check marks to the left of each. The numbers of directories, files, and kilobytes selected
appear in the space just above the left scroll list.
To see how easily one may select specific files for backup, double-click on anyone of the
directory names on the left-you'll see that the checkmark for that directory disappears, the
checkmarks for all of the files in that same directory disappear, and the amounts shown above
the two scroll lists are immediately updated to reflect your specific choices.
Now, double-click on one or more of the files that don't have checkmarks to their left--notice
that the checkmarks re-appear next to each file you select, that the checkmark also re-appears
for the directory (on the left), and that the amounts shown at the top are once again updated.
Double-clicking directories and files is only one of several very effective ways to select data for
backup in GSTape, and you should refer to the Archiving section for all the details.
For now, though, let's get back to the backup example ... so click once on the volume name at the
top of the left-hand scroll list, then click the Include button just below the right-hand scroll list.
This will assure that all files in the volume are selected, no matter what you may just have done
in experimenting with file selection-it just gets us back to the same "all files are selected"
starting point.
Since this is just a 'familiarization' example, ignore the several options at the bottom of the
screen and just click the OK button at the lower right, just under the 'files' scroll list. When you
do, a screen such as the following appears:
8
Enter Backup Name:
IGSl Monda9
D Ruto erase/format backup media
D Save ScriPt
Backup
The default name for a GSTape backup is the name of the volume selected, and you can add to it
(for a total of 32 characters) to lend more meaning-in this. case, we've added the day the backup
was made.
It's almost time for the actual backup process to start, so be sure that there's a fully usable tape
in your tape system. By "fully usable", we mean a tape that GSTape can write over completely.
.
Here's why:
GSTape is able to recognize only the data that it has written on a tape. No matter what else is .
on a tape-or how it got there--GSTape will not recognize it, and it will presume that the tape
needs to be formatted. As you'll recall ...and perhaps you've learned the hard way... formatting
results in everything being lost from a disk, and that's just as true with a tape. So, the first time
GSTape is called on to use a tape, it will have to be formatted to GSTape's 'standards' ... and you
don't want to lose anything from the tape. Later on you will learn how to do advanced things
like appending to tapes and reusing tapes without erasing, but for now, the easiest thing to do
is to use a new tape for your first backup.
Once you click Backup to begin the operation, GSTape looks to see if you have a tape in the
drive. If you don't, don't worry. GSTape will prompt you to load it and wait until it's ready.
Since the tape is new, GSTape will recognize that it needs fprmatting, and will pop up a message
similar to this one:
9
Tape needs to be erased!
Do ~ou wish to do so?
If you have an Apple drive, you will get a different prompt, one that says this tape needs to be
formatted. In any case, just click Yes and the erase (or format) will happen. After a few minutes
(or a lot of minutes if you have an Apple drive) GSTape will begin the backup process. There
will be activity both on your hard drive (as files are read) and on the tape deck (as the files are
written to tape), and progress will be shown on a screen such as this:
When all the files have been copied to the tape, GSTape will rewind the tape back to its
beginning (remember, in tape operation, everything is keyed to the be.ginning of a tape), and
when that's done, you'll see this message:
10
That's all there is to it!
"It Ain't Over 'Til..." • An Example Restore
When you think about it, the most important part of using GSTape (or any other archiving
utility, for that matter) is restoring files ... so let's walk t,hrough an example.
Be sure that the tape you just used for the example backup is in your tape deck and click on the
Archive entry in the menu bar and select Restore, which will bring up 'a screen similar to this
one:
11
iii
8-Sep-1g92 19:08 3129SK F 6S1 Mondo9
GSTape always finds and selects the first archive on a tape automatically. If you have an Apple
tape drive, you won't see the More or All buttons, but since it displays all the backups on a tape
immediately, there is no use for them. Generic SCSI tape owners do see the More and All
buttons, but there's nothing to be gained by trying them at this point... though they will be very
useful later, as you use GSTape more. For now, double-click on the archive that's hilited, and
after a short period of tape access, a screen something like this one will appear:
SYSTEM'
LFSTs
LDrivers
LS~stem.Setup
LDesk.Accs
LTools
LFonts
LCDevs
LSounds
Courier.10
Courier.12
Courier.1Q
Courier.1S
Courier.20
Courier.2Q
FostFont
Font.Lists
Geneva.10
FOH 13-FEB-92
FOH 13-FEB-92
FOH 13-FEB-92
FOH 13-FEB-92
FOH 13-FEB-92
FOH 13-FEB-92
BIH 13-FEB-92
BIH 29-AUG-92
FOH 13-FEB-92
1:00
1:00
1:00
1:00
1:00
1:00
1:00
6:Qa
1:00
[8] Auto Directory
This screen is almost identical to one seen while creating an archive, but a big difference is that
files are selected ....yet. That's your job. Just as was true in the backup example, you
~ of the
12
can double-click on the volume and directory names in the left-hand scroll list to select them
and their contents, and it's also quite practical to select individual files from the right-hand
scroll list.
To illustrate this, click .Qru;g on any directory name in the left-hand scroll list (it will be
highlighted), then double-click on a few files in the right-hand scroll list-the number of files
selected is shown above the scroll lists. Now click once to highlight a different directory on the
left, and select a few files from this one. Notice that these new files are added to the previous
selection (check the amounts shown above the scroll list to confirm) and that checkmarks appear
in the left-hand scroll list to show where you have selected files to be restored. For this
example, a half-dozen or so files will be plenty.
Click the OK button to continue, and you'll see this screen:
Restore Options
Confirmation:
@ Confirm overwrites
Do not confirm overwrites
Overwrites:
@ All file dates
Hew files only
Destination:
@ Original Pathnomes
o Sing Ie directory
o Pick new base directory
o
o
Cancel
This is the place in the restore sequence where choices are made that affect the 'logic' that
GSTape uses in restoring the files you've selected. (See Pre-Restore Options for the specifics.)
To keep things simple, just use the default settings as they appear on the screen. Click the OK
button when you're ready.
After a short time and some action by your tape deck and hard drive, you'll see the following
screen:
13
~[=========::J5I
File exists on destination!
I_=-~--......
( Canc~l Confirmations
)
Restore Status
Courier.12
GSTape is advising that the first file to be restored already exists at its 'destination'! That makes
sense, because in this example we've gone immediately from archiving files from a hard drive
volume to restoring them to the same volume ...in their original locations. Of course the file
already exists!
It will be quite common that you'll want to restore an archived file to some
location where it doesn't already exist (it may have been deleted, or you may
have selected some other location), in which case you won't see this screen.
However, it may be that the 'original' file has been damaged, in which you really do want to
overwrite it with the on the tape, so for this example, just click the Overwrite button. GSTape
will then find the place on the tape where that file has been written when you made the
archive ... and there will probably be some tape deck activity while the file's being foundremember, everything is referenced to the beginning of the tape.
After the first file is restored, the screen above will appear again for the same reason: the next
file to restore also exists in the 'original location' that you selected as the destination. You·may
choose not to restore this file in which case you can click the Skip File button. Or you may get
tired of this confirmation business and decide to overwrite the rest in which case you click the
click the Cancel Confirmations button.
Whichever way you go, GSTape will' advise you of its progress, and when all the files are
restored, you'll see this screen:
14
That's it. Done!!!
Although this has just been an example--and the only files being restored were undamaged and
already in place-there will come a time when you'll sit back and breathe a hlg sigh of relief
when you see the message "Restore Complete".
Just Scratched the Surface
This very short example of how to back up and restore files with GSTape has pointed out only a
few of the many options and controls you now have at your disposal. We suggest that you now .
go to the next sections to become acquainted with the rest of GSTape's features ... and also that
you read through the Troubleshooting section, which describes some of the more common
problems that may arise...and what to do about it.
Before you get away, though, we're going to bend your ear once again: make it a habit to back
up your files often. If you don't remember the last time you made a backup ... do it now!!
15
Setup Menus
Program
Buffer Size
@ 512 K 01.5 Meg
0768K 02Heg
01Heg
(
Save
Cancel)
The Program Setup dialog allows you to alter some of the ways that GSTape runs. Select the
appropriate checkbox or radio button and press Save. The new settings will take effect and be
saved on disk.
Startup Logo - Whether you want the startup title screen to be displayed on program
startup.
Menu Clock - Turns on or off a menu clock in the top right hand part of the screen. Do .
not use it if this conflicts with any other menu clock routine.
Screen Blanker - When this option is selected, a 30 minute screen blanker (or saver) will
be in effect. If you don't hit a key in 30 minutes, the screen will change to black to
prevent an image from being burned into your screen. Press any key to resume the
display.
,
Buffer Size - GSTape uses an internal buffer to contain file information and to provide
the basic input/output buffering. If you are backing up large volumes and/or have
adequate memory, you might consider increasing the amount of ram allocated. The
program will restart when this setting is changed. If you get a memory allocation error,
reduce your buffer size.
Backup Rules
16
o Include 'BAD' Files
[8J Include Invisible Files
[8J Include Sgstem Files
[8J Inc lude App lication Files
[g] Clear. Backup Bits
Log Backups to 'Backup.Log'
Block (ProD OS onlu) mode
[g] Compress backup directoru
o
o
Ok
These settings are available so that you can alter the way GSTape perfonns a backup. These
should be set before the actual backup operation begins and should not be changed after you
. have selected backup from the menu.
Include 'BAD' Files - This is a filetype which ProDOS uses to reserve disk space that
may contain corrupt or bad blocks. GSTape normally will not backup such files.
Include Invisible Files - These are files that you can set so they do not appear on the
Finder desktop although they do appear in the GSTape file lists. GSTape normally
backs up these files.
Include System Files - These are files that have filetypes reserved for tools, drivers, and
other operating syst~m files that usually. come from the GS/OS Install disk. GSTape
normally backs up these files. Warning: If you deselect this file type, you will not back
up desk accessories either.
Include Application Files - These are GS/OS and ProDOS 8 executable files. GSTape
normally backs up these files.
Clear Backup Bits - As files are created in GS/OS or ProDOS 8,a "backup needed" bit is
automatically set in the file information. This bit is checked while you are doing an
incremental backup and is normally always cleared after a backup is completed. If you
run another backup program or are just testing GSTape, you may want to deselect this
option. Note that an incremental backup becomes a compound backup with this option
disabled, however the main reason for this option is to prevent backup bits from being
cleared during full backups.
Log Backups to "Backup.Log" - If this option is selected, a record of your backups will
be kept in a file called Backup.Log in the same directory as GSTape .. This log file will
contain a list of all files backed up while this option is enabled. This can be handy if you
17
are reconstructing a disk volume. The log file is an appending type of file. If you run
out of disk space in your GSTape directory, you will cause the backup to be aborted.
Periodically check the log· file size and delete it or move it to another volume. By
default, GSTape does not log backups.
Block (ProD OS only) mode - This is a faster file backup mode. It is usable only by
generic tape drives attached to a DMA interface. You will not be able to set the mode if
you do not have the proper hardware. This mode is limited to ProDOS partitions
attached to the interface card. You can't use it to backup or restore HFS partitions,
ramdisks, network drives, or floppy drives. You also cannot use it for image backups.
If you have a RamFast, you will need revision 3.0i or better. By default, GSTape does
not use block mode.
Block mode achieves its very fast speed by direct physical reads and writes of the
media. As such, the file directory structure must be correct before a backup or restore is
done. Frequent use of a volume integrity check utility is recommended. Also, fastest
operation will occur if the volume is regularly optimized.
Note: Do not mount or unmount removable or network volumes after starting GSTape if Block
mode is used.
.
Compress backup directory - GSTape places a list of files on the backup media
whenever a backup is done. This is used during the restore to build the selection tree.
In order to maximize available space on the backup media, GSTape normally
compresses this list and does not keep track of files that were not backed up. This
option is mainly intended for use by future versions of GSTape and is not used by the
current version. By default this option is disabled.
Timed Backup
Hour
.1206
07
08
09
010
011
Minute
@OO 030
005035
010 O~O
015 0~5
020050
025055
Days
t2JAll OWed
OSun OThu
OMon OFri
OTue OSat
Script: 1
Name: Nightly
[2] Enable timer
(
Ok
)
(
Cancel
)
( Choose Script )
18
GSTape provides two backup timers. These are used in conjunction with backup scripts and
provide a method of running GSTape at certain times of the day or week without operator
intervention. An example of timed backup usage might be to do a nightly incremental backup.
The user should be familiar with scripts and general backup operations before attempting to
setup timed backups. A tape should be loaded and ready to use.
You must set the day and time (within 5 minutes) of when the backup is to occur. You must
also choose a backup script that will be associated with the timer. Be aware that selecting script
owill cause whatever backup was last run to be used. This may not be what you want. Be sure
to enable the timer. Setting a time and day does not automatically enable the timer. For
convenience, if a timer is enabled, its menu item will contain a preceding check mark. Also
remember that enabling a timer will cause the timed backup to occur at the same time every
week until the timer is disabled.
If a timed backup is enabled, when the time comes for the backup to occur, the computer will
beep three times, indicating that a system reboot will occur in three minutes in order to run the
timed backup. The user should save any open files or work in progress at this time. If you do
not wish the timed backup to occur, run GSTape and disable the appropriate timer.
Note: The SetStart GS/OS utility must be installed before GSTape can run timed
backups. When you do so, GS/OS uses a very small Start file (about 3 blocks long) in
your System directory to launch your starting application. Make sure an application has
been selected with the SetStart CDEV. If you use Finder, you must use the CDEV's
"Select Application" dialog and choose the Finder filename even if it already says
Finder in the drop-down list. Also, timed backups will not occur if the computer is
running a ProDOS 8 (or BASIC) program when the backup is scheduled to start.
19
Tape Menus
The options under the Tape menu are provided so that you may perform general operations and
maintenance of the tape drive itself. The options will differ depending on the model of tape
drive you have attached.
Generic Drives
Rewind - Winds the tape to the beginning of the tape. This should be done before the
tape is taken out of the drive for storage.
Retension - This is like a rewind, however the tape will first go to the end of the spool
and then rewind to the beginning. A retension is suggested whenever a new tape is
used, or before using a tape that has been stored more than a month or so.
Erase - Erases all information from the tape. The tape will advance completely until the
tape is completely erased. When completed, GSTape will record information on the
tape so that it knows that it has previously used the tape. A tape erase is recommended
before new tapes are used in order to insure maximum reliability. Tapes previously
used by different computers or drives should also be erased.
Environment - Displays information about the current SCSI card in use as well as the
attached tape drive. The card information includes the type of card, its version, and
what slot it is in. The drive information includes the model and SCSI id that the drive is
set to. An option to dump SCSI information from the drive is also provided and is
mainly intended to help technical support people diagnose problems that may occur.
This information is generally numeric and technical in nature and of little use to most
users. However if you need to report a problem (particularly SCSI errors), please record
whatever information is displayed in this screen immediately after the problem occurs.
Apple (3M) Drives
Load - You will probably start GSTape without a tape in the drive. This menu
command will prompt you to load a tape and will retension and ready the tape for use.
If the tape has not been formatted, you will be asked whether you wish to do so. The
load process is a good way of determining whether the tape is good or not, and whether
it has previously been used by GSTape.
Unload - If you have a tape loaded, this command will rewind the tape and prepare it
for removal. It is recommended that the tape be properly unloaded before removing the
tape for storage.
Format - All tapes must be formatted before use so that bad sections and dropouts on
the tape can be eliminated. Even "pre-formatted" tapes should be formatted using
GSTape because the format is usually incompatible with the 3M tape drive.
Note: The format operation takes about 40 minutes. If the format operation
exceeds 4S minutes a hardware failure is indicated and you should eject the tape
manually to end the operation as some drives will malfunction causing the tape
20
to move back and forth forever. If this happens the tape may be ruined. Be
present at least at the end of your first few formats and ideally during them all ..
If you remove a tape during the format, it will have to be reformatted before it
can be used.
.
Erase Directories - This command will erase all backup information from a tape.
However, this command only erases the backup history from the tape. A format is still
suggested before the tape is used. A format will automatically do a directory erase.
Note: If you are sure the tape is already formatted correctly or you are having
format problems, you can bypass the format and just do an Erase Directory
operation once the tape is loaded. However, a full format is highly
recommended!
Environment - See Environment under the Generic Tape command discussion.
21
Archive Menus
File Backup
The backup procedure will automatically take you through a series of windows to perform the
operation.
1) Volume selection
2) Volume scan
3) File selection
4) Pre-Backup options
5) Backup status window
Volume Select
When the File Backup menu entry is selected, GSTape will poll all on-line disk drives. A dialog
will then display a list of recognized ProD OS volumes (hard disk, ram disk, floppy, etc.). Move
the selection cursor over the volume containing the files you wish to backup. At this time you
can also set the backup type and preliminary selection mode as described below. When you are
ready to proceed, press OK and the volume will be scanned.
Note: It is permissible to select more than one volume to backup at a time. With the
first volume highlighted, hold down Open-Apple and click all other volumes you wish
to include in the backup set.
Backup Types:
Normal - All files on the drive can be selected for backup. This should be the first kind of
backup you make, especially when backing up full volumes.
Incremental - Only new files can be selected for backup. You might for instance do a full
volume backup and periodically perform incremental backups.
Compound - Same as incremental, however backup needed bits will not be cleared after the
backup is complete. All files created since the last full normal backup can be selected. This
means at the most you only need to restore two backup sets (the full normal and the latest
compound) in order to recover a volume.
Note: If you disable the "Gear Backup Needed Bits" option in the Backup Rules (under
the Setup menu), an incremental becomes a compound backup.
Select Mode:
Setting the "All Files" radio button will pre select all eligible files on the volume for backup.
"Choose Files" lets you pick your files at random and is especially useful for single directory or
single directory tree backups.
22
Volume Scan
When you select OK from the Volume Select window, the volumes that were selected are
scanned in order to determine the names of all files present. The current settings for backup
rules, backup type and selection mode are used to build a directory tree in memory that will be
displayed in the File Select window.
The scan may take a while, particularly if you have selected more than one volume. A dialog
box is presented during the scanning process. It contains a "Stop" button that you can use to
abort the backup process.
File Select
The File SeleCt window is used to select files for both backup and restore operations. There are
two lists displayed. The one on the left is the list of all directories on the volume (if backup
operation) or on the tape (if restore operation). The list on the right shows all files in the current
directory.
Selecting Process
As directories or files are "included", a check mark will appear next to the name. You can
include either by double clicking the entry with the mouse or by moving the selection bar to the
item you want and clicking the "Include" button. Note that you can use arrow keys here to
move the selection bar. The space bar also works like a mouse double click on the current
selection.
Include
Selects the highlighted file(s). If it is a directory and Auto-Directory' is set, all files in the
directory (and subdirectories) will be included.
Exclude
Deselects all highlighted files. If it is a directory and Auto-Directory is set, all files in the
.
directory (and subdirectories) will be included.
Auto-Directory
When this checkbox is set, selecting a directory will automatically select all files in any
subdirectories. The setting of the directory itself will be toggled and used for all files in and
below it.
Reselect
This button will cause any selected directories or files to be "deselected". The directory window
will scroll back to the root directory of the first volume.
Find
23
Searches for a directory or file. Enter a name and the first matching directory or file (if any) will
be brought into view. Set the radio buttons to search from current location or from the root
directory of the first volume.
.
Full Dir
This option creates a dialog that allows you to include or exclude all the files in the currently
displayed subdirectory. This is similar to including or excluding the subdirectory from the left
window, however files in subdirectories are not affected whether the Auto Directory mode is set
or not. Full Dir can be very useful in building scripts for backups of directories where file
names change and or frequently changed and deleted.
.
Cancel
Aborts the current selection (and backup or restore) session.
Pre-Backup Options
Before the backup begins, you are asked pick a name for the backup set you are about to put on
tape. When you restore files from your backup, the name is displayed in a list of backup sets on
the tape (see file restore). By default, the backup name will be the names of all root volumes
selected in volume select. Use the edit control to change the name, particularly if you are
backing up subdirectories, or if you want to give a more meaningful name to the backup.
Auto Erase/Format
You may select an additional option that you should be very careful in using: Autoerase/format. Normally GSTape operates in an "append" mode where the backup is added to
the end of the tape. With auto-erase mode set however, each tape is erased or formatted (if it is
a new 3M tape) as they are inserted. This allows you to "overwrite" pre-used tapes and is
convenient if you normally put one backup on each tape. This means you lose any previous·
backup data on the tape, so use this option with caution.
Save Script
Choosing this option will cause a dialog to appear after Backup is selected. This dialog will
allow you to select which script to create or overwrite (See Load Backup Script). In addition,
you get one last chance to change the name of the backup since this name will be displayed
whenever scripts are selected.
Backup Status
The Backup Status window is active during the actual backup process.
If you are not using block mode (normal operation), the names of the files will be displayed as
they are read from disk. If you are using block mode, the file names are not displayed in order
to increase backup speed. However, the appropriate filename will be displayed on an error
condition.
A percentage remaining count and thermometer bar is also included to let you know how far
the operation has progressed. If you click the Stop button or press Esc or "Apple-period" during
the backup operation, you will be asked whether or not you wish to stop the backup. If you
24
select yes, the backup will be aborted and should be considered incomplete. When the message
"Backup Complete" appears, the backup is finished.
Note: The RamFast disables interrupts during normal operation so you may find that the mouse
cursor "freezes" or is "sticky". This is normal. Use the keyboard to stop operation when using
the RamFast.
File Restore
The file restore procedure is accessed through the common Restore menu option. Uke a file
backup, it automatically takes you through a series of windows:
1) Backup Set selection
2) File selection
3) Pre-Restore options
4) Destination directory selection (optional)
4) Restore status window
Backup Set Selection
When the File Restore menu item is selected, the tape will be rewind and begin scanning for any
backups on the tape. A directory of the backups will be built and displayed.
If the tape is a direct access type like the 3M, the directory will display all the backups at once in
a scrolling list. It the tape drive is a generic SCSI type (Teac, Archive) only the first backup is
initially displayed. To get subsequent backups to appear, you must select the "More" or "All"
buttons that are only available for generic tape drives. "More" will advance the tape to the next
backup or stop at the end of the tape. "All" does not stop at the next backup, but proceeds to
scan the entire tape. Totals for backups and media used are kept at the top of the screen for user
convenience.
Note: The directory of backups is an internal construction of GSTape and does not correspond
to any actual "directories" on disk volumes. Backup names such as :DISK1 are simply names
assigned during backup.
The list of backups displayed shows the name, size, date and type of the backup set. Choose the
backup set you want to restore and press the "Restore" button. GSTape will read in the full file
information for that backup set and display a File Select Window. If you are using a generic
drive, this may take a while as the tape must be rewound and re-scanned if you are not
currently at that position on the tape.
Note: The directory list displays all selectable file and image backups on the tape. If you load a
tape that is not the first tape of the multiple-tape backup, the first backup set will appear
"strangely" grayed and is not selectable. This is normal. In order to restore from multi-tape
backups you must start with the first tape.
File Select
The process of file selection for restoring is very similar to that used for backing up (see File
Select under File Backups). The controls all operate in the same way. However, instead of
reflecting what is present on the disk drive, you are shown what is present on the tape backup
set.
25
As the window comes up, no files have been selected yet (for the restore). Double-click or
highlight and include the files you want to restore. If you include the first (root) directory and
auto-directory mode is enabled, all files in that volume may be restored. Select OK when you
have selected all the files you want to restore.
Moving Directory Trees
An additional button option "Graft Dir" is present during the file select for restore. Grafting a
directory is used whenever you want to restore a directory or file(s) to disk but do not want to
restore parent directories along with it. This is sometimes called "partial pathname restoring".
For instance, you have backed up :DISK1 using a full backup and you select the tape file
:DISK1:SUB1:SUB2:FILE for restore. You then select :DISK2 for a destination directory
(discussed
later in
this section).
Directories :DISK2:NEWDIR:SUB1
and
:DISK2:NEWDIR:SUB1:SUB2
would
normally
be
created
so
that
file
:DISK2:NEWDIR:SUB1:SUB2:FILE (the new full pathname) can be restored.
What you really wanted to do was move (or graft) the file to :DISK2:NEWDIR itself. To do this,
select the file as you would normally. Once the file(s) is selected, highlight the source directory
where you want the move to begin at and press "Graft Dir". In the above example, this would
be SUB2. Notice that the parent directories have been automatically deselected. Also notice
that you can no longer include or exclude additional files.
Note: Select the files to restore, then perform the graft operation.
Note: If you are restoring full volumes, you do not need to perform a graft. The root of your
directory tree is already set (to the root directory of the original backup volume).
Pre-Restore Options
After selecting the files to restore, you must choose where on the destination disk you want to
restore to (the disk must be already Jormatted). You can also set the file overwrite mode. Select
OK when you have picked the options you want.
Destination:
Original Pathnames - Restores the files where they were originally on disk. This is the default.
All files in one directory - As it reads, all files. Any files selected will be placed in one
directory. No subdirectories are created. Remember, only 51 files can be created in the root
directory of ProDOS volumes.
Change base directory - Restores the files to a different directory. If you are restoring to a
different volume name for instance. By default, the files get restored with full pathnames so
subdirectories will be created. See Grafting Directories under File Select if you want to prevent
this.
26
Confirmation
These options let you set whether GSTape automatically overwrites any existing files during
restore. The default is to confirm first before overwriting and is highly recommended. If an
overwrite confirmation prompt does come up during the restore, you will be given an option to
continue the confirmation or not.
Destination directory selection
This dialog will only appear if you select "All Files in One Directory" or "Change Base
Directory". A standard file selection dialog will appear and you will be given the opportunity to
select the restore destination directory.
Normally, the directory with GSTape itself will appear. Use the controls to switch to the drive
and directory you want the files to go to. You can also create new directories if needed.
GSTape will restore to the directory pathname displayed at the top of the dialog. You must
"open" and be in the directory you want the files to appear. Highlighting the name itself will
not cause that directory to be opened. Note that before the restore operation, GSTape may
warn that the restore destination does not have enough space for the operation. This can occur
if there are existing files which you want to overwrite, or because the restore files are sparse in
nature. If you think .the destination should hold the files when all is said and done, go ahead
and ignore the warning.
Restore Status
The Restore Status window is active during the actual restoration process. The names of the
files will be displayed as they are written to disk. A percentage remaining count is also updated
to let you know how far the operation has progressed. If you press the Cancel button, the
restore will be aborted. When the "Restore Completed" message appears, the restore operation
is finished.
Image Backup
GSTape is primarily oriented towards file backups. However, there are times when an image
backup is useful. If you have a volume that is generating errors because the directory is
damaged, you may wish to backup the image of the volume prior to running a volume repair
utility. This gives you a second chance to restore and repair the volume if the first attempt fails
and makes things worse. Or you might have some non-ProDOS floppies such as Apple DOS 3.3
or Pascal that you may want to archive.
You can append image backups like file backups, however image backups cannot span more
than one tape. Also you may not select multiple volumes for image backup.
The backup procedure will automatically take you through a series of
windows to perform the operation.
1) Volume selection
2) Pre-Backup options
3) Backup status window
27
Volume Selection
The volume selection window for file backups is also used for image backups. Since "files" are
not considered during image backups, the options for Type and Select are disabled and cannot
be selected. All on-line devices are scanned and all block devices that can be backed up are
displayed. If a recognizable ProDOS volume is mounted, the root directory name will be
displayed, otherwise the "device" name such as .DEVl is displayed.
Pre-Backup Options
After selecting the volume to backup, you proceed directly to the pre-backup options window
described under file backups. You give the backup a name and you can enable the auto-erase
mode as previously discussed. The default name is the volume name followed by "Image".
Script files are not applicable to image backups so this option is disabled.
Backup Status Window
Once the backup begins, the usual backup status window is displayed. The window will show
when the disk is being read and when the tape is being written. The percentage counter and
thermometer bar will update to show progress. If you wish to abort the backup, select the stop
button as previously discussed. When "Backup Complete" is displayed the backup is finished.
Image Restore
The restore procedure for image backups is accessed through the common Restore menu option.
Image backups are noted by the letter "M" before the backup name. The restore procedure will
automatically take you through a series of windows to perform the operation.
1) Volume selection
2) Restore confirmation
3) Restore status window
Volume Selection
The volume selection window for file restores is also used for image restores. Since "files" are
not considered during image restores, the options for Type and Select are disabled and cannot
be selected. All on-line devices are scanned and all block devices that can be restored to are
displayed. If a recognizable ProDOS volume is mounted, the root directory name will be
display, otherwise the "device" name is displayed.
Note: Ideally, the destination volume should be the same size as the one used for the image
backup. GSTape does not abort the restore if the backup size is different. If the restore volume
size is different, the resulting volume will "look" the same size to the user however there may
actually be some blocks wasted or lost. If there are blocks lost, a block error will occur towards
the end of restore when the program runs out of disk blocks to write. This is normal. Try to
restore to volumes that are same size or larger when possible. Or better yet, use file mode
backups that avoid the problem totally.
Restore Confirmation
28
After selecting the volume to restore to, you enter a dialog that asks you whether you really
want to overwrite the destination volume. Answering yes will start the restore and destroy any
existing information on the destination volume (partition). Answering no will abort the restore.
Restore Status Window
Once the restore begins, the usual backup status window is displayed. The window will show
when the tape is being read and when the disk is being written. The percentage counter and
thermometer bar will update to show progress. If you wish to abort the backup, select the stop
button as previously discussed. When "Restore Complete" is displayed the backup is finished.
Scripts
Scripts are files created by GSTape that allow the user to "repeat" previous backup selections.
The purpose of scripts is to allow the user to easily run backups that involve multiple volume,
directory and file combinations.
Creating Scripts
'Script files are created internally while file mode backup selections are made. They are written
to disk in the GSTape directory just before the actual backup begins (See Pre-Backup options).
While these files are called "scripts" for convenience, they are not intended to be modified by the
user. Also, do not delete or rename any of the files which GSTape uses to keep track of scripts.
,
You can create up to 16 backup scripts which are given the name assigned to the backup. In
addition, the "last backup script" (number 0) is always saved to disk during a backup. This
occurs even if the "Save Script" checkbox is not enabled. Enabling the checkbox simply allows
you to make an additional copy of the current script and save it to the scripts numbered 1-16. If
the numbered script already exists, it is overwritten.
Note: The GSTape directory should be kept write-enabled.
Loading Scripts
Selecting "Script Load" from the Archive menu causes GSTape to display a dialog asking you
which script you want to load. This dialog is similar to the one used for saving scripts. Use the
radio buttons to select the desired script and press OK. As GSTape reads the script, the
"Scanning files" window will automatically appear and you will notice the normal file scanning
process occurs on the disk drives.
Volumes selected in the original backup must always be present or the script will not run.
Individual files or directories selected with the file select window do not necessarily have to be
present. If they are not, a warning will occur for each pathname that is missing. You can ignore
the message and continue or cancel the backup.
Once the files have been scanned, you will enter the file selection window as with normal file
backups. You many add to or change the preselected files at this time. Once you have the files
selected, press OK and you enter the usual pre-backup option window. Here you can set the
auto-erase option and change the name. You can even choose to save a new script that reflects
29
the files that might have been ignored during the scan or added during the file select. This is
how you "modify" scripts. All script activity is handled internally by GSTape. You don't have
to edit anything manually, and you don't have to reselect all the files from scratch if you want to
make a change!
Running Scripts
You can run a script by selecting "Script Run" from the Archive menu.' The difference between
running and loading a script is that running a ~cript does not "stop" for changes with the File
Select or Pre-Backup Options window. All operation is hands off unless an error is
encountered. A tape should already be loaded. Choosing which script to run is done with the
same dialog used for loading scripts.
Note: The backup will be named the same as the original. The auto-erase option will also be
the same. A "last backup" script will be generated as usual however you will not be able to save
a numbered script.
Timed Backup
Timed backups ,make use of script files in order to select the files to backup. When you enable a
backup timer, you must specify which script to use. The script will execute as though you had
selected "Script Run". This means that you cannot change any files and a tape should already be
loaded.
Before using a script for a timed backup, make sure it is complete and will do everything you
want. It is a good idea to load or at least run a script once before assigning it to the timer.
Scripts are probably the most complicated part of GSTape although they are not really all that
hard to use. In any case, you should be comfortable with doing file backups manually before
attempting to use scripts. If you only do full volume backups, you may never use them at all.
30
Troubleshooting
In general, if the tape drive is functioning correctly, GSTape will not have any trouble. Probably
90% of problems reported with GSTape and HDTape have resulted from hardware problems,
with most coming from home brew hookups.
The 3M drive is very particular as to what kind of power supply is used in the tape enclosure.
A low wattage power supply may fail to mount a tape completely. An unshielded power
supply may cause too much RFI or Radio Frequency Interference, preventing a tape format from
being completed.
Generic SCSI tape drives should work okay, however the compatibility of any SCSI device is
never totally assured at the command level. The Apple II SCSI cards will not recognize many
tape drives which can be run on the Mac using special drivers.
If you have problems, please write down as much information as you can before calling or
sending a letter. Any error codes encountered should be recorded, and try to also record the
sequence of events that happened before the error occurred.
.
If you have any suggestions, feel free to share them with us. Most of the nice features in GSTape
were put in because of user suggestions.
County Line Technology
PO Box 462283
Garland, TX 75046
USA
(214) 495-7675
CIS: [73537,2601]
America On-line: TGRAMS
Genie: TGRAMS
31
Registration
Please fill out and send in the following registration form to:
County Line Technology
PO Box 462283
Garland, TX 75046
USA
(214) 495-7675
Name:
Address:
Program:
GSTape
Date Purchased:
Dealer:
Version #:
Serial #:
Model Tape drive:
Controller card:
Suggestions:
32