1
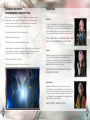
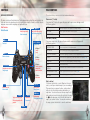
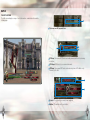
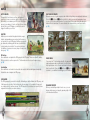
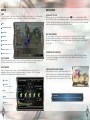
999 N. Sepulveda Blvd., 3rd Floor El Segundo, CA 90245 WARNING: PHOTOSENSITIVITY/EPILEPSY/SEIZURES A very small percentage of individuals may experience epileptic seizures or blackouts when exposed to certain light patterns or flashing lights. Exposure to certain patterns or backgrounds on a television screen or when playing video games may trigger epileptic seizures or blackouts in these individuals. These conditions may trigger previously undetected epileptic symptoms or seizures in persons who have no history of prior seizures or epilepsy. If you, or anyone in your family, has an epileptic condition or has had seizures of any kind, consult your physician before playing. IMMEDIATELY DISCONTINUE use and consult your physician before resuming gameplay if you or your child experience any of the following health problems or symptoms: eye or muscle twitches disorientation any involuntary movement `` dizziness `` altered vision loss of awareness seizures or convulsion. RESUME GAMEPLAY ONLY ON APPROVAL OF YOUR PHYSICIAN. Use and handling of video games to reduce the likelihood of a seizure `` `` `` `` Use in a well-lit area and keep as far away as possible from the television screen. Avoid large screen televisions. Use the smallest television screen available. Avoid prolonged use of the PlayStation®3 system. Take a 15-minute break during each hour of play. Avoid playing when you are tired or need sleep. Stop using the system immediately if you experience any of the following symptoms: lightheadedness, nausea, or a sensation similar to motion sickness; discomfort or pain in the eyes, ears, hands, arms, or any other part of the body. If the condition persists, consult a doctor. NOTICE: Use caution when using the DUALSHOCK®3 wireless controller motion sensor function. When using the DUALSHOCK®3 wireless controller motion sensor function, be cautious of the following point. If the controller hits a person or object, this may cause accidental injury or damage. Before using, check that there is plenty of space around you. When using the controller, grip it firmly to make sure it cannot slip out of your hand. If using a controller that is connected to the PS3™ system with a USB cable, make sure there is enough space for the cable so that the cable will not hit a person or object. Also, take care to avoid pulling the cable out of the PS3™ system while using the controller. 03 Prologue 14 Quests 04 Characters 15 Field Tips 05 Getting Started 17 Battle WARNING TO OWNERS OF PROJECTION TELEVISIONS: 07 Controls 24 Battle Hints 08 Field Controls 25 Customization 09 Game Flow 27 The Outerworld 11 The Field 29 Limited Warranty 13 Field Objects 30 Customer Support Do not connect your PS3™ system to a projection TV without first consulting the user manual for your projection TV, unless it is of the LCD type. Otherwise, it may permanently damage your TV screen. HANDLING YOUR PS3™ FORMAT DISC: `` `` `` `` Do not bend it, crush it or submerge it in liquids. Do not leave it in direct sunlight or near a radiator or other source of heat. Be sure to take an occasional rest break during extended play. Keep this disc clean. Always hold the disc by the edges and keep it in its protective case when not in use. Clean the disc with a lint-free, soft, dry cloth, wiping in straight lines from center to outer edge. Never use solvents or abrasive cleaners. 01 02 THE END OF GOD’S MYTH. THE BEGINNING OF HUMANITY’S TALE. Centuries have passed since she fell into crystal sleep, and the world has continued all the while, edging closer to destruction with every passing moment. Consumed by Chaos, it has slowly fallen into its own demise— and the people have been unable to do a thing to stop it. Now, as the end arrives at last, she wakes again. Lightning—humanity’s last hope. The world has no more than thirteen days remaining. Lightning has been awakened as the savior, but this brief time is all she has for her final battle: a battle for humanity’s future, in which she must save as many souls as she can for the world that is to replace this one. This is her final duty. This is her fate. The curtain has been raised. It is time for the final act. CHARACTERS Lightning The savior of humanity—that is the duty that has been given to Lightning. She awoke at the end of the world, but will she be able to save everyone before the coming destruction? Has she been brought back to bring the world salvation, or is she an angel of death, here to cull the souls of the living? When I awoke from my dreamless sleep, I was just in time to witness the end of the world. Lumina A devilish young girl who waits in Lightning’s path, troubling others with her mischief and yet occasionally guiding Lightning on her journey. She has a striking resemblance to Lightning’s younger sister, Serah, but her true identity is hidden behind a thick shroud of mystery. God turns her into the savior and it all goes straight to her head! Hope Estheim Lightning’s faithful partner, Hope, has been chosen by almighty Bhunivelze to help Lightning on her journey as the savior. Centuries have passed in the world, and yet time has moved in reverse for Hope, returning him to the form of a boy. But despite his young appearance, he always has wise advice at the ready for Lightning. Hello, Lightning. Welcome home. 03 04 GETTING STARTED TYPES OF SAVE DATA The table below lists the kind of data that will be saved and the amount of space you will need on your system storage. GAME DATA/TROPHY DATA /AUTOSAVE DATA At least 8500 KB This data will be created when you first start up the game. If you have insufficient space, the game will not load. SAVE DATA At least 700 KB This data will be created when you begin a new game. INSTALL DATA At least 4800 MB for a full install or 3100 MB for a quick install. Installing the game will shorten load times. THE TITLE SCREEN When you start up the game, you will find the title screen displayed. Select NEW GAME if you wish to start an adventure from the beginning, or CONTINUE if you wish to carry on with an adventure begun previously. NEW GAME Begin a new game from the story’s beginning. You can choose from NORMAL MODE or EASY MODE. You will be unable to change these difficulty settings once you begin play. After making your selection, follow the instructions shown on the screen to create your save data. CONTINUE Select your save data and continue the game where you last left off. SETTINGS View and change game settings. INSTALL Install the game on your system storage. You can choose from the full install or quick install. DOWNLOADABLE CONTENT Connect your PlayStation®3 to the Internet to download a variety of additional content. NEWS & UPDATES Connect your PlayStation®3 to the Internet to view news about the game. SAVING YOUR GAME As you play, your progress will automatically be saved and past records overwritten. While the game is autosaving, you will see the save icon on the screen. Do not turn off the power while this icon is being displayed. You can choose to have your regular save data overwritten by the autosave data, or create another slot exclusively for autosaving. You can also save in the field by pressing the [ button and selecting Save from the pause menu. 05 SETTINGS You can view and change the following from within Settings. CAMERA CONTROLS Set how the camera is controlled during gameplay. STANDARD:The camera moves in the same direction as the right stick. INVERTED Y-AXIS: The camera’s vertical controls are reversed. INVERTED X-AXIS: The camera’s horizontal controls are reversed. DUAL INVERTED: All of the camera’s controls are reversed. CAMERA SENSITIVITY Set the camera sensitivity. The larger the number, the further the camera will move in response to input. BRIGHTNESS Adjust the brightness of the images on the screen. MAGNIFY FONT Turn this option on, and subtitles and messages will appear in a larger font. EVENT SUBTITLES Choose whether or not to have subtitles displayed during event scenes. SPEAKER NAMES Choose whether or not to have speakers labeled in the subtitles. NON-EVENT SUBTITLES Choose whether or not to have subtitles displayed outside of event scenes. MINI-MAP SETTINGS Change how the mini-map functions relative to the player icon MAP SETTINGS Change how the main map functions relative to the player icon. CAMERA MODE AT BATTLE START Choose whether the camera is in near-view or long-view mode when battles begin. OUTERWORLD SERVICES Choose whether to connect to the network and communicate with other players (p. 27). OUTERWORLD CHARACTERS* Set the conditions under which Outerworld characters can appear in your game, bearing messages from other players. LINK WITH FACEBOOK* Turn this setting on to link your game to your Facebook account. LINK WITH TWITTER* Turn this setting on to link your game to your Twitter account. AUTOSAVE SLOT Choose where autosave data will be saved. OPEN-SOURCE SOFTWARE LICENSES View license information for open-source software. *Items marked with an asterisk require that you have Outerworld services turned on. 06 CONTROLS FIELD CONTROLS WIRELESS CONTROLLER The controls that you can use in the field are described below. The basic controls are illustrated below. Text in red describes actions that can be taken in the field, and text in blue describes actions that can be taken in battle. Guides to controls are also displayed on-screen while navigating each particular menu. Pause menu ([ button) If you press the [ button, the game will pause and the pause menu will appear with the following options. Field Controls Battle Controls R Button E Button Attack (begin battle) Switch schemata W Button Dash (if held while moving) Libra (display enemy data) D ASF Buttons Overclock Trigger abilities Switch schemata Close the pause menu and resume your game. Main menu (D button) If you press the D button, the game will pause and the main menu will appear with the following options. Use recovery items to help Lightning heal. EP ABILITIES Use Lightning’s special EP (energy point) abilities. CUSTOMIZE SCHEMATA Customize Lightning’s schemata, or sets of equipment (p. 25). F Button QUESTS View a list of the quests that you have discovered or accepted (p. 14). INVENTORY View a list of the items Lightning is currently carrying. MAP View the main map. DATALOG Review all of the information that has been recorded to date. REWARDS BARTER SHOP Claim or purchase DLC and other rewards (p. 28). SETTINGS View and change game settings (p. 06). S Button Directional Buttons Exit the game and return to the title screen. RESUME GAME RECOVERY ITEMS View map Confirm, sheathe weapon,talk, examine objects Navigate menu options Change target Save your progress. This option is not always available. EXIT GAME Cancel Jump A Button Q Button SAVE D Button Main menu Right Stick Left Stick Move in the field Move in battle Move camera Move camera N Button ] Button Toggle mini-map on/off Skip event scenes while paused [ Button Pause menu Pause menu Reset camera Change camera mode Map (F button) If you press the F button or select Map from the main menu, you will open a detailed map of your surroundings. This map shows your present location, and is marked with icons for shop locations and any destination you might have. You can scroll across the map using the left stick, and zoom in and out using the right stick. Pressing the B button (pressing on the left stick) will return the map to your current location. You can place markers on the map, or press the D button to view the world map. 2 Button 07 08 GAME FLOW A SAVIOR’S BUSY DAY As the savior who is tasked with saving the souls of humanity, Lightning will spend her time moving between the world of Nova Chrysalia and the Ark, her base that hovers in the sky above. The Field (p. 11) This is the world of Nova Chrysalia, where the last survivors of humanity still struggle to live. The world’s time slips away with each passing moment that you stay here. You will be free to roam this world, completing quests and winning battles along the way as you explore the story of the world’s end. Quests (p. 14) While in the field, you will encounter people who need the help of the savior. The tasks they give the savior are called quests, and helping to solve the people’s quandaries before the end of the world will save their souls for the next world—and help Lightning grow stronger as well. Battle (p. 17) While in the field, you may also encounter enemies and be drawn into battle with them. Victory over such enemies will gain you EP and items. THE ARK Every morning at 6:00 AM, Lightning will automatically be called back to her base in the Ark. The more Eradia that she gathered by completing quests in the past day, the more time she will be able to buy herself before the world’s end. Returning to the Ark will also fully restore her lost HP and any spent EP. Hope: You can obtain items from him, or talk to him about events. 09 Book of Conquests: This fantastic tome records data about the challenging foes that Lightning has defeated. By investigating it, you can choose to battle those foes once more. Warp device: This is where you can transport yourself back to the field. You will be able to use it once you have completed the game’s tutorial. THE WORLD’S REMAINING TIME The world is destined to end in a scant thirteen days. When you begin your adventure, however, the world has even fewer than that—only seven days remain. You can extend this time to the full thirteen days by having Lightning gather Eradia and offering it up to Yggdrasil, the great tree of life that stands in the Ark. ABOUT ERADIA Eradia is a special energy needed to grant the world more time. You obtain Eradia by completing quests and saving the souls of the people. EP AND EP ABILITIES The attacks and spells that Lightning can use are called abilities. Among her many abilities, some are further classified as EP abilities. These are special skills that require EP to trigger, either from the main menu while in the field or by opening the pause menu during battle. GAME OVER If the world runs out of time and ends before the destined thirteenth day, your game will be over. If you run out of HP in battle, you will be knocked out, but the game will not end. 10 THE FIELD THE FIELD SCREEN The field screen displays a variety of useful information, as explained below. FIELD ACTIONS Move around the field using the left stick, and jump by pressing the A button. When you find ladders on the sides of buildings, or poles and similar structures, you can climb up or slide down them by approaching them. You can also use the S button to trigger switches and perform other such actions. Hold down the R button while moving to dash—though you will deplete your action gauge by doing so. When your action gauge is empty, you will not be able to dash or strike preemptively to start a battle. 1 3 2 ENCOUNTERING FOES If you approach a foe in the field and press the E button, you will be able to attack the enemy and draw it into battle with you. If your timing is good, you will be able to achieve a preemptive strike and the battle will begin in your favor. 4 1 The mini-map: This small map helps you get your bearings in the immediate area. These are some of the important icons that may appear: Current location Destination Gate (p.13) Station (p.13) Foe 2 Remaining time (p. 10): The time remaining to the world. 3 Current time: The current time in Nova Chrysalia. People’s actions may change based on the hour, and certain gates may open or close at certain times. 4 Gauges: A EP Gauge: Your current EP. Can be restored by winning battles or by returning to the Ark. B Action Gauge: Will be drained by dashing. When empty, you cannot dash or attack enemies. C A HP Gauge: Your current HP. Can be restored by using items or EP abilities, eating food or resting at an inn, or returning to the Ark. B C 11 CHAOS INFUSIONS The places where Chaos spontaneously manifests are called Chaos infusions. Within these pockets of Chaos, you will encounter foes that are stronger than the usual fare. By defeating the monsters that you find within the Chaos, you may obtain rare items. LONG-DISTANCE TRAVEL The world of Nova Chrysalia is split into a number of disparate regions. You can view the world map by pressing the D button while looking at the map, and see these land masses in perspective (p. 08). You can move from one continent to the next by riding on the monorail, which departs from stations in each land (p. 13). You can also use the EP ability Teleport to move instantly to any previously visited area. 12 FIELD OBJECTS QUESTS PEOPLE Among the many people that you may encounter in the field, there are a few special kinds to look out for. These characters will be marked with icons, and you can talk to them by approaching and pressing the S button. ABOUT QUESTS Each quest is its own little adventure, which you complete by fulfilling certain conditions. By completing quests, Lightning will grow stronger. When you find that your foes are too strong and you cannot take them on, try to complete more quests and gain the strength that you need to gain the victory. Can be talked to Outerworld character TREASURE SPHERES Approach treasure spheres or treasure boxes in the field and in the Ark, and press the S button to collect the items contained within. You will find that some treasure spheres have certain conditions that must be fulfilled before you can open them. TIME-LOCKED GATES In the field, there are special gates and doors which shut off some areas. These open and close based on the time of day or other special conditions. Approach the sign that is placed beside such doors and press the S button to learn about them and what makes them open. Any timeactivated doors that you examine in this way will have their opening times added to your map, which can be viewed from the Map option in the main menu (p. 08). STATIONS The stations that can be found in each area will allow you to board the monorail and ride to another destination. Talk to the station staff to catch a train. ACCEPTING QUESTS There are two kinds of quests: main quests, which are triggered by the main story of the game, and side quests, which are triggered by talking to other people in the field. There is also the Canvas of Prayers, a special board filled with requests that is located near each station and managed by the inimitable Chocolina. Quest details can be seen in your quest list by opening the main menu (p. 08). There are no do-overs when it comes to quests, and the only way to attempt them again is to use the Crystal of Atonement to restart your adventure. COMPLETING QUESTS When you have achieved whatever was required for a particular quest, talk to the requester again and the quest will be marked as complete. You may be rewarded with gil (money) or with improvements to Lightning’s stats, such as increases to her maximum HP or ATB, or higher Strength or Magic. Outerworld Tips Speaking to characters whose names appear in blue will display messages sent from other players via the internet. You may also view these players’ profiles and purchase the items they have to offer. 13 14 FIELD TIPS SHOPS There are a variety of shops to be found in Nova Chrysalia. Some are proper shops, with shelves bursting with wares, while others are no more than lone merchants hawking what goods they can carry. At either, you need merely approach the shopkeepers and talk with them to make a purchase. The types of shops and their wares are explained below. The icons that appear beside each will appear on the mini-map and the regular map to mark their locations. General stores These shops stock consumables, such as recovery items. Sorcery shops These shops are where you synthesize your abilities (attacks and spells). Outfitters These shops stock garb and adornments for your pleasure. Forges These shops deal with weapons and shields in all their forms. Inns Inns allow you to restore HP by resting for a set amount of time. Restaurants Restaurants and taverns allow you to restore HP with food and drink. 15 WATCH THE CLOCK The people you find in the field behave differently at different times. Shops also have their own opening and closing hours, which you need to be mindful of. It is important to observe when people perform certain actions and remember how the time of day affects which areas you can access. You will be in particular trouble if you do not keep in mind when certain gates automatically lock. You may find yourself unable to get to the one place you want to go most, and wasting a day of the world’s time. Whenever you find a time-locked gate, be sure that you first learn when it opens and closes. BE OBSERVANT Be sure that you observe the area around you carefully, especially when exploring a new region. You might, for example, find a ladder that allows you to scale a wall even after the area’s gates close for the day. EARN GIL EFFICIENTLY In the field, you will find that certain locations and certain times are particularly prone to monsters. Learn these by heart so that you can quickly defeat a large number of foes, allowing you to earn gil (money) efficiently. USE EP ABILITIES There are a number of different EP abilities that you will be able to use in the field. Using them allows you to tackle quests and battles effectively. For example, you will find the ability Chronostasis—which stops time in the field for a short period—quite handy during quests that have a strict time limit. 16 BATTLE THE BATTLE SCREEN The battle screen displays a range of useful information, as detailed on this and the following page. 1 1 The names and HP gauges of foes. 2 3 4 2 EP Gauge: Your current EP. Can be restored by winning battles or by returning to the Ark. 3 ATB Gauge: ATB levels for your current schemata. 4 HP Gauge: Your current HP. Can be restored using items or EP abilities or by returning to the Ark. 5 6 17 5 Schema: The schema you currently have equipped. 6 Abilities: The abilities set to each button. 18 BATTLE BATTLE BASICS During battle, time flows in real time and Lightning reacts as soon as you select an ability for her to unleash. Each ability you use drains your ATB (Active Time Battle) gauge to some degree. If you do not have the necessary amount left in your ATB gauge, you will not be able to trigger the abilities you choose. SWITCHING SCHEMATA Schemata are sets of garb, weapons, and shields that Lightning can easily switch between. Press the Q button or E button in battle to switch your currently equipped schema for one of your other main schemata. You can set up to three main schemata and switch between them in an instant. You can customize the schemata that you will use in battle. (p. 25). ABILITIES Abilities come in varieties like physical attacks, magic attacks, and guarding moves, and each will consume a set amount from your ATB gauge. Abilities can generally be obtained by obtaining garb that are set with abilities or by defeating foes in battle. You can also synthesize the abilities you possess in sorcery shops to make them stronger (p. 15). EP Abilities Some abilities do not deplete the ATB gauge but the EP gauge. These are called EP abilities. When you wish to use them, press the [ button and select them from the pause menu (p. 08). Auto-Abilities Some abilities do not need to be selected to be used, but will instead trigger automatically. Auto-abilities do not deplete the ATB gauge. ATB GAUGES The ATB gauges play a crucial role in battle. Unleashing an ability will drain the ATB gauge, but it will regenerate over time. Each schema has its own gauge, so if you deplete the gauge of one, simply switch to another schema. The ATB gauges of the schemata not currently in use regenerate faster than your active schema. 19 PAUSE MENU If you press the [ button during a battle, the game will temporarily pause and you will be able to see the items that Lightning has on her. You can use items by selecting them from this list. Press the Q button or E button to switch to your abilities list and trigger your EP abilities. CHANGING TARGETS When you are battling multiple foes at once, you can change which enemy you target by pressing right or left on the directional buttons. 20 BATTLE ATTRIBUTES Both equipment and attacks can have elemental attributes like fire and ice. Some foes will attack using such attributes during battle. Enemies may also have resistances or weaknesses to certain attributes. If you attack a foe using the attribute to which it is vulnerable, you will be able to deal even more damage than usual. But if you attack a foe using an attribute it is resistant to, the damage that you deal will be reduced. You can view a foe’s vulnerabilities and resistances by pressing the R button to open Libra and review data on enemies you have fought before. BUFFS AND STATUS AILMENTS When you are affected by a buff or status ailment in battle, you will see its icon displayed above your HP gauge. These status conditions are described below, along with their icons. Bravery Strength increased Exposed Weak to Ice attribute Debrave Strength decreased Conductive Weak to Lightning attribute Faith Magic increased Brittle Weak to Wind attribute Magic decreased Imperil Elemental resistance lowered Physical Magic Fire Defaith Ice Lightning Wind ATB recovery Haste hastened Vigilance Less likely to have attacks interrupted ATB recovery Slow slowed More likely to have attacks Curse interrupted Physical resistance Protect increased Unable to use physical Pain attacks Deprotect Physical resistance decreased Unable to use magic Fog attacks Magic resistance Shell increased Regen Gradually recover HP Deshell Magic resistance decreased Poison Gradually lose HP Weak to physical attacks Doom KO’d after a countdown Unshelled Weak to magic attacks Daze ATB gauge frozen and actions prevented until damaged. Damage multiplied. Parched Weak to Fire attribute Reraise Will revive from KO STAGGERING FOES By targeting foes’ weaknesses relentlessly, or striking at them when they are attacking, you can “stagger” them, greatly lowering their defenses. When you strike a foe’s weak points, you will see a stagger wave emitted from its HP gauge. The more effective hits that you land, the greater this wave will grow. It will also turn red as the foe gets closer to being staggered. Once you stagger a foe, your attacks will do more damage than usual and you will be able to launch a devastating assault. OVERCLOCK By pressing the W button, you can choose to use some of your EP to trigger the ability Overclock. Using this ability will make time slow to a crawl for everyone except Lightning, allowing you to unleash consecutive hits without interruption. If you use Overclock while a foe is staggered, you will extend that window of opportunity for even greater effect! Unprotected Note: Icons appearing within hexagons cannot be canceled out by other conditions. 21 22 BATTLE BATTLE HINTS LIBRA You can use Libra to view information about foes that you have fought before. Just press the right trigger during battle, and you will see the following information displayed. ATTACK FIRST TO WIN When you run into a foe in the field, quickly press the E button to attack and you will be able to begin the battle in an advantageous position. If, on the other hand, you are not the first to attack, the battle will continue as poorly as it began. Keep a close eye on your surroundings and your mini-map to be sure that you get the first strike. 1 Name 2 Current HP/maximum HP 3 3 Main habitat 4 4 Distribution 5 Dropped items 1 6 Status ailment resistance (p. 22) 7 Attribute resistance (p. 21) 8 Stagger conditions (p. 21) 2 6 7 USE YOUR SCHEMATA You can customize and change the schemata that you use in battle (p. 25). You can set up schemata that are optimized for attack or defense, or even create a schema that is decked out with deadly one-hit KO moves. Switch between them effectively to turn the battle in your favor. 5 8 BATTLE RESULTS When you emerge victorious from battle, you will be presented with the results screen, which shows you how much gil you have earned and any items you may have found. BATTLE SCORES When you defeat certain enemies, you will be awarded a battle score. Enemies who are assigned a battle score can be fought again and again in the Ark (p. 09). The following information will be displayed on the battle score screen. 1 Foe’s Name 2 Battle Time How long the battle lasted 2 3 Score The score for your performance 4 4 Rating A rating based on your score and time 5 23 STRENGTHEN YOUR ABILITIES At sorcery shops, you can use the components that you have found in the field or obtained through battle to strengthen your abilities. Choose which abilities to improve based on your schemata and battle style. KNOW WHEN TO GUARD OR EVADE Some abilities become more effective based upon how well you time their use. A guard can also shield Lightning from more damage than usual if you time it perfectly. Try to guard just when an enemy attack is about to land. 1 3 5 Outerworld Tips By submitting your battle scores to the Outerworld, you can see where you stand in the world rankings. High Score Your highest score to date 24 CUSTOMIZATION CUSTOMIZATION SCREEN Select Customize Schemata from the main menu to edit and change your schemata. You can create a new schema from scratch or select one of your existing schemata to edit. HOW MANY SCHEMATA CAN YOU HAVE? You can have up to three main schemata for use in battle, and keep another six schemata saved as your sub schemata. However, you cannot use the same garb or equipment for more than one schema at a time. This means that you can only make as many schemata as you have complete sets of garb, weapon, and shield. You can switch between your three main schemata in battle, and choose which one appears in the field. CREATING A SCHEMA When making a new schema, you will need to go through the following steps. 1. Select a garb Select the garb that Lightning will wear. The garb that you choose will not only change Lightning’s appearance, but will also determine her ATB gauge’s starting value and maximum value. It may also have abilities or auto-abilities attached to it. Select a garb that suits the way you would like to fight. 2. Select a weapon Select the weapon Lightning will use in battle. The weapon you choose will affect your Strength and Magic stats, which will influence which abilities you may wish to equip. Some weapons also have auto-abilities attached to them. 25 3. Select a shield Select the shield that Lightning will carry. Shields can have various effects, such as raising HP or boosting the ATB gauge, or making guarding more effective. Some shields also have auto-abilities attached to them. 4. Select accessories and adornments If you have accessories or adornments, you can set them to a schema as well. Accessories can have a variety of effects, such as boosting Strength or HP. Accessories worn on the arm will share their effects with all three main schemata, not only the one schema they are set to. 5. Select abilities Select the abilities that will be used with your schema. Select a button and then choose the ability to be triggered by that button. You can toggle between the different categories of abilities by pressing the Q button or E button. 6. Give the schema a name If you wish to change the name of your schema, select the name where it is displayed and input a new one. 7. Save When you are done making your changes, select Done, and choose a slot in which to save your schema. If you choose a slot which already contains another schema, you will overwrite that schema and delete it. 26 THE OUTERWORLD WHAT IS THE OUTERWORLD? The Outerworld is the name of the online environment where you can interact with other players by connecting your PlayStation®3 to the network. You can change your Outerworld settings within the Settings section of the main menu (p. 08). You will be able to communicate with other players via Outerworld characters who appear in the field. These Outerworld characters deliver submitted messages and images from other players to your game. Any messages that you submit are also delivered in the same way to the gameworld of other players around the world. If you use the Facebook app, you can also “summon” specific friends to the world of your game. HOW TO ACCESS THE OUTERWORLD Connect your PlayStation®3 to a network, then open Settings, and select “Enable network connection” from within the Outerworld Services settings (p. 06). TYPES OF SUBMISSIONS The kinds of information that you can submit to the Outerworld are detailed below. When you first open the submission screen, you will automatically be taken through the steps to create your own profile. Follow the instructions on the screen to choose a nickname and enter a brief self-introduction. Posting Snapshots You can post screenshots to the Outerworld. Open the pause menu during battle or while in the field, and when you see “F Submit snapshot” displayed on the bottom of the screen, press the F button. Try posting shots of your favorite schemata or scenes for the world to see. Posting Battle Scores After battling boss enemies and other certain foes, you will receive a battle score. If you press the F button while your battle score is displayed, you can submit your battle score to the Outerworld (p. 27). The enemies for which you receive battle scores can be fought again on the Ark using the Book of Conquests (p. 09). Posting Lightning Messages As you progress through the game, you can post messages from Lightning herself. When you see an icon appear above Lightning’s head in the field, open the pause menu and press the D button to submit Lightning’s message to the world. Message available to be posted LINK UP TO YOUR TIMELINE If you link your game to your Facebook or Twitter accounts in Settings, then any time that you submit a snapshot, battle score, or Lightning message to the Outerworld, the same message will appear in your Facebook or Twitter timelines. Lightning messages cannot appear in their entirety in your Twitter stream, so only your own message will appear. SENDING ITEMS With every submission to the Outerworld, you can choose to attach an item that you have obtained within the game. The item can be delivered to other players through the Outerworld characters. REWARDS BARTER SHOP Select the Rewards Barter Shop within the main menu to collect any downloadable content you have purchased, as well as special items from the Outerworld and rewards for achievements you have unlocked. When there is new DLC or items to be had in the Rewards Barter Shop, a notification will appear on the top left corner of the screen. 27 28 LIMITED WARRANTY You are aware and agree that use of the Game Software and the media on which it is recorded is at your sole risk. Square Enix warrants to the original consumer purchaser of the Game Software that the recording medium on which the Game Software is recorded shall be free from defects in material and workmanship for a period of ninety (90) days from the original date of purchase (the “Limited Warranty”). If a defect covered by the Limited Warranty occurs during this ninety (90) day period, the defective Game Software shall be replaced by the retailer from which you purchased the Game Software, free of charge. Please retain the original or a photocopy of your dated sales receipt to establish the date of purchase for in-warranty replacement. In the event that you cannot obtain a replacement from the retailer, please contact Square Enix by submitting a support ticket through http://support.na.square-enix.com. THE FOREGOING IS YOUR SOLE AND EXCLUSIVE REMEDY FOR THE EXPRESS LIMITED WARRANTY SET FORTH IN THIS SECTION. This Limited Warranty does not apply if the defects have been caused by your negligence, accident, unreasonable use, modification, tampering, or any other causes not related to defective materials or manufacturing workmanship, and Square Enix and its licensors shall not be held liable for any damage, injury or loss if caused as a result of any of these reasons. The Limited Warranty does not apply to used Game Software or to Game Software acquired through private transactions between individuals or purchased from online auction sites, which transactions and purchases are not authorized by Square Enix. OTHER THAN EXPRESSLY SET FORTH IN THIS DOCUMENT, THE GAME SOFTWARE IS PROVIDED “AS IS,” WITHOUT WARRANTY OF ANY KIND, EITHER EXPRESS OR IMPLIED, INCLUDING WITHOUT LIMITATION ANY IMPLIED WARRANTIES OF CONDITION, UNINTERRUPTED USE, MERCHANTABILITY, FITNESS FOR A PARTICULAR PURPOSE, OR NONINFRINGEMENT. NO ORAL OR WRITTEN ADVICE OR INFORMATION GIVEN BY SQUARE ENIX OR ANY OF ITS AUTHORIZED REPRESENTATIVES SHALL CREATE A WARRANTY OR IN ANY WAY INCREASE THE SCOPE OF THIS LIMITED WARRANTY. GAME SOFTWARE, INCLUDING WITHOUT LIMITATION ANY LOSSES OR DAMAGES CONNECTED WITH OR CONSISTING OF LOST PROFITS, DAMAGE TO PROPERTY, LOST OR CORRUPTED DATA OR FILES, LOSS OF GOODWILL, CONSOLE, COMPUTER OR HANDHELD DEVICE FAILURE, ERRORS AND LOST BUSINESS OR OTHER INFORMATION AS A RESULT OF POSSESSION, USE OR MALFUNCTION OF THE GAME SOFTWARE, OR PERSONAL INJURIES, EVEN IF SQUARE ENIX HAS BEEN ADVISED OF THE POSSIBILITY OF SUCH LOSS OR DAMAGES. FURTHERMORE, IN NO EVENT SHALL SQUARE ENIX OR ITS LICENSORS BE LIABLE FOR SPECIAL, CONSEQUENTIAL OR INCIDENTAL DAMAGES RESULTING FROM THE BREACH OF ANY EXPRESS OR IMPLIED WARRANTIES OR ANY OTHER TERMS OF THIS AGREEMENT. SQUARE ENIX’S TOTAL LIABILITY IN ALL CASES SHALL NOT EXCEED THE ACTUAL PRICE PAID FOR THE GAME SOFTWARE. THE FOREGOING APPLIES EVEN IF ANY REMEDY FAILS OF ITS ESSENTIAL PURPOSE. CUSTOMER SUPPORT If you have warranty questions, or require technical or customer support, please visit: www.square-enix.com/na/support There you will be able to contact a representative live through our chat support system, view our hours of operation and review additional support details. You can also contact Customer Support at 310-846-0345. Please note that toll charges do apply when contacting us through phone support. For toll free service, please contact us through chat support or email. FOR INFORMATION AND SERVICES BY SQUARE ENIX, INC., GO TO WWW.SQUARE-ENIX.COM/NA NOTICE: The Product, this manual, and all other accompanying documentation, written or electronic, are protected by United States copyright law, trademark law and international treaties. Unauthorized reproduction is subject to civil and criminal penalties. All rights reserved. Some states and jurisdictions do not allow the exclusion of, or limitations on, limited or implied warranties, and in such states and jurisdictions, Square Enix’s and its licensors’ liability shall be limited in duration and effect to the maximum extent permitted by law. You may have other rights that vary from state-to-state or from jurisdiction-to-jurisdiction. Under no circumstances shall any implied warranty required by law exceed the 90-day period of the Limited Warranty above. LIMITATIONS ON DAMAGES IN NO EVENT SHALL SQUARE ENIX OR ITS LICENSORS BE LIABLE FOR SPECIAL, INCIDENTAL, OR CONSEQUENTIAL DAMAGES RESULTING FROM POSSESSION, USE OR MALFUNCTION OF THE 29 © 2013, 2014 SQUARE ENIX CO., LTD. All Rights Reserved. CHARACTER DESIGN: TETSUYA NOMURA LIGHTNING RETURNS, FINAL FANTASY, SQUARE ENIX and the SQUARE ENIX logo are registered trademarks or trademarks of the Square Enix Holdings Co., Ltd. “PlayStation”, “DUALSHOCK” and “SIXAXIS” are registered trademarks and “PS3” and the PlayStation Network logo are trademarks of Sony Computer Entertainment Inc. 30