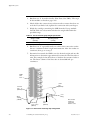
1
ABI 433A Peptide Synthesis 3 mL Reaction Vessel User’s Manual © Copyright 2001, Applied Biosystems. All rights reserved. For Research Use Only. Not for use in diagnostic procedures. ABI PRISM, the ABI PRISM design, Aquapore, Applied Biosystems, Brownlee, GeneScan, INHERIT, Masterpiece, MicroCoat, MPLC, NEWGUARD, OPC, POLYPORE, Precipitette, ProBlott, ProSort, ProSpin, SeqEd, SPHERI10, SPHERI5, SynthAssist, and VeloSep are registered trademarks of Applera Corporation or its subsidiaries in the U.S. and certain other countries. Amplicover, Anitron, AutoAssembler, BaseSprinter, Biobytes, CATALYST, FastPhoramidite, GeneAssist, Genotyper, HLP, Hot Start, ONESTEP, PCR-MATE, PDQ, Phosphalink, PROCISE, ProFocus, Sequence Navigator, StockMarks, Stretch, and Synergy are trademarks of Applera Corporation or its subsidiaries in the U.S. and certain other countries. All other trademarks are the sole property of their respective owners. Printed 11/2001 Applied Biosystems Contents 1 About This Manual Contents of the Manual User Attention Words Technical Support Contacting Technical Support To Contact Technical Support by E-Mail Hours for Telephone Technical Support To Contact Technical Support by Telephone or Fax To Reach Technical Support Through the Internet To Obtain Documents on Demand 2 Introduction About the 3 mL Reaction Vessel System 3 mL Reaction Vessel 3 mL RV Installation Overview How to Assemble the 3 mL RV 3 Installing the Variable Measuring Loop Equipment Required Installation Procedure 4 Chemistry Cycle Times Solvent Consumption Reagent and Bottle Positions Bulk Amino Acid Solutions Peptide Nucleic Acids: Recommended Modifications Lowering the Resin Substitution PNA Monomer Solutions Synthesis Setup for the 3 mL Reaction Vessel Test Synthesis Example November 2001 1-1 1-1 1-2 1-3 1-3 1-3 1-3 1-4 1-7 1-7 2-1 2-1 2-2 2-3 2-5 3-1 3-1 3-3 4-1 4-2 4-3 4-4 4-8 4-12 4-13 4-14 4-15 4-18 5 Cycles and Modules 5-1 Cycles in SynthAssist 2.0 Software Module Descriptions for ABI 433A Fmoc and Boc Cycles Cycles (grouped by coupling) Cycle Modifications Deprotection Monitoring 5-1 5-3 5-6 5-6 5-8 5-9 iii Applied Biosystems Example of a Deprotection Calculation SynthAssist Dictionary Modules for 433A Peptide Synthesizer Cycles using the new 0.5 mL measuring loop Flow Tests Folder A Appendix Plumbing Schematics iv 5-11 5-12 5-13 5-24 5-27 A-1 A-1 November 2001 Applied Biosystems 1 About This Manual This manual describes how to install and use the 3 mL Reaction Vessel System on the ABI 433A Peptide Synthesizer. This manual contains information that you might need to refer to from time to time, so it is recommended that you insert this manual at the back of the ABI 433A Peptide Synthesizer User’s Manual for future reference. Contents of the Manual Section 1 About this Manual Briefly describes each section of this manual, explains the User Attention Words, and tells how to get help. Section 2 Introduction Describes the purpose of the 3 mL Reaction Vessel System and provides brief chemistry information. Section 3 Measuring Loop Installation Gives the procedure for changing and calibrating the new Variable Measuring Loop required for use with the 3 mL Reaction Vessel. Section 4 Chemistry Provides information about reagents, bottle positions, preparing solutions, synthesis setup and example. Section 5 Cycles and Modules Describes the new cycles and modules designed to be used specifically with the 3mL Reaction Vessel. Appendix Contains plumbing schematics for the new 0.125 mL and 0.500 mL measuring loop configurations. November 2001 1 About This Manual 1-1 Applied Biosystems User Attention Words Throughout the 3 mL Reaction Vessel User’s Manual, four kinds of information are set off from the regular text. Each “User Attention Word” requires a particular level of observation or action that is significant to the user’s safety or to proper instrument operation. 1-2 Note Used to call attention to information. IMPORTANT Indicates information that is necessary for proper instrument operation. Caution Damage to the instrument could result if you do not comply with this information. WARNING Physical injury to the user or other persons could result if these precautions are not implemented. 1 About This Manual November 2001 Applied Biosystems Technical Support Contacting Technical Support You can contact Applied Biosystems for technical support by telephone or fax, by e-mail, or through the Internet. You can order Applied Biosystems user documents, MSDSs, certificates of analysis, and other related documents 24 hours a day. In addition, you can download documents in PDF format from the Applied Biosystems Web site (please see the section “To Obtain Documents on Demand” following the telephone information below). To Contact Technical Support by E-Mail Contact technical support by e-mail for help in the following product areas: Product Area E-mail address Genetic Analysis (DNA Sequencing) [email protected] Sequence Detection Systems and PCR [email protected] Protein Sequencing, Peptide and DNA Synthesis [email protected] Biochromatography, PerSeptive DNA, PNA and Peptide Synthesis systems, CytoFluor®, FMAT™, Voyager™, and Mariner™ Mass Spectrometers [email protected] LC/MS (Applied Biosystems/MDS Sciex) [email protected] or [email protected] Chemiluminescence (Tropix) [email protected] Hours for Telephone Technical Support In the United States and Canada, technical support is available at the following times: November 2001 Product Hours Chemiluminescence 8:30 a.m. to 5:30 p.m. Eastern Time Framingham support 8:00 a.m. to 6:00 p.m. Eastern Time All Other Products 5:30 a.m. to 5:00 p.m. Pacific Time 1 About This Manual 1-3 Applied Biosystems To Contact Technical Support by Telephone or Fax In North America To contact Applied Biosystems Technical Support, use the telephone or fax numbers given below. (To open a service call for other support needs, or in case of an emergency, dial 1-800-831-6844 and press 1.) Product or Product Area Telephone Dial... Fax Dial... ABI PRISM® 3700 DNA Analyzer 1-800-831-6844, then press 8 1-650-638-5981 DNA Synthesis 1-800-831-6844, then press 21 1-650-638-5981 Fluorescent DNA Sequencing 1-800-831-6844, then press 22 1-650-638-5981 Fluorescent Fragment Analysis (includes GeneScan® applications) 1-800-831-6844, then press 23 1-650-638-5981 Integrated Thermal Cyclers (ABI PRISM ® 877 and Catalyst 800 instruments) 1-800-831-6844, then press 24 1-650-638-5981 ABI PRISM ® 3100 Genetic Analyzer 1-800-831-6844, then press 26 1-650-638-5981 BioInformatics (includes BioLIMS, BioMerge™, and SQL GT™ applications) 1-800-831-6844, then press 25 1-505-982-7690 Peptide Synthesis (433 and 43X Systems) 1-800-831-6844, then press 31 1-650-638-5981 Protein Sequencing (Procise Protein Sequencing Systems) 1-800-831-6844, then press 32 1-650-638-5981 PCR and Sequence Detection 1-800-762-4001, then press 1 for PCR, 2 for the 7700 or 1-240-453-4613 5700, 6 for the 6700 or dial 1-800-8316844, then press 5 1-4 Voyager MALDI-TOF Biospectrometry and Mariner ESITOF Mass Spectrometry Workstations 1-800-899-5858, then press 13 1-508-383-7855 Biochromatography (BioCAD Workstations and Poros Perfusion Chromatography Products) 1-800-899-5858, then press 14 1-508-383-7855 Expedite Nucleic acid Synthesis Systems 1-800-899-5858, then press 15 1-508-383-7855 Peptide Synthesis (Pioneer and 9050 Plus Peptide Synthesizers) 1-800-899-5858, then press 15 1-508-383-7855 PNA Custom and Synthesis 1-800-899-5858, then press 15 1-508-383-7855 1 About This Manual November 2001 Applied Biosystems Product or Product Area Telephone Dial... Fax Dial... FMAT 8100 HTS System and Cytofluor 4000 Fluorescence Plate Reader 1-800-899-5858, then press 16 1-508-383-7855 Chemiluminescence (Tropix) 1-800-542-2369 (U.S. 1-781-275-8581 only), or 1-781-271-0045 Applied Biosystems/MDS Sciex 1-800-952-4716 1-650-638-6223 Telephone Dial... Fax Dial... Outside North America Region Africa and the Middle East Africa (English Speaking) and West Asia (Fairlands, South Africa) 27 11 478 0411 27 11 478 0349 South Africa (Johannesburg) 27 11 478 0411 27 11 478 0349 Middle Eastern Countries and North Africa (Monza, Italia) 39 (0)39 8389 481 39 (0)39 8389 493 Eastern Asia, China, Oceania Australia (Scoresby, Victoria) 61 3 9730 8600 61 3 9730 8799 China (Beijing) 86 10 64106608 86 10 64106617 Hong Kong 852 2756 6928 852 2756 6968 Korea (Seoul) 82 2 593 6470/6471 82 2 593 6472 Malaysia (Petaling Jaya) 60 3 758 8268 60 3 754 9043 Singapore 65 896 2168 65 896 2147 Taiwan (Taipei Hsien) 886 2 22358 2838 886 2 2358 2839 Thailand (Bangkok) 66 2 719 6405 66 2 319 9788 Europe November 2001 Austria (Wien) 43 (0)1 867 35 75 0 43 (0)1 867 35 75 11 Belgium 32 (0)2 712 5555 32 (0)2 712 5516 Czech Republic and Slovakia (Praha) 420 2 61 222 164 420 2 61 222 168 Denmark (Naerum) 45 45 58 60 00 45 45 58 60 01 Finland (Espoo) 358 (0)9 251 24 250 358 (0)9 251 24 243 France (Paris) 33 (0)1 69 59 85 85 33 (0)1 69 59 85 00 Germany (Weiterstadt) 49 (0) 6150 101 0 49 (0) 6150 101 101 Hungary (Budapest) 36 (0)1 270 8398 36 (0)1 270 8288 Italy (Milano) 39 (0)39 83891 39 (0)39 838 9492 Norway (Oslo) 47 23 12 06 05 47 23 12 05 75 Poland, Lithuania, Latvia, and Estonia (Warszawa) 48 (22) 866 40 10 48 (22) 866 40 20 Portugal (Lisboa) 351 (0)22 605 33 14 351 (0)22 605 33 15 Russia (Moskva) 7 095 935 8888 7 095 564 8787 1 About This Manual 1-5 Applied Biosystems Region Telephone Dial... Fax Dial... South East Europe (Zagreb, Croatia) 385 1 34 91 927 385 1 34 91 840 Spain (Tres Cantos) 34 (0)91 806 1210 34 (0)91 806 1206 Sweden (Stockholm) 46 (0)8 619 4400 46 (0)8 619 4401 Switzerland (Rotkreuz) 41 (0)41 799 7777 41 (0)41 790 0676 The Netherlands (Nieuwerkerk a/d IJssel) 31 (0)180 331400 31 (0)180 331409 United Kingdom (Warrington, Cheshire) 44 (0)1925 825650 44 (0)1925 282502 All other countries not listed (Warrington, UK) 44 (0)1925 282481 44 (0)1925 282509 Japan Japan (Hacchobori, Chuo-Ku, Tokyo) 81 3 5566 6230 81 3 5566 6507 Latin America Del.A. Obregon, Mexico 1-6 1 About This Manual 305-670-4350 305-670-4349 November 2001 Applied Biosystems To Reach Technical Support Through the Internet We strongly encourage you to visit our Web site for answers to frequently asked questions and for more information about our products. You can also order technical documents or an index of available documents and have them faxed or e-mailed to you through our site. The Applied Biosystems Web site address is http://www.appliedbiosystems.com/techsupp To submit technical questions from North America or Europe: Step Action 1 Access the Applied Biosystems Technical Support Web site. 2 Under the Troubleshooting heading, click Support Request Forms, then select the relevant support region for the product area of interest. 3 Enter the requested information and your question in the displayed form, then click Ask Us RIGHT NOW (blue button with yellow text). 4 Enter the required information in the next form (if you have not already done so), then click Ask Us RIGHT NOW. You will receive an e-mail reply to your question from one of our technical experts within 24 to 48 hours. To Obtain Documents on Demand Free, 24-hour access to Applied Biosystems technical documents, including MSDSs, is available by fax or e-mail or by download from our Web site. To order documents... Then... by index number a. Access the Applied Biosystems Technical Support Web site at http://www.appliedbiosystems.com/techsupp b. Click the Index link for the document type you want, then find the document you want and record the index number. c. Use the index number when requesting documents following the procedures below. by phone for fax delivery a. From the U.S. or Canada, call 1-800-487-6809, or from outside the U.S. and Canada, call 1-858-712-0317. b. Follow the voice instructions to order the documents you want. Note November 2001 1 About This Manual There is a limit of five documents per request. 1-7 Applied Biosystems To order documents... through the Internet for fax or e-mail delivery Then... a. Access the Applied Biosystems Technical Support Web site at http://www.appliedbiosystems.com/techsupp b. Under Resource Libraries, click the type of document you want. c. Enter or select the requested information in the displayed form, then click Search. d. In the displayed search results, select a check box for the method of delivery for each document that matches your criteria, then click Deliver Selected Documents Now (or click the PDF icon for the document to download it immediately). e. Fill in the information form (if you have not previously done so), then click Deliver Selected Documents Now to submit your order. Note There is a limit of five documents per request for fax delivery but no limit on the number of documents you can order for e-mail delivery. 1-8 1 About This Manual November 2001 Applied Biosystems 2 Introduction About the 3 mL Reaction Vessel System The 3 mL Reaction Vessel System makes it possible for the ABI 433A to synthesize peptides and peptide analogues on the 5-, 10-, and 20-µmol scale. These scales of synthesis are very useful when using expensive monomers such as glycosylated amino acids, isotopically labeled amino acids, and peptide nucleic acid (PNA) monomers. The 3 mL Reaction Vessel System is established by installing the 3 mL Reaction Vessel kit (P/N 402067), which contains the following components: • 3 mL Reaction Vessel (3 mL RV) • tubing kit containing tubing required to make a 0.125-mL and 0.50-mL Variable Measuring Loop • SynthAssist™ disk containing the Variable Measuring Loop Cycles • boxes of empty amino acid cartridges • this manual The cycles use HBTU activation strategy for both Fmoc and Boc chemistries. This approach is equivalent to Applied Biosystems FastMoc cycles when using Fmoc amino acids. However, we refer to these cycles as either Fmoc or Boc cycles because modules from both chemistries are present within a single chemistry file. This is useful when both Fmoc and Boc deprotections are required for one synthesis. The 3 mL Reaction Vessel System is designed primarily for installation in the ABI 433A Peptide Synthesizer. The 3-mL Reaction Vessel System will also function on the ABI 431A Peptide Synthesizer if equipped as follows: • The ABI 431A has the Feedback Monitoring kit • The ABI 431A has the vortexer bracket that accepts RTF-style (Recessed Tab Filter) reaction vessels. (For information about whether your instrument accepts RTF-style reaction vessels, see 3 mL RV Installation Overview on page 2-3.) Note November 2001 2 Introduction For information about upgrading or retrofitting an ABI 431A, contact Applied Biosystems Technical Support. (Refer to Technical Support on page 1-3.) 2-1 Applied Biosystems 3 mL Reaction Vessel 3 mL Reaction Vessel Part Number: 402776 Filter (Box of 30) Part Number: 401524 Use with 5-µmol, 10-µmol, and 20-µmol scale syntheses Resin-sampling version is not available Note 2-2 2 Introduction The bottom cap of the 3 mL Reaction Vessel has three dots for identification. November 2001 Applied Biosystems 3 mL RV Installation Overview This section describes the process of installing the hardware and software components of the 3 mL RV kit. Each step in the installation process must be performed in the order listed in this section to ensure that the 3-mL RV System functions properly. Carry out the following steps in the installation process: 1. Check ABI 431A for proper vortexer bracket (ignore for ABI 433A) Note If you plan to use the 3 mL RV on an ABI 431A that has had the Monitoring Upgrade installed, verify that the synthesizer is equipped with the vortexer bracket that accepts RTF-style Reaction Vessels (RTF=Recessed Tab Filter). If you have an ABI 433A, ignore this instruction because all ABI 433A instruments have the proper vortexer bracket. If the vortexer bracket does not accept RTF-style Reaction Vessels, do not proceed any further. You need to upgrade the synthesizer’s vortexer bracket before you can use the 3 mL RV. For more information, contact Technical Support (Refer to Technical Support on page 1-3). 2. Verify the contents of the 3 mL RV kit The 3 mL Reaction Vessel System kit contains a number of different parts. Before you begin to install any components, take a minute to inventory the kit to verify that it is complete. Check the packing list(s) in the 3 mL Reaction Vessel System kit to verify that all the pieces are included before you begin any installation procedure. If your kit is missing any parts, contact Applied Biosystems Technical Support (Refer to Technical Support on page 1-3). 3. Inspect the RV Caution The pieces of the 3 mL and 8 mL Reaction Vessels are not interchangeable. Do not mix parts from the two Reaction Vessels. Because the 3 mL Reaction Vessel (RV) is similar in shape to the 8 mL RV, the top and bottom caps of the 3 mL RV both have distinctive markings for easy recognition: the top cap of the 3 mL RV has 3 rings and the bottom cap has 3 dots. 4. Copy the new software modules to your hard disk To copy the new software modules, drag the Variable Loop Folder from the disk in the kit onto your hard drive. Put the new cycles in the SynthAssist chemistry folder. November 2001 2 Introduction 2-3 Applied Biosystems IMPORTANT Once you install the Variable Measuring Loop, you must always use the new cycles included on the disk in the kit. The old cycles will not function properly with the Variable Measuring Loop hardware. 5. Remove the old cycles from the Macintosh hard drive The old cycles will not function properly with the new Measuring Loop hardware. Always use the new cycles from this point on. 6. Install the Variable Measuring Loop For the procedure describing how to install the Variable Measuring Loop, Refer to Installation Procedure on page 3-3. 7. Remove the Conductivity Cell If you are going to run cycles without monitoring, remove the Conductivity Cell. For instructions on removing the Conductivity Cell, refer to the ABI 433A User’s Manual, Section 8: System Description. 8. Assemble the 3 mL RV Install the filter, add the resin, and tighten the caps on the RV (see To assemble the 3 mL RV: on page 2-5). 9. Run a test peptide Before you use expensive monomers, make a simple peptide to test the new synthesizer setup. For information on running a test synthesis, refer to Synthesis Setup for the 3 mL Reaction Vessel on page 4-15 and Test Synthesis Example on page 4-18. Use the normal synthesis procedure, with the following two exceptions: • Prepare Bottle 7 and Bottle 8 reagent solutions according to your intended scale of synthesis (refer to the tables of concentrations on page 4-5). • Prepare the amino acid solutions (Refer to Bulk Amino Acid Solutions on page 4-8). 10. Ready to go If the test synthesis is satisfactory, you may proceed to your small-scale syntheses using the 3 mL RV. 2-4 2 Introduction November 2001 Applied Biosystems How to Assemble the 3 mL RV WARNING CHEMICAL HAZARD. To prevent serious chemical burns and eye damage, make sure a plug is inserted into the bulkhead fitting (ABI 431A) or the sliding cover flap covers the bulkhead fitting (ABI 433A). Even though the 3 mL RV cycles are written without resin sampling functions, hazardous solvents such as DCM, NMP, or DMF may squirt out of the resin sampler bulkhead fitting AT EYE LEVEL. Always wear protective lab coat, chemical-resistant gloves, and safety goggles. To assemble the 3 mL RV: 1. Hold the RV in a vertical position and place an RV filter on the protruding “knife edge” found just inside the openings at either end of the RV (Figure 2-1). The filter forms a seal with the knife edge when the RV cap is screwed in place. reaction vessel (RV) cap filter “knife edge” reaction vessel (RV) Figure 2-1. Placing RV filter on inner knife edge of reaction vessel 2. Screw on the RV cap, making sure to hold the RV in a vertical position at all times. November 2001 2 Introduction 2-5 Applied Biosystems Caution Hold the RV in a vertical position when screwing on the RV cap. If you turn the RV on its side while tightening its cap, the filter may become crooked and form an imperfect seal. As a result, resin may escape and clog the in-line filter. Tighten the cap until you feel a firm resistance. This resistance indicates that the primary seal is forming between the filter and the recessed knife edge. Visually check the filter placement by looking through the open end of the RV. The surface of the filter should be flat and smooth, with no protrusions beyond the knife edge. Use the black, open-ended wrench to tighten and loosen both caps on 3 mL RV (see Figure 2-2). Caution Reaction vessels are designed to be tightened by hand. Use only your hands or the ABI-supplied black wrench to tighten the 3 mL RV caps. Figure 2-2. Use the open-ended wrench to tighten the 3 mL RV caps 2-6 2 Introduction November 2001 Applied Biosystems 3. Add the appropriate amount of resin to the 3 mL RV (Figure 2-3) Refer to Section 4 : Chemistry for resin quantity specifications. Figure 2-3. Filling the 3 mL RV with resin 4. Place a filter on the knife edge of the open end of the 3 mL RV. Tightly screw on the cap, using the procedure described in step 2. Place the RV in the RV holder on the synthesizer. Use the black, open-ended wrench to tighten the 3 mL RV caps. November 2001 2 Introduction 2-7 Applied Biosystems 3 Installing the Variable Measuring Loop The ABI 433A is built using a 0.5-mL fixed measuring loop to deliver the solutions from Bottles 7 and 8. The Variable Measuring Loop kit contains the tubes required to change the fixed measuring loop to one that can deliver either 0.5 mL (for 0.10-, 0.25-, 0.50-, and 1.0-mmol cycles) or 0.125 mL (for 5-, 10-, or 20-µmol cycles). Perform the entire installation procedure to calibrate both measuring loops. IMPORTANT Once you install the Variable Measuring Loop, you must always use the new cycles included on the floppy disk. The old cycles will not function properly with the Variable Measuring Loop hardware. Equipment Required Wrenches: 5/16-inch, 3/8-inch, and 7/16-inch New, single-edged razor blade To prepare for installation: WARNING CHEMICAL HAZARD. Chemicals in bottles under pressure can discharge dangerous liquids into eyes and onto skin. Always wear protective lab coat, gloves, and safety goggles when working with chemicals and bottles under pressure. 1. Run Flow Tests 10 (NMP to the metering vessel) and 11 (NMP to cartridge) to verify proper reagent flow before doing any hardware installation. (See section on Flow Tests in 433A User’s Manual.) Expected Flow Test 10 2.45 to 2.55 mL to RV position Flow Test 11 1.95 to 2.35 g to cartridge Found If the flow test values are not correct, replace the inline filters, then repeat the tests. If the flow test values are still not correct, adjust the bottom regulator, then repeat the tests. November 2001 3 Installing the Variable Measuring Loop 3-1 Applied Biosystems 2. Clean the existing 0.50-mL measuring loop with NMP by using the following procedure: a. Add about 25 mL NMP to an empty 200-mL bottle and place the bottle in the Bottle 8 position. b. Switch the ABI 433A to manual control (use the manual control menu). c. Turn on Fxn 69 and let the ABI 433A run until all the NMP has been removed from Bottle 8. d. Turn off Fxn 69. e. Turn on Fxn 70 for about 10 seconds. 3. Clean the Bottle 7 tube with NMP by using the following procedure: a. Add about 25 mL NMP to an empty 200-mL bottle and place the bottle in the Bottle 7 position. b. Turn on Fxn 68 and let the ABI 433A run until all the NMP has been removed from Bottle 7. c. Turn off Fxn 68. d. Turn on Fxn 70 for about 10 seconds. 4. Add 25 mL NMP to Bottle 7 and 8, then run Flow Test 17 and 18. Expected Flow Test 17 & 18 Found 0.515 to 0.554 g to cartridge 5. Empty both Bottles 7 and 8 by turning on Fxn 68 and 69 until the Bottles are empty. 6. Turn on Fxn 70 for about 10 seconds. 3-2 3 Installing the Variable Measuring Loop November 2001 Applied Biosystems Installation Procedure Removing the existing 0.5-mL measuring loop tube The existing 0.5-mL tube is located between Valve 13 on the 11-port Valve Block and the Teflon cross-fitting (Figure 3-2). To remove the 0.5-mL measuring loop: 1. If you have not already done so, remove the right side panel from the instrument. Refer to Figure 3-1 to identify the correct panel to remove. right side panel (user accessible) Figure 3-1. ABI 431/433 showing location of right side (user accessible) panel 2. Remove the end of the 0.5-mL loop from the cross-fitting (Figure 3-2). To find which tube to remove, locate valve 13 on the middle valve block, trace that tube back to the cross fitting, then remove the tube end from the cross fitting. 3. At the middle valve block, loosen the metal hex nut, then loosen the black bushing that secures the other end of the 0.5-mL loop. 4. Pull the 0.5-mL tube out of the valve block very carefully, making sure that the white ferrule does not pull loose from the tube. If it is difficult to pull out the tube and ferrule, use the following procedure for gas-assisted removal of the tube: a. Switch the ABI 433A to manual control (use the manual control menu). b. Turn on Fxn 10 (Gas B VB) for about 10 seconds. c. Turn off Fxn 10. November 2001 3 Installing the Variable Measuring Loop 3-3 Applied Biosystems middle valve block angar valve 29 valve 13 0.5-mL measuring loop (removed in step 2 and 4) cross fitting lower valve block Note: all tube lengths not necessarily drawn to scale Figure 3-2. Original 0.5-mL measuring loop configuration d. Open valves 17, 16 and 13 to send gas through the tube. e. Place your fingertip over the cross-fitting end of the tube to cause the gas pressure inside the tube to build up. f. Carefully remove the tube, which should now be easier to remove because of the gas pressure assistance. g. Turn off the valves. 3-4 3 Installing the Variable Measuring Loop November 2001 Applied Biosystems To connect the variable measuring loop tube: 1. Locate the short red tube labeled “ASSY, VALVE 13 TO CLPG” (P/N 604130) and install the metal hex nut removed in step 3 above. measuring loop fitting hex nut Figure 3-3. Measuring loop tube with hex nut installed 2. Attach this short red tube to Valve 13 on the 11-port Valve Block (Figure 3-4). Use only your fingers to tighten the fitting. Caution Do not over tighten the measuring loop fitting. Damage to the ferrule from over tightening can cause leaks in the measuring loop. 3. After the fitting is finger tight, use the 5/16-inch wrench to tighten the fitting a maximum of one quarter turn more. Tighten the metal hex nut finger tight. 4. Attach the new long red tube labeled “ASSY, TUBE CPLG TO X-FTG” (P/N 604129) to the cross-fitting (Figure 3-4), again using your fingers. Note You will trim the long red piece of tube to calibrate the 0.125-mL measuring loop in step 3 below. A spare piece of tube is provided in the Tubing Kit. 5. Connect the two red tubes (P/N 604129 and 604130) with a 1/4-28 flange coupling (P/N 110070) (Figure 3-4) using only your fingers until the connections are tight. 6. Remove the existing tube that connects the cross-fitting to Angar Valve 29 and replace it with the new yellow tube labeled “ASSY, TUBE X-FTG TO VALVE 29” (P/N 604128) (Figure 3-4). Be sure the fitting is straight as you screw it into the Angar valve to avoid cross threading. 7. After the fitting is finger tight, use the 5/16-inch wrench to tighten the fitting one quarter turn more. November 2001 3 Installing the Variable Measuring Loop 3-5 Applied Biosystems middle valve block Angar valve 29 yellow tube (604128) valve 13 short red tube (604130) cross fitting flange coupling (110070) long red tube (604129) Note: all tube lengths not necessarily drawn to scale Figure 3-4. New 0.125-mL measuring loop configuration To calculate the 0.125-mL Measuring Loop calibration: The long red tube labeled “ASSY, CPLG TO X-FTG” (P/N 604129) must be trimmed so it will deliver between 0.123 mL and 0.127 mL. 1. Install a bottle of NMP at the Bottle 8 position. NMP has a density of 1.033 g/mL, which will be used for calculating the calibration later (Table 3-1 and Table 3-2). 2. Replace the cartridge inline filter with a flange coupling. (This is only for calibrating the measuring loop. You will replace the inline filter later in this section.) 3. Place an empty tared cartridge with a septum into the guideway under the needle assembly and place the pusher block against the cartridge. 4. If you have not already done so, load the new cycles provided on the Variable Measuring Loop Cycles disk. In the Flow Tests folder, open “Flow Tests (New VML)” and send to the ABI 433A. 3-6 3 Installing the Variable Measuring Loop November 2001 Applied Biosystems 5. Run flow test “a” (module “a”). This module fills the measuring loop 10 times from Bottle 8 and delivers the contents to the cartridge position. The steps in this module are listed on page 5-27. As flow test “a” runs, watch the flow at the waste port to verify that reagents are flowing quickly enough. You should see the NMP fill the tube within three seconds of the start of delivery. If the NMP does not fill the tube within the proper time, a tube restriction or fitting leak is the probable cause. 6. Check all the tube connections you have made to ensure that there are no leaks. If you find a leak on the valve block, tighten the fitting no more than one quarter turn. If the leak is on a fitting, tighten the fitting with your fingers. 7. Weigh the cartridge containing the NMP from the 11-step module. Consult Table 3-1 to determine whether the weight falls within the specified range. Table 3-1. 0.125-mL measuring loop weight specification Weight of NMP (10 loops) 1.27 - 1.31 g Resulting Volume (1 loop) 0.123 - 0.127mL 8. Repeat steps 3 through 7 repeatedly until you achieve three successive results that are consistent in their weight measurements. After the results are consistent, then go on to step 9. 9. Determine how much the NMP is over the desired weight and use this information to determine approximately how much tube to trim. The example below shows how to calculate the amount of tube to cut. The linear volume of the red tube is about 0.002 mL per centimeter. WARNING November 2001 CHEMICAL HAZARD. The measuring loop and other tubes contain N-methylpyrrolidone (NMP). Always wear protective lab coat, gloves, and safety goggles when handling tubes that may contain even small amounts of reagents such as NMP. 3 Installing the Variable Measuring Loop 3-7 Applied Biosystems Example for calculating how much to cut 0.125 mL measuring loop ❶ weight of 10 loops of NMP delivery: 1.35 g ❷ weight of 1 loop of NMP delivery = 1.35 g 10 loops ❸ volume of 1 loop of NMP delivery = NMP weight NMP density = ❹ 0.135 g 0.131 mL difference between the volume of NMP delivery and the upper volume specification (Table 3-1) = ❺ = 0.135 g 1.033 g/mL = 0.131 mL − 0.127 mL = 0.004 mL excess amount of tube to be cut = volume in excess linear vol of tube = 0.004 mL 0.002 mL/cm = 2 cm to cut To cut measuring loop to correct length: 1. Disconnect the long red tube from the flange coupling and cross fitting. Remove the long red tube to a secure work surface. 2. Separate the ferrule (white) from the fitting (black), then slide both the ferrule and fitting several inches farther onto the tube (Figure 3-5). Note When estimating how much tube to trim, it is better to cut too little than to cut too much. 3. Using a new single-edged razor blade, trim the appropriate amount of tube, determined in step 9 above, using a perfectly straight cut (Figure 3-5). 4. Slide the ferrule and fitting to within _1 inch of the trimmed end of the tube. 4 5. Press fit the ferrule and fitting together, leaving approximately 4_1 inch of tube protruding from the ferrule. 3-8 3 Installing the Variable Measuring Loop November 2001 Applied Biosystems fitting ferrule Figure 3-5. Trimming the long red tube 6. Holding the fitting/ferrule assembly between your fingers, press the trimmed end of the red tube down onto a hard surface to bring the ferrule flush with the end of the tube (Figure 3-6). Figure 3-6. Pressing long red tube into fitting and ferrule 7. Reinstall the long red tube between the flange coupling and cross fitting. 8. Rerun flow test “a” to determine whether the measuring loop is within specification (Table 3-1). If further calibration is required, repeat the calculation procedure starting on page 3-6. To calibrating the 0.5-mL Measuring Loop: 1. Connect the new blue tube labeled “ASSY, TUBE 0.5 ML LOOP” (P/N 604127) between the two pieces of red tube (P/N 604129 and 604130) using two flange couplings (P/N 110070) (Figure 3-7). 2. Place an empty tared cartridge with a septum into the guideway under the needle assembly and place the pusher block against the cartridge. November 2001 3 Installing the Variable Measuring Loop 3-9 Applied Biosystems 3. Run flow test “b” located in the file “Flow Tests (New VML).” The steps in this module are listed on page 5-28. 4. Check all the tube connections you have made to ensure that there are no leaks. If you find a leak, tighten the connection with your fingers. 5. Weigh the cartridge containing the NMP from the 11-step module. Consult Table 3-2 to determine whether the weight falls within the specified range. Table 3-2. 0.5-mL measuring loop weight specification Weight of NMP (4 loops) 2.037 - 2.095 g Resulting Volume (1 loop) 0.493 - 0.507 mL 6. Run flow test “b” repeatedly until you achieve three successive results that are consistent in their weight measurements. After the results are consistent, then go on to step 7. 7. Determine how much the NMP is over the desired weight and use this information to determine approximately how much of the blue tube to trim. The example below shows how to calculate the amount of tube to cut. The linear volume of the blue tube is about 0.005 mL per centimeter. middle valve block yellow tube (604128) short red tube (604130) cross fitting flange coupling (110070) blue tube (not to scale) (604127) long red tube (604129) Note: all tube lengths not necessarily drawn to scale Figure 3-7. New 0.5-mL measuring loop configuration 3-10 3 Installing the Variable Measuring Loop November 2001 Applied Biosystems WARNING Wear protective gloves when handling tubes that may contain even small amounts of reagents such as N-methylpyrrolidone(NMP). Example for calculating how much to cut 0.5 mL measuring loop ❶ weight of 4 loops of NMP delivery: 2.373 g ❷ weight of 1 loop of NMP delivery = 2.373 g 4 loops ❸ volume of 1 loop of NMP delivery = NMP weight NMP density = ❹ 0.593 g 0.574 mL difference between the volume of NMP delivery and the upper volume specification (Table 3-2) = ❺ = 0.593 g 1.033 g/mL = 0.574 mL − = 0.507 mL 0.067 mL excess amount of tube to be cut = volume of NMP linear vol of tube = 0.067 mL 0.005 mL/cm = 13.4 cm to cut To cut measuring loop to correct length: 1. Disconnect the blue tube from the flange couplings. Remove the blue tube to a secure work surface. 2. Separate the ferrule (white) from the fitting (black), then slide both the ferrule and fitting several inches farther onto the tube (Figure 3-5 on page 3-9). 3. Using the single-edged razor blade, trim the appropriate amount of tube determined in step 7 above using a perfectly straight cut. 4. Slide the ferrule and fitting to within _1 inch of the trimmed end of the tube. 4 5. Press fit the ferrule and fitting together, leaving approximately 4_1 inch of tube protruding from the ferrule. 6. Holding the fitting/ferrule assembly between your fingers, press the trimmed end of the red tube down onto a hard surface to bring the ferrule flush with the end of the tube (Figure 3-6 on page 3-9). November 2001 3 Installing the Variable Measuring Loop 3-11 Applied Biosystems 7. Reinstall the long red tube between the flange coupling and cross fitting. 8. Rerun flow test “b” to determine whether the measuring loop is within specification (Table 3-2). If further calibration is required, follow this procedure again. 9. Check one more time all the tube connections you have made to ensure that there are no leaks. 10. Reinstall the inline filter you removed earlier (step 2 on page 3-6). 11. Run flow tests “c” and “d” to check the variable measuring loop. These tests will let you verify that the measuring loop fills within the correct time. The 0.125-mL loop should fill within three seconds and the 0.50-mL measuring loop should fill within five seconds. Module “c” is for Bottle 7 and module “d” is for Bottle 8 (see page 5-28 for details). The Variable Measuring Loop is now installed and calibrated. Table 3-3 shows which tubes to use for each scale synthesis. Table 3-3. Measuring Loop Configurations 5-µmol short red tube long red tube blue tube synthesis scale 10-µmol 20-µmol 0.1-mmol 0.25-mmol 0.5-mmol 1.0-mmol • • • • • • removed removed removed • • • • • • • • • • • • • = use this tube for synthesis Note: When you remove the blue tube for the 5-, 10-, and 20-µmol scales, also remove one of the flange couplings, then connect the two red tubes together. Refer to Section 4 for Chemistry information or Section 5 for Cycle and Module information. 3-12 3 Installing the Variable Measuring Loop November 2001 Applied Biosystems 4 Chemistry The cycles provided for the 5-, 10-, and 20-µmol scales use the HBTU activation strategy for both Fmoc and Boc chemistries. This approach is equivalent to Applied Biosystems FastMoc chemistry for the higher scales. However, we refer to these cycles as either Fmoc or Boc cycles because modules from both chemistries are present within a single chemistry file. This is useful when both Fmoc and Boc deprotections are required for one synthesis. The 3 mL Reaction Vessel System uses five equivalents of amino acid monomer, which is predissolved in NMP before being added to an empty amino acid cartridge. Activation occurs through the use of HBTU located in Bottle 8 and DIEA located in Bottle 7. The measuring loop for Bottles 7 and 8 is 0.125 mL and the concentration of the DIEA solution in Bottle 7 and the HBTU solution in Bottle 8 varies according to the scale of synthesis. The amounts of the various reagents are summarized in Table 4-1 on page 4-2. In the Boc cycle, neutralization and coupling are performed simultaneously. This process is often called in situ neutralization† and is possible because the HBTU activation uses excess DIEA. The only different Boc derivative that should be used with this approach is Boc-Asn(Xan) or Boc-Asn(Trt) instead of Boc-Asn. †. November 2001 Schnölzer, M., Alewood, P., Jones, A., Alewood, D. and Kent, S.B.H. 1992. In situ neutralization in Boc-chemistry solid phase peptide synthesis. International Journal of Peptide & Protein Research 40:180-193 4 Chemistry 4-1 Applied Biosystems Table 4-1. Concentration and amounts of reagents 5 µmol 10 µmol 20 µmol 25 µmol 50 µmol 100 µmol ~ 0.110 mL ~ 0.220 mL ~ 0.440 mL HBTU 0.19 M HBTU X 0.125 mL 23.0 µmol 0.38 M HBTU X 0.125 mL 47.5 µmol 0.38 M HBTU X 0.250 mL 95 µmol DIEA 0.40 M DIEA X 0.125 mL 50 µmol 0.80 M DIEA X 0.125 mL 100 µmol 1.60 M DIEA X 0.125 mL 200 µmol ~ 0.35 mL ~ 0.47 mL ~ 0.69 mL Resin Monomer Coupling Volume Coupling Concent. 0.1 mmol (comparison) ~ 0.068 M ~ 0.100 M ~ 0.138 M ~ 0.167 M Cycle Times The cycle time for both the Fmoc and Boc cycles is approximately 50 minutes. The cycles and their durations are listed in Table 4-2 and Table 4-3. Table 4-2. Fmoc Cycle with 3 mL RV 4-2 Module Piperidine Deprotection (2 times) NMP Washes (6 times) Activate monomer Coupling Capping NMP Washes (3 times) Total Time (min) 7.0 2.9 0.3 35 1.0 1.4 Cycle Time for Fmoc chemistry Approximately 50 minutes 4 Chemistry November 2001 Applied Biosystems Table 4-3. Boc Cycle with 3 mL RV Module DCM Wash (1 time) TFA Deprotection (2 times) DCM Wash(1 time) NMP Washes (6 times) Activate monomer Coupling Capping NMP Washes (3 times) Total Time (min) 0.9 6.0 0.5 2.9 0.3 35 1.0 1.4 Cycle Time for Boc chemistry Approximately 50 minutes Solvent Consumption One cycle consumes a total volume of approximately 60 mL of solvent. Each of the three scales of synthesis use the same quantity of solvent. One reason for this is that the quantity of solvent needed to wash the 3 mL RV and amino acid cartridge are the same for each scale. In addition, the quantities of resin used in the 5-, 10- and 20-µmol scale syntheses are so small that the solvent used to wash the RV and cartridge is more than enough to wash the resin. November 2001 4 Chemistry 4-3 Applied Biosystems Reagent and Bottle Positions WARNING CHEMICAL HAZARDS. Chemicals used on the ABI 433A can be hazardous and cause injury, illness or death. Become completely familiar with the Material Safety Data Sheet (MSDS) for each hazardous chemical before attempting to operate the instrument or use the reagents. MSDSs are provided in the Safety Supplement of the ABI 433A User’s Manual. When working with hazardous chemicals, wear all appropriate safety attire listed in the MSDSs. To minimize inhalation of the chemicals, do not leave any chemical bottles uncapped. IMPORTANT Cartridges swell after extended contact with solvents such as NMP and DCM. After only a single synthesis cycle, a cartridge can swell enough to exceed the recommended cartridge size. Reusing a cartridge can result in the cartridge becoming stuck in the autosampler and shutting down your synthesis. Bottle 1: Piperidine (P/N 401750) Piperidine is used for Fmoc removal. Even if only Boc cycles are used, Piperidine (or DIEA) is needed in Bottle 1 because Flow Test 2 contains a step that uses Bottle 1 to neutralize the metering vessel. Bottle 2: TFA (P/N 400137) When synthesizing peptides with Boc-protected amino acids, use 100% TFA in Bottle 2. When synthesizing PNAs, use 95% TFA/5% m-cresol in Bottle 2. Use Bottle 2 bottle seal (P/N 400789) when using TFA in Bottle 2. Avoid leaving TFA installed on an unused synthesizer for an extended period of time. Because an unused synthesizer does not backflush the TFA tubing with nitrogen, TFA fumes are in long-term contact with synthesizer valves. If you plan to not use TFA for an extended period of time (for example, two weeks or more), remove the TFA bottle from the instrument. See Waste Container on page 4-6 for information about neutralizing TFA in the waste container. 4-4 4 Chemistry November 2001 Applied Biosystems Bottle 4: Capping solution Two capping solutions have been used. The typical capping solution for peptides is 0.5 M acetic anhydride, 0.125 M DIEA and 0.015 M HOBt in NMP. This is made by combining the following components: • 19 mL of acetic anhydride (P/N 400660) • 9 mL of 100% DIEA (P/N 400136) or 26 mL of 2 M DIEA (P/N 401517) • 6 mL of 1 M HOBt/NMP (P/N 400662) and diluting to 400 mL with NMP (P/N 400580) The other capping solution often used in Peptide Nucleic Acid (PNA) synthesis is a 1/25/25 mixture of acetic anhydride/pyridine/NMP. Note Make both capping solutions fresh each week. Bottle 7: DIEA solution The concentrations of DIEA for different scales of synthesis, and their preparation using 2 M DIEA (P/N 401517), are shown in Table 4-4. Table 4-4. DIEA solutions Scale 5 µmol 10 µmol 20 µmol November 2001 4 Chemistry DIEA 0.40 M 0.80 M 1.60 M Preparation 40 mL 2 M DIEA diluted to 200 mL in NMP 80 mL 2 M DIEA diluted to 200 mL in NMP 160 mL 2 M DIEA diluted to 200 mL in NMP 4-5 Applied Biosystems Bottle 8: HBTU solution Note Before running any synthesis, verify that the tube for Bottle 8 has the HBTU filter installed. The HBTU solution can be made with or without the additional HOBt. For peptide synthesis, it is usually made with the additional HOBt, according to the directions on the HBTU Activation kit (P/N 401132). This gives a 0.45 M HBTU/0.45 M HOBt solution, which should be diluted with NMP to give the desired solution as shown in Table 4-5 on page 4-6. Table 4-5. HBTU solutions using 0.45 M HBTU/HOBt Scale 5 µmol HBTU 0.19 M 10 µmol 0.38 M 20 µmol 0.38 M HBTU/HOBt Preparation Dilute 84 mL 0.45 M HBTU/HOBt to 200 mL with NMP Dilute 169 mL 0.45 M HBTU/HOBt to 200 mL with NMP Dilute 169 mL 0.45 M HBTU/HOBt to 200 mL with NMP Volume 1 X 0.125 mL = 0.125 mL 1 X 0.125 mL = 0.125 mL 2 X 0.125 mL = 0.250 mL For PNA synthesis, the HBTU solution usually does not have the additional HOBt. The HBTU (mw 379.3) is dissolved in NMP as shown in Table 4-6. Table 4-6. HBTU solutions using solid HBTU 0.19 M HBTU 0.38 M HBTU WARNING 14.4 g HBTU dissolved in NMP and diluted to 200 mL 28.8 g HBTU dissolved in NMP and diluted to 200 mL RESPIRATORY HAZARD. Inhaling HBTU dust can cause bronchial irritation with coughing. Repeated or prolonged exposure may cause allergic respiratory system sensitization. Handle HBTU under a chemical fume hood. The cycles designed for the 3 mL RV do not contain a loading cycle. Loading Fmoc-amino acids on HMP resins requires DCC in Bottle 8. Therefore, use pre-loaded resins for syntheses in these micromole scales. Bottle 9: DCM (P/N 400142) Bottle 10: NMP (P/N 400580) Waste Container If you are using TFA, pour a bottle of Ethanolamine/Methanol (P/N 400230) into the waste container to neutralize the TFA in the waste. 4-6 4 Chemistry November 2001 Applied Biosystems Cartridge Predissolve the Fmoc amino acids, Boc amino acids or Boc-PNAs in NMP, using five or ten equivalents of monomer for each coupling. Add the mixture to the cartridge. The formula for calculating monomer quantity is monomer MW × mmoles of AA = mg of AA per cartridge To calculate the quantity of monomer when five equivalents is required: a. From Table 4-1 on page 4-2, find the quantity of monomer you need for your scale synthesis. If a 5-µmol scale synthesis is being performed, you need 25 µmol of monomer (5 equivalents). b. If you use Fmoc-Ala (MW 311.3), then the calculation using the formula above is as follows: 311.3 × .025 mmol = 7.8 mg c. According to the calculation, 7.8 mg of Fmoc-Ala is needed for a 5-µmol scale synthesis. The formula for calculating the quantity of NMP required to dissolve the monomer is: monomer quantity (in mmol) × Vol of solvent per mmol = Volume of NMP To calculate the quantity of NMP required: a. Use an amount of NMP that equals 4 mL/1 mmol of monomer. b. If you use Fmoc-Ala, the quantity of NMP required is determined as follows: (0.025 mmol) 4 mL mmol = 0.10 mL c. According to the calculation, 0.10 mL of NMP is required for a 5-µmol scale synthesis using Fmoc-Ala. If the same monomer is used several times, then a larger amount of material can be dissolved. The resultant monomer solution can be refrigerated and stored for a week. Details for this are given in the next section. November 2001 4 Chemistry 4-7 Applied Biosystems Bulk Amino Acid Solutions When the same monomer is used several times per week, a larger amount of solution can be prepared. Two calculations are required, one for millimoles of amino acid and one for quantity of solvent. To calculate the number of mmoles of amino acid in 0.25 g Fmoc-Ala. grams of monomer MW × 1000 = no. of mmol 0.25 g × 311.3 1000 = 0.803 mmol To calculate the quantity of NMP required for 0.25 g Fmoc-Ala: (no. of mmol) × (vol of solvent per mmol) = (0.803 mmol) 4 mL = mmol solvent required 3.21 mL The amount of this solution to pipet into the cartridge has been calculated for each Fmoc and Boc amino acid using a density of 1.04 g/mL for each solution. This information is shown in Table 4-7 for the three different scales of syntheses when five equivalents of monomer is used. For example, in Table 4-7, 107-µL of the Fmoc-Ala solution is used for the 5-µmol cycle. Note 4-8 4 Chemistry The solution volumes given in Table 4-7 and Table 4-8 represent the minimum amount of amino acid to use. November 2001 Applied Biosystems Table 4-7. Amino acid solutions when using five equivalents (1 mmol in 4 mL NMP) amino acid Fmoc-Ala-OH Fmoc-Cys(Trt)-OH Fmoc-Asp(OtBu)-OH Fmoc-Glu(OtBu)-OH Fmoc-Phe-OH Fmoc-Gly-OH Fmoc-His(Trt)-OH Fmoc-Ile-OH Fmoc-Lys(Boc)-OH Fmoc-Leu-OH Fmoc-Met-OH Fmoc-Asn(Trt)-OH Fmoc-Pro-OH Fmoc-Gln(Trt)-OH Fmoc-Arg(Pmc)-OH Fmoc-Ser(tBu)-OH Fmoc-Thr(tBu)-OH Fmoc-Val-OH Fmoc-Trp-OH Fmoc-Tyr(tBu)-OH Boc-Ala-OH Boc-Cys(Mob)-OH Boc-Asp(OBzl)-OH Boc-Glu(OBzl)-OH Boc-Phe-OH Boc-Gly-OH Boc-His(Bom)-OH Boc-His(DNP)-OH Boc-Ile-OH (1/2 H2O) Boc-Lys(Cl-Z)-OH Boc-Leu-OH (H2O) Boc-Met-OH Boc-Asn(Xan)-OH Boc-Pro-OH Boc-Gln-OH Boc-Arg(Mts)-OH Boc-Ser(Bzl)-OH Boc-Thr(Bzl)-OH Boc-Val-OH Boc-Trp-OH Boc-Tyr(Br-Z)-OH November 2001 4 Chemistry MW 311.3 585.7 411.4 425.5 387.4 297.3 619.7 353.4 468.6 353.4 371.5 596.7 337.4 610.7 662.8 383.4 397.5 339.4 426.5 459.5 189.2 341.4 323.4 337.4 265.3 175.2 375.4 421.4 240.3 414.9 249.3 249.3 412.4 215.3 246.3 456.6 295.3 309.4 217.3 304.4 494.4 weight (g) of mmol AA and 4 mL NMP 4.443 4.718 4.543 4.557 4.519 4.429 4.752 4.485 4.600 4.485 4.503 4.729 4.469 4.743 4.795 4.515 4.529 4.471 4.558 4.591 4.321 4.473 4.455 4.469 4.397 4.307 4.507 4.553 4.372 4.547 4.381 4.381 4.544 4.347 4.378 4.589 4.427 4.441 4.349 4.436 4.626 weight volume (mL) of solution for: (g) of so- monomer: 25 µmol 50 µmol 100 µmol lution for 25 µmol resin: 5 µmol 10 µmol 20 µmol 0.111 107 214 428 0.118 114 228 456 0.114 110 220 440 0.114 110 220 440 0.113 109 218 436 0.111 107 214 428 0.119 115 230 460 0.112 108 216 432 0.115 111 222 444 0.112 108 216 432 0.113 109 218 436 0.118 114 228 456 0.112 108 216 432 0.119 115 230 460 0.120 116 232 464 0.113 109 218 436 0.113 109 218 436 0.112 108 216 432 0.114 110 220 440 0.115 111 222 444 0.108 104 208 416 0.112 108 216 432 0.111 107 214 428 0.112 108 216 432 0.110 106 212 424 0.108 104 208 416 0.113 109 218 436 0.114 110 220 440 0.109 105 210 420 0.114 110 220 440 0.110 106 212 424 0.110 106 212 424 0.114 110 220 440 0.109 105 210 420 0.110 106 212 424 0.115 111 222 444 0.111 107 214 428 0.111 107 214 428 0.109 105 210 420 0.111 107 214 428 0.116 112 224 448 4-9 Applied Biosystems If you want to perform a synthesis in which some of the monomers are very expensive (such as glycosylated amino acids) and the remaining monomers relatively inexpensive, run the synthesis using five equivalents of the expensive monomer and ten equivalents of the inexpensive monomer. When you select the activation to use five equivalents of the expensive monomer, choose cycles that contain module A (for example, BDAFd). When you select the activation to use ten equivalents of the inexpensive monomer, choose cycles that contain module E (for example, BDEFd). When you use ten equivalents of monomer, you can make the monomer solution more concentrated, for example, 1 mmol dissolved in 2 mL NMP. Table 4-8 gives the volumes for the three scales when using ten equivalents of monomers. 4-10 4 Chemistry November 2001 Applied Biosystems Table 4-8. Amino acid solutions when using ten equivalents (1 mmol in 2 mL NMP) amino acid Fmoc-Ala-OH Fmoc-Cys(Trt)-OH Fmoc-Asp(OtBu)-OH Fmoc-Glu(OtBu)-OH Fmoc-Phe-OH Fmoc-Gly-OH Fmoc-His(Trt)-OH Fmoc-Ile-OH Fmoc-Lys(Boc)-OH Fmoc-Leu-OH Fmoc-Met-OH Fmoc-Asn(Trt)-OH Fmoc-Pro-OH Fmoc-Gln(Trt)-OH Fmoc-Arg(Pmc)-OH Fmoc-Ser(tBu)-OH Fmoc-Thr(tBu)-OH Fmoc-Val-OH Fmoc-Trp-OH Fmoc-Tyr(tBu)-OH Boc-Ala-OH Boc-Cys(Mob)-OH Boc-Asp(OBzl)-OH Boc-Glu(OBzl)-OH Boc-Phe-OH Boc-Gly-OH Boc-His(Bom)-OH Boc-His(DNP)-OH Boc-Ile-OH (1/2 H2O) Boc-Lys(Cl-Z)-OH Boc-Leu-OH (H2O) Boc-Met-OH Boc-Asn(Xan)-OH Boc-Pro-OH Boc-Gln-OH Boc-Arg(Mts)-OH Boc-Ser(Bzl)-OH Boc-Thr(Bzl)-OH Boc-Val-OH Boc-Trp-OH Boc-Tyr(Br-Z)-OH November 2001 4 Chemistry MW 311.3 585.7 411.4 425.5 387.4 297.3 619.7 353.4 468.6 353.4 371.5 596.7 337.4 610.7 662.8 383.4 397.5 339.4 426.5 459.5 189.2 341.4 323.4 337.4 265.3 175.2 375.4 421.4 240.3 414.9 249.3 249.3 412.4 215.3 246.3 456.6 295.3 309.4 217.3 304.4 494.4 weight (g) of mmol AA and 2 mL NMP 2.377 2.652 2.477 2.492 2.453 2.363 2.686 2.419 2.535 2.419 2.438 2.663 2.403 2.677 2.729 2.449 2.464 2.405 2.493 2.526 2.255 2.407 2.389 2.403 2.331 2.241 2.441 2.487 2.306 2.481 2.315 2.315 2.478 2.281 2.312 2.523 2.361 2.375 2.283 2.370 2.560 weight volume (mL) of solution for: (g) of so- monomer: 50 µmol 100 µmol 200 µmol lution for 50 µmol resin: 5 µmol 10 µmol 20 µmol 0.119 115 230 460 0.133 128 256 512 0.124 119 238 476 0.125 120 240 480 0.123 118 236 474 0.118 114 228 456 0.134 129 258 516 0.121 116 232 464 0.127 122 244 488 0.121 116 232 464 0.122 117 234 468 0.133 128 256 512 0.120 116 232 464 0.134 129 258 516 0.136 131 262 524 0.123 118 236 472 0.123 118 236 472 0.120 116 232 464 0.125 120 240 480 0.126 121 242 484 0.113 109 218 436 0.120 116 232 464 0.120 116 232 464 0.120 116 232 464 0.117 113 226 452 0.112 108 216 432 0.122 117 234 468 0.124 119 238 476 0.115 111 222 444 0.124 119 238 476 0.116 112 224 448 0.116 112 224 448 0.124 119 238 476 0.114 110 220 440 0.116 112 224 448 0.126 121 242 484 0.118 114 228 456 0.119 115 230 460 0.114 110 220 440 0.119 115 230 460 0.128 123 246 492 4-11 Applied Biosystems Peptide Nucleic Acids: Recommended Modifications Peptide Nucleic Acids (PNAs) are DNA analogues with a polyamide backbone consisting of an uncharged 2-aminoethylglycine (aeg) unit instead of the charged ribose-phosphate backbone of DNA. The first publication on PNAs was in 1991†. At the time of the writing of this manual (February, 1996) there have been over 75 papers on the synthesis and use of PNAs. The disk contained in the 3 mL Reaction Vessel kit contains special cycles designed specifically for synthesizing PNAs. These cycles are based on modifications and improvements provided by PNA Diagnostics, Copenhagen, who have been synthesizing PNAs on the ABI 433A with the 3 mL RV since November, 1994. As new improvements are made in the PNA cycles, you should include these improvements in your syntheses. PNA Diagnostics has recommended the following changes, which are included in the 5-µmol, 10--µmol, and 20-µmol PNA cycle files: 1. After you add the DIEA, allow for a 60-second activation period of the PNA monomer. To accomplished this, extend the time in module A, step 23 from 5 seconds to 60 seconds. (It may be that the activation of the PNA takes more time than amino acids.) 2. Additional DCM washes are necessary between the TFA deprotection and the NMP washes. To make this change, a module “G” was added to the cycle. (BDAFCd was changed to BGDAFCd.) You can change the number of loops in module “G” from five to two (step 3). 3. For capping, use a 1:25:25 solution of acetic anhydride, pyridine and NMP. 4. Use a resin with a loading of 0.20 mmol/g or less. If the resin you use has a higher substitution, you can lower the resin substitution. For more information on lowering the resin substitution, see Lowering the Resin Substitution on page 4-13. 5. Use 95% TFA/5% m-cresol instead of 100% TFA in Bottle 2. 6. Use a greater excess of PNA monomer over the uronium activator than when synthesizing peptides. For PNA synthesis, use 0.9 equivalent of uronium activator per 1.0 equivalent of PNA monomer. (For peptide synthesis, use 0.95 equivalent of uronium activator per 1.0 equivalent of amino acids.) 7. If you are using HBTU for activation, do not add any additional HOBt. †. 4-12 Nielsen, P.E., Egholm, M., Berg R.F. and Buchardt, O. 1991. Sequence-Selective Recognition of DNA by Strand Displacement with a Thymine-Substituted Polyamide. Science 254: 1497-1500 4 Chemistry November 2001 Applied Biosystems Synthesizing PNAs can be more challenging (and more expensive) than peptides or DNA. For the first PNA synthesis you perform, choose a relatively simple oligomer, such as (Taeg)6-Lys-NH2. PNAs are often synthesized with an amino acid at the C- or N-terminus. The C-terminus is often started with a lysine amide to suppress aggregation of the PNA. Lowering the Resin Substitution The following procedure for lowering the substitution for MBHA resin is adapted from a procedure developed by PNA Diagnostics. To lower the substitution of MBHA resin: 1. Wash 3.0 g MBHA resin (0.45 mmol/g, 1.35 mmol) twice in DCM. 2. Wash the resin in 5% DIEA in DCM for 3 minutes. 3. Wash the resin twice in DCM. The resin is now neutralized. 4. Dissolve 0.60 mmol PNA monomer in 7.5 mL NMP. 5. Add 1.2 mmol DIEA to the monomer solution. 6. Dissolve 224 mg (0.59 mmol) HBTU in 7.5 mL NMP, and add this to the monomer solution. 7. Activate the monomer for 2 minutes. 8. Add the activated monomer solution to the neutralized resin. 9. Allow the reaction to proceed for 1 hour. 10. Filter the resin. 11. Wash the resin with 1x NMP. 12. Make 50 mL of capping solution using a 1:2:2 ratio of acetic anhydride, pyridine, and NMP 13. Add the capping solution to the resin and allow the reaction to proceed for 1 hour. Successful capping will produce a negative Ninhydrin test. 14. Wash the resin with DMF. 15. Wash the resin with 4x DCM. 16. Wash the resin with 5% DIEA in DCM. 17. Wash the resin with 4x DCM. 18. Dry the resin in a vacuum. November 2001 4 Chemistry 4-13 Applied Biosystems To determine the new loading of the resin, couple Fmoc-Gly to about 20 mg of the resin. Follow the procedure for a 5 µmol Boc synthesis using the following cycles: Table 4-9. Cycles for determining resin loading Cycle Boc Depro/Single Final DCM Wash Modules BDAFd c To determine the substitution, follow the procedure located on page 3-18 of the ABI 433A User’s Manual. PNA Monomer Solutions The Boc-PNA monomers are predissolved in NMP and the appropriate amount of the solution is pipeted into a cartridge. Table 4-10 gives the volume of each dissolved monomer for the 3 scales of syntheses when using 4 mL of NMP to dissolve 1 mmol of monomer. All the monomers dissolve at this concentration at room temperature except Boc-Gaeg(Z)-OH, which requires sonication or heating to 50 °C to dissolve the solid, but it will stay in solution once it has dissolved. In Table 4-10, the actual density of 1.06 g/mL was used to calculate the volumes of the four PNA monomers. The density of NMP is 1.033 g/mL. The reason 5.3 equivalents of PNA monomer is used, instead of the 5 equivalents used with the amino acids, is to use a greater excess of monomer over the uronium activator. Table 4-10. PNA Monomer solutions in NMP when using 5.3 equivalents amino acid Boc-Aaeg(Z)-OH Boc-Caeg(Z)-OH Boc-Gaeg(Z)-OH Boc-Taeg-OH 4-14 4 Chemistry MW 527.5 503.5 543.5 348.4 weight (g) of mmol AA and 4 mL NMP 4.660 4.636 4.676 4.480 weight (g) volume (µL) of solution for: of solu- monomer: 26.5 µmol 53 µmol 106 µmol tion for 26.5 µmol resin: 5 µmol 10 µmol 20 µmol 0.123 116 232 464 0.122 115 230 460 0.123 116 232 464 0.118 112 224 448 November 2001 Applied Biosystems Synthesis Setup for the 3 mL Reaction Vessel You can use the following checklist with the ABI 433A FastMoc Quick Start Card to help set up your synthesis. Much of the information on the Quick Start Card, however, is incorrect when you are doing a synthesis using the 3 mL RV cycles. For example, predissolved monomers, bottle position, HBTU concentration, DIEA concentration, and measuring loop volume are all different. WARNING Always wear gloves, protective clothing and eye protection when working with chemicals and bottles under pressure. 1. Check the barcode reader, nitrogen tank and waste container for proper connection and operation. 2. If necessary, change the in-line filters (top RV, bottom RV and cartridge). Note For the next step, weigh the HBTU in a fume hood. 3. Prepare DIEA and HBTU solutions according to your synthesis scale, then place the solutions in Bottles 7 and 8. Install an HBTU line filter on the end of the tube in Bottle 8. Reagent DIEA (Bottle 7) HBTU (Bottle 8) 5-µmol 0.40 M 0.19 M Scale 10-µmol 0.80 M 0.38 M 20-µmol 1.60 M 0.38 M 4. Prepare the monomer solutions, using 1 mmol/4 mL NMP when using five equivalents and 1 mmol/2 mL NMP when using ten equivalents. These monomer solutions can be stored for up to one week when refrigerated. Add the appropriate amount of solution to the cartridges, according to Table 4-7, Table 4-8 and Table 4-10. 5. Prepare the capping solution for Bottle 4. Note Make the capping solution fresh each week. 6. Check all the other solvents and reagents: Piperidine, TFA (if using Boc cycles), DCM, and NMP. 7. Install or remove the conductivity cell, depending on whether conductivity monitoring is used. 8. Check that the 0.125 mL variable measuring loop is installed. November 2001 4 Chemistry 4-15 Applied Biosystems 9. Open Flow Test 1-18 (VML) and send to the synthesizer. Run the appropriate flow tests. Check for leaks after finishing flow tests. Flow Test 10 (module A) Flow Test 11 (module B) NMP to metering vessel. NMP to cartridge. Flow Test 2 (module b) Flow Test 1 (module a) TFA to metering vessel (only if using Boc cycles). Piperidine to metering vessel. Flow Test 4 (module d) Capping solution to metering vessel. Flow Test 7 (module g) DIEA to measuring loop (check that it fills loop in 3 sec or less) HBTU to measuring loop (check that it fills loop in 3 sec or less) Flow Test 8 (module h) 10. If the sequence is not already entered, open “New,” then enter and save the sequence. 11. Open the appropriate 3 mL chemistry (5-, 10- or 20-µmol). a. Choose Boc or Fmoc in the Chemistry Information dialog box. (SynthAssist User’s Manual, page 4-3) The possible cycles to choose from are described on pages 5-6 and 5-7. It is also possible to create your own cycles. b. Check Default Set and change if necessary. (SynthAssist User’s Manual, page 4-14). c. Save and send chemistry to synthesizer. 12. Add resin to the 3 mL RV. The 3 mL RV must be closed and tightened completely before any synthesis is started. You will feel resistance when you tighten the caps of the RV. This resistance is the result of O-rings beginning to become compressed. Keep tightening the RV caps until the RV is completely closed. To completely tighten the RV caps, you may need to use the wrench included in the 3 mL RV kit. If the RV caps are not completely tight, resin will escape from the body of the vessel during the synthesis. For more information about assembling and closing the 3 mL RV, refer to page 2-5. 13. Open a New Run using the following steps: a. Choose sequence. b. Choose resin. c. Enter the resin substitution. 4-16 4 Chemistry November 2001 Applied Biosystems d. Enter the weight of resin. e. Check cycles to make sure the correct cycles are entered. You may want some cycles to be different from the default. f. Check amino acids (pop-up menu) g. Save Run. 14. Send Run File to synthesizer. 15. Load the cartridges that contain the monomer solutions into the guideway. 16. Place RV on synthesizer and begin synthesis. Reminder when using the 8 mL, 40 mL and 55 mL Reaction Vessels. Always check that the 0.50 mL variable measuring loop is installed when you use the cycles written for the 8 mL, 40 mL and 55 mL RV. In addition, you must use the cycles containing the extending filling times for the measuring loop. The correct cycles are in the 0.50 mL Loop Folder and they have VML in the Information Box. Note November 2001 4 Chemistry If you haven’t already removed the original cycles in the Chemistry folder of SynthAssist, remove them from the computer now (drag them into the trash, then empty the trash). 4-17 Applied Biosystems Test Synthesis Example Before performing a synthesis using expensive monomers, make a simple peptide to verify that all the changes made to the measuring loop, cycles and reagents are correct. Table 4-11 shows an example of a 5-µmol ACP (65-74) synthesis using Fmoc cycles. Table 4-11. 5-µmol ACP synthesis using Fmoc cycles. ACP (65-74): Val-Gln-Ala-Ala-Ile-Asp-Tyr-Ile-Asn-Gly Fmoc-Gly-HMP resin: Bottle 7: Bottle 8: Fmoc-amino acids: (0.0082 g)(0.65 mmol/g) = 0.0053 mmol 0.40M DIEA 0.19M HBTU Use the following volumes of amino acids solutions (1 mmol amino acid/4 mL NMP): Fmoc-Asn(Trt) 114 µL Fmoc-Tyr(tBu) 111 µL Fmoc-Ala 107 µL Fmoc-Val 108 µL Fmoc-Ile 108 µL Fmoc-Asp(OtBu) 110 µL Fmoc-Gln(Trt) 115 µL Final weight of resin: 0.0142 g (Theory: 0.0155 g) Cycle information: Cycle: Type: 5 µmol Fmoc (see SynthAssist User’s Manual, p. 4-3) Default set: Default: Preload: Load: End: Fmoc Depro/Single NMP Wash None Final Fmoc Depro bDAFd D Amino Acid 1 Gly 2 Asn 3 Ile 4 Tyr 5Asp 6 Ile 7 Ala 8 Ala 9 Gln 10 Val 11 Cycle NMP Wash Fmoc/Depro/Single Fmoc/Depro/Single Fmoc/Depro/Single Fmoc/Depro/Single Fmoc/Depro/Single Fmoc/Depro/Single Fmoc/Depro/Single Fmoc/Depro/Single Fmoc/Depro/Single Fmoc Final Depro Modules D bDAFd bDAFd bDAFd bDAFd bDAFd bDAFd bDAFd bDAFd bDAFd bDc Cycles: 4-18 4 Chemistry bDc November 2001 Applied Biosystems Cleavage 6.8 mg of resin was treated with 200 µL of 90% TFA, 5% EDT, 2.5% thioanisole and 2.5% H2O for 2 hours. Filter resin, precipitate peptide in 10 mL methyl t-butyl ether, centrifuge, decant, redissolve peptide in 0.5 mL TFA, reprecipitate in 10 mL ether, centrifuge, decant, dissolve peptide in 10% acetic acid and lyophilize. Weight = 1.8 mg (theory 2.5 mg) HPLC Performed on an ABI 130A Micro Separation System equipped with an Aquapore® OD-300, C18, 300-Å pore size, 7-µm particle size reverse phase column. Flow rate of 250 µL/min. with a gradient of 5%-60% B in 45 minutes, where buffer A is 0.10% TFA/H2O and buffer B is 0.08% TFA/ acetonitrile. Detection was at 214 nm. Figure 4-1. HPLC results November 2001 4 Chemistry 4-19 Applied Biosystems 5 Cycles and Modules Cycles in SynthAssist 2.0 Software The disk provided with the 3 mL Reaction Vessel Kit contains new cycles, written in SynthAssist software, that use the Variable Measuring Loop. Figure 5-1 shows the folder structure. The 0.125 mL Loop folder contains the new 0.125 mL cycles. The 0.5 mL Loop folder contains all the old cycles previously on the SynthAssist Chemistry disk, with some steps modified as described in Table 5-5 on page 5-24. 5-µmol (3 mL RV) 2.1.0 5-µmol Folder 5-µmol (3 mL RV) PNA 10-µmol (3 mL RV) 2.1.0 0.125 mL Loop Folder 10-µmol Folder 10-µmol (3 mL RV) PNA 20-µmol (3 mL RV) 2.1.0 20-µmol Folder 20-µmol (3 mL RV) PNA Variable Measuring Loop 0.5 mL Loop Folder Flow Tests (New VML) Flow Tests Folder 17 modified cycles using the 0.5 mL Measuring Loop (see page 5-24) Flow Tests 1-18 (VML) Flow Tests 19-23 Figure 5-1. Arrangement of folders on Variable Measuring Loop disk November 2001 5 Cycles and Modules 5-1 Applied Biosystems The Variable Loop Folder also contains four new flow tests for the Variable Measuring Loop, located in the Flow Tests Folder (Figure 5-1). This folder also contains the original flow tests from the ABI 433A with minor modifications made to Flow Tests 7, 8, 17, and 18 (modules g, h, H, and I). The 3 mL RV cycles are provided with the Fmoc chemistry selected. If you are using Boc resins and Boc amino acids, select Boc in the information window (refer to the SynthAssist 2.0 User’s Manual, page 4-3). 5-2 5 Cycles and Modules November 2001 Applied Biosystems Module Descriptions for ABI 433A The modules described in this section are used for both Boc and Fmoc syntheses. The TFA deprotection for the Boc removal is written in module “B.” The piperidine deprotection for the Fmoc removal is written in module “b” when there is no monitoring and in modules “H” and “h” when there is conductivity monitoring. Module A - Read Cartridge and add HBTU and DIEA Total time = 1.2 minutes The amino acid cartridge name is read, the old cartridge is ejected and the new cartridge is advanced. HBTU (0.95 equiv.) is added to the cartridge. For the 5-µmol cycles, 0.125 mL of 0.19 M HBTU is added; for the 10-µmol cycles, 0.125 mL of 0.38 M HBTU is added; for the 20-µmol cycles, 0.250 mL (2 loops) of 0.38 M HBTU is added. Next, the DIEA solution is added to the cartridge to initiate activation of the carboxylic acid group. The concentration of the DIEA is 0.40 M for the 5-µmol scale synthesis, 0.80 M for the 10-µmol scale synthesis, and 1.6 M for the 20-µmol scale synthesis. When synthesizing PNAs, the 5-second activation period on step 23 is extended to 60 seconds. Module B - TFA Deprotection Total time = 8.6 minutes The resin is washed one time with DCM, then treated for 1 minute with TFA. After draining, the resin is treated again with TFA, this time for 4.1 minutes. At the end of the module there is a single DCM wash. Module C - Capping Total time = 1.6 minutes The resin is drained, the capping solution from Bottle 4 is added and the reaction vessel is vortexed for 1 minute. Module D - NMP Washes Total time = 2.9 minutes The resin is drained and washed six times with NMP. Module E - Read Cartridge and Add Double the Amount of HBTU and DIEA Total time = 2.0 minutes This module is identical to module A, except twice the amount of HBTU and DIEA is added. This module is used with the less expensive amino acids. Module A uses five equivalents of amino acids and module E uses 10 equivalents of amino acids. November 2001 5 Cycles and Modules 5-3 Applied Biosystems Module F - Transfer, Clean Cartridge and Couple Total time = 35.1 minutes At the beginning of this module, the activated monomer is transferred to the reaction vessel and the cartridge is washed two times with NMP. This NMP is transferred to the Activator Vessel and is used later in module “d.” After the cartridge is washed, the coupling is continued. You can modify the coupling time by changing the number of loops in step 29. Module G - DCM Washes Total time = 2.4 minutes The resin is drained and washed five times with DCM. This is an optional module that you might use in the Boc cycles after the TFA deprotections. In the PNA cycles, the resin is drained and washed only twice (see page 5-19). Module H - Piperidine Deprotection - Prev. Peak Total time: if 3 loops: 12.4 minutes if 4 loops: 16.3 minutes The resin is washed three times with NMP. A 20% piperidine/NMP solution is introduced and allowed to deprotect for 2 minutes. The conductivity of the deprotection solution is measured and the resin is drained. This process is continued for at least three deprotections. At the end of the third deprotection, the value of the second and third deprotections are compared to see if they are within the limits defined by step 54 (End loop monitoring). A value of 25 in step 54 means that if the third deprotection is within 2.5% of the second deprotection, then no more deprotections will occur. Three to four deprotections will occur. Module I - Vortex Total time = 5.0 minutes The reaction vessel is vortexed for 5 minutes. Use this module to extend the coupling or capping. Module a - Read Cartridge Total time = 0.9 minutes The cartridge name is read, the old cartridge is ejected and the new cartridge is advanced. Use this module when the material is already in its activated form, such as when using fluorescein isothiocyanate. The material must be dissolved in at least 0.36 mL of solvent. The number of equivalents is user determined and may depend on the expense and availability of the material, as well as the efficiency of the reaction. 5-4 5 Cycles and Modules November 2001 Applied Biosystems Module b - Piperidine Deprotection - no monitoring Total time = 8.7 minutes The resin is washed one time with NMP. A 20% piperidine/NMP solution is introduced and allowed to deprotect for 2 minutes. The RV is drained and a second treatment with 20% piperidine/NMP is performed for 5 minutes. You can change the time in step 24 to extend the second treatment. At the end of the module, the resin is drained. Module c - Final DCM Washes Total time = 5.1 minutes The resin is drained and washed six times with DCM. At the end of the cycle, the resin is drained for 30 seconds and the Activator Vessel is washed with DCM and drained. Use this module at the end of a synthesis. Module d - NMP Wash from Activator Total time = 1.4 minutes The NMP that was used in Module “F” to wash the cartridge is used in this module to wash the resin after the coupling is completed. Module f - DIEA Neutralization Total time = 1.5 minutes The resin is washed two times with NMP and 0.125 mL of the DIEA solution. Module h - Conditional Piperidine Deprotection Total time = 10.8 minutes This module is used only when the maximum deprotection loops have been used in module “H.” When this module is active, a 20% piperidine/NMP solution is introduced and allowed to deprotect for 10 minutes. The conductivity of the solution is measured at the end of the deprotection. Module i - Conditional Vortex Total time = 5.0 minutes This module is used only when the maximum deprotection loops have been used in module H. When this module is active, the reaction vessel is vortexed for 5 minutes. Use this module to conditionally extend the coupling or the capping. November 2001 5 Cycles and Modules 5-5 Applied Biosystems Fmoc and Boc Cycles (PrPk = previous peak monitoring) Boc Depro/Single Boc Depro/Single/cap Boc Depro/Single (10 eq.) Boc Depro/Single (10 eq.)/cap Boc Depro/Single (no 7 & 8) Boc Final Depro Boc Final Depro & Acetylation Fmoc Depro/Single Fmoc Depro/Single/cap Fmoc Depro/Single (10 eq.) Fmoc Depro/Single (10 eq.)/cap Fmoc Depro/Single (no 7 & 8) Fmoc Final Depro Fmoc Final Depro & Acetylation PrPk Fmoc Depro/Single/cap PrPk Fmoc Depro/Single (10 eq.)/cap PrPk Fmoc Depro/Single (no 7 & 8) PrPk Fmoc Final Depro PrPk Fmoc Final Depro & Acetylation NMP Wash Final DCM Wash BDAFd BDAFCd BDEFd BDEFCd BDfDaFIIId BDc BDCCIDc bDAFd bDAFCd bDEFd bDEFCd bDaFIIId bDc bDCCIDc HhDAFiiiCidD HhDEFiiiCidD HhDaFIIIiiidD HhDc HhDCCIiDc D c Cycles (grouped by coupling) The following cycles are single coupling with five equivalents of monomer. Boc Depro/Single Fmoc Depro/Single BDAFd bDAFd The following cycles are single coupling with five equivalents of monomer followed by capping with a pre-mixed solution of acetic anhydride. Boc Depro/Single/cap Fmoc Depro/Single/cap PrPk Fmoc Depro/Single/cap BDAFCd bDAFCd HhDAFiiiCidD The following cycles are single coupling with 10 equivalents of monomer. Boc Depro/Single (10 eq.) Fmoc Depro/Single (10 eq.) 5-6 5 Cycles and Modules BDEFd bDEFd November 2001 Applied Biosystems The following cycles are single coupling with five equivalents of monomer followed by capping with a pre-mixed solution of acetic anhydride. Boc Depro/Single (10 eq.)/cap Fmoc Depro/Single (10 eq.)/cap PrPk Fmoc Depro/Single (10 eq.)/cap BDEFCd bDEFCd HhDEFiiiCidD The following cycles are single treatment with a material that is already in an activated form (for example, a solution containing fluorescein isothiocyanate). The cycle with the TFA deprotection requires a neutralization step. Boc Depro/Single (no 7 & 8) Fmoc Depro/Single (no 7 & 8) PrPk Fmoc Depro/Single (no 7 & 8) BDfDaFIIId bDaFIIId HhDaFIIIiiidD The previous cycles do not include capping. The following cycles may be written if capping is desired. Boc Depro/Single (no 7 & 8)/cap Fmoc Depro/Single (no 7 & 8)/cap PrPk Fmoc Depro/Single (no 7 & 8)/cap BDfDaFIIICd bDaFIIICd HhDaFIIIiiiCdD The following cycles are final deprotection cycles. The final deprotection is usually not performed when using the Boc protecting group. The Boc group is left on the resin and is removed during the cleavage. If one does not want to remove the final Boc group, then the syntheses is finished with a final DCM wash (module c) instead of modules BDc. Boc Final Depro Fmoc Final Depro PrPk Fmoc Final Depro BDc bDc HhDc The following cycles are final deprotection and acetylation cycles. After the deprotection, there are two treatments with the capping solution. After the second treatment, the acetylation is continued for an additional 5 minutes. Boc Final Depro & Acetylation Fmoc Final Depro & Acetylation PrPk Fmoc Final Depro & Acetylation November 2001 5 Cycles and Modules BDCCIDc bDCCIDc HhDCCIiDc 5-7 Applied Biosystems Fmoc Cycle, no monitoring Table 5-1. Fmoc Cycle described by modules Module b Module D Module A Module F Module C Module d Piperidine Deprotection 1st treatment = 2 min. 2nd treatment = 5 min. NMP Wash Read Cart, Add 7 & 8 Transfer & Coupling Capping 1 min. of capping NMP Wash from Act. Total Fmoc Cycle Time 8.7 min. 2.9 min. 1.2 min. 35.1 min. 1.6 min. 1.4 min. 50.9 min. Boc Cycle Table 5-2. Boc Cycle described by modules Module B Module D Module A Module F Module C Module d TFA Deprotection 1st treatment = 1 min. 2nd treatment = 4.1 min. NMP Wash Read Cart, Add 7 & 8 Transfer & Coupling Capping 1 min. of capping NMP Wash from Act. Total Boc Cycle Time 8.6 min. 2.9 min. 1.2 min. 35.1 min. 1.6 min. 1.4 50.8 min. Cycle Modifications Cycles often need to be modified to change times, number of washes, or other cycles parameters. Refer to Table 5-3 for a list of common cycle modifications. Table 5-3. Common Cycle Modifications If you want this: Longer or shorter TFA deprotections for the Boc deprotections Longer or shorter coupling times Longer or shorter capping times To change the number of NMP washes To change the amount of NMP in each wash 5-8 5 Cycles and Modules Then do this: Change the time in module B, step 71 (page 5-14) Change the loop count in Module F, step 29 (page 5-4) Change the time in Module C, step 8 Change the loop count in Module D, step 3 Change the time listed in Module D, step 7 November 2001 Applied Biosystems Deprotection Monitoring Difficulties arise when using monitoring at the small scales made possible by the 3 mL RV. Synthesis reagents and system electronics combine to generate a “background” conductivity value, which is referred to as a “noise baseline.” For example, a noise baseline of 700 units is typical for the 5-µmol scale. The initial Fmoc deprotection of such a small quantity of resin will generate only slight additional conductivity, for a total conductivity of perhaps 1000 units during the initial deprotection (Figure 5-2). The conductivity from the initial deprotection, which in this example is less than 50% above the background of 700, is difficult to discriminate from the background conductivity. Figure 5-2. Background and initial deprotection conductivity using 3 mL RV In larger syntheses, such as those using the 0.1-mmol scale, the signal-to-noise ratio is much higher. As deprotection continues, the conductivity above the noise baseline becomes progressively smaller and it becomes more difficult to detect changes, to the point that the system may be effective at detecting only very poor deprotections at the small scales. Because the signal-to-background ratio is small for the 5-, 10- and 20-µmol cycles, the Previous Peak Deprotection monitoring cycles have capping and extra NMP washes (Module D). The capping is included because uncoupled amino groups seem to cause an ion-exchange effect. The extra washing is included to make sure most of the conductive species from the coupling is removed. November 2001 5 Cycles and Modules 5-9 Applied Biosystems When you use the Previous Peak (PrPk) Fmoc Deprotection cycles, connect the conductivity cell between the bottom in-line filter and valve 10. If you use only the non-monitoring cycles, (Boc cycles and non-monitoring Fmoc Cycles), remove the conductivity cell and the small connecting tube to help minimize the volume between the valve block and the reaction vessel. When using a combination of Boc and Fmoc cycles, we recommend that you use non-monitoring Fmoc cycles. This is because the long-term effect of TFA on the conductivity cell is not known. Only the Previous Peak algorithm cycles are included on the disk contained in the 3 mL Reaction Vessel Kit. Before you use the 1st Peak–X algorithm, you must perform enough syntheses to obtain a confident estimate of the X value to use. For example, if the baseline is steady at 700, the X value to use could be 68 or 69. If the base line is not steady, then do not use the 1st peak–X algorithm. To change Module “H” from Previous Peak to 1st Peak–X, make the following changes: Step Function Description Change step 3 Fxn 110 Begin lower loop change time 2 to 1 step 24 Fxn 130 change to Monitor previous peak time = 1 Fxn 128 Monitoring first peak - X time = X value Fxn 130 change to Monitor previous peak time = 1 Fxn 128 Monitoring first peak - X time = X value Fxn 2 Vortex reaction vessel on time 5 to 120 step 50 step 57 To change Module “h” from Previous Peak to 1st Peak–X, make the following change: 5-10 Step Function Description Change step 15 Fxn 130 change to Monitor previous peak time = 1 Fxn 128 Monitoring first peak - X time = X value 5 Cycles and Modules November 2001 Applied Biosystems Example of a Deprotection Calculation Module H (Piperidine Deprotection - Previous Peak) determines the number of deprotections based on the measured conductivity monitoring values. At the end of the third deprotection, the value of the second and third deprotections are compared to see if they are within the limits defined by step 54 (End loop monitoring). SynthAssist uses the following formula to calculate whether three or four deprotections are used: Value of 2nd deprotect – Value of 3rd deprotect = Value of 2nd deprotect percentage If the percentage calculated is lower than 2.5%, then no more deprotections will occur. For example, if the values of the three deprotections are 995, 775, and 766, 775-766 then = 775 9 775 = 0.012 = 1.2% And only three deprotections will occur. However, if the values of the three deprotections are 903, 792, and 771, 792-771 then 792 = 21 792 = 0.026 = 2.6% And four deprotections will occur in Module H. If four deprotections occur in Module H, then Module h will become active. Note November 2001 You can modify the value in step 54 to change the sensitivity of the monitoring. A lower value will provide greater sensitivity. 5 Cycles and Modules 5-11 Applied Biosystems SynthAssist Dictionary You may use compounds with these cycles that are not in the SynthAssist Dictionary. For information on creating new amino acids or protecting groups in the Dictionary, refer to Chapter 5 of the SynthAssist 2.0 User’s Manual. For peptide nucleic acid monomers, enter into the Dictionary the formula and suggested code shown in Table 5-4. Table 5-4. Peptide Nucleic Acid Monomers Monomer Aaeg Formula C11 H15 N7 O3 Code One Letter Code = 1 Caeg C10 H15 N5 O4 One Letter Code = 2 Gaeg C11 H15 N7 O4 One Letter Code = 3 Taeg C11 H16 N4 O5 One Letter Code = 4 If you use benzyloxycarbonyl protection for monomers “A,” “C,” and “G,” remember to choose Z side-chain protection. Using the one-letter codes shown in Table 5-4 puts the four PNA monomers at the start of the palette rather than mixing them with the amino acids. 5-12 5 Cycles and Modules November 2001 Applied Biosystems Modules for 433A Peptide Synthesizer The modules described in this section are used for both Boc and Fmoc syntheses. The TFA deprotection for the Boc removal is written in module “B.” The piperidine deprotection for the Fmoc removal is written in module “b” when there is no monitoring and in modules “H” and “h” when there is conductivity monitoring. Module A: Read Cartridge and Add HBTU and DIEA µmol 10 20 Time (sec) 1 1 1 10 10 10 10 10 10 10 10 10 10 10 10 10 10 10 1 1 1 2 2 2 3 3 3 2 2 2 5 5 5 1 1 2 3 3 3 2 2 2 10 10 10 1 1 1 2 2 2 1 1 1 3 3 3 2 2 2 10 10 10 1 1 1 5/60* 5/60* 5/60* 5 Step 1 2 3 4 5 6 7 8 9 10 11 12 13 14 15 16 17 18 19 20 21 22 23 Fxn 1 4 6 7 8 5 14 9 10 70 78 98 69 10 63 99 60 98 68 10 63 99 60 Name Wait Read cartridge Needle up Eject cartridge Advance cartridge Needle down Flush bottom valve block with NMP to waste Flush top valve block with gas to waste Flush bottom valve block with gas to waste Flush bottom valve block with loop to waste Pressurize manifold Begin Loop UPPER Deliver HBTU to measuring loop (open) Flush bottom valve block with gas to waste Transfer measuring loop to cartridge End Loop UPPER Mix cartridge Begin Loop UPPER Deliver DIEA to measuring loop (open) Flush bottom valve block with gas to waste Transfer measuring loop to cartridge End Loop UPPER Mix cartridge * For PNA cycles, step 23, Mix Cartridge is 60 seconds November 2001 5 Cycles and Modules 5-13 Applied Biosystems Module B: TFA Deprotection Step 1 2 3 4 5 6 7 8 9 10 11 12 13 14 15 16 17 18 19 20 21 22 23 24 25 26 27 28 29 30 31 32 33 34 35 36 37 38 39 40 41 42 43 44 45 5-14 Fxn 1 12 55 40 2 10 3 73 75 76 11 9 42 49 42 41 72 40 1 41 12 55 41 11 45 2 9 10 73 74 73 13 14 12 11 9 10 76 3 41 42 41 72 40 1 Name Wait Flush bottom valve block with DCM to waste Deliver DCM to reaction vessel Mix reaction vessel Vortex reaction vessel on Flush bottom valve block with gas to waste Vortex reaction vessel off Vent TFA without gas Vent TFA with gas Pressurize TFA Flush top valve block with DCM to waste Flush top valve block with gas to waste Drain reaction vessel to waste Flow DCM through reaction vessel to waste Drain reaction vessel to waste Vent reaction vessel Deliver TFA to reaction vessel Mix reaction vessel Wait Vent reaction vessel Flush bottom valve block with DCM to waste Deliver DCM to reaction vessel Vent reaction vessel Flush top valve block with DCM to waste Deliver DCM to reaction vessel top Vortex reaction vessel on Flush top valve block with gas to waste Flush bottom valve block with gas to waste Vent TFA without gas Back-flush TFA Vent TFA without gas Flush top valve block with NMP to waste Flush bottom valve block with NMP to waste Flush bottom valve block with DCM to waste Flush top valve block with DCM to waste Flush top valve block with gas to waste Flush bottom valve block with gas to waste Pressurize TFA Vortex reaction vessel off Vent reaction vessel Drain reaction vessel to waste Vent reaction vessel Deliver TFA to reaction vessel Mix reaction vessel Wait 5 Cycles and Modules Time 1 1 4 2 1 6 1 2 2 15 2 3 10 10 10 2 15 2 2 2 2 1 2 2 1 1 3 10 5 3 2 1 1 2 2 6 6 15 1 3 10 2 15 2 2 November 2001 Applied Biosystems Step 46 47 48 49 50 51 52 53 54 55 56 57 58 59 60 61 62 63 64 65 66 67 68 69 70 71 72 73 74 75 76 77 78 79 70 81 82 83 November 2001 Fxn 41 12 55 41 11 45 2 9 10 73 74 73 75 74 73 13 14 98 12 11 10 9 99 9 10 2 3 41 42 12 55 40 2 3 41 42 49 42 Name Vent reaction vessel Flush bottom valve block with DCM to waste Deliver DCM to reaction vessel Vent reaction vessel Flush top valve block with DCM to waste Deliver DCM to reaction vessel top Vortex reaction vessel on Flush top valve block with gas to waste Flush bottom valve block with gas to waste Vent TFA without gas Back-flush TFA Vent TFA without gas Vent TFA with gas Back-flush TFA Vent TFA without gas Flush top valve block with NMP to waste Flush bottom valve block with NMP to waste Begin loop UPPER Flush bottom valve block with DCM to waste þFlush top valve block with DCM to waste þFlush bottom valve block with gas to waste þFlush top valve block with gas to waste End loop UPPER Flush top valve block with gas to waste Flush bottom valve block with gas to waste Vortex reaction vessel on Vortex reaction vessel off Vent reaction vessel Drain reaction vessel to waste Flush bottom valve block with DCM to waste Deliver DCM to reaction vessel Mix reaction vessel Vortex reaction vessel on Vortex reaction vessel off Vent reaction vessel Drain reaction vessel to waste Flow DCM through reaction vessel to waste Drain reaction vessel to waste 5 Cycles and Modules Time 2 2 1 2 2 1 1 3 10 5 6 2 4 4 3 2 2 3 2 2 2 2 1 6 6 180 1 3 5 1 4 2 5 1 2 10 10 10 5-15 Applied Biosystems Module C: Capping (1 minute) Step 1 2 3 4 5 6 7 8 9 Fxn 1 77 42 17 10 52 40 2 3 Name Wait Pressurize Cap Solution Drain reaction vessel to waste Flush bottom valve block with Cap Sol. to waste Flush bottom valve block with gas to waste Deliver Cap Solution to reaction vessel Mix reaction vessel Vortex reaction vessel on Vortex reaction vessel off Time 1 10 10 2 2 8 2 60 1 Module D: NMP Washes Step 1 2 3 4 5 6 7 8 9 10 11 12 13 14 Fxn 1 3 98 41 50 42 56 40 2 40 3 42 99 42 Name Wait Vortex reaction vessel off Begin loop UPPER Vent reaction vessel Flow NMP through reaction vessel to waste Drain reaction vessel to waste Deliver NMP to reaction vessel Mix reaction vessel Vortex reaction vessel on Mix reaction vessel Vortex reaction vessel off Drain reaction vessel to waste End loop UPPER Drain reaction vessel to waste Time 1 1 6 2 2 5 4 2 3 2 1 7 1 5 Module E: Read Cartridge and Add Two Times HBTU and DIEA 5 Step 1 2 3 4 5 6 7 8 9 10 11 12 13 5-16 Fxn 1 4 6 7 8 5 14 9 10 70 78 98 69 Name Wait Read cartridge Needle up Eject cartridge Advance cartridge Needle down Flush bottom valve block with NMP to waste Flush top valve block with gas to waste Flush bottom valve block with gas to waste Flush bottom valve block with loop to waste Pressurize manifold Begin Loop UPPER Deliver HBTU to measuring loop (open) 5 Cycles and Modules 1 10 10 10 10 10 1 2 3 2 5 2 3 µmol 10 Time 1 10 10 10 10 10 1 2 3 2 5 2 3 20 1 10 10 10 10 10 1 2 3 2 5 4 3 November 2001 Applied Biosystems 5 Step 14 15 16 17 18 19 20 21 22 23 November 2001 Fxn 10 63 99 60 98 68 10 63 99 60 Name Flush bottom valve block with gas to waste Transfer measuring loop to cartridge End Loop UPPER Mix cartridge Begin Loop UPPER Deliver DIEA to measuring loop (open) Flush bottom valve block with gas to waste Transfer measuring loop to cartridge End Loop UPPER Mix cartridge 5 Cycles and Modules 2 10 1 2 2 3 2 10 1 5 µmol 10 Time 2 10 1 2 2 3 2 10 1 5 20 2 10 1 2 2 3 2 10 1 5 5-17 Applied Biosystems Module F: Transfer, Clean Cartridge, and Couple Step 1 2 3 4 5 6 7 8 9 10 11 12 13 14 15 16 17 18 19 20 21 22 23 24 25 26 27 28 29 30 31 32 33 5-18 Fxn 1 5 98 41 96 2 3 99 40 2 62 98 67 62 99 98 65 60 24 62 99 98 67 62 99 62 60 61 98 2 3 41 99 Name Wait Needle down Begin loop UPPER Vent reaction vessel Transfer cartridge to reaction vessel (top closed) Vortex reaction vessel on Vortex reaction vessel off End loop UPPER Mix reaction vessel Vortex reaction vessel on Drain cartridge to waste Begin loop UPPER Deliver NMP to cartridge small needle Drain cartridge to waste End loop UPPER Begin loop UPPER Deliver NMP to cartridge Mix cartridge Transfer cartridge to activator Drain cartridge to waste End loop UPPER Begin loop UPPER Deliver NMP to cartridge small needle Drain cartridge to waste End loop UPPER Drain cartridge to waste Mix cartridge Vent cartridge Begin loop UPPER Vortex reaction vessel on Vortex reaction vessel off Vent reaction vessel End loop UPPER 5 Cycles and Modules Time 1 10 8 2 6 3 1 1 1 1 10 3 2 5 1 2 22 10 20 10 1 2 2 10 1 10 5 2 60 15 13 2 1 November 2001 Applied Biosystems Module G: DCM Washes Step 1 2 3 4 5 6 7 8 9 10 11 12 13 14 Fxn 1 3 98 41 49 42 55 40 2 40 3 42 99 42 Name Wait Vortex reaction vessel off Begin loop UPPER Vent reaction vessel Flow DCM through reaction vessel to waste Drain reaction vessel to waste Deliver DCM to reaction vessel Mix reaction vessel Vortex reaction vessel on Mix reaction vessel Vortex reaction vessel off Drain reaction vessel to waste End loop UPPER Drain reaction vessel to waste Time 1 1 5 (PNA = 2) 2 2 5 4 2 3 2 1 7 1 5 Module H: Piperidine Deprotection, Previous Peak Step 1 2 3 4 5 6 7 8 9 10 11 12 13 14 15 16 17 18 19 20 21 22 23 24 25 26 27 November 2001 Fxn 1 135 110 42 98 56 40 2 40 3 42 41 50 42 99 56 79 51 56 40 2 3 42 130 1 131 132 Name Wait Monitoring reset Begin loop lower Drain reaction vessel to waste Begin loop UPPER Deliver NMP to reaction vessel Mix reaction vessel Vortex reaction vessel on Mix reaction vessel Vortex reaction vessel off Drain reaction vessel to waste Vent reaction vessel Flow NMP through reaction vessel to waste Drain reaction vessel to waste End loop UPPER Deliver NMP to reaction vessel Pressurize piperidine Deliver piperidine to reaction vessel Deliver NMP to reaction vessel Mix reaction vessel Vortex reaction vessel on Vortex reaction vessel off Drain reaction vessel to waste Monitor previous peak Wait Monitoring stop Read monitoring peak 5 Cycles and Modules Time 1 1 2 7 3 3 2 2 2 1 7 2 3 7 1 2 10 3 2 2 120 1 2 1 3 1 1 5-19 Applied Biosystems Step 28 29 30 31 32 33 34 35 36 37 38 39 40 41 42 43 44 45 46 47 48 49 50 51 52 53 54 55 56 57 58 59 60 61 62 Fxn 111 133 42 98 56 40 2 40 3 42 41 50 42 99 56 79 51 56 40 2 3 42 130 1 131 132 134 10 40 2 3 42 41 50 42 Name End loop lower Begin loop monitoring Drain reaction vessel to waste Begin loop UPPER Deliver NMP to reaction vessel Mix reaction vessel Vortex reaction vessel on Mix reaction vessel Vortex reaction vessel off Drain reaction vessel to waste Vent reaction vessel Flow NMP through reaction vessel to waste Drain reaction vessel to waste End loop UPPER Deliver NMP to reaction vessel Pressurize piperidine Deliver piperidine to reaction vessel Deliver NMP to reaction vessel Mix reaction vessel Vortex reaction vessel on Vortex reaction vessel off Drain reaction vessel to waste Monitor previous peak Wait Monitoring stop Read monitoring peak End loop monitoring Flush bottom valve block with gas to waste Mix reaction vessel Vortex reaction vessel on Vortex reaction vessel off Drain reaction vessel to waste Vent reaction vessel Flow NMP through reaction vessel to waste Drain reaction vessel to waste Time 1 2 7 3 3 2 2 2 1 7 2 3 7 1 2 5 3 2 2 120 1 2 1 3 1 1 25 3 2 5 1 5 2 5 10 Module I: Vortex, 5 minutes Step 1 2 3 5-20 Fxn 1 2 3 Name Wait Vortex reaction vessel on Vortex reaction vessel off 5 Cycles and Modules Time 1 300 1 November 2001 Applied Biosystems Module a: Read Cartridge Step 1 2 3 4 5 6 7 8 9 10 Fxn 1 4 6 7 8 5 14 9 10 60 Name Wait Read cartridge Needle up Eject cartridge Advance cartridge Needle down Flush bottom valve block with NMP to waste Flush top valve block with gas to waste Flush bottom valve block with gas to waste Mix cartridge Time 1 10 10 10 10 10 1 2 5 5 Module b: Piperidine Deprotection, no monitoring Step 1 2 3 4 5 6 7 8 9 10 11 12 13 14 15 16 17 18 19 20 21 22 23 24 25 26 27 28 29 November 2001 Fxn 1 56 40 2 40 3 42 41 50 42 56 79 51 56 40 2 3 42 56 79 51 56 40 2 3 42 41 50 42 Name Wait Deliver NMP to reaction vessel Mix reaction vessel Vortex reaction vessel on Mix reaction vessel Vortex reaction vessel off Drain reaction vessel to waste Vent reaction vessel Flow NMP through reaction vessel to waste Drain reaction vessel to waste Deliver NMP to reaction vessel Pressurize piperidine Deliver piperidine to reaction vessel Deliver NMP to reaction vessel Mix reaction vessel Vortex reaction vessel on Vortex reaction vessel off Drain reaction vessel to waste Deliver NMP to reaction vessel Pressurize piperidine Deliver piperidine to reaction vessel Deliver NMP to reaction vessel Mix reaction vessel Vortex reaction vessel on Vortex reaction vessel off Drain reaction vessel to waste Vent reaction vessel Flow NMP through reaction vessel to waste Drain reaction vessel to waste 5 Cycles and Modules Time 1 3 2 5 2 1 5 2 5 10 2 10 3 2 2 120 1 10 2 5 3 2 2 300 1 5 2 5 10 5-21 Applied Biosystems Module c: Final DCM Washes Step 1 2 3 4 5 6 7 8 9 10 11 12 13 14 15 16 17 18 19 20 21 22 23 Fxn 1 12 9 10 98 55 40 2 40 1 3 42 41 49 42 99 42 29 22 11 12 10 9 Name Wait Flush bottom valve block with DCM to waste Flush top valve block with gas to waste Flush bottom valve block with gas to waste Begin loop UPPER Deliver DCM to reaction vessel Mix reaction vessel Vortex reaction vessel on Mix reaction vessel Wait Vortex reaction vessel off Drain reaction vessel to waste Vent reaction vessel Flow DCM through reaction vessel to waste Drain reaction vessel to waste End loop UPPER Drain reaction vessel to waste Flow DCM through activator to waste Drain activator to waste Flush top valve block with DCM to waste Flush bottom valve block with DCM to waste Flush bottom valve block with gas to waste Flush top valve block with gas to waste Time 1 1 2 2 6 5 2 1 2 5 1 5 2 3 10 1 30 5 30 1 1 10 10 Module d: NMP Wash from Activator Step 1 2 3 4 5 6 7 8 9 10 11 12 13 5-22 Fxn 1 98 3 28 42 38 40 2 40 99 22 3 42 Name Wait Begin loop UPPER Vortex reaction vessel off Pressurize activator Drain reaction vessel to waste Transfer activator to reaction vessel (top open) Mix reaction vessel Vortex reaction vessel on Mix reaction vessel End loop UPPER Drain activator to waste Vortex reaction vessel off Drain reaction vessel to waste 5 Cycles and Modules Time 1 3 1 4 7 6 1 3 2 1 5 1 7 November 2001 Applied Biosystems Module f: DIEA Neutralization Step 1 2 3 4 5 6 7 8 9 10 11 12 13 14 15 16 Fxn 1 3 98 42 56 40 78 68 43 56 40 2 40 3 99 42 Name Wait Vortex reaction vessel off Begin loop UPPER Drain reaction vessel to waste Deliver NMP to reaction vessel Mix reaction vessel Pressurize manifold Deliver DIEA to measuring loop (open) Transfer measuring loop to reaction vessel Deliver NMP to reaction vessel Mix reaction vessel Vortex reaction vessel on Mix reaction vessel Vortex reaction vessel off End loop UPPER Drain reaction vessel to waste Time 1 1 2 7 4 2 5 3 10 2 2 3 2 1 1 7 Module h: Conditional Deprotection, Previous Peak Step 1 2 3 4 5 6 7 8 9 10 11 12 13 14 15 16 17 18 19 Fxn 137 56 79 51 56 40 2 13 14 9 10 1 3 42 130 1 131 132 42 Name Do module if condition not met Deliver NMP to reaction vessel Pressurize piperidine Deliver piperidine to reaction vessel Deliver NMP to reaction vessel Mix reaction vessel Vortex reaction vessel on Flush top valve block with NMP to waste Flush bottom valve block with NMP to waste Flush top valve block with gas to waste Flush bottom valve block with gas to waste Wait Vortex reaction vessel off Drain reaction vessel to waste Monitor previous peak Wait Monitoring stop Read monitoring peak Drain reaction vessel to waste Time 1 2 10 3 2 2 1 2 2 5 5 600 1 2 1 3 1 1 10 Module i: Conditional Vortex, 5 minutes Step 1 2 3 November 2001 Fxn 137 2 3 Name Do module if condition not met Vortex reaction vessel on Vortex reaction vessel off 5 Cycles and Modules Time 1 300 1 5-23 Applied Biosystems Cycles using the new 0.5 mL measuring loop Because the new 0.5 mL measuring loop is made of smaller diameter tubing, the cycles using this new 0.5 mL measuring loop need to have the times in some functions changed, as compared to the cycles using the original 0.5 mL measuring loop. These functions are: • Fxn 23 - Transfer measuring loop to Act • Fxn 43 - Transfer measuring loop to RV • Fxn 63 - Transfer measuring loop to Cart • Fxn 68 - Deliver #7 to measuring loop • Fxn 69 - Deliver #8 to measuring loop • Fxn 70 - Flush bottom valve block to waste Table 5-5 shows the modifications that are made to the cycles that use the 0.5 mL Measuring Loop. These new cycles are included in the Variable Measuring Loop disk. The cycles that have been modified are from the SynthAssist Chemistry disk, version 2.0.3. Check to see if your 0.5 mL measuring loop fills in 6 seconds with Bottle 7 or 8 (Flow Tests, VML, modules “c” and “d”). This test should be done with the solution that is being used in the synthesis because the viscosity of the solutions affect the flow rate. If it is difficult to see the liquid as it fills the measuring loop, check for the appearance of the liquid at the waste tube (valve position 6, top of the 11-port valve block). If the time is less than 6 seconds, you might want to reduce the time of delivery for Fxn 68 and/or Fxn 69. Table 5-5 will provide the information on where Fxn 68 and 69 appear. In addition, if you have already modified the cycles previously provided in the SynthAssist Chemistry disk, then you need to modify the cycles to match the specifications shown in Table 5-5. Table 5-5. Changes to cycles on ABI 433A chemistry disk (version 2.03) FastMoc Cycles (0.10 & 0.25 mmol) 5-24 Module E: Transfer Step Fxn Name 5 70 Flush bottom valve block with loop contents to waste 7 68 Deliver #7 to measuring loop 8 63 Transfer measuring loop to Cart Time (sec) Old New 2 6 2 6 4 10 Module H: Load and Cap Step Fxn Name 27 69 Deliver #8 to measuring loop 28 43 Transfer measuring loop to RV Time (sec) Old New 3 6 4 10 5 Cycles and Modules November 2001 Applied Biosystems Module a: Activation & Transfer (Conditional cycles only) Step Fxn Name 29 70 Flush bottom valve block with loop contents to waste 31 68 Deliver #7 to measuring loop 32 63 Transfer measuring loop to Cart Time (sec) Old New 2 6 2 6 4 10 FastMoc Cycles (1.0 mmol) Module E: Transfer Step Fxn Name 4 70 Flush bottom valve block with loop contents to waste 6 68 Deliver #7 to measuring loop 7 23 Transfer measuring loop to Act Time (sec) Old New 2 6 2 6 2 10 Module H: Load and Cap Step Fxn Name 27 69 Deliver #8 to measuring loop 28 43 Transfer measuring loop to RV Time (sec) Old New 3 6 4 10 Module H: Load and Cap (monitoring cycles) Step Fxn Name 28 69 Deliver #8 to measuring loop 29 43 Transfer measuring loop to RV Time (sec) Old New 3 6 4 10 Fmoc/HOBt/DCC (0.10 mmol) November 2001 Module a: Activation Step Fxn Name 15 68 Deliver #7 to measuring loop 17 63 Transfer measuring loop to Cart 61 69 Deliver #8 to measuring loop 62 23 Transfer measuring loop to Act 64 23 Transfer measuring loop to Act Time (sec) Old New 3 6 6 10 3 6 3 10 3 5 Module h: Loading Step Fxn Name 45 69 Deliver #8 to measuring loop 46 23 Transfer measuring loop to Act 48 23 Transfer measuring loop to Act Time (sec) Old New 3 6 3 10 3 5 5 Cycles and Modules 5-25 Applied Biosystems Fmoc/HOBt/DCC (0.25 mmol) Module a: Activation Step Fxn Name 16 68 Deliver #7 to measuring loop 19 63 Transfer measuring loop to Cart 21 63 Transfer measuring loop to Cart 54 69 Deliver #8 to measuring loop 55 23 Transfer measuring loop to Act 57 23 Transfer measuring loop to Act Time (sec) Old New 3 6 6 10 6 5 3 6 3 10 3 5 Module h: Loading Step Fxn Name 45 69 Deliver #8 to measuring loop 46 23 Transfer measuring loop to Act 48 23 Transfer measuring loop to Act Time (sec) Old New 3 6 3 10 3 5 Boc/HOBt/DCC (0.10 mmol) Module a: Activation Step Fxn Name 21 68 Deliver #7 to measuring loop 23 63 Transfer measuring loop to Cart 61 69 Deliver #8 to measuring loop 62 23 Transfer measuring loop to Act 64 23 Transfer measuring loop to Act Time (sec) Old New 3 6 6 10 3 6 3 10 3 5 Boc/HOBt/DCC (0.50 mmol) Module a: Activation Step Fxn Name 34 70 Flush bottom valve block with loop contents to waste 37 68 Deliver #7 to measuring loop 40 63 Transfer measuring loop to Cart 73 70 Flush bottom valve block to waste 76 69 Deliver #8 to measuring loop 78 23 Transfer measuring loop to Act 80 23 Transfer measuring loop to Act 82 23 Transfer measuring loop to Act 5-26 5 Cycles and Modules Time (sec) Old New 2 6 3 6 5 10 2 6 3 6 2 10 2 5 2 5 November 2001 Applied Biosystems Flow Tests Folder The Flow Test folder contains three flow test files: • Flow Tests (New VML) • Flow Tests 1-18 (VML) • Flow Tests 19-23 Flow Tests (New VML) The Flow Tests (New VML) file contains 4 flow tests that are needed to install and check the variable measuring loop (VML) system. Flow Test a: Calibrate 0.125-mL VML This flow test is used when calibrating the 0.125-mL measuring loop, as described on page 3-6. When running this flow test, Bottle 8 is filled with NMP and the in-line filter to the cartridge is replaced with a flange coupling (P/N 110070). After the calibration of the 0.125-mL measuring loop is completed, calibrate the new 0.50-mL measuring loop. However, before starting a synthesis, remove the flange coupling and re-attach the in-line filter. This flow test uses an empty, tared cartridge, with the septum installed. The flow test fills the 0.125-mL measuring loop with NMP and delivers this NMP to the cartridge 10 times. Step 1 2 3 4 5 6 7 8 9 10 11 November 2001 Fxn 5 78 98 69 10 63 99 6 7 70 10 Name Needle down Pressurize manifold Begin Loop UPPER Deliver #8 to measuring loop (open) Flush bottom valve block with gas to waste Transfer measuring loop to cartridge End Loop UPPER Needle up Eject cartridge Flush bottom valve block with loop to waste Flush bottom valve block to waste 5 Cycles and Modules Time 10 15 10 5 2 10 1 10 10 5 5 5-27 Applied Biosystems Flow Test b: Calibrate 0.50-mL VML This flow test is used when calibrating the new 0.50-mL measuring loop, as described on page 3-9 of this manual. Perform this calibration immediately after calibrating the 0.125 mL loop. When running this flow test, Bottle 8 is filled with NMP and the in-line filter to the cartridge is replace with a flange coupling (P/N 110070). After the calibration of the measuring loop is complete and before a synthesis is started, remove the flange coupling and re-attach the in-line filter. This flow test uses an empty, tared cartridge, with the septum installed. The flow test fills the 0.50-mL measuring loop with NMP and delivers this NMP to the cartridge 4 times. Step 1 2 3 4 5 6 7 8 9 10 11 Fxn 5 78 98 69 10 63 99 6 7 70 10 Name Needle down Pressurize manifold Begin Loop UPPER Deliver #8 to measuring loop (open) Flush bottom valve block with gas to waste Transfer measuring loop to cartridge End Loop UPPER Needle up Eject cartridge Flush bottom valve block with loop to waste Flush bottom valve block to waste Time 10 15 4 8 2 10 1 10 10 5 5 Flow Test c: Test Bottle 7 VML Use this flow test after the 0.125-mL and 0.50-mL measuring loops are calibrated. They can be used with either of the two measuring loops. The objective of the flow test is to insure that the measuring loop can be filled when Bottle 7 is used. The flow test is very similar to Flow Test 7, which is described in the Model 433A User’s manual, except there is an additional step added (step 3, Fxn 1, Wait), which lets you check the waste line to make sure the liquid has completely filled the measuring loop. It does not matter what liquid is in Bottle 7. When the 0.125-mL measuring loop is attached, the loop should fill in 3 seconds. When the 0.50-mL measuring loop is attached, the loop should fill in 5 seconds. Step 1 2 3 4 5 6 7 5-28 Fxn 78 68 1 70 10 14 10 Name Pressurize manifold Deliver #7 to measuring loop (open) Wait Flush bottom valve block with loop to waste Flush bottom valve block with gas to waste Flush bottom valve block with #10 to waste Flush bottom valve block with gas to waste 5 Cycles and Modules Time 15 6 5 10 2 2 10 November 2001 Applied Biosystems Flow Test d: Test Bottle 8 VML This flow test is identical to flow test c, except it is to check the measuring loop when using Bottle 8. Step 1 2 3 4 5 6 7 Fxn 78 69 1 70 10 14 10 Name Pressurize manifold Deliver #8 to measuring loop (open) Wait Flush bottom valve block with loop to waste Flush bottom valve block with gas to waste Flush bottom valve block with #10 to waste Flush bottom valve block with gas to waste Time 15 6 5 10 2 2 10 Flow Tests (1-18 VML) The Flow Tests (1-18 VML) file contains the 18 flow tests described in the 433A User’s Manual. These flow tests are the identical, except for: • Module g: Flow Test 7 • Module h: Flow Test 8 • Module H: Flow Test 17 • Module I: Flow Test 18 In modules g and h, the time to fill the loop has been increased from 4 to 6 seconds. In modules H and I, the time to fill the loop has been changed from 3 to 6 seconds, and the time to deliver the loop contents to the cartridge has been increased from 5 to 10 seconds. Once the variable measuring loop has been installed, Flow Tests (1-18 VML) should be used instead of Flow Test 1-18. When Flow test 17 and 18 are used with the 0.125 mL measuring loop, only one quarter of the amount of solution shown in the ABI 433A User’s Manual (pages 6-31 through 6-32) will be obtained. Flow Tests 19-23 The Flow Tests 19-23 file is identical to the Flow Test 19-23 file that is described in the ABI 433A User's Manual. This file is included on the disk for your convenience. November 2001 5 Cycles and Modules 5-29 Applied Biosystems A Appendix Plumbing Schematics Installing the Measuring Loop for the 3 mL RV involves changing some of the tubes (also known as “plumbing”). The schematics on pages A-2 and A-3 show what the plumbing should look like after modifications are made. November 2001 A Appendix A-1 Applied Biosystems Figure A-1. Plumbing diagram for 0.125 mL configuration A-2 A Appendix November 2001 Applied Biosystems Figure A-2. Plumbing diagram for 0.500 mL configuration November 2001 A Appendix A-3 Applied Biosystems Index A cycles see also modules Boc/HOBt/DCC 0.10 mmol acetic anhydride in capping solution 4-5 activation 4-1 amino acid adding to cartridge 4-7 solutions using five equivalents 4-9 solutions using ten equivalents 4-11 5-26 Boc/HOBt/DCC 0.5 mmol 5-26 combination of Boc and Fmoc 5-10 FastMoc 0.10 & 0.25 mmol 5-24 FastMoc 1.0 mmol 5-25 final deprotection 5-7 final deprotection with acetylation 5-7 Fmoc & Boc 5-6 Fmoc/HOBt/DCC 0.10 mmol 5-25 Fmoc/HOBt/DCC 0.25 mmol 5-26 grouped by coupling 5-6 in SynthAssist 5-1 installing new software 2-3 modifications 5-8 on floppy disk 5-1 single couple 5-6 single couple with capping B Boc cycle times 4-3, 5-8 in situ neutralization 4-1 bottle position capping solution 4-5 DCM 4-6 DIEA 4-5 HBTU 4-6 NMP 4-6 piperidine 4-4 TFA 4-4 waste container 4-6 bracket, vortexer 2-3 5-6, 5-7 C calibration 3-6 capping solutions 4-5 cartridge adding amino acids 4-7 reusing 4-4 conductivity cell 2-4 monitoring 5-9 coupling concentration 4-2 volume 4-2 customer support. See technical support 1-3 cycle times Boc 4-3, 5-8 Fmoc 4-2, 5-8 November 2001 using activated material 5-7 using new 0.5 meas loop 5-24 D DCM bottle position 4-6 deprotection calculation 5-11 monitoring 5-9 diagram, plumbing A-1 dictionary 5-12 DIEA bottle position 4-5 concentration 4-2, 4-5 in capping solution 4-5 Documents on Demand 1-7 downloading. see resin Index E e-mail, address for technical support 1-3 equivalents, calculating 4-7 F filter, HBTU 4-6 Fmoc cycle times 4-2, 5-8 on HMP resins 4-6 folders on floppy disk 5-1 G gas-assisted tubing removal 3-3 glycosylated amino acids 4-10 H HBTU activation 4-1 bottle position 4-6 concentration 4-2, 4-6 filter 4-6 solutions 4-6 with HOBt 4-6 help. See technical support 1-3 HOBt in capping solution 4-5 I in situ neutralization 4-1 Internet address Documents on Demand 1-7 K kit, feedback monitoring 2-1 M manual content descriptions 1-1 User Attention Words 1-2 modifying cycles 5-8 1 Applied Biosystems modules see also cycles A-Read Cart & Add HBTU/ DIEA 5-3, 5-13 a-Read Cartridge 5-4, 5-21 b-Piperidine Deprotection 5-5, 5-21 B-TFA Deprotection 5-3, 5-14 C-Capping 5-3, 5-16 c-Final DCM Washes 5-5, 5-22 descriptions 5-3 D-NMP Wash 5-3, 5-16 d-NMP Wash from Activator 5-5, 5-22 E-Read Cartridge & Add Double HBTU/DIEA 5-3, 5-16 f-DIEA Neutralization 5-5, 5-23 F-Transfer, Clean & Couple 5-4, 5-18 G-DCM Washes 5-4, 5-19 h-Cond Deprotec, Prev Peak 5-5, 5-23 H-Piperidine Deprotection 5-4, 5-19 i-Conditional Vortex 5-5, 5-23 installing new software 2-3 I-Vortex 5-4, 5-20 monitoring 2-4, 5-9 monomer concentration 4-2 dissolving 4-7 PNA 2-1, 5-12 solutions 4-14 storage 4-7 table of volumes 4-9 N neutralization and coupling 4-1 NMP bottle position 4-6 density 3-6 in capping solution 4-5 2 P U peptide nucleic acid (PNA) background 4-12 dictionary 5-12 monomer solutions 4-14 monomers 2-1 peptide, test 2-4 piperidine, bottle position 4-4 plumbing schematic A-1 PNA. see peptide nucleic acid pyridine in capping solution 4-5 User’s Manual. see manual R reagents, concentrations of 4-2 recessed tab filter 2-3 resin concentration 4-2 lowering substitution 4-13 RTF. see recessed tab filter V variable measuring loop 0.125 mL calibrating 3-6 configuration 3-6 0.5 mL calibrating 3-9 configuration 3-10 equipment required 3-1 folder 5-2 installation procedure 3-3 tubing connecting 3-5 gas-assisted removal 3-3 removing 3-3 vortexer bracket 2-3 W S schematic, plumbing A-1 solvent consumption 4-3 SynthAssist 5-1 dictionary 5-12 synthesis example 4-18 setup (checklist) 4-15 test 2-4, 4-18 waste container 4-6 WWW address Applied Biosystems 1-7 Documents on Demand 1-7 T technical support 1-3–1-8 e-mail address 1-3 Internet address 1-7 telephone/fax 1-4–1-6 test synthesis 2-4 TFA bottle position 4-4 3 mL RV assembly 2-5 caps-marks on 2-3 closing and tightening 2-5 filter 2-2, 2-5 installation checklist 2-3 non-interchangeability 2-3 system requirements 2-1 tubing, gas-assisted removal 3-3 Index November 2001 Headquarters 850 Lincoln Centre Drive Foster City, CA 94404 USA Phone: +1 650.638.5800 Toll Free: +1 800.345.5224 Fax: +1 650.638.5884 Worldwide Sales Offices Applied Biosystems vast distribution and service network, composed of highly trained support and applications personnel, reaches into 150 countries on six continents. For international office locations, please call our local office or refer to our web site at www.appliedbiosystems.com. www.appliedbiosystems.com Applera Corporation is committed to providing the world’s leading technology and information for life scientists. Applera Corporation consists of the Applied Biosystems and Celera Genomics businesses. Printed in the USA, 11/2001 Part Number 904323B an Applera business