1
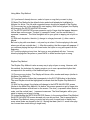
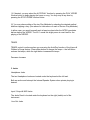
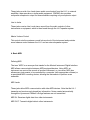
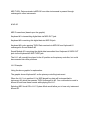
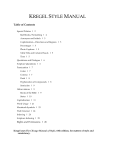
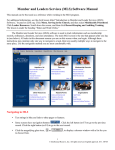
KAWAI
LH-1
Digital Piano/Organ
Owner’s Manual
Introduction
THANK YOU FOR PURCHASING A
Kawai LH-1 Digital Piano/Organ
The LH-1 Digital Piano/Organ is a revolutionary new keyboard instrument that features
exceptional piano/organ sound, a powerful 10-speaker sound system and an attractive,
highly functional cabinet design. The LH-1 keyboard provides the touch response and
full dynamic range required for superb control as you play. In addition, the LH-1
includes a special “Hymns and Children’s Songs” feature that allows anyone,
regardless of musical ability, to play up to 176 favorite hymns and children’s songs of
the Church.
This Owner's Manual contains valuable information that will help you make full use of
the many capabilities of the LH-1. There are two main sections in the manual. The first
is the Basic Operations section that explains the basic operating features of the LH-1.
This section describes the use of the various front panel components – buttons,
sliders, and jacks and their operation. Please read this section first if this is your first
experience with a digital instrument.
The second section teaches you how to play the 176 Hymns & Children’s Songs built
into the LH-1. This section is written in tutorial form and will walk you through this
unique feature step-by-step.
Please read all sections carefully and keep this manual handy for further reference.
We hope you will enjoy learning how to use your LH-1 Digital Piano/Organ.
LH-1 Digital Piano/Organ
Table of Contents
1. Important Safety Information Page 5
2. Basic Operations Page 9
This section explains the basic layout and function of the operating controls, including
a brief explanation of these controls and their associated systems.
3. Hymns & Children’s Songs Page 16
This section provides a step-by-step explanation of this feature that allows those who
lack keyboard skills to play any of the 176 Hymns and
Children’s Songs built into the LH-1.
4. Jacks Page 17
This section identifies the location and operation of all input/output jacks.
5. Basic MIDI Operation Page 19
This section provides introduction to MIDI, including basic connections and operational
use of the LH-1 with other MIDI devices.
6. System Mode Page 23
This section explains System parameter modification. The System Mode feature
provides versatile musical enhancements to the LH-1.
Kawai Model LH-1
READ and SAVE THESE INSTRUCTIONS
PERTAINING TO RISK OF ELECTRIC SHOCK, FIRE OR PERSONAL INJURY
Text Box: Important Safety Information
Text Box: The lightening symbol is to alert the user to the presence of un-insulated
“dangerous voltage” within the enclosure that could be of a magnitude to constitute
electric shock to persons
Text Box: The exclamation point symbol is to alert the user to the presence of
important operating and maintenance instructions in the accompanying literature
European Immunity
For European Immunity, Radiation and Safety information see “Declaration of
Conformity.”
1. Basic Operations
Setting Up the LH-1
Consider instrument placement before playing the LH-1:
For best sound quality, the instrument should be placed in an open area and should
not be confined or surrounded by walls, curtain screens or similar furniture.
The Bass sounds radiate virtually 360 degrees around the base of the LH-1.
Mid-range and treble sounds project at a wide angle from the top rear of the instrument
(the side away from the player).
Additionally, there are hidden monitor speakers at each end of the control button panel
that project sound toward the player.
AC Power
The LH-1 is supplied with a three-wire attached AC power cord. Plug this instrument
into a properly wired three-wire grounded AC outlet only.
Power Switch
The Power On Button is located on the left (bass) end of the front panel. Press this
button one time to turn power ON. Press it again to turn power OFF.
If you haven’t already done so, press the power button to turn on power.
Volume Control
Adjust the VOLUME SLIDER to a minimum low level when you first turn on the
instrument especially when using headphones. Then, adjust volume upward to a
comfortable listening level.
Master Volume Control
Note that overall volume can be adjusted using the MASTER VOLUME knob located
underneath the keyboard on the right side of the instrument. MASTER VOLUME is the
primary volume control. All other volume controls (Volume Slider and Expression
Pedal) will only adjust volume within the overall limit set by the MASTER VOLUME
knob.
Organ Expression Pedal
Located to the right of the three piano pedals at the base of the LH-1 is the ORGAN
EXPRESSION PEDAL. This pedal allows the player to control the volume level of
organ sounds only with the right foot while playing notes on the keyboard. The ORGAN
EXPRESSION PEDAL is not active when Piano Sounds are selected.
Playing the Instrument
When the LH-1 is first powered on, the Display Screen at the center of the operating
panel will move through two introductory screens. After these screens disappear, the
Sound Selection Screen will indicate that the ORGAN 1 Sound (Soft Strings) is active.
The red light on the ORGAN 1 Button should also be lit to indicate that the ORGAN 1
Sound is selected. ORGAN 1 is always the default sound at power up.
Play any key or chord and adjust the volume slider upward or downward to a
comfortable listening level. If the volume seems too low, use the Organ Expression
Pedal to raise the volume as desired. If volume is still too low, adjust the MASTER
VOLUME knob until you reach the desired listening level.
Selecting Organ Sounds
You may select any one of five (5) individual preset ORGAN sounds by pressing the
appropriate Organ Sound Button. The lamp on the selected button will light when a
Sound Button is pressed. The Sound Selection Screen in the DISPLAY should confirm
the desired sound selection.
Select any one of the five organ sounds
Organ 1 is SOFT STRINGS. Organ 2 is MELLOW FLUTES. Organ 3 is MEDIUM
ENSEMBLE.
Organ 4 is LOUDER ENSEMBLE. Organ 5 is FULL ENSEMBLE
Using the Bass Coupler
The BASS COUPLER Button adds a single Bass Note to any selected Organ Sound.
The added Bass Note is one octave below the lowest note currently being played. If
you haven’t already done so, press the BASS COUPLER Button.
The lamp on the button should light and the Sound Selection Screen will change to
indicate the BASS COUPLER feature has been selected. You should hear the lower
bass tone with the first notes played after the BASS COUPLER feature has been
activated.
Important:
The BASS COUPLER feature will only operate with notes played on the G above
Middle C and below. (This G is found below the Display function button #6, see graphic
on page 14). The Bass Coupler will not accompany any notes played above this G.
The BASS COUPLER feature will not operate with the HYMNS & CHILDREN’S
SONGS feature.
The BASS COUPLER feature may be more difficult to hear when using the ORGAN 4
and ORGAN 5 sounds, since these sounds inherently contain more bass component.
Select Piano Sounds or Press one of the two Piano Sound buttons.
Piano 1 is BRIGHT CONCERT GRAND PIANO. Piano 2 is MELLOW GRAND PIANO.
When either of these buttons is pressed, the associated lamp will light and the selected
sound name will appear in the Display.
Like an acoustic piano, the LH-1 keyboard is responsive to touch and expression
when playing Piano 1 or Piano 2. Striking the keys with hard pressure will produce loud
volume. Touching the keys gently will produce a quiet volume. The awarding-winning
Concert Grand Piano tone used in the LH-1 is a reproduction of Kawai’s flagship EX
Concert Grand Piano, chosen by winners and finalists of major piano competitions
around the globe.
Reverb
Each of the seven sounds in the LH-1 has been assigned a preset level of Reverb.
However, these settings can be adjusted for each sound. Select a Piano or Organ
sound and play a note or chord while listening for the Reverb level. Use the LEFT
Select Buttons to adjust the Reverb level for the Piano sounds. Use the RIGHT Select
Buttons to adjust the Reverb level for the Organ sounds. The bottom Select Button is
(0) level or Reverb OFF. Higher Select Buttons provide increasingly more Reverb
level. Each sound can have its own Reverb level during a given playing session.
However, all Reverb settings will return to the original preset levels when the LH-1 is
turned off.
Using the Piano Pedals
The LH-1 piano has three (3) pedals, identical to those found on an acoustic Grand
Piano.
SOFT SOSTENUTO SUSTAIN
Sustain Pedal
Depressing the SUSTAIN PEDAL causes sound to be sustained even after you
remove your hands from the keyboard.
Sostenuto Pedal
Pressing this pedal after pressing the keyboard and before releasing the keys, sustains
the sound of only the keys that have just been played.
Soft Pedal
Depressing this pedal softens the character and volume of the selected piano voice.
Transpose
The TRANSPOSE function can be activated with any sound, or with the HYMNS &
CHILDRENS SONGS feature. The TRANSPOSE function changes the keyboard pitch
by semitones, down (–) 12 semitones or up (+) 12 semitones.
Select Pitch: or Return to Standard Pitch: and
Choose any one of the sounds. Then, press the left TRANSPOSE button one (1) time.
Notice that a “C” key will be heard as a “B” note. The pitch of the LH-1 has been
shifted downward by one semitone. The lamp in the left TRANSPOSE button will light
to alert you that the TRANSPOSE feature is activated. Also, a box in the Display will
appear to tell you that the LH-1 is transposed down one semitone (TRANSPOSE –1).
Now press the right TRANSPOSE button one (1) time. The LH-1 will return to standard
pitch, the lamp on the TRANSPOSE button will go off, and the TRANSPOSE box in the
Display will disappear. When you press the right TRANSPOSE button again, the pitch
will be raised by one semitone (so a played “C” will be heard as a “C#”). The lamp in
the right TRANSPOSE button will light and a box in the Display will appear showing
TRANSPOSE
+1.
NOTE: To return to standard pitch at any time, press both TRANSPOSE buttons
simultaneously. The lamps will go out to indicate standard pitch.
2. Hymns & Children’s Songs
The unique Hymns & Children’s Songs feature allows anyone lacking in keyboard skills
to play any of 176 selected Hymns and Children’s Songs. The following section will
walk you through this feature step by step.
Display Panel
Information shown in the Display guides you through all the various operations of the
LH-1, and will be particularly helpful in leading you through the Hymns & Children’s
Songs feature.
DISPLAY PANEL
Enter/Exit
Button Descriptions
The Left and Right SELECT BUTTONS on either side of the Display are used to select
a Song, Category or other feature from the various menus that will be presented in the
Display. The seven Function Buttons (below the Display) often work in pairs to allow
you to select Up/Down or Left/Right for a particular function. The Display will show
clearly which functions are assigned to each Function Button at any time. Note that the
currently active function will be highlighted.
The rightmost Function Button (#7) will usually be assigned BACK functions. The
ENTER/EXIT button is used to enter or exit the Hymns & Children’s Songs feature.
Text Box: Left
Select
Buttons
Text Box: Right
Select
Buttons
Text Box: 1 2 3 4 5 6 7
Function Buttons
Song Selection
If you haven’t already done so, press the ENTER/EXIT button to activate Hymns &
Children’s Songs.
The Display will present the following screen with a selection of Hymns and Children’s
Songs from which to choose:
(Function Buttons)
SEARCH BY NAME – This is the first of three search methods that allow you to scroll
through the available hymn or song titles in alphabetical order. Note that the
SEARCH BY NAME box at the bottom of the Display is highlighted to indicate that this
method is active. Use the two leftmost Function Buttons to scroll up or down through
the various titles. When you find the desired title, press the corresponding left or right
Select Button to choose that title. The title and number of the selected hymn or song
will appear in the Display.
Press the Function Button corresponding to the BACK box at any time to exit the Hymn
Title screen and return to search screen or to the Sound Selection Screen.
SEARCH BY CATEGORY – If you prefer to select hymns or songs by category, press
the Function Button that corresponds with the CATEGORY SEARCH box in the
Display. The box will become highlighted with up and down arrows to show that this
search method (shown as SEARCH BY CATEGORY) is now active.
Immediately, the Display will change to show the first set of ten categories. There are a
total of 20 categories in all. To select the next ten categories, press the Function
Button that corresponds to the UP arrow in the CATEGORY SEARCH box. The
second set of categories will appear.
The complete list of categories is found below:
1. Children’s Songs 11. Plan of Salvation
2. Faith and Repentance 12. Praise and Worship
3. Family History & Temple Work 13. Prayer & Supplication
4. Funeral, Hope and Comfort 14. Priesthood & Women
5. God the Father and Holy Ghost 15. Prophets
6. Home and Family 16. Restoration of the Gospel
7. Jesus Christ as Example 17. Sacrament & Atonement
8. Jesus Christ as Savior 18. Second Coming of Christ
9. Missionary Work 19. Service, Love & Charity
10. Other Favorites 20. Special Occasions
If you haven’t already done so, use one of the Select Buttons to select a Category.
Immediately, the list of hymns in the selected Category will appear in alphabetical
order. To select a hymn, press the Select Button that corresponds to the desired title.
Upon selection, the hymn title and number will immediately appear in the display. Use
the BACK button at any time to return to the list of Hymns and Songs or to the
Category list for another song selection. You can also exit Hymns & Children’s Songs
at any time by pressing the ENTER/EXIT button or by pressing the BACK button three
(3) times.
SEARCH BY NUMBER – Hymns and children’s songs can also be selected by the
hymn number found in the LDS Hymn Book or the song page found in the LDS
Children’s Song Book. This search method makes it easy to select a hymn using the
LDS Hymn Book or the Children’s Song Book as your reference guide.
Note: In cases where the hymn number and children’s song page are the same, both
numbers will appear with their titles.
To search by hymn or song number, press the function button that corresponds to the
NUMBER SEARCH box in the Display. The box will immediately change to SEARCH
BY
NUMBER and will show all titles by hymn or song number in increasing numerical
order.
To select a hymn or song, use the Select Buttons to select the desired number. Once
selected, the hymn or song title and number will appear in the display.
Note: You can use the BACK button feature at any time to return to the list of hymns or
songs or number list for another song selection. You can also exit Hymns & Children’s
Songs at any time by pressing the ENTER/EXIT button or by pressing the BACK
button two or three times.
PLAYING HYMNS & CHILDREN’S SONGS
Once you have selected a hymn or children’s song, there are three different ways to
play it using the Hymns & Children’s Songs feature:
AUTOPLAY: You can play any hymn or children’s song automatically. Simply select a
song and press the PLAY button. The selected hymn or song will immediately play
back.
METER PLAY METHOD: You can play a hymn or song by tapping any key on the LH1 keyboard in “straight meter” (that is, with evenly spaced beats). Your tapping will
control both the tempo and the volume of the song’s playback. In essence, the
Meter Play Method allows you to “conduct” the hymn or children’s song.
RHYTHM PLAY METHOD: You can play a hymn or song by tapping any key with a
prescribed rhythm that corresponds to the melody of the selected hymn or song.
The “Note Navigator” feature in the Display will guide you in playing the proper rhythm.
AUTOPLAY
Once you have selected a hymn or children’s song, you can play it back easily using
the AutoPlay method. Simply press the function button that corresponds to the PLAY
VERSE button in the Display. When this button is pressed, the selected hymn or song
should begin to play immediately. (The song can be stopped at any time by pressing
the STOP VERSE button). Also, you can press the BACK function button to return to
the hymn or song list for another selection.
Pressing the PLAY VERSE function button again will re-start playing of the hymn or
song from the beginning.
METER PLAY METHOD
There are two different “tap methods” available in the LH-1. Both methods allow you to
“tap” out a hymn or song on the keyboard. Your tapping will control both tempo and
volume of the song’s playback.
The first of the two methods, called the Meter Play Method, allows you to play a hymn
or song by tapping any key on the LH-1 keyboard in “straight meter” (that is, with
evenly spaced beats… similar to “conducting”).
Using Meter Play Method
(1) If you haven’t already done so, select a hymn or song that you want to play.
(2) Meter Play Method is the default choice and should already be highlighted to
indicate it is active. The title with suggested tempo should also appear in the Display.
(3) Choose any key on the keyboard to start tapping. With first key played, the Display
will change to the NOTE NAVIGATOR screen.
(4) The NOTE NAVIGATOR screen presents a grid of large dots that appear between
vertical bars on the screen. The dots (•) represent “beats,” and the vertical bars ( .)
represent “measures.” The Note Navigator will be your guide to tapping out a hymn or
song.
(5) With each keystroke, the dots (•) change to a large plus mark (+) after a note is
played.
Be sure to play with even beats – only one key at a time. Continue playing to the end,
where you will see a double bar ( ..). After this marking, the title screen will reappear. If
you continue playing the keys with even beats, the hymn or song will repeat from the
beginning.
(6) If you stop playing at any time, the hymn or song playback will stop. You may
resume playing after the pause or press BACK to select another hymn or song.
Rhythm Play Method
The Rhythm Play Method is also an easy way to play a hymn or song. However, with
this method, the technique for tapping requires you to use a prescribed rhythm that
corresponds to the melody of the selected hymn or song.
(1) Choose a song to play. The Display will show a title, number and tempo (similar to
the Meter Play Method).
(2) Press the function button that corresponds to the RHYTHM button in the display.
The word Rhythm should be highlighted to indicate that the Rhythm Play Method is
active.
(3) With first key played, the display will change to the NOTE NAVIGATOR screen
(similar to the Meter Play Method). As before, this screen presents a grid of large dots
that appear between vertical bars on the screen. The dots (•) represent either beats or
notes, and the vertical bars ( .) represent measures. The Note Navigator will be your
guide to tapping out a hymn or song.
(4) Understanding the NOTE NAVIGATOR Screen: In the previous Meter Play Method,
the NOTE NAVIGATOR screen showed only one dot per beat. That is appropriate for
the Meter Play Method; since you would tap only once for each beat no matter how
many actual notes are played by the LH-1 during that beat (the LH-1 would often play
two or even three notes during a single beat).
In the Rhythm Play Method, the NOTE NAVIGATOR screen will ask you to tap actual
rhythms rather than even beats. Therefore, you will sometimes see two or more dots
(set closer together) in the space of one beat. In these cases, you would tap the
indicated number of times within that single beat. (Examples: A Mighty Fortress #68, A
Child’s Prayer #12).
At other times, you will see “empty” spaces within a single beat, or some combination
of dots and empty spaces. The empty spaces indicate “rests” where no tap should
occur. The dots will usually be placed at the beginning (left side) or end (right side) of a
beat, adjacent to the “empty” space. This dot placement will tell you whether to tap at
the beginning or end of that beat. (Example: As Sisters in
Zion #309, see second line, second beat).
In musical terms, the use of multiple dots is equivalent to eighth notes or, in some
cases, eighth note triplets. The placement of dots in the NOTE NAVIGATOR screen
will help to introduce novice players to the concept of reading musical rhythms. Once
the player has mastered the Rhythm Play Method using this screen, the next step in
developing your keyboard skills and reading musical notation should be much easier.
Choose any key on the keyboard and begin playing this key repeatedly at the
suggested tempo and note spacing shown on the NOTE NAVIGATOR screen. In
addition, play with some expression. Imagine you are singing the song. Often, the way
you “tap” the keys will be very similar to the way you would “sing” the song.
This concept should help in developing your technique with the Rhythm Play Method.
Again, be sure to play only one key at a time.
With each keystroke, the Dots (•) change to a large plus mark (+) after a note is
played. Continue playing to the end, where you will see a double bar ( ..). After this
marking, the title screen will reappear. If you continue playing the keys in the
appropriate rhythm, the hymn or song will repeat from the beginning.
If you stop tapping at any time, the hymn or song will stop. You may resume tapping
after the pause or press BACK to select a different hymn or song.
INTRO
Each hymn or song is equipped with its own introduction, or INTRO. The built-in
INTROs vary in length. Some are short (4 measures) and others are long (up to 8
measures). To start with the INTRO, press the function button that corresponds with
the PLAY INTRO box in the Display. The INTRO will play immediately after the button
is pressed. After INTRO is finished, the sound stops while the LH-1 waits for you to
select either the AUTOPLAY
Method or one of the two Play Methods (Meter Play or Rhythm Play) as follows:
(1) If desired, you may select the AUTOPLAY function by pressing the PLAY VERSE
function button to begin playing the hymn or song. You may stop at any time by
pressing the STOP VERSE function button.
(2) You may choose either of the two Play Methods by selecting the desired method
and then tapping a key. (See above for instructions on each of the two Play Methods.)
In either case, you would normally wait at least one beat after the INTRO concludes
before starting the VERSE. The LH-1 needs this slight pause to reset itself for the
playing of the VERSE.
TEMPO
TEMPO control is active anytime you are using the AutoPlay function of the Hymns &
Children’s Songs feature. Press either button to change the tempo – the left button
reduces the tempo; while the right button increases the tempo.
Decrease Increase
3. Jacks
Headphone Jacks
The two Headphone Jacks are located under the keyboard at the left end.
Both are active and interrupt the Internal Speaker System when private playing is
desired.
Input / Output & MIDI Jacks
The Jacks Panel is located under the keyboard on the right (treble) end of the
instrument.
Line Out Jacks
These jacks provide Line Level stereo audio sound output from the LH-1 to external
amplifiers, tape recorders or similar audio equipment. L/MONO also provides
composite monophonic output for those situations requiring only monophonic output.
Line In Jacks
These jacks receive Line Level stereo sound from the audio outputs of other
instruments or equipment, which is then heard through the LH-1 speaker system.
Master Volume Control
This control sets the maximum overall volume level of the instrument and provides
some balance control between the LH-1 and an external speaker system.
4. Basic MIDI
Defining MIDI
The term “MIDI” is an acronym that stands for the Musical Instrument Digital Interface.
MIDI allows communication between MIDI-equipped devices. Using MIDI, an
instrument can control the sounds of another instrument, or vice versa. MIDI also
allows many instruments to be controlled by a computer (with appropriate software) or
a specialized MIDI recording device, allowing the instruments to perform as an
ensemble.
MIDI Jacks
These jacks allow MIDI communication with other MIDI devices. Note that the LH-1
transmits and receives only played key information. Notes created automatically
through the Hymns and Children’s Songs features are not transmitted.
MIDI IN: Receives digital data from other instruments.
MIDI OUT: Transmits digital data to other instruments.
MIDI THRU: Data received via MIDI IN from other instruments is passed through
unchanged to other instruments.
#1 #2 #3
MIDI Connections (based upon the graphic)
Keyboard #1 is transmitting digital data via MIDI OUT jack.
Keyboard #2 is receiving this digital data via MIDI IN jack.
Keyboard #2 is also passing THRU Data received via MIDI IN from Keyboard #1
unchanged to Sound Module #3
Sound Module #3 is receiving the digital data transmitted from Keyboard #1 MIDI OUT
jack via the Keyboard #2 MIDI THRU jack.
The LH-1 will normally be placed in the #1 position as the primary controller, but could
be connected into other positions.
LH-1 Example:
Using the above graphic for explanation:
The graphic shows Keyboard #1 as the primary controlling instrument.
When the LH-1 is in position #1, its MIDI played key data will be transmitted to
instrument #2, which also passes THRU unchanged to #3. You could select sounds in
#2 and #3 and hear these sounds while playing the LH-1.
Selecting MIDI Local Off in LH-1 System Mode would allow you to hear only instrument
#2 and #3.
5. System Mode
The SYSTEM MODE screen allows you to modify the LH-1’s Operating System
settings – including Speaker Assignments, MIDI and Musical Tuning, and Restore
Factory Settings. Always enter the System Mode from the normal operating mode. You
cannot enter System Mode from the Hymns and Children’s Songs feature.
Entering System Mode
To enter SYSTEM MODE, press and hold the first two function buttons (located below
the Display) for about 2 to 5 seconds, or until the Display changes.
+
(Hold down both buttons simultaneously)
The top line of the screen will indicate that you are in SYSTEM MODE. The three
SYSTEM Settings will be displayed. Press Function Button #7 (BACK) to return to a
previous LCD screen or to exit the System Mode.
NOTE: Any changes you make while in SYSTEM MODE are not permanent and can
be changed again later or restored to factory defaults. You may exit any screen without
making changes by pressing the BACK function button until you exit the System Mode.
1. Speaker Assignment
Press the SPEAKER ASSIGNMENT button and the Display changes to a menu
showing the seven selectable sounds. Piano sounds are shown on left side. Organ
sounds are shown on right. Any sound you choose will offer these same options.
2. Change Assignment
After you have entered SYSTEM MODE and have selected Speaker Assignment using
the appropriate select button, the Display will show the seven PIANO and ORGAN
sounds. Press the PIANO 1 select button. The Internal box will be highlighted to
indicate that the LH-1’s Internal Speaker System is now active for this sound. Press
the All Speakers function button to change this assignment. Once All Speakers is
selected, the LH-1 will send sound to both the Internal Speakers and the External
Outputs (where optional External Powered Speakers can be connected).
Now, press the BACK button three (3) times. With the third press, a window will open
that says “Saving the Data Please Wait !” Once this statement disappears, the change
will have been made in the LH-1’s computer memory. The PIANO 1 sound will then be
heard through the Internal Speakers and any optional External Powered Speakers that
are connected to the Line Out jacks.
If you re-enter the SYSTEM MODE to check the Speaker Assignment, you should see
that the All Speakers box is highlighted for PIANO 1. To return to the original setting,
select Internal and press the BACK button three (3) times to save the new setting and
exit.
You can use this process to select a separate Speaker Assignment for each of the
LH-1’s seven sounds.
Internal
Choose Internal to hear the LH-1 sounds only through the Internal Speaker System.
This is the default Factory Setting for the two PIANO sounds.
External
Choose External to hear the LH-1 using only an optional External Speaker System that
may be connected to the LH-1’s Audio Output Jacks located under the right side of the
keyboard. Choosing External disconnects the LH-1’s internal speaker system.
External assignment will normally be used with ORGAN sounds.
Note: Do not choose External if there is no External Speaker System connected to the
LH-1.
All Speakers
Choose All Speakers to hear the LH-1 using both the Internal Speaker System and an
optional External Speaker System connected to the LH-1. Choosing All Speakers will
give you maximum sound power distribution. This is the default Factory Setting for all
ORGAN sounds.
Note: You must change Speaker Assignments individually for each sound. There is no
global assignment.
Piano Sounds
When either of the two piano sounds is selected, Internal is the default as indicated by
the highlighted box. Piano sounds will normally sound best using the Internal Speaker
System.
The LH-1’s powerful amplification system should be adequate for a larger room or
small auditorium. However, if used in a large to extra-large auditorium, you may want
to add an External Speaker System. Then, you should choose External or All Speakers
to obtain the best overall balance of sound.
Organ Sounds
When any ORGAN sound is selected, All Speakers are in the default setting as
indicated by the highlighted box. The powerful amplification system within the LH-1
should be adequate
for a larger room or small auditorium. ORGAN sounds are sometimes played with
more power and expression than PIANO sounds. Therefore, in a large to extra-large
auditorium, you may want to add an External Speaker System. Then, you should
choose External or All Speakers to obtain the best overall balance of sound.
2. MIDI/Tuning Functions
Enter SYSTEM MODE (see above), then press the “MIDI/Tuning Functions” Select
Button. The LCD Display will change to the screen below:
NOTE: After making any change in the MIDI/Tuning Functions, press the BACK button
two (2) times to save and exit.
MIDI Channel
The number below the word Channel in the Display is the current operating MIDI
Channel. Note also the MIDI Channel box in the lower left corner of the Display. Press
either the DOWN or UP ARROW function button to change the MIDI Channel from one
(1) to sixteen (16) or MIDI OFF.
NOTE: The LH-1 transmits or receives played key data only. Transmit and
Receive Channels cannot be assigned individually. The default is Channel 1.
MIDI Channel 1 to 16: Press the DOWN or UP ARROW to change the MIDI Channel.
A MIDI channel is chosen to send or receive MIDI data when the LH-1 is used with
other MIDI-equipped instruments or modules. Some instruments or modules may not
have the selectable channel feature or may have a limited range of channels.
MIDI OFF: Choosing MIDI Off disconnects the LH-1’s MIDI System. When MIDI is off,
the LH-1 will not transmit or receive MIDI information.
6. System Mode
LOCAL On/Off: With Local On, the LH-1 transmits “played note” data into the MIDI
system. With Local Off, the LH-1 will not transmit the “played note” data to its own
sound generator. Therefore, the notes played may be heard on other instruments
attached to the LH-1 via MIDI, but not through the LH-1 itself.
Tuning
Tuning of 440.0 Hz (A=440) is the LH-1’s default factory setting. However, Tuning may
be changed from a low pitch of 427.0 Hz to a high pitch of 453.0 Hz. This allows the
LH-1 to be played with different musical instruments or ensembles that may have
tuned to a different pitch. Press the DOWN or UP function button repeatedly to change
the pitch. You can hear the pitch changes by selecting the ORGAN 2 sound and
holding a key down while repeatedly pressing the Tuning DOWN or UP button. Tuning
is active for the seven sounds and the Hymns and Children’s Songs feature.
3. Restore Factory Settings
This function will Reset all SYSTEM MODE settings to the factory default settings,
providing a quick return to all original settings that existed when the LH-1 arrived.
To restore Factory Settings, enter SYSTEM MODE and press the Restore Factory
Settings button. The LCD Display should change.
If you are certain that you want to restore the original Factory Settings, press the sure
(#1) function button. The word “. . . Sure” will change to “. . . Executing” for a few
seconds before the LCD Display returns to SYSTEM MODE main screen. The original
factory settings should now be restored. You can also press the BACK button to exit
without executing the Restore function.