1
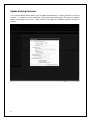
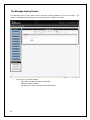
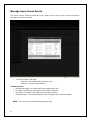
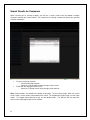
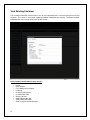
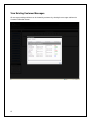
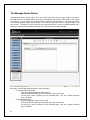
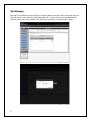
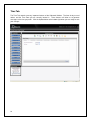
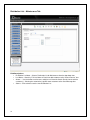
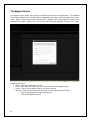
User’s Manual
Release 2.0.0
Table of Contents
Introduction.................................................................................................................................................... 3
Overview ....................................................................................................................................................... 4
Minimum PC Requirements ................................................................................................................... 4
The Outbound Technologies Logon Screen ................................................................................................. 5
The Enter/Update Screen ............................................................................................................................. 6
Add New Customer ................................................................................................................................... 7
Search Results for Existing Customers..................................................................................................... 8
Update Existing Customer......................................................................................................................... 9
The Message Inquiry Screen ...................................................................................................................... 10
Message Inquiry Search Results............................................................................................................. 11
The Customer Inquiry Screen ..................................................................................................................... 12
Search Results for Customers ................................................................................................................ 13
View Existing Customer........................................................................................................................... 14
View Existing Customer Messages ......................................................................................................... 15
The Message Queue Screen ...................................................................................................................... 16
Edit Message ........................................................................................................................................... 17
The System Settings Screen....................................................................................................................... 18
General Tab............................................................................................................................................. 18
Time Tab.................................................................................................................................................. 19
Lapse Notices Tab................................................................................................................................... 20
General Messages Tab ........................................................................................................................... 21
Holiday Messages Tab ............................................................................................................................ 22
Insurance Messages Tab ........................................................................................................................ 23
Terms of Service Tab .............................................................................................................................. 24
Password Tab.......................................................................................................................................... 25
The Templates Screen ............................................................................................................................ 26
The Reports Screen .................................................................................................................................... 27
The Blast Message Screen ......................................................................................................................... 28
Blast Message – Custom Message....................................................................................................... 269
The Distribution List Screen ........................................................................................................................ 28
Distribution List – Create/Update Tab ..................................................................................................... 30
Distribution List – Maintenance Tab ........................................................................................................ 31
The Support Screen .................................................................................................................................... 32
The System Messages Screen ................................................................................................................... 33
The Sign Out Option ................................................................................................................................... 33
Support Procedures .................................................................................................................................... 34
©2009-2010 Outbound Technologies, L.L.C.
2
Introduction
Outbound Technologies provides a web-based software solution to help your agency in making contact
with your customers. The Outbound Solution will automatically produce an email and/or text message to
your customers based upon your system settings. You also have the opportunity to manually generate
an email and/or text to any customer at any given time provided that the customer is listed within the
Outbound Solution.
Reviewing the message history allows you to monitor upcoming and recently generated notifications sent
out by the system. Notifications to your customers may consist of notices, greetings or marketing
messages. Having the ability to produce a variety of messages allows the Outbound Solution to provide
an immediate return on investment when considering the reduced costs of postage and human
resources.
Staying in touch with your customers is essential to the growth and success of your agency. Let the
Outbound Solution fill this void without the restrictions of cost and resources.
Some of the Major highlights include:
• Automate direct contact with customers in the manner they prefer, text and email.
• Tailor the Outbound Solution to your agency by setting up the system in the manner that fits you
and your customers’ needs.
• The Web-Based Service allows you the convenience of logging into the system no matter where
you are. All you need is a PC with an internet connection. No additional hardware or software is
needed.
• The Outbound Solution is ready to be used within 24 hours of your commitment making the setup
process quick, easy and flexible.
• There is no limit to the number of messages that can be sent. Customer contact is virtually
unlimited as postage costs and staff resources are reduced.
• Each message sent can be sent via Text, Email or Both. The Dual Communication Chain will
insure that your customers receive information in a convenient and timely manner.
3
Overview
Outbound Technologies utilizes a browser based system that is easy to use and highly secure. This easy
to use solution allows for more attention on your customers and less on the software. From the
Messaging Menu, you will be able to access all system screens that perform the daily tasks and functions
of the software. Performing these tasks is made easy, with just a click of a button you can add or update
a customer, inquire on a customer and view message history.
Minimum PC Requirements
•
Internet Options – All internet browsers allow access to the Outbound Solution. Whether on
Internet Explorer, FireFox or any other provider, we are ready to handle your requests.
The Outbound Technologies Toolbar
The Outbound Solution toolbar is designed to be as functional and easy to use as possible. By clicking
the bar or program icons listed at the top of the screen you can access any function of the program.
Once you have selected your desired option, various data boxes will become available. For example, to
update a customer, simply click the Enter/Update bar on the left side of the screen and then search by
cell phone number, email address or last name. The available customers that match your request are
then displayed on the screen. Select the desired customer and perform the necessary update.
Icons Located on the Messaging Menu:
Enter/Update Icon
Message Inquiry
Customer Inquiry
Message History
System Settings
Templates
Reports
Blast Message
Distribution List
Support
Sign Out
4
The Outbound Technologies Logon Screen
The Outbound Technologies Logon Screen will be displayed when you access the www.outboundtec.com
website address. Your screen should look similar to the one shown below. To continue with the
Outbound Solution, enter your User ID and Password. Once the correct information is entered, click the
“Login” button or press “Enter” on your keypad.
Note: To access your User ID and Password, contact your System Administrator.
Note: Once you have accessed the program, you can change your password by selecting the “System
Settings” option from the Messaging Menu. When the screen appears, select the Password tab listed at
the top. Data boxes similar to the examples shown below should appear. When you have entered the
correct password information, click the “Change Password” option to successfully change your password.
5
The Enter/Update Screen
The Enter/Update Screen icon is located under the Messaging Menu. The Enter/Update Screen allows
you to enter new customers and update existing ones. Once the desired information has been entered,
you can move throughout the various functions of the program.
From the Enter/Update Screen, the options are:
6
•
Cell Phone# - Enter any portion of the Cell Phone Number to Search for an existing customer.
•
Email Address – Enter any portion of the Email Address to Search for an existing customer.
•
Last Name – Enter any portion of the Last Name to Search for an existing customer.
•
Add New Customer – Select the Add New Customer button to enter a new customer into the
system. See Page 7 for more information on Adding a New Customer.
Add New Customer
When adding a new customer, you will see a screen similar to the one below. Some data fields within
this screen will be pre-filled based upon your system settings.
•
•
•
To create a new customer
o Select the delivery method (email/text, email only or text only)
o Click the get carrier button
o Enter the desired information into the data fields
o Select the “Create” Button
To create a new customer and enter a message to be sent
o Enter the desired information into the data fields
o Select the “Create/Enter Messages” Button
To cancel the addition of a new
o Select the “Exit” Button
Fields listed on the Add New Customer Screen:
• Delivery Method – noted above
• Cell Number - Enter the customer cell phone number even if the customer has decided to only
receive email. Note, only cell phones will be accepted in this field, if a landline or other nonmobile number is entered the record will not create and an error will be given.
• Carrier – This field will be automatically populated by the Outbound Solution.
• Email Address – Enter the customer email address at which they would like to be contacted. If
the customer decides to only receive text, leave this data field blank. Note, if the domain is not
correct the record will not create and you will be asked to check the address with your customer
• First, Middle and Last Name – Enter the customer information into these data fields.
7
•
•
•
•
•
•
•
Language – Select from the drop-down box the appropriate language.
Customer Agent Name – This information will be automatically populated by the Outbound
Solution and is for inquiry purposes only.
Customer Birth Date – Enter the birth date of the customer using the following format (MM/DD).
Annual Life Date – Enter the date to send the Annual Life Date review message.
Send Birthday Message – Check this option to send this customer a birthday message.
Send Holiday Messages – Check this option to send this customer the holiday messages. See
page 23 for more information on what Holiday Messages will be sent.
Send Insurance Review Message – Check this option to send this customer the Insurance
Review message. See page 24 for more information on the Insurance Review template.
Search Results for Existing Customers
When searching for an existing customer, you will see a screen similar to the one below if multiple
customers matched the criteria entered. The selection of an existing customer will display the specified
customer information.
•
•
To select an existing customer
o Locate the desired customer and click on them
To exit from the displayed search results
o Select the “X” Button shown at the top right of the data box
Note: Page numbers are located at the bottom of the page. To view various pages within the search
results screen, use the arrows at the bottom of the screen. To navigate from page to page, use the single
arrows. To navigate from beginning to end, use the double-arrows. The slide bar will also move the
search results from beginning to end as needed.
8
Update Existing Customer
The Customer Update Screen allows users to update information that is currently stored for an existing
customer. To change the current information, simply enter the desired changes and select the “Update”
button at the bottom of the screen. Simply click the “Exit” button at the bottom should no changes be
needed.
9
The Message Inquiry Screen
The Message Inquiry Screen allows you to search for existing customers by first or last name. This
screen is the gateway to inquiring on past, present and future customer messages.
•
10
To search for an existing customer
o Enter the first or last name into the data field
o Select the “Search” Button
o You will see a screen similar to the one shown below.
Message Inquiry Search Results
The Search Results Screen of Message Inquiry allows you to inquire on past, present and future
messages sent to each customer.
•
To view a customer’s messages
o Click the “+” box located to the left of their name
o Click the “–“ box to minimize the data
Field Descriptions:
• Message Description – A summary of the message that was sent.
• Last Sent – The date this message was last sent to the customer.
• Next Send – The date this message will be sent to the customer.
• Remaining Msgs – The remaining number of this message to be sent to the customer.
NOTE: This screen is to be used for Inquiry purposes only.
11
The Customer Inquiry Screen
The Customer Inquiry Screen allows you to search for existing customers by first or last name. This
screen is the gateway to inquiring on existing customers within the Outbound Solution.
•
To search for an existing customer
o Enter the first or last name into the data field
o Select the “Search” Button
o You will see a screen similar to the one shown below.
NOTE: This screen is to be used for Inquiry purposes only.
12
Search Results for Customers
When searching for an existing customer, you will see a screen similar to the one below if multiple
customers matched the criteria entered. The selection of an existing customer will display the specified
customer information.
•
•
To select an existing customer
o Locate the desired customer
o Select the “Check” Button listed to the right of your screen
To exit from the displayed search results
o Select the “X” Button shown at the top right of the data box
Note: Page numbers are located at the bottom of the page. To view various pages within the search
results screen, use the arrows at the bottom of the screen. To navigate from page to page, use the single
arrows. To navigate from beginning to end, use the double-arrows. The slide bar will also move the
search results from beginning to end as needed.
13
View Existing Customer
The Customer Information Screen allows users to view information that is currently stored for an existing
customer. This screen is not used for updating customer information only viewing. To update customer
information the user must go to the Enter Update section.
Fields listed on the Customer Inquiry Screen:
• Cell Number
• Carrier
• Email Address
• First, Middle and Last Name
• Language
• Customer Agent Name
• Customer Birth Date
• Annual Life Date
• Send Birthday Message
• Send Holiday Messages
• Send Insurance Review Message
14
View Existing Customer Messages
All messages pending and future can be viewed by customers by selecting the messages tab from the
Customer Information Screen.
15
The Message Queue Screen
The Message Queue Screen allows the user to view messages from the past, present and future.
Messages that are currently pending can also be cancelled by selecting the “Edit” button to the right of
the message. The messages can be organized and viewed in one of two ways. For future messages,
select the pending messages tab at the top. Then click the drop-down menu to select the day(s) you
want to view. To view your current selection, plus the previous day(s) click the “Include Preceding Days”
check box. Items will be organized by date for the account number currently selected.
Messages can be organized and viewed in one of two ways:
• To view/edit Future Messages
o Select the Pending Messages tab at the top
o Click the Drop-Down Menu and select the day(s) you wish to view
o To view your current selection, plus the preceding days, click the “Include Preceding
Days” check box
• To view Past Messages
o Select the Message History tab at the top
o Click the Drop-Down Menu and select the day(s) you wish to view
o To view your current selection, plus the preceding days, click the “Include Preceding
Days” check box
16
Edit Message
Messages can be edited to cancel/activate or change the date by clicking the EDIT button from within the
Message Queue screen under the Pending Messages tab. A screen shot has been provided below to
display the fields that can be modified: Next Send Date, Description, Cancel/Activate this Notice.
17
The System Settings Screen
The System Settings Screen is designed to tailor the Outbound Solution to your agency. Within this
screen, you can make changes that will affect the affect the Outbound Solution from a global standpoint.
This screen should not require maintenance under normal circumstances.
General Tab
The General Tab contains your agency’s contact information. This information will be utilized when
sending and receiving messages. Please enter the agency name, phone number and email address you
wish to have attached to all messages sent by the Outbound Solution. Click the Update button at the
bottom right when finished.
18
Time Tab
The Time Tab contains two very important features of the Outbound Solution. The time of day to send
notices and the Time Zone you are currently located in. These features will allow us to generate
messages at the time you prefer. Click the Update button at the bottom right when you are ready to save
your changes.
19
Lapse Notices Tab
The Lapse Notices Tab designates how many notices each customer is to receive when his or her policy
has lapsed. It also will designate the number of days to wait before sending the second lapse notice
should the first notice be ignored. Simply click the drop-down button to the right of the desired field to
make a change. Click the Update button at the bottom right when you are ready to save your changes.
20
General Messages Tab
The General Messages Tab will determine which messages will be automatically selected for each
customer that is entered into the system. These settings can be maintained at the customer level but will
initially be selected due to the following. Click the Update button at the bottom right when you are ready
to save your changes.
21
Holiday Messages Tab
The Holiday Messages Tab will determine which holiday messages will be automatically placed into the
Message Queue for each customer. These settings cannot be maintained at the customer level but will
initially be selected based on the following. Click the Update button at the bottom right when you are
ready to save your changes.
22
Insurance Messages Tab
The Insurance Messages Tab determines which messages will be automatically selected for each
customer that is entered into the system. These settings can also be maintained at the customer level
but will initially be selected due to the following. Click the Update button at the bottom right when you are
ready to save your changes.
Maintainable Fields on the Insurance Messages tab:
o Send Insurance Review Message – Check this box to send each policy holder the
Insurance Review Message.
• Click the Drop-Down Menu to designate the number of years to annually send
this message.
o Send Annual Life Reminder – Check this box to send each policy holder the Annual Life
Reminder.
23
Terms of Service Tab
The Terms of Service Tab is designed for inquiry purposes only. Your Terms of Service Agreement can
be read or printed to a PDF from this screen. The Bank Routing Number and Bank Account Number
currently being used are also listed on this screen. To change your financial information, please contact
the Outbound Support Team.
24
Password Tab
The Password Tab allows you to change the Password to your Outbound Technologies User ID. Simply
enter the desired information in the fields listed on this screen and click the “Change Password” box to
finish this change.
25
The Templates Screen
The Templates Screen allows the user to view the design, look and feel of each message within the
Outbound Solution. Each template is governed by the Outbound Technologies Team and is inquiry
only.
Templates Screen options:
• To view different templates
o Click the Drop-Down Menu and select the desired template
o To view your current selection in Spanish, select the Spanish tab listed at the top of the
screen
Note: You will notice that each message has a different body for Text Messages versus Email
Messages. Text Messages have a limit of 160 characters, whereas Email Messages do not have these
restrictions. Therefore, the email template will look more like an email instead of a text message.
26
The Reports Screen
The Reports Screen allows the user to preview and print from the available reports. Simply double-click
on the desired report title to begin report preview. Once the preview screen is displayed, click on the
printer icon at the top to print. Click on the “X” button at the top right to close the Report Preview and
return to the Outbound Solution.
27
The Blast Message Screen
The Blast Message Screen enables a mass communication option to your customers. The ability to send
out custom messaging or insurance reviews to multiple contacts or the user-defined distribution lists is
available from this screen.
Field Descriptions:
• Template – Select the Insurance, Annual Life Review or Custom message from the template
drop-down box.
• Date to Send – Select the date you would like the message to be sent.
• Time to Send – Select the time you would like the message to be sent.
• Send To – Select the desired sort and begin your target customer list.
o Use the Arrows to select one, multiples or all from the Search Results box to add the
customer(s) to the Send Message box click the arrow(s) to the right.
o If selecting customers by distribution list, select the distribution list(s) from the Distribution
Lists Box and click on the arrow to the right.
o Selecting All Customer will send the message to all customers currently loaded into the
system.
• Submit – Select this button to send messages to the Message Queue to be sent at the desired
date and time.
Note: Continually add to the “Send Message to:” box until all the intended recipients are set. When
selecting customers by last name, you can search multiple names and/or partials.
28
Blast Message – Custom Message
When the Custom Message is selected from the template drop-down box your screen will look similar to
the one shown below. Custom Messages require the “Email Subject” and “Message” fields to be defined.
Please refer to Page 28 – Blast Message Screen for more information on Field Descriptions for this
screen.
29
The Distribution List Screen
The Distribution List Screen enables your agency to create user-defined distribution lists for use from the
Blast Message feature. These distribution lists can be created, maintained and deleted from this screen.
When clicking on the Distribution List button a screen similar to the following will appear.
Distribution List – Create/Update Tab
Field Descriptions:
• Distribution List Name – Enter the name of a new list you want to create or edit a selected list.
• Distribution List Description – Enter the description of the new list or selected.
• Create – Click this button to create a new list once you have entered the desired Distribution
Name and Description.
• Reset – Click this button to clear the Distribution Name and Description fields.
Note: You can update a Distribution Name or Description by double-clicking on the desired distribution
list. Once selected, make the necessary changes and click Update button to revise the Name or
Description.
30
Distribution List – Maintenance Tab
Field Descriptions:
• Distribution List Name – Select a Distribution List for Maintenance from the drop-down box.
• Last Name – Search by Full Last Name or Partials to add customers to the “Search Results” box.
• Arrows – Use the Arrows to select one, multiples or all from the Search Results box to add the
customer(s). Selecting the arrow to the right will move customers to the Send Message box.
• Submit – Click submit to save the new Distribution List.
31
The Support Screen
The Support Screen enables you to reach our dedicated and responsive support team. The Outbound
Technologies Support Team is available during extended business hours and will be happy to assist your
needs. When selected, you will be presented with a Support Form (shown below) to submit to the
Outbound Technologies Support Team. You can also call the Outbound Support Team at 417-451-1300.
Support Screen Fields:
• Name – Enter your name within this field
• Email – Enter the Email Address you use for the Outbound Technologies system
• Phone – Enter a Phone Number at which you can be reached
• Message – Enter the desired question/instructions for the Outbound Support Team
o Click the Submit button to Submit your Request
o Click the Exit Button to Cancel
32
The System Messages Screen
The System Messages Screen is designed to allow Outbound Technologies to communicate with you and
your staff. Messages within this screen are to provide you with information, system update times, invalid
customer contact information, etc. Unread messages will be displayed in color (much like your email
software). NOTE: We will never contact you via email for information in regards to your account. All
inquiries will be provided through this screen. Should you have questions or concerns in regards to a
suspicious inquiry, please call the Outbound Support Team at 417-451-1300.
The Sign Out Option
To sign out of the Outbound Solution, click the Sign Out button on the left-hand side of your screen or
click on the “Lock” button shown at the top right. Selecting either option will properly log your machine
out of the Outbound Technologies software. NOTE: You do not need to be logged into the software
to get messages to send out. The Message Queue will continue its daily cycle whether you are
logged in or not.
33
Support Procedures
Outbound Technologies Support Team will be available for support during extended business hours.
Please use the following steps, as guidelines, to submit issues/questions via email:
Step 1
Address an email to [email protected]
Step 2
Please include in the email: Outbound Technologies User Name, Contact Name,
Return Phone Number, and a Detailed Description of the Problem.
Step 3
A Support Specialist will reply by email by the end of the next business day.
Please use the following steps, as guidelines, to request telephone support:
Step 1
Call (417) 451-1300
Step 2
You will be connected with a support technician. If a support technician is not
available, your call will then be forwarded to the support voice mailbox*. When
leaving a message, it is essential to supply the following information: Outbound
Technologies User Name, Contact Name, Return Phone Number, and a Detailed
Description of the Problem.
* Upon leaving a message, a support technician will return your call as soon as possible. Normal
return time is thirty (30) minutes or less.
©2009-2010 Outbound Technologies, L.L.C.
34