1
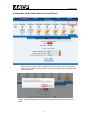
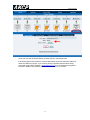
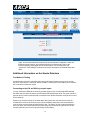
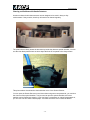
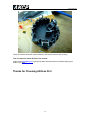
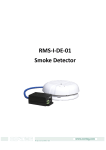
Smoke Detector
SK00
User Manual
Help Version updated till firmware 404j / SP456
Copyright © 2012, AKCess Pro Co., Ltd..
Smoke Detector
Smoke Detector
This makes an important addition to security and safety. These smoke detectors are easy to
install and configure. The smoke detector must be mounted on the ceiling for maximum smoke
detection. These photoelectric type smoke detectors are generally more effective at detecting
smoldering fires which smolder for hours before bursting into flame.
Smoke Detector OIDs
For normal state, return value = 2
For alarm state, return value = 4
The value of the Status for the OID for switch sensors can be Normal, No Status, Critical, or
sensorError.
A popular OID for Smoke Detector Sensors is the status. For RJ45#1, it is
.1.3.6.1.4.1.3854.1.2.2.1.18.1.3.0
Note: You can test the smoke detector by holding down the test button until the audible alarm
occurs - about 5 sec. The smoke detector will then send an alarm signal to the unit.
Smoke Detector Details
The following technical details are sometimes required for certification purposes.
How the Smoke Detector Works
The smoke sensor detects partials of smoke in the air in its photoelectric chamber. Here are the
specs for the sensor:
Features:
o
On/Off alarm signal of Smoke Detected
o
DC operated photoelectric type Smoke Detector
o
Hush / Test feature
o
Non-radioactive technology
o
High and stable sensitivity
o
Quick fix mounting bracket for easy installation
o
Extra loud alarm sound over 85 dB
o
Low-battery and battery missing warning indicator
o
Auto-reset when smoke clears
o
LED indicates the status of Smoke Detector
o
Sensor type - open/closed contact switch
o
Power source: powered by the unit. No additional power needed.
-2-
Smoke Detector
o
The unit auto detects the presence of the Smoke Detector (as Dry Contact sensor)
o
Disconnect alarm (Note that the smoke detector will be detected as a Dry Contact
sensor. See more on this in the configuration of the sensor).
Specifications:
o
Sensor type - open/closed contact switch
o
Detection type: Photoelectric Chamber
o
Power Source: 9 VDC
o
Standby Current: 15 uA max
o
Alarm Current: 30 mA max
o
Alarm Sound Level: 85 dB at 3 m
o
Operating Temp: 5° C - 45° C
o
Ambient Humidity: 10% - 90%
o
Sensitivity to Smoke: 3 - 6% Obs/m
o
Size: 110 mm Ø
o
Ambient Humidity: 10% to 90%
o
Maximum CAT5/6 Extension Cable Run Length: 90 meters or 300 feet (1000 feet
when connected to the X20 or X60 dry contact inputs).
Important Safety Information
Observe and follow all local and national electrical and building codes for installation.
This smoke detector is designed to be used inside a single room only. In multi-room buildings,
each individual room should have its own smoke detector. This smoke detector is not a substitute
for a complete fire alarm system.
Smoke may not reach the smoke detector for many reasons. For example, if a fire starts in a
remote part of a building or home, on another level, wall, roof, or on the other side of a closed
door, smoke may not reach the smoke detector in time to alert personnel. In other words the
smoke detector will not promptly detect a fire except in the area or room in which it is installed.
The smoke detectors can only sound their alarms when they detect smoke. The smoke detectors
detect combustion particles in the air. They do not sense heat, flame , or gas. This smoke
detector is designed to give an audible warning of a developing fire. However, many fires are fastburning, explosive, or intentional. Others are caused by carelessness or safety hazards. So
always keep in mind that smoke may not reach the smoke detector alarm QUCKLY ENOUGH.
The smoke detectors have limitations. This smoke detector is not foolproof and is not warranted
to protect lives or property from fire. Smoke alarms are not a substitute for insurance. Business
owners are responsible for insuring their own lives and property. In addition it is possible for the
smoke alarm to fail at any time. For this reason, you must test the smoke detectors weekly and
replace them every 10 years.
-3-
Smoke Detector
Smoke Detector Placement
It is recommended that you install one detector in each room and in separate hallways. If the
hallway is over 12 meters long, install a detector at each end. They should be located at the top
levels of first-to-second floor stairwells.
Install the smoke detectors as close to the center of the ceiling as possible. If this is not possible,
mount no closer than 4 inches from a wall or corner.
DO NOT install the smoke detectors;
Near appliances or areas where normal combustion regularly occurs (cooking areas, furnaces,
hot water heaters, florescent lighting etc.).
Near air returns or heating and cooling supply vents. Install at least 3 feet away from these areas.
The air could blow the smoke away from the detector, interrupting the alert.
In rooms where temperatures may fall below 5 degrees C or rise above 45 degrees C.
In extremely dusty, dirty, or insect-infested areas where loose particles interfere with the smoke
detectors alarm operation
IMPORTANT!
Specific requirements for Smoke Alarm installation vary from country to country. Check with your
local Fire Department for current requirements in your area.
Installing the Smoke Detector
1. From the back of the smoke detector, remove the mounting plate by turning it
counterclockwise. (To later engage the tamper-resist feature, twist out and set aside one
of the pins molded into the plate. Both pins are exactly the same.)
2. Secure the plate to the ceiling or wall with the mounting screws.
3. Lift open the battery pocket door.
4. Connect the new 9-Volt battery to the battery connector inside the battery pocket. Be
sure the battery is securely connected. The red LED may blink briefly when the battery is
installed.
5. Close the battery picket door, snapping it into place.
6. Position the smoke detector to the mounting plate and turn it clockwise to lock it into
place. To engage the tamper-resist feature, insert the pin into the notch on the edge of
the smoke detector after the detector is properly positioned in the base.
7. Push the test button to test the smoke detector. (see below).
Testing the Smoke Detector
1. Firmly push the TEST button, and the smoke detector alarm will sound a loud beep. The
alarm will stop sounding after releasing the TEST button.
2. If the smoke detector does not sound, please retest the detector again.
-4-
Smoke Detector
HUSH Feature
This button on the smoke detector is a combined Test/Hush button to silence false alarms.
1. To cancel a false alarm, press the Test/Hush button located on the cover. The alarm will
automatically switch to a reduced sensitivity condition. This reduced sensitivity will last for
10 minutes. The unit will flash the red light every 10 seconds (instead of the normal 40
seconds) to indicate the sensitivity has been reduced.
2. The unit will reset to normal sensitivity at the end of the silenced period. If additional
silenced time is required, simply push the Test/Hush button again.
Configuring the Smoke Detector
a) Plug the sensor into one of the RJ45 ports on the rear panel of the unit.
b) Now point your browser to the IP address of the unit (default, 192.168.0.100). Next you need
to login as the administrator using your administrator password (default is “public”). You will then
be taken to the summary page.
c) From the summary page you need to select the sensors tab. The layout of the next page will
vary depending on your unit so please refer to your units manual.
Now we will cover the settings that are specific to your sensor.
Status: If the sensor is offline the status is No Status. If the sensor is online and there is no
Smoke detected, the status is Normal. If Smoke is detected then the status is Critical. If at any
time communications with the Smoke Detector are lost, the status of the Smoke Detector is
changed to sensor Error.
Connecting the Smoke Sensor to your base unit
When a smoke detector is connected, the unit will sense it as dry-contact sensor. The user can
change the description of the sensor to a Smoke Detector on the sensorProbe base units.
The Web interface settings for the smoke detector are:
Direction: Input
Normal State: Open/+5 Volts
Note: see below for exact steps for configuring the Smoke Sensors on your base unit.
-5-
Smoke Detector
Configuration of the Smoke Detector (sensorProbe)
The Smoke Detector when first connected to the sensorProbe’s RJ-45 sensor port will be
auto sensed as a Dry Contact Sensor. So you would first click on the Dry Contacts &
Drivers link, then click on the port that it is connected to as shown in the screen shot
above.
In the Smoke Sensors settings page you will rename your Smoke Sensor as you wish in
the Description field. We can also rename our sensors descriptions in the Descriptions
fields then turn the sensor Online by choosing the Online setting for the sensor in the Go
Online/Offline field and also make sure that the Normal State for the sensor is set to
Open/+5 Volts as shown in the screen shot above. You would then click the Save button
to save the sensor settings into the web interface.
-6-
Smoke Detector
Now we can see that our Smoke Sensor is Online and shows the status of No Smoke.
Now if we navigate back to the Summery page we can see the sensor is present there
showing the correct status.
Note: Please see the Siren / Strobe Sensor User Manual for the step-by-step instructions for
using the Smoke Detector to trigger the Siren / Strobe Sensor.
We found that in testing if the Smoke Detectors are installed near florescent lighting,
these may have an effect on the sensors and cause false alerts. You can use the
“Continuous Time” feature shown in the above screen shot to eliminate these false alerts.
These settings are found in the “Status Filter” tab in the sensor settings page.
-7-
Smoke Detector
Configuration of the Smoke Detector (securityProbe)
When you first connect the Smoke Detector to the RJ45 port is will be auto sensed
online as a Dry contact I/O type sensor. Click the Auto Sense button as shown in the
screen shot above.
Confirm the popup warning by clicking on the OK button as shown in the screen shot
above.
-8-
Smoke Detector
When the auto sense has been turned off, you will now see the link for manually
configuring the sensor, so you will now click on this as shown in the screen shot above.
-9-
Smoke Detector
Now you will click on the down arrow button which will display the list of sensors to
choose from. Choose the Smoke Detector as shown in the screen shot above.
Now click the Save button.
- 10 -
Smoke Detector
As we can now see the Smoke Sensor is Online and is in the Normal state.
If the Smoke Sensor still remains in a critical state please check the extension cable and
check the LED on the sensor. If you continue having a problem with the sensor being
connected contact AKCP Support a [email protected] for more assistance and please
include the details of the problem and serial # of the sensor in your email.
- 11 -
Smoke Detector
Again, as we mentioned before at the end of the sensorProbe configuration, when we
tested the smoke sensors, we found that if these are positioned too close to the
florescent lighting, these lights can cause false alerts. You can add time to the
“Continuous Time Settings” as shown in the screen shot above to eliminate these false
alerts.
Additional Information on the Smoke Detectors
Test Button & Testing
As noted earlier do keep in mind that when testing the Smoke Detectors using real or canned
smoke do not press the "Test/Hush" button at least 10 minutes prior to this testing or the detector
will not be able to detect the smoke.
Connecting to the X20 and X60 dry contact inputs
You can connect the SK00 to the extra dry contacts inputs on the securityProbe 5ES-X20/X60,
the 5ESV-X20 and X60 unit and the sensorProbe8-X20 and X60 base units. The green "phoenix"
type two pin dry contact connector that is mounted on the Smoke Detectors converter box is used
for this purpose.
However you do have to keep in mind that when the sensors are connected to the extra dry
contacts and not the RJ-45 sensors ports, if the 9Volt battery that powers the smoke detector
runs out, then you will not get the alerts from the unit. The reason for this is when connected to
the RJ-45 ports, the Smoke Detectors are powered by the unit and when connected to the dry
contact inputs they are not and only powered by the 9V battery.
- 12 -
Smoke Detector
Cleaning and Problems with Smoke Detectors
As also mentioned earlier these sensors are not designed to be used in dusty or dirty
environments. If they must be, then they will need to be cleaned regularly.
The picture above clearly shows the dust build up inside the detectors optical chamber. You can
see the clear black plastic where we have wiped the dust off compared to the dusty surface.
This picture above also shows the dust inside the cover of the Smoke Detector.
You can open the Smoke Sensors up and clean them using some compressed air, you can blow
the dust out of the optical chamber. You just need to open the optical chamber so the dust
particles can be flushed out properly. If you don't have a compressor or canned compressed air,
you can use a lint free cloth or tissue paper. Just make sure there are no fibers left behind.
- 13 -
Smoke Detector
This picture above shows the optical chamber of the Smoke Detector after cleaning
This concludes the Smoke Detector User manual.
Please contact [email protected] if you have any further technical questions or problems setting up your
modem or your alerts.
Thanks for Choosing AKCess Pro!
- 14 -