1
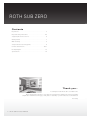
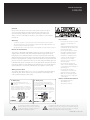
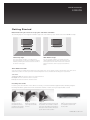
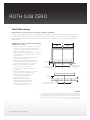
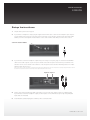
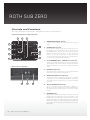
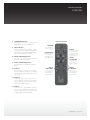
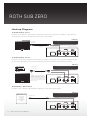
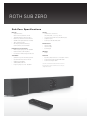
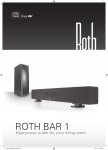
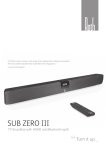
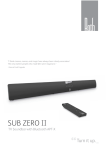
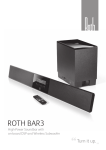
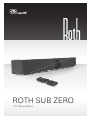
TM
ROTH Sub ZeRO
TV Soundbar
Roth Bar 1 SubZero Manual NoStrap.indd 1
2/5/12 12:08:17
ROTH Sub ZeRO
Contents
Key features ...................................... . . . . . . . . . . . . . . . . . . . . . . . 3
Important safety instructions.................. . . . . . . . . . . . . . . . . . . . . . 4-5
Supplied parts and accessories ............... . . . . . . . . . . . . . . . . . . . . . . . 6
Getting started ................................... . . . . . . . . . . . . . . . . . . . . . . . 7
Wall mounting ................................... . . . . . . . . . . . . . . . . . . . . . . . 8
Setup instructions (hookup guide) ........... . . . . . . . . . . . . . . . . . . . . . . . 9
Controls and functions ........................ . . . . . . . . . . . . . . . . . . . 10-11
Hookup diagram ................................ . . . . . . . . . . . . . . . . . . . . . . . 13
Specifications ................................... . . . . . . . . . . . . . . . . . . . . . . . 14
Thank you...
For taking the Roth AV Sub Zero Soundbar home.
We’ve designed the Sub Zero to look discreet and elegant and, utilising the very best available
amplification and driver technology, sound great too. Stand by... your TV is about to sound fabulous.
Turn It Up.
2 | Roth Sub Zero User Manual
Roth Bar 1 SubZero Manual NoStrap.indd 2
2/5/12 12:08:19
USer ManUal
engliSH
Key Features
Congratulations on your purchase of the Sub Zero Soundbar.
The Sub Zero is designed to provide higher quality sound from your flat panel
television. It is designed to mount either on the desk top with the supplied table stands or on the wall
with the supplied wall mount kit.
You will enjoy outstanding audio performance due to use of patented Class HD™ amplifiers and a novel
surround processor called FX (Fractal Expansion). The Sub Zero is best used with TV’s from 32” up to 42”
where its compact size and styling will unobtrusively complement your TV and the room décor.
advanced Technologies in the Sub Zero
Wider Sound Stage: Vector Firing (VF) Side Drivers
The Vector Firing Side Drivers(4) enhance both stereo and FX surround modes. The sweet spot for
listening is wider and the surround effects are more dramatic as a result of the VF side driver design and
Fractal Expansion processing.
High efficiency amplifier Technology: ClassHD
The Sub Zero employs a new class of patented audio amplifier called Class HD™. The Class HD™
amplifier is more efficient at normal listening levels than conventional amplifiers and even more efficient
than Class D digital amplifiers. This new technology allows for a very compact audio system design with
the performance of a much larger audio system. Another advantage to the Class HD™ amplifier is that
there is no need for bulky external power adapters.
State-of-the-art Processing: Fractal expansion (FX)
Experience a convincing surround sound presentation from the10-speaker Sub Zero. Fractal Expansion
is an advanced audio processing technology that converts the 2 channel stereo into a wide sound
stage with virtual center and surround images that will amaze and thrill you. This advanced processing
preserves the tonal accuracy of the original sound source to create rich sound. You can enjoy your
favorite music using Fractal Expansion or select the high fidelity stereo mode.
rothaudio.co.uk | 3
Roth Bar 1 SubZero Manual NoStrap.indd 3
2/5/12 12:08:19
ROTH Sub ZeRO
Important Safety Instructions
SaFeTy PoInTS yoU SHoUlD KnoW aboUT yoUr SUb Zero SoUnDbar.
To help you operate these products properly, this section illustrates safety tips which will be of benefit to
you. Please read it carefully and apply the knowledge you obtain from it to the proper operation of your
Roth AV Sub Zero Soundbar.
reaD beFore oPeraTInG eQUIPMenT
Follow all warnings and instructions marked on this Sub Zero Soundbar Audio System.
1.
Read these instructions.
2.
Keep these instructions.
3.
Heed all warnings.
4.
Follow all instructions.
5.
Do not use this apparatus near water.
6.
Clean only with a dry cloth.
7.
Do not block any ventilation openings. Install in
accordance with the manufacturer’s instructions.
8.
Do not install near any heat sources such as
radiators, heat registers, stoves, or other apparatus
(including amplifiers) that produce heat.
9.
Do not defeat the safety purpose of the polarized
or grounding type plug. A polarized plug has two
blades with one wider than the other. A grounding
type plug has two blades and a third grounding
prong. The wide blade or the third prong are
provided for your safety. If the provided plug does
not fit into your outlet, consult an electrician for
replacement of the obsolete outlet.
10. Protect the power cord from being walked on
or pinched particularly at plugs, convenience
receptacles, and the point where they exit from the
apparatus.
11. Only use the attachments/accessories specified by
the manufacturer.
12. Use only with the cart, stand, tripod, bracket, or
table specified by the manufacturer, or sold with the
apparatus. When a cart is used, use caution when
moving the cart/apparatus combination to avoid
injury from tip-over.
13. Unplug this apparatus during lightning storms or
when unused for long periods of time.
14. Refer all servicing to qualified service personnel.
Servicing is required when the apparatus has been
damaged in any way, such as power-supply cord or
plug is damaged, liquid has been spilled or objects
have fallen into the apparatus, the apparatus has
been exposed to rain or moisture, does not operate
normally, or has been dropped.
15. The system is designed to comply with the
recommended safety standards for tilt and stability.
Do not apply excessive pulling force to the front, or
top, of the cabinet which could cause the product
to overturn resulting in product damage and/or
personal injury.
16. Follow instructions for wall, shelf or ceiling
mounting as recommended by the manufacturer.
Power Source
This audio system is designed to operate on 230 volts 50 Hz, AC current. Insert the power cords into a 230
volt 50 Hz outlet. The main plugs are used as the disconnect device and shall remain readily accessible.
To prevent electric shock, do not use the audio system’s cords with an extension cord, receptacle, or
other outlet unless the blades and ground terminal can be fully inserted to prevent blade exposure.
Never connect the audio system to 60 Hz, direct current, or anything other than the specified voltage.
Disposal
Proper disposal of this product. This label indicates that, in the EU,
electronic devices cannot be disposed of with regular household
waste. Please use the return or collections systems of your
municipality or contact the seller where you purchased this product
Please dispose of batteries environmentally friendly. Do not
dispose of batteries with regular household waste. Please use
the return or collections systems of your municipality or contact
the seller where you purchased this product.
4 | Roth Sub Zero User Manual
Roth Bar 1 SubZero Manual NoStrap.indd 4
2/5/12 12:08:19
USer ManUal
engliSH
Caution
Never remove the back covers of the audio system as this can expose
you to very high voltages and other hazards. lf the system does not
operate properly, unplug the audio system and call your authorized
dealer or service center. Adjust only those controls that are covered in the
instructions.
Precautions
Warning
•
Toreducetheriskoffireorelectricshock,donotexposethisapparatustorainormoisture
•
Thesystemshouldnotbeexposedtodrippingorsplashingandobjectsfilledwithliquids,such
as vases, should not be placed on the system.
•
Thisapparatusshallbeconnectedtoamainssocketoutletwithaprotectiveearthingconnection.
electrical Information
This system is fitted with a BS1363/A 13 amp plug. If it is not suitable for your
supply sockets it must be removed and replaced with an appropriate plug.
If the plug becomes damaged and/or needs to be replaced please follow the
•
Donotplacethesystemonuneven
surfaces or near the edge of a
cabinet.
•
Unplugimmediatelyifanyforeign
materials falls into the system, of if
the system falls down.
•
Donotopenthesystem’scabinet.
•
Avoiddirectsunlight,dust,high
humidity and smoky locations.
•
Remembertounplugthepower
cord from the AC outlet before
cleaning. Do not use liquid
cleaners or aerosol cleaners to
clean the system.
•
Donotplacethesystemnear
water , such as a bathtub, shower
rooms, kitchen sink, laundry tub or
swimming pool.
•
Donotplacethesystemin
confined spaces or inside a box
when the system is operating.
•
Makesuretounplugthesystem
when not in use for a long period
of time (days).
wiring instructions below. The plug removed must be disposed of immediately.
It must not be plugged into a supply socket as this will be an electrical hazard. If
the fuse needs to be replaced it must be of the same rating and ASTA approved
to BS1362. If the plug is changed, a fuse of the appropriate rating must be fitted
in the plug, adapter or at the distribution board. If the fuse in a moulded plug is
replaced, the fuse cover must be refitted before the appliance can be used.
Wiring Instructions
The supply cable will be either 2-core or 3-core. Follow the appropriate wiring
instructions given below. In both cases ensure that the outer sheath of the
cable is firmly held by the cable clamp.
notice for remote Control
2- Core plug
3- Core plug
This symbol indicates that this 2-core
appliance is Class II and does not require an
earth connection.
The wire coloured blue must be connected to the
terminal marked with the letter N or coloured black.
The wire coloured brown must be connected to the
terminal marked with the letter L or coloured red
Fuse
The wire coloured green and yellow must be
connected to the terminal marked with the letter
E, or by the earth symbol
or coloured green or
green and yellow.
Brown
(Live)
Warning!
Do not connect either wire to the earth terminal.
Avoiddroppingtheunit.
•
Avoidliquidsonit.
•
Avoidaerosolcleaners.
The wire coloured blue must be connected to the
terminal marked with the letter N or coloured black.
The wire coloured brown must be connected to the
terminal marked with the letter L or coloured red.
Green &
Yellow
(Earth)
Blue
(Neutral)
•
Blue
(Neutral)
Fuse
Brown
(Live)
Warning! This appliance must be earthed.
The exclamation point within an equilateral triangle, is
intended to alert the user to the presence of important
operating and maintenance (servicing) instructions in
the literature accompanying the appliance.
The lightning flash with arrowhead symbol, within an equilateral triangle,
is intended to alert the user to the presence of uninsulated “dangerous
voltage” within the product’s enclosure that may be of a sufficient
magnitude to constitute a risk of electric shock to a person.
rothaudio.co.uk | 5
Roth Bar 1 SubZero Manual NoStrap.indd 5
2/5/12 12:08:19
ROTH Sub ZeRO
What’s In The box
Sub Zero Soundbar
Sub Zero RemoteControl
Sub Zero TableStands
accessories
• RCAHookupCable
• 3.5mmStereoCable
• WallMountingKit
• UserManual
battery Installation
Caution
- Do not insert battery with ‘+’ and ‘-’ polarities reversed as this may cause the battery to swell or rupture resulting in leakage.
- Remove the battery if the remote control is not going to be used for an extended period of time.
- Do not put the battery in the general household rubbish. Dispose of the battery according to applicable laws.
6 | Roth Sub Zero User Manual
Roth Bar 1 SubZero Manual NoStrap.indd 6
2/5/12 12:08:21
USer ManUal
engliSH
Getting Started
Determine how you want to set up your Sub Zero Soundbar.
Thefollowingfiguresshow2typicalinstallationstyles.OneistheTableTopstyleandtheotheristheWallMountstyle.
Table Top Style
Wall Mount Style
You can mount the Sub Zero on a cabinet that is
properly designed for a TV. Please install the supplied
stands by following the instructions that are shown on
the bottom of this page.
You can mount the Sub Zero on a wall by using the
supplied hardware kit. The input jacks and power cord
are designed to allow a flush mount. Please follow the
instructions that are shown on page 8 of this Owners
Guide.
Think about location
Select an area where sunlight will not fall directly on the products. Also, be sure that the location selected allows a free flow of air to
and from the products. In order to prevent an internal temperature increase, maintain the following space requirements.
Sub Zero
Top / Bottom / Back: No clearance required - can be flush mounted.
Left / Right: At least 6” (150 mm) clearance required.
Front: Open between the Sub Zero and the listeners.
Installing the stands
In order to place the Sub Zero on the cabinet or a shelf, you need to install the supplied 2 (two) stands by using the
following installation guide. Please make sure that the cabinet or shelf is strong enough and well secured.
Step 1
Step 2
Step 3
Step 4
Insert the top tab of
the stand into the hole
provided for the stand in
the back of the Sub Zero
Makesurethatthetop
tab is fully inserted into
the hole.
Swing down the stand all the way until
the stand hits the Soundbar so that the
base of the stand will be underneath of
the bottom of the Sub Zero. Then push
up the stand to fit the Sub Zero.
Makesurethatthebothstands
are installed as shown in the
above picture.
rothaudio.co.uk | 7
Roth Bar 1 SubZero Manual NoStrap.indd 7
2/5/12 12:08:25
ROTH Sub ZeRO
Wall Mounting
Determine how you want to set up your Sub Zero Soundbar.
The Sub Zero Soundbar comes with a wall mounting kit to be used with a wall mounted TV. The input jacks and power
cord are designed to allow a flush mount where the Soundbar extends only 89 mm from the wall. Also, the Soundbar is
provided with an extra-long power cord so the user may hide the AC line by using a wall track that could be painted to
match the wall.
Follow these steps to mount the Sub Zero
X”
Soundbar on a wall:
X/2”
1. MeasurethewidthoftheTV–theSubZeroshouldbe
mounted so it is centered with the TV. Divide the TV
width measurement by 2 - that will be the centerline
distance from the edges of the TV.
2.
If the Sub Zero is to be mounted below the TV, measure
from the TV edge to the centerline distance on the open
wall below the TV.
Markthedistancewithapencil1-1/2“(38mm)or
more below the bottom of the TV.
3. Makeapencilmark10-7/16”(265mm)oneach
sideofthecenterline.Makesurethemarkisthe
same distance down from the TV on each side.
4. Makeanothermark25/32“(20mm)directly
below the 1st mark on each side.
5.
Drill a ¼” hole in the wall at each of the four
pencil marks.
6.
Hammer the 4 wall mount anchors into the holes
- the anchors should be flush with the wall.
7.
Now, using a Philips screwdriver, screw
the wall brackets in place with the
screws going into the anchors.
8.
X/2”
Tilting the bottom of the Sub Zero
slightly away from the wall, guide the
brackets into the matching holes on the
back of the Sub Zero. The Sub Zero is
now securely wall mounted.
1. Find centerline
of TV.
1-1/2”
or more
2.Makeapencilmark
1-1/2” or more below the
bottom of TV.
1-1/2”
or more
4.Makeanotherpencilmark
on each side of centerline.
+
+
10-7/16”
3.Makeapencil
mark on each side
of centerline.
10-7/16”
+
+
+
+
10-7/16”
25/32”
10-7/16”
noTeS
Thesuppliedmountingkitcanbeusedfortypicaldrywallconstruction.Mountingtowood,concrete,
brick or other types of wall construction will require different hardware. Roth AV recommends seeking
professional assistance for such installations. The instructions on this page and the supplied wall mount kit
are only for the vertical wall mount. Professional assistance is required for other mounting or installation
orientations (e.g., horizontal, tilted).
8 | Roth Sub Zero User Manual
Roth Bar 1 SubZero Manual NoStrap.indd 8
2/5/12 12:08:25
USer ManUal
engliSH
Setup Instructions
1.
Unpack all the parts noted on page 6.
2.
If your TV has a headphone output, plug the supplied 3.5 mm mini stereo cable into the headphone jack output of
your TV and the other end goes to the Input 3 jack on the back of your Sub Zero (shown below). This method will
disable your TV’s sound system and allow direct control of the Sub Zero audio with your TV’s remote control.
3.5 mm Stereo Cable
3.
If your TV does not have a headphone output and you are using a set top box, plug one end of the included RCA
cable into the audio outputs of your set top box and the other end into Input 2 on the back of your Sub Zero. The
Sub Zero remote control and the control buttons on the front panel of the Sub Zero will always function no matter
what the audio input source is.
[Note] Some TV’s do not have a headphone output but do have Audio outputs with RCA jacks. You can connect them to Input 2 by using the RCA cable. This will
also work fine except that the Sub Zero volume must now be adjusted using the Sub Zero remote.
Input 2 Input 1
LR
4.
Input 2 can be attached to Blu-ray, DVD or CD players or to personal music players. Input 1 is an Optical Input.
If your TV does not have a headphone output, use this input to connect with the set-top-box by using an Optical
Input cable (not included).
5.
Install the table stands and plug the Sub Zero power cord into the wall.
rothaudio.co.uk | 9
Roth Bar 1 SubZero Manual NoStrap.indd 9
2/5/12 12:08:29
ROTH Sub ZeRO
Controls and Functions
The controls and functions of the Sub Zero and the Remote Control are explained below.
Front Panel Controls / leD Indicators
2
3
5
1.
reMoTe ConTrol Sensor
Point your remote control at this area when you use the remote
control.
7
10
2.
8
Plug the power cord into the AC outlet. The Sub Zero goes to
the standby mode, and this indicator is also turned off. Press
the POWER button to turn the Sub Zero on, this indicator will
illuminate to indicate the Sub Zero is on. This indicator will
remain on as long as an input signal is active. If the input
becomes inactive the Sub Zero will change to standby mode to
conserve power and this indicator will turn off.
4
11
9
1
6
PoWer on Indicator
3.
FX SUrroUnD (FX) / STereo (ST) Indicator
The FX indicator lights up when FX Surround is selected. The ST
indicatorlightsupwhenStereoModeisselected.Thisindicator
will turn off after about 3 seconds from selecting the surround
setting.
rear Panel of Sounbar
4.
MUTe on Indicator
This indicator lights up when mute is on. This indicator will turn
off after about 3 seconds from turning mute on.
5.
MaIn VolUMe level Indicator
This indicator shows the level of the main volume or Soundbar
volume when you use the MAIN VOLUME Button respectively.
The indicator will turn off after about 3 seconds from adjusting
the volume.
12
13
14
6.
InPUT SeleCTIon Indicator
The 1, 2, or 3 indicator lights up when INPUT 1, INPUT 2, or
INPUT 3 is selected, respectively, by pressing the INPUT Button.
The indicator will turn off after about 3 seconds from selecting
the input.
7.
PoWer button
Plug the power cord into the AC outlet. The Sub Zero goes to the
standby mode. Press this button to turn the Sub Zero on. The
POWER indicator will illuminate to indicate the Sub Zero is on. The
Sub Zero will remain on as long as an input signal is active. If the
input becomes inactive the Sub Zero will change to standby mode
to conserve power. To completely turn off the Sub Zero, press this
button again.
10 | Roth Sub Zero User Manual
Roth Bar 1 SubZero Manual NoStrap.indd 10
2/5/12 12:08:31
USer ManUal
engliSH
8.
SUrroUnD button
remote Control
This button is used to select either the FX
SURROUND mode or the STEREO mode.
PoWer
9.
MUTe button
Press this button when you want to activate
the audio mute. Press it again to deactivate the
mute function. Pressing the VOLUME buttons
will also deactivate the mute function.
10. MaIn VolUMe buttons
Press the + or - button to adjust the main
volume up or down respectively.
Press this button to
turn the Sub Zero on
or off.
SUrroUnD
This button is used to
select either the FX
SURROUND mode or
the STEREO mode.
InPUT
Press this button
to select INPUT 1,
INPUT 2, or INPUT 3.
Press this button to select INPUT 1, INPUT 2, or
INPUT 3.
Connection type - 3.5mm stereo cable. If your
TV has a headphone output, this is a primary
input to use by using the supplied 3.5 mm mini
stereo cable.
Press this button when
you want to activate
the audio mute. Press
it again to deactivate
the mute function.
SeleCTor
11. InPUT SeleCTor button
12. InPUT 3
MUTe
baSS
bUTTonS
Press the + or button to adjust the
Bass volume up or
down respectively.
MaIn
VolUMe
Press the + or button to adjust the
main volume up or
down respectively.
13. InPUT 2
Connection Type - RCA. Use this input to
connect with your external devices (Blu-ray
Players,DVDPlayers,CDPlayers,MP3Players,
or Home Video Game Systems).
14. InPUT 1
Connection Type - Optical INPUT. If your TV
does not have a headphone output, use the
input to connect with the set-top-box by using
the Optical INPUT cable (not included)
rothaudio.co.uk | 11
Roth Bar 1 SubZero Manual NoStrap.indd 11
2/5/12 12:08:31
ROTH Sub ZeRO
Hookup Diagram
TV audio Hookup - Case 1
If your TV has a headphone output, plug the supplied 3.5 mm mini stereo cable into the headphone output from your
TV and plug the other end to the Input 3 jack on the back of your Sub Zero.
Sub Zero
To Headphone
output of TV
3.5mmMiniStereoCable
(Supplied)
ToInput3(MiniStereo
jack) of Sub Zero
Sub Zero Rear Connectors
TV audio Hookup - Case 2
If your TV does not have a headphone output and you are using a set top box, plug one end of the included RCA cable
into the audio outputs from your set top box and plug the other end into Input 2 on the back of your Sub Zero.
Sub Zero
Set Top box
To Audio Output of
Set Top Box or TV
or TV
RCA Cable (Supplied)
To Input 2 (RCA jack) of Sub Zero
Sub Zero Rear Connectors
[Note]
Some TV’s do not have a headphone
output but do have Audio outputs with
RCA jacks. You can connect them to
Input 2 by using the RCA cable. This will
also work fine except that the Sub Zero
volume must now be adjusted using the
Sub Zero remote.
audio Hookup - other Device
The Input 1 can be attached to Blu-ray, DVD or CD players or Home Video Game systems.
Sub Zero
other Device
Blu-ray Players
To Audio Output
DVD Players
CD Players
Home Video Game
Systems
Optical Cable
To Input 1 (Optical) of Sub Zero
Sub Zero Rear Connectors
12 | Roth Sub Zero User Manual
Roth Bar 1 SubZero Manual NoStrap.indd 12
2/5/12 12:08:33
USer ManUal
engliSH
Trouble Shooting
If you encounter problems when using this Sub Zero Soundbar, check the following points before
requesting service.
In order to keep the warranty valid, please DO NOT try to repair the system yourself.
1. no power
1-1. MakesurepowercordsaresecurelyconnectedtotheACoutlet.
1-2. MakesurethatthereispowerattheACoutlet.
1-3. Press the power button on the remote control or the front of the Sub Zero.
2. no sound
2-1. Press the Volume + (Up) button on the remote control or the front of the Sub Zero.
2-2. Makesurethatyouselectedcorrectinput(Input1,Input2,orInput3).
2-3. PressMUTEontheremotetomakesuretheSubZeroisnotmuted.
2-4. MakesureaudiocablesaresecurelyconnectedattheterminalsoftheSubZeroandtheexternaldevices.
3. buzzing or humming noise
3-1. MakesureaudiocablesaresecurelyconnectedattheterminalsoftheSubZeroandtheexternaldevices.
3-2. Test on an alternate device or replace the audio cable.
3-3. Test the device and cable on an alternate input on the Sub Zero.
4. The remote control does not work
4-1. Aim the remote control directly at the sensor on the front of the Sub Zero.
4-2. Reduce the distance between the remote control and the Sub Zero.
4-3. Makesurethatthebatteryisinsertedwithitspolarities(+/–signs)alignedasindicated.
4-4. Replace the battery.
5. The buttons on both the remote control and front panel do not work
5-1. Unplug the power cord from the AC outlet, and plug back in after a few seconds.
rothaudio.co.uk | 13
Roth Bar 1 SubZero Manual NoStrap.indd 13
2/5/12 12:08:33
ROTH Sub ZeRO
Sub Zero Specifications
Design
Inputs
•
4SpeakerDrivers
52mm 4 ohm x2, 88mm 4 ohm x2
•
•
ThickWallReinforcedPolymerCase
•
(1)3.5mmStereoMiniJack(TV,MP3Players)
•
Built-in2pcsUltra-bassPassiveWoofer
•
(1)OpticalInput
•
WallMountCapable(BracketsIncluded)
•
PowerInput:AC230-240V,50Hz
•
TableStandsIncluded
•
LEDDisplaywithAutoDimming
Dimensions
(Volume,Mute,SurroundMode)
•
790mmwidth
•
105mmheight
•
89mmdepth
Performance Features
(1)RCAStereoConnectors
(TV, DVD, DVRs, or Set - Top - Box)
•
WideFrequencyResponse35~20,000Hz
•
HighPowerClassHDAmplifiers
Weight
•
LowdistortionVHR(VoltageHeadRoom)
•
3.1kgs
Soundbar
General
•
(8)40mmLongThrowFullRangeDriver
•
OperatingTemperature:5°C~40°C(32°F~104°F)
(2)19mmAluminumDomeTweeter
•
PowerRequirements:AC230-240V~50Hz
•
64WattsPeak(32Wx2)
•
PowerConsumption:65W
•
32WattsRMS(16Wx2)
•
FrequencyResponse180~20,000Hz
•
Class HD is a trademark of Audera International Sales Inc.
All specifications, features and dimensions are subject to
change without notice.
14 | Roth Sub Zero User Manual
Roth Bar 1 SubZero Manual NoStrap.indd 14
2/5/12 12:08:34
USer ManUal
engliSH
notes:
rothaudio.co.uk | 15
Roth Bar 1 SubZero Manual NoStrap.indd 15
2/5/12 12:08:35
Service
Please contact your local
authorised dealer or reseller.
Email:[email protected]
www.rothaudio.co.uk
In accordance with our policy of continuous development, we reserve
the right to change specifications without notice. Photographs are for
illustration only and actual product may vary. E&OE.
Roth Bar 1 SubZero Manual NoStrap.indd 16
Find us on Facebook.
JustsearchforRothAV.
2/5/12 12:08:39