1
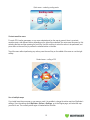
Index
INTRODUCTION
2
FOR YOUR SAFETY
2
GETTING STARTED
2
INSTALLATION
2
CONTROLS
3
MAP
4
CURSOR
4
SEARCHING FOR LOCATIONS
4
FINDING A ROUTE
5
NAVIGATION
5
ACTIVATING THE GPS CONNECTION
6
DEACTIVATING THE GPS CONNECTION
ADVANCED FEATURES
7
7
ADJUSTING MAP VIEW
7
LOCATION MESSAGING
8
USING THE BEACON
8
FAVOURITES
9
PARKING
10
ADDING A ROADBLOCK
10
POINTS OF INTEREST (POIS)
10
QUICK MENU
11
CONTEXT-SENSITIVE MENU
12
USE OF MULTIPLE MAPS
12
SERVICES
13
TRAFFIC INFORMATION
13
SAFETY CAMERA
13
SERVICE SETTINGS
13
SETTINGS AND LANGUAGE OPTIONS
14
TRANSFERRING THE LICENSE
15
TROUBLESHOOTING
16
TURNING INSTRUCTIONS EXPLAINED
17
1
Introduction
WF Navigator is a GPS navigation application for mobile phones. It transforms a mobile phone into a GPS
navigator that can be used in combination with a compatible Bluetooth GPS receiver. WF Navigator is delivered
on a memory card or similar media that contain the navigation application and detailed digital maps.
WF Navigator provides door-to-door routing and guidance to the selected destination. The application assists
the driver with the help of a detailed navigation map, visual turning instructions, and voice guidance. The user
may also browse the map, find a location or services, and use other features described in this document.
For Your Safety
PLEASE ACKNOWLEDGE THAT THE PRODUCT IS PROVIDED ‘AS IS’. SOFTWARE AND MAPS MAY
CONTAIN DEFECTS OR INCORRECT NAVIGATION INFORMATION, AND GPS POSITION DATA MAY BE
INACCURATE OR TEMPORARILY UNAVAILABLE.
ACKNOWLEDGE THAT ANY GUIDANCE RELATING TO NAVIGATION IS, AND IS INTENDED TO BE, ONLY
A GUIDE AND THAT NO VEHICLE CAN BE CONVEYED ALONG ITS JOURNEY BY USING THE PRODUCT.
THE DRIVER AND DRIVER ALONE IS RESPONSIBLE FOR THE DRIVING OF THE VEHICLE.
FOLLOW TRAFFIC REGULATIONS, AND FOCUS YOUR ATTENTION ON DRIVING.
OBEY ALL LOCAL LAWS. DO NOT USE THE PRODUCT IN ANY WAY WHATSOEVER THAT COULD COMPROMISE DRIVING OR OTHERWISE CONVEYING ANY VEHICLE.
DO NOT USE THE PRODUCT AS ON-LINE CONTROL EQUIPMENT IN HAZARDOUS ENVIRONMENTS REQUIRING FAILSAFE PERFORMANCE, SUCH AS THE TRANSPORT OF ANY HAZARDOUS MATERIAL OR
NAVIGATION FOR EMERGENCY VEHICLES, MILITARY VEHICLES, OR OTHER HIGH-RISK ACTIVITIES.
Getting Started
WF Navigator can be used with all compatible Symbian Series 60 (S60) mobile handsets. The product requires
a free memory card slot. See www.wayfinder.com/compatibility for an updated list of compatible phone models
and memory card media requirements.
Installation
Insert the Wayfinder memory card in an empty memory card slot of a mobile phone. The memory card slot is
normally located on the side of the mobile phone or in the back, next to or beneath the battery. Please consult
the user manual of your mobile phone if you have trouble finding the slot.
After you have inserted the memory card, turn on the mobile phone normally. Go to the application menu and
select Wayfinder.
2
NOTE: Some models of phone may require separate installation of WF Navigator before you can use it. For
these models there is an installation package on the memory card. Please consult your phone’s manual for
further details.
When the program starts for the first time, you are prompted to enter a licence key to activate the product for
that phone. Please enter the licence key and press OK. The key is located inside the product package or in the
back of your user manual. During the activation, the product sends out a registration message and receives
confirmation via SMS or Internet connection. Make sure your SMS or Internet connection settings are correct in
order to successfully activate the product.
Controls
The standard keyboard layout for Series 60 is shown below. Some models may have a different set of keys
from this.
Scroll key
‘Browse’ mode: scroll map or move cursor
up, down, left, or right;
‘Navi mode’: press up or down to progress
along the route, or press left or right to
change zoom level
Call-key
Call active object
Left softkey
Select / OK / View
1-key
C-key
Zoom in
Clear route
Right softkey
Edit-key
Exit / Back / Cancel
Change display mode
3-key
2-key
Show cursor
Zoom out
4-9 keys
Use shortcuts to favourites
*-key
#-key
Pick object on map
Show quick menu
0-key
Orient the map with north at the top
3
Map
The map is in ‘Browse’ mode when the application starts. In this mode you can press the arrows of the scroll key
to browse the map in the desired direction. You may press the <1> key to zoom in and the <2> key to zoom out.
The map mode can be changed from Browse to ‘Navi-mode’ and back again by pressing the scroll key. Navimode is switched on automatically whenever a route is searched for and navigation starts. In Navi-mode the up
and down arrow keys are used to move forwards and backwards through the route. The left and right arrows
control the zoom.
Cursor
You may display a cursor or pointer on the map by pressing the <3> key in S60 models. The name or address
of the location the cursor points to is automatically displayed next to it.
Searching for locations
To search for addresses, cities, suburban areas, and services stored in the map database, select
Wayfinder: Options > Find > Location. You can move between different search alternatives by pressing the
scroll key left or right. There are six different alternatives for searching:
1. Address. Type in the street address of a desired location. You can type just a couple of letters of an
address and Wayfinder will automatically display a list of addresses that best match the letters
typed. Note that you can limit your search to a certain area by f rst entering a postal code or a city
name. Only addresses that match the postal code or city will then be displayed.
2. City. Type in the desired city or suburban area. You can decrease the amount of typing by just using
the first couple letters of the name. Wayfinder will display a list of cities and areas that best match
the letters typed.
3. POI. Select the category of a point of interest (POI), and then select the POI from the list that is
displayed onscreen. Example POI categories are petrol stations or restaurants. You may type in a
partial or complete word and Wayfinder will find all POIs in the selected POI category with names
that match your entry. Please read the ‘Points of interest’ section for more information.
4. Contacts. Select a contact from the list. A contact is a person from among your phone’s contacts.
The contact will be shown on the list if it has address information available. After the contact is
selected, a list of the contact’s addresses is shown.
5. Favourites. Select the desired location from a list of your personal favourites. Please read the
‘Favourites’ section for more information.
6. WGS84. Select the location by entering the co-ordinates.
7. History. Select the desired location from the list of most recently used locations.
After your selection, press OK and the map will zoom in on the selected location.
4
Finding a route
The most important application for WF Navigator is finding a route to a destination. To find a route, select the
menu item Wayfinder: Options > Find on S60 models. You will find the following navigation options:
• Route. Finds you the fastest route to your destination when you want to navigate to a single destination.
• Plan route. Allows you to plan a complex route with multiple locations (waypoints). You may create a
new route or edit an existing one.
• Shorter route. Finds you a shorter route to the destination. The shortest route is not necessarily
the fastest. (This option is visible only during navigation.)
• Detour. Finds you an alternate route to the destination. You can use the detour function when your
current route is blocked by an accident, for example. (This option is visible only during navigation.)
• Clear route. Stops the navigation and deletes your current route.
• Location. Displays the location of your choice on a map.
When a GPS signal is available, your current position is used as the point of origin for navigation. Otherwise,
the software will prompt for a point of origin.
Navigation
When WF Navigator has computed your route, you can start navigating. WF Navigator gives you two types of
driving assistance:
1. Visual guidance displayed onscreen. The route to the destination is displayed on the map as a thick
green line. Each turn is also highlighted on the map. For each turn, a clear arrow symbol is
displayed on the screen along with the distance to the next turn. Additionally, the screen shows the
current street name and estimated driving time to the destination.
2. Voice guidance from the mobile phone speaker or hands-free kit. You will receive spoken turning
instructions while driving. You can change voice guidance properties and volume settings by selecting Wayfinder: Options > Settings.
Whenever a GPS signal is available, WF Navigator automatically updates your position along the route, manages map zoom level based on driving speed, and provides driving instructions.
5
Street name or signpost
Turn instruction
Distance to instruction
Second turn instruction
Route
Current position
Status of traffic information
Compass
Driving distance to destination and
estimated driving time remaining
Current street name
To utilise the full potential of WF Navigator, use it with a Bluetooth GPS device. The GPS device provides
real-time position information via your mobile handset, over a wireless Bluetooth connection. The GPS device
receives the position information from a number of satellites orbiting the globe. Note that the normal signal
strength of the GPS system limits it to outdoor use only.
Activating the GPS connection
In order to navigate with GPS, you need to establish a connection between WF Navigator application and a
GPS source. A GPS source can be:
• Phone’s internal GPS if such exists.
• Bluetooth GPS modules.
If the phone has an internal GPS, it is selected and activated by default. If the phone does not have an internal
GPS you will need to have an external Bluetooth GPS module.
To use an external Bluetooth GPS module you need to establish the connection between your mobile phone
and the GPS module:
1. Make sure the Bluetooth GPS device battery is charged, and turn the device on.
2. When WF Navigator is started for the first time, the application must be manually coupled with the GPS
device. To do this on S60 models, select Wayfinder: Options > Activate GPS, ; wait until the program
detects all available devices; and select your GPS receiver from the list of available Bluetooth devices.
WF Navigator remembers the GPS device selected and automatically connects to it the next time it comes
within Bluetooth signal range. Please read ‘Settings and language options’ section for more information about
GPS sources.
The GPS device receives its position from satellites. Place the GPS device on a car dashboard or in a similar
location where there is a clear, unblocked view of the sky. Receiving the f rst position f x may take as long as
several minutes, depending on GPS signal quality and the model of the GPS device.
6
WF Navigator indicates GPS status and position information availability on the mobile phone’s display as
follows:
GREEN
YELLOW
RED
Position is available
Position is inaccurate or not
available
No connection
Deactivating the GPS connection
The connection to the GPS is automatically closed when WF Navigator is closed. Select Wayfinder: Options
> Deactivate GPS on S60 models to manually disable a GPS connection. Automatic GPS connectivity can
be permanently switched off by selecting Settings from the menu and changing the value for the GPS entry to
Manual.
Advanced Features
Adjusting map view
The View menu is used to control map display, scale, and perspective. The S60 models have the following:
• Traffi c alerts shows a list of traffic incidents in the vicinity or on the selected route.
• The Display mode menu contains generic display options. Select 3D or 2D display to change the
map perspective. Select GPS display to show detailed information on satellite availability and signal
strength. Select Safety screen to view turning instructions as large icons. The same options can be
found from the quick menu shortcuts.
• Zoom to zoom the map in <1> or out <2>.
• Cursor to display a cursor over the map.
• Set as default view sets current map display as the default view. The default view is shown each
time the application is started.
7
Safety screen
Distance to turn
Turning instruction
Speed
Estimated time of arrival
Remaining distance to destination
Next street name
Current street name
Location messaging
Location messaging allows you to share destinations, locations, and addresses between mobile phones
equipped with WF Navigator. Location messaging uses SMS messages to exchange location-bound information between two or more peers. You can, for example, send the location of your favourite restaurant to your
friend or see the current locations of friends on your navigation display.
To create and send location messages on S60 mobiles, select Wayfinder: Options > Location messaging >
New message > Location message. You can also pick a desired location from the map with the cursor, press
the scroll key, and then select Send location.
When you receive a location message, a new message notification appears on top of your navigation map. To
view, browse, and manage received location messages, select Wayfinder: Options > Location messaging >
Inbox. You can also pick a location message from the map with the cursor, press the scroll key, and then select
Open.
To view friends, select Wayfinder: Options > Location messaging > Friends. You can see only those friends
who are transmitting their location or have sent their position to you directly.
Sending a location message costs the same as sending a normal SMS message. Please consult your operator
for the message prices that apply for your mobile phone subscription.
Using the beacon
The beacon can be used for automatically transmitting your position to desired recipients. The beacon will periodically send your position to the recipients by means of a position message. The beacon is normally disabled,
hence it must be enabled before use. Be aware that if you choose to transmit your position with the beacon, the
recipients will be aware of your location until you disable the beacon or turn off WF Navigator.
To view and alter beacon settings, select Wayfinder: Options > Settings. On the Beacon page, press the
scroll key to alter the values of the following settings:
• Automatic start. Select Yes to turn the beacon on automatically each time WF Navigator is started.
8
• Recipients. To set the phone numbers of recipients for beacon messages.
• Send interval. To set the time interval between message transmissions. The format is hours:
minutes : seconds.
• Distance threshold. To set the minimum distance that must be travelled before the next position
transmission.
To activate and deactivate the beacon on S60 phones, select Wayfinder: Options > Location messaging and
Beacon: On / Off.
IMPORTANT NOTE: Each time the beacon sends your position to any single recipient, an SMS message will
be sent. Please consult your mobile phone operator for the fees that will be charged for the messages. Depending on pricing, using the beacon frequently may increase your mobile phone bill significantly.
Favourites
Frequently used destinations can be saved to the favourites list for easy access. You can store addresses,
cities, and points of interest (POIs) in the favourites. You can also save your current location as a favourite.
Locations are added to favourites using context sensitive menu. To do this click <3> to display cursor and then
press the scroll key on the location you wish to add and select Context sensitive menu > More Options >
Add to favourites and choose one of the following options:
To manage your favourites list, select Wayfinder : Options > My favourites. You can then activate the selected
item from list by pressing the scroll key. Activation either starts navigation (when a GPS signal is available) or
displays the favourite on a map (when no GPS is available).
To manage your favourites list, select from the options as follows:
• Show location to display the selected item on a map.
• Find route to navigate to your favourite.
• Send landmark to send the favourite to another phone..
• Show details to display the favourite details.
• Edit > Rename to change the name of the selected item.
• Edit > Delete to permanently remove the selected item from the favourites list.
• Edit > Delete all to permanently remove all favourites.
• Edit > Move to sort the items in the favourites list. Use the up and down arrows to move an item in
the list, and then press the scroll key.
9
• Edit > Set speed dial to create a navigation shortcut key for the selected item. You can use the 4-9
keys as navigation speed dial keys.
Parking
Car parking management can be used to keep track of your car’s location and elapsed parking time. Car
parking management is available only when the GPS location is available. To manage car parking, select
Wayfinder: Options > Parking > Options and then select:
• Park here to store your current car location. The exact location of the parking spot is acquired from
the GPS device.
• Status to display car park status and parking time.
• Set time of arrival to reset the parking time.
• Location > Show details to display the parking location details.
• Location > Show location to display the parking location on the map.
• Clear to reset parking information.
Adding a roadblock
Permanent roadblocks can be placed on street segments that you want to permanently avoid in navigation.
Roadblocks may also be used to address minor errors or anomalies in map data.
On S60 phones roadblocks are added using context sensitive menu. To do this click <3> to display cursor and
then press the scroll key on the location you wish to place the roadblock and select Context sensitive menu
> More Options > Add roadblock. A cursor with a special edit symbol will appear on the map display. Then
move the cursor to the location where you wish to place the roadblock. Press the scroll key.
To edit or remove existing roadblocks, select Wayfinder: Options > Roadblocks > Options.
Points of interest (POIs)
WF Navigator includes a large number of special locations such as hotels, petrol stations, golf courses, and
others. These locations are commonly referred to as points of interest or just POIs. The points of interest are
shown on the map as special square shaped icons.
To choose the POI categories that are displayed on the map, select Settings from the menu and scroll right to
the POI page. Use the scroll key to select from the list the POI categories that are to be visible.
There are two alternative ways to pick and highlight a POI from the map:
10
• Press the <*> key. In case there is more than one POI on the current display, you may browse the
POIs by pressing the <*> key.
• Move the cursor on top of a point of interest. By moving the cursor on top of a POI, the POI is
automatically highlighted.
To search for a specif c point of interest, select Find Location from the menu, scroll right to the search dialog
with POIs, select the correct POI category, and type in all or part of the name. The matching POIs are ordered
by distance from the current location (when GPS signal is available).
Whenever a point of interest is picked or highlighted, you can call the displayed phone number by pressing the
<call> key.
You can also set a proximity alert for a POI category. This feature will give you an alert whenever you approach
a POI from the selected category. To set a proximity alert, select Settings from the menu and scroll right to the
POI page. Choose the POI category and then select Options > Proximity alert to specify the distance at which
an alert will be given.
You can also add your own POIs to WF Navigator. You can do this by downloading new POI datasets to a directory on your memory card. More information and tools related to POI management can be found on Wayfinder’s
Web site, www.wayfinder.com.
Quick menu
The quick menu contains shortcuts and options for commonly used navigation settings. To open the quick
menu, press the <#> key. Once the menu is open, you can see icons and text representing the different setting
choices. The currently selected choice is highlighted. You can change the selection by pressing the right or left
scroll key arrow; the up and down arrows change the menu category.
The quick menu contains the following options:
• Voice guidance volume. Change the volume of the voice instructions.
• Traffic info. Switch traffic information on or off.
• Colour theme. Change the map colour and contrast.
• Display mode. Change the display mode, options being 2D, 3D, safety screen, and GPS display. The
safety screen option is visible only when a route has been selected.
• Route type. Change route type between fastest and shortest.
• Routing mode. Set the routing mode to match your current means of transportation. Available
transportation options include car, bicycle, or pedestrian navigation.
11
Quick menu – selecting routing mode
Context-sensitive menu
For each POI, location messages, or any cursor-selected point on the map in general, there is a contextsensitive menu, with different actions depending on the type of item selected. You can access this menu by first
selecting the item and then pressing the scroll key. Use the scroll key to select the action to be performed, and
press down on the scroll key to perform the selected action on the item.
To exit the menu without performing any action, press the scroll key on the middle of the menu or use the right
softkey.
Context menu – calling a POI
Use of multiple maps
If you install more than one map on your memory card, it is possible to change the active map from Wayfinder’s
settings. Open the settings from Wayfinder: Options > Settings, go to the Region page, and select the map
you wish to use. The currently active region is marked with a tick mark.
12
Services
Traffic information
In areas where traffic information is available, you can subscribe and activate it from WF Navigator. Once subscribed, you are able to receive real-time information about traffic jams, incidents, and other events that might
influence your route selection. When automatic routing is used with traffic information, your route is always
recalculated to be optimal in view of the delay caused by traffic.
To subscribe or activate traffic information, select Wayfinder: Options > Services, then select Traffic info and
press the scroll key or select the desired action from the options menu. When traffic information is activated, its
status is represented with a small balloon at the bottom right corner of the map display. Green indicates working
and valid data, yellow means that the information is old, and red means that an error has occurred in retrieving
the data.
Note that the traffic information service uses GPRS/3G to retrieve small quantities of data in the background.
Only changes in traffic information are transferred over the network, in highly compressed format to minimise
the data traffic. Please consult your operator for the packet data prices that apply for your mobile phone
subscription.
Safety camera
In areas where safety camera information is available, you can download and activate it from WF Navigator.
Once it is activated, you are able to receive voice-assisted proximity alerts from safety cameras while en route.
To activate or download updates to the safety camera database, select Wayfinder: Options > Services; select
Safety camera; and press the scroll key or select the desired action from the options menu.
Note that downloading safety camera database updates uses GPRS/3G. Please consult your operator for the
packet data prices applicable for your mobile phone subscription.
Service settings
Service settings allow you to change the way traffic incidents affect your route selection and how often the traffic information is automatically updated. To access settings, select Wayfinder: Options > Settings. From the
Traffic page you can change the following values:
• Traffic information,, to control whether traffic -related information is retrieved and shown while you
are driving along the route
• Dynamic routing, to let the navigator recalculate the route when traffic information changes
• Update interval, to change how often new events are retrieved from the server
On the Server page you can set the values for communication with the traffic information server.
13
• Default access point. The default access point must be set correctly in order for you to retrieve
service data over the Internet. It is recommended that you use the same access point as in accessing the Internet with your mobile phone’s Web browser, instead of using access points for “WAP” or
“MMS”, for instance.
• Server address tells your navigator from where the data will be retrieved. Please leave the default
value active unless otherwise instructed.
• Port specif es the communication port used with the server address. Please leave the default value
active unless otherwise instructed.
• Connection timeout indicates the time after which an unsuccessful traffic information retrieval will
be stopped.
Settings and Language Options
To view and configure WF Navigator properties, select Settings from the menu. Use the scroll key to the left
or right to select a settings page and it’s up and down arrows to select a list item. Press the scroll key or select
Change from the options menu in order to change the properties of a selected list item. Select Back or Done to
save your changes and return to the map.
The Navigation page contains the following GPS navigation settings:
• Automatic scaling. When automatic scaling is enabled, the map zoom level is adjusted automatically
according to your driving speed.
• Voice guidance volume. Select a volume level for voice instructions that suits your navigation preferences.
• Voice. Select the speaker voice used in navigation guidance.
• Positioning method. Select Integrated GPS to use phone’s internal GPS. To use an external GPS
module select either Bluetooth GPS (Direct) or Bluetooth GPS (Shared). In case of shared communication you need to pair the GPS module using phone’s own Bluetooth pairing functionality as in case
of any Bluetooth device. In case of direct method, WF Navigator application communicates
with the GPS directly. With an external GPS module the preferred positioning method is direct.
• GPS activation. Select the automatic GPS function to activate the GPS connection automatically
when WF Navigator is started. When GPS is set to manual, you must turn on the GPS
connection by selecting Wayfinder: Options > Activate GPS.
• Powersave. When powersave is set to active, the mobile phone screen backlight is automatically
turned off and is turned back on only when new driving instructions are given. If powersave is off,
the screen backlight is always on.
• Safety camera alerts. Once you have downloaded safety camera information, select On to display
proximity alerts when there is a camera along the route and your current speed exceeds the speed
limit. Please see the section ‘Services’ for more information.
14
• Graphics quality. With High selected, the lines on the map display are smoother than in Normal
mode. Note that using this setting can slow down WF Navigator and decrease the display
frame rate of some phones.
• Allow toll roads. Set routing preferences related to the use of toll roads.
• Allow ferry. Set routing preferences related to the use of ferries while travelling between land
areas.
• Colour theme. Select suitable map colour theme and contrast (e.g., daylight or night theme).
• Measurement units. Select the units to be used for the distances.
• Handsfree invoke. Select On if you are using a hands-free device with built in power save system, to
avoid navigation voice instruction clipping.
Please read the ‘Points of interest’ section for POI settings, ‘Using the beacon’ for beacon settings and the
‘Services’ section for service settings.
The application language settings, including help files and voice guidance language, are automatically selected
to match the language setting of the mobile phone. The list of supported languages is shown on the product
package. If no matching language is available, WF Navigator defaults to the English language.
Transferring the license
According to the licensing terms of WF Navigator, it is allowed to use the program on only one device at a time.
To prevent unauthorised copying, the product is linked to your device during license activation. You can transfer
the license to a new device by following the instructions below:
Transferring the licence to a new device: The WF Navigator licence can be transferred to a new device, but
note that you first need to deactivate the license from the device that is currently using the same license.
1. Go to Wayfinder : Options > About product > Options > Deactivate license. The license key is
deactivated using a network connection and released to be activated with a new device.
2. Transfer your WF Navigator memory card to the new device, install WF Navigator and start the application..
WF Navigator automatically prompts you to re-activate the product with your license key.
Note that the number of times the license may be transferred to another device within a month is limited.
If you are not able to deactivate the license using your device, please contact Wayfinder customer support
either by telephone or by email. Please locate your licence key before making the contact, and include the
license key in your message if you make contact via email. The Customer Support will help you make the
deactivation and license transfer. You can find the contact details of Wayfinder Customer Support in a separate
leaf et and on Wayfinder’s Web site, www.wayfinder.com.
The End User License Agreement does not allow the use of the product with two or more devices simultaneously. If such use is desired, all devices involved must have a separate licence.
15
Troubleshooting
In case the WF Navigator application icon does not appear in your mobile handset menu for some reason,
please check the following troubleshooting list:
• Check that the memory card type is correct. For example, some mobile phones require a dual-volt-age
memory card and do not work with single-voltage cards.
• Check that the memory card is correctly seated in the phone’s memory card slot and that the back cover is
closed.
• In some models of phone, WF Navigator, like other applications, appears in the ‘My own’ folder instead of the
main menu.
• In case your WF Navigator product was delivered on DVD, please conf rm that you have first installed the
desired phone operating system support and map coverage on the memory card.
• Check also that the format of the memory card is FAT and not FAT32, for some mobile handsets do not
support FAT32 f le systems.
• Some models of phone may require separate installation of WF Navigator before you can use your Wayfinder
product. If your phone is one of these models, please make sure you have installed the package from the
memory card.
If your Wayfinder product does not work or you have trouble licensing it, please see our support pages for more
help or contact our help desk. To access the Wayfinder support pages or frequently asked questions (FAQ),
please visit www.wayfinder.com.
16
Turning Instructions Explained
WF Navigator gives you visual instructions whenever such action as turning is suggested. Remember that
these instructions are only suggestions and that real traffic situations must be taken into account while you are
driving. If you miss an instruction, the correct route will be recalculated and new directions given in an instant.
In the table that follows you can find the most common signs used.
Right turn
Left turn
Take the right lane
Take the left lane
Turn right after one or more roads
Turn left after one or more roads
Make a U-turn
Make a U-turn (left-side traffic)
Slight turn right after one or more roads
Slight turn left after one or more roads
Slight turn to the left
Slight turn to the right
Exit left from the motorway
Exit right from the motorway
Exit roundabout in the direction indicated
(left-side traffic)
Exit roundabout in the direction indicated
Destination
Stay on this road
Take an exit to the left
Take an exit to the right
Turn left to take a diagonal route between
other roads
Turn right to take a diagonal route
between other roads
17