1
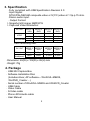
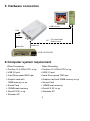
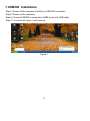
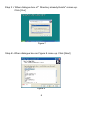
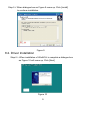
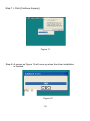
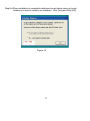
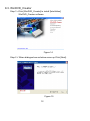
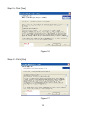
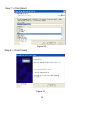
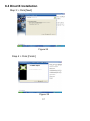
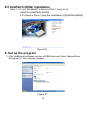
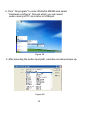
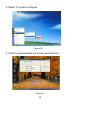
USB202
Video/Audio
to USB 2.0 Adaptor
Operation Manual
1. Introduction
USB 202 is a plug-n-play real-time video /audio capture box with USB 2.0
interface to PC. You can preview, record, or playback audio/video from a VCR,
camcorder, or DVD on your PC. The input audio/video can be captured in
MPEG 2 or MPEG 4 format, which subsequently can be edited, added titles and
burn onto a disc to create your own VCD, SVCD or DVD titles. You can also
snapshot a video to create a still image in BMP/JPG format.
USB2.0 interface provides a high-speed transmission rate so you can watch
video programs at high resolution up to DVD quality. It offers a simple and
easy way to get all of your old VHS tapes or movies on to VCD or DVD so
you can preserve your family treasures for a lifetime.
2. Features
. External USB 2.0 plug-n-play video/audio capture box, no power adapter needed
. Composite Video or S-Video input; supports NTSC, PAL and SECAM input system
. Stereo audio input
. Bundled with capture and edit software:
> WinAVUL-M9205 for preview, record and playback AV signal
on your PC, and convert image file format
> WinDVD_Creator for video editing and burning video into VCD or DVD or
SVCD data disc.
. Snapshot to save still image as BMP or JPEG file.
. Video captured in MPEG 2 VGA/MPEG 2 DVD-NTSC/MPEG 2 DVD-PAL/
MPEG 4 VGA/MPEG 4 DVD-NTSC/MPEG 4 DVD-PAL format.
. High video resolution up to DVD quality
. Supports resolution up to 720x480(NTSC)/720x576(PAL)/640x480 at
30 and 25 frame/sec. respectively.
. Preview on full screen and window size adjustable.
. Compatible OS: Window XP
1
3. Specification
. Fully compliant with USB Specification Revision 2.0
. Input Signal:
NTSC/PAL/SECAM composite video or S(Y/C) video at 1 Vp-p 75 ohm.
. Stereo audio input.
. Output Format:
> Snapshot still image: BMP/JPG
> Captured Video Resolution:
MPEG 2
VGA
MPEG 2
DVD
MPEG 4
VGA
MPEG 4
DVD
640x480
29.97fps
640x480
PAL/SECAM
29.97fps
720x480
29.97fps
720x576
25fps
640x480
29.97fps
640x480
29.97fps
720x480
29.97fps
720x576
25fps
MPEG 2
DVD
MPEG 4
VGA
MPEG 4
DVD
6 Mbps
3 Mbps
IN \ OUT
NTSC
Data Transmitting Rate:
IN \ OUT MPEG 2
VGA
Video(max) 6 Mbps
Audio(max)
48KHz
384kbps
48KHz
384kbps
44.1KHz
354kbps
3 Mbps
44.1KHz
354kbps
. Dimension: 65(W) x 102(D) x 26(H) mm
. Weight: 70g
4. Package
. USB 202 Capture Box
. Software Installation Disc
(Includes driver, AP software--- WinAVUL-M9205,
WinDVD_Creator....)
. Serial number of WinAVUL-M9205 and WinDVD_Creator
. USB Cable
. Video Cable
. S-Video cable
. Phono-RCA Audio cable
. User Manual
2
5. Hardware connection
USB 2.0 port
S IN
V IN
Audio
in
Video Out
or
PC sound card
Audio Line in
Audio out
VCR/ VCD/ DVD
6.Computer system requirement
. When Previewing
. When Recording
> Pentium IV 2.4GHz CPU or up
> Pentium IV 2.4GHz CPU or up
> USB 2.0 port
> USB 2.0 port
> Hard Drive speed 5400 rpm
> Hard Drive speed 7200 rpm
> Graphic card with
> Graphic card with 32MB memory or up
16MB memory or up
> Sound Card
> Sound Card
> 128MB main memory
> 128MB main memory
> DirectX 9.0C or up
> DirectX 9.0C or up
> Windows XP
> Windows XP
3
7.USB202 Installation
Step 1 > Power off the computer first with no USB 202 connection.
Step 2 > Power on the computer.
Step 3 > Connect USB202 to computer's USB2.0 port with USB cable.
Step 4 > A screen as Figure 1 will come up.
Figure 1
4
Step 5 > A dialogue box as Figure 2 will come up to request the installation
of the driver. Click [Cancel]
Figure 2
Step 6 > Select CD-ROM Drive
Figure 3
5
8.USB202 Application Software Installation
. An auto run Menu will come up for installation of Driver and other application
softwares:
> WinAVUL-M9205 : The application software of USB 202. It must be installed
so user interface of the USB 202 can be set up.
> WinDVD_Creator: It is a video editing and burning software developed by
InterVideo.
The software must be installed so WinAVUL-M9205
can perform completely.
> DirectX : Microsoft DirectX9.0 must be installed in order for
WinAVUL-M9205 to work normally.
> Browse : Browse the CD.
> Exit : Exit installation window.
Figure 4
6
8.1. Application Installation
Step 1 > Click "WinAVUL-M9205" to start the installation,the InstallShield Wizard
will come up as Figure 5, Click "Next"
Figure 5
Step 2 > Select your desired Destination Directory where the WinAVUL-M9205
will be installed and Click [Next]
Figure 6
7
Step 3 > When dialogue box of " Directory already Exists" comes up.
Click [Yes]
Figure 7
Step 4> When dialogue box as Figure 8 come up. Click [Next]
Figure 8
8
Step 5 > When dialogue box as Figure 9 come up. Click [Install]
to continue installation.
8.2. Driver Installation
Figure 9
Step 6 > When installation of WinAVUL is complete a dialogue box
as Figure 10 will come up. Click [Next]
Figure 10
9
Step 7 > Click [Continue Anyway]
Figure 11
Step 8 > A screen as Figure 12 will come up when the driver installation
is finished.
Figure 12
10
Step 9 > When installation is completed a dialogue box as below come up to ask
whether you want to restart your computer. Click [Yes] and Click [OK]
Figure 13
11
8.3. WinDVD_Creator
Step 1> Click [WinDVD_Creator] to install [InterVideo]
WinDVD_Creator software.
Figure 14
Step 2 > When dialogue box as below come up Click [Next].
Figure 15
12
Step 3 > Click [Yes]
Figure 16
Step 4 > Click [Yes]
Figure 17
13
Step 5 > When dialogue box as below come up to ask the user information,
key in your user name and serial number of WinDVD_Creator,
Click [Next]
Figure 18
Step 6 > Click [Next]
Figure 19
14
Step 7 > Click [Next]
Figure 20
Step 8 > Click [Finish]
Figure 21
15
8.4 DirectX Installation
Step 1 > If your WindowXP is Service Pack 1 carry on to install the [DirectX]
If it's Service Pack 2, skip the installation of DirectX,Click [DirectX]
Figure 22
Step 2 > Select [I accept the agreement], Click [Next]
Figure 23
16
8.4 DirectX Installation
Step 3 > Click [Next]
Figure 24
Step 4 > Click [Finish]
Figure 25
17
8.5 UsbPatch (ENG) Installation
Step 1 > If your WindowXP is Service Pack 1 carry on to
install the [UsbPatch (ENG)].
If it's Service Pack 2, skip the installation of [UsbPatch(ENG)].
Figure 26
9. Set up the program
1. After installing all softwares, an icon of USB Audio and Video Capture Driver
will appear in " My computer" window.
Figure 27
18
2. Click " All program" to enter WinAVUL-M9205 and select
" Hardware configure", through which you can select
audio coming to PC via Line-in or USB port.
Figure 28
3. After selecting the audio input path, a windoe as below shows up.
Figure 29
19
4. Select TV system configure
Figure 30
5. Confirm all parameters are correct and select ok.
Figure 31
20
6. Select WinAVUL-M9205
Figure 33
7. A dialogue box as below will come up when you first use the program.
Type in the serial number printed in the disc.
Figure 34
21
8. The control panel of USB 2.0 DVR is as below---Figure 34
Figure 34
Explanation of panel buttons:
BUTTON FUNCTION
EXPLANATION
Power Off
Terminate USB2.0 DVR program
Minimize
Minimize window size
Preview
Preview window - ON/OFF
Top Most
Window always on top - ON/OFF
Source
Video source select - composite video or S-video
22
BUTTON FUNCTION
EXPLANATION
Snapshot
To show Snapshot Window and save still image as BMP
or JPEG file
Help To show
Help Window for the explanation of operation
OSD Function
OSD picture adjustments for Brightness,Contrast, Hue,
Saturation
Tune Backward Decrease setting value
Tune Forward
Increase setting value
OSD Default
Return to default value
Play
Playback pre-recorded or selected video file, the icon is then
switched to Stop after activation
Stop
Stop playing during playback a video file
Record
Record video to a MPEG file
Pause / Freeze Pause/Freeze during recording or playing back
Volume - / +
OSD Timer
Schedule
Mute
Volume Up / Down adjust
To start up timer function during recording, or playback,
the time/date information at the time of recording will
appears.
Press the key to set up video recording at a
predetermined time and length of recording.
Audio mute function.
23