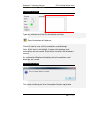
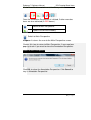
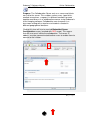
1
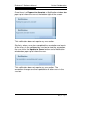
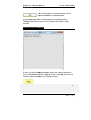
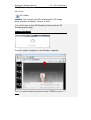
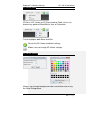
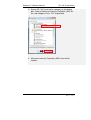
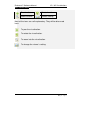
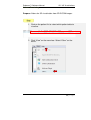
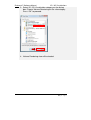
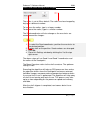
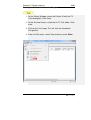
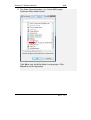
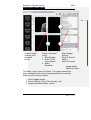
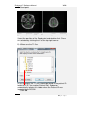
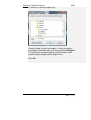
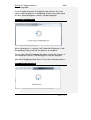
Endeavor™ User Manual
Computer Vision Research Group
School of Computer Sciences
Universiti Sains Malaysia
Malays
Last updated: 28 September 2010
This page is left intentionally blank.
Table of Contents
Introduction................................................................ 1
Primary Functionalities ................................................................... 1
Who needs Endeavor?................................................................... 2
Login Screen .............................................................. 3
Main Perspective ....................................................... 4
Menu Bar icons .............................................................................. 5
Menu Bar Icons Explained ............................................................. 6
Preview Screen .......................................................... 9
View DICOM images .................................................................... 12
Standard 2D Viewer ................................................. 13
Standard 2D Viewer Menu Bar..................................................... 14
Display multiple images as a matrix. ............................................ 16
Display multiple axis / sequence images in Standard View. ......... 18
Annotation Perspective ........................................... 20
Image Series ................................................................................ 22
ROI Drawing Board ...................................................................... 23
ROI Drawing Board Menu Bar icons Explained ............................ 24
User Annotation Text Box ............................................................ 29
Main Menu Bar Icons in Annotation Perspective .......................... 31
Online Collaborative Annotation ............................ 34
Starting Endeavor as a Server ..................................................... 35
Starting Endeavor as a Client....................................................... 35
Online Annotation Procedure ....................................................... 36
Online Chat .................................................................................. 43
2D / 3D Visualizations.............................................. 44
3D Viewer .................................................................................... 44
2D / 3D Orthogonal MPR ............................................................. 47
Maximum Intensity Projection (MIP) ............................................. 50
Volume Rendering ....................................................................... 53
White Matter Lesion Plug-in.................................... 58
How WML Works ......................................................................... 59
Skull Stripper Setting.................................................................... 60
Brain Tissue Classification ........................................................... 62
Segmented White Matter Lesion .................................................. 62
Executing WML Plug-in ................................................................ 62
Starting the White Matter Lesion Plug-in ...................................... 63
WML Menu .................................................................................. 66
Starting with a Fresh Volume ....................................................... 67
Processing WML ..................................................................... 70
Load a Volume that is Already Processed .................................... 72
Simplified Explanation of Histogram Analysis .......................... 77
Volume Rendering + Oblique MPR Viewer ............ 85
Introduction .................................................................................. 85
Volume Rendering + Oblique MPR Viewer Menu icons ................ 87
Software Update ...................................................... 91
Introduction .................................................................................. 91
Updating Endeavor....................................................................... 91
Endeavor™ User Manual
Introduction
Introduction
Endeavor™
Extensible Medical Image Analysis and Visualization Platform
Endeavor™ is a Java-based software for medical image
analysis and visualization developed by the Computer Vision
Research Group, School of Computer Sciences, Universiti Sains
Malaysia. We have been actively developing various versions of
Endeavor since 2008.The Endeavor website is here
http://cvrg.cs.usm.my/dvtrs/
Note: Endeavor's development thus far is supported by University Science
Malaysia's Research University Grant.
Endeavor™ fully supports the DICOM image format and
therefore allows users to load, browse, view and analyze
medical imagery. In addition, our software allows users to add
graphical and textual annotations on the image as dynamic
graphic overlays. Accurate measurements can be performed on
the 2D images. Interactive 3D visualization of medical datasets
allows medical experts to visualize bones, tumours, and other
tissues.
Endeavor leverages on the Eclipse™ plug-in architecture and
this enables advanced image analysis, segmentation, and
visualization algorithms to be added in the form of plug-ins. To
date, we have added DICOM communication capabilities which
allow users to retrieve remotely stored medical data from Picture
Archiving and Communication Systems (PACS).
Primary Functionalities
The primary functionalities provided by the Endeavor include:
•
DICOM Compliant Medical Image Viewer and dataset
browser, which supports MRI, CT, X-Ray, ultrasound, and
other modalities.
•
Revolutionary real-time medical image sharing and
annotation; for instantaneous medical expert collaboration.
•
Includes a built-in relational database to store patient,
dataset and annotation information.
1|Page
Endeavor™ Software Manual
Introduction
•
DICOM query and image retrieval from a PACS Server or
medical image repositories.
•
Provides nondestructive medical image annotation and
measurement capabilities to the user in a user-friendly
interface.
•
Includes basic image processing capabilities and could be
extended to include more sophisticated image analysis
algorithms.
•
Includes powerful, iteractive 3D visualization capabilities for
medical image datasets.
Who needs Endeavor?
Endeavor can be used in hospitals, clinics and research and
educational institutions and can be installed on personal
computers or laptops. With its low hardware requirements and
low-cost of entry, Endeavor is the ideal software tool for
improved healthcare delivery.
Multiplatform support
Endeavor has been known to run on Mac OS X (Leopard) and
Ubuntu Linux 9.04. However, we have not extensively tested
this. For optimal performance, we recommend running Endeavor
on Microsoft Windows.
System Requirements
• Windows XP SP3 or higher (supports Windows 7, 32- and
64-bit)
• Intel Dual Core based CPU or higher, AMD Athlon X2 or
higher. At least processor speed of 2.8Ghz.
• 2GB RAM / 250MB Hard disk space for installation
• Sun Java Runtime Environment version 6.0 and above
• Monitor screen resolution of at least 1024x768 pixels, 16-bit
color.
• DICOM images take up a lot of hard disk space. Make sure
there is ample free gigabyte (GB) hard disk space available.
2|Page
Endeavor™ User Manual
Login
Login Screen
Endeavor’s login screen is setup by an administrator.
Username : admin
Password
: to be advised
Click the Login button once after Username and Password is
entered.
Click Clear if you want to reenter Username and Password.
Click Quit if you want to exit from Endeavor.
The administrator can create other user ids. The icon User
Manager will be available on the File Menu bar once the
administrator is logged in.
To login without a user id, please click on the Guest button. No
password is required.
3|Page
Endeavor™ Software Manual
Main Perspective
Main Perspective
a
b
c
The Main Perspective screen is divided into three parts.
a) Patient Window
b) Information Window
c) Event Log Window
The Information Window and the Event Log Window
can be maximized and minimized.
The Event Log Window is used for technical
troubleshooting. The Event Log can be saved.
Save file
4|Page
Endeavor™ Software Manual
Main Perspective
Menu Bar icons
Import DICOM File Directory
Import DICOM From PACS
Start Collaboration Server
Online Collaboration
Switch to Main Perspective
Export DICOM File Directory
3D Rendering
User Manager
Manages Usernames and Passwords
Note: DICOM stands for Digital Imaging and Communications in Medicine.
5|Page
Endeavor™ Software Manual
Main Perspective
Menu Bar Icons Explained
This section explains the functions of all the icons found in the
menu bar.
Import DICOM File Directory
Purpose: To view images, DICOM files must first be imported to
the local hard drive to a specific folder. A specific named folder
helps Endeavor to bookmark that folder for easier retrieval.
Clicking this icon will display the Open Directory window to
select the folder to place the new DICOM files to be imported.
Open Directory window
Select your directory or Make New Folder. Then click OK.
The new DICOM files will be imported to the directory or folder of
your choice.
The patient details will be displayed on the Patient Window.
6|Page
Endeavor™ Software Manual
Main Perspective
Import DICOM From PACS
Purpose: In a hospital environment, all MRI or CT scans or
other forms of images are stored in PACS (Picture Archiving and
Communications Systems). These DICOM files must be
imported to a specific named folder in the local hard drive of the
PC before image analysis can be performed.
To retrieve from PACS, you need to know the connection to the
server. This information is obtained from your internal PACS
systems administrator.
1. Select Import DICOM from PACS
Import DICOM from PACS window
7|Page
Endeavor™ Software Manual
Main Perspective
2. To establish a connection to the PACS server, please get the
following information from your own organisation’s systems
administrator or IT department head:
a. Server IP
b. Server Port
c. Server AET
d. Client Port
e. Client AET
3. The following information is displayed by Endeavor:
a. Client IP
4. Once the connection server is setup correctly, you will be
able to query and retrieve any DICOM file.
Any DICOM file retrieved from PACS can be stored directly to a
local folder.
8|Page
Endeavor™ Software Manual
Preview
Preview Screen
Purpose: A screen for viewing titles of folders.
The Preview Screen is displayed by clicking once on the Patient
ID displayed at the Patient Window (see big RED arrow).
To Delete or Refresh a Patient, at the patient row, right mouse
click and select Refresh or Delete.
Right
arrow
Left
arrow
Mouse slider to view
images left or right
Number of folders
In the Preview screen, all the folders will be displayed for that
patient. This includes MRI images and CT scans.
Screen Navigation
Right arrow key
Left arrow key
Each folder contains a particular area of the body. To read the
descriptions of each file; use the right and left arrows keys on
the keyboard to move horizontally or click on the Left and Right
arrows.
9|Page
Endeavor™ Software Manual
Main Perspective
Switch off Preview
To close Preview, click the X on the tab.
Switch on Preview
View option
To switch on Preview, go to the View option in the menu bar.
Select Other (marked by RED arrow).
10 | P a g e
Endeavor™ Software Manual
Main Perspective
A new screen is displayed.
Show View
Select Preview (highlighted by a RED arrow).
Note: This Show View option gives many different choices and
can be used if there is a need to open the Volume Rendering,
DICOM image viewer, WML plug-in, Preview, and others.
11 | P a g e
Endeavor™ Software Manual
Preview
View DICOM images
Purpose: Opens folder and see individual images.
In Preview, to view the individual images of each folder of a
patient, do the following:
1. Select the particular folder (as shown by the RED arrow)
2. Double click the folder
In this example, there are 83 images in the folder and all these
83 images will be displayed.
P a g e | 12
Endeavor™ Software Manual
Standard 2D Viewer
Standard 2D Viewer
Purpose: Opens folder and load the patient image on multiple
windows.
In Standard view, to view patient images on multiple display
windows, do the following:
1. Select the folder, (as shown by the RED box)
2. Click the following icon (as shown by the RED circle)
3. The Standard View will appear.
13 | P a g e
Endeavor™ Software Manual
Standard 2D Viewer
Standard 2D Viewer Menu Bar
Standard Viewer Menu Bar (as shown by the big RED arrow)
can be used within the viewer to do few operations related to
the standard viewer.
Standard Viewer Menu Bar Icons
Display the metadata
Zoom in
Adjust contrast /
brightness
Zoom out
Pan the image
Reset
(fit to window)
Rotate the image
Reset
(revert to original)
Set contrast / brightness
to a predefined setting
Multi view
14 | P a g e
Endeavor™ Software Manual
Standard 2D Viewer
Most of the icons are self-explanatory. They are discussed
here.
To display the DICOM metadata.
To adjust the brightness / contrast level.
After selecting this icon, left-click the image and drag
sideways to change the contrast. Drag upward or
downward will change the brightness.
To pan the image within its window.
To rotate the image.
To set brightness / contrast in predefined setting.
To see a larger image, zoom in.
To reduce the image size, zoom out.
To maximize the image to window size.
To reset the image window to its original size.
To load images as a matrix display.
15 | P a g e
Endeavor™ Software Manual
Standard 2D Viewer
Display multiple images as a matrix.
Purpose: Opens multiple images for comparative study.
In Standard view, to view multiple images as a matrix, do the
following:
1. Click
and the following dialog box will appear.
2. Enter the number of columns and rows to display.
3. Press Ok to proceed.
4. Multiple images will be loaded into the window (as
shown below.)
16 | P a g e
Endeavor™ Software Manual
Standard 2D Viewer
5. In order to create multiple image display from multiple
images, just “double-click’ the images to load it into the
Standard View.
6. Dragging the individual windows will align the windows,
and snapping it in place. Multiple numbers of windows
can be created.
17 | P a g e
Endeavor™ Software Manual
Standard 2D Viewer
Display multiple axis / sequence images in Standard
View.
Purpose: To display multiple axis or sequence images in
Standard View.
Note: You will need to use images from a single patient.
Images can be from any sequence but must be different axis,
in order for the scout line to appear. In order to have
synchronized view of the images, images need to be from
same axis but must be different sequence.
In Standard view, to view images from multiple axis or
sequences side-by-side, do the following:
1. Select the folder, (as shown by the RED box)
2. Click the following icon (as shown by the RED circle)
18 | P a g e
Endeavor™ Software Manual
Standard 2D Viewer
3. Choose the images to display from the thumbnails
viewer. Multiple images selected then can be arrange
as required on multiple windows.
4. The scout line will appear automatically if correct
images are loaded. All images will change
synchronously if a different image is selected in one of
the window.
19 | P a g e
Endeavor™ Software Manual
Annotation Perspective
Annotation Perspective
Purpose: Individual images can be selected, viewed, and
annotated.
Click this back arrow
to return to the folder.
Each slide will show the slide number and image resolution. In
this example, image number is IM-0001-0001.dcm and
resolution is 512 x 512 pixels.
To view the annotation perspective, do the following:
1. Select the slide
2. Click once on the slide
20 | P a g e
Endeavor™ Software Manual
Annotation Perspective
There will be a slight delay as the perspective is setup.
Annotation Perspective Setup
Endeavor will now go into the Annotation Perspective screen.
a
c
b
The annotation perspective is divided into 3 areas.
a) Image Series
b) ROI Drawing Board
c) User Annotation
21 | P a g e
Endeavor™ Software Manual
Annotation Perspective
Image Series
Image Series
Maximize
Minimize
View Menu
Play
Scroll up
and down
bar.
The Image Series screen displays all the individual images. The
navigation icon at the top bar gives flexibility for screen display.
The Play icon is to play all the images for quick viewing instead
of viewing one image by one image. This is displayed in the
DICOM Image Viewer screen.
Click the Play icon. There is a Timer Input screen to display in
fast or slow speed. The smaller the number, the faster it plays.
Timer Input
Click Ok to start play. To exit, click Cancel.
The Play key will change to a
Stop icon
To stop playing the images, click on the Stop icon.
22 | P a g e
Endeavor™ Software Manual
ROI Drawing Board Icons
ROI Drawing Board
ROI Drawing Board
ROI Drawing Board Menu Bar Icons
Metadata
Load previous
annotation from xml
Save annotation to xml
Zoom In
Draw rectangle
Zoom Out
Draw freehand
Removing all drawing
Draw arrow
Delete selected object
Measure distance
Capture screen
Select
Load annotation
Pixel Information
Save annotation
Anti-alias
Reset to Original
23 | P a g e
Endeavor™ Software Manual
ROI Drawing Board Icons
ROI Drawing Board Menu Bar icons Explained
Most of the icons are self-explanatory. Some of them will be
discussed here.
To see a larger image, zoom in
To reduce the image size, zoom out
To get back to original size, use reset to original
Displays all pixel information by default
To save the annotations to database, click this icon
To view all the annotations, click this icon
Annotations can be retrieved from xml
Annotations can be saved in xml
Draws an arrow to highlight a particular area
Please note: XML format can be used in other applications.
24 | P a g e
Endeavor™ Software Manual
ROI Drawing Board Icons
Drawing tools include rectangle, freehand, arrow, and
measurements.
Measure a distance
How to Measure a distance
1. Click this icon. The cursor changes to a cross hair.
2. Click the start position and hold the mouse.
3. Move the cursor to the end position and release the
mouse. The length is displayed in mm.
Remove all drawings
This icon removes all drawings. A pop-up window box asks for
confirmation.
How to Remove all Drawings
1. Click Ok to clear all drawings.
2. Click Cancel if all drawings are to remain.
25 | P a g e
Endeavor™ Software Manual
ROI Drawing Board Icons
Draw Rectangle
How to Draw a Rectangle
1. Click this icon. The mouse cursor changes to a crosshair.
2. Move the mouse to a starting position. Click once and
hold down the mouse.
3. Move the mouse diagonally. Release the mouse.
Draw Freehand
How to Draw Freehand
1. Click this icon. The mouse cursor changes to a crosshair.
2. Move the mouse to a place on the image. Click and hold
the mouse and move the cursor in a circular shape.
3. Release the mouse.
26 | P a g e
Endeavor™ Software Manual
ROI Drawing Board Icons
Pixel and Property Information
Enlarged image
Property
Information
Pixel Information
Pixel Information Description
Under the Pixel information, the following information is
displayed:
1. Depth in bits, width and height in pixels
2. Picture number
The picture resolution is given in depth, width, and height. In this
example, depth is12 bits, width is 512 px, and height is 512 px.
DICOM images are 12 bits. If DICOM images are exported into
.jpg or .bmp, these formats will have a lower depth.
As the cursor moves around the image, the intensity level is
displayed along with the x and y coordinates.
27 | P a g e
Endeavor™ Software Manual
ROI Drawing Board Icons
Property Information Description
This column refers to the annotation drawing symbols applied
over the image.
Styles Choices
This refers to the line styles appearing on the rectangle, rulers,
or freehand drawings. By default, it is a SOLID line.
Size
This refers to the thickness of the lines.
Color
This refers to the colors appearing on the lines. Different colors
can be used by different users.
Rotate
The selected drawing can be rotated by selecting the bar.
Reset Button
This will reset all the styles, sizes, color, and rotation to the
default setting.
28 | P a g e
Endeavor™ Software Manual
ROI Drawing Board Icons
User Annotation Text Box
Annotation text box
Type any relevant text into this Annotation text box.
Save Annotation to Database
Click this icon to save all the annotations and drawings.
Note: If this icon is not clicked, it means the drawings and
annotations are not saved. Data will be lost when the window is
closed.
An Information Window will display that all annotations and
drawings are saved.
Information Window
This action will bring the User Annotation Section up to date.
29 | P a g e
Endeavor™ Software Manual
ROI Drawing Board Icons
User Annotation Description
User Annotation Section
For each color that is used, the annotation reflects that color and
it also describes the drawing tool used.
The User Name column is the user login name.
The Annotation column records down all the text that was keyed
into the Annotation text box.
How to Make Changes to database
Sometimes, changes to the saved annotations are required. To
make changes, do the following:
1. Click to load the annotations
2. Check (tick) that particular drawing by going to the User
Name column
3. and then click
4. Click to save the changes
30 | P a g e
Endeavor™ Software Manual
ROI Drawing Board Icons
Main Menu Bar Icons in Annotation Perspective
Once the Annotation Perspective is initiated, 2 other menu bar
icons are also activated (in RED boxes).
Switch to Main Perspective
Export DICOM File Directory
Switch to Main Perspective
Purpose: It returns the user to the Main Perspective screen.
Click on this icon to return to Main Perspective. A message box
pops up to ask if you want to close the Annotation Perspective.
Switch to Main Perspective
Click OK, to close the Annotation Perspective. Click Cancel to
stay in Annotation Perspective.
31 | P a g e
Endeavor™ Software Manual
ROI Drawing Board Icons
Export DICOM File Directory
Purpose: This option will export a selection of DICOM files to a
USB thumb drive or a folder on the local hard drive. Use this
option if a copy is required.
Select slides
From files number refers to
the beginning slide number
to be copied.
To files number refers to
the last slide number to be
copied.
Please note: The slide numbers DO NOT refer to the actual slide
number of IM-0001-0001.dcm.
After the slide numbers are entered into the From/To fields, click
Ok. To exit this option, click Cancel.
If copy of slides is initiated, the next step is to identify the
destination folder.
Save As
The File name is required. Example: SampleExport
The file format types can be in .jpg, .bmp, .png, .tif, or .gif format.
Click on the drop down to select or accept the default.
Click Save to save the slides into SampleExport and in .jpg
format. To abort this operation, click Cancel.
32 | P a g e
Endeavor™ Software Manual
ROI Drawing Board Icons
Export DICOM File Directory (Continued)
The file name is actually a folder name. In this folder, all the
copied slides are stored. The Desktop contains this folder
SampleExport.
Open the SampleExport folder. The folder should contain 3
slides with the following names:
SampleExport_1.jpg
SampleExport_2.jpg
SampelExport_3.jpg
33 | P a g e
Endeavor™ Software Manual
Online Collaboration
Online Collaborative Annotation
How Endeavor Tackles Multiuser Collaboration
The collaboration works by through the token passing
mechanism. This token is passed around among all users to
enable orderly annotation of images in turn. The user who holds
the token is analogous to one who is holding the one and only
pen. Only this user can make annotations to the image during
this time. Once the token is released using Update to Server,
the token can be taken up by another user when he or she
sends a Request to Annotate.
This technique avoids traffic jams and serves on a first-comefirst-served basis. The second or third Request to Annotate is
held in a queue.
In Diagram 1, the server talks to the clients and clients talk to the
server.
When the token is released by Update to Server, the annotation
is updated. For each client to see the updated annotation, each
client must poll the server. Endeavor uses hash polling where
each client checks for updates. The update occurs in seconds.
When the update is done, all users can see on their respective
screen the update under the respective user name.
How the Server and Clients Interact
Diagram 1
Client 1
C1
Server
C2
Client 2
C3
Client 3
34 | P a g e
Endeavor™ Software Manual
Online Collaboration
Starting Endeavor as a Server
To use online collaborative annotation, the first step is to be the
initiator and by default, the initiator’s PC becomes a server. Only
one PC can be a server at any one time. To identify that your PC
is a server, you need to give your IP address to fellow
collaborators.
Inform other users of your intention and then provide them with
the authorization code and main port. This is the tricky part.
The authorization code and main port is under the control of
your own organisation’s systems administrator or the IT
department head. To enable other users to connect to your PC,
the systems administrator must open a specific port in the
computer network. That is why this authorization code and main
port number is required.
Please see Start Collaboration Server below on how to start a
Collaborative Server.
Starting Endeavor as a Client
After you have received an email or an invitation to participate in
an Online Collaborative Annotation event, you can start
Endeavor as a Client.
To do this, you need 3 things from the initiator of the invitation:
1. Server’s IP address
2. Authorization code
3. Server port number
These setup details are required before a connection to the
server can be established.
Please see Online Collaboration on how to start a Collaborative
Client.
35 | P a g e
Endeavor™ Software Manual
Online Collaboration
Online Annotation Procedure
The online annotation procedure involves the use of drawing
tools like drawing a line, drawing a rectangle, freehand drawing,
and typing notes or comments of the drawings on a text screen.
After setting up a Server or a Client, start the Annotation
Perspective and you will be able to see the images. If you have
setup the Server or Client Successfully, the ROI Drawing Board
now includes the buttons, Request to Annotate and Update to
Server. (Note that if you already use the ROI Drawing Board in
the current session, you need to close Endeavor first and start a
new session)
Select a particular image and click the Request to Annotate
button.
This will give you the pen if you are the first requester. Else you
will be on the queue. A Notification Window Box will pop up to
inform you if the Request to Annotate is successful.
Once you hold the pen, do the necessary drawings and
comments. After completion, click the Update to Server button.
This will update the server and all the clients after a short delay.
The Collaboration Server or Client can be closed after the
collaboration session is finished. To do that, click the Home
button on the File Menu to Switch to Main Perspective. Then
click on the X on the tab to close the server or client window.
The following sections describe how to use the Online
Collaborative Annotation.
36 | P a g e
Endeavor™ Software Manual
Online Collaboration
Start Collaboration Server
Purpose: The Collaboration Server acts as a server and clients
can link to the server. This enables various users (specialists,
medical researchers, surgeons) in different locations to come
together and discuss in a collaborative manner using Endeavor’s
visual imaging software. Collaboration can also occur in a
classroom setting with a teacher and students situated in
different geographical locations.
Clicking this icon will start a new tab Embedded Server
Configuration screen (marked with RED arrow). This means
that one user must initiate the collaboration. The server IP
address must be communicated to other users to enable them to
connect to the initiator.
37 | P a g e
Endeavor™ Software Manual
Online Collaboration
Start Collaboration Server (Continued)
Any PC that runs Endeavor can be a server.
The rest of the users are clients linked to the server.
How server collaboration is setup
1. Ask the systems administrator for the authorization code
and main port number and the IP address. Click Save
once the details are entered. If you don’t want to save,
click Cancel.
2. Click Start to start a communications session. To end the
communications session, click Stop.
3. Inform other collaborators the IP address. Once clients
are connected to the server, their IP addresses are
displayed. Click Refresh to view any connections. Clear
will clear the list. * Only shown on the PC which is the
Collaboration Server.
4. Start Annotation Perspective.
Collaborative annotation works by a “who is holding the pen”
system. The first person who clicks on Request to Annotate
button holds the pen. Other users have to wait in while the user
holding the “pen” annotates.
It is possible to view all connected Clients to the server and see
which user is having the Request to Annotate or Update to
Server. To do this, go to the Main Menu.
Select View. In the drop down list, select Other. A Show View
screen displays all choices available.
38 | P a g e
Endeavor™ Software Manual
Online Collaboration
Show View screen
Select Connected Users and Click OK.
This will bring up a new window next to the Embedded Server
Configuration window.
View all Connected Clients Screen
Click X at the tab to close this Connected Users window.
39 | P a g e
Endeavor™ Software Manual
Online Collaboration
Online Collaboration
Purpose: This connects a client to the Collaboration Server. A
user needs to know the main port of the Collaboration Server to
get connected. A new tab screen Embedded Client
Configuration is displayed (marked with RED arrow) in the
Information Window.
How to setup a client to a server
1
2
3
1. Obtain the IP address from the initiator of the
collaboration. Fill in the Authorization Code and Server’s
IP address.
2. Click Save to save the connection setting. If you don’t
want to save, click Cancel.
3. Click Start to start the communications session. In this
example, the client is active. Click Stop to end the
communications session.
4. Start Annotation Perspective.
40 | P a g e
Endeavor™ Software Manual
Online Collaboration
Online
e Collaboration Annotation Screen Description
Online Collaboration Annotation Screen
At the block RED arrow, the button is
greyed out once a user clicks on this
button.
After the annotation is complete, the
user, who is holding the pen, can now
pass the pen to other users by clicking
this button. The changes are then sent to
the Server and later updated to all the
other Clients.
Please note: Each time a user clicks on any of these buttons, a
Notification Window Box is displayed
di
(see thin RED arrow).
P a g e | 41
Endeavor™ Software Manual
Online Collaboration
Notification Window Box
Once there is a Request to Annotate, a Notification window box
pops up to inform the user at the bottom right of the screen.
This notification does not require any user action.
Similarly, when a user has completed the annotation and wants
all the users in the collaboration session to view the annotation,
the user clicks the Update to Server button and a Notification
window box pops up to inform the user.
This notification does not require any user action. The
annotation changes are then updated to all other users in the
session.
42 | P a g e
Endeavor™ Software Manual
Online Collaboration
Online Chat
This chat button is used to initiate a chat
session between all collaborators.
Any collaborator that is connected to a particular online
Collaboration Server can use this button to initiate a chat
session.
Chat Session Window Box
A chat session window box pops up on the screen and each
user is identified with their login id. In this example, the user is
listed in [square brackets]
bracke as [Default User]
1. Type a message and hit the ENTER key to send a chat
message.
2. To close, click the X at top right corner.
43 | P a g e
Endeavor™ Software Manual
2D / 3D Visualizations
2D / 3D Visualizations
3D Viewer
3D Viewer
Purpose: The user will view 3D rendering with a 2D image
plane selection of Sagittal, Coronal, or Axial.
Click on this icon to view 3D Rendering. Please wait for 3D
Rendering to be setup.
3D Rendering Setup
Once the setup is complete, a new Window is opened.
The RED arrow shows the new 3D Viewer. To close, click X.
44 | P a g e
Endeavor™ Software Manual
2D / 3D Visualizations
3D Viewer Menu
2D Plane LUT stands for 2D Plane Lookup Table. Users can
choose any option of Black/White, Hue, or Saturation.
Tissue highlights both Bone and Skin.
Resets the 3D Viewer to default settings
Allows users to change 3D Viewer settings
3D Viewer Settings
Viewers can change background color and outline color using
the Color Dialog demo.
45 | P a g e
Endeavor™ Software Manual
2D / 3D Visualizations
3D Rendering allows the user to turn the image into any position
for viewing.
3D Positions
1. Place the cursor on the image, click once and hold the
cursor.
2. Move the cursor anywhere and the image will follow the
movement of the cursor.
2D Image Plane Selection
Users can enable Sagittal, Coronal, and Axial plane selection by
checking (ticking) the respective boxes.
46 | P a g e
Endeavor™ Software Manual
2D / 3D Visualizations
2D / 3D Orthogonal MPR
Purpose: The user could visualize sagittal, coronal, axial and
3D view in a single window.
1. Click on the patient list to select which patient data to
visualize.
2. Click “View” on the menu bar. Select “Other” on the
menu.
47 | P a g e
Endeavor™ Software Manual
2D / 3D Visualizations
3. Select 2D / 3D Visualization category on the dialog
box. Choose 2D / 3D Orthogonal MPR on the subcategory. Press “OK” to proceed.
4. 2D /3D Orthogonal MPR view will be loaded.
2D /3D Orthogonal MPR Viewer Menu
48 | P a g e
Endeavor™ Software Manual
Reload / Refresh
2D / 3D Visualizations
Load image
Zoom function
Most of the icons are self-explanatory. They will be discussed
here.
To see a larger image, zoom in
To reload the image currently loaded.
To load image from external folder.
49 | P a g e
Endeavor™ Software Manual
2D / 3D Visualizations
Maximum Intensity Projection (MIP)
Purpose: Maximum Intensity Projection (MIP) allows users to
view projected 3D data that represents the plane of the voxels
with maximum intensity.
1. Click on the patient list to select which patient data to
visualize.
2. Click “View” on the menu bar. Select “Other” on the
menu.
50 | P a g e
Endeavor™ Software Manual
2D / 3D Visualizations
3. Select 2D / 3D Visualization category on the dialog
box. Choose Maximum Intensity Projection (MIP) on
the sub-category. Press “OK” to proceed.
4. Maximum Intensity Projection (MIP) view will be
loaded.
51 | P a g e
Endeavor™ Software Manual
2D / 3D Visualizations
MIP Viewer Menu
Pan function
Rotate function
Zoom function
Viewer Setting
Most of the icons are self-explanatory. They will be discussed
here.
To pan the visualization.
To rotate the visualization.
To zoom into the visualization.
To change the viewer’s setting.
52 | P a g e
Endeavor™ Software Manual
2D / 3D Visualizations
Volume Rendering
Purpose: Allows for 3D visualization from 2D DICOM images.
1. Click on the patient list to select which patient data to
visualize.
2. Click “View” on the menu bar. Select “Other” on the
menu.
53 | P a g e
Endeavor™ Software Manual
2D / 3D Visualizations
3. Select 2D / 3D Visualization category on the dialog
box. Choose Volume Rendering on the sub-category.
Press “OK” to proceed.
4. Volume Rendering view will be loaded.
54 | P a g e
Endeavor™ Software Manual
2D / 3D Visualizations
Volume Rendering Viewer Menu
Pan function
Rotate function
Zoom function
Viewer Setting
Most of the icons are self-explanatory. They will be discussed
here.
To pan the visualization.
To rotate the visualization.
To zoom into the visualization.
To change the viewer’s setting.
55 | P a g e
Endeavor™ Software Manual
2D / 3D Visualizations
Plug-ins
The following pages will now look at the Plug-ins available in
Endeavor’s Medical Image Analysis and Visualization package.
56 | P a g e
Endeavor™ Software Manual
2D / 3D Visualizations
This page is left intentionally blank.
57 | P a g e
Endeavor™ Software Manual
WML
White Matter Lesion Plug-in
Introduction
This plug-in is an enhancement to the existing Endeavor
package. It is an algorithm that covers 3 basic areas. These are
as follows:
1. Skull Stripper
2. Run Tissue Classification
3. White Matter Lesion detection
The approach of this module is to make use of the T2-weighted
Flair and T1-weighted images. First step is to load or import the
Flair images. After that the algorithm will need to compare with
the T1 images. The user will be asked for the folder which
contains the T1 images.
The first process is to strip away bone tissue from brain tissue.
This is done by using the skull stripper algorithm. In this step,
the settings for the Seed point is important because this position
identifies the center of the brain. The curvature of the skull must
also be identified.
After this stripping process, the brain tissue is analyzed from its
intensity and classified as normal or abnormal tissue. This is
best pictured by using a histogram analysis. From this
classification, comes the segmentation of White Matter Lesion.
58 | P a g e
Endeavor™ Software Manual
WML
How WML Works
A diagram of the human brain is displayed below.
View of the Brain
a
scanned
images
b
Picture 1
The scan is not perpendicular. This is illustrated by the RED
lines across the brain in Picture 1. Each image slice
e is taken at
an angle. Spacing between each slice
sli of the brain scan is fixed.
Scans can be 5mm or 6mm apart. The metadata will show the
spacing. There is better clarity of White Matter Lesion (WML) if
the spacing is smaller. However, the algorithm will still detect
WML regardless of the spacing between each slice.
a is the top of the Cerebral Cortex and b is the last slide of the
brain scan at the Cerebellum.
59 | P a g e
Endeavor™ Software Manual
WML
Skull Stripper Setting
The algorithm works by first removing the surrounding skull and
bone tissue. This is a necessary step to separate out the brain
tissue from bone tissue. In order to do this, the skull stripper
setting includes several parameters. These parameters involve
the process of identifying Seed X and Seed Y, the radius, and
the curvature. These settings are preset and should run
optimally. However, flexibility is given to the user to adjust these
settings accordingly.
Seed X and Seed Y
To identify the best position for Seed X and Seed Y, the last
slice located at the Cerebellum (b) and the top of the brain
image slice (a) is displayed.
Settings for Seed X and Seed Y
Radius and Seed Setting
Referring to Picture 1, the image on the left side is b
(Cerebellum with nose structure) and the image on the right is a
(Cerebral Cortex).
The optimum setting is displayed by the GREEN crosshairs. The
radius is shown as a circle at the intersection.
60 | P a g e
Endeavor™ Software Manual
WML
Radius and Seed Setting of Skull Stripper
The radius is set at 20 as default. The radius can be changed by
keying in a different number.
To increase the radius, type in a larger number.
To decrease the radius, type in a smaller number.
The Seed coordinates will also change as the crosshairs are
moved around the images.
1. To select the Seed coordinates, position the crosshairs to
the desired position.
2. Double click on the position. Seed numbers are changed.
3. Click Ok.
4. Close this Settings window by clicking the X at the top
right corner.
The above steps will set Seed X and Seed Y coordinates and
the radius of the Seed point.
The Mean Curvature refers to the skull curvature. The optimum
setting is 0.05.
Executing the algorithm will take up CPU processor time and as
the algorithm checks from the Seed point and moves outward,
individual images are processed and comparison between brain
tissue and skull tissue is performed. The algorithm will strip away
all skull tissue leaving only brain tissue. This process may take
up to an hour depending on the processor speed and memory
available.
After the skull stripper is completed, next comes brain tissue
classification.
61 | P a g e
Endeavor™ Software Manual
WML
Brain Tissue Classification
This part of the algorithm is fast. Each slice
sli is read by the
algorithm and brain tissue is classified into different
classifications. At this point, the algorithm compares what “looks”
normal to what “looks” abnormal.
Segmented White Matter Lesion
From brain tissue classification, White Matter Lesion can be
easily segmented. The
e algorithm shows clearly in the brain,
areas affected by White Matter
atter Lesion.
Executing WML Plug-in
The WML Plug-in
in requires T1 and Flair DICOM images. The first
step involves importing these sets of images into the local hard
drive. Once these images are
re imported, the patient ID and name
is displayed in the Patient Window in the Main Perspective
screen.
Import DICOM From Directory
Or
Import DICOM From PACS
(See above documentation on how to import)
After files are imported, the new Patient ID and Name is
displayed.
Patient Window
Description of file type must either be in T1 or T2 Flair.
62 | P a g e
Endeavor™ Software Manual
WML
Starting the White Matter Lesion Plug-in
1. At the Patient Window, select the Patient ID with the T2
Flair description. Click Once.
2. At the Preview Screen, select the Ax T2 Flair folder. Click
once.
3. Click on the first image. This will start the Annotation
Perspective.
4. From the File menu, select View and then select Other.
63 | P a g e
Endeavor™ Software Manual
WML
5. The Show View will display a list. Select WML pluginEndeavor White Matter Lesion.
Click Ok to start the White Matter Lesion plug-in. Click
Cancel to exit this operation.
64 | P a g e
Endeavor™ Software Manual
WML
White Matter Lesion Screen
1
2
Original image
showing skull
and brain
tissues
3
Process Selection
listing
1. Skull Stripper
2. Brain Tissue
Classification
3. WMLs
Detection
Skull Stripper
Setting:
Seed X, Seed Y
Radius
Mean Curvature
Image details:
Spacing is 6mm
This WML screen shows the layout. The images need to be
processed before the results are displayed in the remaining
empty screens listed as follows:
1. Skull-stripped image,
2. Result of Brain Tissue Classification, and
3. Segmented White Matter Lesion.
65 | P a g e
Endeavor™ Software Manual
WML
WML Menu
The Menu Icons are explained below.
Load Volume Images icon.
This is the first step to
process WML. The volume
or image must either be
loaded or imported. Images
can be the whole volume or
selected images.
Run Algorithm icon.
After the images are loaded /
imported, the WML algorithm
can be executed. The
current image or the volume
images can be processed.
Runs the WML 3D viewer.
Show analysis results
DICOM image header
Histogram Analysis
Redo WML segmentation on
selected image
Load the parameter settings
Save the parameter settings
66 | P a g e
Endeavor™ Software Manual
WML
Starting with a Fresh Volume
A fresh volume of images is given for processing of White Matter
Lesion. This volume contains Flair and T1 images. Load only the
Flair images into the Patient Window.
1. Starting with Flair images loaded from DICOM into Patient
Window, select the Patient ID.
2. Go into the Annotation Perspective.
3. From File menu, select View, then Other.
4. Start WML plug-in.
5. At
the WML Load Volume Images icon, select
Load Selected Volume from Database.
6. The Selected Volume From Database window will display.
This will take a short while for all the images to load into
WML from the Database.
Selected Volume From Database
7. Select
the Run Algorithm icon, and select Run
Volume Images.
This is a 3-step process. It will
A) Ask for the Seed point;
B) Where are the T1 images and then
C) Where to store the output file.
67 | P a g e
Endeavor™ Software Manual
WML
A) Seed point
Select the position of the Seed point and double click. Close
this window by clicking the X at the top right corner.
B) Where are the T1 files
In this example, the T1 files should be found in the patient ID
folder of R 227 (or another Patient ID#). Endeavor
automatically locates this folder when the Patient ID was
imported from DICOM.
Click Ok.
68 | P a g e
Endeavor™ Software Manual
WML
C) Where to store the output files
Create a folder to store the output. It is best to create a
new folder in Desktop and use a filename like 227Output.
This will put all the generated files into the folder while
maintaining the integrity of the original files.
Click OK.
69 | P a g e
Endeavor™ Software Manual
WML
Processing WML
From this point onwards, the algorithm will process this new
volume until the process is completed. Process may take up to
an hour. Several progress screens will be displayed.
Skull Stripping in Process
While the process is running, it will show that Endeavor is Not
Responding. Please wait for the process to complete.
Please note: Should it happen that after an hour the process is
not completed, use the Task Manager to stop the program.
After Skull Stripping will be Brain Tissue Classification process.
Brain Tissue Classification
70 | P a g e
Endeavor™ Software Manual
WML
After Brain Tissue Classification, will be White Matter Lesion
detection.
White Matter Lesion Detection
After White Matter Lesion Detection process is done, the next
screen will show that Process is complete.
Process Complete
In this example, the time taken is 1998 seconds or 33.3 minutes.
Please note: In the drop down list for Load Volume Images, the
Load Selected Image From Database work the same way.
71 | P a g e
Endeavor™ Software Manual
WML
Load a Volume that is Already Processed
When a volume is already processed, the images can be copied
over to another PC or loaded onto the WML viewer for further
analysis.
Note: The following sample is a severe WML case.
1. Select the Load Volume Images icon. In the
drop down, select Import External Volume.
2. A directory of folders is displayed. Make a new folder on
the Desktop so that is easy to find.
Import External Volume folders
Click Ok.
This will import the images and start the loading process.
72 | P a g e
Endeavor™ Software Manual
WML
Importing External Volume process
This will take a while depending on the number of images to
be imported.
3. Select any of the images on the left column. The completed
WML detection (if any) is shown on the screen.
WML Processed Output screen
Select an
image
T1
Weighted
Brain Tissue
only
Red area is WML
detection
73 | P a g e
Endeavor™ Software Manual
WML
Show Analysis Results
Purpose: This icon will display the results of WML detection in a
tabular format.
Calculating White Matter Lesions window
After the calculation process, the results are displayed.
Calculating White Matter Lesions result
The image numbers or rows in RED are WML positive. Green
rows are WML negative.
To save this tabular result in a text format, click Save.
74 | P a g e
Endeavor™ Software Manual
WML
A Save As screen will display.
Save As
Select the appropriate folder to save the file. Type in a file name
and click Save. Click Cancel to exit this operation.
Histogram analysis
Purpose: This icon will produce an analysis based on intensity
of the pixels. From this classification, potential areas of WML
can be segmented.
A histogram setting screen is displayed.
Histogram Setting screen
Accept the default settings. Click Ok to run the analysis. Click
Cancel to exit this operation.
The result is displayed in a histogram.
75 | P a g e
Endeavor™ Software Manual
WML
Histogram Analysis Description
Histogram Analysis Diagram
HTLD is a marker. Check this box.
The algorithm uses the Box-Whisker Plot outlier method and
from this process, it generates the HTLD markers. HTLD stands
for Histogram Tail Lesion Detection.
To the right of the peak, the intensity increases. This means that
the tissue in this area would be classified as abnormal or white
matter lesion. Normal tissue has a lower intensity. With this
classification, the WML tissues can be segmented. The
processing starts from the HTLD blue line to the red line.
Click Close to close the window.
Please note: A detail explanation is found at this link: Automated
White Matter Lesion Segmentation in MRI using Box-Whisker
Plot Outlier Detection.
http://www2.warwick.ac.uk/fac/sci/dcs/events/miua2010/proceed
ings/
76 | P a g e
Endeavor™ Software Manual
WML
Simplified Explanation of Histogram Analysis
Tangent Points
CSF
WML
Picture 2
The use of Full Width Half Maximum (FWHM) is used to detect
the starting point of the process of bins until the location of the
tangent point. The histogram of Flair images is used and to get
the tangent point, the right tail of the histogram is calculated.
Then the process is repeated for the left tail of the histogram.
This identifies the cerebrospinal fluid (CSF) and White Matter
Lesion (WML).
In Picture 2, in between the cerebrospinal fluid (CSF) and white
matter lesion (WML) is normal brain tissue. From the tangent
points obtained from HTLD, the WML can be segmented.
The bins here refer to the level of bins found in 16-bit or 8-bit
images. For 16-bit images, the maximum level can be as high
as 65535 bins but only 1000 bins are used. For 8-bit images, the
maximum level of bins is only 255.
WMLs Detection Setting screen
The level
of bins.
The default bins setting is 35.00 and this is in most cases, good
enough. But when there are issues with sensitivity, it is
recommended to change the setting to 1.00 to adjust for 8-bit
images. The smaller the level of bins, the higher the sensitivity
becomes.
77 | P a g e
Endeavor™ Software Manual
WML
Redo WML segmentation for selected image
Purpose: There are certain peculiarities in the images obtained
from DICOM. These peculiarities can cause the WML algorithm
to miscalculate the intensities. When this occurs, the skull
stripper cannot process the image correctly.
An example is shown below.
Miscalculation of Intensities example
Missing lobe
1. Select the image from the left column.
2. To redo this image, click on this Redo icon.
3. A pop-up Redo WML segmentation screen will ask for the
Seed point area.
78 | P a g e
Endeavor™ Software Manual
WML
Redo WML Segmentation Pop-up Screen
4. In this screen, use the rectangle box marked with a red
oval, and select the area around the centre where the
Seed point is likely to be. The miscalculated area must be
included.
5. Click the X at the top right corner (close window).
6. This will prompt for the T1 image file name. Endeavor will
direct you to the original files folder. Select the image
number.
79 | P a g e
Endeavor™ Software Manual
WML
Select the T1 image screen
Please note: The image numbers are different for Flair and T1.
In this example:
Flair image was IM-0531-0005.dcm. The T1 image was IM0529-0005.dcm.
Select the matching T1 image number (the last 4 digits).
In this example, it is IM-0529-0005.dcm
7. Click Open.
The Skull Stripping process begins. It will take a few
minutes.
80 | P a g e
Endeavor™ Software Manual
WML
The images will be redisplayed correctly in the next screen.
After Redo image screen
Missing lobe is shown after Redo an image.
When images are miscalculated, the WML analysis is no longer
accurate. Use this Redo icon as and when needed for selected
images.
81 | P a g e
Endeavor™ Software Manual
WML
Save Parameters
Click this icon to save all parameter settings. This is useful if the
setting is going to be used repetitively. A Save Parameter Dialog
screen pops up to ask for the folder and file name.
Save Parameter Dialog screen
The file extension is .prm. Select an appropriate folder and type
in the file name.
Click Save to save the parameters. Click Cancel to exit the
operation.
82 | P a g e
Endeavor™ Software Manual
WML
Load Parameters
This icon loads the parameter settings like Seed X, Seed Y,
Radius, Sensitivity detection, etc.
Click this icon to load the saved parameter settings. A load
parameter dialog screen asks for the folder and file name.
Load Parameter Dialog screen
Select the appropriate folder and file name.
Then click Open to load the parameters. Click Cancel to exit the
operation.
83 | P a g e
Endeavor™ Software Manual
WML
WMLs 3D Viewer
This icon displays the WMLs in 3D.
Click this icon and a new 3D window is displayed.
WMLs 3D Viewer
The image is in 3D and the severity of WML is clearly seen.
Background colors can be changed by using the Settings icon.
84 | P a g e
Endeavor™ Software Manual
Oblique MPR Viewer
Volume Rendering + Oblique MPR Viewer
Introduction
In MRI scans, there are T1-weighted and T2-weighted Flair
images. These images can be rendered in 2D or 3D. This plugin offers volume rendering of MRI scans.
1. Go to File, View and select Other.
List of plug-ins
2. Click OK to select this plug-in. Click Cancel to exit.
P a g e | 85
Endeavor™ Software Manual
Oblique MPR Viewer
There is a short delay while Volume Rendering is loaded. A Java
applet window is displayed.
Java applet window
Once the app is completed, the Java applet closes and Volume
Rendering screen displays.
Volume Rendering + Oblique MPR Viewer Screen
Main
Frame
3 Side Frame
Settings
Frame
86 | P a g e
Endeavor™ Software Manual
Oblique MPR Viewer
Volume Rendering + Oblique MPR Viewer Menu icons
Viewing Options
The drop down option gives
different viewing variations
Lookup Table
Different color schemes give
different perspectives
Viewing Axis
Select any combination of
Axis to view
87 | P a g e
Endeavor™ Software Manual
Oblique MPR Viewer
Settings Frame
Purpose: This frame displays the selection of choices from the
drop down menu icons and gives a little flexibility to users who
want to experiment with different Z Aspects, angle of rotation,
markers, and scales.
Settings Frame screen (enlarged)
View Options
Axis
Turn on/off 3
Side Frame
Change Scale,
Distance,
Threshold, and
Depth
88 | P a g e
Endeavor™ Software Manual
Oblique MPR Viewer
Main Frame
Purpose: This frame gives the overall volume rendering of the
MRI scan and plays as a movie.
1. To view in moving pictures, hold the cursor down and move it
a few times. Release and the images will start to play.
2. The show is by frames per second (fps).
Main Frame in Play mode
3. Click anywhere on the image to stop play.
Note: This sample movie is scaled down from 1 to 0.5.
89 | P a g e
Endeavor™ Software Manual
Oblique MPR Viewer
3 Side Frame
This frame displays the view of 3 sides.
The lines across the diagram shows how the image is displayed
on the Main Frame.
3 Sides Frame
90 | P a g e
Endeavor™ Software Manual
Oblique MPR Viewer
Software Update
Introduction
Endeavor software update functionality allows you to download
the latest version of each plugins currently installed. We
encourage you to check the software for updates from time to
time as currently the software update function does not
automatically check for updates.
Updating Endeavor
1. From the menu, select File then select
Endeavor Software Update Manager (
2. The following window will be opened.
)
3. Now you may exit the running Endeavor window.
(Note that the software update will fail to perform update if
the Endeavor software still running)
4. Upon pressing the OK button the following windoe will be
opened.
P a g e | 91
Endeavor™ Software Manual
Oblique MPR Viewer
5. To start check for new updates from the our centralized
update server, press the Partial Update button.
6. Then when asked to choose folder, select your Endeavor
software installation folder (usually will be in Program
Files). Press OK and the for check update process will
start followed by the update installation itself.
7. Upon completion you will get the following window and
means your Endeavor software has successfully been
updated.
8. To change the configuration, such as the URL to our
centralized update server, press the Configuration
button.
92 | P a g e