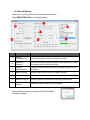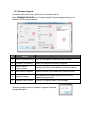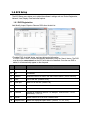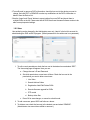
1
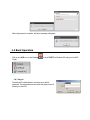
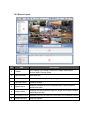
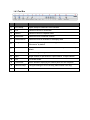
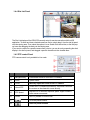
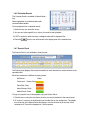
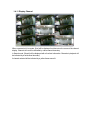
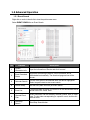
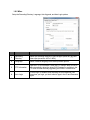
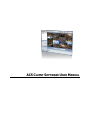
ACS CLIENT SOFTWARE USER MANUAL
1 ACS USER GUIDE
1.1 System Requirement
Recommended System Requirement
OS
CPU
VGA
RAM
HDD
WindowXP, Vista
Pentium 4, 2Ghz
1024*768, 64MB 24bit color graphic card
1GB
20MB Free space
Minimum System Requirement.
OS
CPU
VGA
RAM
HDD
WindowXP, Vista
Intel Core i5 cpu 2.80GHz
ATI Radeon HD 512
4GB
20MB Free space
1.2 Install
a. Run Advanced Client SoftwareSetup.exe on the included CD. Follow the setup
wizard to complete the installation.
b. Press
continue.
to install the program in a different directory. Press
to
c. Select what Icons and shortcuts you wish to install on your desktop. Press
move to the next screen
to
d. Select
to begin installation. When the installation is complete, the below
message will appear.
Select whether you want to launch the software and select “finish”.
1.3 Uninstall
To uninstall ACS, press UNINSTALL ACS from the Start Menu of your PC.
A window will appear in Windows7 or Windows Vista. Press YES to begin the process.
When the process is complete, the below message will appear.
1.4 Basic Operation
Click on the ACS icon on the Desktop
Folder.
, or click START on Windows PC and go to the ACS
1.4.1 Log In
The default ID is Administrator, and there is no default
password. The administrator account has the highest level of
authority on the ACS.
1.4.2 Screen Layout
No.
Description
Item
1
Toolbar
ACS Setting, Live, Search, Disconnect, Image/ Video Export,
Screen Mode, Remote Setup
2
Site List Panel
DVR Sites List
3
PTZ Panel
PTZ Camera Control (Live Mode Only)
4
Calendar Panel
Calendar Search
5
Search Panel
Displays recorded data for the selected date, controls playback
speed, and audio
6
Display Panel
Displays live and playback image from single and multiple cameras
as setup by the user
7
Information Panel
Shows the current time and site information of the selected channel
8
Event List Panel
Event list update
1.4.3 Tool Bar
No.
Icons
Description
1
ACS Setup
Option setup for Advanced Client Software
2
Live
Connect to a DVR in Live mode
3
Search
Connect to DVR in Playback mode
4
Disconnect
Disconnect from a selected channel
5
Disconnect All
Disconnect from all channels in the display area
Image
Export a selected image. Default file type is JPEG, saves to “My
Documents” by default
Movie
Save a selected video in .asf format, saves to “My Documents” by
default
8
Print
Print still image of single channel
9
Split
Single channel, 4-split channel, 9-split channel, 16-split channel
10
Full
Full screen mode
11
Time/Event
Switch between displaying the Search panel & Event list panel
12
Remote Setup
Configure settings of DVR remotely (administrator user only)
13
Window control
Minimize, Maximize & Exit Advanced Client Software
6
7
1.4.4 Site List Panel
The Site List displays all the DEVICES currently setup for remote connection with the ACS
application. To select and view a desired camera or device, simply drag it from the site list panel
onto the viewing area. Then, select the options Live or Search from the tool bar, or the little popup icons after dragging the device to the viewing area.
If you want to connect to a specific camera from a device, you can do so by expanding the site’s
display in the site list panel, and dragged a specific channel onto the viewable area.
1.4.5 PTZ control Panel
PTZ camera control is only available in Live mode.
No.
Button
Description
1
Navigation Key
8 directional arrows to move the PTZ camera.
2
Zoom
Optical Zoom.
3
Focus
Manually adjust the focus of the PTZ camera.
4
Virtual PTZ
Control the PTZ camera’s movement, Zoom and Focus with
the mouse on the channel’s screen directly.
5
PTZ Speed
Adjust the PTZ camera’s response speed. Higher number=
faster camera movement.
6
Preset
Set PTZ presets on current view.
7
Go to the preset location.
8
Save the preset location.
1.4.6 Calendar Search
The Calendar Panel is available in Search Mode
only.
Dates highlighted in red indicate dates with
recorded data available.
To start playback from a calendar search:
1.Select the day you would like to see.
2.You can also select specific hour, minute, & second to start playback.
3.If DST is selected, earlier one-hour overlapped video will be displayed first.
4.Press the
button to turn all channels in the display area to the selected time.
1.4.7 Search Panel
The Search Panel is only available in search mode.
The Search panel displays the record information for each channel from a date selected in the
calendar panel.
Each color represents a different recording mode:
No Record
White
Continuous (Yellow Color)
Panic(Red Color)
Alarm(Orange Color)
Motion(Green Color)
To jump to a specific time in the playback using the Search Panel:
1.Click the time or move the time bar to the time you want to playback in the search panel.
2.To “zoom-in” to an hour in the Search Panel, double-click on the desired hour. The display
time at the top of the Search Panel will display in minutes interval all 60 minutes of that
selected hour. Time will be displayed in 5 minute spaces.
1.4.8 Playback control panel
No.
Button
Description
1
Go to First available data
2
Forward Playback : Decrease the speed
Reverse Playback : Increase the speed
3
Step Backward
4
Reverse Playback
5
Pause
6
Forward Playback
7
Step Forward
8
Forward Playback : Increase the speed
Reverse Playback : Decrease the speed
9
Go to Last available data
1.4.9 Additional Control Options
(Audio On/Off): Turn On or Off for Audio channel.
Two-way Audio: Two-Audio between ACS and DVR.
Relay: Turn On or Off for Relay.
NOTE When options are not properly setup on the DVR side, these buttons will be disabled.
1.4.10 Event List Panel
Event List Panel will display all events related to the DVR currently connected. See section 1.6.4
Event for more information on setting up events recording on the ACS.
To start playback video from any of the events in the event panel, double-click on the item .
1.4.11 Display Channel
When a camera is in Live mode, [Live] will be displayed in white text on the corner of the channel
display. Channels in live will be indicated by a blue channel boundary.
In Search mode, [Search] will be displayed with all red text information. Channels in playback will
be indicated by a red channel boundary.
A channel selected will be indicated by a yellow frame around it.
1.5 Advanced Operation
1.5.1 Event Search
Right-click on a site in the site list to view the quick access menu.
Select EVENT SEARCH to run Event Search.
No.
Description
Function
1
System
Connection Info
Input the information of Device and click ‘connect’.
2
Event Download
Status
Right after connecting to Device, event information will be
downloaded automatically. The download progress bar will be
shown.
3
Calendar Search
If there is an event in the selected date, the date is highlighted.
Select a specific date to start event search.
4
Interval Setup
Set the time (start/ end time) for event search.
5
Event List
The desired date is chosen, the event list of the desired date will be
shown on the list. Press ‘Start’
6
Channel/Event
Filter
Event information can be sorted by channel number, time, or event
type. To view video corresponding to a specific event, double-click
on that event.
7
Start/Stop
Search
Start/Stop Search button.
1.5.2 Remote Backup
Right-click on a site in the site list to view the quick access menu.
Select REMOTE BACKUP to run Remote Backup.
③
①
⑦
④
②
No.
⑥
⑤
Function
Description
1
System
Connection Info
Input the information of Device and press ‘Connect’
2
Recording
Directory
Enter the recording directory to backup. Enter a desired file name
and select where the file will be saved.
3
System
Recording Info
Displays the start and end time of the available recorded data in
the system.
4
Backup Setting
Setup the start and end time of the data to backup.
5
Channel
Select which channels to backup.
6
Backup Progress
Backup Progress bar indicates the backup process status.
7
Backup Status
Window
Displays the backup status in text message.
When the backup process is completed, “Backup Completed”
message will appear.
1.5.3 Firmware Upgrade
To view the quick access menu, right-click on a site from the site list.
Select FIRMWARE UPGRADE to run Firmware Upgrade. Firmware Upgrade allows you to
update the DVR’s firmware remotely.
Description
No.
Function
1
DEVICE Connection Info
Input the information of Device and click ‘connect’.
2
Firmware File Directory
Select the firmware file directory to upgrade.
3
DEVICE Name/
Current Version
Displays the DVR’s current Model and Firmware Version.
4
New Version to upgrade
Displays the new Device Model and Firmware Version.
5
Upgrade Progress
Start Upgrade and upgrade progress bar shows the
upgrade progress status.
6
Upgrade Status Window
Displays the upgrade status in text message.
When the upgrade process is completed, “Upgrade Completed”
message will appear.
1.6 ACS Setup
The ACS Setup menu allows you to adjust the software’s settings such as: Device Registration,
Network, User, Display, Event and other options.
1.6.1 DVR Registration
Add, Modify, Import, Export or Remove DVRs from the site List.
1.To add a DVR, click ‘Add’ button, and input all required information
If a DVR is set to UPNP, it can be automatically detected by using the ‘Search’ button. The DVR
must be on the same network as the ACS to be able to be detected. Once the new DVR is
added, it will automatically appear on the site panel.
No.
Function
Description
1
Name
The name of the site.
2
IP
IP Address.
3
Search
Search the DEVICE sites in the same local network. (UPnP function)
4
Port
Port of the site. (Default: 9010)
5
Web port
Web Port of the site. (Default: 80)
6
ID
User ID of the site.
7
Password
Password of the site.
8
Channel
Number of channel of the site. For example: 16ch DEVICE: 1-16 or
specifically: 1,3,5,7,9...
9
Model
Select a DEVICE or DEVICE’s model name.
10
Aspect Ratio
Select the displayed Aspect Ratio. (Custom, 1:1, 4:3, 16:9)
2.To modify and/ or remove a DVR’s information, check the box next to the device you want to
change, and click EDIT or REMOVE to make any modifications to the DVR’s information or
delete it from the Device List.
3.Use the ‘Import’ and ‘Export’ buttons to export settings from one DVR and import them to
multiple DVRs on the list. Please note that all DVRs must have the same firmware version to be
able to accept exported settings.
1.6.2 User
User authority can be changed by the Administrator user only. “admin” is the built-in account for
administrating the DVR and ACS program. (Default password for the admin user is no password).
1. To edit a user’s permissions, check the box next to the desired user and select ‘EDIT’.
The User setup page will appear. Here you can:
a. Change the user’s ID and Password
b. Set which permissions current user will have. Check the box next to the
permissions you want to allow current user:
i. Live Video
ii. Search Archived Video
iii. Registration- Add/ Edit/ Delete DVRs
iv. Remote firmware upgrade for DVRs
v. PTZ control
vi. Backup video files
c. Press OK to save changes, or cancel to exit edit mode.
2. To add a new user, press ‘ADD’ and follow a~c above.
3. To delete a user, check the box next to the desired user and select ‘REMOVE’.
(Administrator user cannot be modified or removed.)
1.6.3 Display
The Display setup menu allows you to modify the OSD as it appears on the ACS.
Using the check boxes, select which information will be displayed on the video displayed on the
ACS software:
- Title: Show/ Hide the Camera’s title and channel number.
- Date/Time: Show/ Hide the Date/Time
- DEVICE Name: Show/ Hide the DVR’s name.
- Time Format Sync: Synchronize the DVR’s time format
to ACS.
- Record Status: Show/ Hide the Recording Mode for each
channel.
- Live/Search: Show/ Hide the Live/Search indicator.
1.6.4 Event
Setup the event port, event type, and popup settings for events recorded by the DVR.
No
Item
Description
1
Port
Input the same event port as the one set on the DVR’s setting to receive event
notification from the DVR. See section 4.4.3 Notifications for more information.
2
Filter
Select the type of event to receive.
3
Action
Setup the popup duration and enable beep sound on the ACS side.
1.6.5 Misc.
Setup the Recording Directory, Language, Auto Upgrade, and Auto Login options.
No.
Function
Description
1
Recording
Directory
Select the recording directory to save images (saved as .jpg) and
video clips (saved as .ASF or .MP4).
2
Language
Select a desired language from the drop-down options.
3
FTP Information
Enter the FTP’s information. Once the FTP setup is done, the ACS
will automatically detect the latest DVR firmware is available in the
FTP and will start remotely upgrading the DVRs in its device list.
4
Auto Login
If ‘Auto Login’ is enabled, after inputting ID and Password, next
time when you login, you don’t need to type in the ID and Password
again.