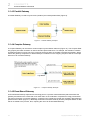
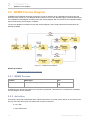
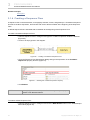
1
USER GUIDE
version 17.0.1
No Magic, Inc.
2011
All material contained herein is considered proprietary information owned by No Magic, Inc. and is not to be
shared, copied, or reproduced by any means. All information copyright 2009-2011 by No Magic, Inc. All Rights
Reserved.
CONTENTS
1 GETTING STARTED
5
1.1 Introduction to Cameo Business Modeler 5
1.2 Installation 5
1.2.1 Installing Cameo Business Modeler Plugin 5
1.3 Switching to Business Modeler Perspective 6
1.4 Working with BPMN 2.0 Projects 7
2 CONCEPTS
8
2.1 Common BPMN 2.0 Elements
9
2.1.1 Definitions 9
2.1.2 Artifacts 9
2.1.2.1 Anchor 9
2.1.2.2 Association 10
2.1.2.3 Group 10
2.1.2.4 Text Annotation 11
2.1.3 Events 11
2.1.3.1 Start Events 11
2.1.3.2 Intermediate Events 16
2.1.3.3 Boundary Events 20
2.1.3.4 End Events 24
2.1.4 Gateways 26
2.1.4.1 Exclusive Gateway 26
2.1.4.2 Inclusive Gateway 27
2.1.4.3 Parallel Gateway 28
2.1.4.4 Complex Gateway 28
2.1.4.5 Event Based Gateway 28
2.1.5 Error 29
2.1.6 Message 29
2.1.7 Participant 30
2.1.8 Sequence Flow 30
2.1.9 Message Flow 31
2.2 BPMN Process Diagram 34
2.2.1 BPMN Process 34
2.2.2 Activities 34
2.2.2.1 Task 36
2.2.2.2 SubProcess 38
2.2.2.3 Call Activity 40
2.2.3 Items and Data 40
2.2.3.1 Data Object 40
2.2.3.2 Data Store 41
2.2.3.3 Data Input and Data Output 41
2.2.3.4 Data Association 42
2.2.4 Compensation 42
2.3 BPMN Collaboration Diagram
44
2.3.1 Collaboration 46
2.3.2 Pool and Lane 46
3
Copyright © 2009-2011 No Magic, Inc.
CONTENTS
2.3.3 Communication 47
2.3.4 SubConversation 48
2.3.5 Call Conversation 49
2.3.6 Conversation Link 49
2.4 BPMN Choreography Diagram
2.4.1 Choreography 50
2.4.2 Choreography Activities
50
51
2.4.2.1 Choreography Task 53
2.4.2.2 SubChoreography 54
2.4.2.3 Call Choreography 55
2.5 Validation Rules
57
2.5.1 BPMN 2.0 Correctness (Active) Validation Rules 57
2.5.2 BPMN 2.0 Correctness Validation Rules 58
2.5.3 BPMN2 Completeness Validation Rules 59
2.6 Exporting Models in XPDL Format
3 PROCEDURES
60
61
3.1 Common BPMN Elements Procedures
61
3.1.1 Specifying Element IDs 61
3.1.2 Creating BPMN Elements in the Model Browser 62
3.1.3 Creating Participants 62
3.1.4 Creating a Sequence Flow 65
3.1.5 Creating an Event 66
3.2 BPMN Process Diagram Procedures
70
3.2.1 Creating a BPMN Process Diagram 70
3.2.2 Managing Activities 71
3.2.3 Creating Tasks 72
3.2.4 Managing SubProcesses 73
3.2.5 Creating Data Items 76
3.3 BPMN Collaboration Diagram Procedures
79
3.3.1 Creating a BPMN Collaboration Diagram 79
3.3.2 Creating Pool and Lane 80
3.3.3 Creating a Message Flow 84
3.3.4 Creating a Communication 89
3.3.5 Creating a SubConversation 91
3.4 BPMN Choreography Diagram Procedures
94
3.4.1 Creating a BPMN Choreography Diagram 94
3.4.2 Creating Choreography Activity 94
3.4.3 Creating a SubChoreography 99
3.4.4 Creating a Choreography Task 100
3.4.5 Creating a Call Choreography 104
3.5
3.6
3.7
3.8
4
Converting Activity Diagram to or from BPMN Process Diagram
Exporting Models to XPDL 117
Importing from BPMN 1.1 120
Integration with Cameo SOA+ 124
105
Copyright © 2009-2011 No Magic, Inc..
1
G E T T I N G STA R T E D
1.1 Introduction to Cameo Business Modeler
Cameo Business Modeler is a tool that provides a solution for modeling and analyzing business processes.
This product allows you to represent and analyze business processes by using the Business Process Modeling
and Notation (BPMN) standard.
The Business Process Modeling and Notation (BPMN) standard provides the capability of understanding internal business procedures in a graphical notation and enables organizations to communicate these procedures
in a standard manner. Furthermore, the graphical notation facilitates the understanding of performance collaborations and business transactions between organizations. This ensures that businesses will understand themselves and the participants in their business.
Cameo Business Modeler for MagicDraw provides support for BPMN 2.0 profile, diagrams, user perspective,
usability features for BPMN modeling, and BPMN model validation. It also includes reports, manual, samples,
and import from BPMN 1.1 models that were created with MagicDraw.
The following three BPMN 2.0 diagrams are supported:
(i) BPMN Process Diagram
(ii) BPMN Collaboration Diagram
(iii) BPMN Choreography Diagram
The “Getting Started” chapter contains the following sections:
• “Installing Cameo Business Modeler Plugin” on page 5
• “Installing Cameo Business Modeler” on page 6
• “Licensing Information” on page 7
• “Switching to Business Modeler Perspective” on page 6
• “Working with BPMN 2.0 Projects” on page 7
1.2 Installation
1.2.1 Installing Cameo Business Modeler Plugin
To install Cameo Business Modeler Plugin, either (i) use Resource/Plugin Manager in MagicDraw to download
and install the plugin, or (ii) follow the manual installation instructions if for some reasons direct download
through Resource/Plugin Manager is not available or if you have already downloaded the plugin.
5
Copyright © 2009-2011 No Magic, Inc.
1
G E T T I N G STA R T E D
Switching to Business Modeler Perspective
(i) To install Cameo Business Modeler Plugin using Resource/Plugin Manager:
1. On the Help menu, click Resource/Plugin Manager. The Resource/Plugin Manager dialog
will open and prompt you to check for the latest product updates and resources. Click Check
for Updates > Check.
NOTE
To start the MagicDraw resource updates, specify HTTP
Proxy Settings for connection.
2. Select the Cameo Business Modeler Plugin check box and click Download/Install.
3. Restart MagicDraw.
(ii) To install Cameo Business Modeler Plugin following the manual installation instructions on all platforms:
1. Download the Cameo_Business_Modeler_Plugin_<version number>.zip file.
NOTE
Exit the currently running MagicDraw application before
extracting the plugin.
2. Extract the file to the directory where your MagicDraw is installed.
3. Start MagicDraw.
IMPORTANT!
When you install the plugin, you will automatically get an
evaluation key, which is valid for seven (7) days. Afterward,
you will need to purchase a license for the plugin to work on
BPMN diagrams (once the evaluation license has expired,
BPMN diagrams will be in read-only mode).
Related sections
“MagicDraw UserManual.pdf”
1.3 Switching to Business Modeler Perspective
The Business Modeler perspective is geared to business process modelers. The perspective simplifies user
interface by hiding features that are relevant to business process modeling, and highlighting all of the features
dedicated to business process modeling.
What you need to do to access the Business Modeler perspective depends on whether you are doing either
one of the following:
(i) Launching MagicDraw once Cameo Business Modeler has been installed.
(ii) Switching to the Business Modeler perspective from any other perspectives.
(i) To switch to the Business Modeler perspective once Cameo Business Modeler has been installed:
1. Start MagicDraw.
2. A message dialog will open, informing you of successful installation and asking whether you
want to switch to the Business Modeler perspective.
3. Click Yes to switch to the Business Modeler perspective supporting BPMN 2.0 diagrams.
6
Copyright © 2009-2011 No Magic, Inc..
1
G E T T I N G STA R T E D
Working with BPMN 2.0 Projects
(ii) To switch to the Business Modeler perspective from any other perspectives:
1. On the Options menu, click Perspectives > Perspectives. The Select Perspectives dialog
will open.
2. Select Cameo Business Modeler and click Apply.
Related sections
Perspectives Selection and Customization in the “Getting Started” section in the MagicDraw user guide.
Working with BPMN 2.0 Projects
1.4 Working with BPMN 2.0 Projects
A BPMN2 project provides a workspace for business process modeling. The Business Process Modeling and
Notation (BPMN) elements and validation rules are available in this project.
To create a new workspace for an empty project:
1. Do one of the following:
• On the File menu, click New Project.
• Click the New Project button on the main toolbar.
• Press Ctrl + N.
2. In the New Project dialog, click the BPMN2 Project icon
3. Type the filename in the Name box.
4. Click the “...” button to locate where to store your newly-created project.
5. Click OK.
If the Business Modeler perspective is not enabled, a message will open and
ask whether you want to change the perspective. Click Yes to switch to the
Business Modeler perspective supporting BPMN2 diagrams.
NOTE
Related sections
• Switching to Business Modeler Perspective
• The ‘Working with Projects’ section in the MagicDraw User Manual.
7
Copyright © 2009-2011 No Magic, Inc..
2
C O N C E P TS
A Business Process Modeling and Notation (BPMN) standard provides the capability to understand internal
business procedures in a graphical notation and gives organizations the ability to communicate these procedures in a standard manner. Furthermore, the graphical notation facilitates the understanding of the performance collaborations and business transactions between organizations. This will ensure the organizations to
understand themselves and participants in the business.
The BPMN 2.0 standard consists of the following three major parts:
(i) Process: shows business processes, events, and messages.
(ii) Collaboration: shows how a process is implemented between collaborators and displays details of the conversations between participants.
(iii) Choreography: provides a view of the messages/information flows between participants.
Cameo Business Modeler for MagicDraw provides support for BPMN 2.0 profile, diagrams, user perspective,
usability features for business process modeling, samples, user guide, and import from BPMN 1.1 models that
have been created with MagicDraw.
Cameo Business Modeler supports all three BPMN 2.0 diagrams:
(i) Process diagram: shows business processes, events, and messages.
(ii) Collaboration diagram: shows how a process is implemented between collaborators and defines the conversations between participants in detail.
(iii) Choreography diagram: shows a flowchart view of the messages/information between participants.
The “Concepts” chapter contains the following sections:
• “Common BPMN 2.0 Elements” on page 9
• “BPMN Process Diagram” on page 34
• “BPMN Collaboration Diagram” on page 44
• “Validation Rules” on page 57
• “Exporting Models in XPDL Format” on page 60
8
Copyright © 2009-2011 No Magic, Inc.
2
C O N C E P TS
Common BPMN 2.0 Elements
2.1 Common BPMN 2.0 Elements
The following section will define the BPMN elements that can be used in more than one type of BPMN diagrams, for example, Process, Collaboration, Conversation, and Choreography diagrams.
2.1.1 Definitions
The Definitions element is a root model in a BPMN project. This element is the outermost containing object for
all BPMN elements (Figure 1). It defines the scope of visibility and the namespace for all of the BPMN elements
in the model.
Figure 1 -- Definitions Element in Containment Tree
2.1.2 Artifacts
Artifacts provide modelers with the capability of showing additional information about a process. This information is not directly related to the sequence or message flow of the process.
2.1.2.1 Anchor
Element
Stereotype
Anchor
n/a
Icon
An Anchor is used to associate a Text Annotation, Note, or Comment with other diagram elements (Figure 2).
Figure 2 -- Text Annotiation Associates Anchor with Note
9
Copyright © 2009-2011 No Magic, Inc..
2
C O N C E P TS
Common BPMN 2.0 Elements
Related concepts
Text Annotation
2.1.2.2 Association
Element
Stereotype
Icon
Association
«Association» [Dependency]
An Association is used to show the Activity used for a compensation (Figure 3).
Figure 3 -- Association Drawn from Compensation Boundary Event to Compensation Task
Related concepts
BPMN Process
Compensation
2.1.2.3 Group
Element
Stereotype
Group
n/a
Icon
A Group element represents an informal visual grouping of the graphical elements of a diagram. A group shows
elements that belong to the same category. This type of grouping does not affect the sequence flow within the
Group. The category name appears on the diagram as the Group label (Figure 4).
Figure 4 -- Group
10
Copyright © 2009-2011 No Magic, Inc..
2
C O N C E P TS
Common BPMN 2.0 Elements
2.1.2.4 Text Annotation
Element
Stereotype
Icon
Text Annotiation
«TextAnnotation» [Comment]
A Text Annotation is used to provide additional information to the reader of a BPMN diagram. A Text annotation
connects to a model element using an anchor (Figure 5).
Figure 5 -- Text Annotation
Related concepts
Anchor
2.1.3 Events
Events in business process modeling show what happens while a process is being performed. Events affect the
flow of a process and usually have a cause or impact, and generally require or allow for a reaction. The term
“event” is general enough to cover many things in a process, for example, the start or end of an activity, the
change of a state of a document, and a message that arrives.
There are three main types of events:
2.1.3.1 Start Events define where a process starts.
2.1.3.2 Intermediate Events indicate that something is happening between the start and end of a process. An Intermediate event, which can be placed on the boundary of an activity, is called a Boundary
Event.
2.1.3.3 Boundary Events indicate where the path of a process ends.
2.1.3.1 Start Events
A Start Event indicates where a particular process starts. In terms of sequence flows, the Start Event starts the
flow of a process, and thus, cannot have any incoming sequence flow.
There are 10 types of Start Events used in business process modeling (Table 1).
Table 1 -- Types of Start Events in Business Process Modeling
Start Event
Stereotype and Description
None Start Event
«NoneStartEvent» [InitialNode]
Notation
A None Start Event does not have a defined trigger that invokes the start of a process.
11
Copyright © 2009-2011 No Magic, Inc..
2
C O N C E P TS
Common BPMN 2.0 Elements
Start Event
Stereotype and Description
Message Start Event
«MessageStartEvent» [InitialNode]
Notation
A Message Start Event shows that a message
from a participant has arrived and triggered the
start of a process.
Interrupting
Message Start Event displays on the diagram:
• Message Start Event name if the name is
specified, or.
• Message Ref property value if the name is
unspecified, or.
• Operation Ref property if name and Message
Non-Interrupting
Ref are not specified.
When a Message Start Event is owned by an
Event SubProcess, it can be:
• Interrupting. The Message Start Event
interrupts the process contained in the Event
SubProcess. The Interrupting Message Start
Event is drawn with a solid border.
• Non-Interrupting. The Message Start Event
does not interrupt the process contained in the
Event SubProcess. The Interrupting Message
Start Event is drawn with a dashed border.
Timer Start Event
«TimerStartEvent» [InitialNode]
A Timer Start Event allows for a particular timedate or cycle setting, for example, every Monday
at 9 A.M., to trigger the start of a process.
Interrupting
Timer Start Event displays on the diagram:
• .Timer Start Event name if the name is
specified, or.
• Time Cycle property name if the name is
unspecified, or.
• Time Date property if name and Time Cycle are
unspecified.
Non-Interrupting
When a Timer Start Event is owned by an Event
SubProcess, it can be:
• Interrupting. The Timer Start Event interrupts
the process contained in the Event
SubProcess. The Interrupting Timer Start
Event is drawn with a solid border.
• Non-Interrupting. The Timer Start Event does
not interrupt the process contained in the
Event SubProcess. The Interrupting Timer
Start Event is drawn with a dashed border.
Compensation Start
Event
12
«CompensationStartEvent» [InitialNode]
A Compensation Start Event is allowed to trigger
an in-line Compensation Event Sub-Process only.
The event is triggered when the compensation
occurs.
Copyright © 2009-2011 No Magic, Inc..
2
C O N C E P TS
Common BPMN 2.0 Elements
Start Event
Stereotype and Description
Conditional Start Event
«ConditionalStartEvent» [InitialNode]
Notation
A Conditional Start Event is triggered when a condition, such as “S&P 500 changes by more than
10% since opening” or “Temperature above
300C” becomes true.
Interrupting
Conditional Start Event displays on the diagram:
• Conditional Start Event name if the name is
specified, or.
• Condition property value if the name is
unspecified.
When a Conditional Start Event is owned by an
Event SubProcess, it can be:
Non-Interrupting
• Interrupting. The Conditional Start Event
interrupts the process contained in the Event
SubProcess. The Interrupting Conditional
Start Event is drawn with a solid border.
• Non-Interrupting. The Conditional Start Event
does not interrupt the process contained in the
Event SubProcess. The Interrupting
Conditional Start Event is drawn with a dashed
border.
NOTE: The condition expression of the event
must become “false”, and then” true” before the
event can be triggered again.
Escalation Start Event
«EscalationStartEvent» [InitialNode]
An Escalation Start Event implements measures
to expedite the completion of a business activity.
Escalation Start Event displays on the diagram:
• Escalation Start Event name if the name is
Interrupting
specified, or.
• Escalation Code property value if then name is
unspecified.
When an Escalation Start Event is owned by an
Event SubProcess, it can be:
Non-Interrupting
• Interrupting. The Escalation Start Event
interrupts the process contained in the Event
SubProcess. The Interrupting Escalation Start
Event is drawn with a solid border.
• Non-Interrupting. The Escalation Start Event
does not interrupt the process contained in the
Event SubProcess. The Interrupting
Escalation Start Event is drawn with a dashed
border.
NOTE: An Escalation Start Event is allowed to
trigger an in-line Event SubProcess only.
13
Copyright © 2009-2011 No Magic, Inc..
2
C O N C E P TS
Common BPMN 2.0 Elements
Start Event
Stereotype and Description
Error Start Event
«ErrorStartEvent» [InitialNode]
Notation
An Error Start Event is allowed to trigger an in-line
Event SubProcess only.
Error Start Event displays on the diagram:
• Error Start Event name if the name is
specified, or.
• Error Ref property value if name is
unspecified.
Signal Start Event
«SignalStartEvent» [InitialNode]
A Signal Start Event shows that a signal, which
has been broadcast from another process, has
arrived and triggered the start of a process.
Interrupting
Signal Start Event displays on the diagram:
• Signal Start Event name if the name is
specified, or.
• Signal Ref property value if the name is
unspecified.
When a Signal Start Event is owned by an Event
SubProcess, it can be:
Non-Interrupting
• Interrupting. The Signal Start Event interrupts
the process contained in the Event
SubProcess. The Interrupting Signal Start
Event is drawn with a solid border.
• Non-Interrupting. The Signal Start Event does
not interrupt the process contained in the
Event SubProcess. The Interrupting Signal
Start Event is drawn with a dashed border.
Multiple Start Event
«MultipleStartEvent» [InitialNode]
A Multiple Start Event indicates that there are multiple ways to trigger a process. However, only one
way is required.
When a Multiple Start Event is owned by an Event
SubProcess, it can be:
Interrupting
• Interrupting. The Multiple Start Event interrupts
the process contained in the Event
SubProcess. The Interrupting Multiple Start
Event is drawn with a solid border.
Non-Interrupting
• Non-Interrupting. The Multiple Start Event
does not interrupt the process contained in the
Event SubProcess. The Interrupting Multiple
Start Event is drawn with a dashed border.
14
Copyright © 2009-2011 No Magic, Inc..
2
C O N C E P TS
Common BPMN 2.0 Elements
Start Event
Stereotype and Description
Parallel Multiple Start
Event
«ParallelMultipleStartEvent» [InitialNode]
Notation
A Parallel Multiple Start Event says that there are
multiple triggers required before a process can be
instantiated.
When a Parallel Multiple Start Event is owned by
an Event SubProcess, it can be:
Interrupting
• Interrupting. The Parallel Multiple Start Event
interrupts the process contained in the Event
SubProcess. The Interrupting Parallel Multiple
Start Event is drawn with a solid border.
• Non-Interrupting. The Parallel Multiple Start
Non-Interrupting
Event does not interrupt the process
contained in the Event SubProcess. The
Interrupting Parallel Multiple Start Event is
drawn with a dashed border.
15
Copyright © 2009-2011 No Magic, Inc..
2
C O N C E P TS
Common BPMN 2.0 Elements
2.1.3.2 Intermediate Events
An Intermediate Event indicates that something is happening somewhere between the start and end of a process. Intermediate Events affect the flow of a process, but do not start or directly terminate the process.
Intermediate Events can be used to:
• show where messages are expected or sent within a process
• show delays that are expected within a process
• interrupt normal flow through exception handling
• show extra work required for a compensation
Intermediate Events can be defined in two ways:
(i) Events catching a trigger
(ii) Events showing a result
The types of Intermediate Catch Events used in business process modeling are described in Table 2 below.
Table 2 -- Types of Intermediate Catch Events in Business Process Modeling
Intermediate Event
Stereotype and Description
None Intermediate Event
«NoneIntermediateEvent» [InitialNode]
Notation
A None Intermediate Event does not have a
defined trigger. It is used to model methodologies
that use events to indicate some changes in a
state in a process.
Message Catching Intermediate Event
«MessageCatchIntermediateEvent» [AcceptEventAction]
Message Catching Intermediate Event displays
on the diagram:
• Message Catching Intermediate Event name if
the name is specified, or.
• Message Ref property value if the name is
unspecified, or.
• Operation Ref property if name and Message
Ref are not specified.
A Message Catching Intermediate Event is used
to receive a message. It will cause a process to
continue, if it is waiting for the message.
16
Copyright © 2009-2011 No Magic, Inc..
2
C O N C E P TS
Common BPMN 2.0 Elements
Intermediate Event
Stereotype and Description
Notation
Message Throwing Intermediate Event
«MessageThowIntermediateEvent» [SendObjectAction]
Message Throwing Intermediate Event displays
on the diagram:
• Message Throwing Intermediate Event name
if the name is specified, or.
• Message Ref property value if the name is
unspecified, or.
• Operation Ref property if name and Message
Ref are not specified.
A Message Throwing Intermediate Event is used
to send a message.
Timer Catching Intermediate Event
«TimerCatchIntermediateEvent» [AcceptEventAction]
A Timer Catching Intermediate Event acts as a
delay mechanism based on a particular time-date
or cycle, for example, every Monday at 9 A.M.
Timer Catching Intermediate Event displays on
the diagram:
• .Timer Catching Intermediate Event name if the
name is specified, or.
• Time Cycle property name if the name is
unspecified, or.
• Time Date property if name and Time Cycle are
unspecified.
Escalation Throwing
Intermediate Event
«EscalationThowIntermediateEvent» [SendObjectAction]
An Escalation Throwing Intermediate Event
raises an Escalation.
Escalation Throwing Intermediate Event displays
on the diagram:
• Escalation Throwing Intermediate Event
name if the name is specified, or.
• Escalation Code property value if then name
is unspecified.
17
Copyright © 2009-2011 No Magic, Inc..
2
C O N C E P TS
Common BPMN 2.0 Elements
Intermediate Event
Stereotype and Description
Notation
Compensation Throwing
Intermediate Event
«CompensationThowIntermediateEvent» [SendObjectAction]
A Compensation Throwing Intermediate Event
indicates that a compensation is necessary.
If an activity, which has been succesfully completed, is identified, then it will be compensated.
If no Activity is identified, all successfully completed Activities visible from a Compensation
Throwing Intermediate Event will be compensated in reverse order of their sequence flows. To
be compensated, that Activity must have a
boundary Compensation Event or contain a compensation Event Sub-Process.
Conditional Catching
Intermediate Event
«ConditionalCatchIntermediateEvent» [AcceptEventAction]
A Conditional Catching Intermediate Event will be
triggered when a condition becomes “true”.
300C” becomes true.
Conditional Catching Intermediate Event displays on the diagram:
• Conditional Catching Intermediate Event
name if the name is specified, or.
• Condition property value if the name is
unspecified.
Link Catching Intermediate Event
«LinkCatchIntermediateEvent» [AcceptEventAction]
A Link Intermediate Event provides the capability
for connecting two sections of a process. This
event can be used to create looping situations or
to avoid long sequence flow lines, as “Off-Page
Connectors” to print a Process across multiple
pages, or as generic “Go To” objects within a Process level.
The use of Link Events is limited to one for each
single Process level, that is, it cannot link a parent
Process with a Sub-Process.
A Link Catching Intermediate Event is used to
catch a link from a Link Throwing Intermediate
Event
Link Catching Intermdiate Event displays:
• Link Catching Intermediate Event name if the
name is specified, or.
• Source property valueif the name is
unspecified.
18
Copyright © 2009-2011 No Magic, Inc..
2
C O N C E P TS
Common BPMN 2.0 Elements
Intermediate Event
Stereotype and Description
Link Throwing Intermediate Event
«LinkThowIntermediateEvent» [SendObjectAction]
Notation
A Link Throwing Intermediate Event is used to
throw a link to a Link Catching Intermediate
Event.
Link Throwing Intermdiate Event displays:
• Link Throwing Intermediate Event name if the
name is specified, or.
• Target Link Event property valueif the name
is unspecified
Signal Catching Intermediate Event
«SignalCatchIntermediateEvent» [AcceptEventAction]
A Signal Catching Intermediate Event is used to
receive a signal.
Signal Catching Intermediate Event displays on
the diagram:
• Signal Catching Intermediate Event name if
the name is specified, or.
• Signal Ref property value if the name is
unspecified.
Signals in business process modeling are used
for general communication within and across process levels.
Signal Throwing Interme- «SignalThowIntermediateEvent» [SendObjectAcdiate Event
tion]
Signal Throwing Intermediate Event displays on
the diagram:
• Signal Throwing Intermediate Event name if
the name is specified, or.
• Signal Ref property value if the name is
unspecified.
A Signal Throwing Intermediate Event is used to
send a signal.
Multiple Caching Interme- «MultipleCatchIntermediateEvent» [AcceptEvendiate Event
tAction]
A Multiple Caching Intermediate Event shows that
multiple types of events can be caught. Only one
of the defined event triggers is required.
Multiple Throwing Intermediate Event
«MultipleThowIntermediateEvent» [SendObjectAction]
A Multiple Throwing Intermediate Event shows
that multiple types of events are thrown. All of the
defined triggers will be thrown by this event.
Parallel Multiple Catching Intermediate Event
«MultipleParalllelCatchIntermediateEvent»
[AcceptEventAction]
A Parallel Multiple Caching Intermediate Event
shows that multiple types of events are caught.
All of the defined event triggers are required to
trigger this event.
19
Copyright © 2009-2011 No Magic, Inc..
2
C O N C E P TS
Common BPMN 2.0 Elements
Related concepts
Compensation
2.1.3.3 Boundary Events
A Boundary Event (Figure 6) is a Catching Intermediate Event that is attached to the boundary of any of the following activities:
• SubProcess, Task, or Call Activity,
• SubChoreography, Choreography Task, or Call Choreography.
Figure 6 -- Error Boundary Event Attached to SubProcess
Table 3 will describe all of the Boundary events used in business process modeling.
Table 3 -- Types of Boundary Events in Business Process Modeling
Boundary Event
Stereotype and Description
Notation
Message Boundary Event «MessageBoundaryEvent» [AcceptEventAction]
A Message Boundary Event is triggered by an
arrived message. The normal flow is changed into
an exception flow when an event is triggered.
The boundary of a Message Event that interrupts
the activity to which it is attached, is solid.
Interrupting
The boundary of a Message Event that does not
interrupt the activity to which it is attached, is
dashed.
Message Boundary Event displays on the diagram:
Non-Interrupting
• Message Boundary Event name if the name is
specified, or.
• Message Ref property value if the name is
unspecified, or.
• Operation Ref property if name and Message
Ref are not specified.
20
Copyright © 2009-2011 No Magic, Inc..
2
C O N C E P TS
Common BPMN 2.0 Elements
Boundary Event
Stereotype and Description
Timer Boundary Event
«TimerBoundaryEvent» [AcceptEventAction]
Notation
A particular time-date or cycle, for example, every
Monday at 9 A.M., can be specified to trigger a
Timer Boundary Event. A Timer Boundary Event,
which is attached to the boundary of an activity,
changes the normal flow into an exception flow
upon being triggered.
Interrupting
The boundary of a Timer Boundary Event that
interrupts the activity to which it is attached, is
solid.
The boundary of a Timer Event that does not
interrupt the activity to which it is attached, is
dashed.
Non-Interrupting
Timer Booundary Event displays on the diagram:
• .Timer Boundary Event name if the name is
specified, or.
• Time Cycle property name if the name is
unspecified, or.
• Time Date property if name and Time Cycle are
unspecified.
Escalation Boundary
Event
«EscalationBoundaryEvent» [AcceptEventAction]
An Escalation Boundary Event is used to catch an
escalation.
The boundary of an Escalation Event that interrupts the activity to which it is attached, is solid.
The boundary of an Escalation Event that does
not interrupt the activity to which it is attached, is
dashed.
Interrupting
Escalation Boundary Event displays on the diagram:
• Escalation Boundary Event name if the name
is specified, or.
• Escalation Code property value if then name
is unspecified.
Error Boundary Event
Non-Interrupting
«ErrorBoundaryEvent» [AcceptEventAction]
An Error Boundary Event reacts to (catches) a
named error or any error if a name is not specified.
An Error Boundary Event always interrupts the
activity to which it is attached. The boundary of
the event is always solid.
Interrupting
Error Boundary Event displays on the diagram:
• Error Boundary Event name if the name is
specified, or.
• Error Ref property value if name is
unspecified.
21
Copyright © 2009-2011 No Magic, Inc..
2
C O N C E P TS
Common BPMN 2.0 Elements
Boundary Event
Stereotype and Description
Cancel Boundary Event
«CancelBoundaryEvent» [AcceptEventAction]
Notation
A Cancel Boundary Event is used within a Transaction SubProcess. This type of Event must be
attached to the boundary of a SubProcess and
will be triggered in two cases:
Interrupting
(i) If a Cancel End Event is reached within the
Transaction SubProcess.
(ii) If a Transaction Protocol “Cancel” message is
received while a transaction is being performed.
A Cancel Boundary Event always interrupts the
activity to which it is attached. The boundary of
the event is always solid.
Compensation Boundary
Event
«CompensationBoundaryEvent» [AcceptEventAction]
A Compensation Boundary Event is used to
"catch" a Compensation Event. The event will be
triggered by a thrown compensation targeting that
activity. When the event is triggered, a Compensation Activity that is associated with it will be performed.
The Interrupting or non-interrupting aspect does
not apply in the case of a Compensation Boundary Event. Compensations can only be triggered
after the completion of the activity to which they
are attached. Thus they cannot interrupt the activity. The boundary of the event is always solid.
Conditional Boundary
Event
«ConditionalBoundaryEvent» [AcceptEventAction]
A Conditional Boundary Event is triggered when a
specified condition becomes true. When an event
is triggered, the normal flow of an activity will be
changed into an exception flow.
Interrupting
The boundary of a Conditional Boundary Event
that interrupts the activity to which it is attached,
is solid.
The boundary of a Conditional Boundary Event
that does not interrupt the activity to which it is
attached, is dashed.
22
Non-Interrupting
Copyright © 2009-2011 No Magic, Inc..
2
C O N C E P TS
Common BPMN 2.0 Elements
Boundary Event
Stereotype and Description
Signal Boundary Event
«SignalBoundaryEvent» [AcceptEventAction]
Notation
A Signal Boundary Event can receive a Signal. In
this context, it will change the normal flow into an
exception flow upon being triggered.
A Signal Event differs from an Error Event
Interrupting
because it defines a more general, non-error condition for interrupting Activities, such as the successful completion of another Activity, and it has a
larger scope than the Error Event does.
The boundary of a Signal Event that interrupts the
activity to which it is attached, is solid.
The boundary of a Signal Event that does not
interrupt the activity to which it is attached, is
dashed.
Non-Interrupting
Signal Boundary Event displays on the diagram:
• Signal Boundary Event name if the name is
specified, or.
• Signal Ref property value if the name is
unspecified.
Multiple Boundary Event
«MultipleBoundaryEvent» [AcceptEventAction]
A Multiple Boundary Event indicates that there
are multiple triggers assigned to the Event. Only
one of the specified triggers is required. The
Event that occurred changes the normal flow into
an exception flow.
Interrupting
The boundary of a Multiple Boundary Event that
interrupts the activity to which it is attached, is
solid.
The boundary of a Multiple Boundary Event that
does not interrupt the activity to which it is
attached, is dashed.
Parallel Multiple Boundary Event
Non-Interrupting
«MultipleParalllelBoundaryEvent» [AcceptEventAction]
There are multiple triggers assigned to a Parallel
Multiple Boundary Event and all of them are
required to trigger the event.
Interrupting
The boundary of a Parallel Multiple Boundary
Event that interrupts the activity to which it is
attached, is solid.
The boundary of a Parallel Multiple Boundary
Event that does not interrupt the activity to which
it is attached, is dashed.
Non-Interrupting
Related concepts
BPMN Process
Compensation
23
Copyright © 2009-2011 No Magic, Inc..
2
C O N C E P TS
Common BPMN 2.0 Elements
2.1.3.4 End Events
An End Event indicates where a particular process will end. In terms of sequence flows, an End Event ends the
flow of a process, and thus, will not have any outgoing sequence flow.
There are nine (9) End Event types that are used in business process modeling (Table 4).
Table 4 -- Types of End Events in Business Process Modeling
End Event
Stereotype and Description
None End Event
«NoneEndEvent» [ActivityFinalNode]
Notation
A None Start Event does not have a defined
result.
Message End Event
«NoneEndEvent» [ActivityFinalNode]
A Message End Event indicates that a message
will be sent when a process is completed.
Message End Event displays on the diagram:
• Message End Event name if the name is
specified, or.
• Message Ref property value if the name is
unspecified, or.
• Operation Ref property if name and Message
Ref are not specified.
Error End Event
«NoneEndEvent» [ActivityFinalNode]
An Error End Event indicates that a named error
will be generated and this will result in the termination of all of the currently active threads in a
particular SubProcess.
Error End Event displays on the diagram:
• Error End Event name if the name is
specified, or.
• Error Ref property value if name is
unspecified.
Escalation End Event
«EscalationEndEvent» [ActivityFinalNode]
An Escalation End Event indicates that an Escalation should be triggered. Other active threads will
not be affected by this and will continue to be executed.
Escalation End Event displays on the diagram:
• Escalation End Event name if the name is
specified, or.
• Escalation Code property value if then name is
unspecified.
24
Copyright © 2009-2011 No Magic, Inc..
2
C O N C E P TS
Common BPMN 2.0 Elements
End Event
Stereotype and Description
Cancel End Event
«CancelEndEvent» [ActivityFinalNode]
Notation
A Cancel End Event is used within a Transaction
SubProcess. It indicates that the transaction
should be cancelled and triggers a Cancel Boundary Event attached to the SubProcess boundary. It
also indicates that a transaction protocol cancel
message should be sent to any entities involved in
the transaction.
Compensation End Event «CompensationEndEvent» [ActivityFinalNode]
A Compensation End Event indicates that a compensation is necessary.
If an activity, which has successfully been completed, identified, then that activity will be compensated.
If no activity is identified, all successfully completed activities visible from the Compensation
End Event will be compensated in reverse order
of their sequence flows.
To be compensated, an activity must have a Compensation Boundary Event or contain a Compensation Event SubProcess.
Signal End Event
«SignalEndEvent» [ActivityFinalNode]
A Signal End Event indicates that a signal will be
broadcast when the end has been reached.
Signal End Event displays on the diagram:
• Signal End Event name if the name is
specified, or.
• Signal Ref property value if the name is
unspecified.
Note that the signal, which is broadcast to any
process that can receive the signal, can be sent
across process levels or pools.
Terminate End Event
«TerminateEndEvent» [ActivityFinalNode]
A Terminate End Event indicates that all activities
in a process should be immediately ended including all of the instances of multi-instance activities.
The process will be ended without any compensation or event handling.
Multiple End Event
«NoneEndEvent» [ActivityFinalNode]
A Multiple End Event shows that there are multiple consequences of ending a process and all of
them will occur, for example, multiple messages
might be sent.
25
Copyright © 2009-2011 No Magic, Inc..
2
C O N C E P TS
Common BPMN 2.0 Elements
2.1.4 Gateways
A Gateways allows you to control the flow of a process through a sequence flow. The term “gateway” implies
that there is a gating mechanism that either allows or disallows passage through the Gateway. Tokens that
arrive at the gateway can be merged on input and/or split on output.
If you do not need to control the flow of a process, you do not need a gateway.
Table 5 will describe five types of gateways defined in business process modeling.
Table 5 -- Types of Gateways in Business Process Modeling
Gateway Type
Stereotype
Notation
Exclusive Gateway (Deci- «ExclusiveGateway» [DecisionNode]
sion)
Event-Based Gateway
«EventBasedGateway» [ForkNode]
Inclusive Gateway
«InclusiveGateway» [ForkNode]
Complex Gateway
«ComplexGateway» [ForkNode]
Parallel Gateway
«ParallelGateway» [ForkNode]
2.1.4.1 Exclusive Gateway
A diverging Exclusive Gateway (Decision) is used to create alternative paths within a process flow. This is basically the “diversion point in the road” for a process. Only one alternative path can be taken for a given instance
of the process.
A Decision can be thought of as a question that is asked at a particular point in the process. The question has a
defined set of alternative answers. Each question is associated with a condition Expression that is associated
with the Gateway’s outgoing sequence flow (Figure 7).
Figure 7 -- Diverging Exclusive Gateway Example
A converging Exclusive Gateway is used to merge alternative paths. Each incoming sequence flow token is
routed to the outgoing sequence flow without synchroning them.
26
Copyright © 2009-2011 No Magic, Inc..
2
C O N C E P TS
Common BPMN 2.0 Elements
2.1.4.2 Inclusive Gateway
A diverging Inclusive Gateway (Inclusive Decision) is used to create not only alternative but also parallel paths
within a process flow. Unlike the Exclusive Gateway, all condition expressions will be evaluated. The true evaluation of one condition expression does not exclude the evaluation of the other condition expressions. All of the
sequence flows with a true evaluation will be traversed by a token.
Since each path is considered to be independent, all combinations of the paths may be taken, from zero to all
(Figure 8). However, it should be designed in such a way that at least one path is taken.
Figure 8 -- Diverging Inclusive Gateway Example
A converging Inclusive Gateway is used to merge a combination of alternative and parallel paths. A control flow
token arriving at an Inclusive Gateway may be synchronized with some other tokens that arrive later at this
gateway.
27
Copyright © 2009-2011 No Magic, Inc..
2
C O N C E P TS
Common BPMN 2.0 Elements
2.1.4.3 Parallel Gateway
A Parallel Gateway is used to synchronize (combine) and create parallel flows (Figure 9).
Figure 9 -- Parallel Gateway Example
2.1.4.4 Complex Gateway
A Complex Gateway can be used to model complex synchronization behavior (Figure 10). The Complex Gateway property Activation Condition is used to describe precise behavior. For example, the activation condition
specifies that tokens on three out of five incoming sequence flows are needed to activate the gateway. Which
tokens the gateway will produce is determined by the conditions on the outgoing sequence flow as in the split
behavior of an Inclusive Gateway.
Figure 10 -- Complex Gateway Example
2.1.4.5 Event Based Gateway
An Event Based Gateway represents a branching point in a process where alternative paths that follow the
gateway are based on the events that occur rather than on the evaluation of expressions using process data
(as with an Exclusive or Inclusive Gateway). A specific event, usually the receipt of a message, determines the
path that will be taken (Figure 11). Basically, the decision has been made by another participant based on data
that is not visible to the process, thus, requiring the use of an Event Based Gateway.
28
Copyright © 2009-2011 No Magic, Inc..
2
C O N C E P TS
Common BPMN 2.0 Elements
Figure 11 -- Event Based Gateway Example
Related concepts
Intermediate Events
2.1.5 Error
An Error represents the contents of an error event or the fault of a failed operation. An Error is generated when
there is a critical problem in the processing of an activity or when the execution of an operation fails.
Element
Stereotype
Error
«Error» [Class]
Icon
Related concepts
Events
2.1.6 Message
Element
Stereotype
Message
«Message» [CentralBufferNode]
Icon
A Message represents the contents of a communication between two participants. It is passed by a message
flow and is sent/received by a message event.
Related procedures
Creating a Message Flow
Related concepts
Participant
Events
29
Copyright © 2009-2011 No Magic, Inc..
2
C O N C E P TS
Common BPMN 2.0 Elements
2.1.7 Participant
A Participant represents a specific partner entity, for example, a company, and/or a more general partner role,
for example, a buyer, seller, or manufacturer, who are participants in a collaboration. A Participant is often
responsible for the execution of the process enclosed in a pool.
Element
Stereotype
Participant
«Participant» [class]
Icon
Related procedures
Creating Participants
Creating Pool and Lane
Related concepts
Pool and Lane
Communication
Choreography Activities
2.1.8 Sequence Flow
Element
Stereotype
Sequence Flow
«SequenceFlow» [ControlFlow]
Icon
A Sequence Flow is used to show the order of flow elements in a process or choreography (Figure 12).
Figure 12 -- Sequence Flow Drawn between Two Tasks
The source and target of a Sequence Flow must be from the set of the following elements:
• Events (Start, Intermediate, and End events)
• Activities (Task and Sub-Process; for Processes)
• Choreography Activities (Choreography Task and Sub-Choreography)
• Gateways
A Sequence Flow can optionally define a condition expression, indicating that a token will be passed down the
Sequence Flow only if the expression is evaluated to be true.
A Condition expression is typically used when the source of a Sequence Flow is a Gateway or an Activity. A
conditional outgoing Sequence Flow from an Activity is drawn with a mini-diamond (indicator) at the beginning
of the Sequence Flow (Figure 13).
30
Copyright © 2009-2011 No Magic, Inc..
2
C O N C E P TS
Common BPMN 2.0 Elements
Figure 13 -- Conditional Sequence Flow Example
A Conditional Sequence Flow outgoing from a Gateway cannot be drawn with a
mini-diamond at the beginning of the Sequence Flow.
NOTE
A Sequence Flow, which has an exclusive, inclusive, or complex gateway, or an activity as its source, can also
be defined as a default Sequence Flow. The default Sequence Flow is distinguished by the presence of a backslash (Figure 14).
A default Sequence Flow will be taken (a token is passed) only if all of the other outgoing Sequence Flows from
the activity or gateway are not valid, that is, their condition expressions are false.
Figure 14 -- Default Sequence Flow Example
Related procedures
Creating a Sequence Flow
Related concepts
BPMN Process
Choreography Activities
Events
Gateways
2.1.9 Message Flow
Element
Stereotype
Message Flow
«MessageFlow» [Dependency]
Icon
A Message Flow is used to show the flow of messages between two participants who are prepared to send and
receive them (Figure 15).
31
Copyright © 2009-2011 No Magic, Inc..
2
C O N C E P TS
Common BPMN 2.0 Elements
Figure 15 -- Message Flow Drawn between Two Pools
Figure 16 -- A Message Flow Drawn between Pools Inner Elements
IMPORTANT
• A Message Flow must connect separate Pools. It can be connected to the
pool boundary or element inside a pool.
• A Message Flow cannot connect two elements in the same Pool.
Messages that are sent by a Message Flow can be displayed in a diagram in two ways: (i) associated with the
Message Flow (Figure 17) and (ii) overlap the Message Flow (Figure 18). But, they can also be hidden.
32
Copyright © 2009-2011 No Magic, Inc..
2
C O N C E P TS
Common BPMN 2.0 Elements
Figure 17 -- Message Associated with a Message Flow
Figure 18 -- Message Overlapping a Message Flow
Related procedures
Creating a Message Flow
Related concepts
Pool and Lane
Message
33
Copyright © 2009-2011 No Magic, Inc..
2
C O N C E P TS
BPMN Process Diagram
2.2 BPMN Process Diagram
A BPMN Process diagram describes a sequence or flow of activities in an organization that shows how the
business works (Figure 19). The diagram shows activities, events, and data that trigger or feed business activities. A BPMN Process diagram is similar to the UML Activity diagram with a much richer set of default message
types and business process styles of notation.
The Process diagrams are based on the UML Activity diagram, and include restrictions and extensions as
defined by BPMN.
Figure 19 -- BPMN Process Diagram
Related procedures
BPMN Process Diagram Procedures
2.2.1 BPMN Process
Element
Stereotype
BPMN Process
«BPMNProcess» [Activity]
Icon
A BPMN process element describes how a process is performed. This element is a container for the BPMN
Process diagram and its elements.
2.2.2 Activities
An Activity is work that is performed within a business process. An Activity can be atomic or non-atomic (compound). There are three types of Activities that are part of a Process:
2.2.2.1 Task
2.2.2.2 SubProcess
34
Copyright © 2009-2011 No Magic, Inc..
2
C O N C E P TS
BPMN Process Diagram
2.2.2.3 Call Activity
If the Activity property Is For Compensation = true, the activity will be used for compensation, which means
that this Activity will be activated only when a Compensation Event is detected and initiated under the Compensation Event visibility scope. The Compensation indicator (marker) is displayed for all activities that are used for
the compensation (Figure 20).
Figure 20 -- Task and Collaped SubProcess with Compensation Indicator
Activities can be repeated sequentially, essentially behaving like a loop. The presence of loop characteristics
signifies that an activity has the looping behavior. There are two types of looping characteristics defined in
BPMN: (a) Standard Loop and (b) MultiInstance Loop.
Table 6 -- Characteristics of Standard and MultiInstance Loops
Characteristics
Stereotype
Standard Loop
«StandardLoopCharacteristics» [CallBehaviourAction, OpaqueAction, StructuredActivityNode]
MultiInstance Loop
«MultiInstanceLoopCharacteristics» [CallBehaviourAction, OpaqueAction, StructuredActivityNode]
Marker
Non-sequential
Sequential
(a) Standard Loop
The Standard Loop indicator (marker) displayed on an activity shape shows that looping behavior based on a
boolean condition is defined for this activity (Figure 21). Additional looping characteristics can be defined and
the activity will loop as long as the boolean condition is true. The condition is evaluated for every loop iteration
and can be evaluated at the beginning or end of the iteration. In addition, a numeric cap can be optionally specified. The number of iterations cannot exceed this cap.
35
Copyright © 2009-2011 No Magic, Inc..
2
C O N C E P TS
BPMN Process Diagram
Figure 21 -- Task and Collapsed SubProcess with Standard Loop Indicator
(b) MultiInstance Loop
The MultiInstance Loop indicator shows that a desired number of activity instances can be created. The
instances can be executed in parallel (Figure 22) or sequentially (Figure 23). Either expression is used to specify the desired number of instances or a data driven setup that can be used.
Figure 22 -- Task and Collapsed SubProcess with MultiInstance Indicator for Parallel Instances
Figure 23 -- Task and Collapsed SubProcess with MultiInstance Indicator for Sequential Instances
IMPORTANT
The Compensation, MultiInstance Loop, and Standard Loop indicators can be
added for all types of activities.
Related procedures
Managing Activities
2.2.2.1 Task
A Task is an atomic activity within a process flow. A Task is used when the work in a process cannot be broken
down to a finer level of detail. Generally, an end-user and/or applications are used to perform the task when it is
executed.
Table 7 below will define the types of Tasks used in business process modeling.
Table 7 -- Types of Tasks in Business Process Modeling
Task Type
Stereotype and Description
Task
«Task» [OpaqueAction]
Notation
A Task that has no specified behavior.
36
Copyright © 2009-2011 No Magic, Inc..
2
C O N C E P TS
BPMN Process Diagram
Task Type
Stereotype and Description
Service Task
«ServiceTask» [OpaqueAction]
Notation
A Service Task is a task that uses some sort of
service, which could be a Web service or an automated application.
Send Task
«SendTask» [OpaqueAction]
A Send Task is a simple task that is designed to
send a message to an external participant. Once
the message has been sent, the task is completed.
Receive Task
«ReceiveTask» [OpaqueAction]
A Receive Task is a simple task that is designed
to wait for a message to arrive from an external
participant (relative to the Process). Once the
message has been received, the task is completed.
User Task
«UserTask» [OpaqueAction]
A User Task is a typical “workflow” task where a
human performer performs the task with the
assistance of a software application and is scheduled through a task list manager of some sort.
Manual Task
«ManualTask» [OpaqueAction]
A Manual Task is a task that is expected to be
performed without the aid of any business process execution engine or application, for example,
a telephone technician installing a telephone at a
customer location.
Business Rule Task
«BusinessRuleTask» [OpaqueAction]
A Business Rule Task provides a mechanism for a
process to provide inputs to a business rules
engine and to get the output of calculations that
the business rules engine might provide.
Script Task
«ScriptTask» [OpaqueAction]
A Script Task is executed by a business process
engine. The modeler or implementer defines a
script in a language that the engine can interpret.
When the task is ready to start, the engine will
execute the script. When the script is completed,
the task will also be completed.
Related procedures
Creating Tasks
37
Copyright © 2009-2011 No Magic, Inc..
2
C O N C E P TS
BPMN Process Diagram
2.2.2.2 SubProcess
A SubProcess is an activity, whose internal details have been modeled using activities, gateways, events, and
sequence flow. A SubProcess is a graphical object within a process and it can also be “opened up” to show a
lower-level process (Figure 24). SubProcesses define a contextual scope that can be used for attribute visibility
and transactional scope for the handling exceptions of Events or for compensation.
Figure 24 -- Expanded SubProcess Used in Sequence Flow
A collapsed view of SubProcess hides its details while an expanded view shows its content. A collapsed SubProcess uses a plus sign (+) to distinguish it from a Task.
Table 8 below shows different types of Sub-Processes used in business process modeling.
Table 8 -- Types of Sub-Processes in Business Process Modeling
SubProcess Type
Stereotype and Description
SubProcess
«SubProcess» [StructuredActivityNode]
Notation
A SubProcess is used to create a context for exception
handling that applies to a group of activities.
A collapsed SubProcesses can be used as a mechanism to show a compact and less-clutter group of parallel activities.
Expanded
Collapsed
38
Copyright © 2009-2011 No Magic, Inc..
2
C O N C E P TS
BPMN Process Diagram
SubProcess Type
Stereotype and Description
Event SubProcess
«SubProcess» [StructuredActivityNode]
Notation
An Event SubProcess is an ordinary SubProcess
whose property Triggered By Event is set to true.
An Event SubProcess is not a part of the normal flow of
its parent process — there is no incoming or outgoing
sequence flow.
It is possible that an Event SubProcess will occur many
times. Unlike the standard SubProcess that uses the
flow of the parent process as a trigger, an Event SubProcess has a start event with a trigger. Whenever the
start event is triggered while the parent process is
active, then the Event SubProcess will start.
Expanded
Collapsed
The Start Event icon of a collapsed Event SubProcess
will be displayed on the top left corner of the SubProcess.
Collapsed (with its
own Start Event)
Transaction
«Transaction» [StructuredActivityNode]
A Transaction is a specialized type of SubProcess,
whose special behavior is controlled through a transaction protocol (such as WS-Transaction).
Expanded
Collapsed
AdHoc SubProcess
An AdHoc SubProcess is a specialized type of SubProcess, that is, a group of activities that have no required
sequence relationships. A set of activities can be
defined for the process, but the sequence and number
of performances for the activities are determined by the
performers of the activities.
Expanded
Collapsed
Related procedures
Managing SubProcesses
39
Copyright © 2009-2011 No Magic, Inc..
2
C O N C E P TS
BPMN Process Diagram
2.2.2.3 Call Activity
Element
Stereotype
Call Activity
«CallActivity» [CallBehaviorAction]
Icon
A Call Activity identifies the point in a process where a global process is used (Figure 25). The Call Activity acts
as a ‘wrapper’ for the invocation of the global process within the execution. The activation of the Call Activity
results in the transfer of control to the called global process.
A Call Activity shares the same notation as a Task or SubProcess with a thick line around the boundary of the
shape.
Figure 25 -- Call Activitties Referencing Process
The BPMN 2.0 Call Activity corresponds to the Reusable Sub-Process of BPMN 1.2 and the BPMN 2.0 SubProcess corresponds to the Embedded Sub-Process of BPMN 1.2.
Related concepts
BPMN Process
2.2.3 Items and Data
The traditional requirement of process modeling is to be able to model the items (physical or information items)
that are created, manipulated, and used during the execution of a process.
This requirement is realized in BPMN through various constructs: Data Objects, Item Definition, Properties,
Data Inputs, Data Outputs, Messages, Input Sets, Output Sets, and Data Associations.
2.2.3.1 Data Object
Element
Stereotype
Data Object
«DataObject» [CentralBufferNode]
Icon
A Data Object is an element that stores or conveys items during process execution. The Data Object elements
must be contained within the process or SubProcess elements.
A Data Object element can optionally reference a DataState element, which is the state of data contained in a
Data Object.
A Data Object element, which references an element marked as a collection, is visualized differently (Figure 26).
40
Copyright © 2009-2011 No Magic, Inc..
2
C O N C E P TS
BPMN Process Diagram
Figure 26 -- Data Object Notation
Related procedures
Creating Data Items
2.2.3.2 Data Store
Element
Stereotype
Icon
Data Store
«DataStore» [CentralBufferNode]
A Data Store (Figure 27) provides a mechanism for activities to retrieve or update stored information that will
persist beyond the scope of a process.
Figure 27 -- Data Store Notation
2.2.3.3 Data Input and Data Output
Element
Stereotype
Data Input
«DataInput» [CentralBufferNode]
Data Output
«DataOutput» [CentralBufferNode]
Icon
Activities and processes often require data in order to execute. In addition, they may produce data during or as
the result of the execution. Data requirements are captured as Data Input. The produced data are captured
using Data Output (Figure 28).
Figure 28 -- Data Input and Data Output Notation
41
Copyright © 2009-2011 No Magic, Inc..
2
C O N C E P TS
BPMN Process Diagram
2.2.3.4 Data Association
Element
Stereotype
Data Association
«DataAssociation» [ObjectFlow]
Icon
Data Association is used to model how data are pushed into or pulled from item-aware elements (Figure 29).
Tokens do not flow along a Data Association, and as a result they have no direct effect on the flow of a process.
Figure 29 -- Data Association Showing the Flow of Data Object
Alternatively, Data Objects can be directly associated with a Sequence Flow to represent the same input/output
Data Associations (Figure 30). This is a visual shortcut that is stored in a model as two Data Associations: one
from Activity to Data Object, and another from Data Object to Activity.
Figure 30 -- Data Association Associated with a Sequence Flow
2.2.4 Compensation
A Compensation in business process modeling is concerned with undoing steps that have already been successfully completed, because their results and possible side effects are no longer desired and need to be
reversed. If an activity is still active, it cannot be compensated and needs to be canceled. The cancellation of a
SubProcess may produce a compensation of the already successfully completed portions of an active activity.
A Compensation is performed by a compensation handler. A compensation handler performs the steps necessary to reverse the effects of an activity. For a SubProcess, the compensation handler will have access to the
SubProcess data once they have been completed (“snapshot data”).
A compensation handler is a set of activities that are not connected to other portions of the BPMN model. The
compensation handler starts with either one of the Compensation Events:
(i) Compensation Boundary Event
(ii) The handler’s Start Event (in case of a Compensation Event Sub-Process)
42
Copyright © 2009-2011 No Magic, Inc..
2
C O N C E P TS
BPMN Process Diagram
A compensation handler connected through a boundary event can only perform a “black-box” compensation of
the original activity. This compensation is modeled with a specialized Compensation Activity, which is connected to the boundary event through an association. The Compensation Activity, which can be either a Task or
a Sub-Process, is marked to show that it is used for compensation only and is outside the normal flow of the
Process (Figure 31).
Figure 31 -- Compensation through Compensation Boundary Event to Compensation Task
Another way to model a compensation is using the compensation handler, which starts with the Start Event of
an Event SubProcess, which is contained within a Process or SubProcess (Figure 32). Just like any other Compensation Activities, a Compensation Event SubProcess is outside the normal flow of a process. The Event
SubProcess, which is marked with a dotted line boundary, has access to data that are part of the parent, a
snapshot at the point in time when the parent has been completed. A Compensation Event SubProcess can
recursively trigger a compensation for activities contained in its parent.
Figure 32 -- Compensation Defined by Event SubProcess
Related concepts
BPMN Process
SubProcess
Events
43
Copyright © 2009-2011 No Magic, Inc..
2
C O N C E P TS
BPMN Collaboration Diagram
2.3 BPMN Collaboration Diagram
A Collaboration represents the interactions between two or more business entities. A Collaboration diagram
depicts a global point of view. It shows the interactions between participants in general.
A Collaboration contains two or more pools, representing the participants in the collaboration. Messages
exchanged between the participants are shown by the message flows that connect two pools (or the objects
within the pools) (Figure 33).
Figure 33 -- Collaboration Diagram with Two “Black Box” Pools
Figure 34 -- Collaboration Diagram with Two Pools Showing a Process
44
Copyright © 2009-2011 No Magic, Inc..
2
C O N C E P TS
BPMN Collaboration Diagram
A Collaboration diagram can also show distinct conversations between the collaborating participants in a
domain. Communications are defined by the conversations, participants, and conversation links between them
(Figure 35).
Figure 35 -- BPMN Collaboration Diagram with Conversations
The BPMN Collaboration diagrams are based on the UML Activity diagram and include restrictions and extensions as defined by BPMN. The elements from a BPMN Process diagram can be displayed in the BPMN Collaboration diagram.
Related procedures
Creating a Communication
45
Copyright © 2009-2011 No Magic, Inc..
2
C O N C E P TS
BPMN Collaboration Diagram
2.3.1 Collaboration
Element
Stereotype
Collaboration
«Collaboration» [Activity]
Icon
A Collaboration element provides a description of several pools collaboration. This element is a container for a
BPMN Collaboration diagram and its elements.
2.3.2 Pool and Lane
Element
Stereotype
Pool
«Pool» [ActivityPartition]
Lane
«Lane» [ActivityPartition]
A Pool represents a participant in a collaboration. The participant can be a specific partner entity, for example, a
company, or it can be a more general partner role, for example, a buyer, seller, or manufacturer. Graphically, a
Pool is a container to partition a process from other pools.
A Pool can contain a process (Figure 36), or it can be a “black box” (Figure 37).
Figure 36 -- Pool that May Contain a Process
Figure 37 -- Pool with Suppressed Contents
A Pool with suppressed contents will display a multiInstance marker if the participant referenced by a pool has
a Minimum Multiplicity value of 2 or greater (Figure 38).
Figure 38 -- Pool with Suppressed Contents Referencing the MultiInstance Participant
46
Copyright © 2009-2011 No Magic, Inc..
2
C O N C E P TS
BPMN Collaboration Diagram
A Lane is a sub-partition within a pool. Lanes are used to organize and categorize activities within a pool. They
are often used in the internal roles, for example, Manager and Associate; systems, for example, an enterprise
application; or internal departments, for example, shipping or finance.
In addition, Lanes can be nested or defined in a matrix. For example, there could be an outer set of Lanes for
company departments and an inner set of Lanes for the roles within each department (Figure 39).
Figure 39 -- Pool with Nested Lanes
Related concepts
Participant
BPMN Process Diagram
2.3.3 Communication
Element
Stereotype
Communication
«Communication» [StructuredActivityNode]
Icon
A Communication is an atomic element for a BPMN Collaboration diagram. It represents a set of message
flows that are grouped together (Figure 40).
A Communication may involve two or more Participants. A Conversation Link path will be drawn from a communication to the involved Participants (Pools).
47
Copyright © 2009-2011 No Magic, Inc..
2
C O N C E P TS
BPMN Collaboration Diagram
Figure 40 -- Communication Notation
Related procedures
Creating a Communication
Creating Pool and Lane
Related concepts
Participant
2.3.4 SubConversation
Element
Stereotype
Icon
SubConversation
«SubConversation» [StructuredActivityNode]
A SubConversation is a conversation node, that is, the hierarchical division within a parent conversation.
A SubConversation is represented as a graphical object within a BPMN Conversation diagram (Figure 41), but
it can also be “opened up” to show a lower-level conversation, which consists of message flows, communications, and/or other SubConversations. The SubConversation shares the participants of its parent conversation.
Figure 41 -- SubConversation Notation
Related procedures
Creating a SubConversation
Related concepts
Communication
48
Copyright © 2009-2011 No Magic, Inc..
2
C O N C E P TS
BPMN Collaboration Diagram
2.3.5 Call Conversation
Element
Stereotype
Icon
Call Conversation
«CallConversation» [CallBehaviorAction]
A Call Conversation identifies a place in the conversation where a Conversation is used (Figure 42).
Figure 42 -- Call Conversation Calling Conversation Delivery
Figure 43 -- Call Conversation that Does Not Call Any Conversation
Related concepts
Collaboration
2.3.6 Conversation Link
Element
Stereotype
Icon
Conversation Link
«ConversationLink» [Dependency]
A Conversation Link allows for connecting conversation nodes (Communication, SubConversation, and Call
Conversation) to and from Participants (Pools).
Figure 44 -- Conversation Link Notation
Related concepts
Collaboration
SubConversation
Call Conversation
Communication
49
Copyright © 2009-2011 No Magic, Inc..
2
C O N C E P TS
BPMN Choreography Diagram
2.4 BPMN Choreography Diagram
A Choreography formalizes the way business participants coordinate their interactions.
A Choreography is a type of process, but its purpose and behavior is different from a standard BPMN process.
A standard process defines the flow of activities of a specific partner entity or organization. In contrast, a Choreography formalizes the way business participants coordinate their interactions. The focus is not on the work
performed within these participants, but rather on the information (messages) exchanged between them.
A Choreography is a definition of expected behavior, basically a procedural business contract, between interacting participants. It shows the messages exchanged and their logical relation (Figure 45). This allows partners to plan their business processes for inter-operation without introducing conflicts.
Figure 45 -- BPMN Choreography Diagram Example
BPMN Choreography diagrams are based on the UML Activity diagram and include restrictions and extensions
as defined by BPMN.
A BPMN Choreography diagram contains the following elements:
• Choreography Activities (Choreography Task, SubChoreography, Call Choreography)
• Start Events
• Intermediate Events
• Boundary Events
• End Events
• Gateways
• Sequence Flow
The following sections will describe the elements, specific for the BPMN Choreography diagram.
Related procedures
BPMN Choreography Diagram Procedures
2.4.1 Choreography
Element
Stereotype
Choreography
«Choreography» [Activity]
Icon
A Choreography is a container for a BPMN Choreography diagram and its elements.
50
Copyright © 2009-2011 No Magic, Inc..
2
C O N C E P TS
BPMN Choreography Diagram
2.4.2 Choreography Activities
Element
Stereotype
Icon
Choreography Activity
«ChoreographyActivity»
n/a
A Choreography Activity is an abstract element. It represents a point on a choreography flow where an interaction occurs between two or more participants.
There are three types of Choreography activities defined in business process modeling:
2.4.2.1 Choreography Task
2.4.2.2 SubChoreography
2.4.2.3 Call Choreography
The shape of a Choreography Task, SubChoreography, or Call Choreography consists of two or more participant compartments and one name compartment (Figure 46). One of the participants can be selected as an initiating participant. The color of the initiating participant compartment is the same as the color of the name
compartment. The other participants compartments are gray.
Figure 46 -- Compartments on Choreography Activity Shape
The looping properties of Choreography Activities can be specified: they can be repeated sequentially, essentially behaving like a loop. The presence of loop characteristics signifies that the Choreography Activity has
looping behavior. There are two types of Looping characteristics defined in BPMN:
(a) Standard Loop
(b) MultiInstance Loop
Table 9 -- Characteristics of Standard and MultiInstance Loops
Characteristics
Stereotype
Marker
Standard Loop
«StandardLoopCharacteristics» [CallBehaviourAction, OpaqueAction, StructuredActivityNode]
MultiInstance Loop
«MultiInstanceLoopCharacteristics» [CallBehaviourAction, OpaqueAction, StructuredActivityNode]
Non-sequential
Sequential
51
Copyright © 2009-2011 No Magic, Inc..
2
C O N C E P TS
BPMN Choreography Diagram
(a) Standard Loop
A Standard Loop marker displayed on a Choreography Activity shape name compartment shows that the looping behavior based on a boolean condition is defined for this activity (Figure 47). Additional looping characteristics can also be defined: the activity will loop as long as the boolean condition is true. The condition is evaluated
for every loop iteration, and can be evaluated at the beginning or end of the iteration. In addition, a numeric cap
can be optionally specified. The number of iterations cannot exceed this cap.
Figure 47 -- Chorepography Task and SubChoreography with a Standard Loop Marker
(b) MultiInstance Loop
A MultiInstance Loop marker shows that a desired number of Choreography Activity instances can be created.
The instances can be executed either in parallel (Figure 48) or sequential (Figure 49), each has a different
marker.
Figure 48 -- Choreography Task and SubChoreography with a Parallel MultiInstance Loop Marker
Figure 49 -- Choreography Task and SubChoreography with a Sequential MultiInstance Loop Marker
IMPORTANT
The MultiInstance Loop and Standard Loop markers can be added to all types
of Choreography activities.
There are circumstancves when a Choreography Activity references a multi-instance participant (the minimum
multiplicity property value for a participant is 2 or greater). A multi-instance participant represents a situation
where there are more than one possible related participants that can be involved in the choreography. If this is
the case, a MultiInstance marker will be displayed in the participant compartment of a choreography activity
shape.
Related procedures
Creating Choreography Activity
52
Copyright © 2009-2011 No Magic, Inc..
2
C O N C E P TS
BPMN Choreography Diagram
Creating Participants
Related concepts
Participant
2.4.2.1 Choreography Task
Element
Stereotype
Choreography Task
«ChoreographyTask» [OpaqueAction]
Icon
A Choreography Task is an atomic activity in a choreography process. It represents one or more messages
exchanged between two Participants (Figure 50).
Figure 50 -- Choreography Task and BPMN Collaboration Diagram Corresponding to the Choreography Task
A Choreography Task can display messages that are defined by the referenced Message Flows. The messages connected to an Initiating Participant compartment are white and those connected to a Non-Initiating
Participant compartment are gray (Figure 51).
53
Copyright © 2009-2011 No Magic, Inc..
2
C O N C E P TS
BPMN Choreography Diagram
Figure 51 -- Choreography Task with Messages and BPMN Collaboration Diagram Corresponding to the Choreography
Task
Related procedures
Creating a Choreography Task
Related concepts
Participant
BPMN Collaboration Diagram
Sequence Flow
2.4.2.2 SubChoreography
Element
Stereotype
SubChoreography
«SubChoreography» [StructuredActivityNode]
Icon
A SubChoreography is a compound activity that can include choreography activities and define their flows (Figure 52). It can be expanded to show its details within the choreography in which it is contained.
54
Copyright © 2009-2011 No Magic, Inc..
2
C O N C E P TS
BPMN Choreography Diagram
Figure 52 -- Expanded SubChoreography
It can also be displayed in a collapsed view to hide its details. A collapsed SubChoreography is indicated with a
plus sign (+) to distinguish it from a Choreography Task (Figure 53).
Figure 53 -- Collapsed SubChoreography
Related concepts
Participant
Events
Gateways
Sequence Flow
2.4.2.3 Call Choreography
Element
Stereotype
Call Choreography
«CallChoreography» [CallBehaviorAction]
Icon
A Call Choreography identifies the point in a process where a global choreography is used. It acts as a place
holder for the inclusion of a choreography element it is calling. A Call Choreography is drawn with a thick border
(Figure 54).
Figure 54 -- Call Choreography Notation
55
Copyright © 2009-2011 No Magic, Inc..
2
C O N C E P TS
BPMN Choreography Diagram
A Call Choreography referencing another Choreography is marked with a plus sign (Figure 55).
Figure 55 -- Call Choreography Referencing Another Choreography
Related procedures
Creating a Call Choreography
Related concepts
Choreography
56
Copyright © 2009-2011 No Magic, Inc..
2
C O N C E P TS
Validation Rules
2.5 Validation Rules
Cameo Business Modeler has the functionality to check if the created BPMN model corresponds to the most
important modeling rules defined in the Business Modeling and Notation (BPMN) standard.
Cameo Business Modeler provides three validation suites to validate BPMN models:
2.5.1 BPMN 2.0 Correctness (Active) Validation Rules suite. The active BPMN 2.0 validation in MagicDraw
instantly checks the most important correctness rules of a BPMN 2.0 model, displays errors in the model, and
suggests solutions.
2.5.2 BPMN 2.0 Correctness Validation Rules suite is included to all BPMN 2.0 projects. You may run this
suite to verify if a BPMN 2.0 model has been created correctly. This suite verifies a bigger set of correctness
rules than the active validation rules set does.
2.5.3 BPMN2 Completeness Validation Rules suite is included in all of the BPMN 2.0 projects. You may run
this suite to verify if a BPMN 2.0 model is fully specified.
2.5.1 BPMN 2.0 Correctness (Active) Validation Rules
Table 10 describes the BPMN correctness (active) validation rules defined in Cameo Business Modeler for
BPMN 2.0 projects.
Table 10 -- BPMN 2.0 Correctness (Active) Validation Rules
Validation rule
Severity
A Sequence Flow cannot connect the elements inside a SubProcess to the elements out- Error
side the SubProcess.
57
A Message Flow must connect two separate Pools or elements from separate pools.
Error
A Conversation Link shall be drawn either from Participant to Communication, SubConversation, or CallConversation, or from Communication, SubConversation, or CallConversation to Participant.
Error
An Ad Hoc SubProcess may not have a Start Event.
Warning
An Ad Hoc SubProcess may not have an End Event.
Warning
A Message Start Event cannot be used in a Choreography diagram.
Error
An Error Start Event cannot be used in a Choreography diagram.
Error
An Error Boundary Event cannot be used in a Choreography diagram.
Error
A Message End Event cannot be used in a Choreography diagram.
Error
An Error End Event cannot be used in a Choreography diagram.
Error
An Escalation End Event cannot be used in a Choreography diagram.
Error
A Cancel End Event cannot be used in a Choreography diagram.
Error
A Signal End Event cannot be used in a Choreography diagram.
Error
Copyright © 2009-2011 No Magic, Inc..
2
C O N C E P TS
Validation Rules
A Multiple End Event cannot be used in a Choreography diagram.
Error
A Compensation End Event cannot be used in a Choreography diagram.
Error
A Sequence Flow cannot cross the Pool Boundary.
Error
2.5.2 BPMN 2.0 Correctness Validation Rules
Table 11 shows the BPMN 2.0 validation rules included in the BPMN 2.0 Correctness validation rules suite:
Table 11 -- BPMN 2.0 Correctness Validation Rules
58
Validation rule
Severity
A Message Flow cannot connect the elements inside a SubProcess to the elements outside the SubProcess.
Error
An Event SubProcess cannot have any incoming or outgoing Sequence Flow.
Warning
An Ad Hoc SubProcess cannot have a Call Choreography.
Warning
An Ad Hoc SubProcess cannot have a SubChoreography.
Warning
An Ad Hoc SubProcess cannot have Conversations.
Warning
A Converging Gateway should not have more than one outgoing Sequence Flow.
Info
A Diverging Gateway should not have more than one incoming Sequence Flow.
Info
The Participant multiplicity minimum value must be 0 for an unspecified multiplicity or >=2
when the multiplicity minimum value is specified.
Warning
The Participant multiplicity maximum value must be 0 for an unspecified multiplicity or
>=2 when the multiplicity maximum value is specified.
Warning
The Activity start quantity shall be one (1) or greater.
Warning
The Activity completion quantity shall be one (1) or greater.
Warning
A Data Input cannot have an incoming Data Association.
Warning
A Data Output cannot have an outgoing Data Association.
Warning
A Data Output cannot have an incoming Sequence Flow.
Warning
A Condition cannot be specified for an outgoing Sequence Flow from a Start Event.
Info
Only Messages and Multiple Start Events can have incoming Message Flows.
Warning
Only Multiple Start Events can have multiple incoming Message Flows.
Warning
Copyright © 2009-2011 No Magic, Inc..
2
C O N C E P TS
Validation Rules
Validation rule
Severity
A Cancel Event can only be attached to the Transaction SubProcess boundary.
Warning
An Intermediate Boundary Event cannot have an incoming Sequence Flow.
Warning
A Compensation Boundary Event cannot have an outgoing Sequence Flow.
Warning
A Link Intermediate Event can have either an incoming or outgoing Sequence Flow, it
cannot have both.
Warning
A Compensation Start Event should not be used for a top-level Process.
Info
A Cancel End Event can only be used within a Transaction SubProcess.
Warning
A None Start Event cannot be used for an Event Sub-Process.
Warning
A default Sequence Flow should not have a conditionExpression.
Warning
A Sequence Flow outgoing from an Event Gateway should not have a conditionExpression.
Info
A Message Boundary Event cannot be attached to a SubChoreography.
Warning
A Message Boundary Event cannot be attached to a Call Choreography.
Warning
A Non-Interrupting Start Event can only be used inside an Event SubProcess.
Warning
2.5.3 BPMN2 Completeness Validation Rules
Table 12 shows the BPMN 2.0 validation rules included in the BPMN 2.0 Completeness validation suite.
Table 12 -- BPMN 2.0 Completeness Validation Rules
59
Validation rule
Severity
An Intermediate Boundary Event should have an outgoing Sequence Flow.
Info
An Intermediate Event should have an incoming or outgoing Sequence Flow.
Info
An Error Code should be specified for an Error End Event.
Info
An Event Based Gateway should have two or more outgoing Sequence Flows.
Info
An Event SubProcess must have one Start Event.
Warning
An Event SubProcess shall have one Start Event.
Warning
A Start Event shall have at least one outgoing Sequence Flow.
Warning
An Intermediate Event can have either an incoming or outgoing Message Flow, it cannot
have both.
Warning
Copyright © 2009-2011 No Magic, Inc..
2
C O N C E P TS
Exporting Models in XPDL Format
2.6 Exporting Models in XPDL Format
XML Process Definition Language (XPDL) is a serialization format for BPMN. XPDL provides a file format that
supports all BPMN process definition description properties. It defines a description of both model element
properties and graphical descriptions of the diagram. With XPDL, Cameo Business Modeler can export process definition for other products to read it and allow you to exchange your model with other tools to perform
further model simulation, execution, or deployment.
MagicDraw supports export of BPMN models to XPDL Version 2.2. This version is backward compatible with
previous versions of XPDL and can be used to export BPMN 2.0 and BPMN 1.x models.
Related procedures
Exporting Models to XPDL
60
Copyright © 2009-2011 No Magic, Inc..
3
PROCEDURES
This chapter provides the main procedures of Cameo Business Modeler and contains the following sections:
• “Common BPMN Elements Procedures” on page 61
• “BPMN Process Diagram Procedures” on page 70
• “BPMN Collaboration Diagram Procedures” on page 79
• “BPMN Choreography Diagram Procedures” on page 94
• “Converting Activity Diagram to or from BPMN Process Diagram” on page 105
• “Exporting Models to XPDL” on page 117
• “Integration with Cameo SOA+” on page 124
3.1 Common BPMN Elements Procedures
Common BPMN elements are those that can be used in more than one type of BPMN diagrams, for example,
Process, Collaboration, Conversation, and Choreography diagrams. The following sections will describe how
to create and specify those elements and their properties.
3.1.1 Specifying Element IDs
.
Most of the elements in the BPMN specification have their element IDs. IDs of the elements (in gray) are displayed in the following places:
• In a diagram: the ID is displayed above,or before the element name.
• In the model browser: the ID is displayed in front of the element name.
• In the Specification dialog before the Numbered property .
To specify a BPMN element ID:
• Open the element Specification dialog and type an ID number in the ID property text box
(Figure 56).
Figure 56 -- Element ID Property Field
To hide or display an element ID in a BPMN 2.0 diagram, either:
• Right-click an element in the BPMN 2.0 diagram and clear or select Show Elements Id, or
• Right-click an element in the BPMN 2.0 diagram and click Diagram Properties, and then clear
or select the Show Elements Id check box.
61
Copyright © 2009-2011 No Magic, Inc.
3
PROCEDURES
Common BPMN Elements Procedures
3.1.2 Creating BPMN Elements in the Model Browser
Some of the BPMN elements will not be represented in the BPMN diagrams and need to be created in the
model browser, Containment tree. These elements will be used as the data types for specifying the values of
the business modeling element properties.
To create a BPMN element in the Containment tree:
• Open the package shortcut menu in the Containment tree and click New Element > BPMN
Element, and then select a BPMN element that you want to create (Figure 57).
Figure 57 -- Creating a BPMN Element in the Containment Tree
Related concepts
Common BPMN 2.0 Elements
3.1.3 Creating Participants
You can create a Participant inside a package. The participant will not be displayed in a BPMN 2.0 diagram as
it is represented by a Pool and Choreography Task. A Participant is called mutiInstance if its Minimum Multiplicity value is equal or more than two.
To create a participant in a Containment tree:
• Open the package shortcut menu in the Containment tree and click New Element > BPMN
Element > Participant.
62
Copyright © 2009-2011 No Magic, Inc..
3
PROCEDURES
Common BPMN Elements Procedures
To create a multiInstance participant:
• Open the participant Specification dialog and type the value (two or greater) in the Minimum
property text box (Figure 58).
Figure 58 -- Specifying the Minimum Multiplicity Value of a MultiInstance Participant
To review traceability information related to a Participant:
• Open the Participant Specification dialog and select Traceability (Figure 59).
63
Copyright © 2009-2011 No Magic, Inc..
3
PROCEDURES
Common BPMN Elements Procedures
Figure 59 -- Traceability Information of Participant
64
Copyright © 2009-2011 No Magic, Inc..
3
PROCEDURES
Common BPMN Elements Procedures
Related concepts
Participant
3.1.4 Creating a Sequence Flow
A Sequence flow connects activities, choreography activities, events, and gateways. A Conditional sequence
flow has a condition expression, and is drawn with a mini diamond marker at the beginning of the Sequence
Flow.
A default sequence flow is indicated with a backslash at the beginning of the Sequence Flow.
To create a Conditional Sequence Flow:
1. Select a Sequence Flow in a diagram and type the condition expression inside the brackets
(Figure 60).
2. Click on an empty space in the diagram.
Figure 60 -- Creating a Conditional Sequence Flow
3. Open the Sequence Flow Specification dialog and type the expression in the Condition
Expression property text box (Figure 61).
Figure 61 -- Defining the Condition Expression Property
4. Click Submit.
NOTE
An outgoing Conditional Sequence Flow from a gateway is displayed
without a mini diamond marker.
To make a default Sequence Flow:
1. Select a Sequence Flow in a diagram and click the Make Default button on the Smart Manipu-
lator toolbar (Figure 62).
65
Copyright © 2009-2011 No Magic, Inc..
3
PROCEDURES
Common BPMN Elements Procedures
Figure 62 -- Make Default Button
Click the Make Default button to make a default Sequence Flow nondefault.
TIP
2. Open the sequence flow source element, for example, task, Specification dialog, and select
Sequence Flow from the Default property list. The Sequence Flow will be marked as a default
one.
A default Sequence Flow can be specified for activities (tasks, subprocesses, and call activity) or exclusive, inclusive, and complex gateways.
IMPORTANT
A default sequence flow should not have a condition expression.
NOTE
Related concepts
Sequence Flow
3.1.5 Creating an Event
This section will describe how to create and specify events in the BPMN diagrams.
To draw an Event:
• On the Process Diagram toolbar, click the None Start Event, None Catching Intermediate
Event, Message Throwing Intermediate Event, or None End Event arrow button to open the
submenu (Figure 63), and select a type of Event.
66
Copyright © 2009-2011 No Magic, Inc..
3
PROCEDURES
Common BPMN Elements Procedures
Figure 63 -- Selecting an Event
To draw a Boundary Event:
1. On the Process Diagram toolbar, click the Message Boundary Event arrow button, and
select a type of Boundary Event.
2. Click an Activity or Choreography Activity in a diagram.
To change an Event type:
• Open the Event shortcut menu and select a new Event type (Figure 64).
67
Copyright © 2009-2011 No Magic, Inc..
3
PROCEDURES
Common BPMN Elements Procedures
Figure 64 -- Event Shortcut Menu
NOTE
You can change an Event type for Start, Intermediate, Boundary, or End Events.
To create a non-interrupting Start Event, either:
• Open the Start Event shortcut menu and click Is Interrupting > False, or
• Open the Start Event Specification dialog, select Is Interrupting > False (Figure 65), and then
click Close.
Figure 65 -- Creating a Non-Interrupting Start Event
68
Copyright © 2009-2011 No Magic, Inc..
3
PROCEDURES
Common BPMN Elements Procedures
Not all Start Event types can be created as non-interrupting. The command Is
Interrupting is only available for the following Start Event types:
IMPORTANT
• Message Start Event
• Timer Start Event
• Escalation Start Event
• Conditional Start Event
• Signal Start Event
• Multiple Start Event
• Parallel Multiple Start Event
To make a Boundary Event non-interrupting, either:
• Open the Boundary Event shortcut menu and click Cancel Activity > False, or
• Open the Boundary Event Specification dialog, select Cancel Activity > False (Figure 66), and
then click Close.
Figure 66 -- Creating a Non-Interrupting Boundary Event
IMPORTANT
Not all Boundary Event types can be created as non-interrupting. The command Cancel Activity is available for the following Boundary Event types:
• Message Boundary Event
• Timer Boundary Event
• Escalation Boundary Event
• Conditional Boundary Event
• Signal Boundary Event
• Multiple Boundary Event
• Parallel Multiple Boundary Event
Related concepts
Events
Activities
Choreography Activities
69
Copyright © 2009-2011 No Magic, Inc..
3
PROCEDURES
BPMN Process Diagram Procedures
3.2 BPMN Process Diagram Procedures
This section will describe how to create and specify a BPMN Process diagram.
A BPMN Process diagram may also contain the elements of a BPMN Collaboration diagram.
NOTE
Related concepts
BPMN Process Diagram
Related procedures
3.3 BPMN Collaboration Diagram Procedures
3.2.1 Creating a BPMN Process Diagram
You can create a BPMN Process diagram by using the (i) main toolbar, (ii) main menu, or (iii) shortcut menu in
the Containment tree.
(i) To create a new BPMN diagram by using the main toolbar:
1. Click the BPMN Process Diagram icon on the BPMN 2.0 main toolbar (Figure 67). The Cre-
ate Diagram dialog will open.
Figure 67 -- BPMN Process Diagram Icon on the Main Toolbar
2. Type the name and select the owner of the BPMN Process diagram, and then click OK.
(ii) To create a new BPMN diagram by using the main menu:
1. On the main menu, click Diagrams > BPMN2 Diagrams > BPMN Process Diagrams. The
BPMN Process Diagrams dialog will open.
2. Click the Add button. The Create Diagram dialog will open.
3. Type the name and select the owner of the BPMN Process diagram, and then click OK.
(iii) To create new BPMN diagram from the shortcut menu in the Containment tree:
1. Right-click a package in the Containment Tree to open the shortcut menu and click New Dia-
gram > BPMN2 Diagrams > BPMN Process Diagram.
2. Type the name for a created BPMN Process diagram.
IMPORTANT!
You can create a BPMN Process diagram only from the Business Modeler,
Business Analyst, and Full Featured user perspectives.
Related concepts
BPMN Process Diagram
70
Copyright © 2009-2011 No Magic, Inc..
3
PROCEDURES
BPMN Process Diagram Procedures
3.2.2 Managing Activities
This section will describe how to create and specify activities in a BPMN process diagram. Activities (Tasks,
Subprocesses, and Call Activities) may have the following specific markers displayed on their shapes:
• Compensation
• Standard loop
• MultiInstance loop (parallel)
• MultiInstance loop (sequential)
To add a Compensation marker to an activity, either:
• Open the activity shortcut menu and select the Is For Compensation check box, or
• Open the activity Specification dialog, select Is For Compensation > false (Figure 68), and
then click Close.
Figure 68 -- Adding a Compensation Marker to an Activity
To add a Standard Loop marker to an activity:
• Open the activity shortcut menu and select the Standard Loop check box.
To add a MultiInstance Loop (parallel) marker to an activity:
• Open the activity shortcut menu and select the MultiInstance Loop check box.
To display a MultiInstance Loop (sequential) marker on a MultiInstance Loop activity, either:
• Right-click an activity with a MultiInstance Loop (parallel) marker to open its shortcut menu,
and select the Is Sequential check box, or
• Open an activity with the MultiInstance marker Specification dialog, select Is Sequential >
false (Figure 69), and then click Close.
Figure 69 -- Displaying MultiInstance Loop Marker on a MultiInstance Loop Activity
To convert an Activity to another type of Activity:
• Open the Task, SubProcess, or Call Activity shortcut menu, click Refactor > Convert To, and
select an activity type (Figure 70).
71
Copyright © 2009-2011 No Magic, Inc..
3
PROCEDURES
BPMN Process Diagram Procedures
Figure 70 -- Converting Activity Type
Related concepts
Activities
3.2.3 Creating Tasks
There are multiple types of Tasks that you can create in a BPMN Process diagram.
To draw a task:
• On the Process Diagram toolbar, click the Task arrow button and select a type of Task
(Figure 71).
Figure 71 -- Selecting a Type of Task
To change a task type:
• Open the Task shortcut menu and select a new Task type (Figure 72).
72
Copyright © 2009-2011 No Magic, Inc..
3
PROCEDURES
BPMN Process Diagram Procedures
Figure 72 -- Task Shortcut Menu
Related concepts
Task
3.2.4 Managing SubProcesses
A BPMN diagram may display subprocesses with different symbol properties:
• An expanded SubProcess can contain inner shapes.
• A collapsed SubProcess cannot display inner shapes. A plus sign (+) marker will be displayed
for a collapsed subprocess.
If the property of a SubProcess, Is Triggered By Event = true, it will be called an Event SubProcess and drawn
with a dashed border.
There are two specific types of SubProcesses:
(i) A Transaction SubProcess: drawn with a double border.
(ii) An AdHoc SubProcess: drawn with an AdHoc marker on its shape.
To draw an expanded SubProcess:
• On the Process Diagram toolbar, click the Collapsed SubProcess arrow button and select
Expanded SubProcess (Figure 73).
73
Copyright © 2009-2011 No Magic, Inc..
3
PROCEDURES
BPMN Process Diagram Procedures
Figure 73 -- Expanded SubProcess Option on the Process Diagram Toolbar
To draw a collapsed SubProcess:
• On the Process Diagram toolbar, click Collapsed SubProcess > Collapsed SubProcess.
To convert a collapsed SubProcess from/to an expanded SubProcess, either:
• Open the SubProcess shape shortcut menu and select or clear the Suppress Content check
box, or
• Open the expanded SubProcess shape shortcut menu, click Symbol Properties and select or
clear the Suppress Content check box.
To draw an event SubProcess:
• On the Process Diagram toolbar, click the Collapsed SubProcess arrow button and select
Collapsed Event SubProcess or Expanded Event SubProcess (Figure 74).
Figure 74 -- Selecting an Event Subprocess
To draw a Transaction SubProcess:
• On the Process Diagram toolbar, click the Collapsed SubProcess arrow button and select
Collapsed Transaction SubProcess or Expanded Transaction SubProcess (Figure 75).
74
Copyright © 2009-2011 No Magic, Inc..
3
PROCEDURES
BPMN Process Diagram Procedures
Figure 75 -- Selecting a Transaction Subprocess
To draw an AdHoc SubProcess:
• On the Process Diagram toolbar, click the Collapsed SubProcess arrow button and select
Collapsed AdHoc SubProcess or Expanded AdHoc SubProcess (Figure 76).
Figure 76 -- Selecting an AdHoc Subprocess
To mark a created SubProcess as an event SubProcess, either:
• Open any SubProcess shortcut menu and select the Triggered By Event check box, or
• Open any SubProcess Specification dialog and select the Triggered By Event check box on
the SubProcess properties list (Figure 77).
75
Copyright © 2009-2011 No Magic, Inc..
3
PROCEDURES
BPMN Process Diagram Procedures
.
Figure 77 -- Marking Subprocess as Event Subprocess
To convert a SubProcess to a Transaction SubProcess or AdHoc SubProcess:
• Open the SubProcess shortcut menu and click Refactor > Convert To > More Specific >
AdHoc SubProcess or Transaction.
To convert a Transaction SubProcess or AdHoc SubProcess to a simple SubProcess:
• Open the Ad Hoc SubProcess or Transaction SubProcess shortcut menu and click Refactor >
Convert To > More General > AdHoc SubProcess or Transaction.
To display a Start Event icon on a suppressed Event SubProcess:
1. Draw an expanded Event SubProcess.
2. Draw a Start Event to the Event SubProcess.
3. Open the SubProcess shortcut menu and select the Suppress Content checkbox.
Related concepts
SubProcess
3.2.5 Creating Data Items
You can create the following data items in a BPMN process diagram:
• Data Object
• Data Store
• Data Input
• Data Output
You can indicate a Data Object as a collection and connect a Data Item to other elements of the BPMN Process
diagram by using a Data Association.
To draw a data item:
• On the Process Diagram toolbar, click the Data Object arrow button and select Data Object,
Data Store, Data Input, or Data Output (Figure 78).
76
Copyright © 2009-2011 No Magic, Inc..
3
PROCEDURES
BPMN Process Diagram Procedures
Figure 78 -- Drawing a Data Item
To create a new Data Object typed by a classifier:
• Select a classifier in the Containment tree and drag it to a BPMN Process or BPMN
Collaboration diagram.
To mark a Data Object as a collection, either:
• Open the Data Object shortcut menu and select Is Collection > true.
• Open the Data Object Specification dialog and select Is Collection > true.
To draw a Data Association:
1. On the Process Diagram toolbar, select Data Association.
2. Click an element, which is the source of Data Association, in a diagram.
3. Click an element, which is the target of Data Association, in a diagram.
NOTE
• The source or target of a Data Association must always be a Data
Object, Data Store, Data Input, or Data Output.
• The other end of a Data Association should always be an activity or
event.
To display a Data Object connected to a Sequence Flow:
1. Draw a Data Association from an Activity to a Data Object.
2. Draw another Data Association from the Data Object to another Activity.
3. Draw a Sequence Flow from the first to the second Activity.
4. Open the Data Object shortcut menu and select Show Connected to Sequence Flow
(Figure 79).
77
Copyright © 2009-2011 No Magic, Inc..
3
PROCEDURES
BPMN Process Diagram Procedures
Figure 79 -- Data Object Shortcut Menu.
A Data Object connected to a Sequence Flow is a visual shortcut of
two Data Associations. In the model, the Data Associations will stillexist and the Data Object connecting to the Sequence Flow will be displayed.
NOTE
Related concepts
Items and Data
78
Copyright © 2009-2011 No Magic, Inc..
3
PROCEDURES
BPMN Collaboration Diagram Procedures
3.3 BPMN Collaboration Diagram Procedures
This section will describe how to create and specify a BPMN Collaboration diagram.
A BPMN Collaboration diagram can contain the elements from a Process diagram.
NOTE
3.3.1 Creating a BPMN Collaboration Diagram
You can create a BPMN Collaboration diagram by using the (i) main toolbar, (ii) main menu, or (iii) shortcut
menu in the Containment tree.
(i) To create a new BPMN Collaboration diagram by using the main toolbar:
1. Click the BPMN Collaboration Diagram icon on the BPMN 2.0 toolbar (Figure 80). The Create
Diagram dialog will open.
Figure 80 -- BPMN Collaboration Diagram Icon on the Main Toolbar
2. Type the name and select the owner of the diagram.
3. Click OK.
(ii) To create a new BPMN Collaboration diagram by using the main menu:
1. On the Diagrams menu, click BPMN2 Diagrams > BPMN Collaboration Diagram. The
BPMN Collaboration Diagrams dialog will open.
2. Click the Add button. The Create Diagram dialog will open.
3. Type the name and select the owner of the diagram, and then click OK.
(iii) To create a new BPMN Collaboration diagram by using the shortcut menu in the Containment tree:
1. Right-click a package in the Containment tree and select New Diagram > BPMN2 Diagrams >
BPMN Collaboration Diagram.
2. Type the name of the diagram.
IMPORTANT!
You can create a BPMN Collaboration diagram only from the Business Modeler
and Full Featured user perspectives.
Related concepts
BPMN Collaboration Diagram
Related procedures
3.2 BPMN Process Diagram Procedures
79
Copyright © 2009-2011 No Magic, Inc..
3
PROCEDURES
BPMN Collaboration Diagram Procedures
3.3.2 Creating Pool and Lane
A Pool in a BPMN collaboration diagram represents a participant of a collaboration. A Pool can have its inner
process flows defined. You can add the elements from a BPMN Process diagram to a pool. You can also hide
the pool details by displaying a “black box” pool. A Pool can also have inner lanes.
To draw a pool:
• On the Collaboration Diagram toolbar, click the Horizontal Pool arrow button and select
either Horizontal Pool or Vertical Pool (Figure 81).
Figure 81 -- Drawing a Pool
To draw a Pool with a suppressed context:
• Click Participant (Pool) on the Conversations toolbar (Figure 82).
Figure 82 -- Drawing a Suppressed Context Pooll
To create a Pool with a representing Participant:
• Drag a Participant from the Containment tree to a BPMN Collaboration diagram.
To open a Pool Specification dialog:
• Right-click the Pool header and select Specification (Figure 83).
80
Copyright © 2009-2011 No Magic, Inc..
3
PROCEDURES
BPMN Collaboration Diagram Procedures
Figure 83 -- Pool Shortcut Menu
To specify a model element represented by a Pool, do one of the following:
• Click a Pool in a diagram. The smart manipulators toolbar will open (Figure 84). Click the
Participant button, or
Figure 84 -- Selecting a Pool
• In the Pool Specification window, open the Represents drop-down list and select an element
(Figure 85), or
81
Copyright © 2009-2011 No Magic, Inc..
3
PROCEDURES
BPMN Collaboration Diagram Procedures
Figure 85 -- Selecting a Participant
• Select a represented element in the Containment tree and drag it to the Pool header in a
diagram.
NOTE
A Pool may represent a BPMN Participant element or UML classifier element.
TIP!
You can create a Participant in your model as described in section 3.1.2 Creating BPMN Elements in the Model Browser.
To hide a Pool content in a diagram (to display a “black box” pool):
• Open the pool shortcut menu and click either (i) Suppress Pool Content or (ii) Symbol(s)
Properties and select the Suppress Pool Content check box.
A Pool with suppressed contents that references a multiInstance Participant will be displayed with a MultiInstance marker.
To display a multiInstance marker on a Pool:
• Open the Pool Specification dialog, open the Represents drop-down list, and select a
represented multiInstance Participant.
NOTE
A MultiInstance marker can be displayed only on a Poll with suppressed contents.
TIP
The Minimum Multiplicity value of a MultiInstance participant property must be at least 2.
To add a lane to a Pool:
• Open the Pool shortcut menu and click either Insert Lanes or Insert Inner Lanes, and select a
lane type.
To review the Pool traceability information:
• Open the Pool Specification dialog and click Traceability. The Pool traceability information will
open (Figure 86).
82
Copyright © 2009-2011 No Magic, Inc..
3
83
PROCEDURES
BPMN Collaboration Diagram Procedures
Copyright © 2009-2011 No Magic, Inc..
3
PROCEDURES
BPMN Collaboration Diagram Procedures
Figure 86 -- Opening Pool Traceability Information
Related concepts
Participant
Pool and Lane
Related procedures
3.1.2 Creating BPMN Elements in the Model Browser
3.3.3 Creating a Message Flow
A Message flow connects two pools or the inner elements of a pool.
To draw a Message Flow:
1. Click Message Flow on the Collaboration Diagram toolbar.
2. Click an element, which is the source of the Message Flow, in a diagram.
3. Click an element, which is the target of the Message Flow, in a diagram.
IMPORTANT!
84
A Message Flow must connect two different Pools (or the inner elements of a pool).
Copyright © 2009-2011 No Magic, Inc..
3
PROCEDURES
BPMN Collaboration Diagram Procedures
To create a new Message for a Message Flow:
• Drag a classifier (Class, Input Set, Output Set, or Error) from the Containment tree to a
Message Flow in a Collaboration diagram.
To create a Message for a Message Flow:
1. Click a Message Flow path in a diagram and click the Referenced Messages button on the
Smart Manipulators toolbar (Figure 87). The Select Message dialog will open.
Figure 87 -- Referenced Messages Button on the Smart Manipulators Toolbar
85
Copyright © 2009-2011 No Magic, Inc..
3
86
PROCEDURES
BPMN Collaboration Diagram Procedures
Copyright © 2009-2011 No Magic, Inc..
3
PROCEDURES
BPMN Collaboration Diagram Procedures
Figure 88 -- Selecting a Message in the Select Message Dialog
2. Click the Element creation mode button.
3. Select a Collaboration element in the model element tree and click the Create button
(Figure 89).
87
Copyright © 2009-2011 No Magic, Inc..
3
88
PROCEDURES
BPMN Collaboration Diagram Procedures
Copyright © 2009-2011 No Magic, Inc..
3
PROCEDURES
BPMN Collaboration Diagram Procedures
Figure 89 -- Creating a Collaboration Element in the Select Message Dialog
To select a Message for a Message Flow, either:
(i)Click a Message Flow path in a diagram and click the Referenced Messages button on the
Smart Manipulators toolbar. The Select Message dialog will open. Select a message in the
tree and click OK.
(ii) Right-click the the Message Flow and select Specification. The Message Flow specification dialog will open. Click the Message Ref “...” button (Figure 90) and select a message.
Figure 90 -- Message Ref in the Message Flow Specification dialog
You can create a Message in a BPMN Process, Collaboration, Choreography,
or SubProcess element.
NOTE
To change a Message Flow display mode:
• Right-click a Message Flow and select either (i) Show Message and select a message display
mode (Do not Show, Associated with Message Flow, or Overlapping with Message
Flow), or (ii) Symbol(s) Properties and select the required Show Message property value
(Do not Show, Associated with Message Flow, or Overlapping with Message Flow).
Related concepts
Message
Message Flow
3.3.4 Creating a Communication
A Communication groups messages exchanged between Participants.
To create a Communication between two participants:
1. Draw a Communication.
2. Draw a Communication Link from the Communication to a Participant.
3. Draw another Communication Link from the Communication to another Participant.
IMPORTANT!
89
A Participant (pool) requires a specified Represented Participant.
Copyright © 2009-2011 No Magic, Inc..
3
PROCEDURES
BPMN Collaboration Diagram Procedures
To select the message flows grouped by a Communication:
1. Either: (i) right-click a communication shape, select Specification, click Message Flow Refs,
and then click the “...” button, or (ii) click a Communication shape in a collaboration diagram
and click the Message Flows button on the Smart Manipulators toolbar (Figure 91).
Figure 91 -- Message Flows Button on the Smart Manipulators Toolbar
2. The Select Message Flows dialog will open showing all of the Message Flows that are
grouped by a Communication (Figure 92).
Figure 92 -- Selecting Message Flows in the Select Message Flows Dialog
3. Select the Message Flows and click OK.
90
Copyright © 2009-2011 No Magic, Inc..
3
PROCEDURES
BPMN Collaboration Diagram Procedures
NOTE
When the Show Message Flows Related to Participants check box is
selected, only the message flows that exist in a project between the representing participants of the pools that are connected by a communication will show.
Clear the check box to see all of the message flows in a project.
TIP
You can also assign a Message Flow to a Communication by dragging it from
the browser contrainment tree to the Communication shape in a BPMN Collaboration diagram.
Related concepts
Communication
Related procedures
3.3.2 Creating Pool and Lane
3.3.5 Creating a SubConversation
A SubConversation can contain inner Conversation Nodes (Communications and SubConversations).
To create a conversation node for a SubConversation:
1. Right-click a SubConversation and select Specification. The SubConversation specification
dialog will open (Figure 93) .
91
Copyright © 2009-2011 No Magic, Inc..
3
PROCEDURES
BPMN Collaboration Diagram Procedures
Figure 93 -- Creating a Conversation Node in the Subconversation Specification Dialog
2. Click Conversation Nodes > Create, and then select either Communication or SubConver-
sation.
3. Type the name of the node and click Close.
92
Copyright © 2009-2011 No Magic, Inc..
3
PROCEDURES
BPMN Collaboration Diagram Procedures
Related concepts
2.3.4 SubConversation
93
Copyright © 2009-2011 No Magic, Inc..
3
PROCEDURES
BPMN Choreography Diagram Procedures
3.4 BPMN Choreography Diagram Procedures
This section will describe how to create and specify a BPMN Choreography diagram.
3.4.1 Creating a BPMN Choreography Diagram
You can create a BPMN Choreography diagram by using the (i) main toolbar, (ii) main menu, (iii) shortcut menu
in the Containment tree.
(i) To create a new BPMN Choreography diagram by using the main toolbar:
1. Click the BPMN Choreography Diagram icon on the BPMN 2.0 toolbar. The Create Diagram
dialog will open (Figure 94).
Figure 94 -- BPMN Choreography Icon on the Main Toolbar
2. Type the name and select the owner of the diagram, and then click OK.
(ii) To create a new BPMN Choreography diagram by using the main menu:
1. On the Diagrams menu, click BPMN2 Diagrams > BPMN Choreography Diagrams. The
BPMN Choreography Diagrams dialog will open.
2. Click the Add button. The Create Diagram dialog will open.
3. Type the name and select the owner of the diagram, and then click OK
(iii) To create a new BPMN Collaboration diagram by using the shortcut menu in the Containment tree:
1. Right-click a package in the Containment tree and click New Diagram > BPMN2 Diagrams >
BPMN Choreography Diagram.
2. Type the name of the diagram.
IMPORTANT!
You can create a BPMN Choreography diagram only from the Business Modeler and Full Featured user perspectives.
Related concepts
BPMN Choreography Diagram
2.4.1 Choreography
3.4.2 Creating Choreography Activity
This section will describe how to model choreography activities in a BPMN Choreography diagram. Choreography Activities, such as Choreography Task, SubChoreography, and Call Choreography, can have the following
specific markers displayed on their shapes:
• Standard loop marker
• MultiInstance loop (parallel) marker
• MultiInstance loop (sequential) marker
94
Copyright © 2009-2011 No Magic, Inc..
3
PROCEDURES
BPMN Choreography Diagram Procedures
Choreography activities must have a list of specified participants and initiating participant. The Participants in a
choreography activity will be displayed in gray, and the initiating participant will be displayed in another color.
You can specify a list of participants in a choreography activity by using the (i) Specification dialog, (ii) Smart
Manipulators toolbar, and (ii) drag-and-drop action.
(i) To specify a list of participants by using the Specification dialog:
1. Right-click a Choreography activity and select Specification.
2. Click the Participant Refs “...“ buttton (Figure 95). The Select Participant dialog will open.
Figure 95 -- Participant Refs in the Choreography Activity Specification Dialog
3. Click either the Tree or List tab, select participants, and then click OK (Figure 96).
95
Copyright © 2009-2011 No Magic, Inc..
3
96
PROCEDURES
BPMN Choreography Diagram Procedures
Copyright © 2009-2011 No Magic, Inc..
3
PROCEDURES
BPMN Choreography Diagram Procedures
Figure 96 -- Selecting Participants in the Select Participant Dialog
• If you cannot see the participant you want on the list, click the creation
TIP!
mode button in the Select Participant dialog, and create a new participant.
• When creating a participant, select a package as the participant owner.
IMPORTANT!
You need to specify at least two participants in a Choreography activity.
NOTE
The MultiInstance participants on a choreography shape will be displayed with
a multiInstance marker in the participant compartment.
(ii) To specify a list of participants by using the Smart Manipulators toolbar:
1. Click a Choreography activity in a BPMN Choreography diagram. The Smart Manipulators tool-
bar will open (Figure 97).
97
Copyright © 2009-2011 No Magic, Inc..
3
PROCEDURES
BPMN Choreography Diagram Procedures
Figure 97 -- The Participants Button on the Smart Manipulators Toolbar
2. Click the Participants button (Figure 97). The Select Participant dialog will open.
3. Select the Participants and click OK.
(iii) To specify a list of participants by using the drag-and-drop action:
• Drag a Participant from the Containment tree to a Choreography activity in a BPMN
Choreography diagram.
You can drag more than one participant at a time.
TIP
To specify an initiating participant in a choreography activity:
• Open a Choreography activity Specification dialog. Click the Initiating Participant Ref
property button to select a participant from the list (Figure 98).
Figure 98 -- Selecting an Initiating Participant
IMPORTANT
The Initiating Participants Ref property is required for a choreography activity.
To add a Standard Loop marker to a choreography activity:
• Right-click a choreography activity and select Standard Loop.
98
Copyright © 2009-2011 No Magic, Inc..
3
PROCEDURES
BPMN Choreography Diagram Procedures
To add a MultiInstance Loop (parallel) marker to a choreography activity:
• Right-click a choreography activity and select MultiInstance Loop.
To display a MultiInsatance Loop (sequential) marker on a MultiInstane Loop choreography activity, either:
• Right-click a choreography activity with the MultiInstance Loop (parallel) marker and select Is
Sequential.
• Right-click a choreography activity with the MultiInstance Loop marker and select
Specification. Select Is Sequential > false and click Close (Figure 99).
Figure 99 -- Displaying a MultiInstance Loop (Sequential) Marker
Related concepts
2.4.2 Choreography Activities
2.1.7 Participant
Related procedures
3.1.2 Creating BPMN Elements in the Model Browser
3.4.3 Creating a SubChoreography
A SubChoreography can be displayed with different symbol properties:
• An Expanded SubChoreography can contain inner shapes.
• A Collapsed SubChoreography cannot display inner shapes. A plus sign (+) marker is
displayed for a collapsed subprocess.
To draw an expanded SubChoreography:
• On the BPMN Choreography Diagram toolbar in a BPMN Choreography diagram, click the
Collapsed SubChoreography SubProcess arrow button, and select Expanded
SubChoreography (Figure 100).
Figure 100 -- Selecting Expanded Choreography SubProcess
99
Copyright © 2009-2011 No Magic, Inc..
3
PROCEDURES
BPMN Choreography Diagram Procedures
To draw a collapsed SubChoreography:
• On the BPMN Choreography Diagram toolbar in a BPMN Choreography diagram, click the
Collapsed SubChoreography SubProcess arrow button, and select Collapsed
SubChoreography.
To convert a collapsed SubChoreography to/from an expanded SubChoreography:
• Right-click a SubChoreography in a BPMN Choreography diagram and either select or
deselect Suppress Content.
• Right-click a SubChoreography in a BPMN Choreography diagram and click Symbol(s)
Properties. The Symbol Properties dialog will open. Either select or clear the Suppress
Content check box.
Related concepts
2.4.2.2 SubChoreography
3.4.4 Creating a Choreography Task
A Choreography Task can have references to message flows, existing between referenced participants.
To draw a Choreography Task
• On the BPMN Choreography Diagram toolbar in a BPMN Choreography diagram, click
Choreography Task, and then click the diagram (Figure 101).
Figure 101 -- Choreography Task Button
To select Message Flows referenced by a Choreography Task:
1. Open the choreography activity Specification dialog, Message Flow property (Figure 102).
100
Copyright © 2009-2011 No Magic, Inc..
3
101
PROCEDURES
BPMN Choreography Diagram Procedures
Copyright © 2009-2011 No Magic, Inc..
3
PROCEDURES
BPMN Choreography Diagram Procedures
Figure 102 -- Selecting Message Flows
2. Select the Message Flows and click OK.
IMPORTANT
If the Message Flows, which are referenced by a Choreography Task, have the
Messages specified, they will be displayed and attached to the Choreography
Task in a diagram.
To specify Messages for a Choreography Task:
1. Create a BPMN Collaboration diagram.
2. Draw two pools and specify the Referenced Participants for the pools.
3. Draw a Message Flow between the Pool and specify a Message for Message Ref in the Mes-
sage Flow property (Figure 103).
102
Copyright © 2009-2011 No Magic, Inc..
3
PROCEDURES
BPMN Choreography Diagram Procedures
Figure 103 -- Pools, Participants, and Message Flow
4. Create a BPMN Choreography diagram and draw a Choreography Task.
5. Open the Choreography Task Specification dialog. Specify the Participants for the Partici-
pant Refs property and a Participant for the Initiating Participant Ref property.
6. Click the “...” button to edit the Message Flow property. The Select Message Flows dialog will
open. Select the Message Flows you have created in step 3 as the Message Flow property
value and click Submit.
Figure 104 -- Messages Created for a Choreography Task
NOTE
• Initiating Messages (connected to an initiating Participant compartment) will
be displayed in white.
• Non-initiating messages (connected to a non-initiating Participant
compartment) will be displayed in gray.
To hide or display the Messages for a Choreography Task, either:
• Right-click a Choreography Task and either select or deselect Show Messages, or
• Right-click a Choreography Task and click Symbol(s) Properties. The Symbol Properties
dialog will open. Either select or clear the Show Messages check box.
103
Copyright © 2009-2011 No Magic, Inc..
3
PROCEDURES
BPMN Choreography Diagram Procedures
Related concepts
2.4.2.1 Choreography Task
Participant
Message
Collaboration
Related procedures
3.3.2 Creating Pool and Lane
3.3.3 Creating a Message Flow
3.4.5 Creating a Call Choreography
A Call Choreography holds a reference to a Choreography.
To create a Call Choreography:
1. Click the Call Choreography button on the BPMN Choreography Diagram toolbar in a
BPMN Choreography diagram (Figure 105) and click the diagram to draw the shape. The
Select Behavior dialog will open.
.
Figure 105 -- Creating a Call Choreography
2. Select a choreography and click OK.
To change the element called by a Call Choreography, either:
• Open the Call Choreography shortcut menu, click Called Element, and then select a
Choreography from the elements list, or
• Open the Call Choreography Specification dialog and select a choreography as the Called
Element property value.
Related concepts
2.4.2.3 Call Choreography
104
Copyright © 2009-2011 No Magic, Inc..
3
PROCEDURES
Converting Activity Diagram to or from BPMN Process Diagram
3.5 Converting Activity Diagram to or from BPMN
Process Diagram
This section will describe how to convert your Activity diagram to a BPMN Process diagram and vice versa.
IMPORTANT!
Some incompatible information between Activity and BPMN Process diagrams
may be lost during conversion.
To convert an Activity diagram to a BPMN Process diagram:
1. Click either:
(i) Transform to BPMN Process Diagram on the Activity diagram context menu (Figure 106)
or
Figure 106 -- Converting BPMN Process Diagram to Activity Diagram Using the Context Menu
(ii) Tools > Model Transformations on the main menu (Figure 107).
Figure 107 -- Converting BPMN Process Diagram to Activity Diagram Using the Main Menu
105
Copyright © 2009-2011 No Magic, Inc..
3
PROCEDURES
Converting Activity Diagram to or from BPMN Process Diagram
2. The Model Transformation Wizard dialog will open. Select UML Activity Diagram to BPMN
Process Diagram and click Next (Figure 108).
Figure 108 -- Model Transformation Wizard Step 1
NOTE
A dialog may open to inform you that the required profiles are no longer used in
a project. Click Yes to load the profiles required for the transformation.
3. Select an activity diagram that will be transformed to a BPMN Process diagram (Figure 109).
106
Copyright © 2009-2011 No Magic, Inc..
3
107
PROCEDURES
Converting Activity Diagram to or from BPMN Process Diagram
Copyright © 2009-2011 No Magic, Inc..
3
PROCEDURES
Converting Activity Diagram to or from BPMN Process Diagram
Figure 109 -- Model Transformation Wizard Step 2
TIP
Select the whole package to transform all diagrams contained in the package.
4. Click the “...” button after the Place Transformation model in package radio button to locate
the place to save the BPMN Process diagram that willl be created (Figure 110). The Destination Package dialog will open (Figure 111).
108
Copyright © 2009-2011 No Magic, Inc..
3
109
PROCEDURES
Converting Activity Diagram to or from BPMN Process Diagram
Copyright © 2009-2011 No Magic, Inc..
3
PROCEDURES
Converting Activity Diagram to or from BPMN Process Diagram
Figure 110 -- Selecting the Location to Save the BPMN Process Diagram
Figure 111 -- Confirming the Package Location
5. Select a package and click OK.
TIP
Click the Create button in the Destination Package dialog to create a new
package.
IMPORTANT
• If you select Transform in place as the Transformation Destination option,
your original activity diagram(s) will be lost after conversion.
• It is recommended to select the Place transformation model in package
option.
6. Click Finish.
110
Copyright © 2009-2011 No Magic, Inc..
3
PROCEDURES
Converting Activity Diagram to or from BPMN Process Diagram
To convert a BPMN Process diagram to an Activity diagram:
1. Either (i) right-click a BPMN Process diagram and select Transform to UML Activity Diagram
(Figure 112) or
Figure 112 -- Transform to UML Activity Diagram Menu
(ii) Click Tools > Model Transformations on the main menu (Figure 113).
Figure 113 -- Model Transformations Menu
2. Select the BPMN Process Diagram to UML Activity Diagram transformation type and click
Next (Figure 114).
111
Copyright © 2009-2011 No Magic, Inc..
3
PROCEDURES
Converting Activity Diagram to or from BPMN Process Diagram
Figure 114 -- Model Transformation Wizard Step 1
NOTE
A dialog may open to inform you that the required profiles will not be used in the
project. Click Yes to load the profiles required for the transformation.
3. Select a BPMN Process diagram that will be transformed to a UML Activity Diagram
(Figure 115).
112
Copyright © 2009-2011 No Magic, Inc..
3
PROCEDURES
Converting Activity Diagram to or from BPMN Process Diagram
Figure 115 -- Model Transformation Wizard Step 2
113
Copyright © 2009-2011 No Magic, Inc..
3
TIP
PROCEDURES
Converting Activity Diagram to or from BPMN Process Diagram
Select the whole package to transform all diagrams contained in the package.
4. Click the “...” button next to the Place Transformation model in package text box to locate the
place to save the Activity diagram that willl be created (Figure 116). The Destination Package
dialog will open (Figure 117).
114
Copyright © 2009-2011 No Magic, Inc..
3
PROCEDURES
Converting Activity Diagram to or from BPMN Process Diagram
Figure 116 -- Selecting the Location to Save the Activity Diagram
115
Copyright © 2009-2011 No Magic, Inc..
3
PROCEDURES
Converting Activity Diagram to or from BPMN Process Diagram
Figure 117 -- Confirming the Package Location
5. Select a package and click OK.
TIP
Click the Create button in the Destination Package dialog to create a new
package.
IMPORTANT
• If you select Transform in place as the Transformation Destination option,
your original BPMN Process diagram will be lost after conversion.
• It is recommended to select the Place transformation model in package
option.
6. Click Finish.
116
Copyright © 2009-2011 No Magic, Inc..
3
PROCEDURES
Exporting Models to XPDL
3.6 Exporting Models to XPDL
Cameo Business Modeler for MagicDraw supports BPMN 2.0 model export to XPDL 2.2.
The support for XPDL 2.2 allows you to export your BPMN Processes and Collaborations to XPDL 2.2 format.
A separate XPDL file will be created for each exported BPMN Process or Collaboration diagram.
IMPORTANT!
XPDL 2.2 does not support BPMN Choreography and Conversation elements
from BPMN Collaborations.
To export multiple BPMN Processes or Collaborations to XPDL:
1. Click File > Export To > XPDL File on the main menu. The Export to XPDL dialog will open
(Figure 118).
117
Copyright © 2009-2011 No Magic, Inc..
3
118
PROCEDURES
Exporting Models to XPDL
Copyright © 2009-2011 No Magic, Inc..
3
PROCEDURES
Exporting Models to XPDL
Figure 118 -- Exporting Multiple BPMN Processes or Collaborations to XPDL
2. Select the Selected BPMN Processes/Collaborations radio button and choose the diagrams
you want to export from the BPMN Processes/Collaborations list.
TIP!
Press and hold down the Ctrl key to select multiple BPMN Processes or Collaborations.
3. Type the name of a destination directory in the Working Directory box or click the “...” button to
browse for a destination folder.
4. Click Save.
To export an active BPMN Process/Collaboration to XPDL:
1. Either:
(i) Click File > Export To > XPDL File on the main menu, or
(ii) Open the BPMN Process/Collaboration shortcut menu in the browser and click Tools >
Export To XPDL File.
2. The Export to XPDL dialog will open (Figure 119)
119
Copyright © 2009-2011 No Magic, Inc..
3
PROCEDURES
Importing from BPMN 1.1
Figure 119 -- Exporting a Selected BPMN Process/Collaboration to XPDL
3. Select the Active BPMN Process/Collaboration radio button
4. Type the name of the destination directory and the XPDL filename in the Xpdl File box or click
the “...” button to browse for a destination folder.
5. Click Save.
3.7 Importing from BPMN 1.1
The MagicDraw 16.8 and its earlier versions support for BPMN 1.1 and Business Process diagram allows you
to model business processes using the BPMN 1.1 notation.
IMPORTANT!
120
The support for BPMN 1.1 and Business Process diagram will no longer be
available starting from the next version of MagicDraw. It will be replaced by the
Cameo Business Modeler support for the BPMN 2.0 specification.
Copyright © 2009-2011 No Magic, Inc..
3
PROCEDURES
Importing from BPMN 1.1
You can convert your MagicDraw projects containing old BPMN profile and Business Process diagrams to the
new BPMN 2.0 standard. A backup file will be created for the project conversion. This backup file allows you to
find your BPMN 1.1 models whenever you need them.
You can convert a project to BPMN 2.0 by either:
(i) Opening a MagicDraw project that contains the BPMN 1.1 profile and/or Business Process diagram, or
(ii) Importing a BPMN 1.1 project
(i) To convert a BPMN 1.1 project to BPMN 2.0 by opening it:
1. Open a MagicDraw project that contains the BPMN Profile or Business Process diagram. A
Question dialog will open (Figure 120).
Figure 120 -- Question Dialog
2. Click Yes to convert the project.
3. Click OK.
(ii) To convert a BPMN 1.1 project to BPMN 2.0 by importing it:
1. Click File > Import From > BPMN 1.1 Project on the main menu. The Open BPMN 1.1 Proj-
ect dialog will open.
2. Select a project that contains the Business Process diagram and click Open.
3. Click OK.
121
Copyright © 2009-2011 No Magic, Inc..
3
PROCEDURES
Importing from BPMN 1.1
IMPORTANT!
A backup file project_name_bpmn1.1.bak will be created after the project has
been migrated. It will include the BPMN 1.1 project before migration.
To convert a Teamwork BPMN 1.1 project to BPMN 2.0:
1. Click File > Import From > BPMN 1.1 Project on the main menu. A Question dialog will open
(Figure 121).
Figure 121 -- Question Dialog
2. Click Yes to convert the project. Another Question dialog will open to inform you that that all
elements will be locked (Figure 122).
122
Copyright © 2009-2011 No Magic, Inc..
3
PROCEDURES
Importing from BPMN 1.1
Figure 122 -- Question Dialog
3. Click Yes
IMPORTANT
Before migrating a Teamwork project to BPMN 2.0, make sure that other users
do not lock the BPMN elements.
NOTE
A backup file for a Teamwork project will not be created when migrating the
project to BPMN 2.0. Use a Teamwork version as a backup copy that will
include the BPMN 1.1 Business Process diagrams before migrating the project.
123
Copyright © 2009-2011 No Magic, Inc..
3
PROCEDURES
Integration with Cameo SOA+
3.8 Integration with Cameo SOA+
The BPMN and SoaML standards compliment each other. Together they describe organizations, information,
and behavior from different perspectives: SoaML defines the structure of collaborating systems, and BPMN
describes the dynamic behavior.
IMPORTANT!
Cameo SOA+ Plugin should be installed in order to use the BPMN and SoaML
standards together.
The Cameo Business Process Modeler integration with Cameo SOA + Plugin allows you to use the BPMN and
SoaML standards together. The following are the advantages of using SoaML elements:
• A BPMN Pool can represent an SoaML Participant
• SoaML elements can be selected as the BPMN Data Object type
• SoaML elements can be selected as the BPMN Message type
• BPMN Elements can be traced to SoaML elements.
• SoaML elements can be traced to BPMN elements.
To create a new BPMN-SoaML project:
1. Do any of the following:
(i) Click File > New Project on the main menu.
(ii) Click the New Project button on the main toolbar, or
(iii) Press Ctrl + N.
2. The New Project dialog will open. Click the BPMN2-SoaML Project icon (Figure 123).
124
Copyright © 2009-2011 No Magic, Inc..
3
125
PROCEDURES
Integration with Cameo SOA+
Copyright © 2009-2011 No Magic, Inc..
3
PROCEDURES
Integration with Cameo SOA+
Figure 123 -- New Project Dialog
3. Type a filename in the Name box.
4. Click the “...” button to locate where to store the project to be created.
5. Click OK.
NOTE
If the Business Modeler perspective is not enabled, a message offering to
change the perspective will open. Click Yes to switch to the Business Modeler
perspective supporting the BPMN2 diagrams.
To use the SoaML concepts in an existing BPMN2 project:
1. Click File > Use Module on the main menu. The Use Module dialog will open (Figure 124).
126
Copyright © 2009-2011 No Magic, Inc..
3
PROCEDURES
Integration with Cameo SOA+
Figure 124 -- Use Module Dialog
2. Select the BPMN-SOAML Integration Profile.mdzip module file.
127
Copyright © 2009-2011 No Magic, Inc..
3
PROCEDURES
Integration with Cameo SOA+
3. Click Finish.
To create a pool that represents an SoaML participant:
1. Create a Pool in the BPMN Process or BPMN Collaboration diagram.
2. Select an SoaML Participant as the participant referenced by a Pool (see procedure “ To spec-
ify a model element represented by a Pool, do one of the following:”).
To select an SoaML element as a BPMN Data Object type:
1. Create a Data Object in the BPMN Process or BPMN Collaboration diagram.
2. Open the Data Object Specification dialog and select an SoaML element as the property Type
value.
To create a Message typed by an SoaML element as the Message Flow:
1. Select a Message Flow in the BPMN Collaboration or BPMN Process diagram. The Smart
Manipulators toolbar will open.
2. Click the Referenced Messages button. Create a new message as described in the To create
a Message for a Message Flow: steps.
3. Open the Message Specification dialog. Select an SoaML element as the property Type
value.
The Traceability relations between the BPMN and SoaML elements can be reviewed and defined in the BPMNSOAML Traceability tab of the Element specification dialog. The BPMN-SOAML Traceability tab is available
for the following elements:
• BPMN Activities
• Events
• Gateways
• Data Objects
• SoaML and UML Classifiers
• Ports
Two types of traceabilitty relations are defined in MagicDraw:
(i) Relations to BPMN model elements
(ii) Relations to SoaML model elements
Table 13 below lists the BPMN-SoaML traceability relations to BPMN elements that are available in MagicDraw.
Table 13 -- BPMN-SoaML Traceability Relations to BPMN Elements
128
Property Name
Function
BPMN Choregraphy
Diagrams
To select the BPMN Choreography diagrams that describe the current element.
BPMN Collaboration
Diagrams
To select the BPMN Collaboration diagrams that describe the current element.
BPMN Interface
To select the BPMN Interfaces that correspond to the current element.
BPMN Participants
To select the BPMN Participants that correspond to the current
element.
Copyright © 2009-2011 No Magic, Inc..
3
PROCEDURES
Integration with Cameo SOA+
Property Name
Function
Choreography
To select the BPMN Choreographies that describe the current element.
Collaboration
To select the BPMN Collaborations that describe the current element.
Table 14 below lists the BPMN-SoaML traceability relations to SoaML elements that are available in
MagicDraw.
Table 14 -- BPMN-SoaML Traceability Relations to SoaML Elements
Property Name
Interface
Function
To select the Interface that is related to the current element.
Request Points
To select the SoaML request points that are related to current element.
Service Interface
To select the SoaML Service Interfaces that are related to the current element.
Service Points
To select the SoaML Service Points that are related to the current
element.
To review or define the BPMN-SoaML element traceability relations:
• Open the element Specification dialog and click BPMN/SOAML Traceability (Figure 125).
129
Copyright © 2009-2011 No Magic, Inc..
3
130
PROCEDURES
Integration with Cameo SOA+
Copyright © 2009-2011 No Magic, Inc..
3
PROCEDURES
Integration with Cameo SOA+
Figure 125 -- BPMN/SOAML Traceability Tab in the Element Specification Dialog
NOTE
The BPMN/SOAML Traceability tab is available for the following elements:
• BPMN Activities
• Events
• Gateways
• Data Objects
• SoaML and UML Classifiers
To review the Pools that represent SoaML Participants:
1. Open the SoaML Participant specification dialog. The Property Representing Pools will show
all the Pools that represent SoaML Participants (Figure 126).
131
Copyright © 2009-2011 No Magic, Inc..
3
132
PROCEDURES
Integration with Cameo SOA+
Copyright © 2009-2011 No Magic, Inc..
3
PROCEDURES
Integration with Cameo SOA+
Figure 126 -- Representing Pools in the Participant Specification Dialog
133
Copyright © 2009-2011 No Magic, Inc..