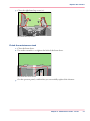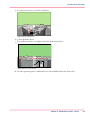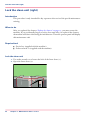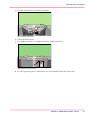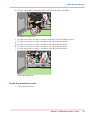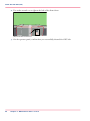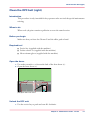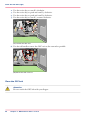
1
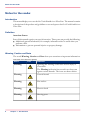
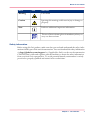
-
Océ
VarioPrint® 6000
Ultra Line
Experience ultra
speed
o
User manual
Maintenance tasks
Copyright
© 2010 Océ
All rights reserved. No part of this work may be reproduced, copied, adapted, or transmitted
in any form or by any means without written permission from Océ.
Océ makes no representation or warranties with respect to the contents hereof and specifically disclaims any implied warranties of merchantability or fitness for any particular purpose.
Further, Océ reserves the right to revise this publication and to make changes from time
to time in the content hereof without obligation to notify any person of such revision or
changes.
Edition: 2010-06
Trademarks
Trademarks
List of trademarks
Océ, Océ VarioPrint® 6000 Ultra Line are registered trademarks of Océ-Technologies
B.V.
Products in this publication are referred to by their general trade names. In most, if not
all cases, these designations are claimed as trademarks or registered trademarks of their
respective companies.
3
Contents
Contents
Chapter 1
Introduction.........................................................................................................5
Notes for the reader...................................................................................6
Available documentation...........................................................................8
Introduction to the maintenance tasks.....................................................9
Determine the required maintenance.....................................................12
Chapter 2
Maintenance tasks - Level 1.............................................................................13
Replace the cleaners................................................................................14
Lock the clean unit (left)...........................................................................28
Lock the clean unit (right)........................................................................30
Chapter 3
Maintenance tasks - Level 2.............................................................................33
Remove sheets from the process modules............................................34
Clean the OPC belt (left)...........................................................................51
Clean the OPC belt (right)........................................................................57
Clean the glue cleaning rollers................................................................63
Appendix A
Miscellaneous....................................................................................................77
Reader's comment sheet.........................................................................78
Addresses of local Océ organisations ...................................................80
4
Chapter 1
Introduction
Notes for the reader
Notes for the reader
Introduction
This manual helps you to use the Océ VarioPrint® 6000 Ultra Line. The manual contains
a description of the product and guidelines to use and operate the Océ VarioPrint® 6000
Ultra Line.
Definition
Attention-Getters
Parts of this manual require your special attention. These parts can provide the following:
■ Additional general information, for example, information that is useful when you
perform a task.
■ Information to prevent personal injuries or property damage.
Warning, Caution and Note
The words Warning, Caution and Note draw your attention to important information.
Overview of the attention-getters#
Word
6
Icon
Indicates
Warning
Ignoring this warning could cause serious injury or
even death.
The Warning indication has several icons that warn
against various hazards. The icons are shown below.
Warning
General hazard
Warning
Hot surface
Warning
Electric shock
Warning
Moving parts
Chapter 1 - Introduction
Notes for the reader
Word
Icon
Indicates
Warning
Laser beam
Caution
Ignoring this warning could cause injury or damage to
property.
Note
Indicates additional important information.
The use of heat-resistant gloves is mandatory when you
carry out these actions.
Safety information
Before using this Océ product, make sure that you read and understand the safety information which is part of the user documentation. You can download the safety information
via http://global.oce.com/support/ or, if applicable, find it on the user documentation
CD/DVD that is delivered together with the machine or obtain the safety information
from your local Océ representative. To avoid potential hazards, maintenance is strictly
preserved to properly qualified and trained service technicians.
Chapter 1 - Introduction
7
Available documentation
Available documentation
Introduction
This machine is delivered with the following items:
■ A 'Documentation and Driver Notice'.
■ A 'Safety Information Sheet'.
Note:
Please check www.oce.com for the latest version of the documentation.
Main Content of the User Manuals
The following table provides an overview of the main content of the user manuals.
Main Content of the User Manuals#
User Manual
Main content
Operating information
■
■
■
■
Maintenance tasks
■
Replacing parts
Cleaning parts
Solve a paper jam in the engine module
■
Instructions for safe use
■
■
Safety information
8
Chapter 1 - Introduction
Overview of the main system components
Working with the operator panel
Handling and managing jobs on the operator panel
Add media, toner and staples
Introduction to the maintenance tasks
Introduction to the maintenance tasks
Introduction
This manual is intended for trained and certified operators who received the special
maintenance training for the printer. Therefore, this manual is only intended as a reference
guide for the described maintenance procedures.
On the operator panel, you must always press 'Next' to continue with the next step, or
'Finish' to complete a maintenance task. After you finished a maintenance task, the operator panel will also ask you to restart the system. The procedures in this manual only
describe the physical maintenance actions.
Note:
In this manual and on the operator panel, the trained and certified operator is referred
to as the key operator.
Note:
Only a key operator is allowed to perform the maintenance tasks that are described in
this manual. To make sure that only a key operator performs the maintenance tasks, it
is recommended to define a maintenance PIN in the Settings Editor. Then the operator
panel asks for the maintenance PIN when you start the first task of a maintenance session.
A maintenance session can involve more than 1 maintenance task. A maintenance session
ends when you leave the maintenance screen that displays the maintenance tasks. When
no maintenance PIN is defined in the Settings Editor, the operator panel will not ask
for a maintenance PIN.
The maintenance levels
The machine is a high-volume production printer. Therefore, a short downtime due to
required maintenance is very important to you. To help you reduce the downtime, 2
levels of maintenance tasks which key operators can carry out are defined. The following
table gives an overview of the maintenance levels and the respective maintenance tasks.
Overview of the maintenance tasks#
Maintenance level
Maintenance task
Where to find more information
1
Replace the cleaners
‘Replace the cleaners’ on page 14
Lock the clean units
■
■
‘Lock the clean unit (left)’ on
page 28
‘Lock the clean unit (right)’ on
page 30
Chapter 1 - Introduction
9
Introduction to the maintenance tasks
Maintenance level
Maintenance task
Where to find more information
2
Solve paper jams in hot areas of the printer
‘Remove sheets from the process
modules’ on page 34
Clean the OPC belts
■
■
Clean the glue cleaning
rollers
‘Clean the OPC belt (left)’ on
page 51)
‘Clean the OPC belt (right)’
on page 57)
‘Clean the glue cleaning rollers’ on
page 63
Begin maintenance
The maintenance section of the 'System' view shows the required or suggested maintenance
tasks. Here, you can only view the maintenance tasks.
[10] Begin maintenance
When you press the 'Start maintenance' button, the actual maintenance screen appears.
10
Chapter 1 - Introduction
Introduction to the maintenance tasks
The maintenance screen
After you press the 'Start maintenance' button in the 'System' view, the maintenance
screen appears. The maintenance screen shows the required and suggested maintenance
tasks. A red icon indicates required tasks. A yellow icon indicates suggested tasks. These
tasks may be required soon. You can select a maintenance task from the list and press
'Start' to start the maintenance wizard.
Chapter 1 - Introduction
11
Determine the required maintenance
Determine the required maintenance
Introduction
The operator panel indicates that maintenance is required, and when maintenance is required. The operator panel also leads you through all the steps of each maintenance task.
This section describes how the operator panel indicates that the machine requires maintenance.
Replace the cleaners
The sheet cleaners and the spiral cleaners are consumables. The cleaners have counters.
If maintenance is required immediately or soon, the color of the maintenance icon changes.
The 'Maintenance' section of the 'System' view on the operator panel indicates that you
can or must replace the cleaners. There, the counter information is regularly updated.
The following table describes what you must do when the maintenance icon is blue, orange
or red.
When to replace the cleaners#
Maintenance icon
Description
The maintenance icon is blue. Maintenance is currently not
required.
The maintenance icon is orange. The machine can print another
20,000 images before you must replace the cleaners. Your service
technician can change this to another number within the range
of 10,000 and 50,000.
The maintenance icon is red. The counter is 0. The machine
stops. You must replace the cleaners. Only then, the machine
can continue printing.
Solve a paper jam in hot areas of the machine
When a paper jam occurs in the hot areas of the machine, the procedure is as follows.
■ The machine stops.
■ The operator panel displays the maintenance screen with this maintenance task.
■ Select the maintenance task and press 'Start'.
■ If applicable, enter the maintenance PIN.
■ Follow the instructions on the operator panel to solve the paper jam.
12
Chapter 1 - Introduction
Chapter 2
Maintenance tasks - Level
1
Replace the cleaners
Replace the cleaners
Introduction
This procedure is only intended for key operators who received the special maintenance
training.
When to do
If the maintenance icon in the dashboard indicates that maintenance is required soon or
immediately.
Before you begin
Make sure that you have 2 new spiral cleaners and 2 new sheet cleaners at hand.
Required tool
■
■
■
■
Service key (supplied with the machine)
Socket wrench 10 (supplied with the machine)
Heat-resistant gloves (supplied with the machine)
Adhesive tape (supplied with the machine)
Caution:
Certain parts of the machine may be hot. Therefore, always use the special heat- and oilresistant fuser gloves.
Open the doors and covers
1. Use socket wrench 10 to loosen the bolt of the front doors (1).
14
Chapter 2 - Maintenance tasks - Level 1
Replace the cleaners
2. Open the front doors (2).
2
1
[14] Open the front doors
3. Lift the right-hand top cover to the upper position (1).
4. Lift the left-hand top cover to the upper position (2).
2
1
[15] Lift the top covers
Caution:
Hot area. Use heat-resistant gloves.
Caution:
Make sure that the left-hand inner cover is locked in the upper position.
5. Unlock the left-hand upper cover and lift the left-hand inner cover to the upper position
(1).
Chapter 2 - Maintenance tasks - Level 1
15
Replace the cleaners
6. Unlock and lower the right-hand top cover (2).
2
1
[16] Lift the left-hand inner cover
Caution:
Make sure that the right-hand inner cover is locked in the upper position.
7. Lift the right-hand inner cover to the upper position.
[17] Lift the right-hand inner cover
Unlock the clean units
Caution:
Hot area. Use heat-resistant gloves.
1. Use the service key to turn N1 counter-clockwise.
16
Chapter 2 - Maintenance tasks - Level 1
Replace the cleaners
2. Use the service key to turn M1 counter-clockwise.
[18] Unlock the clean units
Lift the clean units
Caution:
Hot area. Use heat-resistant gloves.
Caution:
Make sure that both clean units are locked in the upper position.
1. Use the red handle to lift the right-hand clean unit to the upper position (1).
2. Use the red handle to lift the left-hand clean unit to the upper position (2).
2
1
[19] Lift the clean units
Chapter 2 - Maintenance tasks - Level 1
17
Replace the cleaners
Remove the sheet cleaners
Caution:
Hot area. Use heat-resistant gloves.
Attention:
Do not remove a layer of the sheet cleaner when the cleaner is inside the machine.
1. Press both red leaf springs at the end of the right-hand sheet cleaner outwards.
[20] Press the red leaf springs outwards
18
Chapter 2 - Maintenance tasks - Level 1
Replace the cleaners
2. Remove the sheet cleaner.
[21] Remove the sheet cleaners
3. Repeat the steps 1 and 2 for the left-hand sheet cleaner.
Remove the spiral cleaners
Caution:
Hot area. Use heat-resistant gloves.
Chapter 2 - Maintenance tasks - Level 1
19
Replace the cleaners
1. Press both red leaf springs at the end of the right-hand spiral cleaner outwards.
[22] Press the red leaf springs outwards
20
Chapter 2 - Maintenance tasks - Level 1
Replace the cleaners
2. Remove the spiral cleaner.
[23] Remove the spiral cleaners
3. Repeat the steps 1 and 2 for the left-hand spiral cleaner.
Recondition the sheet cleaners
1. Remove 1 layer and an extra 2-3 cm (about 1 inch) of both sheet cleaners, including the
old adhesive strip (1).
Chapter 2 - Maintenance tasks - Level 1
21
Replace the cleaners
2. Use heat-resistant adhesive tape at 3 places to stick the end of the layer to the sheet
cleaner (2).
1
2
[24] Recondition the sheet cleaners
Note:
Only use a new sheet cleaner if the cylinder does not contain enough clean-sheet paper.
22
Chapter 2 - Maintenance tasks - Level 1
Replace the cleaners
Install the spiral cleaners
1. Lock the right-hand spiral cleaner between the red leaf springs.
[25] Install the spiral cleaners
2. Repeat step 1 for the left-hand spiral cleaner.
Note:
The spiral cleaners only fit in one way.
Chapter 2 - Maintenance tasks - Level 1
23
Replace the cleaners
Install the sheet cleaners
1. Lock the right-hand sheet cleaner between the red leaf springs.
[26] Install the sheet cleaners
2. Repeat step 1 for the left-hand sheet cleaner.
Note:
The sheet cleaners only fit in one way.
Lower the clean units
Attention:
Make sure that the clean units are in the lowest position.
1. Lift the right-hand clean unit and push the red handle to unlock the locking mechanism
(1).
2. Lower the right-hand clean unit into the locked position (2).
24
Chapter 2 - Maintenance tasks - Level 1
Replace the cleaners
3. Lift the left-hand clean unit and push the red handle to unlock the locking mechanism
(3).
4. Lower the left-hand clean unit into the locked position (4).
4
3
2
1
[27] Lower the clean units
Lock the clean units
1. Use the service key to turn N1 clockwise.
2. Use the service key to turn M1 clockwise.
[28] Lock the clean units
Chapter 2 - Maintenance tasks - Level 1
25
Replace the cleaners
Close the covers
1. Unlock and lower the right-hand inner cover.
[29] Close the right-hand inner cover
2. Lift the right-hand top cover to the upper position (1).
3. Unlock and lower the left-hand inner cover (2).
2
1
[30] Close the left-hand inner cover
4. Close the left-hand top cover (1).
26
Chapter 2 - Maintenance tasks - Level 1
Replace the cleaners
5. Close the right-hand top cover (2).
1
2
[31] Close the top covers
Finish the maintenance task
1. Close the front doors.
2. Use socket wrench 10 to tighten the bolt of the front doors.
[32] Close the front doors
3. On the operator panel, confirm that you successfully replaced the cleaners.
Chapter 2 - Maintenance tasks - Level 1
27
Lock the clean unit (left)
Lock the clean unit (left)
Introduction
This procedure is only intended for key operators who received the special maintenance
training.
When to do
After you replaced the cleaners ‘Replace the cleaners’ on page 14, you must restart the
machine. If you accidentally forgot to lock a clean unit after you replaced the cleaners,
the machine will detect this during the initialization. Then the operator panel will display
this maintenance task.
Required tool
■
■
Service key (supplied with the machine)
Socket wrench 10 (supplied with the machine)
Lock the clean unit
1. Use socket wrench 10 to loosen the bolt of the front doors (1).
2. Open the front doors (2).
2
1
[33] Open the front doors
28
Chapter 2 - Maintenance tasks - Level 1
Lock the clean unit (left)
3. Use the service key to turn N1 clockwise.
[34] Lock the clean unit
4. Close the front doors.
5. Use socket wrench 10 to tighten the bolt of the front doors.
[35] Close the front doors
6. On the operator panel, confirm that you successfully locked the clean unit.
Chapter 2 - Maintenance tasks - Level 1
29
Lock the clean unit (right)
Lock the clean unit (right)
Introduction
This procedure is only intended for key operators who received the special maintenance
training.
When to do
After you replaced the cleaners ‘Replace the cleaners’ on page 14, you must restart the
machine. If you accidentally forgot to lock a clean unit after you replaced the cleaners,
the machine will detect this during the initialization. Then the operator panel will display
this maintenance task.
Required tool
■
■
Service key (supplied with the machine)
Socket wrench 10 (supplied with the machine)
Lock the clean unit
1. Use socket wrench 10 to loosen the bolt of the front doors (1).
2. Open the front doors (2).
2
1
[36] Open the front doors
30
Chapter 2 - Maintenance tasks - Level 1
Lock the clean unit (right)
3. Use the service key to turn M1 clockwise.
[37] Lock the clean unit
4. Close the front doors.
5. Use socket wrench 10 to tighten the bolt of the front doors.
[38] Close the front doors
6. On the operator panel, confirm that you successfully locked the clean unit.
Chapter 2 - Maintenance tasks - Level 1
31
Lock the clean unit (right)
32
Chapter 2 - Maintenance tasks - Level 1
Chapter 3
Maintenance tasks - Level
2
Remove sheets from the process modules
Remove sheets from the process modules
Introduction
During the printing process, sheets can get stuck in one or more process modules.
Sometimes, you can only remove these sheets when the machine is off, for example when
a sheet is stuck in the preheat unit. Then, only trained operators are allowed to remove
these sheets. This section describes the procedure to check all the modules and remove
the sheets.
Required tool
■
■
■
Service key (supplied with the machine)
Socket wrench 10 (supplied with the machine)
Heat-resistant gloves (supplied with the machine)
Caution:
Certain parts of the machine may be hot. Therefore, always use the special heat- and oilresistant fuser gloves.
Remove sheets from the interface module
1. Open the front door of the interface module.
2. Remove the sheets at B4.
B4
[39] Remove the sheets at B4
3. Close B4.
4. Close the front door of the interface module.
34
Chapter 3 - Maintenance tasks - Level 2
Remove sheets from the process modules
Note:
After you checked the interface module for sheets, you must press 'Next' on the operator
panel to continue.
Open the doors
1. Use socket wrench 10 to loosen the bolt of the front doors (1).
2. Open the front doors (2).
2
1
[40] Open the front doors
Remove sheets at the top cover
1. Remove the sheets at the top cover (1).
2. Lift the right-hand top cover to the upper position (2).
3. Lift the left-hand top cover to the upper position (3).
3
2
1
[41] Remove the sheets at the top cover
Chapter 3 - Maintenance tasks - Level 2
35
Remove sheets from the process modules
Remove sheets at the inner covers
Caution:
Hot area. Use heat-resistant gloves.
Caution:
Make sure that the left-hand inner cover is locked in the upper position.
1. Remove the sheets at the inner covers.
2. Unlock the left-hand inner cover and lift the left-hand inner cover to the upper position
(2).
3. Unlock and lower the right-hand top cover (3).
3
2
[42] Open the inner covers (1 of 2)
Caution:
Make sure that the right-hand inner cover is locked in the upper position.
36
Chapter 3 - Maintenance tasks - Level 2
Remove sheets from the process modules
4. Lift the right-hand inner cover to the upper position.
[43] Open the inner covers (2 of 2)
5. Remove the sheets from the receiving unit.
Note:
Always pull out the sheet straight and in horizontal direction.
[44] Remove the sheets from the receiving unit
Chapter 3 - Maintenance tasks - Level 2
37
Remove sheets from the process modules
6. Use the service key to turn the axle of the transfuse pinch clockwise. The transfuse pinch
gets unlocked.
[45] Unlock the transfuse pinch
7. Remove the sheets from the transfuse pinch.
[46] Remove the sheets from the transfuse pinch
Remove sheets from the registration unit
1. Turn handle C1 clockwise (1).
2. Open drawer C1 (2).
38
Chapter 3 - Maintenance tasks - Level 2
Remove sheets from the process modules
Note:
Opening the drawer can be difficult due to jammed media.
1
C1
2
[47] Open the registration unit
3. Remove the sheets at C2, C3 and C4.
C4
C2
C3
[48] Remove the sheets from the registration unit
Caution:
Hot area.
Chapter 3 - Maintenance tasks - Level 2
39
Remove sheets from the process modules
4. Remove the sheets below the preheat unit.
[49] Remove the sheets below the preheat unit
5. Close drawer C1.
Note:
Do not turn handle C1.
C1
[50] Close drawer C1
Remove the preheat unit
Caution:
Hot area. Use heat-resistant gloves.
40
Chapter 3 - Maintenance tasks - Level 2
Remove sheets from the process modules
1. Remove the bolts of the preheat unit to unlock the preheat unit.
[51] Unlock the preheat unit
2. Pull out the unit as far as possible.
1
[52] Pull the unit out
3. Lift the red handle and pull the unit further outwards.
2
2
[53] Pull the unit out further
4. Lower the front of the unit and remove the unit.
5. Put the unit on a heat-resistant base. Make sure that the left-hand side is on top.
Chapter 3 - Maintenance tasks - Level 2
41
Remove sheets from the process modules
Disassemble and assemble the preheat unit
Caution:
Hot area. Use heat-resistant gloves.
1. Press both red leaf springs at the preheat unit plate outwards and pull out the plate.
[54] Disassemble the preheat unit
2. Turn both belts to remove the sheets inside the preheat unit.
[55] Turn the belts
42
Chapter 3 - Maintenance tasks - Level 2
Remove sheets from the process modules
3. Put the preheat unit plate back.
[56] Assemble the preheat unit
4. Remove the sheets below the transfer unit.
[57] Remove the sheets below the transfer unit
Install the preheat unit
Caution:
Hot area. Use heat-resistant gloves.
Chapter 3 - Maintenance tasks - Level 2
43
Remove sheets from the process modules
1. Put the slider wheels of the preheat unit behind the slider wheels of the machine.
1
[58] Install the preheat unit
2. Put the preheat unit in horizontal position and push the unit into the machine.
2
[59] Push the preheat unit into the machine
44
Chapter 3 - Maintenance tasks - Level 2
Remove sheets from the process modules
3. Replace and tighten the bolts of the preheat unit.
3
3
[60] Tighten the bolts
4. Turn handle C1 anticlockwise to lock the registration unit.
C1
[61] Lock the registration unit
Unlock the clean units
Caution:
Hot area. Use heat-resistant gloves.
1. Use the service key to turn N1 counter-clockwise.
Chapter 3 - Maintenance tasks - Level 2
45
Remove sheets from the process modules
2. Use the service key to turn M1 counter-clockwise.
[62] Unlock the clean units
Lift the clean units
Caution:
Hot area. Use heat-resistant gloves.
Caution:
Make sure that both clean units are locked in the upper position.
1. Use the red handle to lift the right-hand clean unit to the upper position (1).
2. Use the red handle to lift the left-hand clean unit to the upper position (2).
2
1
[63] Lift the clean units
When you press 'Next' on the operator panel, a dialog box appears.
46
Chapter 3 - Maintenance tasks - Level 2
Remove sheets from the process modules
Attention:
A sheet on one of the spiral cleaners or on both spiral cleaners will seriously damage the
machine.
3. Check whether there is a sheet on one of the spiral cleaners.
If not, go to step 4. If there is, go to step 5.
4. Press 'No' if the spiral cleaners do not have sheets on them.
5. Press 'Yes' if there is a sheet on one of the spiral cleaners. Now you must follow the procedures for removing, reconditioning and installating of the sheet cleaners and spiral
cleaners ‘Replace the cleaners’ on page 14.
Lower the clean units
Attention:
Make sure that the clean units are in the lowest position.
1. Lift the right-hand clean unit and push the red handle to unlock the locking mechanism
(1).
2. Lower the right-hand clean unit into the locked position (2).
3. Lift the left-hand clean unit and push the red handle to unlock the locking mechanism
(3).
4. Lower the left-hand clean unit into the locked position (4).
4
3
2
1
[64] Lower the clean units
Lock the clean units
1. Use the service key to turn N1 clockwise.
Chapter 3 - Maintenance tasks - Level 2
47
Remove sheets from the process modules
2. Use the service key to turn M1 clockwise.
[65] Lock the clean units
Close the covers
1. Unlock and lower the right-hand inner cover.
[66] Close the right-hand inner cover
2. Lift the right-hand top cover to the upper position (1).
48
Chapter 3 - Maintenance tasks - Level 2
Remove sheets from the process modules
3. Unlock and lower the left-hand inner cover (2).
2
1
[67] Close the left-hand inner cover
4. Close the left-hand top cover (1).
5. Close the right-hand top cover (2).
1
2
[68] Close the top covers
Finish the maintenance task
1. Close the front doors.
Chapter 3 - Maintenance tasks - Level 2
49
Remove sheets from the process modules
2. Use socket wrench 10 to tighten the bolt of the front doors.
[69] Close the front doors
3. On the operator panel, confirm that you successfully removed the sheets.
50
Chapter 3 - Maintenance tasks - Level 2
Clean the OPC belt (left)
Clean the OPC belt (left)
Introduction
This procedure is only intended for key operators who received the special maintenance
training.
When to do
When each 7th print contains a pollution at exact the same location.
Before you begin
Make sure that you have the Cleaner P and the offset pads at hand.
Required tool
■
■
■
Service key (supplied with the machine)
Socket wrench 10 (supplied with the machine)
Heat-resistant gloves (supplied with the machine)
Open the doors
1. Use socket wrench 10 to loosen the bolt of the front doors (1).
2. Open the front doors (2).
2
1
[70] Open the front doors
Unlock the OPC unit
1. Use the service key to push and turn L1 counter-clockwise.
Chapter 3 - Maintenance tasks - Level 2
51
Clean the OPC belt (left)
2.
3.
4.
5.
Use the service key to turn L2 counter-clockwise.
Use the service key to push and turn L3 counter-clockwise.
Use the service key to push and turn L4 counter-clockwise.
Use the service key to turn L5 clockwise.
L5
L4
L3
L1
L2
[71] Unlock the OPC unit
6. Use the red handle to move the OPC unit as far outward as possible.
[72] Move the OPC unit out
Clean the OPC belt
Attention:
Do not touch the OPC belt with your fingers.
52
Chapter 3 - Maintenance tasks - Level 2
Clean the OPC belt (left)
1. Rotate the metal OPC pulley to locate the spot(s) on the OPC.
[73] Rotate the OPC pulley to locate the spots
2. Rotate the OPC pulley until the spot(s) are in the indicated area
Note:
In this area, the OPC has a hard bottom surface which is required to enable proper
cleaning without damaging the OPC belt.
[74] Position the spot(s) in the indicated area
3. Apply a small amount of Cleaner P on an offset pad.
Chapter 3 - Maintenance tasks - Level 2
53
Clean the OPC belt (left)
4. Clean the spot(s) with this offset pad.
[75] Clean the OPC
5. Carefully remove all Cleaner P from the OPC belt. Use new offset pads for this.
Lock the OPC unit
1. Rotate the metal OPC pulley until the end of the back side of the OPC belt runs near
(+/- 0.1 inch) the arrows of the yellow registration board.
[76] Reposition the OPC belt
54
Chapter 3 - Maintenance tasks - Level 2
Clean the OPC belt (left)
2. Use the red handle to push the OPC unit inwards as far as possible.
[77] Move the OPC unit in
3.
4.
5.
6.
7.
Use the service key to turn L5 counter-clockwise into the locked position.
Use the service key to turn L4 clockwise into the locked position.
Use the service key to turn L3 clockwise into the locked position.
Use the service key to turn L2 clockwise into the locked position.
Use the service key to turn L1 clockwise into the locked position.
L5
L4
L3
L1
L2
[78] Lock the OPC unit
Finish the maintenance task
1. Close the front doors.
Chapter 3 - Maintenance tasks - Level 2
55
Clean the OPC belt (left)
2. Use socket wrench 10 to tighten the bolt of the front doors.
[79] Close the front doors
3. On the operator panel, confirm that you successfully cleaned the OPC belt.
56
Chapter 3 - Maintenance tasks - Level 2
Clean the OPC belt (right)
Clean the OPC belt (right)
Introduction
This procedure is only intended for key operators who received the special maintenance
training.
When to do
When each 7th print contains a pollution at exact the same location.
Before you begin
Make sure that you have the Cleaner P and the offset pads at hand.
Required tool
■
■
■
Service key (supplied with the machine)
Socket wrench 10 (supplied with the machine)
Heat-resistant gloves (supplied with the machine)
Open the doors
1. Use socket wrench 10 to loosen the bolt of the front doors (1).
2. Open the front doors (2).
2
1
[80] Open the front doors
Unlock the OPC unit
1. Use the service key to push and turn K1 clockwise.
Chapter 3 - Maintenance tasks - Level 2
57
Clean the OPC belt (right)
2.
3.
4.
5.
Use the service key to turn K2 clockwise.
Use the service key to push and turn K3 clockwise.
Use the service key to push and turn K4 clockwise.
Use the service key to turn K5 counter-clockwise.
K5
K4
K3
K1
K2
[81] Unlock the OPC unit
6. Use the red handle to move the OPC unit as far outward as possible.
[82] Move the OPC unit out
Clean the OPC belt
Attention:
Do not touch the OPC belt with your fingers.
58
Chapter 3 - Maintenance tasks - Level 2
Clean the OPC belt (right)
1. Rotate the metal OPC pulley until the spots are visible.
[83] Rotate the OPC pulley to locate the spots
2. Rotate the OPC pulley until the spots are in the indicated area.
Note:
In this area, the OPC has a hard bottom surface which is required to enable proper
cleaning without damaging the OPC belt.
[84] Position the spots in the indicated area
3. Apply a small amount of Cleaner P on an offset pad.
Chapter 3 - Maintenance tasks - Level 2
59
Clean the OPC belt (right)
4. Clean any spots with this offset pad.
[85] Clean the OPC
5. Carefully remove all Cleaner P from the OPC belt. Use new offset pads for this.
Lock the OPC unit
1. Rotate the metal OPC pulley until the end of the back side of the OPC belt runs near
(+/- 0.1 inch) the arrows of the yellow registration board.
[86] Reposition the OPC belt
60
Chapter 3 - Maintenance tasks - Level 2
Clean the OPC belt (right)
2. Use the red handle to push the OPC unit inwards as far as possible.
[87] Move the OPC unit in
3.
4.
5.
6.
7.
Use the service key to turn K5 clockwise into the locked position.
Use the service key to turn K4 counter-clockwise into the locked position.
Use the service key to turn K3 counter-clockwise into the locked position.
Use the service key to turn K2 counter-clockwise into the locked position.
Use the service key to turn K1 counter-clockwise into the locked position.
K5
K4
K3
K1
K2
[88] Lock the OPC unit
Finish the maintenance task
1. Close the front doors.
Chapter 3 - Maintenance tasks - Level 2
61
Clean the OPC belt (right)
2. Use socket wrench 10 to tighten the bolt of the front doors.
[89] Close the front doors
3. On the operator panel, confirm that you successfully cleaned the OPC belt.
62
Chapter 3 - Maintenance tasks - Level 2
Clean the glue cleaning rollers
Clean the glue cleaning rollers
Introduction
This procedure is only intended for key operators who received the special maintenance
training.
When to do
Certain media may contain substances (for example ink or wax) that pollute the machine.
This pollution can lead to decreased image quality and/or machine damage. Depending
on the amount of substances, you must clean the glue cleaning rollers at a certain interval.
Consult your service technician if you need advise.
Before you begin
Make sure that the machine is switched off.
Required tool
■
■
■
■
■
■
■
■
Service key (supplied with the machine)
Socket wrench 10 (supplied with the machine)
Heat-resistant gloves (supplied with the machine)
Offset pads (supplied with the machine)
Large sheets of paper to protect the OPC
Océ Cleaner P (supplied with the machine)
Océ Cleaner K
Océ Cleaner T
Caution:
Hot area. Use heat-resistant gloves.
Open the doors and covers
1. Use socket wrench 10 to loosen the bolt of the front doors (1).
Chapter 3 - Maintenance tasks - Level 2
63
Clean the glue cleaning rollers
2. Open the front doors (2).
2
1
[90] Open the front doors
3. Lift the right-hand top cover to the upper position (1).
4. Lift the left-hand top cover to the upper position (2).
2
1
[91] Lift the top covers
Caution:
Hot area. Use heat-resistant gloves.
Caution:
Make sure that the left-hand inner cover is locked in the upper position.
5. Unlock the left-hand upper cover and lift the left-hand inner cover to the upper position
(1).
64
Chapter 3 - Maintenance tasks - Level 2
Clean the glue cleaning rollers
6. Unlock and lower the right-hand top cover (2).
2
1
[92] Lift the left-hand inner cover
Caution:
Make sure that the right-hand inner cover is locked in the upper position.
7. Lift the right-hand inner cover to the upper position.
[93] Lift the right-hand inner cover
Unlock the clean units
Caution:
Hot area. Use heat-resistant gloves.
1. Use the service key to turn N1 counter-clockwise.
Chapter 3 - Maintenance tasks - Level 2
65
Clean the glue cleaning rollers
2. Use the service key to turn M1 counter-clockwise.
[94] Unlock the clean units
Lift the clean units
Caution:
Hot area. Use heat-resistant gloves.
Caution:
Make sure that both clean units are locked in the upper position.
1. Use the red handle to lift the right-hand clean unit to the upper position (1).
2. Use the red handle to lift the left-hand clean unit to the upper position (2).
2
1
[95] Lift the clean units
66
Chapter 3 - Maintenance tasks - Level 2
Clean the glue cleaning rollers
Lift the TTF units
Caution:
Hot area. Use heat-resistant gloves.
1. Use socket wrench 10 to loosen the two bolts of the right-hand TTF Unit.
2. Lift the right-hand TTF unit, using the metal bar at the front side.
Chapter 3 - Maintenance tasks - Level 2
67
Clean the glue cleaning rollers
3. Push the service key at the indicated location inside and turn it counter-clockwise.
4. Use socket wrench 10 to loosen the two bolts of the left-hand TTF Unit.
68
Chapter 3 - Maintenance tasks - Level 2
Clean the glue cleaning rollers
5. Lift the left-hand TTF unit, using the metal bar at the front side.
Prepare for cleaning
Caution:
Hot area. Use heat-resistant gloves.
1. Put a minimum of 4 layers of paper under the left-hand and the right-hand glue cleaning
roller to protect the OPC.
Chapter 3 - Maintenance tasks - Level 2
69
Clean the glue cleaning rollers
Clean the glue cleaning rollers
Caution:
Cleaner fluids can cause irritation. Read the Material Safety Data Sheets of the cleaner
fluids before use.
Caution:
Hot area. Use heat-resistant gloves.
Attention:
Always clean both glue cleaning rollers.
Attention:
For all cleaning actions, apply a small amount of cleaner fluid on an offset pad.
Depending on the kind of pollution, you may require different cleaner solutions.
1. Clean the glue cleaning rollers with Océ Cleaner K.
2. When the rollers contain white pollution (probably PE-wax), clean the rollers with Océ
Cleaner T.
3. If the rollers show extreme pollution,
■ clean the rollers with Océ Cleaner P first and then,
■ clean the rollers with Océ Cleaner T.
4. Clean the rollers again with Océ cleaner K to finish the cleaning procedure.
5. Carefully remove all the protective paper.
70
Chapter 3 - Maintenance tasks - Level 2
Clean the glue cleaning rollers
Close the TTF units
Caution:
Hot area. Use heat-resistant gloves.
1. Carefully push the left-hand TTF unit down, using the metal bar at the front side.
2. Use socket wrench 10 to tighten the two bolts of the left-hand TTF Unit.
Chapter 3 - Maintenance tasks - Level 2
71
Clean the glue cleaning rollers
3. Push the service key at the indicated location inside and turn it clockwise.
4. Carefully push the right-hand TTF unit down, using the metal bar at the front side.
72
Chapter 3 - Maintenance tasks - Level 2
Clean the glue cleaning rollers
5. Use socket wrench 10 to tighten the two bolts of the left-hand TTF Unit.
Lower the clean units
Attention:
Make sure that the clean units are in the lowest position.
1. Lift the right-hand clean unit and push the red handle to unlock the locking mechanism
(1).
2. Lower the right-hand clean unit into the locked position (2).
3. Lift the left-hand clean unit and push the red handle to unlock the locking mechanism
(3).
4. Lower the left-hand clean unit into the locked position (4).
4
3
2
1
[108] Lower the clean units
Chapter 3 - Maintenance tasks - Level 2
73
Clean the glue cleaning rollers
Lock the clean units
1. Use the service key to turn N1 clockwise.
2. Use the service key to turn M1 clockwise.
[109] Lock the clean units
Close the covers
1. Unlock and lower the right-hand inner cover.
[110] Close the right-hand inner cover
2. Lift the right-hand top cover to the upper position (1).
74
Chapter 3 - Maintenance tasks - Level 2
Clean the glue cleaning rollers
3. Unlock and lower the left-hand inner cover (2).
2
1
[111] Close the left-hand inner cover
4. Close the left-hand top cover (1).
5. Close the right-hand top cover (2).
1
2
[112] Close the top covers
Finish the maintenance task
1. Close the front doors.
Chapter 3 - Maintenance tasks - Level 2
75
Clean the glue cleaning rollers
2. Use socket wrench 10 to tighten the bolt of the front doors.
[113] Close the front doors
76
Chapter 3 - Maintenance tasks - Level 2
Appendix A
Miscellaneous
Reader's comment sheet
Reader's comment sheet
Questions
Have you found this manual to be accurate?
O Yes
O No
Were you able to operate the product, after reading this manual?
O Yes
O No
Does this manual provide sufficient background information?
O Yes
O No
Is the format of this manual convenient in size, readability and arrangement (page layout,
chapter order, etc.)?
O Yes
O No
Could you find the information you were looking for?
O Always
O Most of the times
O Sometimes
O Not at all
What did you use to find the required information?
O Table of contents
O Index
Are you satisfied with this manual?
O Yes
O No
Thank you for evaluating this manual.
If you have other comments or concerns, please explain or suggest improvements overleaf
or on a separate sheet.
Comments:
-------------------------------------------------------------------------------------------------------------------------------------------------------------------------------------------------------------------------------------------------------------------------------------------------------------------------------------------------------------------------------------------------------------------------------------
78
Appendix A - Miscellaneous
Reader's comment sheet
------------------------------------------------------------------------------------------------------------------------------Date:
This reader's comment sheet is completed by:
(If you prefer to remain unknown, please do fill in your occupation)
Name:
Occupation:
Company:
Phone:
Address:
City:
Country:
Please return this sheet to:
Océ-Technologies B.V.
For the attention of ITC User Documentation.
P.O. Box 101,
5900 MA Venlo
The Netherlands
Send your comments by E-mail to: [email protected]
For the addresses of local Océ organisations see: http://www.oce.com
Appendix A - Miscellaneous
79
Addresses of local Océ organisations
Addresses of local Océ organisations
#
80
Océ-Australia Ltd.
P.O. Box 363
Ferntree Gully MDC
Vic 3165
Australia
http://www.oce.com.au/
Océ-Österreich GmbH
Postfach 95
1233 Vienna
Wienerbergstrasse 11
Vienna Twin Tower
1100 Vienna
Austria
http://www.oce.at/
Océ-Belgium N.V./S.A.
J. Bordetlaan 32
1140 Brussel
Belgium
http://www.oce.be/
Océ-Brasil Comércio e Indústria Ltda.
Av. das Nações Unidas, 11.857
Brooklin Novo
São Paulo-SP 04578-000
Brasil
http://www.oce-brasil.com.br/
Océ-Canada Inc.
4711 Yonge Street, Suite 1100
Toronto, Ontario M2N 6K8
Canada
http://www.oce.ca/
Océ Office Equipment (Shanghai)
First Shanghai Center, Phase II, Building
4,
Lane 180, Zhangheng Road
Pudong District
Shanghai 201204, P.R.
China
http://www.oce.com.cn/
Océ-Czech Republic ltd.
Babická 2329/2
149 00 Praha 4
Czech Republic
http://www.oce.cz/
Océ-Danmark a/s
Vallensbækvej 45
2605 Brøndby
Denmark
http://www.oce.dk/
Océ Finland OY
Niittyrinne 7
02270 Espoo
Finland
http://www.oce.fi/
Océ-France S.A.
32, Avenue du Pavé Neuf
93882 Noisy-le-grand, Cedex
France
http://www.oce.fr/
Appendix A - Miscellaneous
Addresses of local Océ organisations
Océ-Deutschland GmbH
Solinger Straße 5-7
45481 Mülheim/Ruhr
Germany
http://www.oce.de/
Océ-Hong Kong and China head office
Room 3711-18 Tower 1
Millennium City 1
388 Kwun Tong Road
Kwun Tong
Kowloon
Hong Kong
http://www.oce.com.hk/
Océ-Hungaria Kft.
H-1241 Budapest
Pf.: 237
Hungary
http://www.oce.hu/
Océ-Ireland Ltd.
3006 Lake Drive
Citywest Business Campus
Saggart
Co. Dublin
Ireland
http://www.oce.ie/
Océ-Italia S.p.A.
Strada Padana Superiore 2/B
20063 Cernusco sul Naviglio (MI)
Italia
http://www.oce.it/
Océ Japan Corporation
1-28-1, Oi
Shinagawa-ku
Tokyo 140-0014
Japan
http://www.ocejapan.co.jp/
Océ-Belgium S.A.
Rue Astrid 2/A
1143 Luxembourg-Belair
http://www.oce.lu/
Océ Malaysia Sdn. Bhd.
#3.01, Level 3, Wisma Academy
Lot 4A, Jalan 19/1
46300 Petalig Jaya
Selangor Darul Ehsan
Malaysia
http://www.ocemal.com.my/
Océ-Mexico S.A. de C.V.
Prolongación Reforma 1236,
4to Piso
Col. Santa Fé, Del. Cuajimalpa
C.P. 05348
México, D.F.
México
http://www.oceusa.com/
Océ-Norge A.S.
Postboks 4434 Nydalen
Gjerdrums vei 8
0403 Oslo
Norway
http://www.oce.no/
Appendix A - Miscellaneous
81
Addresses of local Océ organisations
Océ-Poland Ltd. Sp.z o.o.
ul. Bitwy Warszawskiej 1920 r. nr. 7
02-366 Warszawa
Poland
http://www.oce.com.pl/
Océ-Portugal Equipamentos Gráficos S.A.
Av. José Gomes Ferreira, 11 Piso 2 - Miraflores
1497-139 Algés
Portugal
http://www.oce.pt/
Océ Singapore Pte Ltd.
21 Ubi Road 1
#05-01 Brilliant Building
Singapore408724
Océ España SA
Business Park Mas Blau
Osona, 2 08820 El Prat de Llobregat
Barcelona
Spain
http://www.oce.es/
Océ-Svenska AB
Sollentunavägen 84
191 27 Sollentuna
Sweden
http://www.oce.se/
Océ-Schweiz AG
Sägereistrasse 10
CH8152 Glattbrugg
Schweiz
http://www.oce.ch/
Océ (Thailand) Ltd.
B.B. Building 16/Floor
54 Asoke Road
Sukhumvit 21
Bangkok 10110
Thailand
Océ-Nederland B.V.
P.O.Box 800
5201 AV 's-Hertogenbosch
The Netherlands
http://www.oce.nl/
Océ (UK) Limited
Océ House
Chatham Way
Brentwood, Essex CM14 4DZ
United Kingdom
http://www.oce.co.uk/
Océ North America Inc.
100 Oakview Drive
Trumbull, CT 06611
USA
http://www.oceusa.com/
Note:
The web site http://www.oce.com gives the current addresses of the local Océ organizations and distributors.
82
Appendix A - Miscellaneous
Addresses of local Océ organisations
Note:
The addresses of local Océ organizations for information about the Wide Format
Printing Systems and the Production Printing Systems can be different from the addresses
above. Refer to the web site http://www.oce.com for the addresses you need.
Appendix A - Miscellaneous
83
Index
Left .................................................................51
Right ..............................................................57
Index
Available documentation
Available documentation ...................................8
R
Replace
Sheet cleaners .................................................14
Spiral cleaners .................................................14
C
Clean
Glue cleaning rollers .......................................63
OPC belt (left) ...............................................51
OPC belt (right) .............................................57
Clean unit
Left .................................................................28
Right ..............................................................30
Content of the manuals
Content of the manuals ....................................8
D
Determine the required maintenance
Determine the required maintenance ..............12
G
Glue cleaning rollers
Glue cleaning rollers .......................................63
L
Lock
Clean unit (left) ..............................................28
Clean unit (right) ...........................................30
M
Maintenance
Level 1 ..............................................................9
Level 2 ..............................................................9
Maintenance levels
Maintenance levels ............................................9
Maintenance screen
Maintenance screen ..........................................9
O
OPC belt
84
S
Sheet cleaners
Sheet cleaners .................................................14
Solve paper jam in hot areas
Solve paper jam in hot areas ............................12
Spiral cleaners
Spiral cleaners .................................................14
+3
+3
+3
-
Beyond the Ordinary
o
Printing for
Professionals
Professionals everywhere look to Océ for digital printing
and document management. In the office, Océ systems
keep the information of business and government
flowing. In manufacturing, architecture, engineering,
and construction, Océ wide-format printers set the
standard, while our display graphics systems help people
produce banners, billboards, and other large, colorful
applications. In corporate print facilities, marketing
service bureaus, and the graphic arts industry, Océ
systems print transaction documents, mailings,
newspapers, manuals, and books—on demand and at
the highest speeds. And Océ Business Services manages
the complete document workflows of customers around
the world. It all helps you go “Beyond the Ordinary” in
printing and document management.
©
2010 Océ. Illustrations and specifications do not necessarily apply to
products and services offered in each local market. Technical
For more information visit us at:
specifications are subject to change without prior notice. All other
trademarks are the property of their respective owners.
2010-06
www.oce.com
US