1
®
1587/1577
Insulation Multimeters
Users Manual
PN 2401027
April 2005
© 2005 Fluke Corporation. All rights reserved. Printed in USA
All product names are trademarks of their respective companies.
LIMITED WARRANTY AND LIMITATION OF LIABILITY
Each Fluke product is warranted to be free from defects in material and workmanship under normal use and service. The warranty period is three
years and begins on the date of shipment. Parts, product repairs, and services are warranted for 90 days. This warranty extends only to the original
buyer or end-user customer of a Fluke authorized reseller, and does not apply to fuses, disposable batteries, or to any product which, in Fluke's opinion, has been misused, altered, neglected, contaminated, or damaged by accident or abnormal conditions of operation or handling. Fluke warrants
that software will operate substantially in accordance with its functional specifications for 90 days and that it has been properly recorded on nondefective media. Fluke does not warrant that software will be error free or operate without interruption.
Fluke authorized resellers shall extend this warranty on new and unused products to end-user customers only but have no authority to extend a
greater or different warranty on behalf of Fluke. Warranty support is available only if product is purchased through a Fluke authorized sales outlet or
Buyer has paid the applicable international price. Fluke reserves the right to invoice Buyer for importation costs of repair/replacement parts when
product purchased in one country is submitted for repair in another country.
Fluke's warranty obligation is limited, at Fluke's option, to refund of the purchase price, free of charge repair, or replacement of a defective product
which is returned to a Fluke authorized service center within the warranty period.
To obtain warranty service, contact your nearest Fluke authorized service center to obtain return authorization information, then send the product to
that service center, with a description of the difficulty, postage and insurance prepaid (FOB Destination). Fluke assumes no risk for damage in transit.
Following warranty repair, the product will be returned to Buyer, transportation prepaid (FOB Destination). If Fluke determines that failure was caused
by neglect, misuse, contamination, alteration, accident, or abnormal condition of operation or handling, including overvoltage failures caused by use
outside the product’s specified rating, or normal wear and tear of mechanical components, Fluke will provide an estimate of repair costs and obtain
authorization before commencing the work. Following repair, the product will be returned to the Buyer transportation prepaid and the Buyer will be
billed for the repair and return transportation charges (FOB Shipping Point).
THIS WARRANTY IS BUYER'S SOLE AND EXCLUSIVE REMEDY AND IS IN LIEU OF ALL OTHER WARRANTIES, EXPRESS OR IMPLIED, INCLUDING BUT NOT LIMITED TO ANY IMPLIED WARRANTY OF MERCHANTABILITY OR FITNESS FOR A PARTICULAR PURPOSE. FLUKE
SHALL NOT BE LIABLE FOR ANY SPECIAL, INDIRECT, INCIDENTAL OR CONSEQUENTIAL DAMAGES OR LOSSES, INCLUDING LOSS OF
DATA, ARISING FROM ANY CAUSE OR THEORY.
Since some countries or states do not allow limitation of the term of an implied warranty, or exclusion or limitation of incidental or consequential damages, the limitations and exclusions of this warranty may not apply to every buyer. If any provision of this Warranty is held invalid or unenforceable by
a court or other decision-maker of competent jurisdiction, such holding will not affect the validity or enforceability of any other provision.
Fluke Corporation
P.O. Box 9090
Everett, WA 98206-9090
U.S.A.
11/99
Fluke Europe B.V.
P.O. Box 1186
5602 BD Eindhoven
The Netherlands
Table of Contents
Title
Introduction ....................................................................................................................
Contacting Fluke ............................................................................................................
Safety Information ..........................................................................................................
Accessories ....................................................................................................................
Unsafe Voltage...............................................................................................................
Test Lead Alert ...............................................................................................................
Battery Saver (Sleep Mode) ...........................................................................................
Rotary Switch Positions..................................................................................................
Buttons ...........................................................................................................................
Understanding the Display .............................................................................................
Input Terminals...............................................................................................................
Power-Up Options ..........................................................................................................
AutoHold Mode...............................................................................................................
MIN MAX AVG Recording Mode ....................................................................................
Manual Ranging and Autoranging ..................................................................................
Understanding AC Zero Input Behavior of True RMS Meters ........................................
Low-Pass Filter (Model 1587).........................................................................................
i
Page
1
1
2
4
4
4
4
5
6
8
11
12
13
13
14
15
15
1587/1577
Users Manual
Making Basic Measurements.........................................................................................
Measuring AC and DC Voltage .................................................................................
Measuring Temperature (Model 1587)......................................................................
Measuring Resistance...............................................................................................
Measuring Capacitance (Model 1587) ......................................................................
Testing for Continuity ................................................................................................
Testing Diodes (Model 1587) ....................................................................................
Measuring AC or DC Current ....................................................................................
Testing Insulation ......................................................................................................
Measuring Frequency (Model 1587) .........................................................................
Cleaning.........................................................................................................................
Testing the Batteries ......................................................................................................
Testing the Fuse ............................................................................................................
Replacing the Batteries and Fuse..................................................................................
Specifications.................................................................................................................
General Specifications ..............................................................................................
AC Voltage Measurement .........................................................................................
1587 Accuracy......................................................................................................
1587 Lowpass Filter Voltage ................................................................................
1577 Accuracy......................................................................................................
DC Voltage Measurement.........................................................................................
DC Millivolts Measurement .......................................................................................
DC and AC Current Measurement ............................................................................
Ohms Measurement..................................................................................................
Diode Test (1587 Only) .............................................................................................
Continuity Test ..........................................................................................................
Frequency Measurement (1587 Only).......................................................................
Frequency Counter Sensitivity ..................................................................................
ii
16
17
18
19
19
20
21
22
24
25
27
27
27
28
29
29
30
30
30
31
31
32
32
33
33
33
34
34
Contents (continued)
Capacitance (1587 Only) ...........................................................................................
Temperature Measurement (1587 Only) ...................................................................
Insulation Specifications ............................................................................................
Model 1587 ...........................................................................................................
Model 1577 ...........................................................................................................
iii
35
35
35
36
36
1587/1577
Users Manual
iv
List of Tables
Table
Title
Page
1.
2.
3.
4.
5.
6.
7.
Symbols.................................................................................................................................
Rotary Switch Selections.......................................................................................................
Buttons ..................................................................................................................................
Display Indicators ..................................................................................................................
Error Messages .....................................................................................................................
Input Terminal Descriptions...................................................................................................
Power-Up Options .................................................................................................................
3
5
7
8
10
12
12
v
1587/1577
Users Manual
vi
List of Figures
Figure
Title
Page
1.
2.
3.
4.
5.
6.
7.
8.
9.
10.
11.
12.
13.
14.
15.
16.
Rotary Switch ........................................................................................................................
Buttons ..................................................................................................................................
Display Indicators ..................................................................................................................
Input Terminals......................................................................................................................
Low Pass Filter ......................................................................................................................
Measuring AC and DC Voltage .............................................................................................
Measuring Temperature ........................................................................................................
Measuring Resistance ...........................................................................................................
Measuring Capacitance.........................................................................................................
Testing for Continuity.............................................................................................................
Testing Diodes ......................................................................................................................
Measuring AC or DC Current ................................................................................................
Testing Insulation ..................................................................................................................
Measuring Frequency............................................................................................................
Testing the Fuse....................................................................................................................
Replacing the Fuse and Battery ............................................................................................
5
6
8
11
15
17
18
19
19
20
21
23
25
26
27
28
vii
1587/1577
Users Manual
viii
1587/1577
Insulation Multimeters
Introduction
The Fluke Model 1587, and Model 1577 are
battery-powered, true-RMS insulation multimeters
(hereafter "the Meter") with a 6000-count and a 3 ¾ digit
display. Although this manual describes the operation of
both Models 1587 and 1577, all illustrations and
examples assume use of Model 1587.
These meters meet CAT III and CAT IV IEC 61010
standards. The IEC 61010 standard defines four
measurement categories (CAT I to IV) based on the
magnitude of danger from transient impulses. CAT III
meters are designed to protect against transients in Fixed
equipment installations at the distribution level; CAT IV
meters are designed to protect against transients from the
primary supply level (overhead or underground utility
service).
The Meter measures or tests the following:
•
•
•
•
AC / DC voltage and
current
Resistance
Voltage and current
frequency
Temperature (Model
1587)
•
Diodes (Model 1587)
•
•
Continuity
Capacitance (Model
1587)
Insulation testing
•
Contacting Fluke
To contact Fluke, call:
1-888-993-5853 in USA
1-800-363-5853 in Canada
+31-402-678-200 in Europe
+81-3-3434-0181 in Japan
+65-738-5655 in Singapore
+1-425-446-5500 from anywhere in the world
Visit Fluke's web site at: www.fluke.com
Register your Meter at: register.fluke.com
1
1587/1577
Users Manual
Safety Information
Use the Meter only as specified in this manual. Otherwise, the protection provided by the Meter may be impaired. See
Table 1 for a list of symbols used on the Meter and in this manual.
A XWWarning identifies hazardous conditions and actions that could cause bodily harm or death.
A XWCaution identifies conditions and actions that could damage the Meter, the equipment under test, or cause
permanent loss of data.
XWWarning
To avoid possible electric shock or personal injury, follow these guidelines:
•
•
•
•
•
•
•
•
•
•
2
Use the Meter only as specified in this manual or the protection provided by the Meter might be
impaired.
Do not use the Meter or test leads if they appear damaged, or if the Meter is not operating properly. If in
doubt, have the Meter serviced.
Always use the proper terminal, switch position, and range for measurements before connecting Meter
to circuit under test.
Verify the Meter’s operation by measuring a known voltage.
Do not apply more than the rated voltage as marked on the Meter, between the terminals or between
any terminal and earth ground.
Use caution with voltages above 30 V ac rms, 42 V ac peak, or 60 V dc. These voltages pose a shock
hazard.
Replace the battery as soon as the low battery indicator (b) appears.
Disconnect circuit power and discharge all high-voltage capacitors before testing resistance,
continuity, diodes, or capacitance.
Do not use the Meter around explosive gas or vapor.
When using the test leads, keep your fingers behind the finger guards.
Insulation Multimeters
Safety Information
•
•
•
•
•
•
Remove test leads from the Meter before opening the Meter case or battery door. Never operate the
Meter with the cover removed or the battery door open.
Comply with local and national safety requirements when working in hazardous locations.
Use proper protective equipment, as required by local or national authorities when working in
hazardous areas.
Avoid working alone.
Use only the replacement fuse specified or the protection may be impaired.
Check the test leads for continuity before use. Do not use if the readings are high or noisy.
Table 1. Symbols
B
F
X
b
AC (Alternating Current)
DC (Direct Current)
WARNING: risk of electric shock.
Battery (Low battery when shown on display.)
J
I
T
W
Earth Ground
Fuse
Double Insulated
Important information; see manual
3
1587/1577
Users Manual
Accessories
Model
Leads
Probes
Clips
Holster
Hard Case
K Type
Thermocouple
Remote
Probe
1587
TL224
TP74
AC285
Yes
Yes
Yes
Yes
1577
TL224
TL74
AC285
Yes
Yes
No
Yes
Unsafe Voltage
Battery Saver (Sleep Mode)
To alert you to the presence of a potentially hazardous
voltage, when the Meter detects a voltage ≥ 30 V or a
voltage overload (OL), the Z symbol is displayed.
The Meter enters the “Sleep mode” and blanks the display
if there is no function change or button press for
20 minutes. This done to conserve battery power. The
Meter comes out of Sleep mode when a key is pressed or
when the rotary switched is turned to the OFF position and
then back on.
To disable the Sleep mode, hold down the blue button
while turning the Meter on. Sleep mode is always disabled
in the MIN MAX AVG recording mode, AutoHold mode,
insulation test active, or if the auto power off feature has
been disabled by pressing the blue button when the Meter
is turned on.
Test Lead Alert
To remind you to check that the test leads are in the
correct terminals, LEAd is momentarily displayed when you
move the rotary switch to or from the c position.
XW Warning
To avoid a blown fuse, damage to the Meter,
or serious personal injury, never attempt to
make a measurement with a test lead in an
incorrect terminal.
4
Insulation Multimeters
Rotary Switch Positions
Table 2. Rotary Switch Selections
Rotary Switch Positions
Turn the Meter on by selecting any measurement function.
The Meter presents a standard display for that function
(range, measurement units, modifiers, etc.). Use the blue
button to select any rotary switch alternate functions
(labelled with blue letters). Rotary switch selections are
shown in Figure 1 and described in Table 2.
Switch
Position
B
Measurement Function
AC voltage from 30.0 mV to 1000 V.
K
AC voltage with 800 Hz “low-pass” filter.
(1587 only)
C
E
DC voltage 1 mV to 1000 V.
DC mV 0.1 mV to 600 mV.
Temperature from - 40 °C to + 537 °C
T
(1587 only) (- 40 °F to + 998 °F).
Celsius is the default temperature
measurement unit. The temperature
measurement you select is retained in
memory when the Meter is turned off.
bav02f.eps
o
Ohms from 0.1 Ω to 50 MΩ.
Figure 1. Rotary Switch
N
Capacitance from 1 nF to 9999 µF.
(1587 only)
5
1587/1577
Users Manual
Table 2. Rotary Switch Selections (cont.)
Switch
Position
Measurement Function
X
Continuity test. Beeper turns on at <25 Ω and
turns off at >100 Ω.
Buttons
Use the buttons to activate features that augment the
function selected with the rotary switch. The buttons are
shown in Figure 2 and described in Table 3.
O
Diode test. There is no ranging in this
(1587 only) function. Displays 0L above 6.600 V.
c
AC mA from 3.00 mA to 400 mA (600 mA
overload for 2 minutes maximum).
DC mA from 0.01 mA to 400 mA (600 mA
overload for 2 minutes maximum).
a
INSULATION
Ohms from 0.01 MΩ to 2 GΩ.
Performs insulation test with 50, 100, 250,
500 (default), and 1000 V source on the 1587
or 500 (default) and 1000 V source on the
1577. The last selected high voltage setting
is retained in memory when the Meter is
turned off.
Press the blue button to activate smoothing
during insulation testing (1587 only).
6
bav03f.eps
Figure 2. Buttons
Insulation Multimeters
Buttons
Table 3. Buttons
Button
Description
Press to freeze the displayed value. Press
again to release the display.
When a reading changes, the display
updates and the Meter beeps.
h
In MIN MAX AVG or Hz mode, this button
operates a display hold.
In Insulation Test mode, this schedules a
test lock the next time you press t on
the Meter or on the remote probe. The test
lock acts to hold down the button until your
press h or t again to release the
lock.
Press to start retaining maximum, minimum,
and average values. Press successively to
m display maximum, minimum, and average
(1587 only)
values. Press and hold to cancel
MIN MAX AVG.
Button
f
Description
Activate frequency measurement.
(1587 only)
r
Changes Ranging mode from Auto (default)
to Manual Ranging mode. Press and hold to
return to Auto Ranging mode.
H
Turns the backlight on and off. The backlight
goes off after 10 minutes.
t
Initiates an insulation test when the rotary
switch is on the INSULATION position. Causes
the Meter to source (output) a high voltage
and measure insulation resistance.
G
The blue button. Functions as a shift key.
Press to access blue functions on the rotary
switch.
7
1587/1577
Users Manual
Understanding the Display
Table 4. Display Indicators
Display indicators are shown in Figure 3 and described in
Table 4. Error messages that may appear on the display
are described in Table 5.
Indicator
Description
b
Low battery. Indicates when it is time
to replace the battery. When b is on,
the backlight button is disabled to
conserve battery life.
XW Warning
To avoid false readings, which
could lead to possible electric
shock or personal injury, replace
the battery as soon as the low
battery indicator appears.
L
LOCK
Q
bav01f.eps
Figure 3. Display Indicators
8
Indicates a test lock will be applied the
next time you press t on the
Meter or on the remote probe. The test
lock acts to hold down the button until
you press h or t again.
Minus, or greater than symbols
Insulation Multimeters
Understanding the Display
Table 4. Display Indicators (cont.)
Indicator
Description
Z
Unsafe voltage warning. Indicates 30
V or greater (ac or dc depending on
the rotary switch position) is detected
on the input. Also appears when the
display shows 0L in the B, C, or E
switch positions, and when batt
appears on the display. The Z also
appears when insulation test is active,
or in Hz.
a
K
(1587 only)
“Smoothing” enabled. Smoothing
dampens display fluctuations of rapidly
changing inputs by digital filtering.
Smoothing is available for insulation
testing on Model 1587 only. For more
on smoothing, see Power-Up options.
Indicator
Y
S
Description
Indicates AutoHold is active.
Indicates display hold is active.
M
n
(1587 only)
Indicates minimum, maximum, or
average reading has been selected
using the m button.
X
Continuity test function is selected
O
(1587 only)
nF, µF, ° C, ° F,
AC, DC, Hz, kHZ,
Ω, kΩ, MΩ, GΩ
Diode test function is selected
Measurement units
0.0.0.0
Primary display
VDC
Volts
1000
Secondary display
Indicates the low-pass filter function
for ac volts is selected.
9
1587/1577
Users Manual
Table 5. Error Messages
Table 4. Display Indicators (cont.)
Feature
Auto Range
ManualRange
610000mV
2500V
1000V
T
Description
Message
Display range in use
batt
Appears on the primary display and
indicates that the battery is too low for
reliable operation. The Meter will not
operate at all until the battery is replaced.
The b also appears when batt is on the
primary display.
bat
Appears on the secondary display and
indicates that the battery is too low to
perform an insulation test. The t
button is disabled until the battery is
replaced. This message disappears when
the rotary switch is turned to any other
function.
0L
Indicates an out of range value. 0L also
appears when an open thermocouple is
detected.
Source voltage rating for insulation
test: 50, 100, 250, 500 (default) or
1000 V on the 1587. 500 (default) and
1000 V ranges available on the 1577.
Insulation test indicator. Appears when
insulation test voltage is present.
LEAd
10
Description
Test lead alert. The message appears
briefly and a single beep will sound when
you move the switch in or out of the c
position.
Insulation Multimeters
Input Terminals
Table 5. Error Messages (cont.)
Message
Description
diSc
Meter cannot discharge a capacitor.
EPPr
Err
Invalid EEProm data. Have the Meter
serviced.
CAL
Err
Invalid calibration data. Calibrate the Meter.
Input Terminals
Input terminals are shown in Figure 4 and described in
Table 6.
1
3
2
4
bav04f.eps
Figure 4. Input Terminals
11
1587/1577
Users Manual
Table 6. Input Terminal Descriptions
Table 7. Power-Up Options
.
Item
Description
A
p input terminal for insulation test.
B
q input terminal for insulation test. Use for ac
Button
B switch position turns on all LCD segments.
C switch position displays the software
version number.
and dc milliamp measurements to 400 mA and
current frequency measurements.
C
Input terminal for voltage, continuity, resistance,
diode, capacitance, voltage frequency, and
temperature (Model 1587 only) measurements.
D
Common (return) terminal for all measurements
except insulation test.
E switch position displays the model
number.
S
INSULATION switch position initiates a fully
loaded battery test and displays the charge
level of the battery until the button is
released.
The remaining positions show all LCD
segments.
Power-Up Options
Holding a button down while turning the Meter on activates
a power-up option. Power-up options allow you to use
additional features and functions of the Meter. To select a
power-up option, hold down the appropriate button
indicated while turning the Meter from OFF to any switch
position. Power-up options are cancelled when the Meter
is turned OFF. Power-up options are described in Table 7.
Description
r
Enables “Smoothing” mode for all of the
functions except insulation. The display
shows S - - - until the button is released.
Smoothing dampens display fluctuations of
rapidly changing inputs by digital filtering.
Note
Power Up options are active when the button is
pressed.
12
Insulation Multimeters
AutoHold Mode
Table 7. Power-Up Options (cont.)
Button
G
(Blue)
H
t
Description
Disables automatic power-off ("Sleep
mode"). Display shows PoFF until the button is
released.
Sleep mode is also disabled while the Meter
is in a MIN MAX AVG Recording mode,
AutoHold mode, and when performing an
insulation test.
Starts the Calibration mode. The Meter
displays Cal and enters Calibration mode
when the button is released.
Disables the beeper. The display shows bEEP
until the button is released.
AutoHold Mode
XWWarning
To avoid electric shock, do not use the
Display AutoHold mode to determine if a
circuit is live. Unstable or noisy readings will
not be captured.
In the AutoHold mode, the Meter holds the reading on the
display until it detects a new stable reading. Then the
Meter beeps and displays the new reading.
•
Press h to activate AutoHold. Y appears.
•
Press h again or turn the rotary switch to
resume normal operation.
MIN MAX AVG Recording Mode
The MIN MAX AVG mode records minimum and maximum
input values. When the inputs go below the recorded
minimum value or above the recorded maximum value,
the Meter beeps and records the new value. This mode
can be used to capture intermittent readings, record
maximum readings while you are away or record readings
while you are operating the equipment under test and
cannot watch the Meter. MIN MAX AVG mode can also
calculate an average of all readings taken since the MIN
MAX AVG mode was activated.
The Meter tracks the minimum, maximum, and average
values for each display which are updated 4 times per
second.
13
1587/1577
Users Manual
To use MIN MAX AVG recording:
•
Make sure the Meter is in the desired
measurement function and range. (Autoranging is
disabled in the MIN MAX AVG mode).
•
Press m to activate MIN MAX AVG mode.
M appears on the display.
•
Press m to step through the high (MAX), low
(MIN), average (AVG), and present readings.
•
1.
To enter the Manual Range mode, press r. Manual
Range is displayed.
2.
In the Manual Range mode, press r to increment
the range. After the highest range, the Meter wraps to
the lowest range.
Note
You cannot manually change the range in the MIN
MAX AVG, or Display HOLD modes.
To pause MIN MAX AVG recording without
erasing stored values, press h. S is
displayed.
•
To resume MIN MAX AVG recording, press h
again. S turns off.
•
To exit and erase stored readings, press m for
one second or turn the rotary switch.
Manual Ranging and Autoranging
The Meter has both Manual Range and Autorange modes.
14
When you turn the Meter on, it defaults to Autorange and
Auto Range is displayed.
•
In the Autorange mode, the Meter selects the
range with the best resolution.
•
In the Manual Range mode, you override
Autorange and select the range yourself.
If you press r while in MIN MAX AVG, or
Display HOLD the Meter beeps twice, indicating
an invalid operation, and the range does not
change.
3.
To exit Manual Range, press r for one second or
turn the rotary switch. The Meter returns to Autorange
and Auto Range is displayed.
Insulation Multimeters
Understanding AC Zero Input Behavior of True RMS Meters
Understanding AC Zero Input Behavior
of True RMS Meters
True RMS Meters accurately measure distorted
waveforms, but when the input leads are shorted together
in the AC functions, the Meter displays a residual reading
between 1 and 30 counts. When the test leads are open,
the display readings may fluctuate due to interference.
These offset readings are normal. They do not affect the
Meter’s ac measurement accuracy over the specified
measurement ranges.
Unspecified input levels are:
•
•
AC voltage: below 5% of 600 mV ac, or 30 mV
ac.
AC current: below 5% of 60 mA ac, or 3 mA ac.
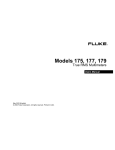
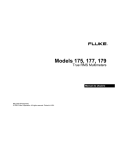
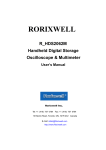
Low-Pass Filter (Model 1587)
The 1587 is equipped with an ac low-pass filter. When
measuring ac voltage or ac frequency (B), press the blue
button to activate the Low-Pass Filter function (K). The
Meter continues measuring in the selected ac mode, but
now the signal diverts through a filter that blocks unwanted
frequencies above 800 Hz. Refer to Figure 5. The low
pass filter can improve measurement performance on
composite sine waves that are typically generated by
inverters and variable frequency motor drives.
XWWarning
To avoid possible electric shock or personal
injury, do not use the Low-Pass Filter
function to verify the presence of hazardous
voltages. Voltages greater than what is
indicated may be present. First, make a
voltage measurement without the filter to
detect the possible presence of hazardous
voltage. Then, select the filter function.
Note
When using the Low-Pass filter function, the
Meter goes to Manual mode. Select ranges by
pressing the r button. Autoranging is not
available with the Low-Pass filter function.
800 Hz
100 Hz
bav16f.eps
Figure 5. Low Pass Filter
15
1587/1577
Users Manual
Making Basic Measurements
The figures on the following pages show how to make
basic measurements.
When connecting the test leads to the circuit or device,
connect the common (COM) test lead before connecting
the live lead; when removing the test leads, remove the
live lead before removing the common test lead.
XWWarning
To avoid electric shock, injury, or damage to
the Meter, disconnect circuit power and
discharge all high-voltage capacitors before
testing resistance, continuity, diodes, or
capacitance.
For better accuracy when measuring the dc offset of an ac
voltage, measure the ac voltage first. Note the ac voltage
range, then manually select a dc voltage range equal to or
higher than the ac range. This procedure improves the
accuracy of the dc measurement by ensuring that the
input protection circuits are not activated.
16
Insulation Multimeters
Making Basic Measurements
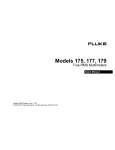
Measuring AC and DC Voltage
Volts DC
Volts AC
LO
TEST
HOLD
MIN MAX
LO
HOLD
MIN MAX
TEST
Millivolts DC
LO
HOLD
MIN MAX
TEST
bav05f.eps
Figure 6. Measuring AC and DC Voltage
17
1587/1577
Users Manual
Measuring Temperature (Model 1587)
The Meter measures the temperature of a type-K
thermocouple (included). Choose between degrees
Celsius (°C) or degrees Fahrenheit (°F) by
pressing r.
LO
HOLD
MIN MAX
TEST
XWCaution
To avoid possible damage to the Meter or
other equipment, remember that while the
Meter is rated for -40 °C to 537 °C ( -40 °F to
998.0 °F), the included K-type thermocouple is
rated for 260 °C (500 °F). For temperatures out
of that range, use a higher rated
thermocouple.
˚C
˚F
XWWarning
To avoid risk of shock do not connect
thermocouple to electrically live circuits.
80BK1 Type K
Thermocouple
Probe
Vent
or
Pipe
bav09f.eps
Figure 7. Measuring Temperature
18
Insulation Multimeters
Making Basic Measurements
Measuring Resistance
Measuring Capacitance (Model 1587)
.
.
LO
HOLD
MIN MAX
LO
TEST
HOLD
MIN MAX
TEST
bav06f.eps
Figure 8. Measuring Resistance
bav07f.eps
Figure 9. Measuring Capacitance
19
1587/1577
Users Manual
Testing for Continuity
The continuity test features a beeper that sounds as long
as a circuit is complete. The beeper allows you to perform
quick continuity tests without having to watch the display.
To test for continuity, set up the Meter as shown in
Figure 10. The beeper sounds when a short (<25 Ω) is
detected.
LO
HOLD
MIN MAX
TEST
XWCaution
To avoid possible damage to the Meter or to
the equipment under test, disconnect circuit
power and discharge all high voltage
capacitors before testing for continuity.
LO
HOLD
MIN MAX
TEST
Constant Beep
bav08f.eps
Figure 10. Testing for Continuity
20
Insulation Multimeters
Making Basic Measurements
Testing Diodes (Model 1587)
.
Good Diode
LO
HOLD
Good Diode
MIN MAX
LO
TEST
HOLD
MIN MAX
TEST
Bad Diode
Bad Diode
LO
HOLD
MIN MAX
LO
TEST
MIN MAX
TEST
Open
and
Constant
Beep
Shorted
Single Beep
Forward Bias
HOLD
Reverse Bias
bav10f.eps
Figure 11. Testing Diodes
21
1587/1577
Users Manual
Measuring AC or DC Current
XWWarning
To avoid personal injury or damage to the
Meter:
•
Never attempt to make an in-circuit current
measurement when the open-circuit potential
to earth is > 1000 V.
•
Check the Meter’s fuses before testing. See
Testing the Fuses later in this manual.
•
Use the proper terminals, switch position,
and range for your measurement.
•
Never place the probes in parallel with a
circuit or component when the leads are
plugged into the current terminals.
Turn power OFF to the circuit under test, break circuit,
insert Meter in series, turn power ON. To measure ac or
dc current, set up the Meter as shown in Figure 12.
22
Insulation Multimeters
Making Basic Measurements
LO
LO
HOLD
HOLD
MIN MAX
MIN MAX
TEST
DC Display
TEST
Load
Load
Load
bav11f.eps
Figure 12. Measuring AC or DC Current
23
1587/1577
Users Manual
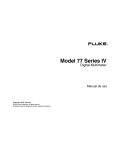
•
Testing Insulation
Insulation tests should only be performed on dead
circuits. Check the fuse before testing. See Testing the
Fuse later in this manual. To measure insulation
resistance set up the Meter as shown in Figure 13 and
follow the steps below:
1.
Insert test probes in the p and q input terminals.
2.
Turn the knob to INSULATION position. A battery load
check is initiated when the switch is moved to this
position. If the battery fails the test b and bat
appear in the lower display. Insulation tests cannot
be performed until the batteries are replaced.
3.
Press r to select the voltage.
4.
Connect the probes to the circuit to be measured.
The Meter automatically detects if the circuit is
energized.
•
24
The primary display shows - - - - until you press
t and a valid insulation resistance reading
is obtained.
5.
The high voltage symbol (Z) along with a primary
display of >30 V warns if voltage more than 30 V
ac or dc is present. In this condition, the test is
inhibited. Disconnect the Meter and remove
power before proceeding.
Push and hold t to start the test. The
secondary display shows the test voltage applied to
the circuit under test. The high voltage symbol (Z)
along with a primary display showing the resistance
in MΩ or GΩ appears. The T icon appears on the
lower portion of the display until t is released.
When resistance is higher than the maximum display
range, the Meter displays the Q symbol and the
maximum resistance for the range.
6.
Keep the probes on the test points and release the
t button. The circuit under test then discharges
through the Meter. The resistance reading appears
on the primary display until a new test is started or a
different function or range is selected or > 30 V is
detected.
Insulation Multimeters
Making Basic Measurements
Measuring Frequency (Model 1587)
LO
HOLD
The Meter measures the frequency of a voltage or current
signal by counting the number of times the signal crosses
a threshold level each second. To measure frequency,
set up the Meter as shown in Figure 14 and follow the
steps below.
MIN MAX
1.
Connect the Meter to the signal source.
2.
Turn the rotary switch to the B, C, or c position.
3.
In the c position press the blue button to select dc if
needed.
4.
Press the f button.
5.
Press the blue button, the f button, or change the
rotary switch position to end this function
bav13f.eps
Figure 13. Testing Insulation
25
1587/1577
Users Manual
AC/DC Voltage Frequency
LO
TEST
HOLD
MIN MAX
AC/DC Current Frequency
LO
HOLD
MIN MAX
TEST
Load
bav12f.eps
Figure 14. Measuring Frequency
26
Insulation Multimeters
Cleaning
Cleaning
Periodically wipe the case with a damp cloth and mild
detergent. Do not use abrasives or solvents. Dirt or
moisture in the terminals can affect readings.
LO
HOLD
MIN MAX
TEST
Testing the Batteries
To test the batteries, press h and turn to the rotary
switch to the INSULATION position. This initiates a battery test
and displays the charge level of the battery.
440 mA
Testing the Fuse
OK
XWWarning
To avoid electrical shock or injury, remove
the test leads and any input signals before
replacing the fuse.
Test the fuse as described below and shown in Figure 15.
Replace the fuse as shown in Figure 16.
1.
Insert a test probe in the J input terminal.
2.
Turn the rotary switch to the N position and verify
the Meter is in Auto Range.
3.
Insert the probe in the mA input terminal. If the
display reading is 0L, the fuse is bad and should be
replaced.
bav14f.eps
Figure 15. Testing the Fuse
27
1587/1577
Users Manual
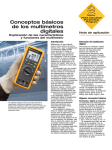
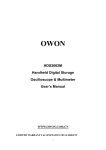
Replacing the Batteries and Fuse
Replace the fuse and batteries as shown in Figure 16.
Follow the steps below to replace the batteries.
XWWarning
To avoid shock, injury, or damage to the
Meter:
•
To avoid false readings, which could lead
to possible electric shock or personal
injury, replace the batteries as soon as
the battery indicator (b) appears.
•
Use ONLY fuses with the amperage,
interrupt, voltage, and speed ratings
specified.
•
1.
Turn the rotary switch to OFF and remove
the test leads from the terminals.
Remove the battery door by using a standard
screwdriver to turn the battery door lock until the
unlock symbol aligns with the arrow.
2.
Remove and replace the batteries.
3.
Replace the battery door and secure by turning the
battery door lock until the lock symbol aligns with the
arrow.
28
F440 mA 1000V
Min interrupt rating
10 000 A
bav15f.eps
Fuse, Fast, 440 mA, 1000 V, Fluke PN 943121
Min Interrupt Rating 10000 A
Battery, 1.5 V AA Alkaline,
NEDA 15A, IEC LR6
Fluke PN 376756
Figure 16. Replacing the Fuse and Battery
Insulation Multimeters
Specifications
Specifications
Need intro paragraph here
General Specifications
Maximum Voltage Applied to any Terminal.........1000 V ac rms or dc
Storage Temperature ..........................................-40 °C to 60 °C (-40 °F to 140 °F)
Operating Temperature .......................................-20 °C to 55 °C (-4 °F to 131 °F)
Temperature Coefficient......................................0.05 x (specified accuracy) per °C for temperatures < 18 °C or > 28 °C
(< 64 °F or > 82 °F)
Relative Humidity ................................................Noncondensing
0 % to 95 % @ 10 °C to 30 °C (50 °F to 86 °F)
0 % to 75 % @ 30 °C to 40 °C (86 °F to 104 °F)
0 % to 40 % @ 40 °C to 55 °C (104 °F to 131 °F)
Vibration ..............................................................Random, 2 g, 5-500 Hz per MIL-PRF-28800F, Class 2 instrument
nd
Shock ..................................................................1 meter drop per IEC 61010-1 2 Edition (1 meter drop test, six sides, oak floor)
Electromagnetic Compatibility.............................In an RF field of 3 V/M, accuracy = specified accuracy except in temperature: specified
accuracy = ± 5 °C (9 °F). (EN 61326-1:1997).
Safety ..................................................................Complies with ANSI/ISA 82.02.01 (61010-1) 2004, CAN/CSA-C22.2 NO. 61010-1-04, and
nd
IEC/EN 61010-1 2 Edition for measurement category III 1000 V (CAT III) and
CAT IV 600 V.
Certifications........................................................CSA per standard CSA/CAN C22.2 No. 61010.1-04; TUV per standard EN 61010
Part 1-1002
Batteries ..............................................................Four AA batteries (NEDA 15A or IEC LR6)
Battery Life ..........................................................Meter use 1000 hours; Insulation test use: Meter can perform at least 1000 insulation
tests with fresh alkaline batteries at room temperature. These are standard tests of
1000 V into 1 MΩ with a duty cycle of 5 seconds on and 25 seconds off.
Size .....................................................................5.0 cm H x 10.0 cm W x 20.3 cm L (1.97 in H x 3.94 in W x 8.00 in L)
Weight .................................................................550 g (1.2 lb.)
IP Rating..............................................................IP40
29
1587/1577
Users Manual
Altitude ................................................................Operating: 2000 m CAT III 1000 V, CAT IV 600 V; 3000 m CAT II 1000 V,
CAT III 600 V
Storage................................................................12,000 m
Over-Range Capability........................................110% of range except for capacitance which is 1 %
Compliance to EN 61557 ....................................IEC61557-1, IEC61557-2
AC Voltage Measurement
1587 Accuracy
Resolution
50 Hz to 60 Hz
± (% of Rdg + Digits)
60 Hz to 5000 Hz
± (% of Rdg + Digits)
600.0 mV
0.1 mV
+ (1 % + 3)
+ (2 % + 3)
6.000 V
60.00 V
600.0 V
1000 V
0.001 V
0.01 V
0.1 V
1V
+ (1 % + 3)
+ (1 % + 3)
+ (1 % + 3)
+ (2 % + 3)
+ (2 % + 3)
+ (2 % + 3)
+ (2 % + 3)1
+ (2 % + 3) 1
Resolution
50 Hz to 60 Hz
± (% of Rdg + Digits)
60 Hz to 400 Hz
± (% of Rdg + Digits)
600.0 mV
0.1 mV
+ (1 % + 3)
+ (2 % + 3)
6.000 V
60.00 V
600.0 V
1000 V
0.001 V
0.01 V
0.1 V
1V
+ (1 % + 3)
+ (1 % + 3)
+ (1 % + 3)
+ (2 % + 3)
+ (2 % + 3)
+ (2 % + 3)
+ (2 % + 3)
+ (2 % + 3)
Range
1.
1 kHz bandwidth.
1587 Lowpass Filter Voltage
Range
30
Insulation Multimeters
Specifications
1577 Accuracy
Resolution
50 Hz to 60 Hz
± (% of Rdg + Digits)
600.0 mV
0.1 mV
+ (2 % + 3)
6.000 V
60.00 V
600.0 V
1000 V
0.001 V
0.01 V
0.1 V
1V
+ (2 % + 3)
+ (2 % + 3)
+ (2 % + 3)
+ (2 % + 3)
Range
AC Conversion ....................................................Inputs are ac-coupled and calibrated to the rms value of sine wave input. Conversions are
true-rms responding and specified from 5 % to 100 % of range. Input signal crest factor
can be up to 3 at full scale up to 500 V, decreasing linearly to crest factor <= 1.5 at
1000 V. For non-sinusoidal waveforms add ± (2 % reading + 2 % FS) typical, for a crest
factor up to 3.
Input Impedance..................................................10 MΩ (nominal), <100 pF, ac-coupled
Common Mode Rejection Ratio
(1 kΩ unbalanced)...............................................>60 dB at dc, 50 or 60 Hz
Overload Protection.............................................1000 V rms or dc, 107 V Hz Max
DC Voltage Measurement
1.
Accuracy 15871
± (% of Rdg + Digits)
Accuracy 15771
± (% of Rdg + Digits)
0.001 V
+ (0.09 % + 2)
+ (0.2 % + 2)
0.01 V
0.1 V
1V
+ (0.09 % + 2)
+ (0.09 % + 2)
+ (0.09 % + 2)
+ (0.2 % + 2)
+ (0.2 % + 2)
+ (0.2 % + 2)
Range
Resolution
6.000 V dc
60.00 V dc
600.0 V dc
1000 V dc
Accuracies apply to ± 100% of range.
31
1587/1577
Users Manual
Input Impedance .................................................10 MΩ (nominal), < 100 pF
Normal Mode Rejection Ratio .............................> 60 dB @ 50 Hz or 60 Hz
Common Mode Rejection Ratio ..........................>120 dB @ dc, 50 Hz or 60 Hz (1 k unbalance)
Overload Protection ............................................1000 V rms or dc
DC Millivolts Measurement
Range
Resolution
Accuracy 1587
± (% of Rdg + Digits)
Accuracy 1577
± (% of Rdg + Digits)
600.0 mV dc
0.1 mV
+ (0.1 % + 1)
+ (0.2 % + 1)
DC and AC Current Measurement
Range
AC
45 Hz to 1000 Hz
DC
1.
400 mA
60 mA
400 mA
60 mA
Resolution
Accuracy 1587
+ (% of Rdg+Digits)
Accuracy 1577
+ (% of Rdg+Digits)
.1 mA
+ (1.5 % + 2)1
+ (2 % + 2)1
.01 mA
.1 mA
.01 mA
1
+ (1.5 % + 2)
+ (0.2 % + 2)
+ (0.2 % + 2)
+ (2 % + 2)1
+ (1.0 % + 2)
+ (1.0 % + 2)
Burden Voltage
(Typical)
2 mV/mA
2 mV/mA
1 kHz bandwidth.
Overload ............................................................600 mA for 2 minutes maximum
Overload Protection ............................................440 mA, 1000 V, FAST fuse
AC Conversion ....................................................Inputs are ac-coupled and calibrated to the rms value of sine wave input. Conversions are
true-rms responding and specified from 5 % to 100 % of range. Input signal crest factor
can be up to 3 at full scale up to 300 mA, decreasing linearly to crest factor <= 1.5 at
600 mA. For non-sinusoidal waveforms add +(2 % reading + 2 % FS) typical, for a crest
factor up to 3.
32
Insulation Multimeters
Specifications
Ohms Measurement
Range
1.
Resolution
600.0 Ω
0.1 Ω
6.000 kΩ
.001 kΩ
60.00 kΩ
0.01 kΩ
600.0 kΩ
0.1 KΩ
6.000 MΩ
.001 MΩ
50.0 MΩ
.01 MΩ
Accuracy 15871
+ (% of Rdg+Digits)
Accuracy 15771
+ (% of Rdg+Digits)
+ (0.9 % + 2)
+ (1.2 % + 2)
+ (1.5 % + 3)
+ (2.0 % + 3)
Accuracies apply from 0 to 100% of range.
Overload Protection ............................................1000 V rms or dc
Open Circuit Test Voltage ...................................< 8.0 V dc
Short Circuit Current............................................< 1.1 mA
Diode Test (1587 Only)
Diode Test Indication...........................................Display voltage drop: 0.6 V at 1.0 mA nominal test current :
Accuracy..............................................................+(2 % + 3)
Continuity Test
Continuity Indication ............................................Continuous audible tone for test resistance below 25 Ω and off above 100 Ω. Maximum
Reading; 1000 Ω
Open Circuit Voltage ...........................................< 8.0 V
Short Circuit Current............................................1.0 mA typical
Overload Protection.............................................1000 V rms
Response Time ...................................................> 1 m sec
33
1587/1577
Users Manual
Frequency Measurement (1587 Only)
Range
Resolution
Accuracy
+ (% of Rdg+Digits)
99.99 Hz
0.01 Hz
+ (0.1 % + 1)
999.9 Hz
9.999 kHz
99.99kHz
0.1 Hz
0.001 kHz
0.01 kHz
+ (0.1 % + 1)
+ (0.1 % + 1)
+ (0.1 % + 1)
Frequency Counter Sensitivity
Input Range
V ac Sensitivity (RMS Sinewave)1
DC Trigger Levels1 to 20 kHz2
5 Hz to 20 kHz
20 kHz to 100 kHz
600.0 mV ac
100.0 mV
150.0 mV
na
6.0 V
60.0 V
600.0 V
1000.0 V
1.0 V
10.0 V
100.0 V
300.0 V
1.5 V
36.0 V
-
-400.0 mV and 2.5 V
1.2 V and 4.0 V
12.0 V and 40.0 V
12.0 V and 40.0 V
1.
Maximum input for specified accuracy = 10x range (1000 V max). Noise at low frequencies and amplitudes may affect accuracy.
2.
Usable to 100 kHz with full scale input.
34
Insulation Multimeters
Specifications
Capacitance (1587 Only)
Range
Resolution
Accuracy
+ (% of Rdg+Digits)
1000 nF
1 nF
10.00 µF
0.01 µF
100.0 µF
0.1 µF
9999 µF
1 µF
+ (1.2 % +/- 90 counts)
Resolution
Accuracy1
± (% of Rdg+Digits)
+ (1.2 % + 2)
Temperature Measurement (1587 Only)
Range
o
o
0.1 C
o
o
0.1 F
-40 C to 537 C
-40 F to 998 F
1.
o
+ (1 % + 10 counts)
o
+ (1 % + 18 counts)
Accuracies apply following 90 minutes settling time after a change in the ambient temperature of the instrument.
Insulation Specifications
Measurement Range...........................................0.1 MΩ to 2 GΩ model 1587, 0.1 MΩ to 600 MΩ model 1577
Test Voltages ......................................................50, 100, 250, 500, 1000 V model 1587, 500 and 1000 V model 1577
Test Voltage Accuracy ........................................+ 20 %, - 0 %
Short-Circuit Test Current ...................................1 mA nominal
Auto Discharge....................................................Discharge time <0.5 second for C = 1 µF or less
Live Circuit Detection: .........................................Inhibit test if terminal voltage > 30 V prior to initialization of test.
Maximum Capacitive Load ..................................Operable with up to 1 µF load.
35
1587/1577
Users Manual
Model 1587
Test Current
Resistance Accuracy
± (% of Rdg + Digits)
1 mA @ 50 kΩ
± (3 % + 5 counts)
1 mA @ 100 kΩ
± (3 % + 5 counts)
1 mA @ 250 kΩ
± (1.5 % + 5 counts)
1 mA @ 500 kΩ
± (1.5 % + 5 counts)
Output Voltage
Display Range
Resolution
50 V
(0 % to + 20 %)
0.01 to 6.00 MΩ
0.01 MΩ
6.0 to 50.0 MΩ
0.1 MΩ
0.01 to 6.00 MΩ
0.01 MΩ
6.0 to 60.0 MΩ
0.1 MΩ
60 to 100 MΩ
0.1 to 60.0 MΩ
1 MΩ
0.1 MΩ
60 to 250 MΩ
1 MΩ
0.1 to 60.0 MΩ
0.1 MΩ
60 to 500 MΩ
1 MΩ
0.1 to 60.0 MΩ
60 to 600 MΩ
0.6 to 2.0 GΩ
0.1 MΩ
1 MΩ
100 MΩ
1 mA @ 1 MΩ
Output Voltage
Display Range
Resolution
Test Current
Resistance Accuracy
± (% of Rdg + Digits)
500 V
(0 % to + 20 %)
0.1 to 60.0 MΩ
0.1 MΩ
60 to 500 MΩ
0.1 to 60.0 MΩ
60 to 600 MΩ
1 MΩ
0.1 MΩ
1 MΩ
1 mA @ 500 kΩ
± (2.0 % + 5 counts)
1 mA @ 1 MΩ
± (2.0 % + 5 counts)
100 V
(0 % to + 20 %)
250 V
(0 % to + 20 %)
500 V
(0 % to + 20 %)
1000 V
(0 % to + 20 %)
± (1.5 % + 5 counts)
± (10 % + 3 counts)
Model 1577
1000 V
0 % to + 20 %)
36