1
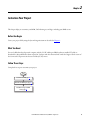
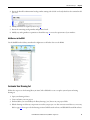
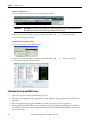
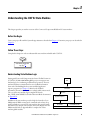
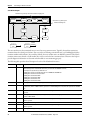
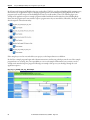
Quick Start Getting Started Connected Components Accelerator Toolkit with System Design Assistant Important User Information Read this document and the documents listed in the additional resources section about installation, configuration, and operation of this equipment before you install, configure, operate, or maintain this product. Users are required to familiarize themselves with installation and wiring instructions in addition to requirements of all applicable codes, laws, and standards. Activities including installation, adjustments, putting into service, use, assembly, disassembly, and maintenance are required to be carried out by suitably trained personnel in accordance with applicable code of practice. If this equipment is used in a manner not specified by the manufacturer, the protection provided by the equipment may be impaired. In no event will Rockwell Automation, Inc. be responsible or liable for indirect or consequential damages resulting from the use or application of this equipment. The examples and diagrams in this manual are included solely for illustrative purposes. Because of the many variables and requirements associated with any particular installation, Rockwell Automation, Inc. cannot assume responsibility or liability for actual use based on the examples and diagrams. No patent liability is assumed by Rockwell Automation, Inc. with respect to use of information, circuits, equipment, or software described in this manual. Reproduction of the contents of this manual, in whole or in part, without written permission of Rockwell Automation, Inc., is prohibited. Throughout this manual, when necessary, we use notes to make you aware of safety considerations. WARNING: Identifies information about practices or circumstances that can cause an explosion in a hazardous environment, which may lead to personal injury or death, property damage, or economic loss. ATTENTION: Identifies information about practices or circumstances that can lead to personal injury or death, property damage, or economic loss. Attentions help you identify a hazard, avoid a hazard, and recognize the consequence. IMPORTANT Identifies information that is critical for successful application and understanding of the product. Labels may also be on or inside the equipment to provide specific precautions. SHOCK HAZARD: Labels may be on or inside the equipment, for example, a drive or motor, to alert people that dangerous voltage may be present. BURN HAZARD: Labels may be on or inside the equipment, for example, a drive or motor, to alert people that surfaces may reach dangerous temperatures. ARC FLASH HAZARD: Labels may be on or inside the equipment, for example, a motor control center, to alert people to potential Arc Flash. Arc Flash will cause severe injury or death. Wear proper Personal Protective Equipment (PPE). Follow ALL Regulatory requirements for safe work practices and for Personal Protective Equipment (PPE). Allen-Bradley, Connected Components Workbench, Micro800, Micro810, Micro820, Micro830, Micro850, PanelView, PowerFlex, ProposalWorks, and Rockwell Automation are trademarks of Rockwell Automation, Inc. Trademarks not belonging to Rockwell Automation are property of their respective companies. Where to Start Follow this path to complete your building block project. Chapter 1 Using the System Design Assistant (SDA) Chapter 2 Customize Your Project Chapter 3 Understanding the CCAT V2 State Machine HMI State Machine Auto Mode Application Sequences Auto Variables Manual Mode Manual (MAn) Variables Building Block Chapter 4 Incorporate Building Block Examples into the Application Sequence Programs Rockwell Automation Publication CC-QS035B-EN-P - August 2015 3 Where to Start Notes: 4 Rockwell Automation Publication CC-QS035B-EN-P - August 2015 Table of Contents Prefae About This Publication. . . . . . . . . . . . . . . . . . . . . . . . . . . . . . . . . . . . . . . . . . . . . 7 Terminology. . . . . . . . . . . . . . . . . . . . . . . . . . . . . . . . . . . . . . . . . . . . . . . . . . . . . . . 8 Available Connected Components Accelerator Toolkits . . . . . . . . . . . . . . 9 Additional Resources . . . . . . . . . . . . . . . . . . . . . . . . . . . . . . . . . . . . . . . . . . . . . . . 9 Chapter 1 Using the System Design Assistant (SDA) Before You Begin . . . . . . . . . . . . . . . . . . . . . . . . . . . . . . . . . . . . . . . . . . . . . . . . What You Need . . . . . . . . . . . . . . . . . . . . . . . . . . . . . . . . . . . . . . . . . . . . . . . . . Follow These Steps . . . . . . . . . . . . . . . . . . . . . . . . . . . . . . . . . . . . . . . . . . . . . . . Open the Connected Components Accelerator Toolkit (CCAT) . . . . Review the System Design Assistant Workspace . . . . . . . . . . . . . . . . . . . . Define the Machine Basics . . . . . . . . . . . . . . . . . . . . . . . . . . . . . . . . . . . . . . . . Specify Products . . . . . . . . . . . . . . . . . . . . . . . . . . . . . . . . . . . . . . . . . . . . . . . . . Review the System Summary . . . . . . . . . . . . . . . . . . . . . . . . . . . . . . . . . . . . . . Generate the Project Folder . . . . . . . . . . . . . . . . . . . . . . . . . . . . . . . . . . . . . . . Review the Project Folder . . . . . . . . . . . . . . . . . . . . . . . . . . . . . . . . . . . . . . . . . 11 11 11 12 13 14 15 16 17 17 Chapter 2 Customize Your Project Before You Begin . . . . . . . . . . . . . . . . . . . . . . . . . . . . . . . . . . . . . . . . . . . . . . . . What You Need . . . . . . . . . . . . . . . . . . . . . . . . . . . . . . . . . . . . . . . . . . . . . . . . . Follow These Steps . . . . . . . . . . . . . . . . . . . . . . . . . . . . . . . . . . . . . . . . . . . . . . . Customize Your BOM . . . . . . . . . . . . . . . . . . . . . . . . . . . . . . . . . . . . . . . . . . . Review or Modify Your Controller and HMI Terminal Selections . . Add Devices to the BOM . . . . . . . . . . . . . . . . . . . . . . . . . . . . . . . . . . . . . Customize Your Drawing Set . . . . . . . . . . . . . . . . . . . . . . . . . . . . . . . . . . . . . Customize Your Logic and HMI Screens. . . . . . . . . . . . . . . . . . . . . . . . . . . 19 19 19 20 20 21 21 22 Chapter 3 Understanding the CCAT V2 State Machine Before You Begin . . . . . . . . . . . . . . . . . . . . . . . . . . . . . . . . . . . . . . . . . . . . . . . . Follow These Steps . . . . . . . . . . . . . . . . . . . . . . . . . . . . . . . . . . . . . . . . . . . . . . . Understanding State Machine Logic . . . . . . . . . . . . . . . . . . . . . . . . . . . . . . . Machine Overview Screen. . . . . . . . . . . . . . . . . . . . . . . . . . . . . . . . . . . . . Machine Functions Screen . . . . . . . . . . . . . . . . . . . . . . . . . . . . . . . . . . . . State Diagram Screen . . . . . . . . . . . . . . . . . . . . . . . . . . . . . . . . . . . . . . . . . Machine Monitor Screen. . . . . . . . . . . . . . . . . . . . . . . . . . . . . . . . . . . . . . Rockwell Automation Publication CC-QS035B-EN-P - August 2015 23 23 23 25 25 26 26 5 Table of Contents Chapter 4 Incorporate Building Block Examples Before You Begin. . . . . . . . . . . . . . . . . . . . . . . . . . . . . . . . . . . . . . . . . . . . . . . . . Understanding Application Sequence Programs. . . . . . . . . . . . . . . . . . . . . into the Application Sequence Programs Appendix A State Machine User-defined Function RA_STATE_MACHINE User-defined Function Block . . . . . . . . . . . . Block Appendix B ................................................................. State Machine Global Variables 6 Rockwell Automation Publication CC-QS035B-EN-P - August 2015 27 27 31 33 Preface About This Publication This quick start is designed to provide a way to implement common control tasks by aiding in the selection of products and providing access to panel and wiring information. Each section is designed with a different task as a standalone machine, or implemented in a larger system. IMPORTANT Use this publication together with other Connected Components Accelerator Toolkit quick starts to aid in building your Micro800® based application. Refer to You can view or download publications at http:/www.rockwellautomation.com/literature/. To order paper copies of technical documentation, contact your local Allen-Bradley distributor or Rockwell Automation sales representative. on page 9 for a listing of quick starts. To help with the design and installation of your system, application files and other information are provided on the Connected Components Accelerator Toolkit (CCAT). The CCAT provides bills of materials (BOM), CAD drawings for panel layout and wiring, control programs, Human Machine Interface (HMI) screens, and more. With these tools and the built-in best-practices design, you are free to focus on the design of your machine control and not on design overhead tasks. The CCAT is available on the Connected Components Accelerator Toolkit DVD, publication CC-QR002, or through the Rockwell Automation Software Download and Registration System (SDRS) at http://www.rockwellautomation.com/rockwellautomation/products-technologies/connected-components/tools/ accelerator-toolkit.page. The beginning of each chapter contains the following information. Read these sections carefully before you begin work in each chapter: • Before You Begin - The chapters in this quick start do not have to be completed in the order in which they appear. However, this section defines the minimum amount of preparation that is required before completing the current chapter. • What You Need - This section lists the tools that are required to complete the steps in the current chapter, including, but not limited to, hardware and software. • Follow These Steps - This section illustrates the steps in the current chapter and identifies the steps that are required to complete the examples. Rockwell Automation Publication CC-QS035B-EN-P - August 2015 7 Preface Terminology 8 Term (abbreviation) Definition Application Sequence Programs User-modified programs that work together with the standard state machine logic to control what the machine does while in the abort, clear, reset, run and stop states. Auto/manual operation When the PanelView™ 800 terminal is in Auto mode, the controller logic controls the machine and monitors machine status. When the PanelView 800 terminal switches to Manual mode, the terminal takes over control. Command buttons and numeric entry fields are available only when the machine is in Manual mode. Bill of Materials (BOM) A list of components that are needed for your system. Building block (BB) Tools for accelerating and simplifying the development of a Micro800 controller-based application. A typical building block includes a starting Bill of Material (BOM), Computer-Aided Design (CAD) drawings, Micro800 controller programs, PanelView 800 terminal applications, and a quick start document. Computer-Aided Design (CAD) A computer-based system that is developed to facilitate design of mechanical parts. Connected Components Accelerator Toolkit (CCAT) Software with application files and other information to speed the design and startup of component-based machines. CCAT project A project that consists of these items: • A ProposalWorks™-based bill of materials • A set of CAD drawings (dimensions and schematics) • A Connected Components Workbench project • HMI screens • A set of Quick Start documents • A project document with information about the project components and links to reference materials Connected Components Workbench™ Software environment for configuring or programming Micro800 controllers, PanelView 800 terminals, PowerFlex® drives, and other component-level products. Connected Components Workbench project A project consists of one or more of the following: • Micro800 controller configuration • Up to 256 Micro800 programs, each with program local variables • Micro800 global variables • PanelView 800 terminal application • PowerFlex drive parameter lists Global variables Project variables that any program can access, including all I/O and system variables. State Machine control code Machine logic for coordinating overall machine operation that is based on states. The state machine broadcasts commands and receives feedback information from each of the building blocks via user-modified application sequence programs. System Design Assistant (SDA) Software with application files and other information to speed the design and start-up of component-based machines. Tags A PanelView 800 term for variables. User-defined Function Blocks (UDFBs) Function block instructions that can be used like standard function block instructions within any Connected Components Workbench programming language. Anyone using Connected Components Workbench software can write these functions blocks. Many UDFBs are posted on the Rockwell Automation sample code website: http://samplecode.rockwellautomation.com/idc/groups/public/documents/webassets/sc_home_page.hcst. User-defined Object (UDO) A collection of PanelView 800 terminal screen objects that can be pasted into a new screen. Rockwell Automation Publication CC-QS035B-EN-P - August 2015 Preface Available Connected Components Accelerator Toolkits For the most up-to-date listing of available Connected Components Accelerator Toolkits and related quick starts, refer to these resources: • Rockwell Automation Connected Components Accelerator Toolkit website at http://www.rockwellautomation.com/rockwellautomation/products-technologies/connected-components/tools/ accelerator-toolkit.page. • Connected Components Accelerator Toolkit Building Block Project Descriptions Quick Reference, publication CC-QR003. Additional Resources These resources contain information about related products from Rockwell Automation. Resource Description Micro810® Programmable Controllers User Manual, publication 2080-UM001 Provides information to install, wire, and troubleshoot the Micro810 Programmable Controller. Micro820® Programmable Controllers User Manual, publication 2080-UM005 Provides information to install, wire, and troubleshoot the Micro820 Programmable Controller. Micro830® and Micro850® Programmable Controllers User Manual, publication 2080-UM002 Provides information to install, wire, and troubleshoot the Micro830 and Micro850 Programmable Controller. PanelView 800 HMI Terminals User Manual, publication 2711R-UM001 Provides information to configure, operate, and troubleshoot the PanelView 800 HMI terminals. You can view or download publications at http:/www.rockwellautomation.com/literature/. To order paper copies of technical documentation, contact your local Allen-Bradley distributor or Rockwell Automation sales representative. Rockwell Automation Publication CC-QS035B-EN-P - August 2015 9 Preface Notes: 10 Rockwell Automation Publication CC-QS035B-EN-P - August 2015 Chapter 1 Using the System Design Assistant (SDA) This chapter guides you in creating your project and generating a project folder. Before You Begin Become familiar with the contents of this Quick Start. What You Need A Windows-based personal computer with the following software installed: • Connected Components Accelerator Toolkit (CCAT) with System Design Assistant • ProposalWorks™ software • Connected Components Workbench, version 6.0 (or higher) • Adobe Acrobat Reader. Follow These Steps Complete these steps to design and install your starting Building Block. Start Open the Connected Components Accelerator Toolkit (CCAT), page 12 Specify Products, page 15 Review the System Summary, page 16 Review the System Design Assistant Workspace, page 13 Generate the Project Folder, page 17 Define the Machine Basics, page 14 Review the Project Folder, page 17 Rockwell Automation Publication CC-QS035B-EN-P - August 2015 11 Chapter 1 Using the System Design Assistant (SDA) Open the Connected Components Accelerator Toolkit (CCAT) 1. From your Windows desktop, choose Start > All Programs > Rockwell Automation > CCAT > Connected Components Accelerator Toolkit. 2. Click Connected Components Accelerator Toolkit to launch the software. The System Design Assistant welcome screen is displayed. 3. Choose Create a new CCAT project. The System Design Assistant workspace is displayed. 12 Rockwell Automation Publication CC-QS035B-EN-P - August 2015 Using the System Design Assistant (SDA) Chapter 1 Review the System Design Assistant Workspace Features of the main workspace are described below. Data Incomplete Menu Bar Data Reviewed Product/Device Selection System Summary and Project Folder Generation Project Summary Item Description Menu Bar Perform file operations, copy/paste, access ProposalWorks or other software packages and help. Data Incomplete Required data is missing or incorrect. Data Reviewed Data in this category has been entered/reviewed. Project Summary Provides a summary of the project specifications. System Summary and Generate Provides a complete listing of all products selected in the project and creates the project folder. Product/Device Selection Selects the products/devices used in the project. Navigation Arrows Navigation Arrows Sequences backward or forward through the SDA screens. Rockwell Automation Publication CC-QS035B-EN-P - August 2015 13 Chapter 1 Using the System Design Assistant (SDA) Define the Machine Basics 1. Choose Machine Basics to enter the basic information about your system. Project Name, Description, and Designer Name Line Voltage, Control Power, and Disconnect Type 2. Type your project name by using alpha-numeric characters and the underscore (_) character. 3. Type the designer name and project description. 4. Enter the basic information for your system by choosing the appropriate items for line voltage, disconnect, and control power. IMPORTANT The line voltage class and control power selections establish the basis of the system. During product selection, only devices compatible with the specified line voltage and control power are displayed. 5. Click the right navigation arrow at the bottom of the screen or choose Motor Control to start selecting devices for your project. The Motor Control product list is shown. 14 Rockwell Automation Publication CC-QS035B-EN-P - August 2015 Using the System Design Assistant (SDA) Chapter 1 Specify Products Choose products/devices in your project by going through the items listed on the left. 1. Choose a product by using the pull-down menus and filling in fields. For example, when choosing VFD Drive Controlled Motors, you must specify the number of controlled motors and the branch circuit protection type. Clicking Add shows a screen similar to the one shown below. The software selects the most logical device according to the basic system information entered earlier. Default Name Default Drive Accessories Edit a. If desired, click Edit to customize the product (size, type, and so forth). This opens the Product Configuration Assistant, enabling custom configuration of the device. Accept b. Click Accept when finished to update the device information in the SDA. Rockwell Automation Publication CC-QS035B-EN-P - August 2015 15 Chapter 1 Using the System Design Assistant (SDA) 2. Change the default name of the device to be descriptive of the system; click in the field and type a new name, using alpha-numeric characters and the underscore (_) character. The name of the device (VFD1, in this case) is used in a number of places throughout the project folder, including bill of materials, CAD drawing title, program/screen name, screen text, and HMI screens. 3. Follow this process for each product in your project. 4. Click the right navigation arrow to advance to the next item or choose an item from the list. Review the System Summary When you’ve completed product selection, review your choices by following these steps. 1. Choose System Summary and Generate. System Summary and Project Folder Generation A summary of the selected devices and associated names is presented. A check in the Default box indicates that the device is using the default configuration. Device is using the Default Configuration. 2. Review the summary and make any necessary changes or additions by double-clicking the product category. 16 Rockwell Automation Publication CC-QS035B-EN-P - August 2015 Using the System Design Assistant (SDA) Chapter 1 Generate the Project Folder 1. After reviewing the summary and making any necessary changes, click . 2. A dialog box opens letting you select the desired CAD drawing format. 3. Verify the default location for the project files and change, if necessary. 4. Click Generate. 5. The project folder is generated in the location specified. The folder contains the following: • Project document • Bill of materials (BOM) document • CAD drawings folder • Literature folder • Connected Components Workshop project folder Review the Project Folder The contents of the project folder are summarized in the following table. Item Description Project Document Includes basic system data and links to additional information. Bill of Material (BOM) The Bill of Material is produced in ProposalWorks format, the catalog number and proposal generation software from Rockwell Automation. Users can build complete quotes, proposals, and product information for Rockwell Automation and Encompass Partner products. Literature Contains literature that provides basic system information and specific product information. CAD CAD drawings are provided to speed the design of the CAD documentation of a system. They include example drawings of the system and individual products to let the user easily add their machine-specific wiring. The drawings are provided in individual sub-folders for each drawing format selected. Each sub-folder contains system drawings and individual product drawings related to the products selected. The drawings include schematics and 3D modules for panel layout. Schematics are available as individual drawings and circuit library additions. Programming The programming sub-folder contains the Connected Components Workbench project for the products and functions selected. The project provides the basic foundation to start your machine design. Use the features and functions of the Connected Components Workbench software to add your individual machine functions and to optimize the machine operation. The Connected Components Workbench software provides the programming and configuration functionality needed for controller, HMI, and drives in one project. Rockwell Automation Publication CC-QS035B-EN-P - August 2015 17 Chapter 1 Using the System Design Assistant (SDA) Notes: 18 Rockwell Automation Publication CC-QS035B-EN-P - August 2015 Chapter 2 Customize Your Project This chapter helps you customize your BOM, CAD drawing set, and logic, including your HMI screens. Before You Begin Create your project file by using the System Design Assistant as described in Chapter 1. What You Need You need a Windows-based personal computer with the CCAT and ProposalWorks software installed. The link to download free ProposalWorks software is listed in “Software and other Internet links” under the Support Tools section of the Connected Components Accelerator Toolkit (CCAT) menu. Follow These Steps Complete these steps to customize your project. Start Customize Your BOM, page 20 Customize Your Drawing Set, page 21 Customize Your Logic and HMI Screens, page 22 Rockwell Automation Publication CC-QS035B-EN-P - August 2015 19 Chapter 2 Customize Your Project Customize Your BOM You can modify the default controller and PanelView terminal selection or add more devices to your project BOM by using ProposalWorks software. Review or Modify Your Controller and HMI Terminal Selections 1. Open your BOM file from the project document. 2. Review the Micro800 controller catalog number starting with 2080-L* and verify that it is the controller model you need. 3. If you need to modify the controller or add controller plug-ins or accessories to your system BOM, follow these steps. a. Double-click the controller catalog number to open the Product Configuration Assistant. b. Modify controller information and add controller plug-ins or accessories as necessary. c. Click Accept to save your modifications or additions. 4. Verify that your controller has enough plug-in slots to accommodate your plug-in modules. If necessary, choose a controller with more I/O points. 10, 16, and 20-point controllers have 2 plug-in slots, 24-point controllers have 3 plug-in slots, and 48-point controllers have 5 plug-in slots. TIP 20 Each catalog number specifies how many I/O points a controller has. For example, 2080-LC30-16QWB has 16 points. Rockwell Automation Publication CC-QS035B-EN-P - August 2015 Customize Your Project Chapter 2 5. Review the PanelView 800 terminal catalog number starting with 2711R-* and verify that this is the terminal model you need. 6. Modify information as required (refer to step 3). 7. Review the remaining catalog numbers and quantities listed. 8. Modify any catalog numbers or quantities as detailed in step 3 to meet the requirements of your machine. Add Devices to the BOM Use the RAISE Product Library wizards and configurators to add other devices to the BOM. Customize Your Drawing Set Follow these steps to use the drawing library in AutoCAD or EPLAN to create a complete system layout and wiring drawing set. 1. Open your drawing software. 2. Create and name your new project. 3. Find and add to your circuit library the library drawings (.circ) that are in your project folder. 4. Edit the drawings to delete any components not used in your project or to edit connections and devices, as necessary. Refer to page 22 for steps to edit the drawings in AutoCAD Electrical software, and EPLAN Electrical P8 software. Rockwell Automation Publication CC-QS035B-EN-P - August 2015 21 Chapter 2 Customize Your Project For AutoCAD Electrical a. From the Panel Layout menu, choose Insert Footprint (Icon Menu). IMPORTANT ATTENTION: If you are using an AutoCAD application other than AutoCAD Electrical, choose Insert Block from the Panel Layout menu to browse to the same directory described in the following step. b. Browse to the CAD sub-folder in your project folder and find the “FP_ …” or “… footprints” drawings. c. Select the drawing by part number. For EPLAN Electrical P8 software a. From the Insert menu, choose Window macro. b. Browse to the CAD sub-folder in your project folder and find the “AB_ …” or “… footprints” drawings. c. Select the drawing (macro) by part number. Customize Your Logic and HMI Screens 1. Open the Connected Components Workbench project file. 2. Select and copy the application logic rungs from the example application logic programs that are needed for your application. 3. Delete the application logic programs and HMI screens that you do not need for your application. 4. Edit the logic and modify the HMI screens as needed for your specific application by following the information provided in the Connected Components Workbench help files and the individual Building Block Quick Starts in your Literature folder. 22 Rockwell Automation Publication CC-QS035B-EN-P - August 2015 Chapter 3 Understanding the CCAT V2 State Machine This chapter provides you with an overview of the Connected Components Workbench V2 state machine. Before You Begin Create your project file with the System Design Assistant as described in Chapter 1. Customize your project as described in Chapter 2. Follow These Steps Complete this chapter in order to understand the state machine included with CCAT V2. Start Understanding State Machine Logic, page 23 Understanding State Machine Logic Starting with Connected Components Accelerator Toolkit Version 2.0 (CCAT V2), all Micro800 Building Block projects incorporate state machine logic for coordinating overall machine operation. The state machine broadcasts commands and receives feedback information from each of the building blocks via user-modified application sequence programs (see Chapter 4). Based on the feedback information, the state machine reacts accordingly while in Auto mode. The core of the state machine logic is implemented in the RA_STATE_MACHINE User-Defined Function Block documented in Appendix A. In addition, the state machine provides a high-level interface for an HMI terminal. While in Auto mode, commands such as Start, Stop, and Clear Faults are accepted. The state machine also provides status information (for example, Current State) that can be displayed on the HMI terminal. Refer to Appendix B for a complete list of state machine global variables. HMI State Machine Auto Mode Application Sequences Auto Variables Rockwell Automation Publication CC-QS035B-EN-P - August 2015 Manual Mode Manual (MAn) Variables Building Block 23 Chapter 3 Understanding the CCAT V2 State Machine State Machine Diagram The machine can go from any state in the shaded box to Stopping state. Idle (Enabled) Resetting Reset Start Starting Running The machine can go from any state in this box to Aborting state. Stop Abort Stopping Stopped (Disabled) Transitional State Permanent State Aborting Clearing Clear Aborted Machine Command The state machine uses the transitional states to move between permanent states. Typically, the machine remains in a transitional state for a brief period of time. If an error is detected during a transitional state or if a building block fails to transition within an allotted time (10 seconds by default), the state machine issues an ABORT command. The fail safe transition timer assures that the overall machine does not become locked in a transitional state. This timer also helps to provide diagnostic information to determine which module is not transitioning properly. The following table provides a brief description for each of the default machine states. Machine State State Type Description ABORTING Transitional Broadcasts the ABORT command until confirmation that all of the building blocks are aborted. The ABORTING state is triggered based on feedback from the building blocks. The default ABORT conditions that place the machine into ABORTING state include: • Power-up detected (in other words, controller first scan • Building block or blocks not ready while the machine is in a STARTING and/or RUNNING state • Building block or blocks detected a fault condition • Building block or blocks failed to RESET • Building block or blocks failed to START • Building block or blocks failed to STOP • Building block or blocks failed to CLEAR ABORTED Permanent All building blocks are aborted (for example, stopped and disabled). Typically this state indicates a fault condition. CLEARING Transitional Broadcasts the CLEAR command until confirmation that all of the building blocks are OK (for example, all active drives have been cleared) within the allotted time, otherwise an ABORT condition is generated. Once all of the building blocks are OK, the machine is placed into the STOPPED state. RESETTING Transitional Broadcasts the RESET command until confirmation that all of the building blocks are reset within the allotted time, otherwise an ABORT condition is generated. IDLE Permanent All building blocks are reset or ready to run (for example, enabled, homed, and so forth). Typically this is the state that the machine is ready to run and awaits a START command. STARTING Transitional Broadcasts the RESET command until confirmation that all of the building blocks are running within the allotted time, otherwise an ABORT condition is generated. RUNNING Permanent All building blocks are running. STOPPING Transitional Broadcasts the STOP command until confirmation that all of the building blocks are stopped within the allotted time, otherwise an ABORT condition is generated. STOPPED Permanent All building blocks are stopped and ready. 24 Rockwell Automation Publication CC-QS035B-EN-P - August 2015 Understanding the CCAT V2 State Machine Chapter 3 Machine Overview Screen The Machine Overview screen is the main screen for the PanelView 800 applications supplied with CCAT V2. The screen indicates which state the state machine is in and if it is faulted or ready. If the current state is aborted, then the reason the state machine entered the aborted state is indicated. The following state machine screens are implemented in all CCAT V2 building block PanelView 800 applications. Button Description 'X' button Press to return to the PanelView 800 Configuration Stop Machine button Press to stop machine Clear Faults button Press to clear machine faults (appears when machine is faulted) Start Machine button Press to start machine (appears when machine is not faulted) Machine Functions button Press to go to Machine Functions screen Manual/Auto button Switches machine between Auto and Manual modes Machine Functions Screen The Machine Functions screen is the starting point for each of the building block specific screens. Button Description 'X' button Press to return to the Machine Overview screen Building block button Press to go to the specific building block overview screen Stop Machine button Press to stop machine Clear Faults button Press to clear machine faults (appears when machine is faulted) Start Machine button Press to start machine (appears when machine is not faulted) Machine Functions button Press to go to Machine State Diagram screen Manual/Auto button Switches machine between Auto and Manual modes Rockwell Automation Publication CC-QS035B-EN-P - August 2015 25 Chapter 3 Understanding the CCAT V2 State Machine State Diagram Screen The State Diagram screen graphically shows which state the machine is in. Button Description 'X' button Press to return to the Machine Functions screen Stop Machine button Press to stop machine Clear Faults button Press to clear machine faults (appears when machine is faulted) Start Machine button Press to start machine (appears when machine is not faulted) Machine Monitor button Press to go to Machine Monitor screen Manual/Auto button Switches machine between Auto and Manual modes Machine Monitor Screen The Machine Monitor screen shows the current on/off value of individual machine commands, machine status, and application status. 26 Button Description X' button Press to return to the Machine State Diagram screen Stop Machine button Press to stop machine Clear Faults button Press to clear machine faults (appears when machine is faulted) Start Machine button Press to start machine (appears when machine is not faulted) Rockwell Automation Publication CC-QS035B-EN-P - August 2015 Chapter 4 Incorporate Building Block Examples into the Application Sequence Programs This chapter helps you incorporate building block examples into your application sequence programs. Before You Begin Create your project file by using the System Design Assistant as described in Chapter 1. Be familiar with the content presented in Chapter 2 and Chapter 3. Complete the integration and validation of each of the individual building blocks included in your project by referring to the individual building block Quick Start manuals. Understanding Application Sequence Programs Starting with Connected Components Accelerator Toolkit Version 2.0 (CCAT V2), all Micro800 Building Block projects incorporate the same MC_StateMachine program and a set of application sequence programs that together control what the machine does while in each machine state. Rockwell Automation Publication CC-QS035B-EN-P - August 2015 27 Chapter 4 Incorporate Building Block Examples into the Application Sequence Programs Each Connected Components Workbench project produced by CCAT V2, as well as each building-block starting project, also includes a set of application sequence example programs specific to the building blocks being implemented. These programs can be used to incorporate the building blocks into the overall machine control. The following figure is an example of the application sequence example programs included with the PowerFlex 520-Series drives building block. Notice that the program names start with the sequence program name they are intended for, followed by “Example,” and a short description of their functionality. If the examples you need are not included in your project, use the Import function to add them. Each of these example programs begins with a Return instruction in its first rung, which prevents the rest of the example program from ever executing. It is your responsibility to review each example and determine how you want to use the example in the intended sequence program. Following is an example of the process you should go through for each application sequence. App_Stop_Seq_Example_PF5_Stop_Drive Example 28 Rockwell Automation Publication CC-QS035B-EN-P - August 2015 Incorporate Building Block Examples into the Application Sequence Programs Chapter 4 1. Compare the provided example against the default App_Stop_Seq program. 2. Modify rungs 1 and 2 in the App_Stop_Seq program to function like the example rungs 2 and 3, assuming you want the drive to stop when the machine stops. 3. Delete the App_Stop_Seq_Example_PF5_Stop_Drive program, as it is no longer needed. 4. Repeat this general procedure to complete the programming for the Abort, Clear, Reset and Run sequence programs as well. Rockwell Automation Publication CC-QS035B-EN-P - August 2015 29 Chapter 4 Incorporate Building Block Examples into the Application Sequence Programs Notes: 30 Rockwell Automation Publication CC-QS035B-EN-P - August 2015 Appendix A State Machine User-defined Function Block This appendix describes the state machine user-defined function block and the associated inputs and outputs. RA_STATE_MACHINE User-defined Function Block This user-defined function block (UDFB) provides a simple state machine for machine control that issues commands (start, stop, reset, clear faults, and abort) to and receives feedback information (running, stopped, reset, ready, OK, and aborted) from each of the building blocks (BBs). Rockwell Automation Publication CC-QS035B-EN-P - August 2015 31 Appendix A State Machine User-defined Function Block Input Variable Data Type Description FBEN BOOL Set this bit TRUE to enable the function block. Clear_Faults_PB BOOL Pushbutton input to initiate the Clear Faults machine command. Start_PB BOOL Pushbutton input to initiate the Start machine command. Stop_PB BOOL Pushbutton input to initiate the Stop machine command. AutoModeEnabled BOOL Input indicating that Auto mode is enabled. App_Aborted BOOL Input indicating that all building blocks (BBs) are Aborted. App_OK BOOL Input indicating that all BBs are OK. App_Ready BOOL Input indicating that all BBs are Ready. App_Reset BOOL Input indicating that all BBs are Reset. App_Running BOOL Input indicating that all BBs are Running. App_Stopped BOOL Input indicating that all BBs are Stopped. Clear_Delay TIME Maximum time after a Clear Faults command to wait for all BBs to be OK. Reset_Delay TIME Maximum time after a Reset command to wait for all BBs to be Idle. Start_Delay TIME Maximum time after a Start command to wait for all BBs to be Running. Stop_Delay TIME Maximum time after a Stop command to wait for all BBs to be Stopped. Output Variable Data Type Description FBENO BOOL This bit is TRUE when the function block is enabled. Cmd_Abort BOOL Machine command to all BBs to Abort. Cmd_Reset BOOL Machine command to all BBs to Reset. Cmd_ClearFaults BOOL Machine command to all BBs to Clear Faults. Cmd_Start BOOL Machine command to all BBs to Start. Cmd_Stop BOOL Machine command to all BBs to Stop. Mach_AbortCode UINT Code indicating why the machine last aborted. Mach_CurrentState UINT Integer representing the current machine state. Mach_Aborting BOOL Machine state is Aborting when this bit is TRUE. Mach_Aborted BOOL Machine state is Aborted when this bit is TRUE. Mach_Clearing BOOL Machine state is Clearing when this bit is TRUE. Mach_Idle BOOL Machine state is Idle when this bit is TRUE. Mach_OK BOOL Machine state is OK when this bit is TRUE. Mach_Ready BOOL Machine state is Ready when this bit is TRUE. Mach_Resetting BOOL Machine state is Resetting when this bit is TRUE. Mach_Running BOOL Machine state is Running when this bit is TRUE. Mach_Starting BOOL Machine state is Starting when this bit is TRUE. Mach_Stopped BOOL Machine state is Stopped when this bit is TRUE. Mach_Stopping BOOL Machine state is Stopping when this bit is TRUE. 32 Rockwell Automation Publication CC-QS035B-EN-P - August 2015 Appendix B State Machine Global Variables This appendix provides a listing of the global variables used for program interfacing. Variable Name Mach_Cmd_Abort_Auto Mach_Cmd_ClearFaults_Auto Mach_Cmd_ClearFaults_PB Mach_Cmd_Req_OperToAuto Mach_Cmd_Req_OperToManual Mach_Cmd_Req_ProgToAuto Mach_Cmd_Req_ProgToManual Mach_Cmd_Reset_Auto Mach_Cmd_Start_Auto Mach_Cmd_Start_PB Mach_Cmd_Stop_Auto Mach_Cmd_Stop_PB Mach_Sts_AbortCode Mach_Sts_Aborted Mach_Sts_Aborting Mach_Sts_AutoModeEnabled Mach_Sts_AutoONS Mach_Sts_Clearing Mach_Sts_CurrentState Mach_Sts_Idle Mach_Sts_ManualModeEnabled Mach_Sts_ManualONS Mach_Sts_OK Mach_Sts_Permissive_AutoToManual Mach_Sts_Permissive_ManualToAuto Mach_Sts_Ready Mach_Sts_Resetting Mach_Sts_Running Mach_Sts_Starting Mach_Sts_Stopped Mach_Sts_Stopping Rockwell Automation Publication CC-QS035B-EN-P - August 2015 33 Appendix B State Machine Global Variables Notes: 34 Rockwell Automation Publication CC-QS035B-EN-P - August 2015 Rockwell Automation Support Rockwell Automation provides technical information on the Web to assist you in using its products. At http://www.rockwellautomation.com/support, you can find technical and application notes, sample code, and links to software service packs. You can also visit our Support Center at https://rockwellautomation.custhelp.com/ for software updates, support chats and forums, technical information, FAQs, and to sign up for product notification updates. In addition, we offer multiple support programs for installation, configuration, and troubleshooting. For more information, contact your local distributor or Rockwell Automation representative, or visit http://www.rockwellautomation.com/services/online-phone. Installation Assistance If you experience a problem within the first 24 hours of installation, review the information that is contained in this manual. You can contact Customer Support for initial help in getting your product up and running. United States or Canada 1.440.646.3434 Outside United States or Canada Use the Worldwide Locator at http://www.rockwellautomation.com/rockwellautomation/support/overview.page, or contact your local Rockwell Automation representative. New Product Satisfaction Return Rockwell Automation tests all of its products to help ensure that they are fully operational when shipped from the manufacturing facility. However, if your product is not functioning and needs to be returned, follow these procedures. United States Contact your distributor. You must provide a Customer Support case number (call the phone number above to obtain one) to your distributor to complete the return process. Outside United States Please contact your local Rockwell Automation representative for the return procedure. Documentation Feedback Your comments will help us serve your documentation needs better. If you have any suggestions on how to improve this document, complete this form, publication RA-DU002, available at http://www.rockwellautomation.com/literature/. Rockwell Automation maintains current product environmental information on its website at http://www.rockwellautomation.com/rockwellautomation/about-us/sustainability-ethics/product-environmental-compliance.page. Rockwell Otomasyon Ticaret A.Ş., Kar Plaza İş Merkezi E Blok Kat:6 34752 İçerenköy, İstanbul, Tel: +90 (216) 5698400 Publication CC-QS035B-EN-P - August 2015 Supersedes Publication CC-QS035A-EN-P - January 2014 Copyright © 2015 Rockwell Automation, Inc. All rights reserved. Printed in the U.S.A.