1
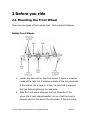
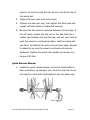
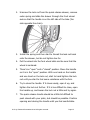
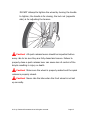
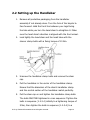
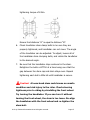
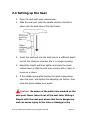
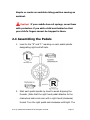
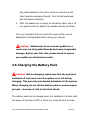
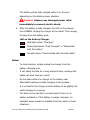
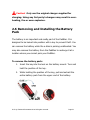
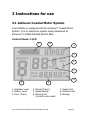
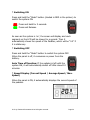
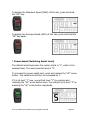
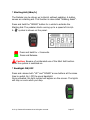
Pedal Assisted Electric Bike Owner Manual for models: WHISTLER / Hugo 26 / Sport Read This First: Safety and Compliance with the Law Congratulations on your purchase of your new PedElec. Your new PedElec is an excellent piece of personal transportation equipment that will give you good service for many years. Before you start using your PedElec, we want you to be aware of a few important points. Please read this section carefully. Observe Laws Regarding the Use of PedElecs Your PedElec is designed and manufactured to meet safety requirements as a Pedal Assisted Electric Bike. However, state and local laws governing the use of PedElec on public roadways, parks, and other open areas may differ. Please check with your local authority before using your PedElec in public areas. Observe Laws Regarding the Use of Bicycles Note that all laws regarding the use of bicycles in public areas, such as those mandatory uses of helmets, lighting, reflectors and the use of infant seats, will automatically apply for PedElec. Check with your local authority on what restrictions might apply. Your First Ride When you are ready to get on your PedElec for the first time, be VERY CAREFUL because the PedElec, when in active power-assisted mode, moves significantly faster than a regular bicycle. Take your PedElec to an area with a lot of open space before you start. Do not start pedaling hard as soon as you get on the PedElec (as you normally would with a regular bicycle), as the PedElec will accelerate under pedal-assist mode and you may be unprepared for the sudden increase in speed. However, after a few times, you will enjoy using the pedal-assisted function. About This Manual This manual contains important safety, performance and maintenance Information. Read the manual before taking your first ride on your new PedElec, and keep the manual handy for future reference. 2013 © Fanciteck International Ltd. All rights reserved. Page 1 WARNING! 1. Your PedElec is not a toy. Always wear a good quality helmet. Always follow the laws and regulations of your city and state. 2. Your PedElec may be ridden in light rain and can be carefully rinsed off with water for cleaning. However, it cannot be submerged in water. Keep the bike dry and clean when possible. Wet brakes will take longer distance to stop the bike. 3. Never use your Electric Assisted Bike for jumping or other stunts. Serious injury or death could result. Any damage caused by improper use will void the warranty. 4. EPIK PedElec uses air tires. Please check tire pressure to make sure that both tires have at least 30 ~ 40 PSI before use. Pump up tires if necessary. 5. Always turn off your PedElec and plug in the charger after each and every ride. 6. The manufacturer reserves the right to update WHISTLER / Hugo 26 / Sport in function and technical issues. 7. Maximum Load Capacity: One person up to 100 kilograms. 8. Please contact the seller for any questions not addressed in this manual. 2013 © Fanciteck International Ltd. All rights reserved. Page 2 INDEX Page 1 1.1 1.2 1.3 General Parts Checklist ....................................................... 4 Parts introduction ………….………………………………….... 5 Achiever® Coaxial Motor System…………………….…….. 6 2 2.1 2.2 2.3 2.4 2.5 2.6 Before you ride Setting up the handlebar ………………………………….… 10 Mounting the Front Wheel ………….……..…….…………. 14 Setting up the seat …….……….…………………………..… 16 Assembling the pedals …………………..…………………... 17 Charging the Battery Pack ………………………..…….….. 18 Removing and installing the Battery Pack ……..……… 21 3 3.1 3.2 Instructions for use Achiever PedElec System Panel ..…………………..……. 23 Derailleur Operation …………………………….……………. 32 4 4.1 4.2 4.3 Maintenance Care and Maintenance ………………………………………. 34 Recommendation for washing ……………………………. 38 Suggestions for use…………………………………………... 38 5. 5.1 Technical information Specifications …………….………………………….…………. 40 2013 © Fanciteck International Ltd. All rights reserved. Page 3 1 General 1.1 Parts Checklist Check if the Package is complete and not damaged Your PedElec comes in a carton containing the following: PedElec Model: WHISTLER / HUGO 26 / Sport assembled main body The front wheel Pedals This Owner’s Manual 2013 © Fanciteck International Ltd. All rights reserved. Page 4 1.2 Parts Introduction 5 4 3 2 1 6 18 7 17 16 8 9 10 11 1. 2. 3. 4. 5. 6. 7. 8. 9. 12 Brake lever Shifter Battery Quick release for seat post Seat Rear reflector Battery mount Rear brake Quick release for rear wheel 13 10. 11. 12. 13. 14. 15. 16. 17. 18. 2013 © Fanciteck International Ltd. All rights reserved. 14 15 Rear derailleur Chain Kick stand Achiever® Coaxial Motor Achiever® Crank Set Quick release for front wheel Front brake Suspension front fork Stem Page 5 1.3 Achiever® Coaxial Motor System Your pedelec is a bike with electric pedal assistance. This means that you can pedal it as a normal bike, or that the bike can assist you in your pedaling. The pedelec will assist you when you are pedaling. The amount of assistance depends on the force you exert on the pedals and the speed of your pedaling. Achiever® PedElec system utilizes a compact mid-motor design to work with the rear multi-gears of the pedelec to yields more power and more speed. The system with J-LCD panel has five levels of assistance. When the system is set to assistance, the electric motor drives the cranks and assists you in your pedaling. Electric Assistance for general purpose riding Your e-bike has an electric pedal assist drive system – Achiever Coaxial Motor System. It is not a moped or motorcycle. In EU countries, it is known legally as an “EPAC” cycle or Electrically Powered Assisted Cycle. The drive assist system consists of a drive unit, a battery, a computer control, and various electronic components (harness wires, sensors, and switches). Other than that, your e-bike shares components common with pedal-only bikes. It is important to know that when the assist system is turned ON, the drive unit engages to provide power only while you are pedaling. The amount of power provided by the drive unit depends on your pedaling force and speeds and the assistance mode/level you set on the panel. At anytime, if you stop pedaling, or when you brakes, the drive assist will disengage. 2013 © Fanciteck International Ltd. All rights reserved. Page 6 In all modes/levels, the drive assist system power reduces progressively and cuts off as the bike reaches a speed of 25 km/h, (15.5 mph), or sooner if you stop pedaling. The drive assist reengages when speed drops below 25 km/h, (15.5 mph) as long as the pedals are turning. Whenever the drive assist system is turned OFF, You can pedal the bike normally. The drive system will not engage. Basic Operation of the PedElec When the system power is ON, power assist is triggered when you pedal forward. The torque sensor monitors how hard you are pedaling and the system calculates the amount of assist you need. The power assistance stops when you stop pedaling (i.e. no torque is put on the pedals). In other words, power assist happens as long as you pedal. When you apply one of the brakes, power assist will automatically stop, allowing the e-bike to slow down and stop. Power assist will turn itself off when the e-bike has reached the maximum speed of 25 km/h. You should use the gear shifter at the handlebar to set the gears appropriately according to road conditions and pedal as usual, you will find that you need to exert a lot less effort. Power output ratios (applicable to Japanese version ONLY) The system provides extra power to assist the rider at startup and low speed situation (< 10km/h) in a human power to motor power at a ratio of 1:2. When the bike is running at a speed higher than 10km/h, the power assist ratio reduces to 1:1. The power assist will gradually reduce to 1:0 when or before the bike’s speed reaches 25km/h to ensure safety, which is also conforming to the EU standard. 2013 © Fanciteck International Ltd. All rights reserved. Page 7 Power Modes Selection The Achiever® System provides five different assistance modes for use with different terrains and riders to achieve the best riding experience and also for power saving and maximum riding range: Lever 1 to 5 (1 is most economic and 5 is most powerful) Easy-to-use LCD Control Panel There are three buttons – the “Mode” button and the “UP” and “Down” arrow buttons. Press and hold the “mode” button to turn the system on and off. Press the “UP” and “DOWN” selection buttons to change the assist level. Battery Level Speed ON/OFF & Mode Switch Assistance level Selector Note: For details operation, please refer to “instructions for use” in section 3. Note: The LCD panel only functions when the main power switch located on the battery is ON. WARNING: Please read below warning very carefully before you ride. 2013 © Fanciteck International Ltd. All rights reserved. Page 8 INTENDED USE: This bicycle is intended to be used as a commuter bicycle. This bike complies with the requirements of European Standard EN 15194, Electrically Power Assisted Cycles. The drive assist system is limited to a maximum continuous power rating of 0,25 kW (250W) and a maximum speed of 25Km/h, (15.5 mph). NOT INTENDED: You must not ride this bike in automobile traffic lanes. This vehicle must only be operated on paved surfaces that are legally open to commuter pedal bicycles. This bike is not for mountain biking use, jumping, or racing. YOU MUST FOLLOW ALL LOCAL LAWS: It is your responsibility to identify and follow all local laws and regulations (including fitting your bike with additional equipment such as lighting and reflectors) necessary to comply with local laws. Ask your E-bike Dealer for more information about operating an electrically assisted pedal bicycle in your area. DO NOT MODIFY THIS BICYCLE/FORK IN ANY WAY FOR ANY REASON. Doing so can result in severe damage, faulty or dangerous operating conditions, or violation of local laws. IMPORTANCE OF PRACTICE & RIDER TRAINING - Before you ride this bike, practice riding in a safe area free from hazards. Take time to learn to bike’s controls and performance. Practice the controls and gain the experience necessary to avoid the many hazards you will encounter while riding. UNDERSTAND YOUR BIKE AND ITS INTENDED USE. USING YOUR BIKE THE WRONG WAY IS DANGEROUS. YOU CAN BE YOU SERIOUSLY INJURED, PARALYZED OR KILLED IF YOU IGNORE THESE WARNINGS. 2013 © Fanciteck International Ltd. All rights reserved. Page 9 2 Before you ride 2.1 Mounting the Front Wheel There are two types of front wheel hubs - Nut and Quick Release. Nutted Front Wheels 1. Loosen the axle nuts on the front wheel. If there is a washer inside of the axle nut, it belongs outside of the fork dropouts. If the washer has a hook or a step, be sure that it engages the fork before tightening the axle nuts. 2. Slide the front wheel between the fork dropouts. If the wheel has a hook shaped washer, be sure that the hook is hooked into the hole above the wheel slot. If there is a step 2013 © Fanciteck International Ltd. All rights reserved. Page 10 washer, be sure the step fits into the key hole at the top of the wheel slot. 3. Tighten the two outer axle nuts evenly; 4. Tighten one side part way, then tighten the other side and repeat until both sides are tightened securely. 5. Be sure that the wheel is centered between the fork legs. If it is off center, loosen the axle nut on the side that has a smaller gap between tire and fork leg, and use your hand to push the wheel to a centered position; hold the wheel with one hand, and tighten the axle nut and check again. Repeat if needed to be sure the wheel is centered and securely tightened. Tighten the wheel nuts equally and evenly to a torque of 40 Nm. Quick Release Wheels 1. Locate the quick release skewer. Some tire tread patterns have a direction, so compare your front tire and rear tire of the bicycle so that both tread patterns face the same way. 2013 © Fanciteck International Ltd. All rights reserved. Page 11 2. Unscrew the lock nut from the quick release skewer, remove outer spring and slide the skewer through the front wheel axle so that the handle is on the left side of the bike (the side opposite the chain). 3. Install the spring and then start to thread the lock nut back onto the skewer, but do not tighten too far. 4. Put the wheel into the fork wheel slots and be sure that the wheel is centered. 5. There’s an “open” and a “closed” position. Move the handle so it is in the “open” position. With one hand on the handle and one hand on the lock nut, start to hand tighten the lock nut until you start to feel some resistance with the fork. 6. Try to close the handle. If it closes easily, open it up, and tighten the lock nut further. If it is too difficult to close, open the handle up, and loosen the lock nut a little and try again. 7. The quick release handle should be a little bit difficult to push closed with your palm, but should be possible. Practice opening and closing the handle until you feel comfortable. 2013 © Fanciteck International Ltd. All rights reserved. Page 12 DO NOT attempt to tighten the wheel by turning the handle to tighten; the handle is for closing, the lock nut (opposite side) is for adjusting the tension. Caution! All quick release levers should be inspected before every ride to be sure they are fully closed and secure. Failure to properly close a quick release lever can cause loss of control of the bicycle resulting in injury or death. Caution! Make sure the wheel is properly seated and the quick release is properly closed. Caution! Never ride the bike when the front wheel is not set up correctly. 2013 © Fanciteck International Ltd. All rights reserved. Page 13 2.2 Setting up the Handlebar 1. Remove all protective packaging from the handlebar assembly if not already done. Turn the fork of the bicycle to face forward. Hold the front tire between your legs facing the bike while you turn the head stem to straighten it. Make sure the head stem’s direction is aligned with the front wheel. 2. Lock tightly the head stem and the head tube with the steerer clamp bolts with a fixing torque of 10 Nm. 3. Unscrew the handlebar clamp bolts and remove the stem cap. 4. Put the handlebar in the center of the handlebar clamp. Ensure that the diameters of the stem’s handlebar clamp and the central section of the handlebar match perfectly. 5. Put the stem cap on and tighten the handlebar clamp bolts. The bolts MUST BE tightened in cross sequence: Tighten the bolts in sequence (1-2-3-4) initially to a tightening torque of 5 Nm, then tighten the bolts in sequence (1-2-3-4) to a 2013 © Fanciteck International Ltd. All rights reserved. Page 14 tightening torque of 8 Nm. Ensure that distance “A” is equal to distance “B”. 6. Check handlebar stem clamp bolts to be sure they are properly tightened, and handlebar can not move. The angle of the handlebar can be adjusted. To adjust; loosen all of the handlebar stem clamping bolts, and rotate the handlebar to the desired angle. 7. Be sure that the handlebar stays centered in the stem. Retighten the bolts a LITTLE at a time being sure that the gap between the stem cap and stem stays even. Repeat tightening each bolt a little bit until handlebar is secure. Caution! A loose head stem could cause an unsafe condition and risk injury to the rider. Check steering tightness prior to riding by straddling the front wheel. Try turning the handlebar. If you can turn it without turning the front wheel, the stem is too loose. Re-align the handlebar with the front wheel and re-tighten the stem bolt. 2013 © Fanciteck International Ltd. All rights reserved. Page 15 2.3 Setting up the Seat 1. Open the seat post quick release lever. 2. Slide the seat post (with the saddle already mounted in place) into the seat tube of the bike frame. 3. Insert the seat post into the seat tube to a sufficient depth so that the minimum insertion line is no longer showing. 4. Adjust the height and then tighten and close the quickrelease lever so that the seat may not turn left or right, or move up or down. 5. If the saddle moves after locking the quick release lever, open the lever, and tighten the adjusting nut further, then close the quick release lever again. Caution! Be aware of the safety line marked on the seat post. Never leave it out of the seat tube. Riding a bicycle with the seat post above this line is dangerous and can cause injury to the rider or damage to the 2013 © Fanciteck International Ltd. All rights reserved. Page 16 bicycle or create an unstable riding position causing an accident. Caution! If your saddle has coil springs, cover them with protectors if you add a child seat behind so that your child's fingers cannot be trapped in them. 2.4 Assembling the Pedals 1. Look for the "R" and "L" marking on each pedal spindle designating right and left side. 2. Start each pedal spindle by hand to avoid stripping the threads. (Note that the right hand pedal attaches to the chainwheel side crank arm with a right-hand (clockwise) thread. Turn the right pedal axle clockwise until tight. The 2013 © Fanciteck International Ltd. All rights reserved. Page 17 left pedal attaches to the other crank arm and has a lefthand (counter-clockwise thread). Turn the left pedal axle anti-clockwise until tight). 3. After the pedals can no longer be turned by hand, use a 15 mm pedal wrench to tighten the pedals securely to 40 Nm. It is very important that you check the crank set for correct adjustment and tightness before riding your bicycle. Caution! Attachment of an incorrect pedal into a crank arm can strip pedal threads and cause irreparable damage. Before your first ride, please check to ensure your pedals are attached correctly. 2.5 Charging the Battery Pack Caution! Before charging, make sure that the system is switched off and never turn the system on or off during charging. This prevents unintended activation of the system. When charging, do not let the battery-pack or power supply get wet – because of risk of electrical shock. The battery pack can be charged when it is installed in the bike (with the power of the bike is OFF) or when it is removed from the bike. 2013 © Fanciteck International Ltd. All rights reserved. Page 18 Make sure that the main power switch on the bike is turned off or the battery is removed from the bike before charging. Label on the charger contains information about its specifications such as input voltage, output voltage, polarity and cautions on use. It is important to follow instruction contained in this manual and on the label of the battery charger. Caution! It is important to follow the instruction contained on the label of the battery charger. 1. Turn your PedElec OFF. 2. Open the seal on the charging port of the battery and plug the output jack of the charger into the charger port of the battery pack. Charging port 3. Plug the power cord of the charger into your home power outlet. The LED on the charger turns RED when charging. 2013 © Fanciteck International Ltd. All rights reserved. Page 19 The battery will be fully charged within 5 or 6 hours, depending on the battery power situation. Caution! Replace any damaged power cable immediately to prevent electric shock. 4. After the battery is fully charged, the LED on the charger turns GREEN. Unplug the charger at the outlet. Then unplug the jack from the battery pack. LED on the battery Charger Red light means “Charging” Green light means “Fully Charged” or “Discounted with the battery” No light means “disconnected with the wall outlet” Notes: - To stop charging, simply unplug the charger from the battery charging port. - If not riding the bike for a long period of time, recharge the battery at least once per month. - Do not place either the charger or the battery near flammable substances while charging is taking place. - It is normal for the charger and the battery to be slightly hot while charging is on-going. - The bike can be ride like a normal bicycle if there is no battery installed or if the battery is empty. However, no assistant power would be available from the motor in these situations. 2013 © Fanciteck International Ltd. All rights reserved. Page 20 Caution! Only use the original charger supplied for charging. Using any 3rd party’s chargers may result in overheating, fire or even explosion. 2.6 Removing and Installing the Battery Pack The battery is an important and costly part of the PedElec. It is designed to be locked into position with a key to prevent theft. You can remove the battery while the e-bike is parking unattended. You may also remove the battery from the PedElec to recharge it at a location where you cannot park your PedElec. To remove the battery pack: 1. Insert the key into the lock on the battery mount. Turn and hold the position of the key. 2. While holding the position of the key, pull and extract the entire battery pack from the upper end of the battery. 2013 © Fanciteck International Ltd. All rights reserved. Page 21 Note: The battery is quite heavy and you should take care not to drop it. To install the battery pack: 1. Align the bottom of the battery into the mount. 2. Push the upper end of the battery onto the battery mounting till you hear a click sound. Caution! It is important to use only genuine replacement parts for several safety critical components. Battery is one such component. Only use battery approved by Achiever. 2013 © Fanciteck International Ltd. All rights reserved. Page 22 3 Instructions for use 3.1 Achiever Coaxial Motor System Your PedElec is equipped with the Achiever® Coaxial Motor System. It is an electronic system solely developed by Achiever for Pedal Assisted Electric Bike. Control Panel: J-LCD 3 2 4 5 6 7 8 1 1. Assistanc Level 2. Battery Level 3. Hour (Timer) 9 4. Minute (Timer) 5. Speed Display 6. Starting Aid (6 km/hr walk assist) 2013 © Fanciteck International Ltd. All rights reserved. 7. Speed Unit 8. Distance Unit 9. Mileage Page 23 * Switching ON Press and hold the “Mode” button (shaded in RED in the picture) to switch the system ON. Press and Hold for 3 seconds. Press and Release. As soon as the system is ‘on’, the screen will display and each segment on the LCD will be shown for a second. Then it automatically shows the speed of the PedElec, which will be “0.0” if it is stationary. * Switching OFF Press and hold the “Mode” button to switch the system OFF. When the panel is off, it consumes no power from the battery. Auto Time off function: If the pedelec is left with the system ON, it will automatically switch off after about 10 minutes. * Speed Display (Current Speed / Average Speed / Max. Speed) When the panel is ON, it automatically displays the current speed of the pedelec. 2013 © Fanciteck International Ltd. All rights reserved. Page 24 To display the Maximum Speed (MAX) of this ride, press and hold the “UP” key. To display the Average Speed (AVG) of this ride, press and hold the “UP” key again. * Power Assist (Switching Assist Level) The default assist level when the system starts is “1”, which is the weakest level. The most powerful level is “5”. To increase the power assist level, press and release the “UP” arrow button. The assist level will then be increased by 1. If it is at level “1” now, you will get level “2” by pressing and releasing the “UP” arrow button once. You will get up to level “5” by pressing the “UP” arrow button repeatedly. 2013 © Fanciteck International Ltd. All rights reserved. Page 25 To lower the power assist level, press and release the “DOWN” arrow button. The assist level will then be decreased by 1. If it is at level “5” now, you will get level “4” by pressing and releasing the “DOWN” arrow button once. You will get down to level “1” by pressing the “DOWN” arrow button repeatedly. Press and Hold for ~3 seconds. Press and Release. To switch among all levels, press and release “UP” or “DOWN” arrow button to access the level you want. Notice: It is strongly advised to ride away in a straight line when an assistance level is selected. Never select assistance level 4 or 5 during maneuvering or riding away in a tight corner. The powerful reaction of motor might take you unawares. 2013 © Fanciteck International Ltd. All rights reserved. Page 26 * Starting Aid (6Km/h) The Pedelec can be driven up to 6km/h without pedaling. A button serves as a starting aid. This function is also called “Walking Assist”. Press and hold the “DOWN” button for a while to activate the Starting Aid. The pedelec starts running up to a speed of 6 km/h. A“ ” symbol is shown on the panel. Press and Hold for ~3 seconds. Press and Release. Caution: Beware of unintended use of the Start Aid function when the system is switched on. * Backlight ON/OFF Press and release both “UP” and “DOWN” arrow buttons at the same time to switch On / Off the panel backlight. Once activated, the light symbol will appear on the screen. The lights will stay on even when you stop. 2013 © Fanciteck International Ltd. All rights reserved. Page 27 * See trip distance / total distance The panel can measure two types of riding information. Push ‘Mode’ button to switch between trip distance and total distance. This function is convenient for users to check the riding distance (TRIP) and the total distance (ODO). * Power Display The battery level is displayed as follow: Full Low Battery level is very low. The system may shut off anytime. Need Recharging now. * Entering to Setup State Some perimeters can be changed in Setup state. To enter the setup state, press and hold both the “UP” and “DOWN” button for 3 seconds. 2013 © Fanciteck International Ltd. All rights reserved. Page 28 - Setup Time Right after entering into the setting state, set the HOUR by using “UP” or “DOWN” arrow button. OR Press “MODE” for confirmation and jump to set the MINUTE. Set the MINUTE by using “UP” or “DOWN” arrow button. OR Press “MODE” for confirmation and jump to set the maximum speed limit (MAX). 2013 © Fanciteck International Ltd. All rights reserved. Page 29 - Set up max speed The default value of the maximum speed limit set up by the factory is 25 Km/h. When the speed of the pedelec reach this pre-set value, the power cutoffs automatically. When the speed drops below this limit, the power assistance resumes. The maximum speed limit can be set to a value within the range 10 – 35 km/h, by using the “UP” or “DOWN” arrow button. OR Confirm the value by pressing the “MODE” button and then jump to the setting of unit (metric system vs English system) Caution: Before changing the maximum speed limit, you MUST make sure that it compiles with your local regulations. - Setup unit (metric system / English system) Select the unit system you preferred by using “UP” or “DOWN” arrow button. This will affect both speed and mileage display. OR 2013 © Fanciteck International Ltd. All rights reserved. Page 30 OR Press “MODE” to confirm your selection and jump to set the Wheel Diameter. - Setup Wheel diameter The default value is set to 26”. Set the Wheel diameter by using “UP” or “DOWN” arrow button. OR Press “MODE” to confirm your selection and jump to set the LCD back light brightness. - Setup LCD back light brightness You can choose from level 1 to level 3. Level 1 is the minimum brightness. Level 3 is the maximum brightness. The default value of the backlight brightness in J—LCD display is level 1. Set the LCD back light brightness by using “UP” or “DOWN” arrow button. Press “MODE” button to confirm the setting and jump to set the Time. 2013 © Fanciteck International Ltd. All rights reserved. Page 31 * Quit from Setup State Press and hold the “MODE” button to save all current setting and quit from Setup State. 3.2 Derailleur Operation Your PedElec uses multi-speeds derailleur up to 7 o 8 speeds*. The speed change is controlled by a shifting levers* or twist grip* during riding. (* depending on derailleur model) The rear shifter on the right of the handlebar will have an indicator that reads a series of numbers from 1 up. “1” is the lowest gear. This is used for slower riding, hill climbing, or to allow for easier pedaling. It is recommended to start off in this gear and move through the gears as speed increases as needed, or comfortable. It is OK to ride the whole time in only one gear if this is comfortable. Shift only while pedaling forward and seated. When shifting, lessen the pressure exerted on the pedals during the shift. Once you have successfully shifted gears, it is OK to start to pedal hard if desired. Pedaling hard while shifting can cause the chain to skip and not engage the appropriate gear. 2013 © Fanciteck International Ltd. All rights reserved. Page 32 Low gear provides higher torque but lower speed while high gear provides low torque but higher speed. Below are examples of using the speeds in different situations: Gear no. 1 – 3 are good for startup and going uphill. Gear no. 3 – 6 are comfortable for cruising on flat road. Gear no. 6 – 8 are good for high speed cruising. Attention! It is important to be pedaling forward when shifting gears. This allows the chain to “derail” from one gear to the next. Operating the shifter while sitting still or not pedaling can cause damage to the system, and can be dangerous, as the chain may jam and cause the bike to become unstable. 2013 © Fanciteck International Ltd. All rights reserved. Page 33 4 Maintenance 4.1 Care and Maintenance Take care of your PedElec the way you would with a regular bicycle by keeping it dry, clean and the moving parts well lubricated. Avoid parking your PedElec in exposed areas whenever possible. Avoid parking your PedElec outside when there is rain or snow. At the end of a trip where there was rain or snow, bring the PedElec inside and use a clean, dry towel to eliminate any wetness. Be sure you do not lose both keys. If you lost one key, you should immediately make a copy as a back-up. If you lost both keys, you will be unable to remove the battery from the PedElec. Common bike’s parts Check the effectiveness of the brakes before each use. Brake levers should be checked for tightness at least every three months. They should be set in a comfortable position within easy reach of the rider’s hands, and must not be able to move on the handlebar. Always check your disc brake rotors or caliper brake pads for excessive wear before you ride as well as the operation of the brake levers and cables before each ride. If aluminium rims and rim brakes are used (such as cantilevers, V brakes, calliper brakes, hydraulic rim brakes etc), always check your rims for any wear, dents, gouges and damage and that the wheels are true before you ride. If there is any damage to your rims, replace them BEFORE you ride. 2013 © Fanciteck International Ltd. All rights reserved. Page 34 Caution! Riding a damaged or worn rim may lead to sudden improper braking function. Sudden or improper braking function can cause loss of control, resulting in serious injury or death. Replace damaged or worn rims before riding the bike. The operation of the derailleur system should be checked at least every month. Pedals should be inspected every month of the correct tightness into the crank arms. The chain should be lubricated with light oil at least every month, or after use in wet, muddy, or dusty conditions. Take care to wipe off excess oil, and not to get oil on the tires or rim braking surfaces. Check the frame of the pedelec periodically for any dents, bends, and kinks. Carefully examine the frame for cracks. A crack will weaken your frame significantly and can cause catastrophic damage. Inspect your fork before every ride carefully for signs of stress and fatigue. If the fork shows signs of damage or fatigue, consult your dealer or replace the fork before riding. Check the quick release levers before every ride to ensure all connections are made properly and securely. Periodically, inspect all reflectors, brackets and mounting hardware for signs of wear or damage. Replace immediately if damage is found. Front and rear reflectors should be adjusted to within 5 degrees of vertical. This is measured by looking at the bicycle from the side while it is on flat ground. If the reflectors are out of line, adjust as necessary and be sure all fasteners are tight. WARNING: Do not sit on the bicycle with the kickstand down. Kickstand is not designed to support the weight of a person. Make sure kickstand is up before riding. 2013 © Fanciteck International Ltd. All rights reserved. Page 35 Caution! As with all mechanical components, the bicycle is subjected to wear and high stresses. Different materials and components may react to wear or stress fatigue in different ways. If the design life of a component has been exceeded, it may suddenly fail possibly causing injuries to the rider. Any form of crack, scratches or change of colouring in highly stressed areas indicate that the life of the component has been reached and it should be replaced. Caution! It is important to use only genuine replacement parts for several safety critical components, such as brake pads. Consult a qualified ebike mechanic or your local ebikes dealer if you have any questions. Electric Parts Check the connections of the system every two to three months. Make sure that no dirt or moisture can get into the ‘docking station’ (connector) when the battery-pack is not on the bike. If you notice anything like this, clean with a smooth, dry brush. The motor is of the ‘brushless’ type and requires no maintenance. Battery Care When the battery-pack is not in use, store it in a dry, cool place. LiIon batteries are best stored at 70% to 80% charge. Charge it every two months. Keep away from extreme temperature changes. Keep the batterypack from condensation to prevent rust forming on the terminals. Use only the supplied charger to charge your battery. Do not use an unauthorized substitute. If your charger is lost or damaged, contact your dealer to order a replacement. 2013 © Fanciteck International Ltd. All rights reserved. Page 36 Do not place the battery near fire or corrosive substances. Do not immerse in water or other liquids. Avoid subjecting the battery to high temperature, such as directly under the hot sun, for prolonged periods of time. After much use, your battery's charge holding capacity will decrease. If you find that your battery does not hold sufficient charge even for short trips, you should contact your dealer to order a replacement. Under normal use, the battery will undergo 1000 charging and discharging cycles. The battery is splash proof but not waterproof. Do not immerse the battery into water and do not clean with a high pressure cleaner. Caution: Improper use of the battery will damage the battery and shorten its useful life, and may cause fire or an explosion. Caution: Do not short-circuit the battery terminals. This may cause the battery pack to overheat, catch fire, or even explode. Caution: Do not attempt to open the battery-pack. Opening the battery-pack may cause a short, resulting in overheating, fire, or even explosion. There are no user-serviceable parts inside. Opening the battery-pack will void your warranty. Battery pack recycling Attention: Because a battery pack contains certain harmful substances, it must be treated as chemical waste and may not be disposed as normal waste. To prevent environmental pollution, a defective or end-of-life battery pack can be handed over to your dealer or to another waste disposal according to local rules. 2013 © Fanciteck International Ltd. All rights reserved. Page 37 4.2 Recommendation for washing Use only water. On suspension forks and shocks, cover adjustment knobs with a clean plastic bag secured temporarily with a rubber band or masking tape. When cleaning the bike, use a sponge and/or a soft brush. For the battery-case, a damp cloth suffices. Use little water. Keep water away from the electrical connections. CAUTION: Do not use high pressure water streams to clean your PedElec. The powerful water-jet may damage the electronics. Water might seep inside the motor or the wiring compartment and cause rusting of electrical parts or short circuits. Power washing will also force contaminants into parts where they will promote corrosion, immediately damage, or result in accelerated wear. DO NOT use compressed air to dry. DO NOT use abrasive or harsh chemical cleaner/solvents which can damage the finish or attack and destroy both the outside and internal parts. 4.3 Suggestions for use Always remember that your PedElec is still a bicycle and should be used as such. Your PedElec is designed for regular road use for a single person. CAUTION! Using your PedElec for extreme maneuvers, such as extreme off-road use, jumping, or carrying excessive load will damage the PedElec and could cause serious injury. 2013 © Fanciteck International Ltd. All rights reserved. Page 38 Maximizing the Riding Range Many factors affect the rate of energy consumption and hence affect the riding range. - Fully charge the battery before a long journey. - Rough road conditions and hilly terrain will consume more energy. - Frequent change of speed will consume more energy. - Carrying more weight on the bike will consume more energy. - Keeping the tires properly inflated and keeping the PedElec clean and well lubricated will save energy. - Making sure that both wheels move freely when brakes are not applied will save energy. - Check brake adjustments frequently. - When the battery is turned off, your PedElec functions as a regular bicycle. You might want to turn off the battery for awhile where the road is level or downhill, and pedal the PedElec as a regular bicycle. So that you can conserve electrical energy in the battery for later use. 2013 © Fanciteck International Ltd. All rights reserved. Page 39 5 Specifications Model: WHISTLER / Hugo 26 / Sport Frame Front Fork Frame Size Tyres Size Motor Battery Type Voltage Capacity Battery Life Cycles Charging Time Battery Level Meter Battery Weight Max. Speed Max. Uphill Inclination Max. Riding Range Max. Rider's Weight Unfolded Size Folded Size Wheel base Net Weight Aluminum Alloy Suspension Aluminum Front Fork 17.5" (Uni size) 26" x 1.95" Brushless DC Motor, 36V, 250W Lithium Ion 36 V 8.8 Ah 1,000 cycles 5~6 hrs Yes 3.2 kg 25 km/h 15 ° 70 - 80 km (PedElec mode) 100 kg 180 x 80 x 101 cm N/A 110 cm 20.5 kg 2013 © Fanciteck International Ltd. All rights reserved. Page 40 The developer and manufacturer of PedElecs.