1
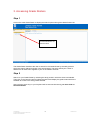
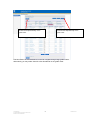
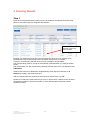
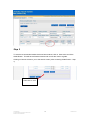
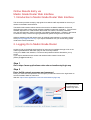
Online Results Entry via
Medici Grade Roster Web Interface
1. Introduction to Medici Grade Roster Web Interface
This document provides a step-by-step guide for academic staff responsible for the entry of
results via the Medici web interface.
The Medici Web interface allows results to be saved to the Medici database via the web,
eliminating the need to have special software installed on personal computers. The minimum
software requirement is a web browser that is able to access the University’s website.
Only the final semester grade is recorded in the Medici Grade Rosters. Academic staff needs
to continue to keep a record of ongoing assessment grades throughout the semester.
Offshore academic staff will need to apply for a Medici web interface by contacting Lianne
Gore ([email protected]). If you require assistance with your results entry please
contact the course coordinator.
2. Logging On to Medici Grade Roster
Access to login to the Medici web interface for instructors is available through a link on the
Teaching and Research Education page on the University website.
To log on to Medici web interface, a username and password will be allocated to you by
UniSA.
If you require assistance with access and results entries contact Lianne Gore
([email protected]).
Step 1
Go to https://www.applications.unisa.edu.au/resultsentry/login.asp
Step 2
Enter UniSA network username and password
Enter your username and password into the space provided and click on the login button to
access the Medici Web for Instructors.
Web link: https://www.applications.unisa.edu.au/resultsentry/login.asp
Enter your username
and password and
click the login button
This will display the Medici welcome page for instructors.
Created by
Transnational Support Services
Division of Business
1
12/07/2007
3. Accessing Grade Rosters
Step 1
Click on the word Grade Roster to display the search options through the Grade Roster List.
Click on Grade Roster to
reveal Grade Roster List
search function
The Grade Roster list allows the user to search for the Grade Roster by the study period in
which the class is offered as shown in the second panel. The study period your course is
attached to will have been supplied to your on the student class list.
Step 2
Search for your Grade Roster by selecting the study period in which the class is scheduled.
Then click on the Search button to initiate the search and display the grade rosters which are
available to access in the study period selected.
Note using the return key on your keyboard will not execute the search; you must click on
the Select button.
Created by
Transnational Support Services
Division of Business
2
12/07/2007
2. Click on the
Search button to
initiate the search
1. Click on the drop down
arrow to select the
appropriate study period
Step 3
Find the grade roster for which results are to be entered and click on Select in the Action
column. Please note that your Class Number will be recorded on the excel classlist you were
given at the commencement of the course.
Select the grade roster
If the class you expected to have access to is not displayed on this screen please contact
Lianne Gore ([email protected]).
Step 4
Open the Grade Roster for the class you want to enter results - click on the Select button for
that class.
The Grade Roster details all students enrolled in the selected class.
Created by
Transnational Support Services
Division of Business
3
12/07/2007
Click on the Next button to view other
students listed alphabetically on the
grade roster.
Click on the View All button to view all
students listed alphabetically on the
grade roster.
The Next button as indicated above is used to navigate through large grade rosters.
Alternatively you may select View All to list all students on the grade roster.
Created by
Transnational Support Services
Division of Business
4
12/07/2007
4. Entering Results
Step 1
Enter the recommended result (a mark from 0-100 should be entered) for the entire study
period in the Grade Input box alongside each student.
Enter recommended
semester marks in the
boxes provided
Entering any results other than those recommended will cause an error message to be
generated and any entered results cannot be saved until the error is resolved.
A space in a results entry field will cause an error message to be generated.
The corresponding grade for a mark is automatically generated when you save the Grade
Roster.
The Grade Roster can also be printed by selecting the Print option from your browser menu.
X Notation
Students who have had a Deferred or Supplementary Exam approved will have an X
Notation recorded in the Grade Input box.
Add the required mark the student has received so far before the X e.g. 41X.
Please do not leave the grade roster as just an X or remove the X notation as this will affect
the student’s academic records and impact on other administrative processes such as
Academic Review.
Created by
Transnational Support Services
Division of Business
5
12/07/2007
Step 2
To save the recommended results that have been entered, click on Save at the end of the
Grade Roster. This will save all entered results and convert the mark to a grade.
Clicking on Search will return you to the search screen (refer Accessing Grade Roster – Step
1).
To save the Grade
Roster click on Save
Created by
Transnational Support Services
Division of Business
6
12/07/2007
5. Grade Roster Approval Status
There are three options to save the grade roster approval status, Not Reviewed, Ready for
Review and Approved. Please save the grades as Ready for Review.
Ready for Review
All results must be entered and the Grade Roster saved as Ready for Review and the marks
converted to a grade before it can be saved as Approved by UniSA.
Click on the Approval Status drop down box and select Ready for Review and save.
Once the status has been saved as Ready for Review the grade boxes are no longer
accessible to enter or amend marks.
Approval Status is set at
Ready for Review
Grade boxes are not
accessible and grade entry
is no longer allowed
Mark is converted to a
grade
6. Logging Out
It is extremely important that you log out of the Medici Web interface when you have finished
entering and saving results. Not doing so could jeopardise the security of the grade entry
process.
Select Exit at the far
right of the menu at the
top of the screen
Created by
Transnational Support Services
Division of Business
7
12/07/2007